# 安装包存放目录
cd /usr/local/redis
# 下载最新稳定版
wget https://download.redis.io/releases/redis-6.2.6.tar.gz
# 解压
tar -zxvf redis-6.2.6.tar.gz
# 进入解压后的目录
cd /usr/local/redis/redis-6.2.6/
# 编译
make
# 执行 "make install" 默认会安装到 /usr/local/bin,可通过PREFIX指定安装路径
make install PREFIX=/usr/local/redis
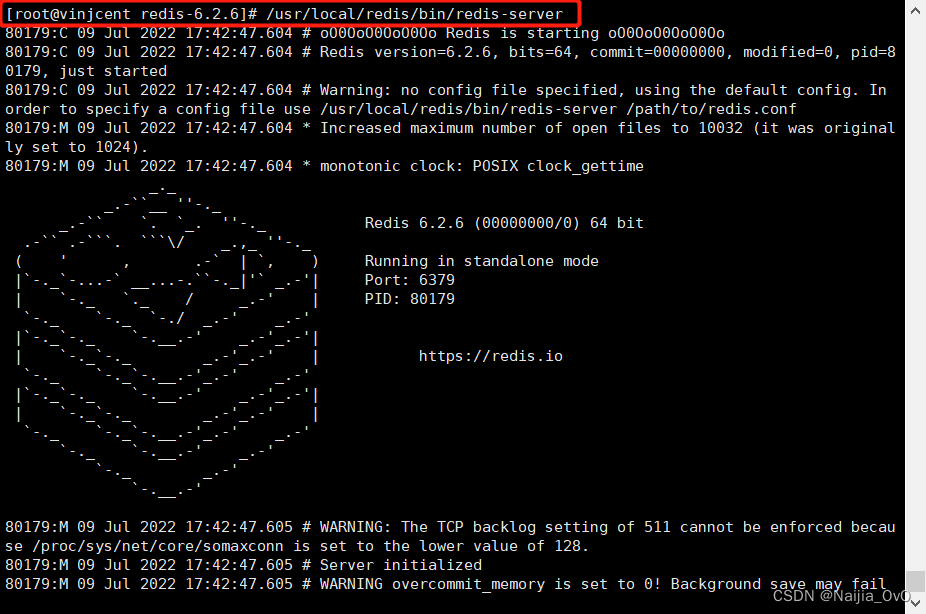
# 测试是否安装成功,执行下面命令
/usr/local/redis/bin/redis-server

简要过程
三个redis-server服务都运行在我们虚拟机上,我这里的设置的IP地址都为192.168.159.100(根据自己的IP地址定义),端口分别为6380、6381、6382,以6380作为主节点,6381、6382作为从节点
redis.conf运行文件
redis.conf文件到 redis-cluster 文件夹目录下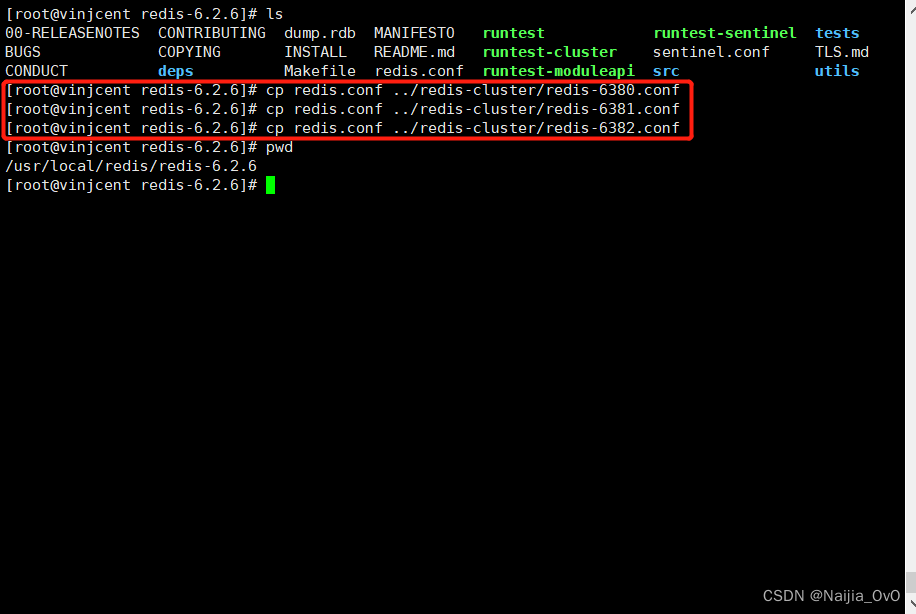
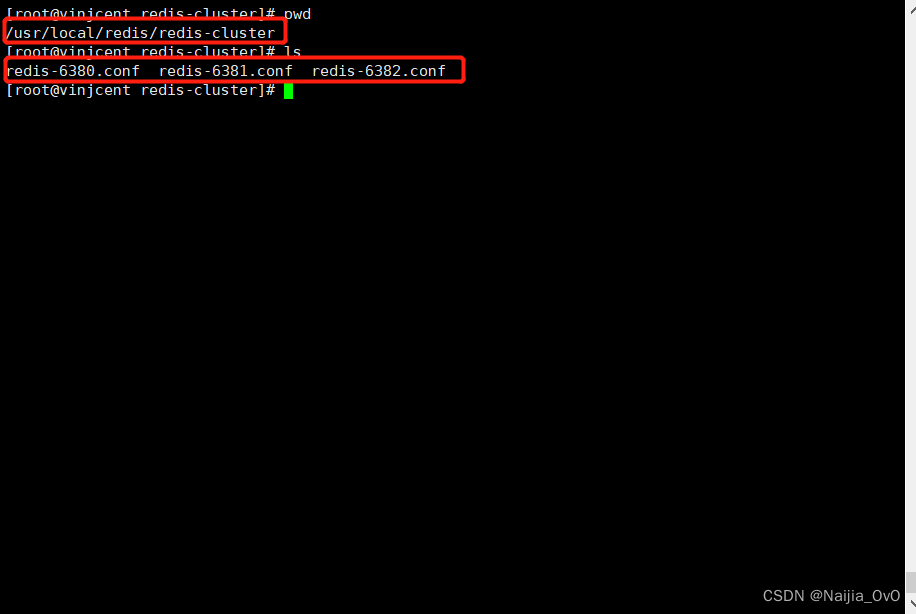
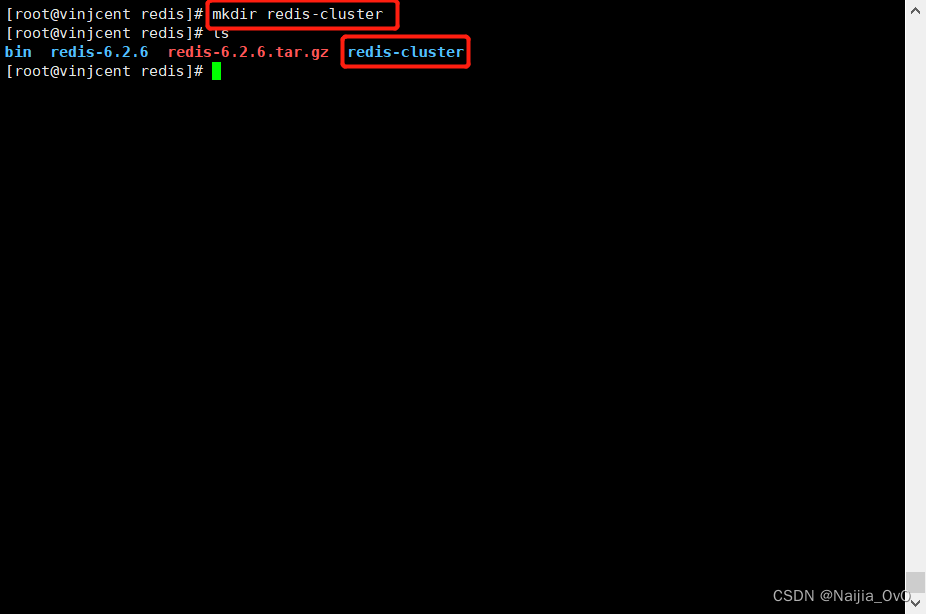
配置文件可在解压后的源码文件根目录中找到,这里以从节点 6381 配置文件为例,其余两个配置文件几乎一致。首先将配置文件redis.conf拷贝到/usr/local/redis/redis-cluster(redis-cluster文件夹需要手动创建),拷贝三份,然后进行下面的修改
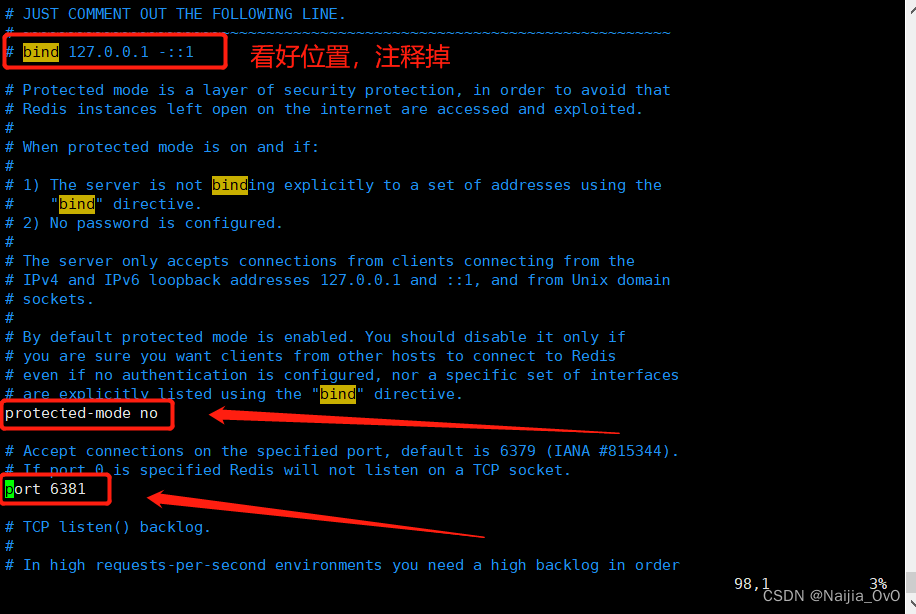
# (1)设置允许外部ip访问,需要注释掉bind配置,并关掉保护模式
# bind 127.0.0.1 -::1
protected-mode no
# (2)修改端口号
port 6381
# (3)修改为以守护进程模式后台运行
daemonize yes
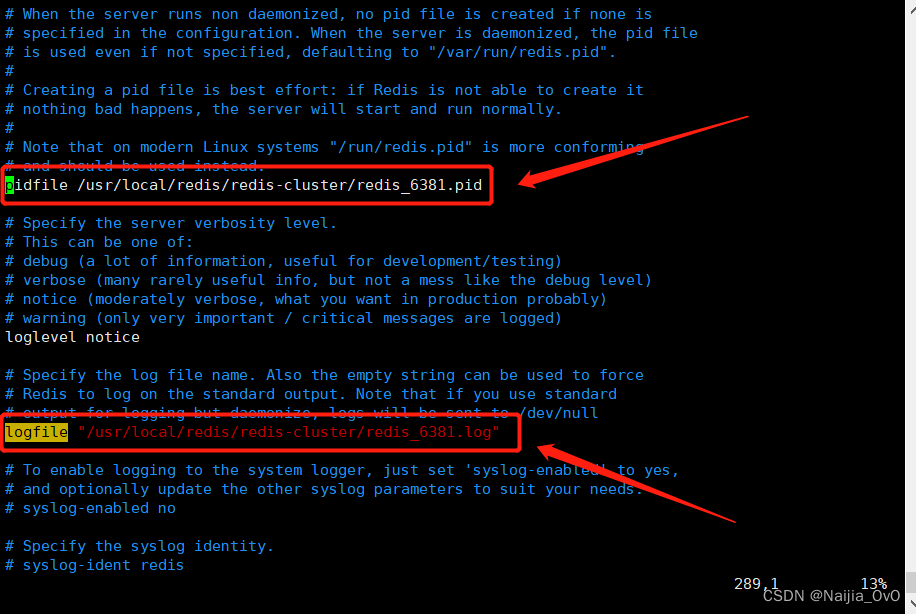
# (4)修改pid文件名,以守护进程运行的时候,会产生pid文件,默认位置为 /run/redis.pid
# 因为这里在同一台机器上运行多个实例,所以需要指定
pidfile /usr/local/redis/redis-cluster/redis_6381.pid
# (5)修改日志文件位置
logfile /usr/local/redis/redis-cluster/redis_6381.log
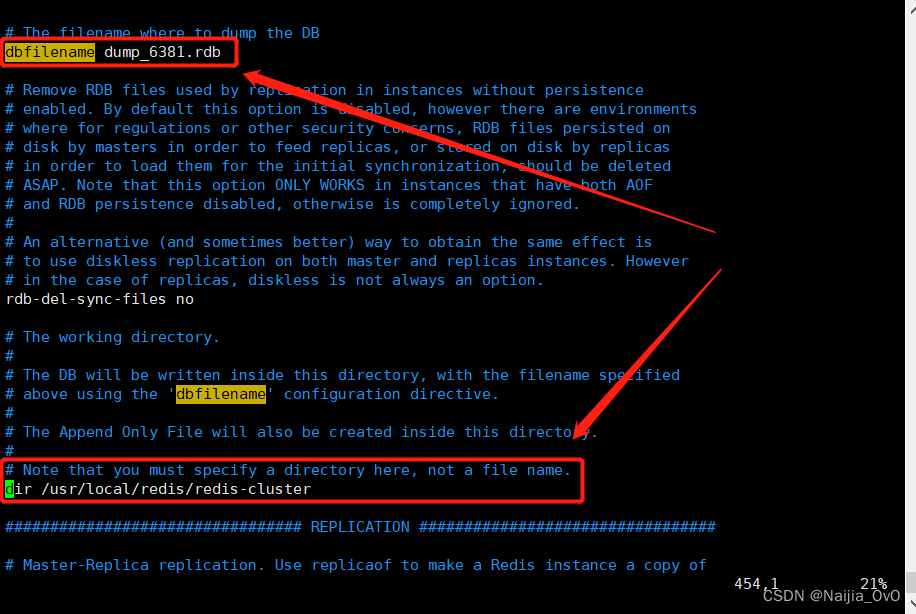
# (6)修改rdb快照文件位置
dir /usr/local/redis/redis-cluster
dbfilename dump_6381.rdb
# (7)修改主节点地址,在部分旧版本中是slaveof命令,主节点6380配置文件中不要加这一行
replicaof 192.168.159.100 6380
# (8)aof可按需要开启,这里我们使用.rdb文件的存储方式,以下不进行配置
appendonly yes
appendfilename appendonly_6381.aof


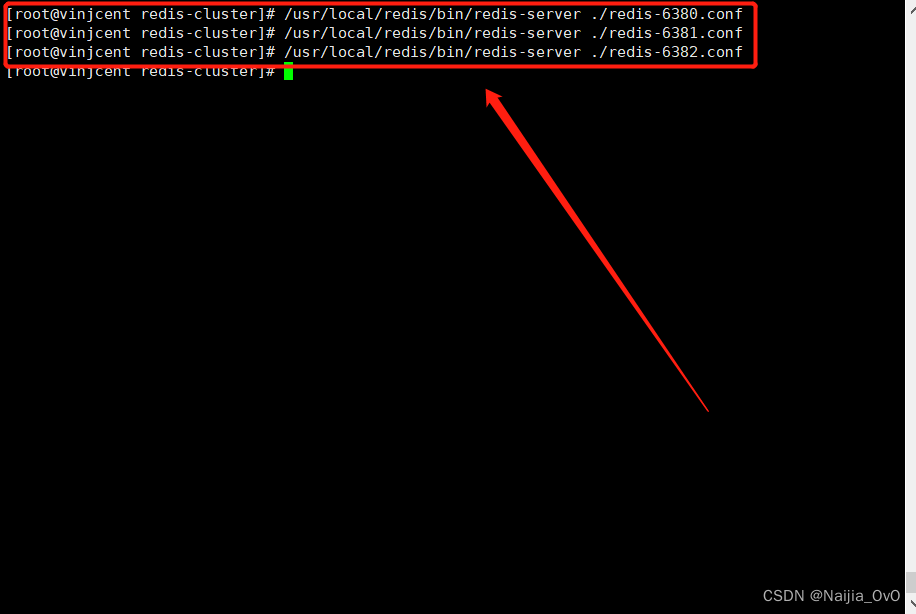
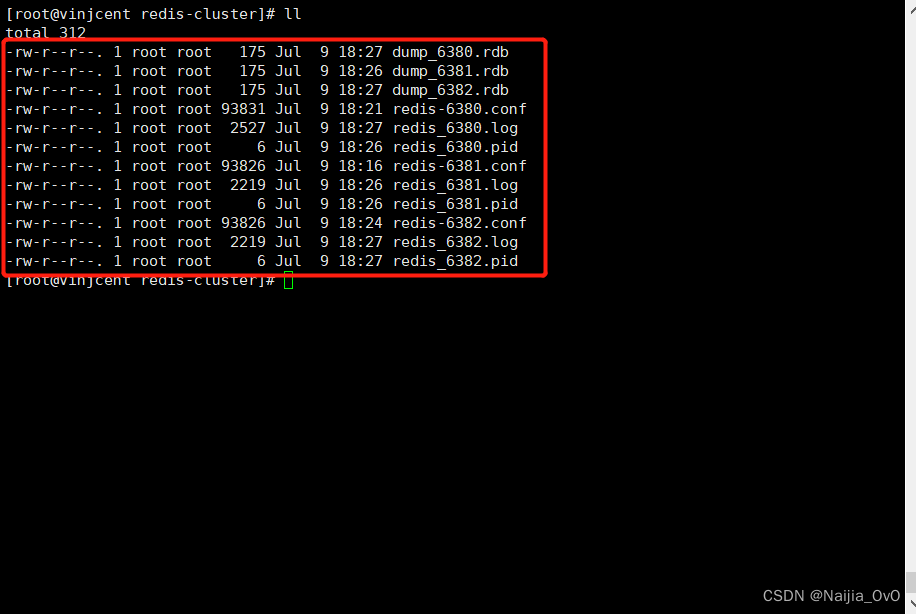
在上面的配置中,6381与6382的.conf一致,改一下其中的端口及地址就可以了,其中,6380作为主节点,没有第(7)步骤。建议三服务运行在不同的文件夹下,方便查看日志以及数据的输出。为了省去切换文件目录的时间,都放在一个文件夹下了
[root@vinjcent redis-cluster]# /usr/local/redis/bin/redis-server ./redis-6380.conf
[root@vinjcent redis-cluster]# /usr/local/redis/bin/redis-server ./redis-6381.conf
[root@vinjcent redis-cluster]# /usr/local/redis/bin/redis-server ./redis-6382.conf
# 运行redis客户端 -p 代表进入的是那个端口
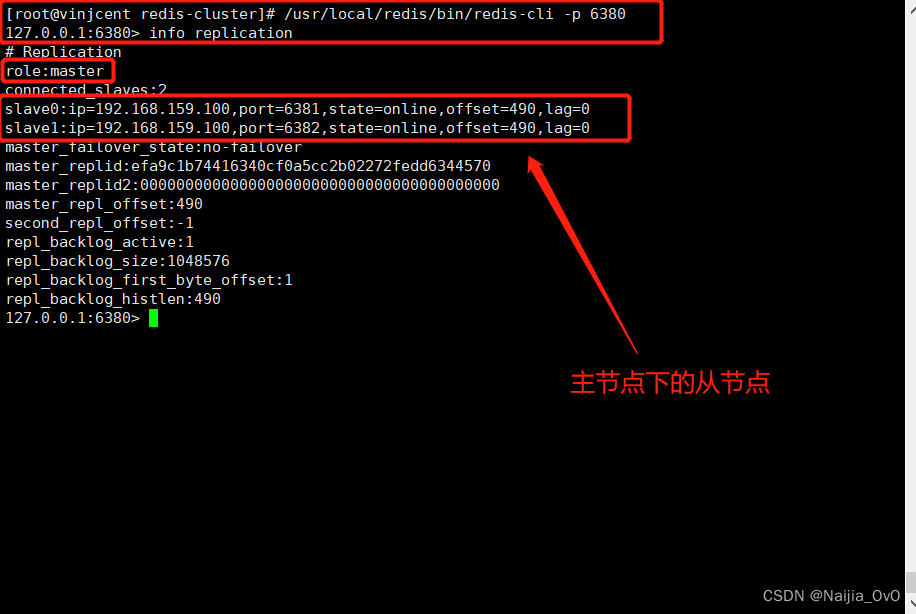
[root@vinjcent redis-cluster]# /usr/local/redis/bin/redis-cli -p 6380
# 查看主从信息
127.0.0.1:6380> info replication
# Replication
role:master
connected_slaves:2
slave0:ip=192.168.159.100,port=6381,state=online,offset=490,lag=0
slave1:ip=192.168.159.100,port=6382,state=online,offset=490,lag=0
master_failover_state:no-failover
master_replid:efa9c1b74416340cf0a5cc2b02272fedd6344570
master_replid2:0000000000000000000000000000000000000000
master_repl_offset:490
second_repl_offset:-1
repl_backlog_active:1
repl_backlog_size:1048576
repl_backlog_first_byte_offset:1
repl_backlog_histlen:490

简要过程
需要启动三个redis-sentinel服务,分别运行于26380、26381、26382三个端口,同样也需要配置.conf文件运行服务
/usr/local/redis/redis-6.2.6目录下,拷贝三份sentinel.conf文件到redis-cluster文件夹下# 拷贝文件sentinel.conf
[root@vinjcent redis-6.2.6]# cp sentinel.conf ../redis-cluster/sentinel-26380.conf
[root@vinjcent redis-6.2.6]# cp sentinel.conf ../redis-cluster/sentinel-26381.conf
[root@vinjcent redis-6.2.6]# cp sentinel.conf ../redis-cluster/sentinel-26382.conf

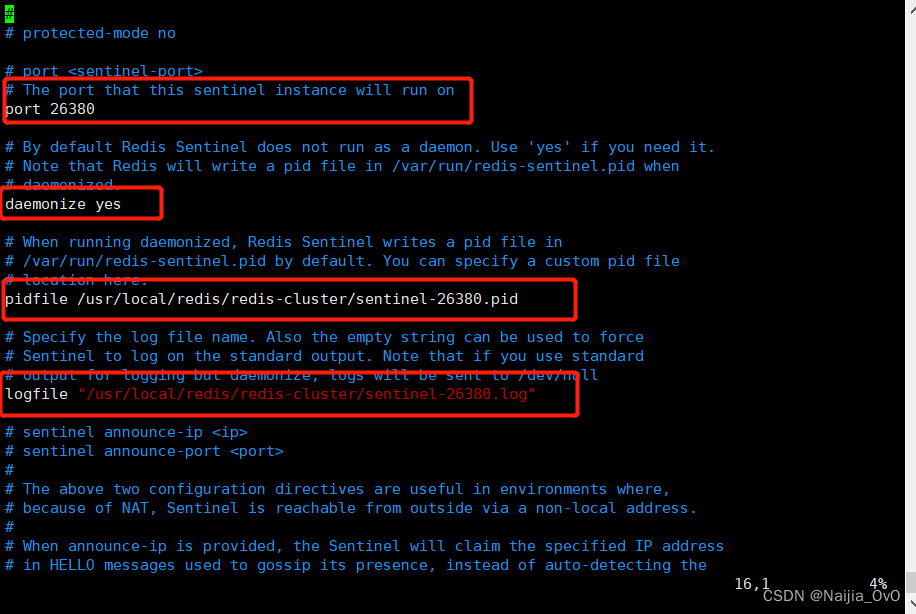
sentinel-26380.conf为例,配置信息如下,其余两个配置文件基本上一致,改一下端口以及pidfile、logfile即可# 配置端口
port 26380
daemonize yes
pidfile /usr/local/redis/redis-cluster/sentinel-26380.pid
logfile /usr/local/redis/redis-cluster/sentinel-26380.log
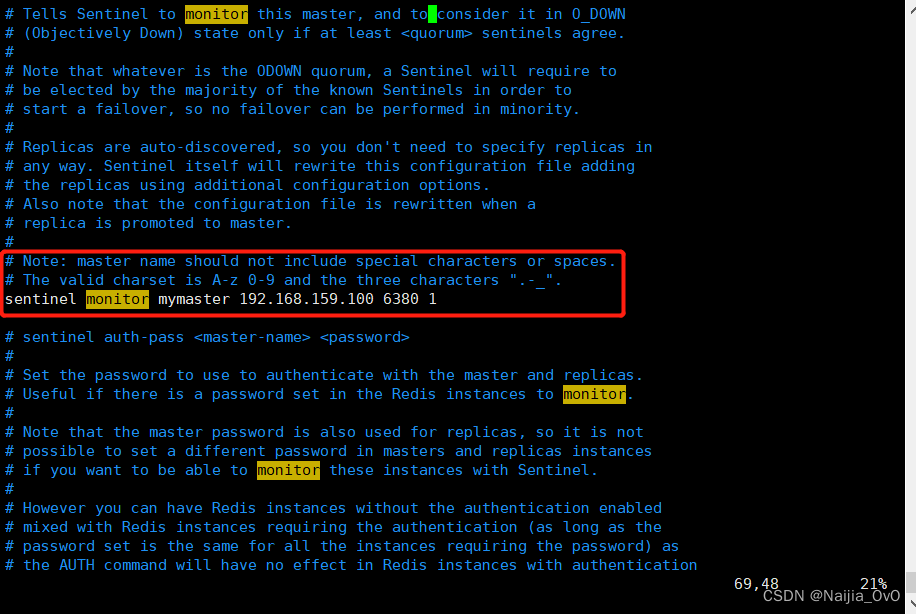
# 监控192.168.159.100:6380的主节点,实例取名为mymaster,当有两个哨兵认为该服务下线后,自动进行故障转移
# 后面的数字1,代表主机宕机了后,slave投票看让谁接替成为主机,票数最多的,就会成为主机,默认是2
sentinel monitor mymaster 192.168.159.100 6380 1
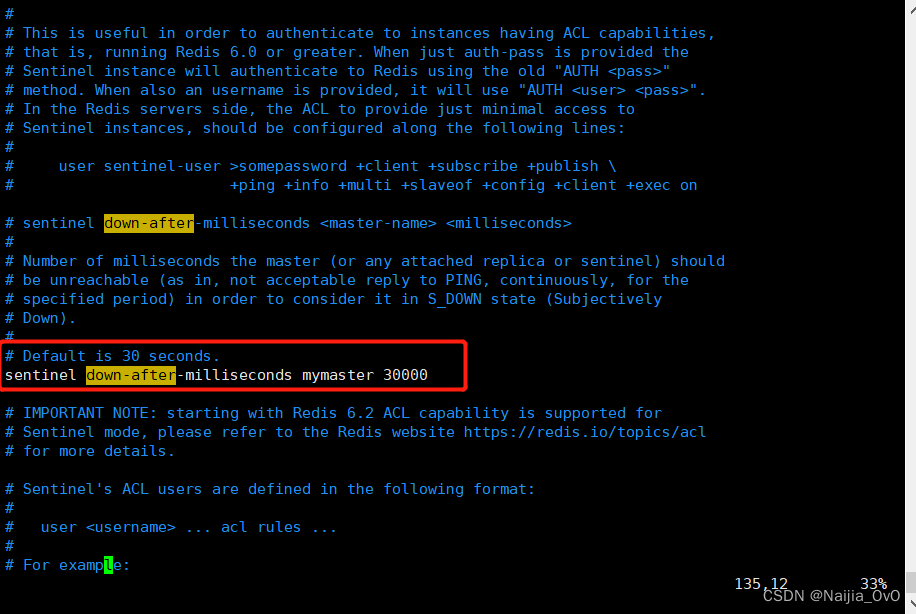
# 设置主节点多长时间没有响应就代表挂了,默认是30s
sentinel down-after-milliseconds mymaster 30000
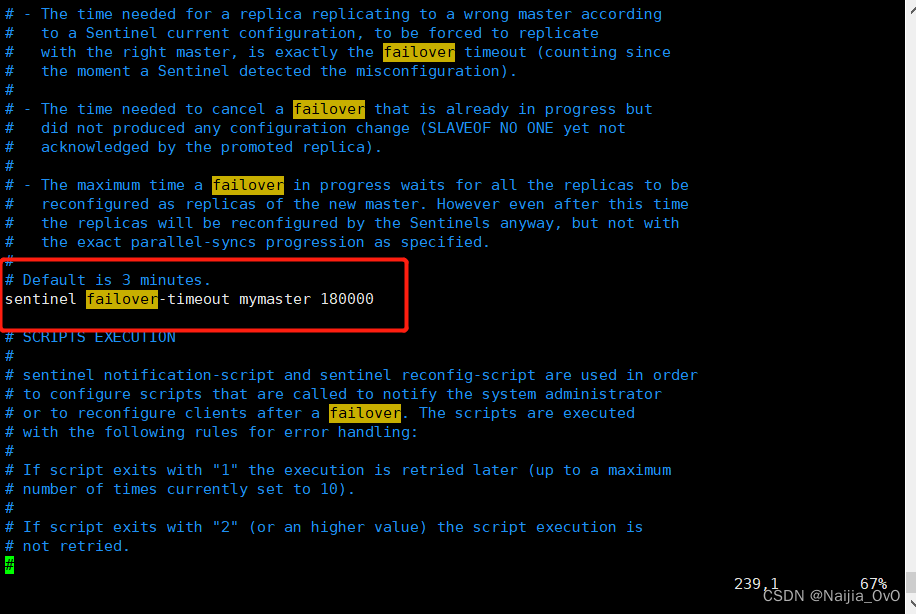
# 故障转移的时间上限,默认是三分钟
sentinel failover-timeout mymaster 180000
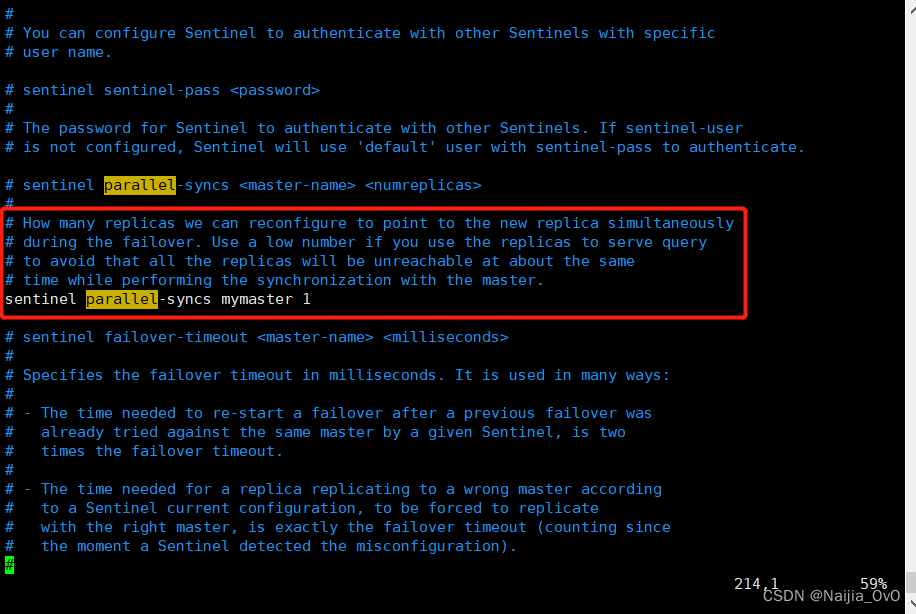
# 此配置值在发生故障时,最多可以有几个slave同时对新的master进行同步,这个数字越小完成故障处理的时间越短
sentinel parallel-syncs mymaster 1
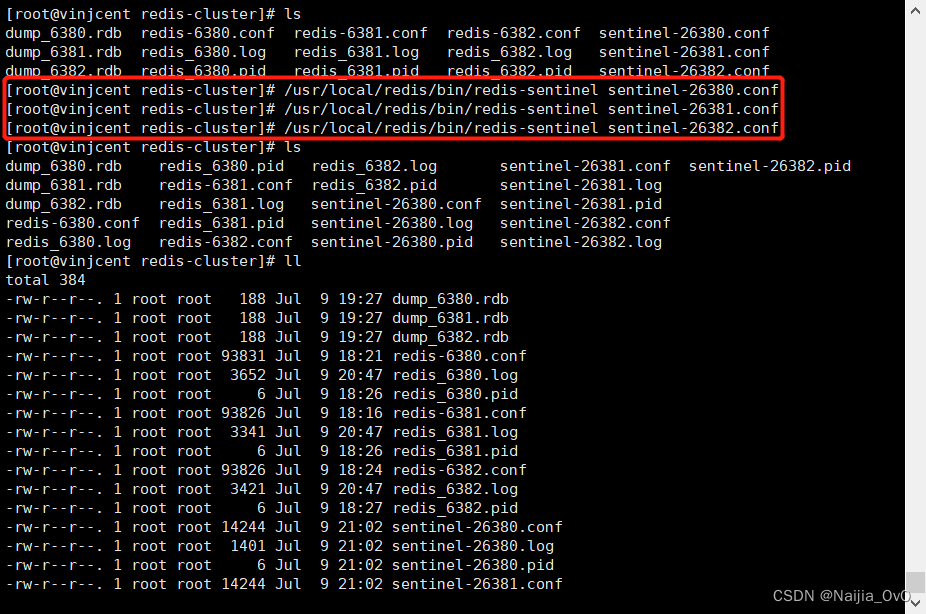
[root@vinjcent redis-cluster]# /usr/local/redis/bin/redis-sentinel sentinel-26380.conf
[root@vinjcent redis-cluster]# /usr/local/redis/bin/redis-sentinel sentinel-26381.conf
[root@vinjcent redis-cluster]# /usr/local/redis/bin/redis-sentinel sentinel-26382.conf

[root@vinjcent redis-cluster]# ../bin/redis-cli -p 26381
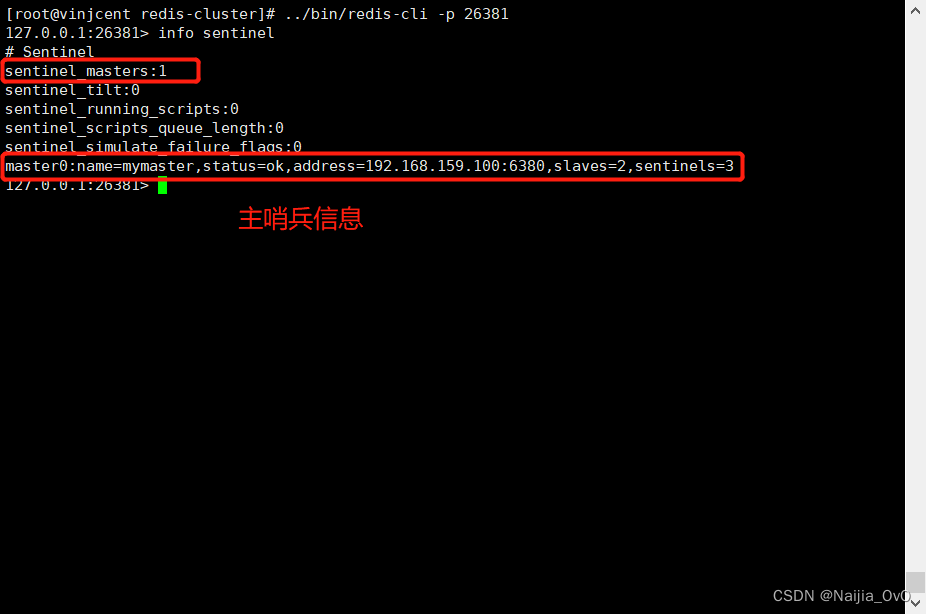
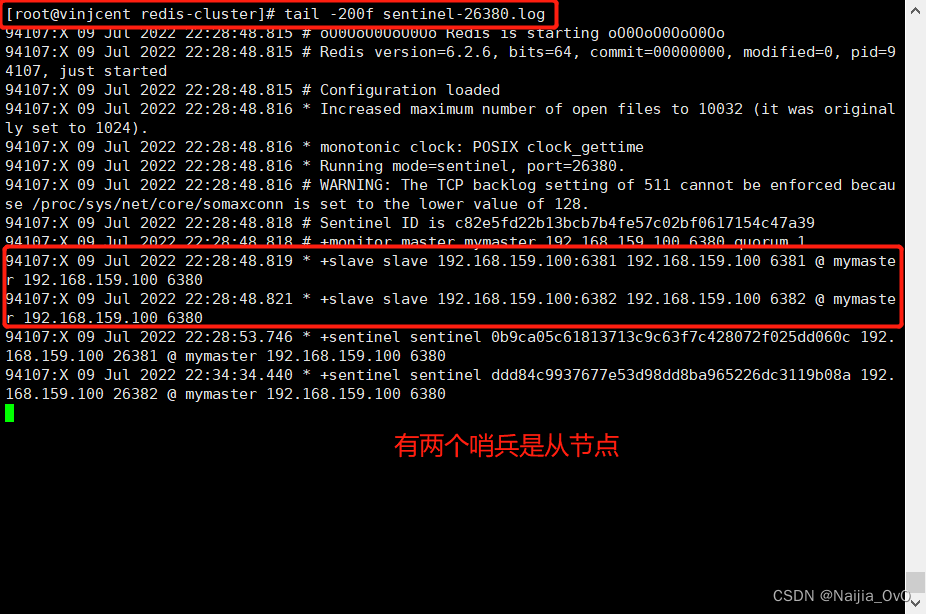
[root@vinjcent redis-cluster]# tail -200f sentinel-26380.log

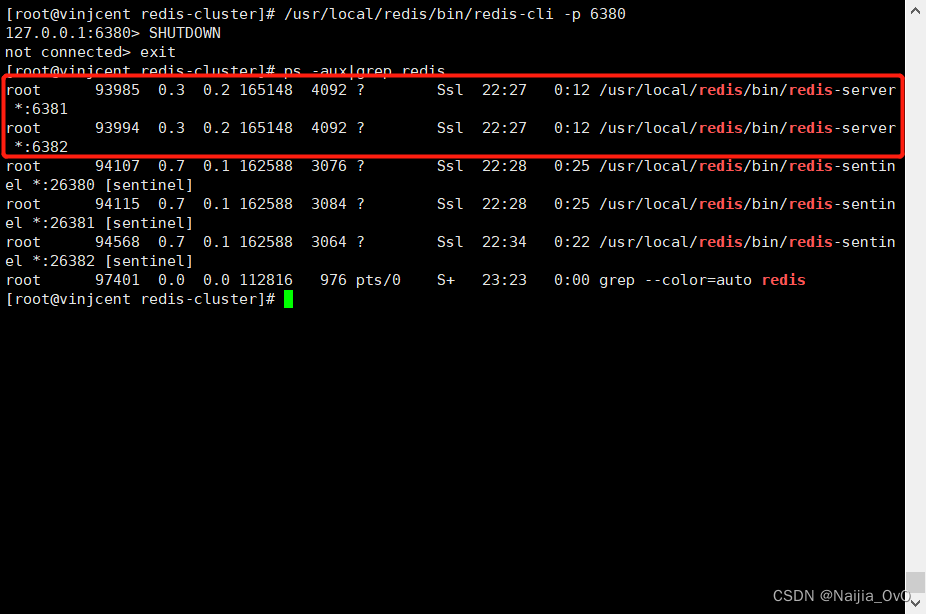
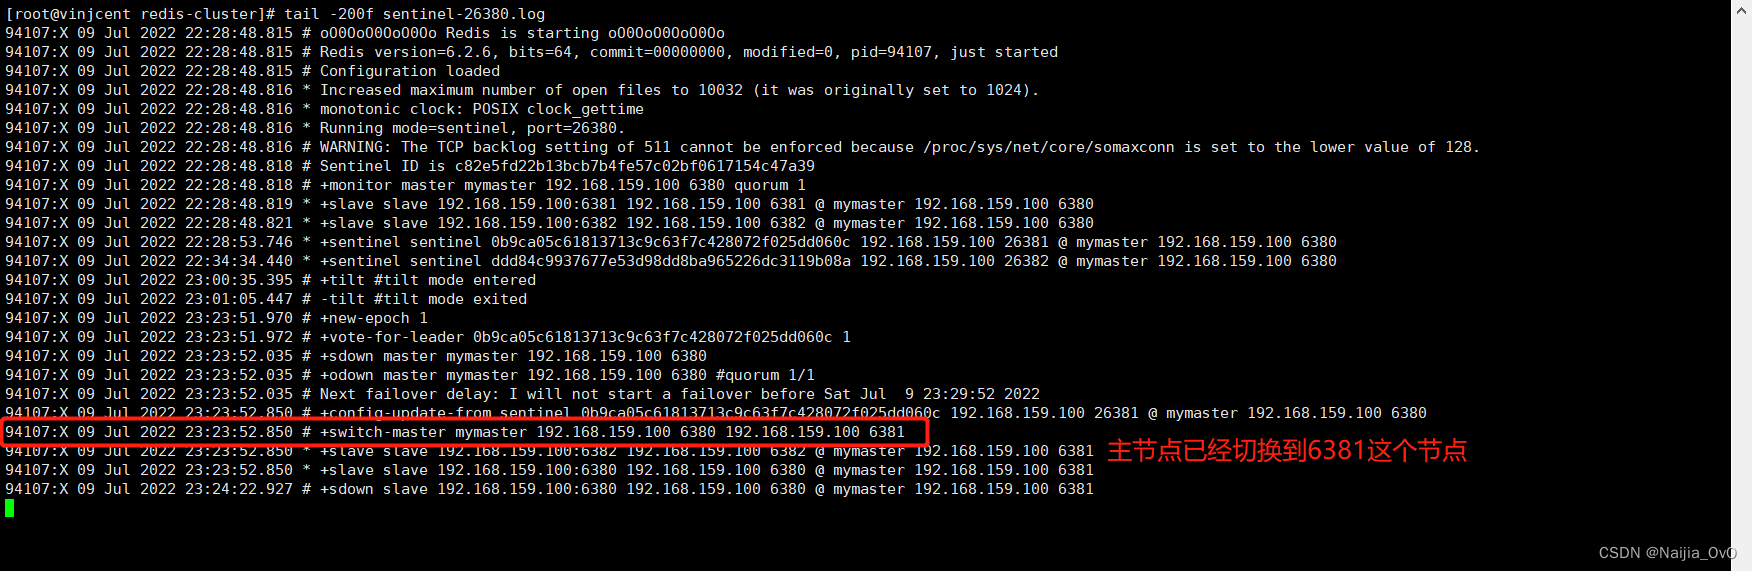
从上面的日志文件中,我们可以看到哨兵投票选举master以及切换主节点的大概过程,这时候,主节点已经切换到6381节点了
这时候再重新启动6380节点,也就是之前的主节点,这个节点会被哨兵自动加入到集群中作为从节点,sentinel会打印如下日志
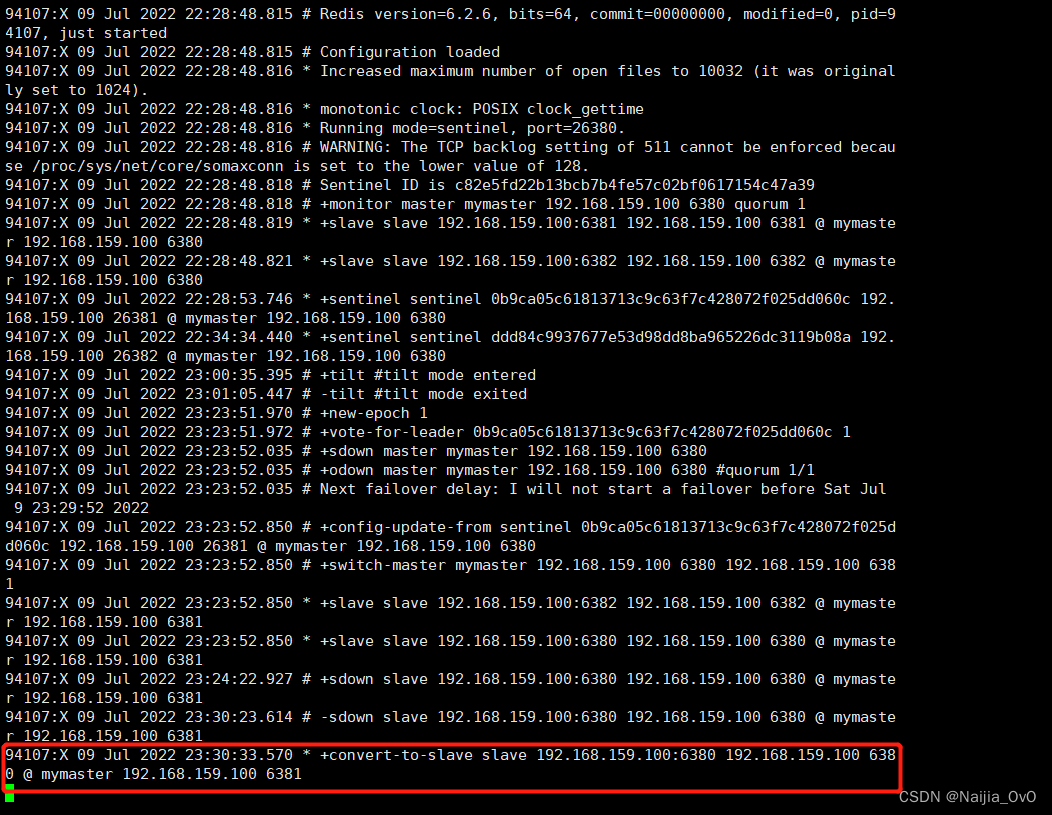

可以看到6380这个节点由主节点转换成了从节点
在整合springboot之前,首先要开放redis集群的防火墙端口,不然连接不上我们的redis服务
# 开放端口
firewall-cmd --zone=public --add-port=6380/tcp --permanent
firewall-cmd --zone=public --add-port=6381/tcp --permanent
firewall-cmd --zone=public --add-port=6382/tcp --permanent
firewall-cmd --zone=public --add-port=26380/tcp --permanent
firewall-cmd --zone=public --add-port=26381/tcp --permanent
firewall-cmd --zone=public --add-port=26382/tcp --permanent
# 重启防火墙
systemctl restart firewalld.service
# 查看端口
firewall-cmd --list-ports
创建一个springboot项目
导入依赖
<!--redis-->
<dependency>
    <groupId>org.springframework.boot</groupId>
    <artifactId>spring-boot-starter-data-redis</artifactId>
</dependency>
<!--连接池依赖-->
<dependency>
    <groupId>org.apache.commons</groupId>
    <artifactId>commons-pool2</artifactId>
</dependency>
<!--web-->
<dependency>
    <groupId>org.springframework.boot</groupId>
    <artifactId>spring-boot-starter-web</artifactId>
</dependency>
<!--lombok-->
<dependency>
    <groupId>org.projectlombok</groupId>
    <artifactId>lombok</artifactId>
    <version>1.18.24</version>
</dependency>
application.ymlserver:
port: 3035
spring:
redis:
# redis哨兵配置
sentinel:
# 主节点名称
master: mymaster
nodes:
- 192.168.159.100:26380
- 192.168.159.100:26381
- 192.168.159.100:26382
# # 集群的部署方式
# cluster:
# nodes:
# - 192.168.158.100:6380
# - 192.168.158.100:6381
# - 192.168.158.100:6382
# # #最大重定向次数(由于集群中数据存储在多个节点,所以在访问数据时需要通过转发进行数据定位)
# max-redirects: 2
# lettuce:
# pool:
# max-idle: 10 # 连接池中的最大空闲连接
# max-wait: 500 # 连接池最大阻塞等待时间(使用负值表示没有限制)
# max-active: 8 # 连接池最大连接数(使用负值表示没有限制)
# min-idle: 0 # 连接池中的最小空闲连接
# 服务应用名
application:
name: redis-cluster
logging:
pattern:
console: '%date{yyyy-MM-dd HH:mm:ss.SSS} | %highlight(%5level) [%green(%16.16thread)] %clr(%-50.50logger{49}){cyan} %4line -| %highlight(%msg%n)'
level:
root: info
io.lettuce.core: debug
org.springframework.data.redis: debug
package com.vinjcent.config;

import com.fasterxml.jackson.annotation.JsonAutoDetect;
import com.fasterxml.jackson.annotation.PropertyAccessor;
import com.fasterxml.jackson.databind.ObjectMapper;
import com.fasterxml.jackson.databind.jsontype.impl.LaissezFaireSubTypeValidator;
import io.lettuce.core.ReadFrom;
import org.springframework.boot.autoconfigure.data.redis.RedisProperties;
import org.springframework.context.annotation.Bean;
import org.springframework.context.annotation.Configuration;
import org.springframework.context.annotation.Primary;
import org.springframework.data.redis.connection.RedisConnectionFactory;
import org.springframework.data.redis.connection.RedisSentinelConfiguration;
import org.springframework.data.redis.connection.lettuce.LettuceConnectionFactory;
import org.springframework.data.redis.connection.lettuce.LettucePoolingClientConfiguration;
import org.springframework.data.redis.core.RedisTemplate;
import org.springframework.data.redis.serializer.Jackson2JsonRedisSerializer;
import org.springframework.data.redis.serializer.StringRedisSerializer;

import java.text.SimpleDateFormat;
import java.util.HashSet;


@Configuration
public class RedisConfiguration {

    /**
     *
     *  配置redis序列化json
     * @param redisConnectionFactory
     * @return
     */
    @Bean
    @Primary    //若有相同类型的Bean时,优先使用此注解标注的Bean
    public RedisTemplate<String, Object> redisTemplate(RedisConnectionFactory redisConnectionFactory) {
        // 为了开发方便,一般直接使用<String, Object>
        RedisTemplate<String, Object> template = new RedisTemplate<>();
        template.setConnectionFactory(redisConnectionFactory);

        // 配置具体的序列化方式
        // JSON解析任意对象
        Jackson2JsonRedisSerializer jackson2JsonRedisSerializer = new Jackson2JsonRedisSerializer(Object.class);
        ObjectMapper om = new ObjectMapper();
        // 指定要序列化的域,field,get和set,以及修饰符范围,ANY是都有包括private和public
        om.setVisibility(PropertyAccessor.ALL, JsonAutoDetect.Visibility.ANY);
        // 指定序列化输入的类型,类必须是非final修饰的,final修饰的类,比如String,Integer等会跑出异常
        om.activateDefaultTyping(LaissezFaireSubTypeValidator.instance, ObjectMapper.DefaultTyping.NON_FINAL);
        // 设置日期格式
        om.setDateFormat(new SimpleDateFormat("yyyy-MM-dd HH:mm:ss"));
        jackson2JsonRedisSerializer.setObjectMapper(om);
        // String的序列化
        StringRedisSerializer stringRedisSerializer = new StringRedisSerializer();


        //key采用String的序列化
        template.setKeySerializer(stringRedisSerializer);
        //hash的key也采用String的序列化
        template.setHashKeySerializer(stringRedisSerializer);
        //value的序列化方式采用jackson
        template.setValueSerializer(jackson2JsonRedisSerializer);
        //hash的value序列化方式采用jackson
        template.setHashValueSerializer(jackson2JsonRedisSerializer);
        //设置所有配置
        template.afterPropertiesSet();

        return template;
    }

    /**
     * 配置读写分离
     * @param redisProperties
     * @return
     */
    @Bean
    public RedisConnectionFactory lettuceConnectionFactory(RedisProperties redisProperties) {
        // 配置哨兵节点以及主节点
        RedisSentinelConfiguration redisSentinelConfiguration = new RedisSentinelConfiguration(
                redisProperties.getSentinel().getMaster(), new HashSet<>(redisProperties.getSentinel().getNodes())
        );

        // 配置读写分离
        LettucePoolingClientConfiguration lettuceClientConfiguration = LettucePoolingClientConfiguration.builder()
                // 读写分离,这里的ReadFrom是配置Redis的读取策略,是一个枚举,包括下面选择
                // MASTER   仅读取主节点
                // MASTER_PREFERRED   优先读取主节点,如果主节点不可用,则读取从节点
                // REPLICA_PREFERRED   优先读取从节点,如果从节点不可用,则读取主节点
                // REPLICA   仅读取从节点
                // NEAREST   从最近节点读取
                // ANY   从任意一个从节点读取
                .readFrom(ReadFrom.REPLICA_PREFERRED)
                .build();

        return new LettuceConnectionFactory(redisSentinelConfiguration, lettuceClientConfiguration);
    }

}
package com.vinjcent.serivce;

import com.vinjcent.utils.RedisUtils;
import lombok.RequiredArgsConstructor;
import lombok.extern.slf4j.Slf4j;
import org.springframework.beans.factory.annotation.Autowired;
import org.springframework.boot.ApplicationArguments;
import org.springframework.boot.ApplicationRunner;
import org.springframework.stereotype.Component;

import java.util.concurrent.TimeUnit;

@SuppressWarnings("all")
@Slf4j
@RequiredArgsConstructor
@Component
public class RedisInit implements ApplicationRunner {

    @Autowired
    private RedisUtils redisUtils;

    @Override
    public void run(ApplicationArguments args) throws Exception {
        for (int i = 0; i < 300; i++) {
            try {
                redisUtils.set("k" + i, "v" + i);
                log.info("set value success: {}", i);

                Object val = redisUtils.get("k" + i);
                log.info("get value success: {}", val);
                TimeUnit.SECONDS.sleep(1);
            } catch (Exception e) {
                log.error("error: {}", e.getMessage());
            }
        }
        log.info("finished...");
    }
}
import org.springframework.beans.factory.annotation.Autowired;
import org.springframework.data.redis.core.RedisTemplate;
import org.springframework.stereotype.Component;
import org.springframework.util.CollectionUtils;

import java.util.List;
import java.util.Map;
import java.util.Set;
import java.util.concurrent.TimeUnit;

@SuppressWarnings("all")
@Component
public final class RedisUtils {
    // ......
}
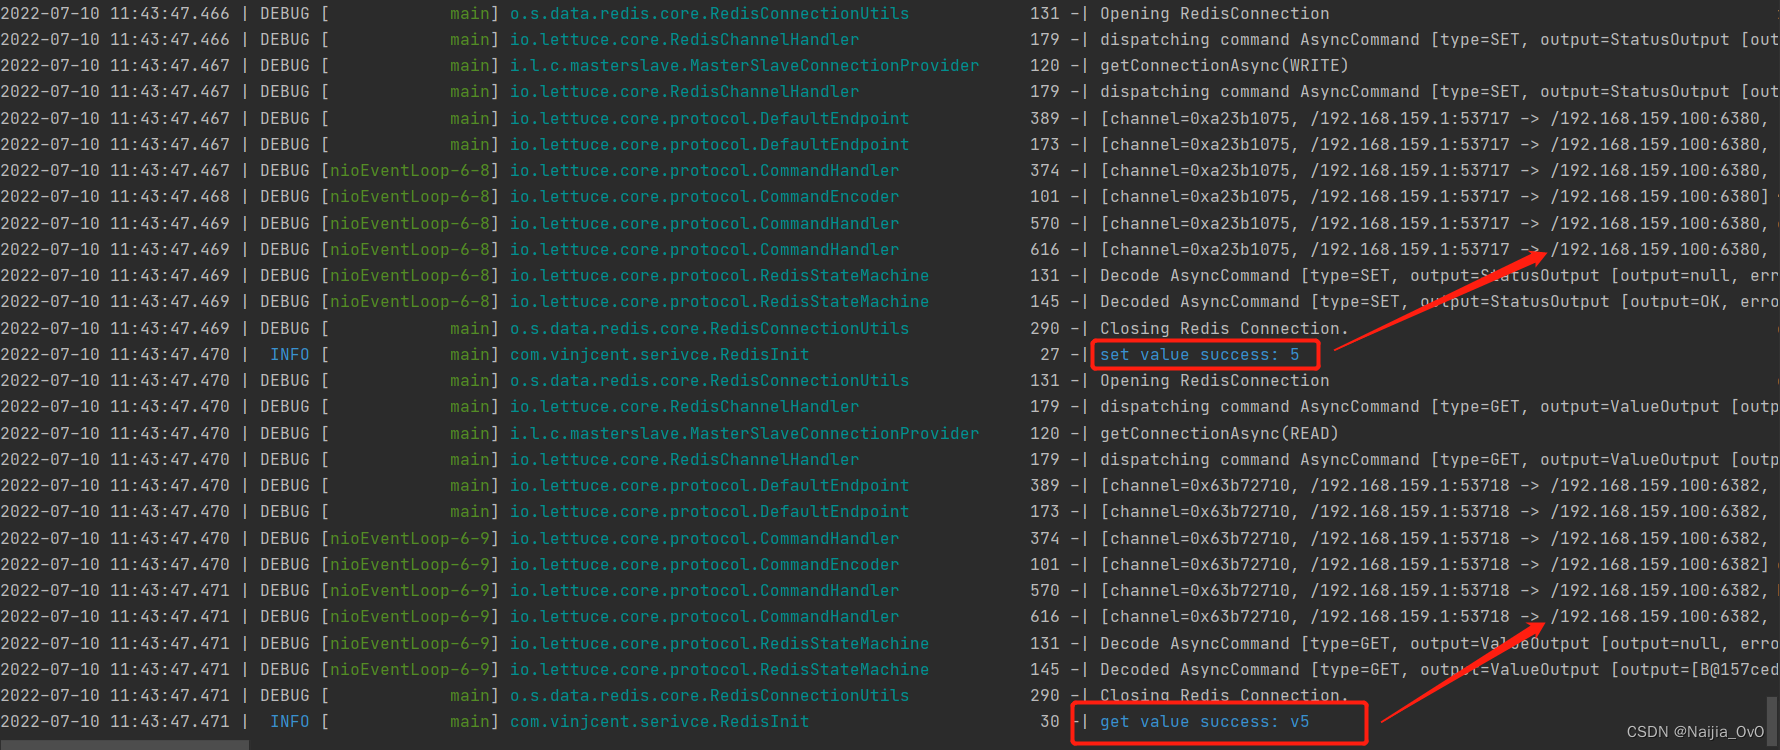
可以在控制台看到,写入是在6380端口的redis服务端,而读取是在6382端口的redis服务端
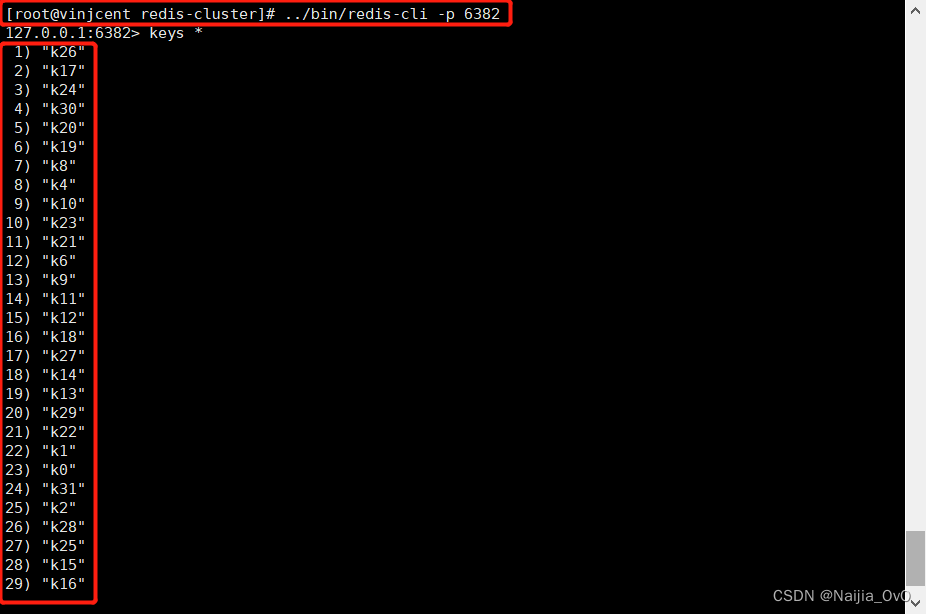
随便进入一个redis-cli客户端,可以看到主从复制实现成功!
停止主节点6380的redis服务端,查看控制台


可以看到我们的主节点变成了6381端口的redis服务端,由从节点成为主节点,实现写的功能;而从节点是6382端口的服务端
我正在尝试测试是否存在表单。我是Rails新手。我的new.html.erb_spec.rb文件的内容是:require'spec_helper'describe"messages/new.html.erb"doit"shouldrendertheform"dorender'/messages/new.html.erb'reponse.shouldhave_form_putting_to(@message)with_submit_buttonendendView本身,new.html.erb,有代码:当我运行rspec时,它失败了:1)messages/new.html.erbshou
我在从html页面生成PDF时遇到问题。我正在使用PDFkit。在安装它的过程中,我注意到我需要wkhtmltopdf。所以我也安装了它。我做了PDFkit的文档所说的一切......现在我在尝试加载PDF时遇到了这个错误。这里是错误:commandfailed:"/usr/local/bin/wkhtmltopdf""--margin-right""0.75in""--page-size""Letter""--margin-top""0.75in""--margin-bottom""0.75in""--encoding""UTF-8""--margin-left""0.75in""-
我在我的项目目录中完成了compasscreate.和compassinitrails。几个问题:我已将我的.sass文件放在public/stylesheets中。这是放置它们的正确位置吗?当我运行compasswatch时,它不会自动编译这些.sass文件。我必须手动指定文件:compasswatchpublic/stylesheets/myfile.sass等。如何让它自动运行?文件ie.css、print.css和screen.css已放在stylesheets/compiled。如何在编译后不让它们重新出现的情况下删除它们?我自己编译的.sass文件编译成compiled/t
我有一个对象has_many应呈现为xml的子对象。这不是问题。我的问题是我创建了一个Hash包含此数据,就像解析器需要它一样。但是rails自动将整个文件包含在.........我需要摆脱type="array"和我该如何处理?我没有在文档中找到任何内容。 最佳答案 我遇到了同样的问题;这是我的XML:我在用这个:entries.to_xml将散列数据转换为XML,但这会将条目的数据包装到中所以我修改了:entries.to_xml(root:"Contacts")但这仍然将转换后的XML包装在“联系人”中,将我的XML代码修改为
为了将Cucumber用于命令行脚本,我按照提供的说明安装了arubagem。它在我的Gemfile中,我可以验证是否安装了正确的版本并且我已经包含了require'aruba/cucumber'在'features/env.rb'中为了确保它能正常工作,我写了以下场景:@announceScenario:Testingcucumber/arubaGivenablankslateThentheoutputfrom"ls-la"shouldcontain"drw"假设事情应该失败。它确实失败了,但失败的原因是错误的:@announceScenario:Testingcucumber/ar
我在我的项目中添加了一个系统来重置用户密码并通过电子邮件将密码发送给他,以防他忘记密码。昨天它运行良好(当我实现它时)。当我今天尝试启动服务器时,出现以下错误。=>BootingWEBrick=>Rails3.2.1applicationstartingindevelopmentonhttp://0.0.0.0:3000=>Callwith-dtodetach=>Ctrl-CtoshutdownserverExiting/Users/vinayshenoy/.rvm/gems/ruby-1.9.3-p0/gems/actionmailer-3.2.1/lib/action_mailer
我的瘦服务器配置了nginx,我的ROR应用程序正在它们上运行。在我发布代码更新时运行thinrestart会给我的应用程序带来一些停机时间。我试图弄清楚如何优雅地重启正在运行的Thin实例,但找不到好的解决方案。有没有人能做到这一点? 最佳答案 #Restartjustthethinserverdescribedbythatconfigsudothin-C/etc/thin/mysite.ymlrestartNginx将继续运行并代理请求。如果您将Nginx设置为使用多个上游服务器,例如server{listen80;server
在MRIRuby中我可以这样做:deftransferinternal_server=self.init_serverpid=forkdointernal_server.runend#Maketheserverprocessrunindependently.Process.detach(pid)internal_client=self.init_client#Dootherstuffwithconnectingtointernal_server...internal_client.post('somedata')ensure#KillserverProcess.kill('KILL',
我已经从我的命令行中获得了一切,所以我可以运行rubymyfile并且它可以正常工作。但是当我尝试从sublime中运行它时,我得到了undefinedmethod`require_relative'formain:Object有人知道我的sublime设置中缺少什么吗?我正在使用OSX并安装了rvm。 最佳答案 或者,您可以只使用“require”,它应该可以正常工作。我认为“require_relative”仅适用于ruby1.9+ 关于ruby-主要:Objectwhenrun
我花了三天的时间用头撞墙,试图弄清楚为什么简单的“rake”不能通过我的规范文件。如果您遇到这种情况:任何文件夹路径中都不要有空格!。严重地。事实上,从现在开始,您命名的任何内容都没有空格。这是我的控制台输出:(在/Users/*****/Desktop/LearningRuby/learn_ruby)$rake/Users/*******/Desktop/LearningRuby/learn_ruby/00_hello/hello_spec.rb:116:in`require':cannotloadsuchfile--hello(LoadError) 最佳