分页功能作为各类网站和系统不可或缺的部分(例如百度搜索结果的分页等)
,当一个页面数据量大的时候分页作用就体现出来的,其作用有以下5个。
(1)减少系统资源的消耗
(2)提高数据库的查询性能
(3)提升页面的访问速度
(4)符合用户的浏览习惯
(5)适配页面的排版
由于需要实现分页功能,所需的数据较多
DROP TABLE IF EXISTS tb_user;

CREATE TABLE tb_user (
    id int(11) NOT NULL AUTO_INCREMENT COMMENT '主键id',
    name varchar(100) NOT NULL DEFAULT '' COMMENT '登录名',
    password varchar(100) NOT NULL DEFAULT '' COMMENT '密码',
    PRIMARY KEY (id) USING BTREE
) ENGINE = InnoDB CHARACTER SET = utf8;

insert into tb_user (id,name,password)
value (1,'C','123456'),
(2,'C++','123456'),
(3,'Java','123456'),
(4,'Python','123456'),
(5,'R','123456'),
(6,'C#','123456');

insert into tb_user (id,name,password) value (7,'test1','123456');
insert into tb_user (id,name,password) value (8,'test2','123456');
insert into tb_user (id,name,password) value (9,'test3','123456');
insert into tb_user (id,name,password) value (10,'test4','123456');
insert into tb_user (id,name,password) value (11,'test5','123456');
insert into tb_user (id,name,password) value (12,'test6','123456');
insert into tb_user (id,name,password) value (13,'test7','123456');
insert into tb_user (id,name,password) value (14,'test8','123456');
insert into tb_user (id,name,password) value (15,'test9','123456');
insert into tb_user (id,name,password) value (16,'test10','123456');
insert into tb_user (id,name,password) value (17,'test11','123456');
insert into tb_user (id,name,password) value (18,'test12','123456');
insert into tb_user (id,name,password) value (19,'test13','123456');
insert into tb_user (id,name,password) value (20,'test14','123456');
insert into tb_user (id,name,password) value (21,'test15','123456');
insert into tb_user (id,name,password) value (22,'test16','123456');
insert into tb_user (id,name,password) value (23,'test17','123456');
insert into tb_user (id,name,password) value (24,'test18','123456');
insert into tb_user (id,name,password) value (25,'test19','123456');
insert into tb_user (id,name,password) value (26,'test20','123456');
insert into tb_user (id,name,password) value (27,'test21','123456');
insert into tb_user (id,name,password) value (28,'test22','123456');
insert into tb_user (id,name,password) value (29,'test23','123456');
insert into tb_user (id,name,password) value (30,'test24','123456');
insert into tb_user (id,name,password) value (31,'test25','123456');
insert into tb_user (id,name,password) value (32,'test26','123456');
insert into tb_user (id,name,password) value (33,'test27','123456');
insert into tb_user (id,name,password) value (34,'test28','123456');
insert into tb_user (id,name,password) value (35,'test29','123456');
insert into tb_user (id,name,password) value (36,'test30','123456');
insert into tb_user (id,name,password) value (37,'test31','123456');
insert into tb_user (id,name,password) value (38,'test32','123456');
insert into tb_user (id,name,password) value (39,'test33','123456');
insert into tb_user (id,name,password) value (40,'test34','123456');
insert into tb_user (id,name,password) value (41,'test35','123456');
insert into tb_user (id,name,password) value (42,'test36','123456');
insert into tb_user (id,name,password) value (43,'test37','123456');
insert into tb_user (id,name,password) value (44,'test38','123456');
insert into tb_user (id,name,password) value (45,'test39','123456');
insert into tb_user (id,name,password) value (46,'test40','123456');
insert into tb_user (id,name,password) value (47,'test41','123456');
insert into tb_user (id,name,password) value (48,'test42','123456');
insert into tb_user (id,name,password) value (49,'test43','123456');
insert into tb_user (id,name,password) value (50,'test44','123456');
insert into tb_user (id,name,password) value (51,'test45','123456');
新建一个util包并在包中新建Result通用结果类,代码如下:
package ltd.newbee.mall.entity;

public class User {
    private Integer id;
    private String name;
    private String password;

    public Integer getId() {
        return id;
    }

    public void setId(Integer id) {
        this.id = id;
    }

    public String getName() {
        return name;
    }

    public void setName(String name) {
        this.name = name;
    }

    public String getPassword() {
        return password;
    }

    public void setPassword(String password) {
        this.password = password;
    }
}
后端接口返回的数据会根据以上格式进行数据封装,包括业务码、返回信息、实际的数据结果。这个格式是开发人员自行设置的,如果有其他更好的方案也可以进行适当的调整。
在util包中新建PageResult通用结果类,代码如下:
package ltd.newbee.mall.util;

import java.util.List;

/**
 * 分页工具类
 */
public class PageResult {
    //总记录数
    private int totalCount;
    //每页记录数
    private int pageSize;
    //总页数
    private int totalPage;
    //当前页数
    private int currPage;
    //列表数据
    private List<?> list;

    /**
     *
     * @param totalCount 总记录数
     * @param pageSize 每页记录数
     * @param currPage 当前页数
     * @param list 列表数据
     */
    public PageResult(int totalCount, int pageSize, int currPage, List<?> list) {
        this.totalCount = totalCount;
        this.pageSize = pageSize;
        this.currPage = currPage;
        this.list = list;
        this.totalPage = (int) Math.ceil((double) totalCount / pageSize);
    }

    public int getTotalCount() {
        return totalCount;
    }

    public void setTotalCount(int totalCount) {
        this.totalCount = totalCount;
    }

    public int getPageSize() {
        return pageSize;
    }

    public void setPageSize(int pageSize) {
        this.pageSize = pageSize;
    }

    public int getTotalPage() {
        return totalPage;
    }

    public void setTotalPage(int totalPage) {
        this.totalPage = totalPage;
    }

    public int getCurrPage() {
        return currPage;
    }

    public void setCurrPage(int currPage) {
        this.currPage = currPage;
    }

    public List<?> getList() {
        return list;
    }

    public void setList(List<?> list) {
        this.list = list;
    }
}
在UserDao接口中新增两个方法findUsers()和getTotalUser(),代码如下所示:
/**
     * 返回分页数据列表
     *
     * @param pageUtil
     * @return
     */
    List<User> findUsers(PageQueryUtil pageUtil);

    /**
     * 返回数据总数
     *
     * @param pageUtil
     * @return
     */
    int getTotalUser(PageQueryUtil pageUtil);
在UserMapper.xml文件中新增这两个方法的映射语句,代码如下所示:
<!--分页-->
    <!--查询用户列表-->
    <select id="findUsers" parameterType="Map" resultMap="UserResult">
        select id,name,password from tb_user
        order by id desc
        <if test="start!=null and limit!=null">
            limit #{start}.#{limit}
        </if>
    </select>
    <!--查询用户总数-->
    <select id="getTotalUser" parameterType="Map" resultType="int">
        select count(*) from tb_user
    </select>
新建service包,并新增业务类UserService,代码如下所示:
import ltd.newbee.mall.dao.UserDao;
import ltd.newbee.mall.entity.User;
import ltd.newbee.mall.util.PageResult;
import ltd.newbee.mall.util.PageQueryUtil;
import org.springframework.beans.factory.annotation.Autowired;
import org.springframework.stereotype.Service;

import java.util.List;

@Service
public class UserService {

    @Autowired
    private UserDao userDao;

    public PageResult getUserPage(PageQueryUtil pageUtil){
        //当前页面中的数据列表
        List<User> users = userDao.findUsers(pageUtil);
        //数据总条数,用于计算分页数据
        int total = userDao.getTotalUser(pageUtil);
        //分页信息封装
        PageResult pageResult = new PageResult(users,total,pageUtil.getLimit(),pageUtil.getPage());
        return pageResult;
    }
}
首先根据当前页面和每页条数查询当前页的数据集合,然后调用select count(*)语句查询数据的总条数用于计算分页数据,最后将获取的数据封装到PageResult对象中并返回给控制层。
在controller包中新建PageTestController类,用于实现分页请求的处理并返回查询结果,代码如下所示:
@RestController
@RequestMapping("users")
public class PageTestController {

    @Autowired
    private UserService userService;

    //分页功能测试
    @RequestMapping(value = "/list",method = RequestMethod.GET)
    public Result list(@RequestParam Map<String,Object> params){
        Result result = new Result();
        if (StringUtils.isEmpty(params.get("page"))||StringUtils.isEmpty(params.get("limit"))){
            //返回错误码
            result.setResultCode(500);
            //错误信息
            result.setMessage("参数异常!");
            return result;
        }
        //封装查询参数
        PageQueryUtil queryParamList = new PageQueryUtil(params);
        //查询并封装分页结果集
        PageResult userPage = userService.getUserPage(queryParamList);
        //返回成功码
        result.setResultCode(200);
        result.setMessage("查询成功");
        //返回分页数据
        result.setData(userPage);
        return result;
    }
}
分页功能的交互流程:前端将所需页码和条数参数传输给后端,后端在接收分页请求后对分页参数进行计算,并利用MySQL的limit关键字查询对应的记录,在查询结果被封装后返回给前端。在TestUserControler类上使用的是@RestController注解,该注解相当于@ResponseBody+@Controller的组合注解。
jqGrid是一个用来显示网格数据的jQuery插件。开发人员通过使用jqGrid可以轻松实现前端页面与后台数据的Ajax异步通信并实现分页功能。同时,jqGrid是一款代码开源的分页插件,源码也一直处于迭代更新的状态中。
下载地址:jqGrid
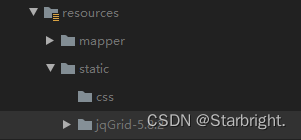
下载jqGrid后解压文件,将解压的文件直接拖进项目的static目录下
以下是jqGrid实现分页的步骤:
首先,在前端页面代码中引入jqGrid分页插件所需的源文件,代码如下所示:
<link href="plugins/jqgrid-5.8.2/ui.jqgrid-bootstrap4.css" rel="stylesheet"/>
<!--jqGrid依赖jQuery,因此需要先引入jquery.min.js文件,下方地址为字节跳动提供的cdn地址-->
<script src="http://s3.pstatp.com/cdn/expire-1-M/jquery/3.3.1/jquery.min.js"></script>
<!--grid.locale-cn.js为国际化所需的文件,-cn表示中文-->
<script src="plugins/jqgrid-5.8.2/grid.locale-cn.js"></script>
<script src="plugins/jqgrid-5.8.2/jquery.jqGrid.min.js"></script>
其次,在页面中需要展示分页数据的区域添加用于jqGrid初始化的代码:
<!--jqGrid必要DOM,用于创建表格展示列表数据-->
<table id="jqGrid" class="table table-bordered"></table>

<!--jqGrid必要DOM,分页信息区域-->
<div id="jqGridPager"></div>
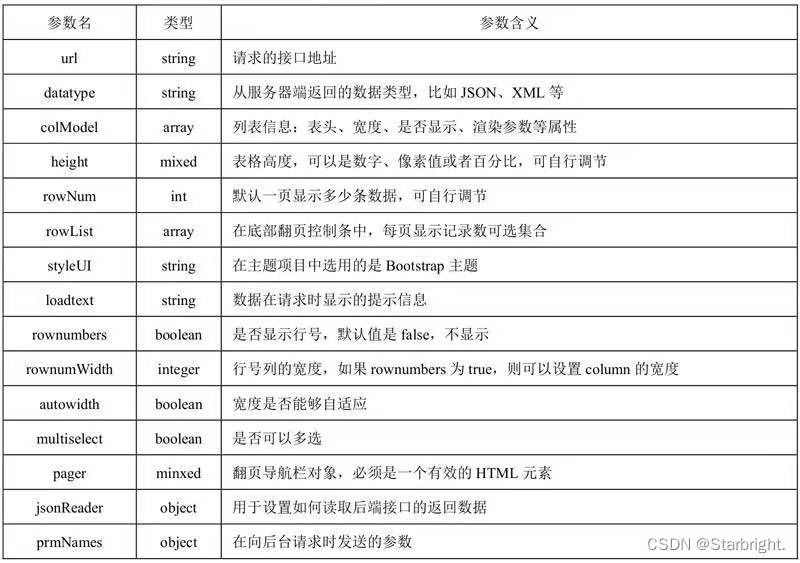
最后,调用jqGrid分页插件的jqGrid()方法渲染分页展示区域,代码如下所示:
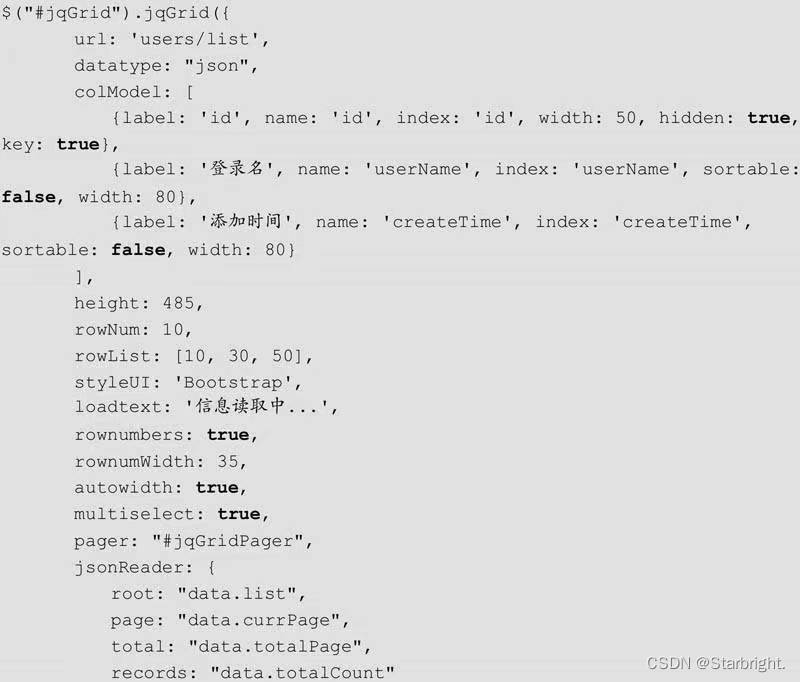
jqGrid()方法中的参数及含义如图所示。
jqGrid前端页面测试:
在resources/static目中新建jqgrid-page-test.html文件,代码如下所示:
<!DOCTYPE html>
<html lang="en">
<head>
    <meta charset="UTF-8">
    <title>jqGrid分页测试</title>
    <!--引入bootstrap样式文件-->
    <link rel="stylesheet" href="/static/bootstrap-5.3.0-alpha3-dist/css/bootstrap.css"/>
    <link href="jqGrid-5.8.2/css/ui.jqgrid-bootstrap4.css" rel="stylesheet"/>
</head>
<body>
<div style="margin: 24px;">
    <!--数据展示列表,id为jqGrid-->
    <table id="jqGrid" class="table table-bordered"></table>
    <!--分页按钮展示区-->
    <div id="jqGridPager"></div>
</div>
</body>
<!--jqGrid依赖jQuery,因此需要先引入jquery.min.js文件,下方地址为字节跳动提供的cdn地址-->
<script src="http://s3.pstatp.com/cdn/expire-1-M/jquery/3.3.1/jquery.min.js"></script>
<!--grid.locale-cn.js为国际化所需的文件,-cn表示中文-->
<script src="plugins/jqgrid-5.8.2/grid.locale-cn.js"></script>
<script src="plugins/jqgrid-5.8.2/jquery.jqGrid.min.js"></script>
<script src="jqgrid-page-test.js"></script>
</html>
jqGrid初始化
在resources/static目录下新建jqgrid-page-test.js文件,代码如下所示:
$(function () {
$("#jqGrid").jqGrid({
url: 'users/list',
datatype: "json",
colModel: [
{label: 'id',name: 'id', index: 'id', width: 50, hidden: true,key:true},
{label: '登录名',name: 'name',index: 'name', sortable: false, width: 80},
{label: '密码字段',name: 'password',index: 'password', sortable: false, width: 80}
],
height: 485,
rowNum: 10,
rowList: [10,30,50],
styleUI: 'Bootstrap',
loadtext: '信息读取中...',
rownumbers: true,
rownumWidth: 35,
autowidth: true,
multiselect: true,
pager: "#jqGridPager",
jsonReader:{
root: "data.list",
page: "data.currPage",
total: "data.totalCount"
},
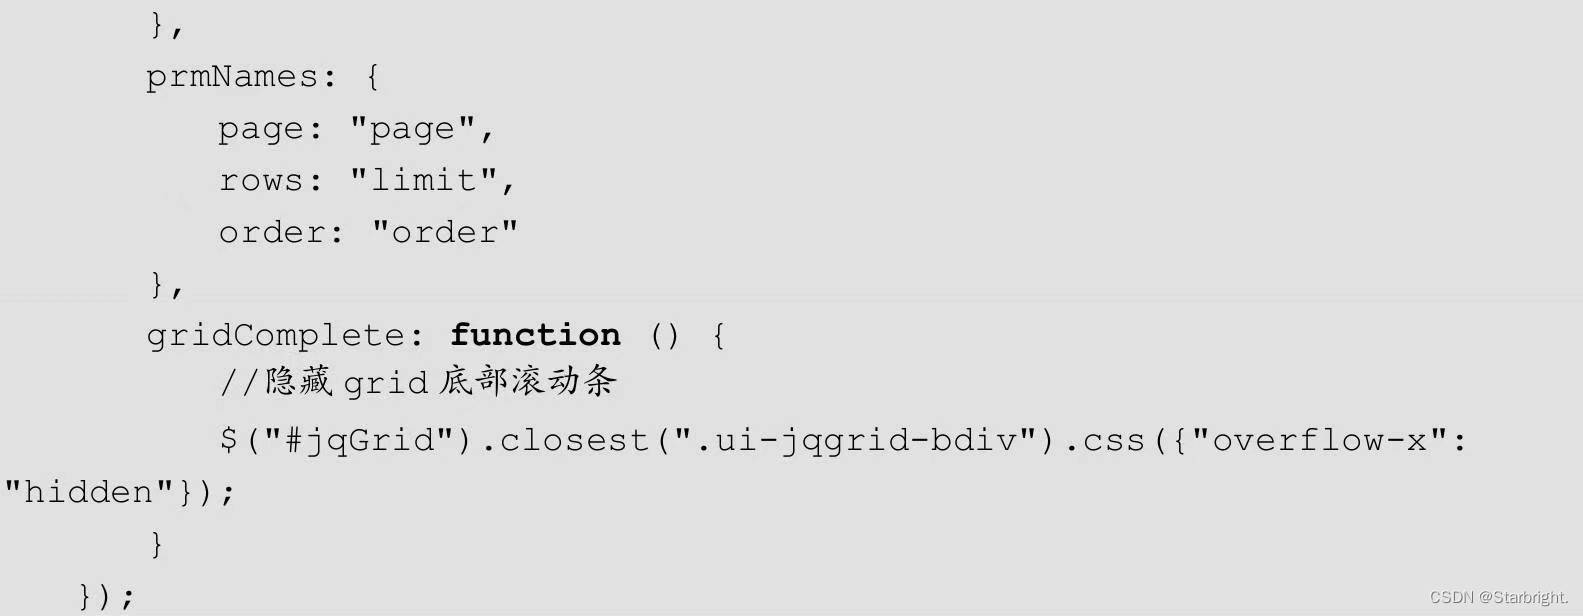
prmNames:{
page: "page",
rows: "limit",
order: "order"
},
gridComplete: function () {
//隐藏grid底部滚动条
$("#jqGrid").closest(".ui-jqgrid-bdiv").css({"overflow-x": "hidden"});
}
});
$(window).resize(function () {
$("jqGrid").setGridWidth($(".card-body").width());
});
});
只是想确保我理解了事情。据我目前收集到的信息,Cucumber只是一个“包装器”,或者是一种通过将事物分类为功能和步骤来组织测试的好方法,其中实际的单元测试处于步骤阶段。它允许您根据事物的工作方式组织您的测试。对吗? 最佳答案 有点。它是一种组织测试的方式,但不仅如此。它的行为就像最初的Rails集成测试一样,但更易于使用。这里最大的好处是您的session在整个Scenario中保持透明。关于Cucumber的另一件事是您(应该)从使用您的代码的浏览器或客户端的角度进行测试。如果您愿意,您可以使用步骤来构建对象和设置状态,但通常您
在Rails自动生成的功能测试(test/functional/products_controller_test.rb)中,我看到以下代码:classProductsControllerTest我的问题是:方法调用products()在哪里/如何定义?products(:one)到底是什么意思?看代码,大概意思是“创建一个产品”,但是它是如何工作的呢?注意我是Ruby/Rails的新手,如果这些是微不足道的问题,我深表歉意。 最佳答案 如果您查看test/fixtures文件夹,您会看到一个products.yml文件。这是在您创建
据我们所知,Jekyll默认分页仅支持index.html,我想创建blog.html并在那里包含分页。有什么解决办法吗? 最佳答案 如果您创建一个名为/blog的目录并在其中放置一个index.html文件,那么您可以向_config.yml表示paginate_path:"blog/page:num"。不是使用根文件夹中的默认index.html作为分页器模板,而是使用/blog/index.html。分页器将根据需要生成类似/blog/page2/和/blog/page3/的页面。这将使您到达yourwebsite.com/b
在我的一些Controller中,我有一个before_filter检查用户是否登录?用于CRUD操作。application.rbdeflogged_in?unlesscurrent_userredirect_toroot_pathendendprivatedefcurrent_user_sessionreturn@current_user_sessionifdefined?(@current_user_session)@current_user_session=UserSession.findenddefcurrent_userreturn@current_userifdefine
require'pp'p*1..10这会打印出1-10。为什么这么简洁?您还可以用它做什么? 最佳答案 它是“splat”运算符。它可用于分解数组和范围并在赋值期间收集值。这里收集赋值中的值:a,*b=1,2,3,4=>a=1b=[2,3,4]在此示例中,内部数组([3,4])中的值被分解并收集到包含数组中:a=[1,2,*[3,4]]=>a=[1,2,3,4]您可以定义将参数收集到数组中的函数:deffoo(*args)pargsendfoo(1,2,"three",4)=>[1,2,"three",4]
我读过的关于Ruby符号的每一篇文章都在谈论符号相对于字符串的效率。但是,这不是1970年代。我的电脑可以处理一些额外的垃圾收集。我错了吗?我拥有最新最好的奔腾双核处理器和4GBRAM。我认为这应该足以处理一些字符串。 最佳答案 您的计算机可能能够处理“一点点额外的垃圾收集”,但是当“一点点”发生在运行数百万次的内部循环中时呢?如果它在内存有限的嵌入式系统上运行呢?有很多地方你可以随意使用字符串,但在某些地方你不能。这完全取决于上下文。 关于ruby-现代计算机的功能是否不足以处理字符串
我正在使用Windows并尝试运行一个现有的功能包,该功能包最初是在MacOS上构建的,这允许他们通过使用带空格的"\"来解决问题。我正在使用Ruby2.2.3和Cucumber。功能名称包含空格,我无法更改它。我尝试使用""和''来绕过空白,但每次都有同样的问题。这是问题的一个例子。如果我运行:cucumberfeatures/'Namecontainingwhitespaces.feature'它工作正常。但是当我运行时:cucumber-pmy_profile和cucumber.yml包含:my_profile:features/'Namecontainingwhitespace
单元测试的好方法是测试脚本在执行之间保持正确数据的能力——在使用Ctrl-C终止脚本然后重新运行之后?是否有针对执行类似操作的现有模块或脚本的任何测试可以针对最佳实践进行审查? 最佳答案 像http://avdi.org/devblog/2010/07/19/greenletters-painless-automation-and-testing-for-command-line-applications/一样使用库或者期望、运行、终止并重新运行您的程序,并检查它是否运行正确。好的做法是将程序设计为独立的模块,每个模块都经过良好测试
如果您希望在Spring中启用定时任务功能,则需要在主类上添加 @EnableScheduling 注解。这样Spring才会扫描 @Scheduled 注解并执行定时任务。在大多数情况下,只需要在主类上添加 @EnableScheduling 注解即可,不需要在Service层或其他类中再次添加。以下是一个示例,演示如何在SpringBoot中启用定时任务功能:@SpringBootApplication@EnableSchedulingpublicclassApplication{publicstaticvoidmain(String[]args){SpringApplication.ru
软件特点部署后能通过浏览器查看线上日志。支持Linux、Windows服务器。采用随机读取的方式,支持大文件的读取。支持实时打印新增的日志(类终端)。支持日志搜索。使用手册基本页面配置路径配置日志所在的目录,配置后按回车键生效,下拉框选择日志名称。选择日志后点击生效,即可加载日志。windows路径E:\java\project\log-view\logslinux路径/usr/local/XX历史模式历史模式下,不会读取新增的日志。针对历史文件可以分页读取,配置分页大小、跳转。历史模式下,支持根据关键词搜索。目前搜索引擎使用的是jdk自带类库,搜索速度相对较低,优点是比较简单。2G日志全文搜