多个数据源是指在同一个系统中,用户数据来自不同的表,在认证时,如果第一张表没有查找到用户,那就去第二张表中査询,依次类推。
看了前面的分析,要实现这个需求就很容易了,认证要经过AuthenticationProvider,每一 个 AuthenticationProvider 中都配置了一个 UserDetailsService,而不同的 UserDetailsService 则可以代表不同的数据源,所以我们只需要手动配置多个AuthenticationProvider,并为不同的 AuthenticationProvider 提供不同的 UserDetailsService 即可。
为了方便起见,这里通过 InMemoryUserDetailsManager 来提供 UserDetailsService 实例, 在实际开发中,只需要将UserDetailsService换成自定义的即可,具体配置如下:
@Configuration
public class SecurityConfig extends WebSecurityConfigurerAdapter {
    @Bean
    @Primary
    UserDetailsService us1(){
        return new InMemoryUserDetailsManager(User.builder().username("testuser1").password("{noop}123")
                .roles("admin").build());
    }
    @Bean
    UserDetailsService us2(){
        return new InMemoryUserDetailsManager(User.builder().username("testuser2").password("{noop}123")
                .roles("user").build());
    }
    @Override
    public AuthenticationManager authenticationManagerBean() throws Exception {
        DaoAuthenticationProvider dao1 = new DaoAuthenticationProvider();
        dao1.setUserDetailsService(us1());
        DaoAuthenticationProvider dao2 = new DaoAuthenticationProvider();
        dao2.setUserDetailsService(us2());
        ProviderManager manager = new ProviderManager(dao1, dao2);
        return manager;
    }

    @Override
    protected void configure(HttpSecurity http) throws Exception {
        //省略
    }
}
首先定义了两个UserDetailsService实例,不同实例中存储了不同的用户;然后重写 authenticationManagerBean 方法,在该方法中,定义了两个 DaoAuthenticationProvider 实例并分别设置了不同的UserDetailsService ;最后构建ProviderManager实例并传入两个 DaoAuthenticationProvider,当系统进行身份认证操作时,就会遍历ProviderManager中不同的 DaoAuthenticationProvider,进而调用到不同的数据源。
登录验证码也是项目中一个常见的需求,但是Spring Security对此并未提供自动化配置方案,需要开发者自行定义,一般来说,有两种实现登录验证码的思路:
通过自定义过滤器来实现登录验证码,这种方案我们会在后面的过滤器中介绍, 这里先来看如何通过自定义认证逻辑实现添加登录验证码功能。
生成验证码,可以自定义一个生成工具类,也可以使用一些现成的开源库来实现,这里 采用开源库kaptcha,首先引入kaptcha依赖,代码如下:
<dependency>
    <groupId>com.github.penggle</groupId>
    <artifactId>kaptcha</artifactId>
    <version>2.3.2</version>
</dependency>
然后对kaptcha进行配置:
 package com.intehel.demo.config;

import com.google.code.kaptcha.Producer;
import com.google.code.kaptcha.impl.DefaultKaptcha;
import com.google.code.kaptcha.util.Config;
import org.springframework.context.annotation.Bean;
import org.springframework.context.annotation.Configuration;
import java.util.Properties;

@Configuration
public class KaptchaConfig {
    @Bean
    Producer kaptcha(){
        Properties properties = new Properties();
        properties.setProperty("kaptcha.image.width", "150");
        properties.setProperty("kaptcha.image.height", "50");
        properties.setProperty("kaptcha.textproducer.char.string", "0123456789");
        properties.setProperty("kaptcha.textproducer.char.length", "4");
        Config config = new Config(properties);
        DefaultKaptcha defaultKaptcha = new DefaultKaptcha();
        defaultKaptcha.setConfig(config);
        return defaultKaptcha;
    }
}
配置一个Producer实例,主要配置一下生成的图片验证码的宽度、长度、生成字符、验证码的长度等信息,配置完成后,我们就可以在Controller中定义一个验证码接口了。
 package com.intehel.demo.controller;

import com.google.code.kaptcha.Producer;
import org.springframework.beans.factory.annotation.Autowired;
import org.springframework.web.bind.annotation.RequestMapping;
import org.springframework.web.bind.annotation.RestController;
import javax.imageio.ImageIO;
import javax.servlet.ServletOutputStream;
import javax.servlet.http.HttpServletResponse;
import javax.servlet.http.HttpSession;
import java.awt.image.BufferedImage;
import java.io.IOException;

@RestController
public class LoginController {
    @Autowired
    Producer producer;
    @RequestMapping("/vc.jpg")
    public void getVerifyCode(HttpServletResponse resp, HttpSession session){
        resp.setContentType("image/jpeg");
        String text = producer.createText();
        session.setAttribute("kaptcha",text);
        BufferedImage image = producer.createImage(text);
        try(ServletOutputStream out = resp.getOutputStream()) {
            ImageIO.write(image,"jpg",out);
        } catch (IOException e) {
            e.printStackTrace();
        }
    }
}
在这个验证码接口中,我们主要做了两件事:
接下来修改登录表单,加入验证码,代码如下:
 <!DOCTYPE html>
<html lang="en" xmlns:th="http://www.thymeleaf.org">
<head>
    <meta charset="UTF-8">
    <title>登录</title>
    <link href="//maxcdn.bootstrapcdn.com/bootstrap/4.1.1/css/bootstrap.min.css" rel="stylesheet" id="bootstrap-css">
    <script src="//maxcdn.bootstrapcdn.com/bootstrap/4.1.1/js/bootstrap.min.js"></script>
    <script src="//cdnjs.cloudflare.com/ajax/libs/jquery/3.2.1/jquery.min.js"></script>
</head>
<style>
    #login .container #login-row #login-column #login-box {
        border: 1px solid #9c9c9c;
        background-color: #EAEAEA;
    }
</style>
<body>
<div id="login">
    <div class="container">
        <div id="login-row" class="row justify-content-center align-items-center">
            <div id="login-column" class="col-md-6">
                <div id="login-box" class="col-md-12">
                    <form id="login-form" class="form" action="/doLogin" method="post">
                        <h3 class="text-center text-info">登录</h3>
                        <!--/*@thymesVar id="SPRING_SECURITY_LAST_EXCEPTION" type="com"*/-->
                        <div th:text="${SPRING_SECURITY_LAST_EXCEPTION}"></div>
                        <div class="form-group">
                            <label for="username" class="text-info">用户名:</label><br>
                            <input type="text" name="uname" id="username" class="form-control">
                        </div>
                        <div class="form-group">
                            <label for="password" class="text-info">密码:</label><br>
                            <input type="text" name="passwd" id="password" class="form-control">
                        </div>
                        <div class="form-group">
                            <label for="kaptcha" class="text-info">验证码:</label><br>
                            <input type="text" name="kaptcha" id="kaptcha" class="form-control">
                            <img src="/vc.jpg" alt="">
                        </div>
                        <div class="form-group">
                            <input type="submit" name="submit" class="btn btn-info btn-md" value="登录">
                        </div>
                    </form>
                </div>
            </div>
        </div>
    </div>
</div>
</body>
</html>
登录表单中增加一个验证码输入框,验证码的图片地址就是我们在Controller中定义的验证码接口地址。
接下来就是验证码的校验了。经过前面的介绍,读者已经了解到,身份认证实际上就是在AuthenticationProvider.authenticate方法中完成的。所以,验证码的校验,我们可以在该方法执行之前进行,需要配置如下类:
 package com.intehel.demo.provider;

import org.springframework.security.authentication.AuthenticationServiceException;
import org.springframework.security.authentication.dao.DaoAuthenticationProvider;
import org.springframework.security.core.Authentication;
import org.springframework.security.core.AuthenticationException;
import org.springframework.web.context.request.RequestContextHolder;
import org.springframework.web.context.request.ServletRequestAttributes;
import javax.servlet.http.HttpServletRequest;

public class KaptchaAuthenticationProvider extends DaoAuthenticationProvider{
    @Override
    public Authentication authenticate(Authentication authentication) throws AuthenticationException {
        HttpServletRequest req = ((ServletRequestAttributes)RequestContextHolder.getRequestAttributes()).getRequest();
        String kaptcha = req.getParameter("kaptcha");
        String serssionKaptcha = (String) req.getSession().getAttribute("kaptcha");
        if (kaptcha != null && serssionKaptcha != null && kaptcha.equalsIgnoreCase(serssionKaptcha)){
            return super.authenticate(authentication);
        }
        throw new AuthenticationServiceException("验证码输入错误");
    }
}
这里重写authenticate方法,在authenticate方法中,从RequestContextHolder中获取当前请求,进而获取到验证码参数和存储在HttpSession中的验证码文本进行比较,比较通过则继续执行父类的authenticate方法,比较不通过,就抛出异常。
你可能会想到通过重写 DaoAuthenticationProvider类的 additionalAuthenticationChecks 方法来完成验证码的校验,这个从技术上来说是没有问题的,但是这会让验证码失去存在的意义,因为当additionalAuthenticationChecks方法被调用时,数据库查询已经做了,仅仅剩下密码没有校验,此时,通过验证码来拦截恶意登录的功能就已经失效了。
最后,在 SecurityConfig 中配置 AuthenticationManager,代码如下:
 package com.intehel.demo.config;

import com.fasterxml.jackson.databind.ObjectMapper;
import com.intehel.demo.Service.MyUserDetailsService;
import com.intehel.demo.handler.MyAuthenticationFailureHandler;
import com.intehel.demo.provider.KaptchaAuthenticationProvider;
import org.springframework.beans.factory.annotation.Autowired;
import org.springframework.context.annotation.Bean;
import org.springframework.context.annotation.Configuration;
import org.springframework.security.authentication.AuthenticationManager;
import org.springframework.security.authentication.AuthenticationProvider;
import org.springframework.security.authentication.ProviderManager;
import org.springframework.security.config.annotation.web.builders.HttpSecurity;
import org.springframework.security.config.annotation.web.configuration.WebSecurityConfigurerAdapter;
import org.springframework.security.web.util.matcher.AntPathRequestMatcher;
import org.springframework.security.web.util.matcher.OrRequestMatcher;
import java.util.HashMap;
import java.util.Map;

@Configuration
public class SecurityConfig extends WebSecurityConfigurerAdapter {
    @Autowired
    MyUserDetailsService myUserDetailsService;
    @Override
    protected void configure(HttpSecurity http) throws Exception {
        http.authorizeRequests()
                .antMatchers("/vc.jpg").permitAll()
                .anyRequest().authenticated()
                .and()
                .formLogin()
                .loginPage("/mylogin.html")
                .loginProcessingUrl("/doLogin")
                .defaultSuccessUrl("/index.html")
                .failureHandler(new MyAuthenticationFailureHandler())
                .usernameParameter("uname")
                .passwordParameter("passwd")
                .permitAll()
                .and()
                .logout()
                .logoutRequestMatcher(new OrRequestMatcher(new AntPathRequestMatcher("/logout1","GET"),
                        new AntPathRequestMatcher("/logout2","POST")))
                .invalidateHttpSession(true)
                .clearAuthentication(true)
                .defaultLogoutSuccessHandlerFor((req,resp,auth)->{
                    resp.setContentType("application/json;charset=UTF-8");
                    Map<String,Object> result = new HashMap<String,Object>();
                    result.put("status",200);
                    result.put("msg","使用logout1注销成功!");
                    ObjectMapper om = new ObjectMapper();
                    String s = om.writeValueAsString(result);
                    resp.getWriter().write(s);
                },new AntPathRequestMatcher("/logout1","GET"))
                .defaultLogoutSuccessHandlerFor((req,resp,auth)->{
                    resp.setContentType("application/json;charset=UTF-8");
                    Map<String,Object> result = new HashMap<String,Object>();
                    result.put("status",200);
                    result.put("msg","使用logout2注销成功!");
                    ObjectMapper om = new ObjectMapper();
                    String s = om.writeValueAsString(result);
                    resp.getWriter().write(s);
                },new AntPathRequestMatcher("/logout1","GET"))
                .and()
                .csrf().disable();
    }
    @Bean
    AuthenticationProvider kaptchaAuthenticationProvider(){
        KaptchaAuthenticationProvider provider = new KaptchaAuthenticationProvider();
        provider.setUserDetailsService(myUserDetailsService);
        return provider;
    }

    @Override
    public AuthenticationManager authenticationManagerBean() throws Exception {
        ProviderManager manager = new ProviderManager(kaptchaAuthenticationProvider());
        return manager;
    }
}
这里配置分三步:首先配置UserDetailsService提供数据源;然后提供一个 AuthenticationProvider 实例并配置 UserDetailsService;最后重写 authenticationManagerBean 方 法,提供一个自己的PioviderManager并使用自定义的AuthenticationProvider实例。
另外需要注意,在configure(HttpSecurity)方法中给验证码接口配置放行,permitAll表示这个接口不需要登录就可以访问。
配置完成后,启动项目,浏览器中输入任意地址都会跳转到登录页面,如图3-5所示。
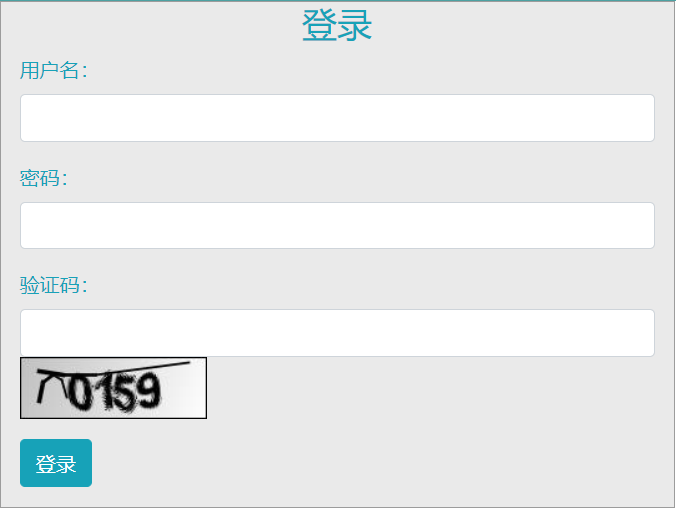
图 3-5
此时,输入用户名、密码以及验证码就可以成功登录。如果验证码输入错误,则登录页面会自动展示错误信息,如下:

当我使用Bundler时,是否需要在我的Gemfile中将其列为依赖项?毕竟,我的代码中有些地方需要它。例如,当我进行Bundler设置时:require"bundler/setup" 最佳答案 没有。您可以尝试,但首先您必须用鞋带将自己抬离地面。 关于ruby-我需要将Bundler本身添加到Gemfile中吗?,我们在StackOverflow上找到一个类似的问题: https://stackoverflow.com/questions/4758609/
Rails2.3可以选择随时使用RouteSet#add_configuration_file添加更多路由。是否可以在Rails3项目中做同样的事情? 最佳答案 在config/application.rb中:config.paths.config.routes在Rails3.2(也可能是Rails3.1)中,使用:config.paths["config/routes"] 关于ruby-on-rails-Rails3中的多个路由文件,我们在StackOverflow上找到一个类似的问题
我有多个ActiveRecord子类Item的实例数组,我需要根据最早的事件循环打印。在这种情况下,我需要打印付款和维护日期,如下所示:ItemAmaintenancerequiredin5daysItemBpaymentrequiredin6daysItemApaymentrequiredin7daysItemBmaintenancerequiredin8days我目前有两个查询,用于查找maintenance和payment项目(非排他性查询),并输出如下内容:paymentrequiredin...maintenancerequiredin...有什么方法可以改善上述(丑陋的)代
我主要使用Ruby来执行此操作,但到目前为止我的攻击计划如下:使用gemsrdf、rdf-rdfa和rdf-microdata或mida来解析给定任何URI的数据。我认为最好映射到像schema.org这样的统一模式,例如使用这个yaml文件,它试图描述数据词汇表和opengraph到schema.org之间的转换:#SchemaXtoschema.orgconversion#data-vocabularyDV:name:namestreet-address:streetAddressregion:addressRegionlocality:addressLocalityphoto:i
我需要从一个View访问多个模型。以前,我的links_controller仅用于提供以不同方式排序的链接资源。现在我想包括一个部分(我假设)显示按分数排序的顶级用户(@users=User.all.sort_by(&:score))我知道我可以将此代码插入每个链接操作并从View访问它,但这似乎不是“ruby方式”,我将需要在不久的将来访问更多模型。这可能会变得很脏,是否有针对这种情况的任何技术?注意事项:我认为我的应用程序正朝着单一格式和动态页面内容的方向发展,本质上是一个典型的网络应用程序。我知道before_filter但考虑到我希望应用程序进入的方向,这似乎很麻烦。最终从任何
我有一个ModularSinatra应用程序,我正在尝试将Bootstrap添加到应用程序中。get'/bootstrap/application.css'doless:"bootstrap/bootstrap"end我在views/bootstrap中有所有less文件,包括bootstrap.less。我收到这个错误:Less::ParseErrorat/bootstrap/application.css'reset.less'wasn'tfound.Bootstrap.less的第一行是://CSSReset@import"reset.less";我尝试了所有不同的路径格式,但它
我正在使用Sequel构建一个愿望list系统。我有一个wishlists和itemstable和一个items_wishlists连接表(该名称是续集选择的名称)。items_wishlists表还有一个用于facebookid的额外列(因此我可以存储opengraph操作),这是一个NOTNULL列。我还有Wishlist和Item具有续集many_to_many关联的模型已建立。Wishlist类也有:selectmany_to_many关联的选项设置为select:[:items.*,:items_wishlists__facebook_action_id].有没有一种方法可以
我有一个在Linux服务器上运行的ruby脚本。它不使用rails或任何东西。它基本上是一个命令行ruby脚本,可以像这样传递参数:./ruby_script.rbarg1arg2如何将参数抽象到配置文件(例如yaml文件或其他文件)中?您能否举例说明如何做到这一点?提前谢谢你。 最佳答案 首先,您可以运行一个写入YAML配置文件的独立脚本:require"yaml"File.write("path_to_yaml_file",[arg1,arg2].to_yaml)然后,在您的应用中阅读它:require"yaml"arg
我有一个具有一些属性的模型:attr1、attr2和attr3。我需要在不执行回调和验证的情况下更新此属性。我找到了update_column方法,但我想同时更新三个属性。我需要这样的东西:update_columns({attr1:val1,attr2:val2,attr3:val3})代替update_column(attr1,val1)update_column(attr2,val2)update_column(attr3,val3) 最佳答案 您可以使用update_columns(attr1:val1,attr2:val2
我正在尝试修改当前依赖于定义为activeresource的gem:s.add_dependency"activeresource","~>3.0"为了让gem与Rails4一起工作,我需要扩展依赖关系以与activeresource的版本3或4一起工作。我不想简单地添加以下内容,因为它可能会在以后引起问题:s.add_dependency"activeresource",">=3.0"有没有办法指定可接受版本的列表?~>3.0还是~>4.0? 最佳答案 根据thedocumentation,如果你想要3到4之间的所有版本,你可以这
