开通步骤如下图所示

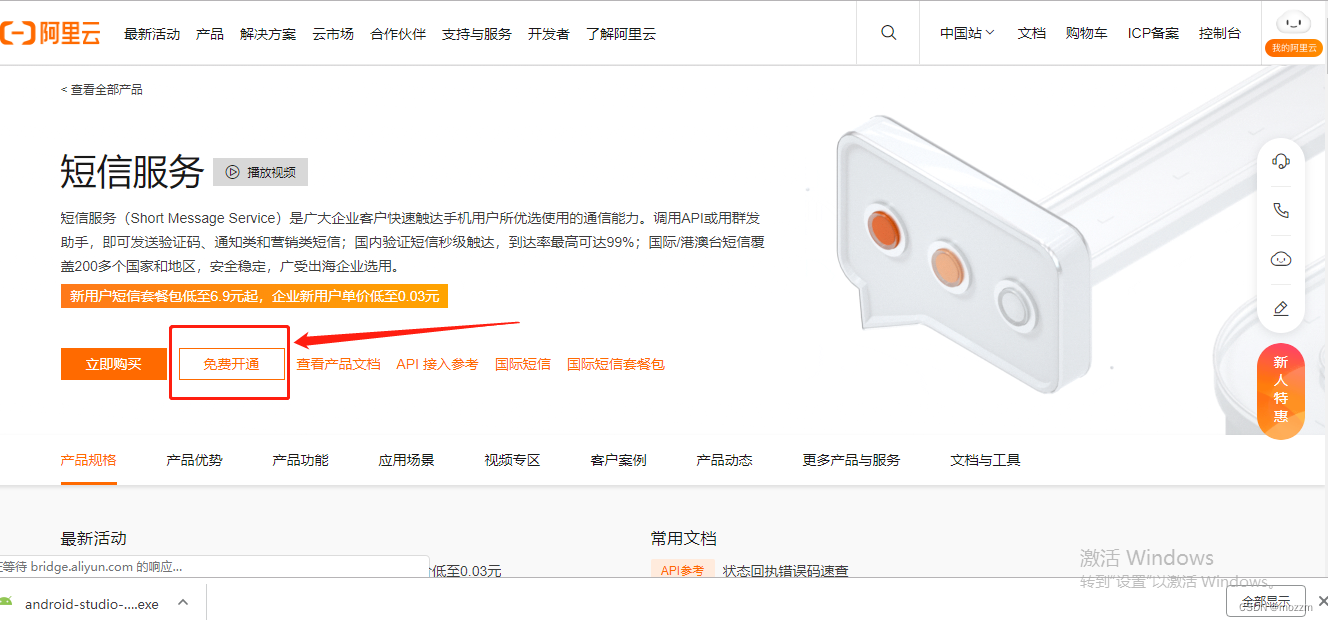
开通完成后,进入阿里云短信验证首页,点击国内消息

一般来说,在短信验证时需要签名管理和模板管理,但是签名管理需要备案或者上线服务,所以对于没有备案和上线应用的用户来说,就进行不了这一项,但是阿里云提供了免费的api测试短信验证服务(当然测试信息验证码也是收费的),具体过程如下:


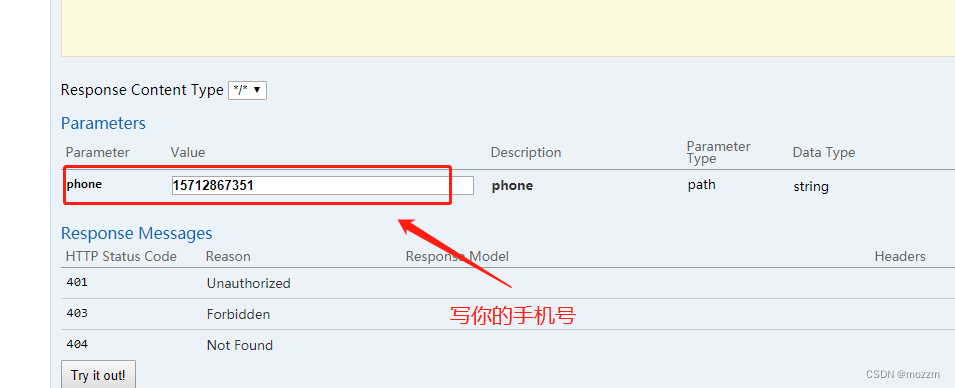
这边点击api发送测试功能,进行我们的测试验证,此时会让绑定手机号,我们剋以绑定自己的手机号即可。

我自己测试绑定了两个,随便搞一个就行
绑定后点击调用api发短信

然后会自动生成签名名称和模板code,这个我们需要记住,后续代码中需要这两个参数。

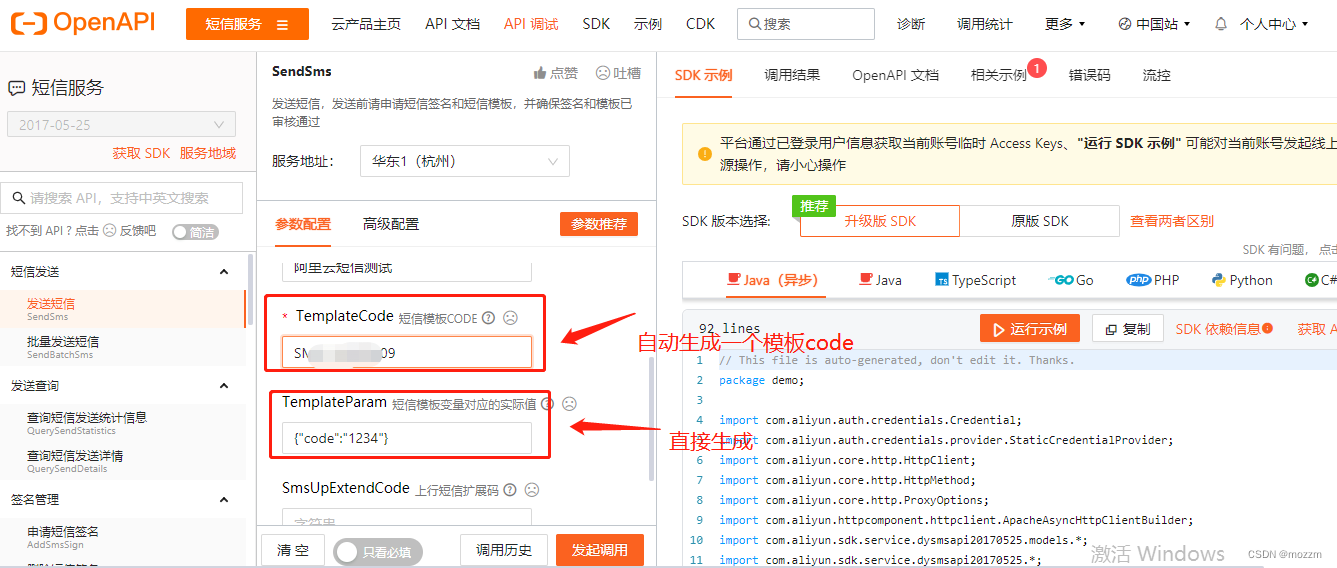
主要参数就这几个,后面代码中使用的也就是这几个参数。阿里云短信服务开通后,进行代码分析。
首先我们需要用到
1.redis:在进行登陆注册的时候进行短信验证时,我们可以将相关的信息存到redis中,这样避免了从数据库查找,直接从缓存中查找更加方便。
2.swagger:用来进行接口测试
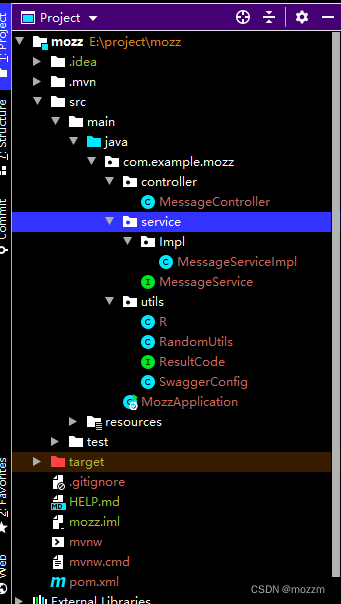
(0)首先创建一个spring initializr项目,具体的项目结构如下所示。
(1)相关的pom依赖如下所示:
<?xml version="1.0" encoding="UTF-8"?>
<project xmlns="http://maven.apache.org/POM/4.0.0" xmlns:xsi="http://www.w3.org/2001/XMLSchema-instance"
         xsi:schemaLocation="http://maven.apache.org/POM/4.0.0 https://maven.apache.org/xsd/maven-4.0.0.xsd">
    <modelVersion>4.0.0</modelVersion>
    <parent>
        <groupId>org.springframework.boot</groupId>
        <artifactId>spring-boot-starter-parent</artifactId>
        <version>2.7.0</version>
        <relativePath/> <!-- lookup parent from repository -->
    </parent>
    <groupId>com.example</groupId>
    <artifactId>mozz</artifactId>
    <version>0.0.1-SNAPSHOT</version>
    <name>mozz</name>
    <description>Demo project for Spring Boot</description>
    <properties>
        <java.version>1.8</java.version>
    </properties>
    <dependencies>
        <dependency>
            <groupId>org.springframework.boot</groupId>
            <artifactId>spring-boot-starter-web</artifactId>
        </dependency>
        <!--swagger-->
        <dependency>
            <groupId>io.springfox</groupId>
            <artifactId>springfox-swagger2</artifactId>
            <version>2.7.0</version>
        </dependency>
        <!--swagger ui-->
        <dependency>
            <groupId>io.springfox</groupId>
            <artifactId>springfox-swagger-ui</artifactId>
            <version>2.7.0</version>
        </dependency>

        <dependency>
            <groupId>org.springframework.boot</groupId>
            <artifactId>spring-boot-starter-redis</artifactId>
            <version>1.4.0.RELEASE</version>
        </dependency>

        <dependency>
            <groupId>org.springframework.boot</groupId>
            <artifactId>spring-boot-devtools</artifactId>
            <scope>runtime</scope>
            <optional>true</optional>
        </dependency>

        <dependency>
            <groupId>com.aliyun</groupId>
            <artifactId>aliyun-java-sdk-core</artifactId>
            <version>4.2.0</version>
        </dependency>

        <dependency>
            <groupId>com.alibaba</groupId>
            <artifactId>fastjson</artifactId>
            <version>2.0.10</version>
        </dependency>

        <dependency>
            <groupId>org.projectlombok</groupId>
            <artifactId>lombok</artifactId>
            <optional>true</optional>
        </dependency>
        <dependency>
            <groupId>org.springframework.boot</groupId>
            <artifactId>spring-boot-starter-test</artifactId>
            <scope>test</scope>
        </dependency>
    </dependencies>

    <build>
        <plugins>
            <plugin>
                <groupId>org.springframework.boot</groupId>
                <artifactId>spring-boot-maven-plugin</artifactId>
                <configuration>
                    <excludes>
                        <exclude>
                            <groupId>org.projectlombok</groupId>
                            <artifactId>lombok</artifactId>
                        </exclude>
                    </excludes>
                </configuration>
            </plugin>
        </plugins>
    </build>

</project>
(2)相关配置文件application.properties
# 端口号
server.port=8888

spring.redis.host=127.0.0.1
spring.redis.port=6379
spring.redis.database= 0
spring.redis.timeout=1800000

spring.redis.lettuce.pool.max-active=20
spring.redis.lettuce.pool.max-wait=-1
spring.redis.lettuce.pool.max-idle=5
spring.redis.lettuce.pool.min-idle=0

#返回json的全局时间格式
spring.jackson.date-format=yyyy-MM-dd HH:mm:ss
spring.jackson.time-zone=GMT+8

spring.mvc.pathmatch.matching-strategy=ant_path_matcher
(3)相关工具类
(3.1)统一返回值
package com.example.mozz.utils;

import io.swagger.annotations.ApiModelProperty;
import lombok.Data;

import java.util.HashMap;
import java.util.Map;

//统一返回结果的类
@Data
public class R {

    @ApiModelProperty(value = "是否成功")
    private boolean success;

    @ApiModelProperty(value = "返回码")
    private Integer code;

    @ApiModelProperty(value = "返回消息")
    private String message;

    @ApiModelProperty(value = "返回数据")
    private Map<String,Object> data = new HashMap<String,Object>();

    //构造方法私有
    private R(){};

    //成功的静态方法
    public static R ok(){
        R r = new R();
        r.setSuccess(true);
        r.setCode(ResultCode.SUCCESS);
        r.setMessage("成功");
        return r;
    }

    //失败的静态方法
    public static R error(){
        R r = new R();
        r.setSuccess(false);
        r.setCode(ResultCode.ERROR);
        r.setMessage("失败");
        return r;
    }

    public R success(Boolean success){
        this.setSuccess(success);
        return this;
    }

    public R code(Integer code){
        this.setCode(code);
        return this;
    }

    public R message(String message){
        this.setMessage(message);
        return this;
    }

    public R data(String s, Object o){
        this.data.put(s,o);
        return this;
    }

    public R data(Map<String,Object> map){
        this.setData(map);
        return this;
    }
}
package com.example.mozz.utils;

public interface ResultCode {

    public static Integer SUCCESS = 20000;
    public static Integer ERROR = 20001;

}
(3.2)验证码分为四位和六位,所以写一个工具类返回四位还是六位验证码RandomUtils
package com.example.mozz.utils;

import java.text.DecimalFormat;
import java.util.ArrayList;
import java.util.HashMap;
import java.util.List;
import java.util.Random;

/**
 * @author mozz
 * @version 1.0
 * @date 2022/8/22
 */
public class RandomUtils {

    private static final Random random = new Random();

    private static final DecimalFormat fourdf = new DecimalFormat("0000");

    private static final DecimalFormat sixdf = new DecimalFormat("000000");

    public static String getFourBitRandom() {
        return fourdf.format(random.nextInt(10000));
    }

    public static String getSixBitRandom() {
        return sixdf.format(random.nextInt(1000000));
    }

    /**
     * 给定数组,抽取n个数据
     * @param list
     * @param n
     * @return
     */
    public static ArrayList getRandom(List list, int n) {

        Random random = new Random();

        HashMap<Object, Object> hashMap = new HashMap<Object, Object>();

        // 生成随机数字并存入HashMap
        for (int i = 0; i < list.size(); i++) {

            int number = random.nextInt(100) + 1;

            hashMap.put(number, i);
        }

        // 从HashMap导入数组
        Object[] robjs = hashMap.values().toArray();

        ArrayList r = new ArrayList();

        // 遍历数组并打印数据
        for (int i = 0; i < n; i++) {
            r.add(list.get((int) robjs[i]));
            System.out.print(list.get((int) robjs[i]) + "\t");
        }
        System.out.print("\n");
        return r;
    }

}
(3.3) swagger配置类SwaggerConfig
package com.example.mozz.utils;

import com.google.common.base.Predicates;
import org.springframework.context.annotation.Bean;
import org.springframework.context.annotation.Configuration;
import springfox.documentation.builders.ApiInfoBuilder;
import springfox.documentation.builders.PathSelectors;
import springfox.documentation.service.ApiInfo;
import springfox.documentation.service.Contact;
import springfox.documentation.spi.DocumentationType;
import springfox.documentation.spring.web.plugins.Docket;
import springfox.documentation.swagger2.annotations.EnableSwagger2;

@Configuration
@EnableSwagger2
public class SwaggerConfig {

    @Bean
    public Docket webApiConfig(){
        return new Docket(DocumentationType.SWAGGER_2)
                .groupName("webApi")
                .apiInfo(webApiInfo())
                .select()
                .paths(Predicates.not(PathSelectors.regex("/admin/.*")))
                .paths(Predicates.not(PathSelectors.regex("/error.*")))
                .build();

    }
    private ApiInfo webApiInfo(){
         return new ApiInfoBuilder()
         .title("API文档")
         .description("接口定义")
         .version("1.0")
         .contact(new Contact("mozz", "http://www.baidu.com",
                "1345656307@qq.com"))
         .build();
         }
}
至此整个工具类都创建完成
(2)编写service层
(2.1)MessageService接口
package com.example.mozz.service;

import java.util.Map;

public interface MessageService {

//是否发送成功
    boolean send(Map<String, Object> map, String phone);
}
(2.2)实现类
package com.example.mozz.service.Impl;

import com.alibaba.fastjson.JSONObject;
import com.aliyuncs.CommonRequest;
import com.aliyuncs.CommonResponse;
import com.aliyuncs.DefaultAcsClient;
import com.aliyuncs.IAcsClient;
import com.aliyuncs.exceptions.ClientException;
import com.aliyuncs.exceptions.ServerException;
import com.aliyuncs.http.MethodType;
import com.aliyuncs.profile.DefaultProfile;
import com.aliyuncs.utils.StringUtils;
import com.example.mozz.service.MessageService;
import org.springframework.stereotype.Service;

import java.util.Map;

@Service
public class MessageServiceImpl implements MessageService {

    @Override
    public boolean send(Map<String,Object> map, String phone) {
         if(StringUtils.isEmpty(phone)) return false;

         DefaultProfile profile =
                 DefaultProfile.getProfile("default", "LTAI5tArv8Ccgp2YWX7ejmJa",
                "5CvuGiss2sLMi5vcmI7N0UT7OjqWFC");
         IAcsClient client = new DefaultAcsClient(profile);

         CommonRequest request = new CommonRequest();
         //request.setProtocol(ProtocolType.HTTPS);
         request.setMethod(MethodType.POST);
         request.setDomain("dysmsapi.aliyuncs.com");
         request.setVersion("2017-05-25");
         request.setAction("SendSms");

         request.putQueryParameter("PhoneNumbers", phone);   //手机号
         request.putQueryParameter("SignName", "阿里云短信测试");    //签名名称
         request.putQueryParameter("TemplateCode", "SMS_151923909");  //模板名称
         request.putQueryParameter("TemplateParam", JSONObject.toJSONString(map));  //验证码转换json数据

         try {
             CommonResponse response = client.getCommonResponse(request);
             System.out.println(response.getData());
             return response.getHttpResponse().isSuccess();
             } catch (ServerException e) {
             e.printStackTrace();
             } catch (ClientException e) {
             e.printStackTrace();
             }
         return false;
         }
}
这边有几个注意事项:

如何获取你的accessKeyId和secret,步骤如下:

点击继续使用AccessKey, 出现对应的AccessKeyId以及secret信息

查看secret时,需要手机验证码,验证一下即可。(获取到id和secret后,最好将其保存在本地,这样以后再用的话可以直接使用,不需要这样去查找了)
(3)controller层编写
package com.example.mozz.controller;

import com.example.mozz.service.MessageService;
import com.example.mozz.utils.R;
import com.example.mozz.utils.RandomUtils;
import org.springframework.beans.factory.annotation.Autowired;
import org.springframework.data.redis.core.RedisTemplate;
import com.aliyuncs.utils.StringUtils;
import org.springframework.web.bind.annotation.*;

import java.util.HashMap;
import java.util.Map;
import java.util.concurrent.TimeUnit;

@RestController
@RequestMapping("/user/message")
public class MessageController {

    @Autowired
    private MessageService messageService;

    @Autowired
    private RedisTemplate<String,String> redisTemplate;


    @GetMapping("{phone}")
    public R sendMessage(@PathVariable String phone){

        //1.从redis中获取验证码,如果缓存中有的话直接返回,没有的话从阿里云发送获取
       String code = redisTemplate.opsForValue().get(phone);

       if(!StringUtils.isEmpty(code)){
            return R.ok();
       }

       //从阿里云发送
        // 1.生成随机值,发送给阿里云
        code = RandomUtils.getSixBitRandom();   //六位验证码
        Map<String,Object> map = new HashMap<>();
        map.put("code",code);

        boolean isSend = messageService.send(map,phone);

        if(isSend){
            redisTemplate.opsForValue().set(phone,code,5, TimeUnit.MINUTES);
            return R.ok();
        }else{
            return R.error().message("发送失败");
        }
    }

}
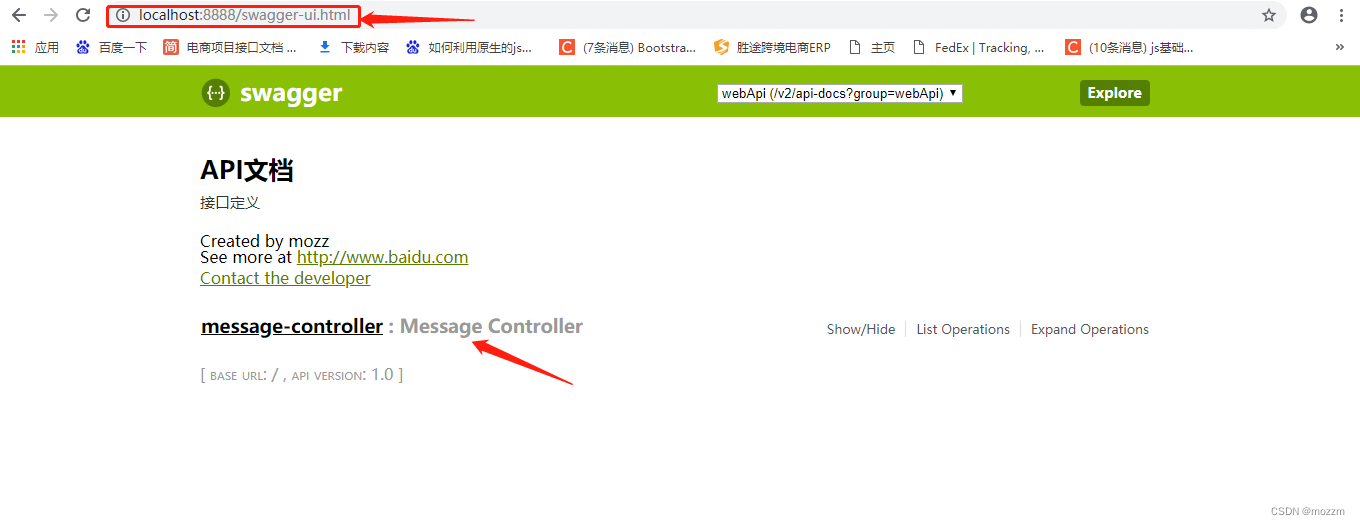
至此整个的代码就编写完成,随后进行swagger测试
启动类:需要注意注解需要加上exclude = {DataSourceAutoConfiguration.class}, 因为我们没有用到数据库相关信息,所以需要将数据源排除掉。
package com.example.mozz;

import org.springframework.boot.SpringApplication;
import org.springframework.boot.autoconfigure.SpringBootApplication;
import org.springframework.boot.autoconfigure.jdbc.DataSourceAutoConfiguration;

@SpringBootApplication(exclude = {DataSourceAutoConfiguration.class})
public class MozzApplication {

    public static void main(String[] args) {
        SpringApplication.run(MozzApplication.class, args);
    }

}


发送成功,这是你的手机上应该会收到相应的验证码:
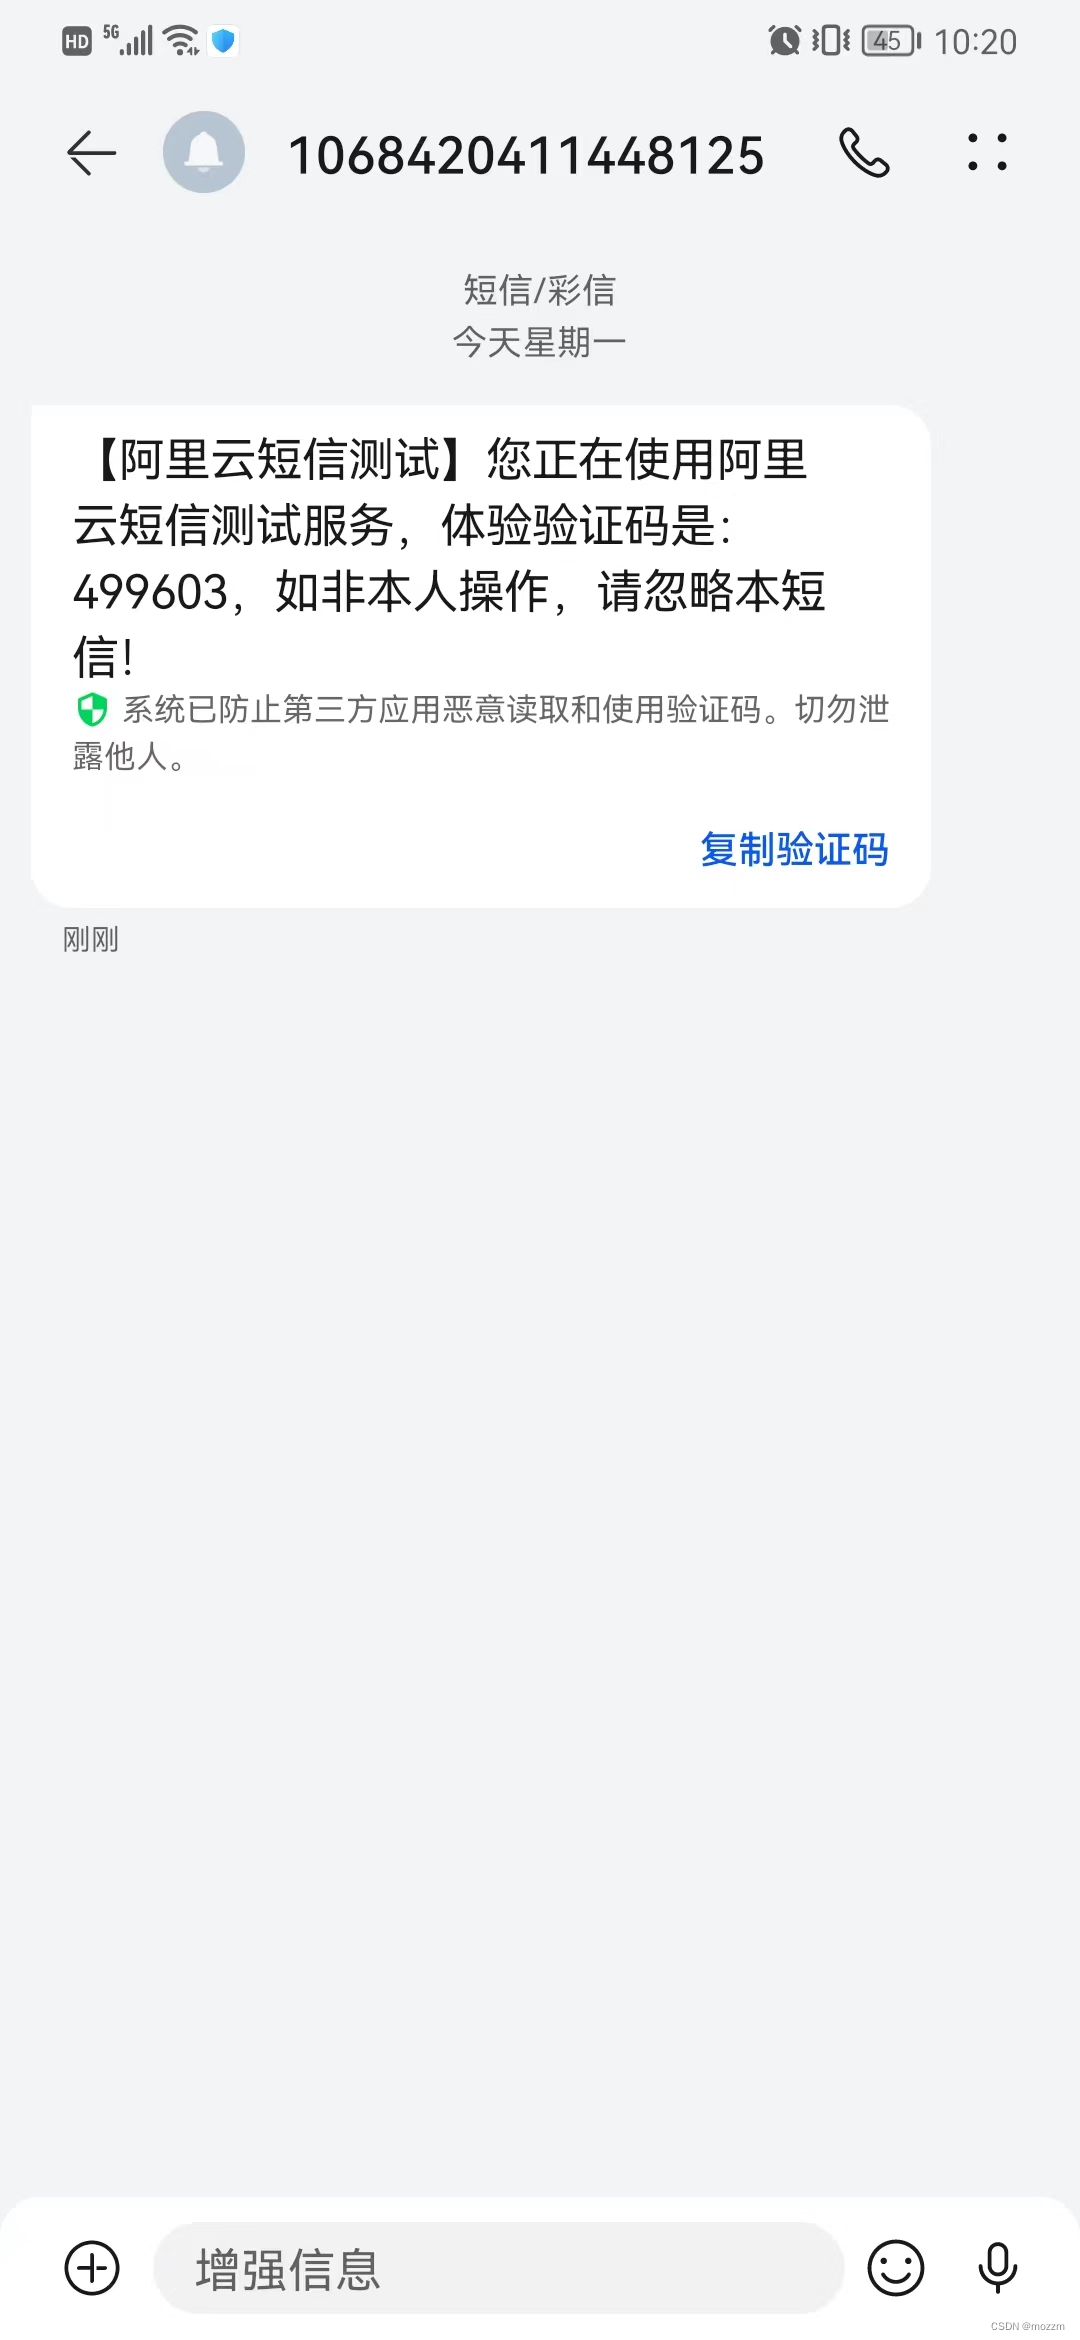
可以看到这是六位验证码,也可以改成四位验证码,在controller层里面调用getFourBitRandom方法,即发送四位验证码。

至此短信验证功能结束,后续实现完整的q前后端登陆注册短信验证功能
给定这段代码defcreate@upgrades=User.update_all(["role=?","upgraded"],:id=>params[:upgrade])redirect_toadmin_upgrades_path,:notice=>"Successfullyupgradeduser."end我如何在该操作中实际验证它们是否已保存或未重定向到适当的页面和消息? 最佳答案 在Rails3中,update_all不返回任何有意义的信息,除了已更新的记录数(这可能取决于您的DBMS是否返回该信息)。http://ar.ru
我想安装一个带有一些身份验证的私有(private)Rubygem服务器。我希望能够使用公共(public)Ubuntu服务器托管内部gem。我读到了http://docs.rubygems.org/read/chapter/18.但是那个没有身份验证-如我所见。然后我读到了https://github.com/cwninja/geminabox.但是当我使用基本身份验证(他们在他们的Wiki中有)时,它会提示从我的服务器获取源。所以。如何制作带有身份验证的私有(private)Rubygem服务器?这是不可能的吗?谢谢。编辑:Geminabox问题。我尝试“捆绑”以安装新的gem..
我希望我的UserPrice模型的属性在它们为空或不验证数值时默认为0。这些属性是tax_rate、shipping_cost和price。classCreateUserPrices8,:scale=>2t.decimal:tax_rate,:precision=>8,:scale=>2t.decimal:shipping_cost,:precision=>8,:scale=>2endendend起初,我将所有3列的:default=>0放在表格中,但我不想要这样,因为它已经填充了字段,我想使用占位符。这是我的UserPrice模型:classUserPrice回答before_val
我有一个表单,其中有很多字段取自数组(而不是模型或对象)。我如何验证这些字段的存在?solve_problem_pathdo|f|%>... 最佳答案 创建一个简单的类来包装请求参数并使用ActiveModel::Validations。#definedsomewhere,atthesimplest:require'ostruct'classSolvetrue#youcouldevencheckthesolutionwithavalidatorvalidatedoerrors.add(:base,"WRONG!!!")unlesss
我有一些非常大的模型,我必须将它们迁移到最新版本的Rails。这些模型有相当多的验证(User有大约50个验证)。是否可以将所有这些验证移动到另一个文件中?说app/models/validations/user_validations.rb。如果可以,有人可以提供示例吗? 最佳答案 您可以为此使用关注点:#app/models/validations/user_validations.rbrequire'active_support/concern'moduleUserValidationsextendActiveSupport:
当我的预订模型通过rake任务在状态机上转换时,我试图找出如何跳过对ActiveRecord对象的特定实例的验证。我想在reservation.close时跳过所有验证!叫做。希望调用reservation.close!(:validate=>false)之类的东西。仅供引用,我们正在使用https://github.com/pluginaweek/state_machine用于状态机。这是我的预订模型的示例。classReservation["requested","negotiating","approved"])}state_machine:initial=>'requested
我有一个服务模型/表及其注册表。在表单中,我几乎拥有服务的所有字段,但我想在验证服务对象之前自动设置其中一些值。示例:--服务Controller#创建Action:defcreate@service=Service.new@service_form=ServiceFormObject.new(@service)@service_form.validate(params[:service_form_object])and@service_form.saverespond_with(@service_form,location:admin_services_path)end在验证@ser
我有一个用户工厂。我希望默认情况下确认用户。但是鉴于unconfirmed特征,我不希望它们被确认。虽然我有一个基于实现细节而不是抽象的工作实现,但我想知道如何正确地做到这一点。factory:userdoafter(:create)do|user,evaluator|#unwantedimplementationdetailshereunlessFactoryGirl.factories[:user].defined_traits.map(&:name).include?(:unconfirmed)user.confirm!endendtrait:unconfirmeddoenden
这里有一个很好的答案解释了如何在Ruby中下载文件而不将其加载到内存中:https://stackoverflow.com/a/29743394/4852737require'open-uri'download=open('http://example.com/image.png')IO.copy_stream(download,'~/image.png')我如何验证下载文件的IO.copy_stream调用是否真的成功——这意味着下载的文件与我打算下载的文件完全相同,而不是下载一半的损坏文件?documentation说IO.copy_stream返回它复制的字节数,但是当我还没有下
我有用于控制用户任务的Rails5API项目,我有以下错误,但并非总是针对相同的Controller和路由。ActionController::RoutingError:uninitializedconstantApi::V1::ApiController我向您描述了一些我的项目,以更详细地解释错误。应用结构路线scopemodule:'api'donamespace:v1do#=>Loginroutesscopemodule:'login'domatch'login',to:'sessions#login',as:'login',via::postend#=>Teamroutessc