const AndroidView({
    Key key,
    @required this.viewType,
    this.onPlatformViewCreated,
    this.hitTestBehavior = PlatformViewHitTestBehavior.opaque,
    this.layoutDirection,
    this.gestureRecognizers,
    this.creationParams,
    this.creationParamsCodec,
})
public class NLayout implements PlatformView {
    private LinearLayout mLinearLayout;
    private BinaryMessenger messenger;

    NLayout(Context context, BinaryMessenger messenger, int id, Map<String, Object> params) {
        this.messenger = messenger;
        LinearLayout mLinearLayout = new LinearLayout(context);
        mLinearLayout.setBackgroundColor(Color.rgb(100, 200, 100));
        LinearLayout.LayoutParams lp = new LinearLayout.LayoutParams(900, 900);
        mLinearLayout.setLayoutParams(lp);
        this.mLinearLayout = mLinearLayout;
    }

    @Override
    public View getView() { return mLinearLayout; }

    @Override
    public void dispose() {}
}
public class NLayoutFactory extends PlatformViewFactory {
    private final BinaryMessenger messenger;

    public NLayoutFactory(BinaryMessenger messenger) {
        super(StandardMessageCodec.INSTANCE);
        this.messenger = messenger;
    }

    @Override
    public PlatformView create(Context context, int i, Object o) {
        Map<String, Object> params = (Map<String, Object>) o;
        return new NLayout(context, messenger, i, params);
    }

    public static void registerWith(PluginRegistry registry) {
        final String key = "NLayout";
        if (registry.hasPlugin(key)) return;
        PluginRegistry.Registrar registrar = registry.registrarFor(key);
        registrar.platformViewRegistry().registerViewFactory("com.ace.ace_demo01/method_layout", new NLayoutFactory(registrar.messenger()));
    }
}
NLayoutFactory.registerWith(this);
return ListView(children: <Widget>[
  Container(child: AndroidView(viewType: "com.ace.ace_demo01/method_layout"),
      color: Colors.pinkAccent, height: 400.0),
  Container(child: AndroidView(viewType: "com.ace.ace_demo01/method_layout"),
      color: Colors.greenAccent, height: 200.0)
]);
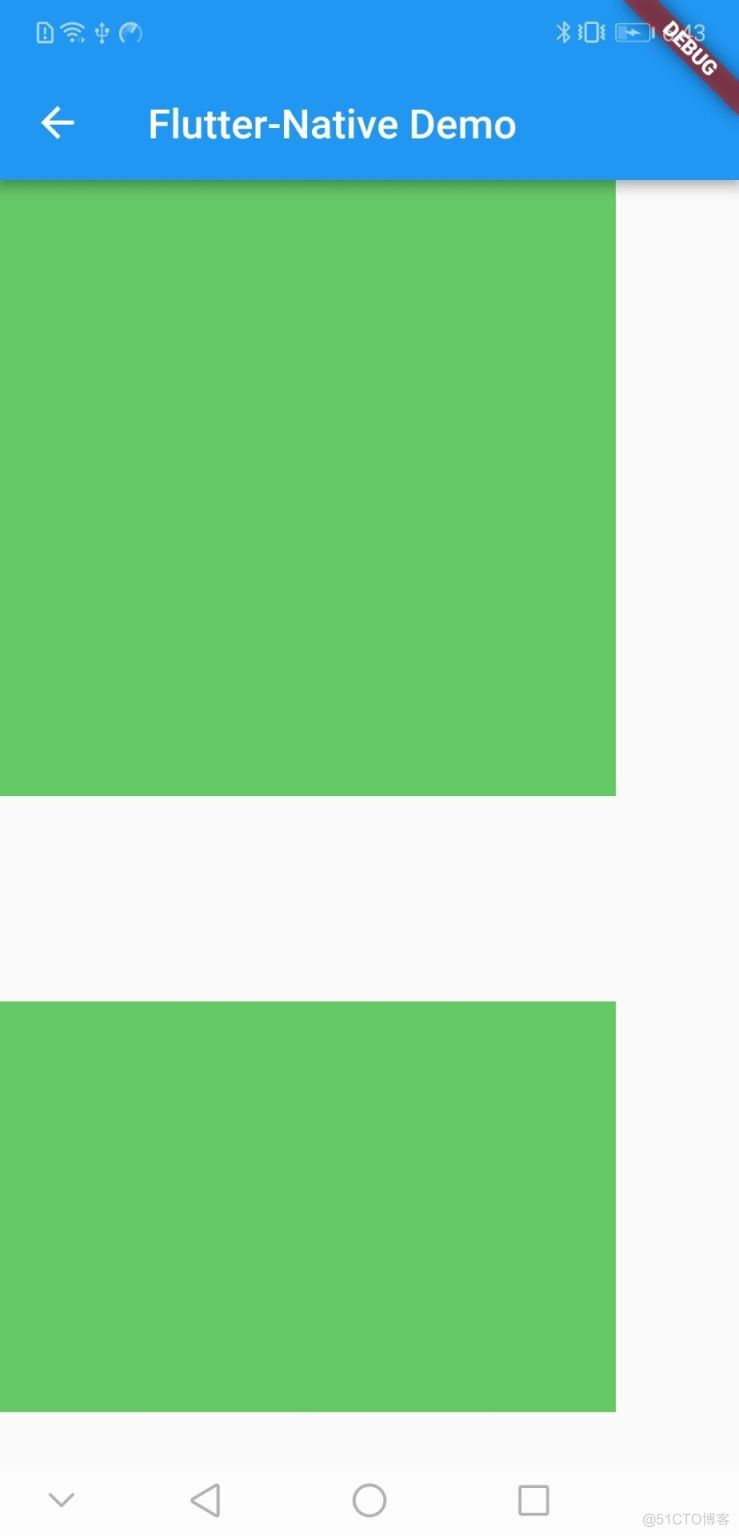
// Flutter 端 默认传递不同尺寸参数
return ListView(children: <Widget>[
  Container(child: AndroidView(viewType: "com.ace.ace_demo01/method_layout0",
          creationParamsCodec: const StandardMessageCodec(),
          creationParams: {'method_layout_size': 150}),
      color: Colors.pinkAccent,height: 400.0),
  Container(child: AndroidView(viewType: "com.ace.ace_demo01/method_layout0",
          creationParamsCodec: const StandardMessageCodec(),
          creationParams: {'method_layout_size': 450}),
      color: Colors.greenAccent,height: 200.0)
]);

// Android NLayout
public class NLayout implements PlatformView {
    private LinearLayout mLinearLayout;
    private BinaryMessenger messenger;
    private int size = 0;

    NLayout(Context context, BinaryMessenger messenger, int id, Map<String, Object> params) {
        this.messenger = messenger;
        LinearLayout mLinearLayout = new LinearLayout(context);
        mLinearLayout.setBackgroundColor(Color.rgb(100, 200, 100));
        if (params != null && params.containsKey("method_layout_size")) {
            size = Integer.parseInt(params.get("method_layout_size").toString());
        } else {
            size = 900;
        }
        LinearLayout.LayoutParams lp = new LinearLayout.LayoutParams(size,size);
        mLinearLayout.setLayoutParams(lp);
        this.mLinearLayout = mLinearLayout;
    }

    @Override
    public View getView() { return mLinearLayout; }

    @Override
    public void dispose() {}
}
// Flutter 端
return Container(height: 80.0, child: AndroidView(
      onPlatformViewCreated: (id) async {
        MethodChannel _channel = const MethodChannel('ace_method_text_view');
        _channel..invokeMethod('method_set_text', 'Method_Channel')..setMethodCallHandler((call) {
            if (call.method == 'method_click') {
              _toast('Method Text FlutterToast!', context);
            }
          });
      },
      viewType: "com.ace.ace_demo01/method_text_view",
      creationParamsCodec: const StandardMessageCodec(),
      creationParams: {'method_text_str': 'Method Channel Params!!'}));

// Android NMethodTextView
public class NMethodTextView implements PlatformView, MethodChannel.MethodCallHandler {
    private TextView mTextView;
    private MethodChannel methodChannel;
    private BinaryMessenger messenger;

    NMethodTextView(Context context, BinaryMessenger messenger, int id, Map<String, Object> params) {
        this.messenger = messenger;
        TextView mTextView = new TextView(context);
        mTextView.setText("我是来自Android的原生TextView");
        mTextView.setBackgroundColor(Color.rgb(155, 205, 155));
        mTextView.setGravity(Gravity.CENTER);
        mTextView.setTextSize(16.0f);
        if (params != null && params.containsKey("method_text_str")) {
            mTextView.setText(params.get("method_text_str").toString());
        }
        this.mTextView = mTextView;

        methodChannel = new MethodChannel(messenger, "ace_method_text_view");
        methodChannel.setMethodCallHandler(this);

        mTextView.setOnClickListener(new View.OnClickListener() {
            @Override
            public void onClick(View v) {
                methodChannel.invokeMethod("method_click", "点击!");
                Toast.makeText(context, "Method Click NativeToast!", Toast.LENGTH_SHORT).show();
            }
        });
    }

    @Override
    public void onMethodCall(MethodCall methodCall, MethodChannel.Result result) {
        if (methodCall != null && methodCall.method.toString().equals("method_set_text")) {
            mTextView.setText(methodCall.arguments.toString());
            result.success("method_set_text_success");
        }
    }

    @Override
    public View getView() { return mTextView; }

    @Override
    public void dispose() { methodChannel.setMethodCallHandler(null); }
}
// Flutter 端
return Container(height: 80.0, child: AndroidView(
      hitTestBehavior: PlatformViewHitTestBehavior.translucent,
      onPlatformViewCreated: (id) async {
        BasicMessageChannel _channel = const BasicMessageChannel('ace_basic_text_view', StringCodec());
        _channel..send("Basic_Channel")..setMessageHandler((message) {
            if (message == 'basic_text_click') {
              _toast('Basic Text FlutterToast!', context);
            }
            print('===${message.toString()}==');
          });
      },
      viewType: "com.ace.ace_demo01/basic_text_view",
      creationParamsCodec: const StandardMessageCodec(),
      creationParams: {'basic_text_str': 'Basic Channel Params!!'}));

// Android NBasicTextView
public class NBasicTextView implements PlatformView, BasicMessageChannel.MessageHandler {
    private TextView mTextView;
    private BasicMessageChannel basicMessageChannel;
    private BinaryMessenger messenger;

    NBasicTextView(Context context, BinaryMessenger messenger, int id, Map<String, Object> params) {
        this.messenger = messenger;
        TextView mTextView = new TextView(context);
        mTextView.setTextColor(Color.rgb(155, 155, 205));
        mTextView.setBackgroundColor(Color.rgb(155, 105, 155));
        mTextView.setGravity(Gravity.CENTER);
        mTextView.setTextSize(18.0f);
        if (params != null && params.containsKey("basic_text_str")) {
            mTextView.setText(params.get("basic_text_str").toString());
        }
        this.mTextView = mTextView;

        basicMessageChannel = new BasicMessageChannel(messenger, "ace_basic_text_view", StringCodec.INSTANCE);
        basicMessageChannel.setMessageHandler(this);

        mTextView.setOnClickListener(new View.OnClickListener() {
            @Override
            public void onClick(View v) {
                basicMessageChannel.send("basic_text_click");
                Toast.makeText(context, "Basic Click NativeToast!", Toast.LENGTH_SHORT).show();
            }
        });
    }

    @Override
    public View getView() { return mTextView; }

    @Override
    public void dispose() { basicMessageChannel.setMessageHandler(null); }

    @Override
    public void onMessage(Object o, BasicMessageChannel.Reply reply) {
        if (o != null){
            mTextView.setText(o.toString());
            basicMessageChannel.send("basic_set_text_success");
        }
    }
}
// Flutter 端
return Container(height: 80.0, child: AndroidView(
      hitTestBehavior: PlatformViewHitTestBehavior.opaque,
      onPlatformViewCreated: (id) async {
        EventChannel _channel = const EventChannel('ace_event_text_view');
        _channel.receiveBroadcastStream('Event_Channel').listen((message) {
          if (message == 'event_text_click') {
            _toast('Event Text FlutterToast!', context);
          }
        });
      },
      viewType: "com.ace.ace_demo01/event_text_view",
      creationParamsCodec: const StandardMessageCodec(),
      creationParams: {'event_text_str': 'Event Channel Params!!'}));

// Android EventChannel
public class NEventTextView implements PlatformView, EventChannel.StreamHandler {
    private TextView mTextView;
    private EventChannel eventChannel;
    private BinaryMessenger messenger;

    NEventTextView(Context context, BinaryMessenger messenger, int id, Map<String, Object> params) {
        this.messenger = messenger;
        TextView mTextView = new TextView(context);
        mTextView.setTextColor(Color.rgb(250, 105, 25));
        mTextView.setBackgroundColor(Color.rgb(15, 200, 155));
        mTextView.setGravity(Gravity.CENTER);
        mTextView.setPadding(10, 10, 10, 10);
        mTextView.setTextSize(20.0f);
        if (params != null && params.containsKey("event_text_str")) {
            mTextView.setText(params.get("event_text_str").toString());
        }
        this.mTextView = mTextView;

        eventChannel = new EventChannel(messenger, "ace_event_text_view");
        eventChannel.setStreamHandler(this);

        mTextView.setOnClickListener(new View.OnClickListener() {

            @Override
            public void onClick(View v) {
                Toast.makeText(context, "Event Click NativeToast!", Toast.LENGTH_SHORT).show();
            }
        });
    }

    @Override
    public View getView() { return mTextView; }

    @Override
    public void dispose() { eventChannel.setStreamHandler(null); }

    @Override
    public void onListen(Object o, EventChannel.EventSink eventSink) {
        if (o != null) {
            mTextView.setText(o.toString());
            eventSink.success("event_set_text_success");
        }
    }

    @Override
    public void onCancel(Object o) {}
}
// Flutter 端
return Container(height: 480.0,
    child: GestureDetector(
      child: AndroidView(
          gestureRecognizers: Set()..add(Factory<VerticalDragGestureRecognizer>(() => VerticalDragGestureRecognizer()))
            ..add(Factory<LongPressGestureRecognizer>(() => LongPressGestureRecognizer())),
          hitTestBehavior: PlatformViewHitTestBehavior.opaque,
          onPlatformViewCreated: (id) async {
            MethodChannel _channel = const MethodChannel('ace_method_list_view');
            _channel..invokeMethod('method_set_list', 15)..setMethodCallHandler((call) {
                if (call.method == 'method_item_click') {
                  _toast('List FlutterToast! position -> ${call.arguments}', context);
                } else if (call.method == 'method_item_long_click') {
                  _toast('List FlutterToast! -> ${call.arguments}', context);
                }
              });
          },
          viewType: "com.ace.ace_demo01/method_list_view",
          creationParamsCodec: const StandardMessageCodec(),
          creationParams: {'method_list_size': 10})));

// Android NMethodListView
public class NMethodListView implements PlatformView, MethodChannel.MethodCallHandler, ListView.OnItemClickListener, ListView.OnItemLongClickListener {

    private Context context;
    private ListView mListView;
    private MethodChannel methodChannel;
    private List<Map<String, String>> list = new ArrayList<>();
    private SimpleAdapter simpleAdapter = null;
    private int listSize = 0;

    NMethodListView(Context context, BinaryMessenger messenger, int id, Map<String, Object> params) {
        this.context = context;
        ListView mListView = new ListView(context);
        if (params != null && params.containsKey("method_list_size")) {
            listSize = Integer.parseInt(params.get("method_list_size").toString());
        }
        if (list != null) { list.clear(); }
        for (int i = 0; i < listSize; i++) {
            Map<String, String> map = new HashMap<>();
            map.put("id", "current item = " + (i + 1));
            list.add(map);
        }
        simpleAdapter = new SimpleAdapter(context, list, R.layout.list_item, new String[] { "id" }, new int[] { R.id.item_tv });
        mListView.setAdapter(simpleAdapter);
        mListView.setOnItemClickListener(this);
        mListView.setOnItemLongClickListener(this);
        this.mListView = mListView;

        methodChannel = new MethodChannel(messenger, "ace_method_list_view");
        methodChannel.setMethodCallHandler(this);
    }

    @Override
    public View getView() { return mListView; }

    @Override
    public void dispose() { methodChannel.setMethodCallHandler(null); }

    @Override
    public void onMethodCall(MethodCall methodCall, MethodChannel.Result result) {
        if (methodCall != null && methodCall.method.toString().equals("method_set_list")) {
            if (list != null) { list.clear(); }
            for (int i = 0; i < Integer.parseInt(methodCall.arguments.toString()); i++) {
                Map<String, String> map = new HashMap<>();
                map.put("id", "current item = " + (i + 1));
                list.add(map);
            }
            simpleAdapter.notifyDataSetChanged();
            result.success("method_set_list_success");
        }
    }

    @Override
    public void onItemClick(AdapterView<?> parent, View view, int position, long id) {
        methodChannel.invokeMethod("method_item_click", position);
        Toast.makeText(context, "ListView.onItemClick NativeToast! position -> " + position, Toast.LENGTH_SHORT).show();
    }

    @Override
    public boolean onItemLongClick(AdapterView<?> parent, View view, int position, long id) {
        methodChannel.invokeMethod("method_item_long_click", list.get(position).get("id"));
        Toast.makeText(context, "ListView.onItemLongClick NativeToast! " + list.get(position).get("id"), Toast.LENGTH_SHORT).show();
        return true;
    }
}
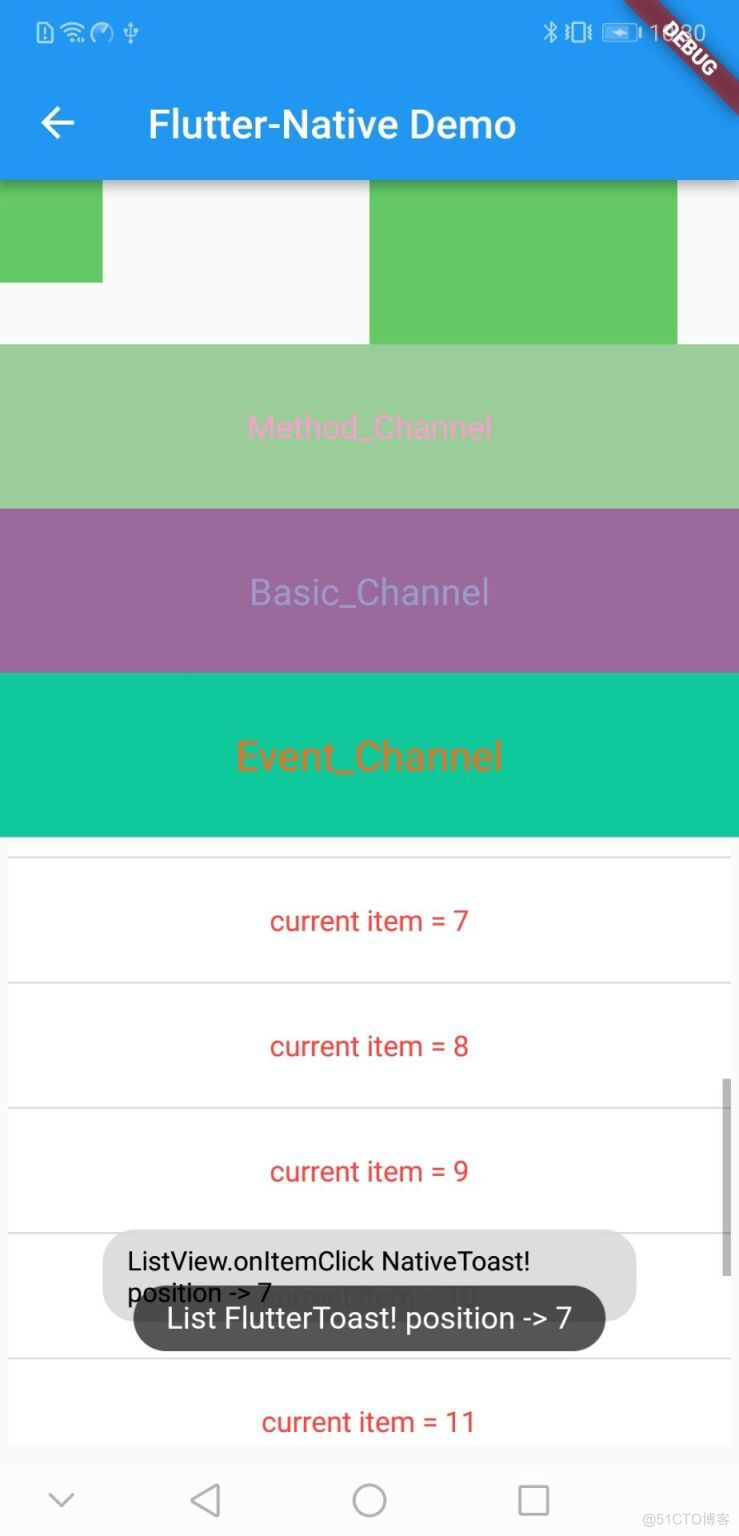
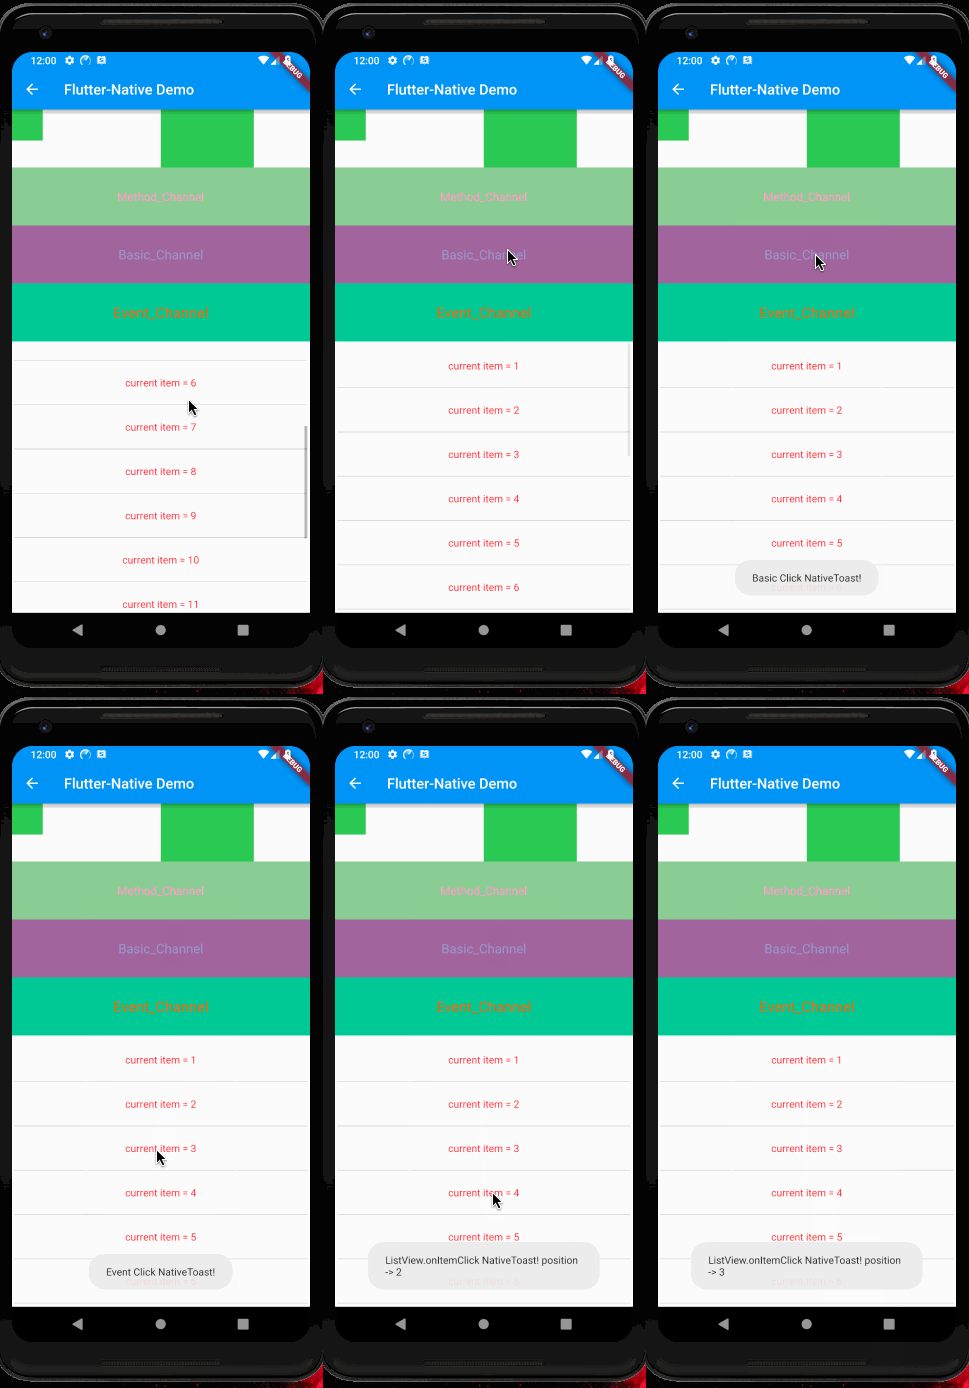
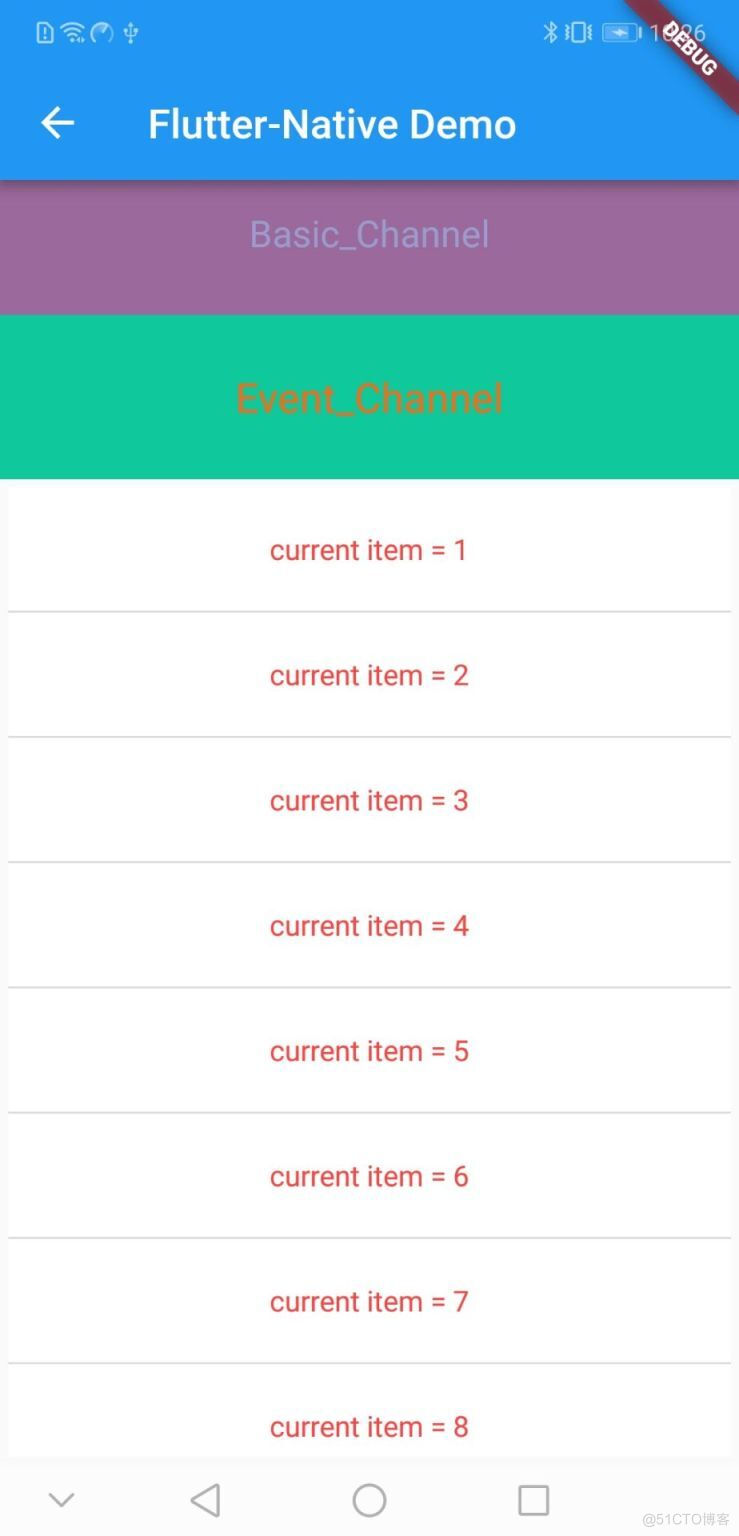 小菜在测试时,NMethodListView 设置高度超过剩余空间高度,例 Container 高度设置 500.0 可实际屏幕剩余高度只有 300.0,因 transparent 不会透传,所以 Flutter 外层 ListView 可以滑动,NMethodListView 不会滑动;使用 opaque / translucent 方式,NMethodListView 可以滑动,Flutter 外层 ListView 不能滑动,故有 200.0 高度展示不出来;
来源:阿策小和尚
我正在用Ruby编写一个简单的程序来检查域列表是否被占用。基本上它循环遍历列表,并使用以下函数进行检查。require'rubygems'require'whois'defcheck_domain(domain)c=Whois::Client.newc.query("google.com").available?end程序不断出错(即使我在google.com中进行硬编码),并打印以下消息。鉴于该程序非常简单,我已经没有什么想法了-有什么建议吗?/Library/Ruby/Gems/1.8/gems/whois-2.0.2/lib/whois/server/adapters/base.
我是Google云的新手,我正在尝试对其进行首次部署。我的第一个部署是RubyonRails项目。我基本上是在关注thisguideinthegoogleclouddocumentation.唯一的区别是我使用的是我自己的项目,而不是他们提供的“helloworld”项目。这是我的app.yaml文件runtime:customvm:trueentrypoint:bundleexecrackup-p8080-Eproductionconfig.ruresources:cpu:0.5memory_gb:1.3disk_size_gb:10当我转到我的项目目录并运行gcloudprevie
我正在关注Hartl的railstutorial.org并已到达11.4.4:Imageuploadinproduction.我做了什么:注册亚马逊网络服务在AmazonIdentityandAccessManagement中,我创建了一个用户。用户创建成功。在AmazonS3中,我创建了一个新存储桶。设置新存储桶的权限:权限:本教程指示“授予上一步创建的用户读写权限”。但是,在存储桶的“权限”下,未提及新用户名。我只能在每个人、经过身份验证的用户、日志传送、我和亚马逊似乎根据我的名字+数字创建的用户名之间进行选择。我已经通过选择经过身份验证的用户并选中了上传/删除和查看权限的框(而不
我正在尝试循环哈希数组。当我到达获取枚举器开始循环的位置时,出现以下错误:undefinedmethod`[]'fornil:NilClass我的代码如下所示:defextraireAttributs(attributsParam)classeTrouvee=falsescanTrouve=falseownerOSTrouve=falseownerAppTrouve=falseresultat=Hash.new(0)attributs=Array(attributsParam)attributs.eachdo|attribut|#CRASHESHERE!!!typeAttribut=a
我正在尝试用Ruby(Rails)编写一个正则表达式,以便用户名的字符仅包含数字和字母(也没有空格)。我有这个正则表达式,/^[a-zA-Z0-9]+$/,但它似乎没有用,我在Rails中收到一个错误,说“The如果正则表达式使用多行anchor(^或$),这可能会带来安全风险。您是要使用\A和\z,还是忘记添加:multiline=>true选项?"我的user.rb模型中此实现的完整代码是:classUser我做错了什么以及如何修复此正则表达式,使其仅对数字和字母有效而不对空格有效?谢谢。 最佳答案 简短回答:使用/\A[a-z
我有两个文本文件,master.txt和926.txt。如果926.txt中有一行不在master.txt中,我想写入一个新文件notinbook.txt。我写了我能想到的最好的东西,但考虑到我是一个糟糕的/新手程序员,它失败了。这是我的东西g=File.new("notinbook.txt","w")File.open("926.txt","r")do|f|while(line=f.gets)x=line.chompifFile.open("master.txt","w")do|h|endwhile(line=h.gets)ifline.chomp!=xputslineendende
按照目前的情况,这个问题不适合我们的问答形式。我们希望答案得到事实、引用或专业知识的支持,但这个问题可能会引发辩论、争论、投票或扩展讨论。如果您觉得这个问题可以改进并可能重新打开,visitthehelpcenter指导。关闭9年前。我尝试安装CMS时出现错误。它说Bundler::GemfileNotFound此外,当我运行bundle时,它还会显示Bundler::GemfileNotFound我该如何解决这个问题?
我使用“newapp_name”创建了一个新的Rails应用程序,我正在尝试编辑.gitignore文件,但在我的应用程序文件夹中找不到它。我在哪里可以找到它?我安装了Git。 最佳答案 .gitignore位于项目的root中,而不是app子目录中。首先打开终端并进入您的目录。您需要使用ls-a来显示stash文件。然后使用打开.gitignore 关于ruby-on-rails-尝试打开.gitignore以在文本编辑器中对其进行编辑,但在OSXMountainLion上找不到文件位
尝试从我的AngularJS端将数据发布到Rails服务器时出现问题。服务器错误:ActionController::RoutingError(Noroutematches[OPTIONS]"/users"):actionpack(4.1.9)lib/action_dispatch/middleware/debug_exceptions.rb:21:in`call'actionpack(4.1.9)lib/action_dispatch/middleware/show_exceptions.rb:30:in`call'railties(4.1.9)lib/rails/rack/logg
目录SpringBootStarter是什么?以前传统的做法使用SpringBootStarter之后starter的理念:starter的实现: 创建SpringBootStarter步骤在idea新建一个starter项目、直接执行下一步即可生成项目。 在xml中加入如下配置文件:创建proterties类来保存配置信息创建业务类:创建AutoConfiguration测试如下:SpringBootStarter是什么? SpringBootStarter是在SpringBoot组件中被提出来的一种概念、简化了很多烦琐的配置、通过引入各种SpringBootStarter包可以快速搭建出一
