在上一篇文章,我总结了一些UNet的基础知识,对UNet不了解的可以看看,文章链接:https://wanghao.blog.csdn.net/article/details/123714994
我也整理的UNet的pytorch版本,文章链接:
https://blog.csdn.net/hhhhhhhhhhwwwwwwwwww/article/details/123280059
今天这篇文章讲解如何使用UNet实现图像的二分类分割。
关于二分类一般有两种做法:
第一种输出是单通道,即网络的输出 output 为 [batch_size, 1, height, width] 形状。其中 batch_szie 为批量大小,1 表示输出一个通道,height 和 width 与输入图像的高和宽保持一致。
在训练时,输出通道数是 1,网络得到的 output 包含的数值是任意的数。给定的 target ,是一个单通道标签图,数值只有 0 和 1 这两种。为了让网络输出 output 不断逼近这个标签,首先会让 output 经过一个sigmoid 函数,使其数值归一化到[0, 1],得到 output1 ,然后让这个 output1 与 target 进行交叉熵计算,得到损失值,反向传播更新网络权重。最终,网络经过学习,会使得 output1 逼近target。
训练结束后,网络已经具备让输出的 output 经过转换从而逼近 target 的能力。首先将输出的 output 通过sigmoid 函数,然后取一个阈值(一般设置为0.5),大于阈值则取1反之则取0,从而得到预测图 predict。后续则是一些评估相关的计算。
如果网络的最后一层使用sigmoid,则选用BCELoss,如果没有则选择用BCEWithLogitsLoss,例:
最后一层没有sigmod
output = net(input)  # net的最后一层没有使用sigmoid
loss_func1 = torch.nn.BCEWithLogitsLoss()
loss = loss_func1(output, target)
加上sigmod
output = net(input)  # net的最后一层没有使用sigmoid
output = F.sigmoid(output)
loss_func1 = torch.nn.BCEWithLoss()
loss = loss_func1(output, target)
预测的时:
output = net(input)  # net的最后一层没有使用sigmoid
output = F.sigmoid(output)
predict=torch.where(output>0.5,torch.ones_like(output),torch.zeros_like(output))
第二种输出是多通道,即网络的输出 output 为 [batch_size, num_class, height, width] 形状。其中 batch_szie 为批量大小,num_class 表示输出的通道数与分类数量一致,height 和 width 与输入图像的高和宽保持一致。
在训练时,输出通道数是 num_class(这里取2)。给定的 target ,是一个单通道标签图,数值只有 0 和 1 这两种。为了让网络输出 output 不断逼近这个标签,首先会让 output 经过一个 softmax 函数,使其数值归一化到[0, 1],得到 output1 ,在各通道中,这个数值加起来会等于1。对于target 他是一个单通道图,首先使用onehot编码,转换成 num_class个通道的图像,每个通道中的取值是根据单通道中的取值计算出来的,例如单通道中的第一个像素取值为1(0<= 1 <=num_class-1,这里num_class=2),那么onehot编码后,在第一个像素的位置上,两个通道的取值分别为0,1。也就是说像素的取值决定了对应序号的通道取1,其他的通道取0,这个非常关键。上面的操作执行完后得到target1,让这个 output1 与 target1 进行交叉熵计算,得到损失值,反向传播更新网路权重。最终,网络经过学习,会使得 output1 逼近target1(在各通道层面上)。
训练结束后,网络已经具备让输出的 output 经过转换从而逼近 target 的能力。计算 output 中各通道每一个像素位置上,取值最大的那个对应的通道序号,从而得到预测图 predict。
训练选择用的loss是加插上损失函数,例:
output = net(input)  # net的最后一层没有使用sigmoid
loss_func = torch.nn.CrossEntropyLoss()
loss = loss_func(output, target)
预测时
output = net(input)  # net的最后一层没有使用sigmoid
predict = output.argmax(dim=1)
本次实战选用的第二种做法。
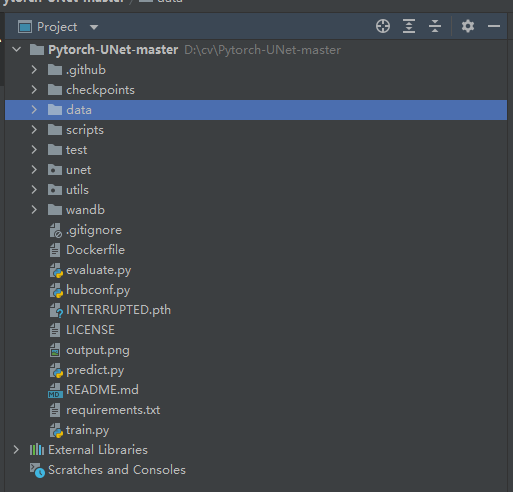
下载代码后,解压到本地,如下图:
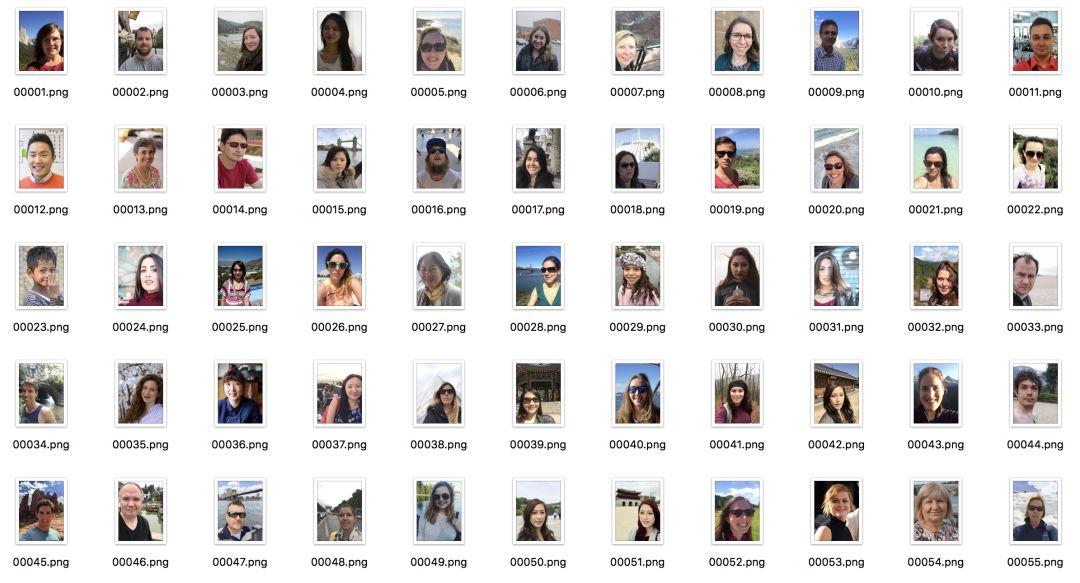
数据集地址:http://www.cse.cuhk.edu.hk/~leojia/projects/automatting/,发布于2016年。
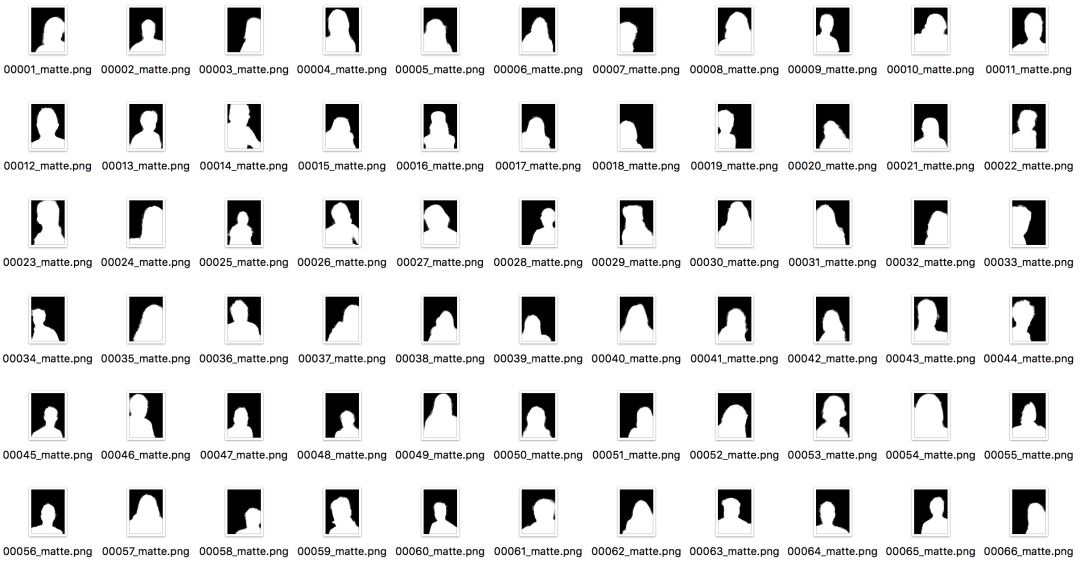
数据集包含2000张图,训练集1700张,测试集300张,数据都是来源于Flickr的肖像图,图像原始分辨率大小为600×800,其中Matting用closed-form matting和KNN matting方法生成。
由于肖像分割数据集商业价值较高,因此公开的大规模数据集很少,这个数据集是其中发布较早,使用范围也较广的一个数据集,它有几个比较重要的特点:
(1) 图像分辨率统一,拍摄清晰,质量很高。
(2) 所有图像均为上半身的肖像图,人像区域在长度和宽度均至少占据图像的2/3。
(3) 人物的姿态变化很小,都为小角度的正面图,背景较为简单。

[1] Shen X, Tao X, Gao H, et al. Deep Automatic Portrait Matting[M]// ComputerVision – ECCV 2016. Springer International Publishing, 2016:92-107.
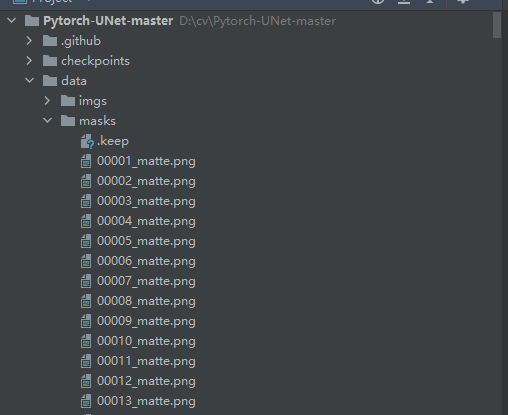
将数据集下载后放到将训练集放到data文件夹中,其中图片放到imgs文件夹中,mask放到masks文件夹中,测试集放到test文件夹下面:
由于原程序是用于Carvana Image Masking Challenge,所以我们需要修改加载数据集的逻辑,打开utils/data_loading.py文件:
class CarvanaDataset(BasicDataset):
    def __init__(self, images_dir, masks_dir, scale=1):
        super().__init__(images_dir, masks_dir, scale, mask_suffix='_matte')
将mask_suffix改为“_matte”
打开train.py,先查看全局参数:
def get_args():
    parser = argparse.ArgumentParser(description='Train the UNet on images and target masks')
    parser.add_argument('--epochs', '-e', metavar='E', type=int, default=300, help='Number of epochs')
    parser.add_argument('--batch-size', '-b', dest='batch_size', metavar='B', type=int, default=16, help='Batch size')
    parser.add_argument('--learning-rate', '-l', metavar='LR', type=float, default=0.001,
                        help='Learning rate', dest='lr')
    parser.add_argument('--load', '-f', type=str, default=False, help='Load model from a .pth file')
    parser.add_argument('--scale', '-s', type=float, default=0.5, help='Downscaling factor of the images')
    parser.add_argument('--validation', '-v', dest='val', type=float, default=10.0,
                        help='Percent of the data that is used as validation (0-100)')
    parser.add_argument('--amp', action='store_true', default=False, help='Use mixed precision')
    return parser.parse_args()
epochs:epoch的个数,一般设置为300。
batch-size:批处理的大小,根据显存的大小设置。
learning-rate:学习率,一般设置为0.001,如果优化器不同,初始的学习率也要做相应的调整。
load:加载模型的路径,如果接着上次的训练,就需要设置上次训练的权重文件路径,如果有预训练权重,则设置预训练权重的路径。
scale:放大的倍数,这里设置为0.5,把图片大小变为原来的一半。
validation:验证验证集的百分比。
amp:是否使用混合精度?
比较重要的参数是epochs、batch-size和learning-rate,可以反复调整做实验,达到最好的精度。
接下来是设置模型:
net = UNet(n_channels=3, n_classes=2, bilinear=True)
    logging.info(f'Network:\n'
                 f'\t{net.n_channels} input channels\n'
                 f'\t{net.n_classes} output channels (classes)\n'
                 f'\t{"Bilinear" if net.bilinear else "Transposed conv"} upscaling')
    if args.load:
        net.load_state_dict(torch.load(args.load, map_location=device))
        logging.info(f'Model loaded from {args.load}')
设置UNet参数,n_channels是imgs图片的通道数,如果是rgb则是3,如果是黑白图片就是1,n_classes设置为2,在这里把背景也当做一个类别,所以有两个类。
如果设置了权重文件,则加载权重文件,加载权重文件做迁移学习可以加快训练,减少迭代次数,所以如果有还是尽量加载预训练权重。
接下来修改train_net函数的逻辑。
try:
    dataset = CarvanaDataset(dir_img, dir_mask, img_scale)
except (AssertionError, RuntimeError):
    dataset = BasicDataset(dir_img, dir_mask, img_scale)

# 2. Split into train / validation partitions
n_val = int(len(dataset) * val_percent)
n_train = len(dataset) - n_val
train_set, val_set = random_split(dataset, [n_train, n_val], generator=torch.Generator().manual_seed(0))
# 3. Create data loaders
loader_args = dict(batch_size=batch_size, num_workers=4, pin_memory=True)
train_loader = DataLoader(train_set, shuffle=True, **loader_args)
val_loader = DataLoader(val_set, shuffle=False, drop_last=True, **loader_args)
1、加载数据集。
2、按照比例切分训练集和验证集。
3、将训练集和验证集放入DataLoader中。
 # (Initialize logging)
 experiment = wandb.init(project='U-Net', resume='allow', anonymous='must')
 experiment.config.update(dict(epochs=epochs, batch_size=batch_size, learning_rate=learning_rate,
                                  val_percent=val_percent, save_checkpoint=save_checkpoint, img_scale=img_scale,
                                  amp=amp))
设置wandb,wandb是一款非常好用的可视化工具。安装和使用方法见:https://blog.csdn.net/hhhhhhhhhhwwwwwwwwww/article/details/116124285。
 # 4. Set up the optimizer, the loss, the learning rate scheduler and the loss scaling for AMP
    optimizer = optim.RMSprop(net.parameters(), lr=learning_rate, weight_decay=1e-8, momentum=0.9)
    scheduler = optim.lr_scheduler.ReduceLROnPlateau(optimizer, 'max', patience=2)  # goal: maximize Dice score
    grad_scaler = torch.cuda.amp.GradScaler(enabled=amp)
    criterion = nn.CrossEntropyLoss()
    global_step = 0
1、设置优化器optimizer为RMSprop,我也尝试了改为SGD,通常情况下SGD的表现好一些。但是在训练时发现,二者最终的结果都差不多。
2、ReduceLROnPlateau学习率调整策略,和keras的类似。本次选择用的是Dice score,所以将mode设置为max,当得分不再上升时,则降低学习率。
3、设置loss为 nn.CrossEntropyLoss()。交叉熵,多分类常用的loss。
接下来是train部分的逻辑,这里需要修改的如下:
 masks_pred = net(images)
 true_masks = F.one_hot(true_masks.squeeze_(1), net.n_classes).permute(0, 3, 1, 2).float()
 print(masks_pred.shape)
 print(true_masks.shape)
masks_pred = net(images)计算出来的结果是:[batch, 2, 400, 300],其中2代表两个类别。
true_masks.shape是[batch, 1, 400, 300],所以要对true_masks做onehot处理。如果直接对true_masks做onehot处理,你会发现处理后的shape是[batch, 1, 400, 300,2],这样就和masks_pred 对不上了,所以在做onehot之前,先将第二维(也就是1这一维度)去掉,这样onehot后的shape是[batch, 400, 300,2],然后调整顺序,和masks_pred 的维度对上。
接下来就要计算loss,loss分为两部分,一部分时交叉熵,另一部分是dice_loss,这两个loss各有优势,组合使用效果更优。dice_loss在utils/dice_sorce.py文件中,代码如下:
import torch
from torch import Tensor

def dice_coeff(input: Tensor, target: Tensor, reduce_batch_first: bool = False, epsilon=1e-6):
    # Average of Dice coefficient for all batches, or for a single mask
    assert input.size() == target.size()
    if input.dim() == 2 and reduce_batch_first:
        raise ValueError(f'Dice: asked to reduce batch but got tensor without batch dimension (shape {input.shape})')
    if input.dim() == 2 or reduce_batch_first:
        inter = torch.dot(input.reshape(-1), target.reshape(-1))
        sets_sum = torch.sum(input) + torch.sum(target)
        if sets_sum.item() == 0:
            sets_sum = 2 * inter
        return (2 * inter + epsilon) / (sets_sum + epsilon)
    else:
        # compute and average metric for each batch element
        dice = 0
        for i in range(input.shape[0]):
            dice += dice_coeff(input[i, ...], target[i, ...])
        return dice / input.shape[0]

def dice_coeff_1(pred, target):
    smooth = 1.
    num = pred.size(0)
    m1 = pred.view(num, -1)  # Flatten
    m2 = target.view(num, -1)  # Flatten
    intersection = (m1 * m2).sum()
    return 1 - (2. * intersection + smooth) / (m1.sum() + m2.sum() + smooth)

def multiclass_dice_coeff(input: Tensor, target: Tensor, reduce_batch_first: bool = False, epsilon=1e-6):
    # Average of Dice coefficient for all classes
    assert input.size() == target.size()
    dice = 0
    for channel in range(input.shape[1]):
        dice += dice_coeff(input[:, channel, ...], target[:, channel, ...], reduce_batch_first, epsilon)

    return dice / input.shape[1]
def dice_loss(input: Tensor, target: Tensor, multiclass: bool = False):
    # Dice loss (objective to minimize) between 0 and 1
    assert input.size() == target.size()
    fn = multiclass_dice_coeff if multiclass else dice_coeff
    return 1 - fn(input, target, reduce_batch_first=True)
导入到train.py中,然后和交叉熵组合作为本项目的loss。
 loss = criterion(masks_pred, true_masks) \
        + dice_loss(F.softmax(masks_pred, dim=1).float(),
                                       true_masks,
                                       multiclass=True)
接下来是对evaluate函数的逻辑做修改。
 mask_true = mask_true.to(device=device, dtype=torch.long)
 mask_true = F.one_hot(mask_true.squeeze_(1), net.n_classes).permute(0, 3, 1, 2).float()
增加对mask_trued的onehot逻辑。
修改完上面的逻辑就可以开始训练了。
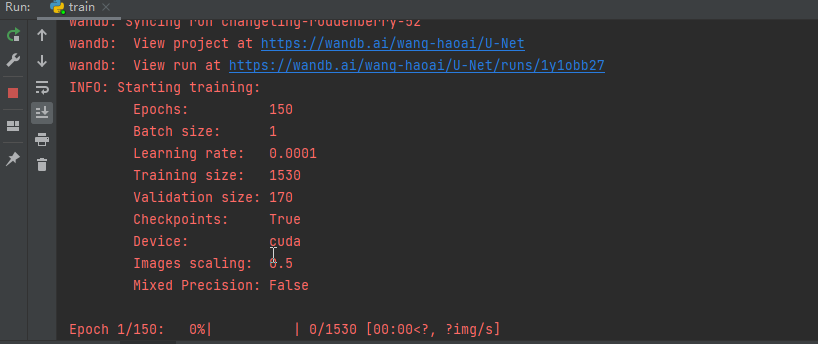
完成训练后就可以测试了。打开predict.py,修改全局参数:
def get_args():
    parser = argparse.ArgumentParser(description='Predict masks from input images')
    parser.add_argument('--model', '-m', default='checkpoints/checkpoint_epoch7.pth', metavar='FILE',
                        help='Specify the file in which the model is stored')
    parser.add_argument('--input', '-i', metavar='INPUT',default='test/00002.png', nargs='+', help='Filenames of input images')
    parser.add_argument('--output', '-o', metavar='INPUT',default='00001.png', nargs='+', help='Filenames of output images')
    parser.add_argument('--viz', '-v', action='store_true',
                        help='Visualize the images as they are processed')
    parser.add_argument('--no-save', '-n', action='store_true',default=False, help='Do not save the output masks')
    parser.add_argument('--mask-threshold', '-t', type=float, default=0.5,
                        help='Minimum probability value to consider a mask pixel white')
    parser.add_argument('--scale', '-s', type=float, default=0.5,
                        help='Scale factor for the input images')
model:设置权重文件路径。这里修改为自己训练的权重文件。
scale:0.5,和训练的参数对应上。
其他的参数,通过命令输入。
def mask_to_image(mask: np.ndarray):
    if mask.ndim == 2:
        return Image.fromarray((mask * 255).astype(np.uint8))
    elif mask.ndim == 3:
        img_np=(np.argmax(mask, axis=0) * 255 / (mask.shape[0]-1)).astype(np.uint8)
        print(img_np.shape)
        print(np.max(img_np))
        return Image.fromarray(img_np)
img_np=(np.argmax(mask, axis=0) * 255 / (mask.shape[0]-1)).astype(np.uint8)这里的逻辑需要修改。
源代码:
return Image.fromarray((np.argmax(mask, axis=0) * 255 / mask.shape[0]).astype(np.uint8))
我们增加了一类背景,所以mask.shape[0]为2,需要减去背景。
展示结果的方法也需要修改;
def plot_img_and_mask(img, mask):
    print(mask.shape)
    classes = mask.shape[0] if len(mask.shape) > 2 else 1
    fig, ax = plt.subplots(1, classes + 1)
    ax[0].set_title('Input image')
    ax[0].imshow(img)
    if classes > 1:
        for i in range(classes):
            ax[i + 1].set_title(f'Output mask (class {i + 1})')
            ax[i + 1].imshow(mask[i, :, :])
    else:
        ax[1].set_title(f'Output mask')
        ax[1].imshow(mask)
    plt.xticks([]), plt.yticks([])
    plt.show()
将原来的ax[i + 1].imshow(mask[:, :, i])改为:ax[i + 1].imshow(mask[i, :, :])。
执行命令:
python predict.py -i test/00002.png -o output.png -v
输出结果:

到这里我们已经实现将人物从背景图片中完整的抠出来了!
本文实现了用Unet对图像做分割,通过本文,你可以学习到:
1、如何使用Unet对图像对二分类的语义分割。
2、如何使用wandb可视化。
3、如何使用交叉熵和dice_loss组合。
4、如何实现二分类语义分割的预测。
完整的代码:
https://download.csdn.net/download/hhhhhhhhhhwwwwwwwwww/85083165
我正在学习如何使用Nokogiri,根据这段代码我遇到了一些问题:require'rubygems'require'mechanize'post_agent=WWW::Mechanize.newpost_page=post_agent.get('http://www.vbulletin.org/forum/showthread.php?t=230708')puts"\nabsolutepathwithtbodygivesnil"putspost_page.parser.xpath('/html/body/div/div/div/div/div/table/tbody/tr/td/div
我有一个Ruby程序,它使用rubyzip压缩XML文件的目录树。gem。我的问题是文件开始变得很重,我想提高压缩级别,因为压缩时间不是问题。我在rubyzipdocumentation中找不到一种为创建的ZIP文件指定压缩级别的方法。有人知道如何更改此设置吗?是否有另一个允许指定压缩级别的Ruby库? 最佳答案 这是我通过查看rubyzip内部创建的代码。level=Zlib::BEST_COMPRESSIONZip::ZipOutputStream.open(zip_file)do|zip|Dir.glob("**/*")d
类classAprivatedeffooputs:fooendpublicdefbarputs:barendprivatedefzimputs:zimendprotecteddefdibputs:dibendendA的实例a=A.new测试a.foorescueputs:faila.barrescueputs:faila.zimrescueputs:faila.dibrescueputs:faila.gazrescueputs:fail测试输出failbarfailfailfail.发送测试[:foo,:bar,:zim,:dib,:gaz].each{|m|a.send(m)resc
很好奇,就使用rubyonrails自动化单元测试而言,你们正在做什么?您是否创建了一个脚本来在cron中运行rake作业并将结果邮寄给您?git中的预提交Hook?只是手动调用?我完全理解测试,但想知道在错误发生之前捕获错误的最佳实践是什么。让我们理所当然地认为测试本身是完美无缺的,并且可以正常工作。下一步是什么以确保他们在正确的时间将可能有害的结果传达给您? 最佳答案 不确定您到底想听什么,但是有几个级别的自动代码库控制:在处理某项功能时,您可以使用类似autotest的内容获得关于哪些有效,哪些无效的即时反馈。要确保您的提
假设我做了一个模块如下:m=Module.newdoclassCendend三个问题:除了对m的引用之外,还有什么方法可以访问C和m中的其他内容?我可以在创建匿名模块后为其命名吗(就像我输入“module...”一样)?如何在使用完匿名模块后将其删除,使其定义的常量不再存在? 最佳答案 三个答案:是的,使用ObjectSpace.此代码使c引用你的类(class)C不引用m:c=nilObjectSpace.each_object{|obj|c=objif(Class===objandobj.name=~/::C$/)}当然这取决于
我正在尝试使用ruby和Savon来使用网络服务。测试服务为http://www.webservicex.net/WS/WSDetails.aspx?WSID=9&CATID=2require'rubygems'require'savon'client=Savon::Client.new"http://www.webservicex.net/stockquote.asmx?WSDL"client.get_quotedo|soap|soap.body={:symbol=>"AAPL"}end返回SOAP异常。检查soap信封,在我看来soap请求没有正确的命名空间。任何人都可以建议我
关闭。这个问题是opinion-based.它目前不接受答案。想要改进这个问题?更新问题,以便editingthispost可以用事实和引用来回答它.关闭4年前。Improvethisquestion我想在固定时间创建一系列低音和高音调的哔哔声。例如:在150毫秒时发出高音调的蜂鸣声在151毫秒时发出低音调的蜂鸣声200毫秒时发出低音调的蜂鸣声250毫秒的高音调蜂鸣声有没有办法在Ruby或Python中做到这一点?我真的不在乎输出编码是什么(.wav、.mp3、.ogg等等),但我确实想创建一个输出文件。
我在我的项目目录中完成了compasscreate.和compassinitrails。几个问题:我已将我的.sass文件放在public/stylesheets中。这是放置它们的正确位置吗?当我运行compasswatch时,它不会自动编译这些.sass文件。我必须手动指定文件:compasswatchpublic/stylesheets/myfile.sass等。如何让它自动运行?文件ie.css、print.css和screen.css已放在stylesheets/compiled。如何在编译后不让它们重新出现的情况下删除它们?我自己编译的.sass文件编译成compiled/t
我想将html转换为纯文本。不过,我不想只删除标签,我想智能地保留尽可能多的格式。为插入换行符标签,检测段落并格式化它们等。输入非常简单,通常是格式良好的html(不是整个文档,只是一堆内容,通常没有anchor或图像)。我可以将几个正则表达式放在一起,让我达到80%,但我认为可能有一些现有的解决方案更智能。 最佳答案 首先,不要尝试为此使用正则表达式。很有可能你会想出一个脆弱/脆弱的解决方案,它会随着HTML的变化而崩溃,或者很难管理和维护。您可以使用Nokogiri快速解析HTML并提取文本:require'nokogiri'h
我想为Heroku构建一个Rails3应用程序。他们使用Postgres作为他们的数据库,所以我通过MacPorts安装了postgres9.0。现在我需要一个postgresgem并且共识是出于性能原因你想要pggem。但是我对我得到的错误感到非常困惑当我尝试在rvm下通过geminstall安装pg时。我已经非常明确地指定了所有postgres目录的位置可以找到但仍然无法完成安装:$envARCHFLAGS='-archx86_64'geminstallpg--\--with-pg-config=/opt/local/var/db/postgresql90/defaultdb/po
