在第2.5节中,通过光线追踪的方式渲染了一个三角形,但由于速度太慢而不能直接用于实时渲染。主流方式通过光栅化的方式将图元显示到屏幕上。
在Windows上,屏幕空间坐标以左上角为(0,0)点,x轴正方向朝右,y轴正方向朝下。首先我们想要在屏幕上绘制一条线段,比较著名的时Bresenham绘直线算法,下图表达了当斜率小于1时,线段下一像素的位置。
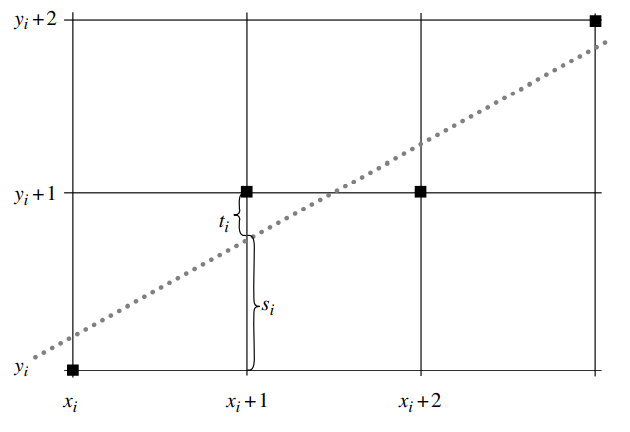
在这里定义:
 1 void CRasterizer::DrawLine(int x0, int y0, int x1, int y1, const Color &c /* = Color(1, 0, 0, 0)*/)
 2 {
 3     // start point of the line
 4     int x = x0;
 5     int y = y0;
 6
 7     // direction of line
 8     int dx = x1 - x0;
 9     int dy = y1 - y0;
10
11     // Increment or decrement on direction of line
12     int sx = 0;
13     int sy = 0;
14     if (dx > 0)
15     {
16         sx = 1;
17     }
18     else if (dx < 0)
19     {
20         sx = -1;
21         dx = -dx;
22     }
23
24     if (dy > 0)
25     {
26         sy = 1;
27     }
28     else if (dy < 0)
29     {
30         sy = -1;
31         dy = -dy;
32     }
33
34     int ax = 2 * dx;
35     int ay = 2 * dy;
36
37     if (dy <= dx)
38     {
39         // single step in x-direction
40         for (int decy = ay - dx; x += sx; decy += ay)
41         {
42             DrawPixel(x, y, c);
43             if (x == x1)
44             {
45                 break;
46             }
47             if (decy >= 0)
48             {
49                 decy -= ax;
50                 y += sy;
51             }
52         }
53     }
54     else
55     {
56         // single step in y-direction
57         for (int decx = ax - dy; y += sy; decx += ax)
58         {
59             DrawPixel(x, y, c);
60             if (y == y1)
61             {
62                 break;
63             }
64             if (decx >= 0)
65             {
66                 decx -= ay;
67                 x += sx;
68             }
69         }
70     }
71
三角形的绘制通常采用扫描线算法,即从上到下依次进行水平扫描线方向进行光栅化操作,光栅化一个三角形,首先要计算的三角形边上扫描线的起点和终点,这个些位置则可以通过上面的Bresenham算法计算获取。因为三角形是带有顶点属性的,
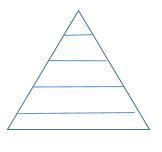
过程需要对顶点属于进行插值计算,前面章节讲到,顶点属性在屏幕空间除以z值是线性插值的,因此这里还需要进行透视校正的计算。根据三角形的位置,需要有以下四种情况进行处理,分别为上三形、下三角形、左三角形、右三角形。

 1 void CRasterizer::DrawTriangle(Vector4f p[3], Vector3f n[3], Color c[3], Vector2f t[3])
 2 {
 3     int i0 = 0;
 4     int i1 = 1;
 5     int i2 = 2;
 6     //三角形退化为线
 7     if ((FLOAT_EQUAL(p[i0].y, p[i1].y) && FLOAT_EQUAL(p[i0].y, p[i2].y)) ||
 8         (FLOAT_EQUAL(p[i0].x, p[i1].x) && FLOAT_EQUAL(p[i0].x, p[i2].x)))
 9         return;
10
11     //按y从小到大排序
12     if (p[i1].y < p[i0].y)
13     {
14         Utils::Swap(i0, i1);
15     }
16
17     if (p[i2].y < p[i1].y)
18     {
19         Utils::Swap(i2, i1);
20     }
21
22     if (p[i1].y < p[i0].y)
23     {
24         Utils::Swap(i0, i1);
25     }
26
27     if (FLOAT_EQUAL(p[i0].y, p[i1].y))//bottom triangle
28     {
29         if (p[i1].x < p[i0].x)
30         {
31             DrawEdgeBuffer(i1, i2, p, n, c, t, _pMinEdgeBuffer);
32             DrawEdgeBuffer(i0, i2, p, n, c, t, _pMaxEdgeBuffer);
33         }
34         else
35         {
36             DrawEdgeBuffer(i0, i2, p, n, c, t, _pMinEdgeBuffer);
37             DrawEdgeBuffer(i1, i2, p, n, c, t, _pMaxEdgeBuffer);
38         }
39     }
40     else if (FLOAT_EQUAL(p[i1].y, p[i2].y)) //top triangle
41     {
42         if (p[i1].x < p[i2].x)
43         {
44             DrawEdgeBuffer(i1, i0, p, n, c, t, _pMinEdgeBuffer);
45             DrawEdgeBuffer(i2, i0, p, n, c, t, _pMaxEdgeBuffer);
46         }
47         else
48         {
49             DrawEdgeBuffer(i0, i2, p, n, c, t, _pMinEdgeBuffer);
50             DrawEdgeBuffer(i0, i1, p, n, c, t, _pMaxEdgeBuffer);
51         }
52     }
53     else
54     {
55         //p1点在扫描线位置与p0p2的交点x
56         float newX = p[i0].x + (p[i2].x - p[i0].x) * (p[i1].y - p[i0].y) / (p[i2].y - p[i0].y);
57
58         if (p[i1].x < newX)
59         {
60             DrawEdgeBuffer(i0, i1, p, n, c, t, _pMinEdgeBuffer);
61             DrawEdgeBuffer(i1, i2, p, n, c, t, _pMinEdgeBuffer);
62             DrawEdgeBuffer(i0, i2, p, n, c, t, _pMaxEdgeBuffer);
63         }
64         else
65         {
66             DrawEdgeBuffer(i0, i2, p, n, c, t, _pMinEdgeBuffer);
67             DrawEdgeBuffer(i0, i1, p, n, c, t, _pMaxEdgeBuffer);
68             DrawEdgeBuffer(i1, i2, p, n, c, t, _pMaxEdgeBuffer);
69         }
70     }
71
72
73     int yMin =  MAX((int)p[i0].y, 0);
74     int yMax = MIN((int)p[i2].y, _bufferHeight - 1);
75     for (int y = yMin; y <= yMax; ++y)
76     {
77         EdgeBuffer &minEdge = _pMinEdgeBuffer[y];
78         EdgeBuffer &maxEdge = _pMaxEdgeBuffer[y];
79
80         unsigned int offset = (unsigned int)(MAX(minEdge.X, 0) + (y - 1) * _bufferWidth);
81         unsigned int *addr = (unsigned int *)_pDrawBuffer + offset;
82         if (_pDepthBuffer)
83         {
84             float *zbuffer = _pDepthBuffer + offset;
85             if (_pSamplers)
86             {
87                 FillColor(addr, zbuffer, minEdge, maxEdge);
88             }
89             else
90             {
91                 FillColor(addr, zbuffer, minEdge, maxEdge);
92             }
93         }
94         else
95         {
96             FillColor(addr, nullptr, minEdge, maxEdge);
97         }
98     }
99 }
上述代码是光栅化三角形的入口代码,首先对三个顶点进行y值从小到大的排序,然后区分三角形的几种情况记录边的数据,最后从最小到最大的执行扫描线算法。DrawEdgeBuffer函数如下,利用顶点中的w值(储存了世界坐标的z)进行透视校正并计算边的顶点属性。
  1 void CRasterizer::DrawEdgeBuffer(int i0, int i1, Vector4f p[3], Vector3f n[3], Color c[3], Vector2f t[3], EdgeBuffer *edgeBuffer)
  2 {
  3     int x0 = p[i0].x;
  4     int x1 = p[i1].x;
  5     int y0 = p[i0].y;
  6     int y1 = p[i1].y;
  7     float invz0 = p[i0].z;
  8     float invz1 = p[i1].z;
  9     float invw0 = 1.f / p[i0].w;
 10     float invw1 = 1.f / p[i1].w;
 11
 12     // start point of the line
 13     int x = x0;
 14     int y = y0;
 15
 16     // direction of line
 17     int dx = x1 - x0;
 18     int dy = y1 - y0;
 19
 20     // Increment or decrement on direction of line
 21     int sx = 0;
 22     int sy = 0;
 23     if (dx > 0)
 24     {
 25         sx = 1;
 26     }
 27     else if (dx < 0)
 28     {
 29         sx = -1;
 30         dx = -dx;
 31     }
 32
 33     if (dy > 0)
 34     {
 35         sy = 1;
 36     }
 37     else if (dy < 0)
 38     {
 39         sy = -1;
 40         dy = -dy;
 41     }
 42
 43     int ax = 2 * dx;
 44     int ay = 2 * dy;
 45
 46
 47     float dx01 = (p[i1].x - p[i0].x) / (p[i1].y - p[i0].y);
 48     float rate = sqrt(1 + dx01 * dx01);
 49
 50     float invDis = Utils::InvSqrt(dx * dx + dy * dy);
 51     float invdz = (invz1 - invz0) * invDis * rate;
 52     float invdw = (invw1 - invw0) * invDis * rate;
 53     float decz = invz0;
 54     float decw = invw0;
 55
 56     Vector3f dn;
 57     Vector3f decn;
 58     Vector2f dt;
 59     Vector2f dect;
 60     Color dc;
 61     Color decc;
 62
 63     if (n)
 64     {
 65         dn = (n[i1] * invw1 - n[i0] * invw0) * invDis * rate;
 66         decn  = n[i0] * invw0;
 67     }
 68     if (t)
 69     {
 70         dt.x = (t[i1].x * invw1 - t[i0].x * invw0) / dx;
 71         dt.y = (t[i1].y * invw1 - t[i0].y * invw0) / dy;
 72         dect = t[i0] * invw0;
 73     }
 74
 75     if (c)
 76     {
 77         dc = (c[i1] * invw1 - c[i0] * invw0) * invDis * rate;
 78         decc =  c[i0] * invw0;
 79     }
 80
 81     if (dy <= dx)
 82     {
 83         // single step in x-direction
 84         for (int decy = ay - dx; ;x += sx, decy += ay)
 85         {
 86             edgeBuffer[y].X = x;
 87             if (n)
 88             {
 89                 edgeBuffer[y].Normal = decn;
 90             }
 91
 92             if (t)
 93             {
 94                 edgeBuffer[y].TexCoords = dect;
 95             }
 96
 97             if (c)
 98             {
 99                 edgeBuffer[y].Color = decc;
100             }
101
102             edgeBuffer[y].InvZ = decz;
103             edgeBuffer[y].InvW = decw;
104
105             if (x == x1)
106             {
107                 break;
108             }
109
110             if (decy >= 0)
111             {
112                 if (n)
113                 {
114                     decn = decn + dn;
115                 }
116
117                 if (t)
118                 {
119                     dect.x += dt.x;
120                     dect.y += dt.y;
121                 }
122
123                 if (c)
124                 {
125                     decc = decc + dc;
126                 }
127
128                 decz += invdz;
129                 decw += invdw;
130
131                 decy -= ax;
132                 y += sy;
133             }
134             else
135             {
136                 if (t)
137                 {
138                     dect.x += dt.x;
139                 }
140             }
141         }
142     }
143     else
144     {
145         // single step in y-direction
146         for (int decx = ax - dy; ;y += sy, decx += ax)
147         {
148             edgeBuffer[y].X = x;
149
150             if (n)
151             {
152                 edgeBuffer[y].Normal = decn;
153             }
154
155             if (t)
156             {
157                 edgeBuffer[y].TexCoords = dect;
158             }
159
160             if (c)
161             {
162                 edgeBuffer[y].Color = decc;
163             }
164
165             edgeBuffer[y].InvZ = decz;
166             edgeBuffer[y].InvW = decw;
167
168             if (y == y1)
169             {
170                 break;
171             }
172
173             if (n)
174             {
175                 decn = decn + dn;
176             }
177
178             if (t)
179             {
180                 dect.y += dt.y;
181             }
182
183             if (c)
184             {
185                 decc = decc + dc;
186             }
187
188             decz += invdz;
189             decw += invdw;
190
191             if (decx >= 0)
192             {
193                 decx -= ay;
194                 x += sx;
195                 if (t)
196                 {
197                     dect.x += dt.x;
198                 }
199             }
200         }
201     }
202 }
最后利用FillColor填充扫描线颜色时,同样要进行透视校正,当计算出当前像素处的顶点属性插值后,将其传入给FragmentShader处理程序:
void CRasterizer::FillColor(unsigned int *addr, float *zbuffer, const EdgeBuffer &minEdge, const EdgeBuffer &maxEdge)
{
    int count = maxEdge.X - minEdge.X;
    if (count < 0)
        count = -count;
    int x = minEdge.X;
    float invcount = 1.f / count;
    float dz = (maxEdge.InvZ - minEdge.InvZ) * invcount;
    float invz = minEdge.InvZ;
    float dw = (maxEdge.InvW - minEdge.InvW) * invcount;
    float invw = minEdge.InvW;
    Color dc = (maxEdge.Color - minEdge.Color) * invcount;
    Color c = minEdge.Color;
    Vector2f dt = (maxEdge.TexCoords - minEdge.TexCoords) * invcount;
    Vector2f t = minEdge.TexCoords;


    float realz;

    for (int i = 0; i < count; ++i)
    {
        if ((x >= 0) && (invz < *zbuffer) && (invz >= -1 && invz <= 1))
        {
            realz = 1.f / invw;
            // color + uv
            static float datas[4 + 2];
            Color &color = *((Color *)datas);
            color.a = c.a * realz;
            color.r = c.r * realz;
            color.g = c.g * realz;
            color.b = c.b * realz;
            Vector2f &texCoord = *(Vector2f *)(&color + 1);
            texCoord.x = t.x * realz;
            texCoord.y = t.y * realz;
            // fragment shader
            auto result = _OnFProgram(_pGlobalUniforms, _pUniforms, _pSamplers, datas);
            *addr = result.Get32BitColor();
            *zbuffer = invz;
        }

        x += 1;

        if (x >= _bufferWidth)
            break;

        invz += dz;
        invw += dw;
        c.a += dc.a;
        c.r += dc.r;
        c.g += dc.g;
        c.b += dc.b;
        t.x = t.x + dt.x;
        t.y = t.y + dt.y;

        if (x >= 0)
        {
            ++zbuffer;
            ++addr;
        }
    }
}
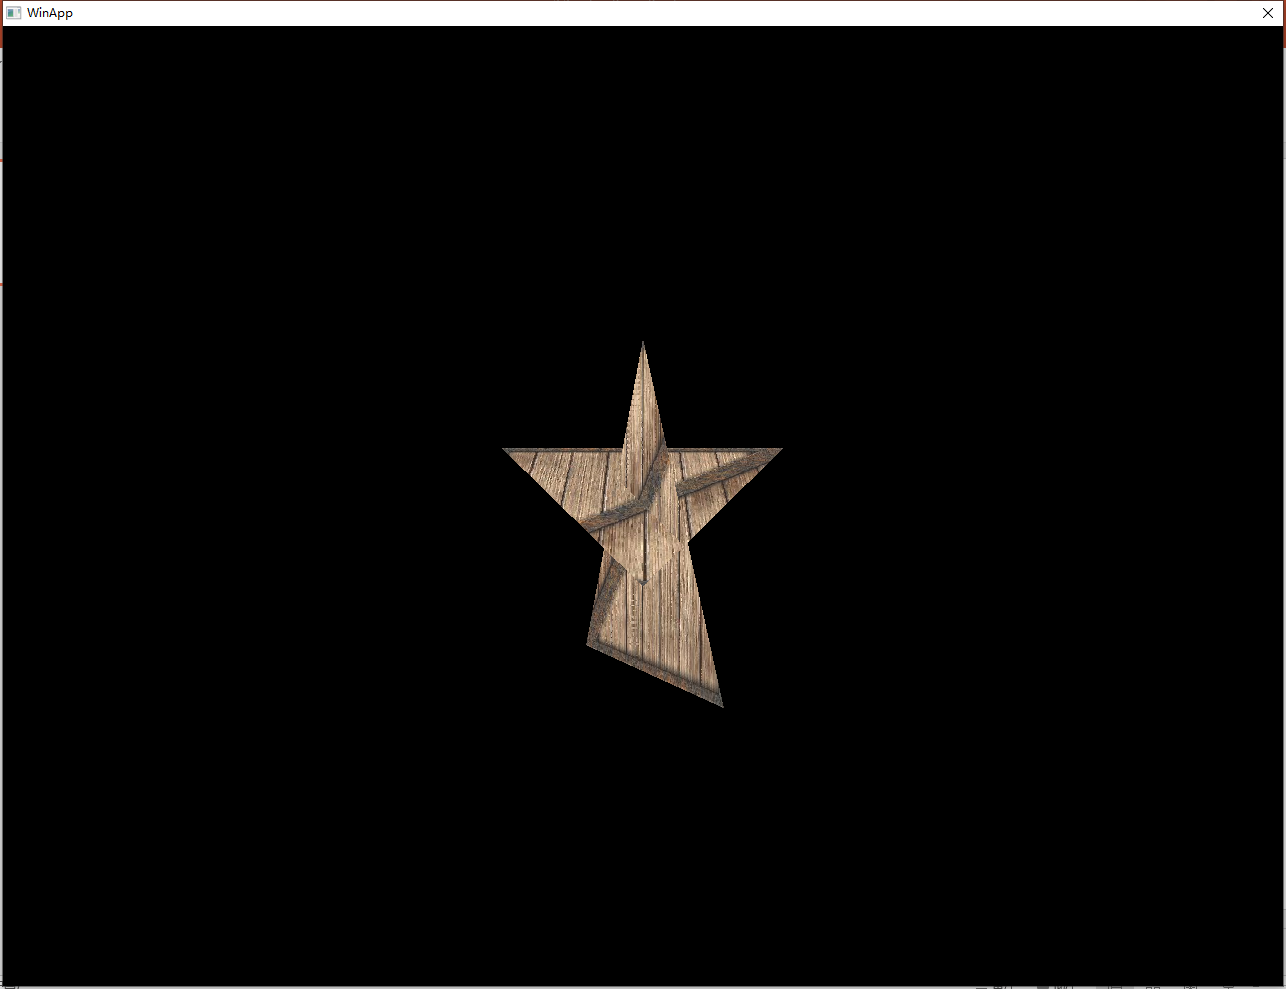
下图为光栅化后的两个三角形效果,光栅化三角形时,也可以采用不记录边的方式,将左、右三角形分割为上三角形和下角形,再执行扫描线算法,这种方式省去了储存边的空间,具体代码也上传至了Github上。
我正在编写一个包含C扩展的gem。通常当我写一个gem时,我会遵循TDD的过程,我会写一个失败的规范,然后处理代码直到它通过,等等......在“ext/mygem/mygem.c”中我的C扩展和在gemspec的“扩展”中配置的有效extconf.rb,如何运行我的规范并仍然加载我的C扩展?当我更改C代码时,我需要采取哪些步骤来重新编译代码?这可能是个愚蠢的问题,但是从我的gem的开发源代码树中输入“bundleinstall”不会构建任何native扩展。当我手动运行rubyext/mygem/extconf.rb时,我确实得到了一个Makefile(在整个项目的根目录中),然后当
我已经在Sinatra上创建了应用程序,它代表了一个简单的API。我想在生产和开发上进行部署。我想在部署时选择,是开发还是生产,一些方法的逻辑应该改变,这取决于部署类型。是否有任何想法,如何完成以及解决此问题的一些示例。例子:我有代码get'/api/test'doreturn"Itisdev"end但是在部署到生产环境之后我想在运行/api/test之后看到ItisPROD如何实现? 最佳答案 根据SinatraDocumentation:EnvironmentscanbesetthroughtheRACK_ENVenvironm
我们的git存储库中目前有一个Gemfile。但是,有一个gem我只在我的环境中本地使用(我的团队不使用它)。为了使用它,我必须将它添加到我们的Gemfile中,但每次我checkout到我们的master/dev主分支时,由于与跟踪的gemfile冲突,我必须删除它。我想要的是类似Gemfile.local的东西,它将继承从Gemfile导入的gems,但也允许在那里导入新的gems以供使用只有我的机器。此文件将在.gitignore中被忽略。这可能吗? 最佳答案 设置BUNDLE_GEMFILE环境变量:BUNDLE_GEMFI
这似乎非常适得其反,因为太多的gem会在window上破裂。我一直在处理很多mysql和ruby-mysqlgem问题(gem本身发生段错误,一个名为UnixSocket的类显然在Windows机器上不能正常工作,等等)。我只是在浪费时间吗?我应该转向不同的脚本语言吗? 最佳答案 我在Windows上使用Ruby的经验很少,但是当我开始使用Ruby时,我是在Windows上,我的总体印象是它不是Windows原生系统。因此,在主要使用Windows多年之后,开始使用Ruby促使我切换回原来的系统Unix,这次是Linux。Rub
我正在玩HTML5视频并且在ERB中有以下片段:mp4视频从在我的开发环境中运行的服务器很好地流式传输到chrome。然而firefox显示带有海报图像的视频播放器,但带有一个大X。问题似乎是mongrel不确定ogv扩展的mime类型,并且只返回text/plain,如curl所示:$curl-Ihttp://0.0.0.0:3000/pr6.ogvHTTP/1.1200OKConnection:closeDate:Mon,19Apr201012:33:50GMTLast-Modified:Sun,18Apr201012:46:07GMTContent-Type:text/plain
无论您是想搭建桌面端、WEB端或者移动端APP应用,HOOPSPlatform组件都可以为您提供弹性的3D集成架构,同时,由工业领域3D技术专家组成的HOOPS技术团队也能为您提供技术支持服务。如果您的客户期望有一种在多个平台(桌面/WEB/APP,而且某些客户端是“瘦”客户端)快速、方便地将数据接入到3D应用系统的解决方案,并且当访问数据时,在各个平台上的性能和用户体验保持一致,HOOPSPlatform将帮助您完成。利用HOOPSPlatform,您可以开发在任何环境下的3D基础应用架构。HOOPSPlatform可以帮您打造3D创新型产品,HOOPSSDK包含的技术有:快速且准确的CAD
在应用开发中,有时候我们需要获取系统的设备信息,用于数据上报和行为分析。那在鸿蒙系统中,我们应该怎么去获取设备的系统信息呢,比如说获取手机的系统版本号、手机的制造商、手机型号等数据。1、获取方式这里分为两种情况,一种是设备信息的获取,一种是系统信息的获取。1.1、获取设备信息获取设备信息,鸿蒙的SDK包为我们提供了DeviceInfo类,通过该类的一些静态方法,可以获取设备信息,DeviceInfo类的包路径为:ohos.system.DeviceInfo.具体的方法如下:ModifierandTypeMethodDescriptionstatic StringgetAbiList()Obt
这篇文章是继上一篇文章“Observability:从零开始创建Java微服务并监控它(一)”的续篇。在上一篇文章中,我们讲述了如何创建一个Javaweb应用,并使用Filebeat来收集应用所生成的日志。在今天的文章中,我来详述如何收集应用的指标,使用APM来监控应用并监督web服务的在线情况。源码可以在地址 https://github.com/liu-xiao-guo/java_observability 进行下载。摄入指标指标被视为可以随时更改的时间点值。当前请求的数量可以改变任何毫秒。你可能有1000个请求的峰值,然后一切都回到一个请求。这也意味着这些指标可能不准确,你还想提取最小/
@作者:SYFStrive @博客首页:HomePage📜:微信小程序📌:个人社区(欢迎大佬们加入)👉:社区链接🔗📌:觉得文章不错可以点点关注👉:专栏连接🔗💃:感谢支持,学累了可以先看小段由小胖给大家带来的街舞👉微信小程序(🔥)目录自定义组件-behaviors 1、什么是behaviors 2、behaviors的工作方式 3、创建behavior 4、导入并使用behavior 5、behavior中所有可用的节点 6、同名字段的覆盖和组合规则总结最后自定义组件-behaviors 1、什么是behaviorsbehaviors是小程序中,用于实现
了解Rails缓存如何工作的人可以真正帮助我。这是嵌套在Rails::Initializer.runblock中的代码:config.after_initializedoSomeClass.const_set'SOME_CONST','SOME_VAL'end现在,如果我运行script/server并发出请求,一切都很好。然而,在我的Rails应用程序的第二个请求中,一切都因单元化常量错误而变得糟糕。在生产模式下,我可以成功发出第二个请求,这意味着常量仍然存在。我已通过将以上内容更改为以下内容来解决问题:config.after_initializedorequire'some_cl