作者简介:在校大学生一枚,华为云享专家,阿里云星级博主,腾云先锋(TDP)成员,云曦智划项目总负责人,全国高等学校计算机教学与产业实践资源建设专家委员会(TIPCC)志愿者,以及编程爱好者,期待和大家一起学习,一起进步~ . 博客主页:ぃ灵彧が的学习日志 . 本文专栏:机器学习 . 专栏寄语:若你决定灿烂,山无遮,海无拦 .(文章目录)

import paddle
import paddle as P
from paddle import ParamAttr
import paddle.nn as nn
import paddle.nn.functional as F
from paddle.nn import Conv2D, BatchNorm, Linear, Dropout, AdaptiveAvgPool2D, MaxPool2D, AvgPool2D
import numpy as np
import PIL
from sklearn.neighbors import KNeighborsRegressor
import os
from skimage import io
from skimage.color import rgb2lab, lab2rgb
from skimage.transform import resize
import matplotlib.pyplot as plt
import math

place = P.CUDAPlace(0)
P.disable_static(place)
image_style = '/home/aistudio/work/风格图像/'
print('风格图像:')
plt.imshow(io.imread(image_style+'虚空夜月.jpg'))
plt.show()

image_content = '/home/aistudio/work/浮光楼阁.png'
print('内容图像:')
plt.imshow(io.imread(image_content))
plt.show()

edge_size = 1
k = 4
L_train = []
ab_train = []
for file in os.listdir(image_style):
    L0, ab0, _, _ = create_dataset(image_style+file)
    L_train.extend(L0)
    ab_train.extend(ab0)

knnr = KNeighborsRegressor(n_neighbors=k, weights='distance')
knnr.fit(L_train, ab_train)
L_train = []
ab_train = []
for file in os.listdir(image_style):
    L0, ab0, _, _ = create_dataset(image_style+file)
    L_train.extend(L0)
    ab_train.extend(ab0)

knnr = KNeighborsRegressor(n_neighbors=k, weights='distance')
knnr.fit(L_train, ab_train)
def rebuild(image_content):
    L, _, row, col = create_dataset(image_content)
    ab = knnr.predict(L).reshape([row-2*edge_size, col-2*edge_size, -1])
    Lab = np.zeros([row, col, 3])
    Lab[:,:,0] = rgb2lab(io.imread(image_content))[:,:,0]
    for x in range(edge_size, row-edge_size):
        for y in range(edge_size, col-edge_size):
            Lab[x, y, 1] = ab[x-edge_size, y-edge_size, 0]
            Lab[x, y, 2] = ab[x-edge_size, y-edge_size, 1]
    return Lab
import paddle
import paddle as P
from paddle import ParamAttr
import paddle.nn as nn
import paddle.nn.functional as F
from paddle.nn import Conv2D, BatchNorm, Linear, Dropout, AdaptiveAvgPool2D, MaxPool2D, AvgPool2D
import numpy as np
import PIL
from sklearn.neighbors import KNeighborsRegressor
import os
from skimage import io
from skimage.color import rgb2lab, lab2rgb
from skimage.transform import resize
import matplotlib.pyplot as plt
import math

# place = P.CUDAPlace(0)
# P.disable_static(place)

means = np.array([0.485, 0.456, 0.406])

image_style = io.imread('/home/aistudio/work/风格图像/虚空夜月.jpg')
image_style = resize(image_style, (384,512))
image_style = (image_style - means) * 255

image_content = io.imread('/home/aistudio/work/浮光楼阁.png')
sz = image_content.shape[:2]
image_content = resize(image_content, (384,512))
image_content = (image_content - means) * 255

image_transfer = 0.3*image_content + 0.7*np.random.randint(-20, 20, (image_content.shape[0],image_content.shape[1],image_content.shape[2]))
print('初始化的迁移图像:')
plt.imshow(PIL.Image.fromarray(np.uint8(image_transfer/255+means)))
plt.show()
image_transfer = P.to_tensor(image_transfer[:,:,:,None].transpose([3,2,0,1]).astype('float32'), stop_gradient=False)
class ConvBlock(nn.Layer):
    def __init__(self, input_channels, output_channels, groups, name=None):
        super(ConvBlock, self).__init__()

        self.groups = groups
        self._conv_1 = Conv2D(
            in_channels=input_channels,
            out_channels=output_channels,
            kernel_size=3,
            stride=1,
            padding=1,
            weight_attr=ParamAttr(name=name + "1_weights"),
            bias_attr=False)
        if groups == 2 or groups == 3 or groups == 4:
            self._conv_2 = Conv2D(
                in_channels=output_channels,
                out_channels=output_channels,
                kernel_size=3,
                stride=1,
                padding=1,
                weight_attr=ParamAttr(name=name + "2_weights"),
                bias_attr=False)
        if groups == 3 or groups == 4:
            self._conv_3 = Conv2D(
                in_channels=output_channels,
                out_channels=output_channels,
                kernel_size=3,
                stride=1,
                padding=1,
                weight_attr=ParamAttr(name=name + "3_weights"),
                bias_attr=False)
        if groups == 4:
            self._conv_4 = Conv2D(
                in_channels=output_channels,
                out_channels=output_channels,
                kernel_size=3,
                stride=1,
                padding=1,
                weight_attr=ParamAttr(name=name + "4_weights"),
                bias_attr=False)

        # self._pool = MaxPool2D(kernel_size=2, stride=2, padding=0)
        self._pool = AvgPool2D(kernel_size=2, stride=2, padding=0)

    def forward(self, inputs):
        conv1 = self._conv_1(inputs)
        x = F.relu(conv1)
        if self.groups == 2 or self.groups == 3 or self.groups == 4:
            conv2 = self._conv_2(x)
            x = F.relu(conv2)
        if self.groups == 3 or self.groups == 4:
            x = self._conv_3(x)
            x = F.relu(x)
        if self.groups == 4:
            x = self._conv_4(x)
            x = F.relu(x)
        x = self._pool(x)
        return x, conv1, conv2
def forward(self, inputs):
        conv1 = self._conv_1(inputs)
        x = F.relu(conv1)
        if self.groups == 2 or self.groups == 3 or self.groups == 4:
            conv2 = self._conv_2(x)
            x = F.relu(conv2)
        if self.groups == 3 or self.groups == 4:
            x = self._conv_3(x)
            x = F.relu(x)
        if self.groups == 4:
            x = self._conv_4(x)
            x = F.relu(x)
        x = self._pool(x)
        return x, conv1, conv2
class VGGNet(nn.Layer):
    def __init__(self):
        super(VGGNet, self).__init__()
        self.groups = [2, 2, 4, 4, 4]
        self._conv_block_1 = ConvBlock(3, 64, self.groups[0], name="conv1_")
        self._conv_block_2 = ConvBlock(64, 128, self.groups[1], name="conv2_")
        self._conv_block_3 = ConvBlock(128, 256, self.groups[2], name="conv3_")
        self._conv_block_4 = ConvBlock(256, 512, self.groups[3], name="conv4_")
        self._conv_block_5 = ConvBlock(512, 512, self.groups[4], name="conv5_")

    def forward(self, inputs):
        x, conv1_1, _ = self._conv_block_1(inputs)
        x, conv2_1, _ = self._conv_block_2(x)
        x, conv3_1, _ = self._conv_block_3(x)
        x, conv4_1, conv4_2 = self._conv_block_4(x)
        _, conv5_1, _ = self._conv_block_5(x)
        return conv4_2, conv1_1, conv2_1, conv3_1, conv4_1, conv5_1
vgg19 = VGGNet()
vgg19.set_state_dict(P.load('/home/aistudio/work/vgg19_ww.pdparams'))
vgg19.eval()
def contentloss(content, transfer):
    return 0.5 * P.sum((content - transfer)**2)
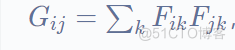 其中i、j是特征图通道的编号,k是展平后特征图的长度,也就是展平前的长x宽。
def gram(feature):
    _, c, h, w = feature.shape
    feature = feature.reshape([c,h*w])
    return P.matmul(feature, feature.transpose([1,0]))
 其中w为conv1_1, conv2_1, conv3_1, conv4_1, conv5_1层的权重。
def styleloss(style, transfer, weight):
    loss = 0
    for i in range(len(style)):
        gram_style = gram(style[i])
        gram_transfer = gram(transfer[i])
        _, c, h, w = style[i].shape
        loss += weight[i] * P.sum((gram_style - gram_transfer)**2) / (2*c*h*w)**2
    return loss
def adam(image_transfer, m, v, g, t, η, β1=0.9, β2=0.999, ε=1e-8):
    m = β1*m + (1-β1)*g
    v = β2*v + (1-β2)*g**2
    m_hat = m / (1 - β1**t)
    v_hat = v / (1 - β2**t)
    image_transfer -= η*m_hat / (P.sqrt(v_hat) + ε)
    return image_transfer, m, v
def trainer(image_transfer, m, v, net, features_content, features_style, t, η):
    features_transfer = net(image_transfer)
    loss_content = contentloss(features_content[0], features_transfer[0])
    weight_style = [0.5,1.0,1.5,3.0,4.0]
    loss_style = styleloss(features_style[1:], features_transfer[1:], weight_style)
    loss = 1e0*loss_content + 1e3*loss_style
    net.clear_gradients()
    gradients = P.grad(loss, image_transfer)[0]
    m,v=0,0
    image_transfer, m, v = adam(image_transfer, m, v, gradients, t, η)
    return image_transfer, m, v
def train(image_transfer, net, epoch_num):
features_content = net(P.to_tensor(image_content[:,:,:,None].transpose([3,2,0,1]).astype('float32')))
features_style = net(P.to_tensor(image_style[:,:,:,None].transpose([3,2,0,1]).astype('float32')))
m = P.zeros_like(image_transfer)
v = P.zeros_like(image_transfer)
for epoch in range(epoch_num):
image_transfer, m, v = trainer(image_transfer, m, v, net, features_content, features_style, epoch+1, 2)
if (epoch) % 50 == 0:
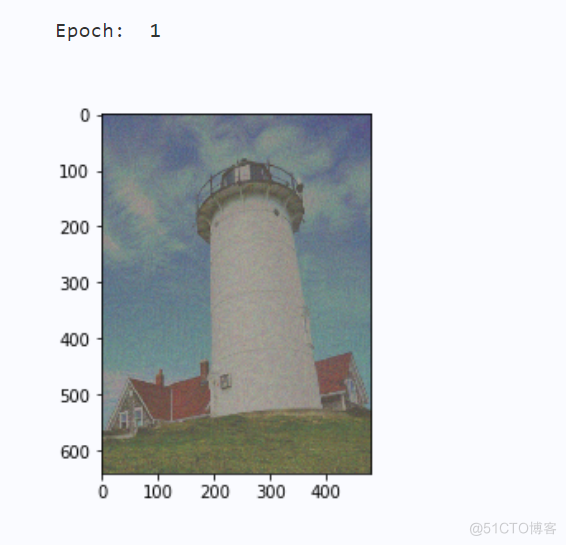
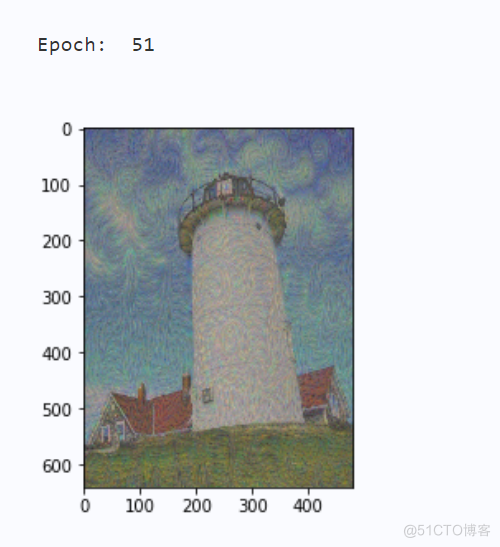
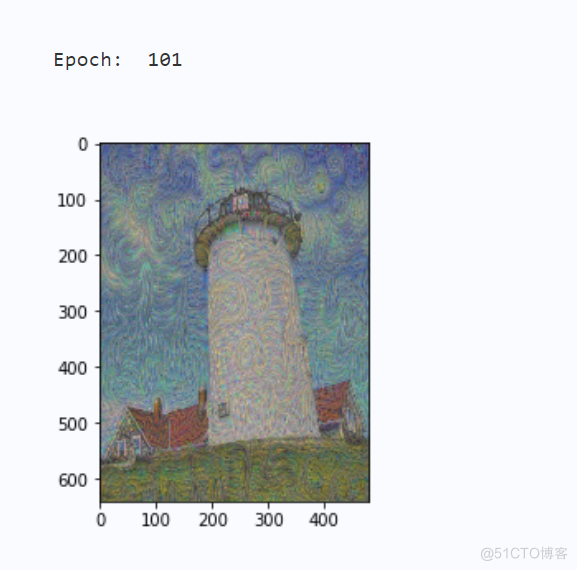
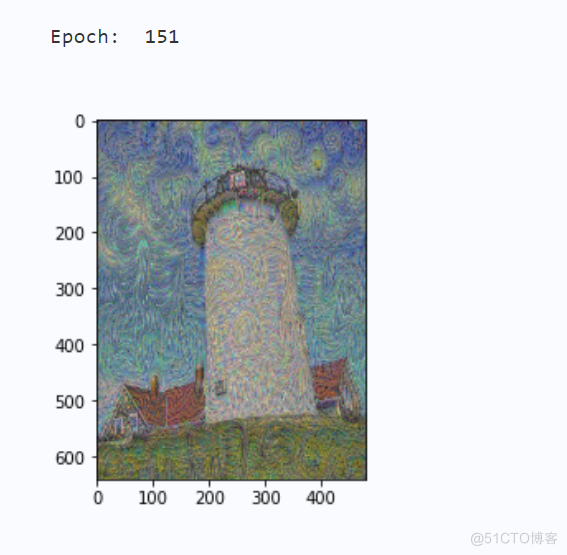
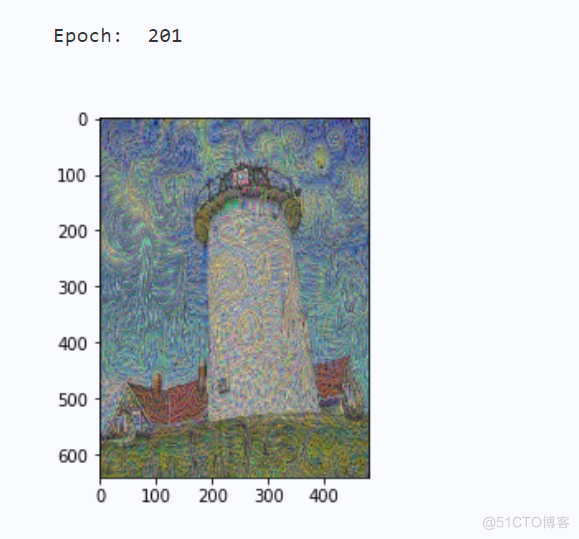
print('Epoch: ', epoch+1)
im = np.squeeze(image_transfer.numpy().transpose([2,3,1,0]))
im = im/255 + means
im = resize(im, sz)
im = PIL.Image.fromarray(np.uint8(im*255))
plt.imshow(im)
plt.show()
train(image_transfer, vgg19, 250)
输出结果如图2-1所示:
import paddlehub as hub
import cv2
import matplotlib.image as mpimg
import matplotlib.image as mpimg
import matplotlib.pyplot as plt

! hub install stylepro_artistic


stylepro_artistic = hub.Module(name="stylepro_artistic")
results = stylepro_artistic.style_transfer(images=[{
        'content': cv2.imread("work/浮光楼阁.png"),
        'styles': [cv2.imread("work/风格图像/虚空夜月.jpg")]}],
        alpha = 1.0,
        visualization = True)

# 原图展示
test_img_path = "work/浮光楼阁.png"
img = mpimg.imread(test_img_path)

plt.figure(figsize=(10,10))
plt.imshow(img)
plt.axis('off')
plt.show()

# 原图展示
test_img_path = "work/风格图像/虚空夜月.jpg"
img = mpimg.imread(test_img_path)

plt.figure(figsize=(10,10))
plt.imshow(img)
plt.axis('off')
plt.show()

# 预测结果展示
test_img_path = "transfer_result/ndarray_1620094320.1111157.jpg"
img = mpimg.imread(test_img_path)

# 展示预测结果图片
plt.figure(figsize=(10,10))
plt.imshow(img)
plt.show()

如何正确创建Rails迁移,以便将表更改为MySQL中的MyISAM?目前是InnoDB。运行原始执行语句会更改表,但它不会更新db/schema.rb,因此当在测试环境中重新创建表时,它会返回到InnoDB并且我的全文搜索失败。我如何着手更改/添加迁移,以便将现有表修改为MyISAM并更新schema.rb,以便我的数据库和相应的测试数据库得到相应更新? 最佳答案 我没有找到执行此操作的好方法。您可以像有人建议的那样更改您的schema.rb,然后运行:rakedb:schema:load,但是,这将覆盖您的数据。我的做法是(假设
对于具有离线功能的智能手机应用程序,我正在为Xml文件创建单向文本同步。我希望我的服务器将增量/差异(例如GNU差异补丁)发送到目标设备。这是计划:Time=0Server:hasversion_1ofXmlfile(~800kiB)Client:hasversion_1ofXmlfile(~800kiB)Time=1Server:hasversion_1andversion_2ofXmlfile(each~800kiB)computesdeltaoftheseversions(=patch)(~10kiB)sendspatchtoClient(~10kiBtransferred)Cl
使用带有Rails插件的vim,您可以创建一个迁移文件,然后一次性打开该文件吗?textmate也可以这样吗? 最佳答案 你可以使用rails.vim然后做类似的事情::Rgeneratemigratonadd_foo_to_bar插件将打开迁移生成的文件,这正是您想要的。我不能代表textmate。 关于ruby-使用VimRails,您可以创建一个新的迁移文件并一次性打开它吗?,我们在StackOverflow上找到一个类似的问题: https://sta
我构建了两个需要相互通信和发送文件的Rails应用程序。例如,一个Rails应用程序会发送请求以查看其他应用程序数据库中的表。然后另一个应用程序将呈现该表的json并将其发回。我还希望一个应用程序将存储在其公共(public)目录中的文本文件发送到另一个应用程序的公共(public)目录。我从来没有做过这样的事情,所以我什至不知道从哪里开始。任何帮助,将不胜感激。谢谢! 最佳答案 无论Rails是什么,几乎所有Web应用程序都有您的要求,大多数现代Web应用程序都需要相互通信。但是有一个小小的理解需要你坚持下去,网站不应直接访问彼此
我尝试运行2.x应用程序。我使用rvm并为此应用程序设置其他版本的ruby:$rvmuseree-1.8.7-head我尝试运行服务器,然后出现很多错误:$script/serverNOTE:Gem.source_indexisdeprecated,useSpecification.Itwillberemovedonorafter2011-11-01.Gem.source_indexcalledfrom/Users/serg/rails_projects_terminal/work_proj/spohelp/config/../vendor/rails/railties/lib/r
刚入门rails,开始慢慢理解。有人可以解释或给我一些关于在application_controller中编码的好处或时间和原因的想法吗?有哪些用例。您如何为Rails应用程序使用应用程序Controller?我不想在那里放太多代码,因为据我了解,每个请求都会调用此Controller。这是真的? 最佳答案 ApplicationController实际上是您应用程序中的每个其他Controller都将从中继承的类(尽管这不是强制性的)。我同意不要用太多代码弄乱它并保持干净整洁的态度,尽管在某些情况下ApplicationContr
我是一个Rails初学者,但我想从我的RailsView(html.haml文件)中查看Ruby变量的内容。我试图在ruby中打印出变量(认为它会在终端中出现),但没有得到任何结果。有什么建议吗?我知道Rails调试器,但更喜欢使用inspect来打印我的变量。 最佳答案 您可以在View中使用puts方法将信息输出到服务器控制台。您应该能够在View中的任何位置使用Haml执行以下操作:-puts@my_variable.inspect 关于ruby-on-rails-如何在我的R
我的假设是moduleAmoduleBendend和moduleA::Bend是一样的。我能够从thisblog找到解决方案,thisSOthread和andthisSOthread.为什么以及什么时候应该更喜欢紧凑语法A::B而不是另一个,因为它显然有一个缺点?我有一种直觉,它可能与性能有关,因为在更多命名空间中查找常量需要更多计算。但是我无法通过对普通类进行基准测试来验证这一点。 最佳答案 这两种写作方法经常被混淆。首先要说的是,据我所知,没有可衡量的性能差异。(在下面的书面示例中不断查找)最明显的区别,可能也是最著名的,是你的
我有带有Logo图像的公司模型has_attached_file:logo我用他们的Logo创建了许多公司。现在,我需要添加新样式has_attached_file:logo,:styles=>{:small=>"30x15>",:medium=>"155x85>"}我是否应该重新上传所有旧数据以重新生成新样式?我不这么认为……或者有什么rake任务可以重新生成样式吗? 最佳答案 参见Thumbnail-Generation.如果rake任务不适合你,你应该能够在控制台中使用一个片段来调用重新处理!关于相关公司
是否可以在应用程序中包含的gem代码中知道应用程序的Rails文件系统根目录?这是gem来源的示例:moduleMyGemdefself.included(base)putsRails.root#returnnilendendActionController::Base.send:include,MyGem谢谢,抱歉我的英语不好 最佳答案 我发现解决类似问题的解决方案是使用railtie初始化程序包含我的模块。所以,在你的/lib/mygem/railtie.rbmoduleMyGemclassRailtie使用此代码,您的模块将在