在真实的项目开发中,使用SpringBoot可以说非常普遍了,而在框架整合中,与数据库的交互无外乎使用jpa,mybatis,mybatis-plus这几种,虽然hibernate仍然有在使用,毕竟框架毕竟重,而且用起来相较于mybatis还是差了那么点意思;
接下来演示下使用 SpringBoot 同时与mybatis,mybatis-plus的整合步骤;
1、准备如下一个数据表
CREATE TABLE `student` (
  `id` varchar(32) NOT NULL,
  `gender` varchar(32) DEFAULT NULL,
  `age` int(12) DEFAULT NULL,
  `nick_name` varchar(32) DEFAULT NULL,
  `name` varchar(32) DEFAULT NULL,
  PRIMARY KEY (`id`)
) ENGINE=InnoDB DEFAULT CHARSET=utf8;
2、插入几条测试数据

工程的完整包结构如图所示

    <parent>
        <groupId>org.springframework.boot</groupId>
        <artifactId>spring-boot-starter-parent</artifactId>
        <version>2.1.1.RELEASE</version>
        <relativePath/> <!-- lookup parent from repository -->
    </parent>


    <properties>
        <project.build.sourceEncoding>UTF-8</project.build.sourceEncoding>
        <project.reporting.outputEncoding>UTF-8</project.reporting.outputEncoding>
        <java.version>1.8</java.version>
        <mysql-connector-java.version>8.0.11</mysql-connector-java.version>
        <commons-lang3.version>3.7</commons-lang3.version>
        <fastjson.version>1.2.47</fastjson.version>
        <mybatis-plus-boot-starter.version>3.3.0</mybatis-plus-boot-starter.version>
        <mybatis-plus-generator.version>3.3.0</mybatis-plus-generator.version>
        <druid.version>1.1.14</druid.version>
        <lombok.version>1.18.0</lombok.version>
        <dubbo-spring-boot-starter.version>2.0.0</dubbo-spring-boot-starter.version>
        <swagger.version>2.9.2</swagger.version>
        <swagger-bootstrap-ui.version>1.9.6</swagger-bootstrap-ui.version>
    </properties>

    <dependencies>
        <dependency>
            <groupId>org.apache.commons</groupId>
            <artifactId>commons-lang3</artifactId>
            <version>3.4</version>
        </dependency>

        <dependency>
            <groupId>org.springframework.boot</groupId>
            <artifactId>spring-boot-starter-web</artifactId>
        </dependency>

        <!--mysql依赖-->
        <dependency>
            <groupId>mysql</groupId>
            <artifactId>mysql-connector-java</artifactId>
            <version>${mysql-connector-java.version}</version>
        </dependency>

        <!--阿里巴巴fastjosn依赖-->
        <dependency>
            <groupId>com.alibaba</groupId>
            <artifactId>fastjson</artifactId>
            <version>${fastjson.version}</version>
        </dependency>

        <!--阿里巴巴数据库连接池依赖-->
        <!-- Druid -->
        <dependency>
            <groupId>com.alibaba</groupId>
            <artifactId>druid-spring-boot-starter</artifactId>
            <version>${druid.version}</version>
        </dependency>

        <dependency>
            <groupId>org.mybatis.spring.boot</groupId>
            <artifactId>mybatis-spring-boot-starter</artifactId>
            <version>2.1.1</version>
        </dependency>

        <!-- MyBatis增强工具-->
        <dependency>
            <groupId>com.baomidou</groupId>
            <artifactId>mybatis-plus-boot-starter</artifactId>
            <version>${mybatis-plus-boot-starter.version}</version>
        </dependency>
        <dependency>
            <groupId>com.baomidou</groupId>
            <artifactId>mybatis-plus-generator</artifactId>
            <version>${mybatis-plus-generator.version}</version>
        </dependency>

        <!-- lombok -->
        <dependency>
            <groupId>org.projectlombok</groupId>
            <artifactId>lombok</artifactId>
            <version>${lombok.version}</version>
        </dependency>

        <!--swagger-ui-->
        <dependency>
            <groupId>io.springfox</groupId>
            <artifactId>springfox-swagger2</artifactId>
            <version>${swagger.version}</version>
        </dependency>

        <dependency>
            <groupId>io.springfox</groupId>
            <artifactId>springfox-swagger-ui</artifactId>
            <version>${swagger.version}</version>
        </dependency>

        <dependency>
            <groupId>com.github.xiaoymin</groupId>
            <artifactId>swagger-bootstrap-ui</artifactId>
            <version>${swagger-bootstrap-ui.version}</version>
        </dependency>

    </dependencies>
server:
  port: 8083

logging:
  config: classpath:logback-spring.xml  #日志

spring:
  datasource:
    driver-class-name: com.mysql.cj.jdbc.Driver
    url: jdbc:mysql://IP:3306/school?autoReconnect=true&useUnicode=true&characterEncoding=utf8&serverTimezone=GMT%2B8&useSSL=false
    username: root
    password: root
    druid:
      max-active: 100
      initial-size: 10
      max-wait: 60000
      min-idle: 5


  #设置单个文件最大上传大小
  servlet:
    multipart:
      max-file-size: 20MB


mybatis-plus:
  mapper-locations: classpath*:mapper/*.xml
  global-config:
    db-column-underline: true  #开启驼峰转换
    db-config:
      id-type: uuid
      field-strategy: not_null
    refresh: true
  configuration:
    map-underscore-to-camel-case: true
    #log-impl: org.apache.ibatis.logging.stdout.StdOutImpl #打印sql语句便于调试
import org.springframework.context.annotation.Bean;
import org.springframework.context.annotation.Configuration;
import springfox.documentation.builders.ApiInfoBuilder;
import springfox.documentation.builders.PathSelectors;
import springfox.documentation.builders.RequestHandlerSelectors;
import springfox.documentation.service.ApiInfo;
import springfox.documentation.spi.DocumentationType;
import springfox.documentation.spring.web.plugins.Docket;
import springfox.documentation.swagger2.annotations.EnableSwagger2;

/**
 * swagger文档,项目启动后,浏览器访问:http://localhost:8083/swagger-ui.html
 */
@Configuration
@EnableSwagger2
public class ApiSwagger2 {

    @Bean
    public Docket createRestBmbsApi() {
        return new Docket(DocumentationType.SWAGGER_2)
                .groupName("users")
                .apiInfo(apiInfo())
                .select()
                .apis(RequestHandlerSelectors.basePackage("com.congge.controller"))
                .paths(PathSelectors.any())
                .build();
    }

    private ApiInfo apiInfo() {
        return new ApiInfoBuilder()
                .title("后端相关API")
                .version("1.0")
                .build();
    }

}import com.baomidou.mybatisplus.annotation.TableField;
import lombok.Data;
@Data
public class Student {
@TableField("id")
private String id;
@TableField("name")
private String name;
@TableField("gender")
private String gender;
@TableField("age")
private int age;
@TableField("nick_name")
private String nickName;
}
import com.baomidou.mybatisplus.core.mapper.BaseMapper;
import com.congge.entity.Student;
import org.apache.ibatis.annotations.Mapper;

import java.util.List;

@Mapper
public interface StudentMapper extends BaseMapper<Student> {

    List<Student> queryAll();

}
<?xml version="1.0" encoding="UTF-8"?>
<!DOCTYPE mapper PUBLIC "-//mybatis.org//DTD Mapper 3.0//EN" "http://mybatis.org/dtd/mybatis-3-mapper.dtd">
<mapper namespace="com.congge.dao.StudentMapper">

    <select id="queryAll" resultType="com.congge.entity.Student">
		select * from student
	</select>

</mapper>
在本次的业务实现中,同时可以使用mybatis的方式以及mybatis-plus的方式进行,具体使用的时候结合自身的需求进行选择;
import com.baomidou.mybatisplus.core.conditions.query.QueryWrapper;
import com.congge.dao.StudentMapper;
import com.congge.entity.Student;
import com.congge.service.StudentService;
import org.springframework.stereotype.Service;

import javax.annotation.Resource;
import java.util.List;

@Service
public class StudentServiceImpl implements StudentService {

    @Resource
    private StudentMapper studentMapper;

    @Override
    public List<Student> queryAllStudent() {
        QueryWrapper<Student> queryWrapper = new QueryWrapper();
        List<Student> students = studentMapper.selectList(queryWrapper);
        return students;
        //return studentMapper.queryAll();
    }

    @Override
    public List<Student> getByName(String name) {
        QueryWrapper<Student> queryWrapper = new QueryWrapper();
        queryWrapper.like("name",name);
        return studentMapper.selectList(queryWrapper);
    }

    public Student getById(String id) {
        QueryWrapper<Student> queryWrapper = new QueryWrapper();
        queryWrapper.like("id",id);
        return studentMapper.selectOne(queryWrapper);
    }
}
@RestController
public class StudentController {

    @Autowired
    private StudentService studentService;

    @GetMapping("/getAll")
    public List<Student> getAll(){
        return studentService.queryAllStudent();
    }

    @GetMapping("/getByName")
    public List<Student> getByName(@RequestParam String name){
        return studentService.getByName(name);
    }

    @GetMapping("/getById")
    public Student getById(@RequestParam String id){
        return studentService.getById(id);
    }
}
import org.springframework.boot.SpringApplication;
import org.springframework.boot.autoconfigure.SpringBootApplication;

@SpringBootApplication
public class App {

    public static void main(String[] args) {
        SpringApplication.run(App.class,args);
    }

}
接下来,将工程运行起来做一下测试吧

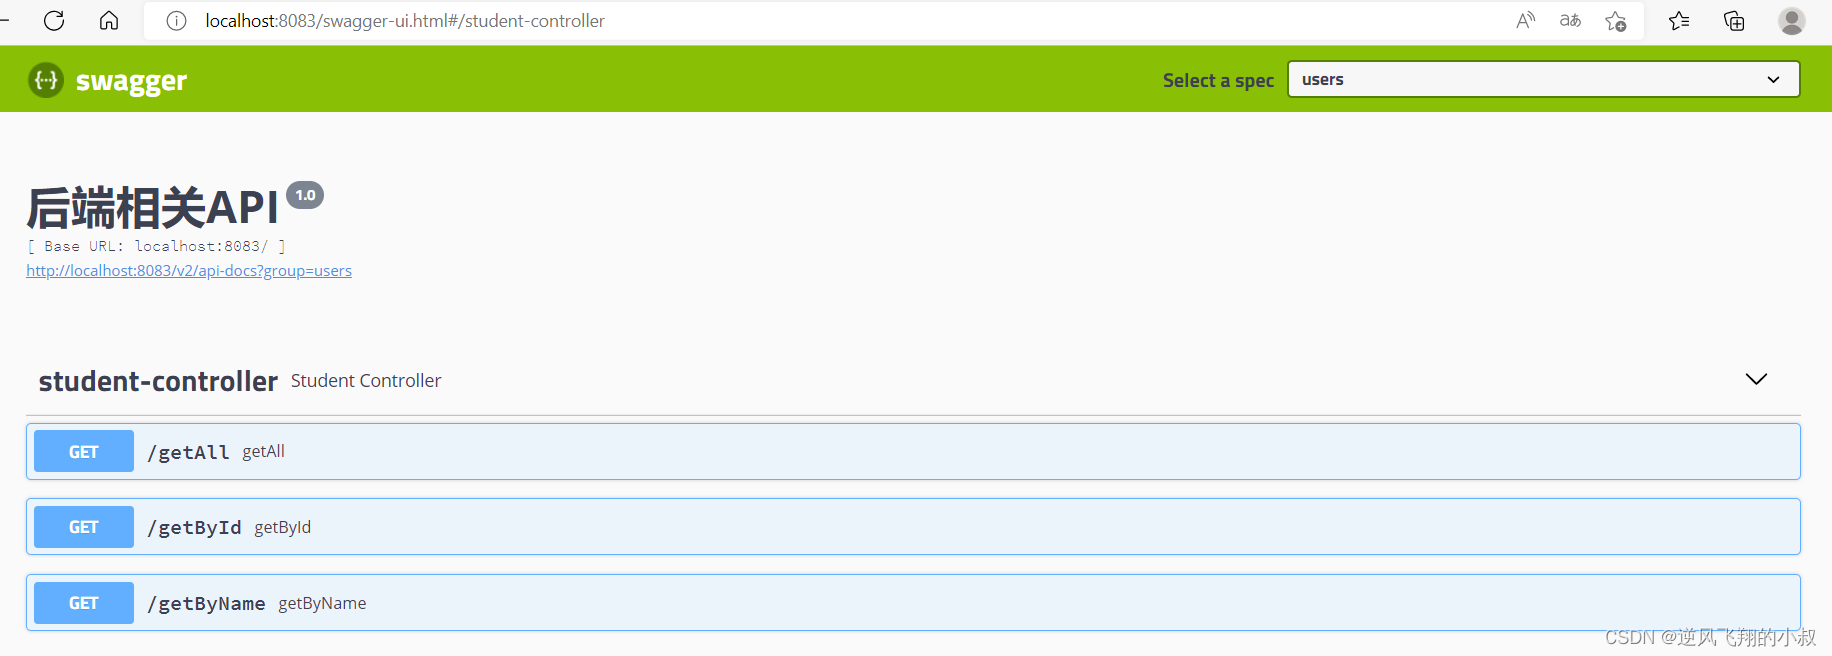
不妨随机测试两个接口吧,测试下获取所有学生的数据接口

本篇到这里基本上就结束了,更多的业务大家可以结合自身的实际情况,继续在代码中补充即可
如果您希望在Spring中启用定时任务功能,则需要在主类上添加 @EnableScheduling 注解。这样Spring才会扫描 @Scheduled 注解并执行定时任务。在大多数情况下,只需要在主类上添加 @EnableScheduling 注解即可,不需要在Service层或其他类中再次添加。以下是一个示例,演示如何在SpringBoot中启用定时任务功能:@SpringBootApplication@EnableSchedulingpublicclassApplication{publicstaticvoidmain(String[]args){SpringApplication.ru
软件特点部署后能通过浏览器查看线上日志。支持Linux、Windows服务器。采用随机读取的方式,支持大文件的读取。支持实时打印新增的日志(类终端)。支持日志搜索。使用手册基本页面配置路径配置日志所在的目录,配置后按回车键生效,下拉框选择日志名称。选择日志后点击生效,即可加载日志。windows路径E:\java\project\log-view\logslinux路径/usr/local/XX历史模式历史模式下,不会读取新增的日志。针对历史文件可以分页读取,配置分页大小、跳转。历史模式下,支持根据关键词搜索。目前搜索引擎使用的是jdk自带类库,搜索速度相对较低,优点是比较简单。2G日志全文搜
1.依赖导入org.springframework.bootspring-boot-starter-weborg.springframework.bootspring-boot-starter-validation2.validation常用注解@Null被注释的元素必须为null@NotNull被注释的元素不能为null,可以为空字符串@AssertTrue被注释的元素必须为true@AssertFalse被注释的元素必须为false@Min(value)被注释的元素必须是一个数字,其值必须大于等于指定的最小值@Max(value)被注释的元素必须是一个数字,其值必须小于等于指定的最大值@D
我正在尝试找到一种更好的方法将IRB与我的常规ruby开发集成。目前我很少在我的代码中使用IRB。我只用它来验证语法或尝试一些小的东西。我知道我可以将我自己的代码加载到ruby中作为一个require'mycode'但这通常不符合我的编程风格。有时我要检查的变量超出范围或在循环内。有没有一种简单的方法可以启动我的脚本并在IRB内的某个点卡住?我想我正在寻找一种更简单的方法来调试我的ruby代码而不破坏我的F5(编译)键。也许有经验的ruby开发者可以和我分享一个更精简的开发方法。 最佳答案 安装ruby-debugg
我开始了一个小型网络项目并使用Drupal来构建它。到目前为止,还不错:您可以快速建立一个不错的面向CMS的网站,通过模块添加社交功能,并且您有一个广泛的API可以在一个架构良好的平台中进行自定义。现在问题来了:网站的增长超出了最初的计划,我发现自己正处于认真开始为它编写代码的境地。由于Drupal项目,我对PHP有了新的认识,但我想用Ruby来做。我会感觉更舒服,以后维护起来更容易,我可以在其他Ruby/Rails应用程序中重用它。随着时间的推移,我想我会用Ruby重写Drupal中的现有部分。基于此,问题是:是否有人将两者(成功或失败的故事)结合起来?这是一个相当大的决定,但我在G
Iparking停车收费管理系统-可商用介绍Iparking是一款基于springBoot的停车收费管理系统,支持封闭车场和路边车场,支持微信支付宝多种支付渠道,支持多种硬件,涵盖了停车场管理系统的所有基础功能。技术栈Springboot,MybatisPlus,Beetl,Mysql,Redis,RabbitMQ,UniApp功能云端功能序号模块功能描述1系统管理菜单管理配置系统菜单2系统管理组织管理管理组织机构3系统管理角色管理配置系统角色,包含数据权限和功能权限配置4系统管理用户管理管理后台用户5系统管理租户管理多租户管理6系统管理公众号配置租户公众号配置7系统管理操作日志审计日志8系统
查看原文>>>基于”PLUS模型+“生态系统服务多情景模拟预测实践技术应用目录第一章、理论基础与软件讲解第二章、数据获取与制备第三章、土地利用格局模拟第四章、生态系统服务评估第五章、时空变化及驱动机制分析第六章、论文撰写技巧及案例分析基于ArcGISPro、Python、USLE、INVEST模型等多技术融合的生态系统服务构建生态安全格局基于生态系统服务(InVEST模型)的人类活动、重大工程生态成效评估、论文写作等具体应用基于ArcGISPro、R、INVEST等多技术融合下生态系统服务权衡与协同动态分析实践应用 本文从数据、方法、实践三方面对生态系统服务多情景预测进行讲解。内容涵盖多
一、Elasticsearch简介实际业务场景中,多端的查询功能都有很大的优化空间。常见的处理方式有:建索引、建物化视图简化查询逻辑、DB层之上建立缓存、分页…然而随着业务数据量的不断增多,总有那么一张表或一个业务,是无法通过常规的处理方式来缩短查询时间的。在查询功能优化上,作为开发人员应该站在公司的角度,本着优化客户体验的目的去寻找解决方案。本人有幸做过Tomcat整合solr,今天一起研究一下当前比较火热的Elasticsearch搜索引擎。Elasticsearch是一个非常强大的搜索引擎。它目前被广泛地使用于各个IT公司。Elasticsearch是由Elastic公司创建。它的代码位
在Rails3(Ruby1.9.2)中我发送一个请求StartedGET"/controller/action?path=/41_+"但是参数列表是这样的:{"path"=>"/41_","controller"=>"controller","action"=>"action"}这里出了什么问题?-、*或.符号工作正常,只是+将被空格替换。 最佳答案 这是正常的URL编码,theplussignisashorthandforaspace:Withinthequerystring,theplussignisreservedasshor
场景在SpringBoot项目中需要对接三方系统,对接协议是TCP,需实现一个TCP客户端接收服务端发送的数据并按照16进制进行解析数据,然后对数据进行过滤,将指定类型的数据通过mybatis存储进mysql数据库中。并且当tcp服务端断连时,tcp客户端能定时检测并发起重连。全流程效果 注:博客:霸道流氓气质的博客_CSDN博客-C#,架构之路,SpringBoot领域博主实现1、SpringBoot+Netty实现TCP客户端本篇参考如下博客,在如下博客基础上进行修改Springboot+Netty搭建基于TCP协议的客户端(二):https://www.cnblogs.com/haolb