在网上已经有好多关于Elasticsearch的介绍,就不在翻来覆去讲一些基本概念,大家感兴趣的可以自己去找一些资料巩固下。这次只为了顾及众多首次接触Elasticsearch,案例都讲的很浅显,还有就是受个人能力所限,各位读者发现有错误之处,也可进行讨论和指出。
本篇文章主要讲的是在Linux下安装Elasticsearch7.4环境,并熟悉一下Elasticsearch的基本操作
题外话,这一章节仅仅作为开发学习来构建基础的环境,并未考虑elasticsearch的高可用性,仅说明一些基础知识,带大家有一个认识。当然既然是自我发挥,也就是一家之言,难免有遗漏地方,希望大家也就本着看看。
CentOs7
内存4G+:这个因环境而异
JDK11+:由于 elasticsearch 运行需要JDK环境,我机器 JDK 版本是 11,如果 JDK 低于 9.0 会有一些问题,下图我也贴出来。
Java HotSpot(TM) 64-Bit Server VM warning: Option UseConcMarkSweepGC was deprecated in version 9.0 and will likely be removed in a future release.官方 elasticsearch 下载,下载 elasticsearch,目前最新的稳定版本为 7.4.0 版本。
下载 elasticsearch,会得到一个文件 elasticsearch-X.X.X-linux-x86_64.tar.gz
创建个文件夹 elastic
再创建一个组,案例中我以 dev命名
再创建一个用户, elasticsearch不允许使用 root启动,创建一个新的用户 elastic,并为这个账户赋予相应的权限来启动 elasticsearch。
解压文件
将 elasticsearch-X.X.X-linux-x86_64.tar.gz 文件移入 elastic中
重新调整下权限 chown -R
[root@localhost download]$ pwd
/data/download/

[root@localhost download]$ wget https://artifacts.elastic.co/downloads/elasticsearch/elasticsearch-7.4.0-linux-x86_64.tar.gz

[root@localhost download]$ cd ../app/

[root@localhost app]$ mkdir elastic

[root@localhost app]$ groupadd dev

[root@localhost app]$ useradd elastic -g dev

[root@localhost app]$ passwd elastic

[root@localhost app]$ chown -R elastic:dev elastic

[root@localhost app]$ su elastic

[elastic@localhost app]$ cd /elastic

[elastic@localhost elastic]$ cp ../../download/elasticsearch-7.4.0-linux-x86_64.tar.gz .

[elastic@localhost elastic]$ tar -zxvf elasticsearch-7.4.0-linux-x86_64.tar.gz

[elastic@localhost elastic]$ mv elasticsearch-7.4.0/ .配置文件中有很多配置项,例如集群信息、端口等。
elasticsearch 本身为安全考虑,默认不允许外部访问,我们这里做演示,就需要将这个配置项修改掉,路径在 config/elasticsearch.yml
[elastic@localhost elastic]$ vi config/elasticsearch.yml修改后的效果如下:
-- 激活节点1
node.name: node-1

-- 允许外部IP访问
network.host: 0.0.0.0

-- 把这个注释先放开并修改
cluster.initial_master_nodes: ["node-1"]启动
[elastic@localhost elastic]$ ./bin/elasticsearch验证结果
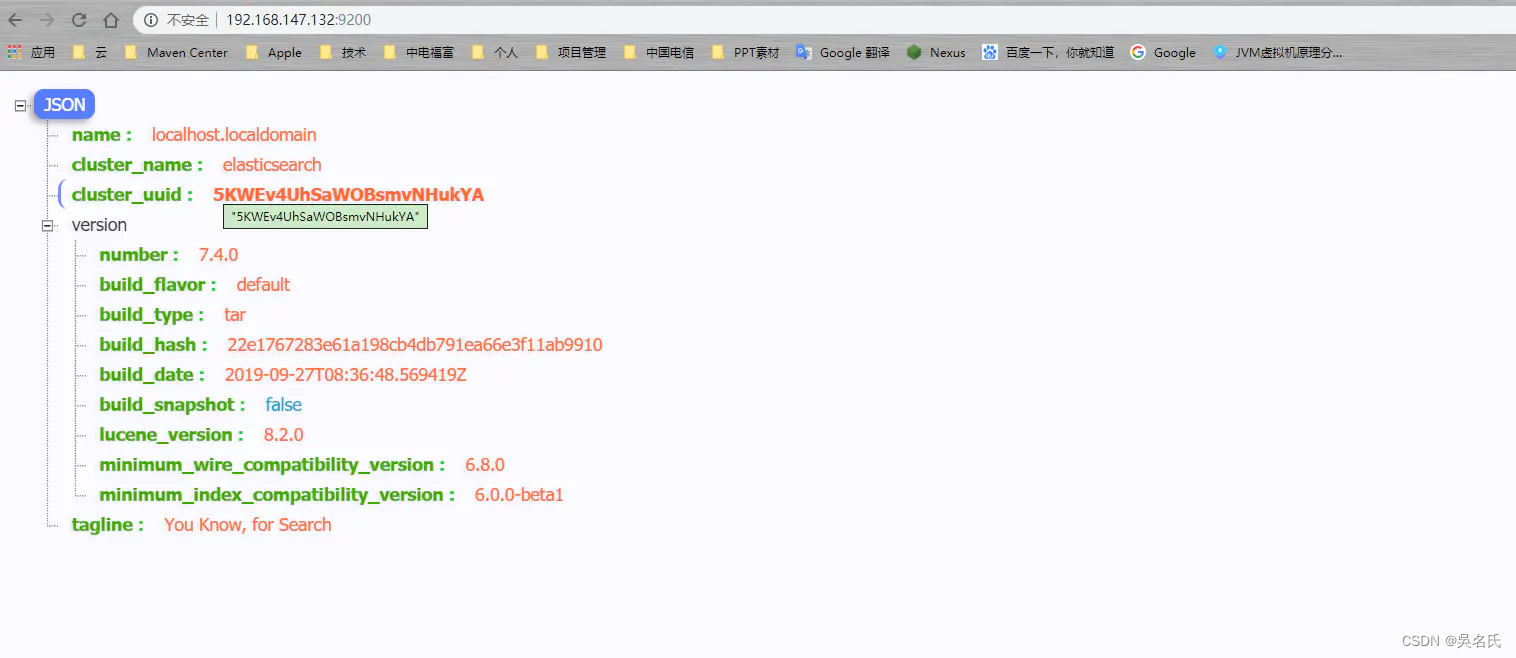
elasticsearch 默认端口是 9200 ,打开地址:http://192.168.147.128:9200/
注意,启动后可能会有两种错误导致启动失败。

从中可以看出主要是打开时数量不够以及虚拟内存不足。
[1]: max file descriptors [4096] for elasticsearch process is too low, increase to at least [65535]
[2]: max virtual memory areas vm.max_map_count [65530] is too low, increase to at least [262144]
解决措施
vi /etc/security/limits.conf
elastic hard nofile 65536
elastic soft nofile 65536
其中 elastic 为启动 elasticsearch的用户名。
vi /etc/sysctl.conf
vm.max_map_count=655360再执行 sysctl -p
从中我们看到, elasticsearch安装本身并不困难,比较简单,修改配置文件以及注意 JDK版本。
elasticsearch 的可视化工具有很多,比如 elasticsearch-head、Dejavu、ElasticHD等。
此处选择 ElasticHD,比较适合学习以及演示,这是一个开源 elasticHD, Github下载地址
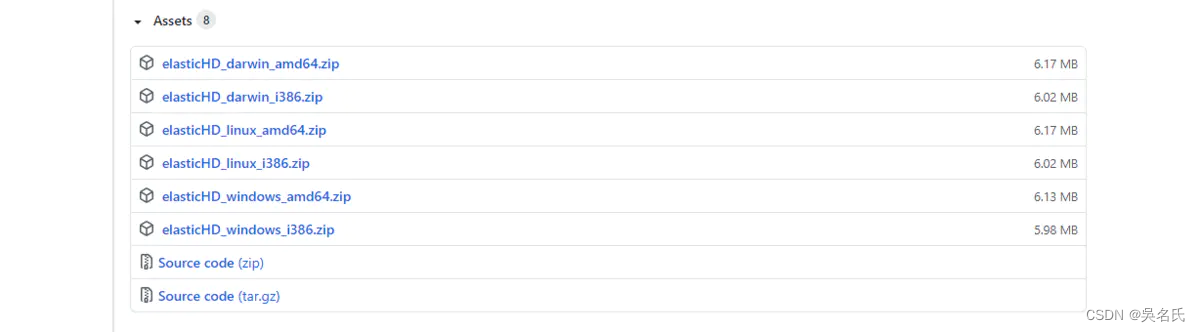
提供Windows和linux,但是这个版本有一个弊端,就是好久没更新,凑合着用呗。
1、unzip elasticHD_linux_amd64.zip

2、chmod -R 777 ElasticHD

3、./ElasticHD -p 0.0.0.0:9800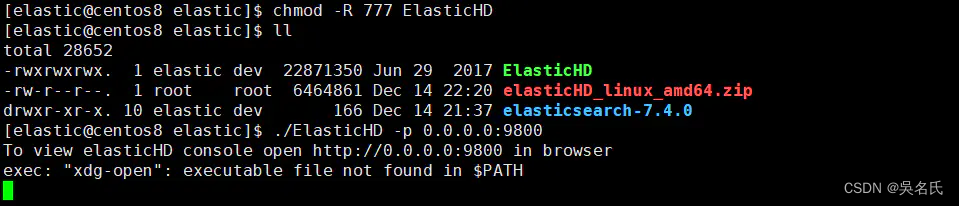
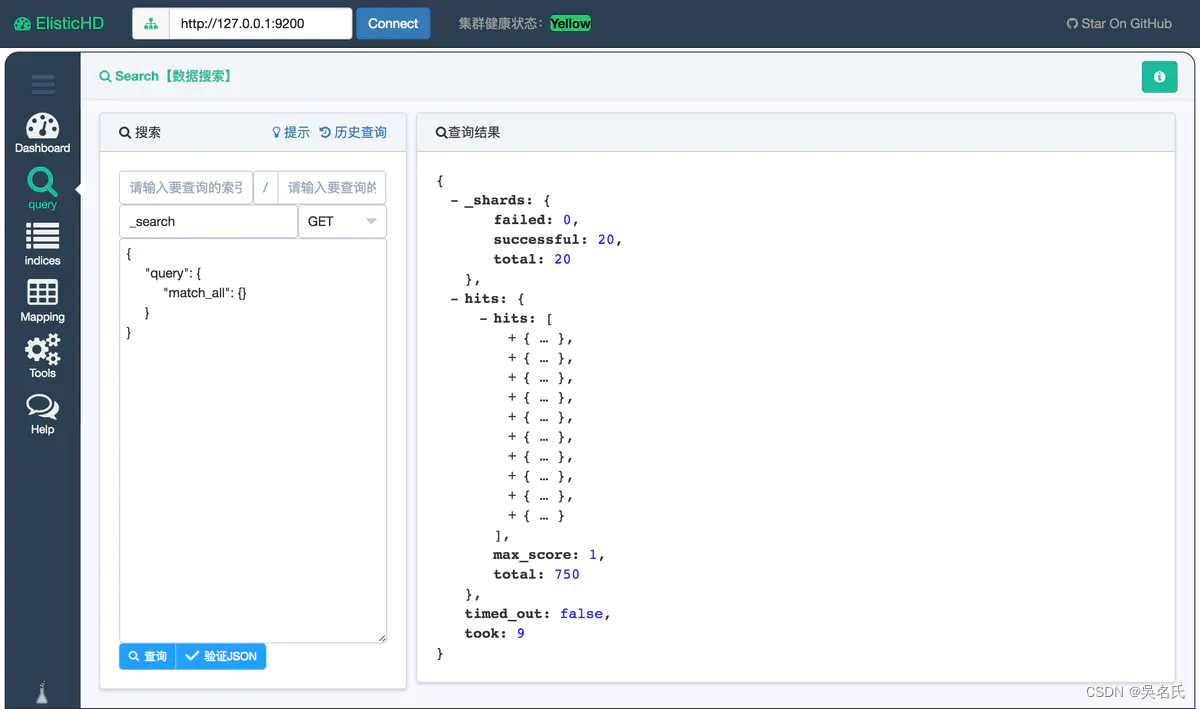
在浏览器中打开 http://192.168.244.128:9800/ 就可以看到。

elasticsearch 本身对中文支持不够好,所以需要中文的分词插件,目前主流的都用 IK。 以下这是 Google的中文词条。
IK Analyzer是一个开源的,基于java语言开发的轻量级的中文分词工具包。从2006年12月推出1.0版开始, IKAnalyzer已经推出了4个大版本。最初,它是以开源项目Luence为应用主体的,结合词典分词和文法分析算法的中文分词组件。从3.0版本开始,IK发展为面向Java的公用分词组件,独立于Lucene项目,同时提供了对Lucene的默认优化实现。在2012版本中,IK实现了简单的分词歧义排除算法,标志着IK分词器从单纯的词典分词向模拟语义分词衍化。
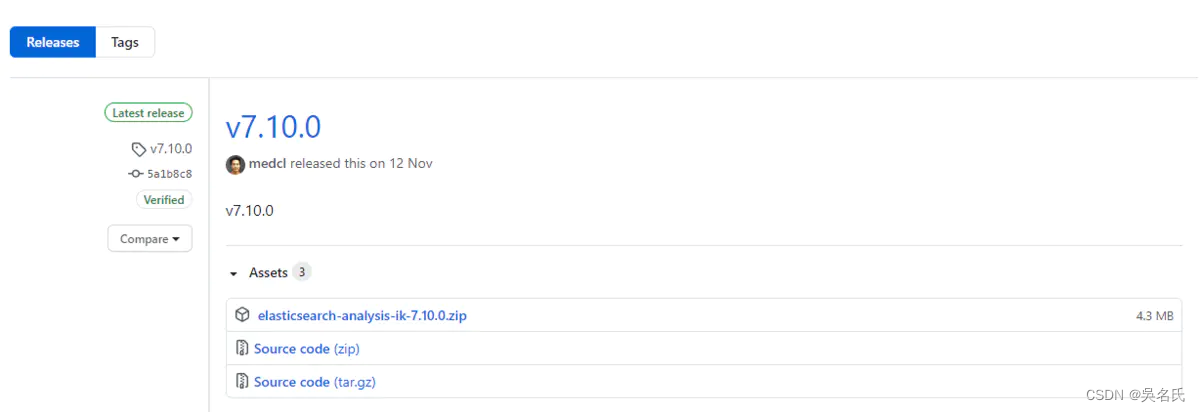
安装地址,截止当前 IK 最新版本是 v7.4.0 ,但是我 elasticsearch 版本是 7.4所以下载与自己相对应的版本,否则分词插件将不能被识别。
下载
[root@localhost download]$ wget https://github.com/medcl/elasticsearch-analysis-ik/releases/download/v7.4.0/elasticsearch-analysis-ik-7.4.0.zip安装插件
在 elasticsearch 安装目录下 找到 plugins 文件夹并创建一个名为 ik的目录,将下载的 elasticsearch-analysis-ik-7.10.0.zip 移入。
[elastic@localhost elastic]$ cd plugins

[elastic@localhost plugins]$ cd mkdir ik && cd ik

[elastic@localhost ik]$ cp ../../../download/elasticsearch-analysis-ik-7.4.0.zip .

[elastic@localhost ik]$ unzip elasticsearch-analysis-ik-7.4.0.zip
完成后,将 elasticsearch 重启,我们观察控制台
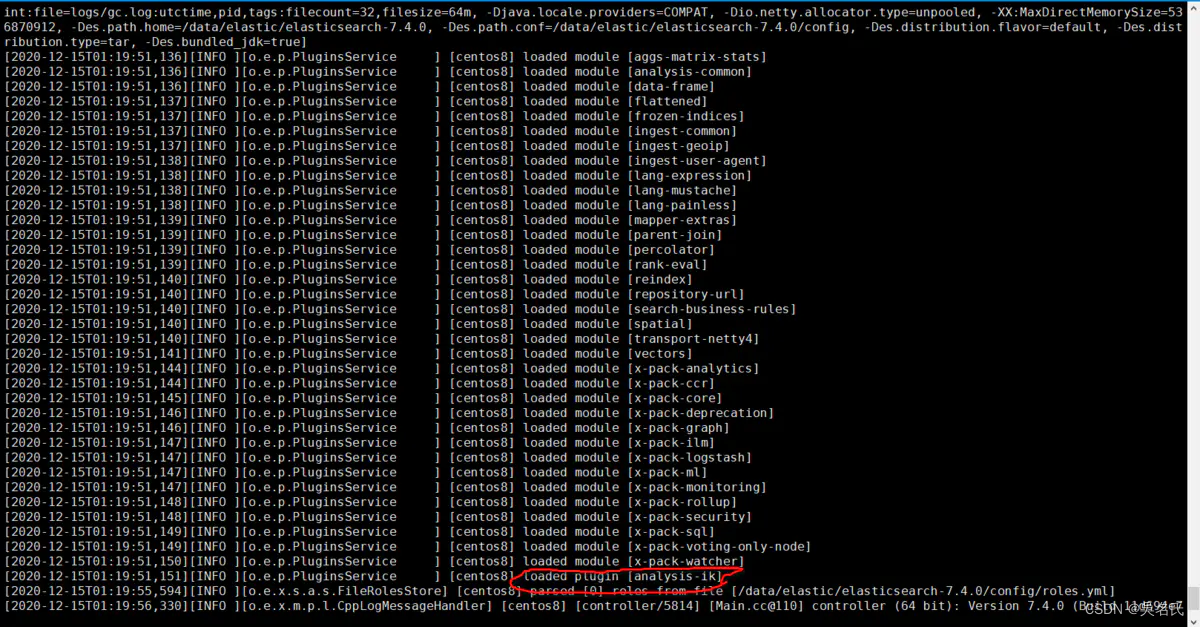
其中红线处就是 elasticsearch将分词器加载,说明我们安装成功。
[2020-12-15T01:19:51,151][INFO ][o.e.p.PluginsService ] [centos8] loaded plugin [analysis-ik]上一章节我们演示对中文分词的安装,下来我们开始我们分词器验证之旅。
使用crul命令,输入下面的URL地址,验证分词器是否成功。
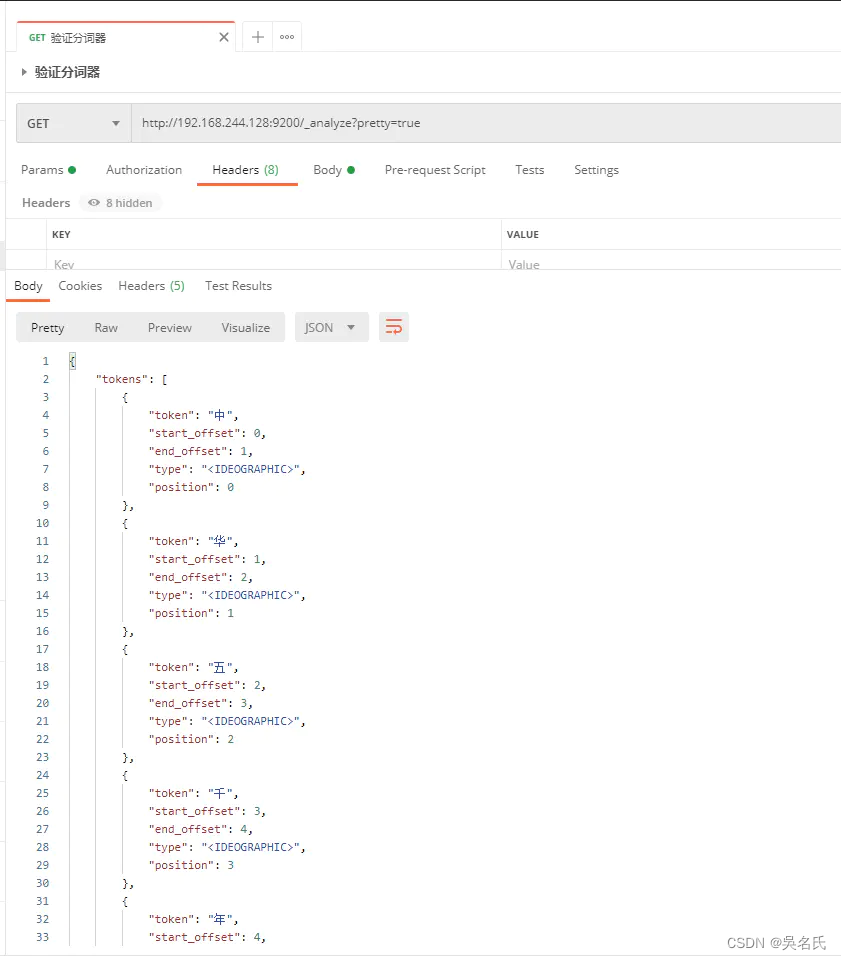
[elastic@localhost elastic]$ curl -X GET -H "Content-Type: application/json" "http://localhost:9200/_analyze?pretty=true" -d'{"text":"中华五千年华夏"}';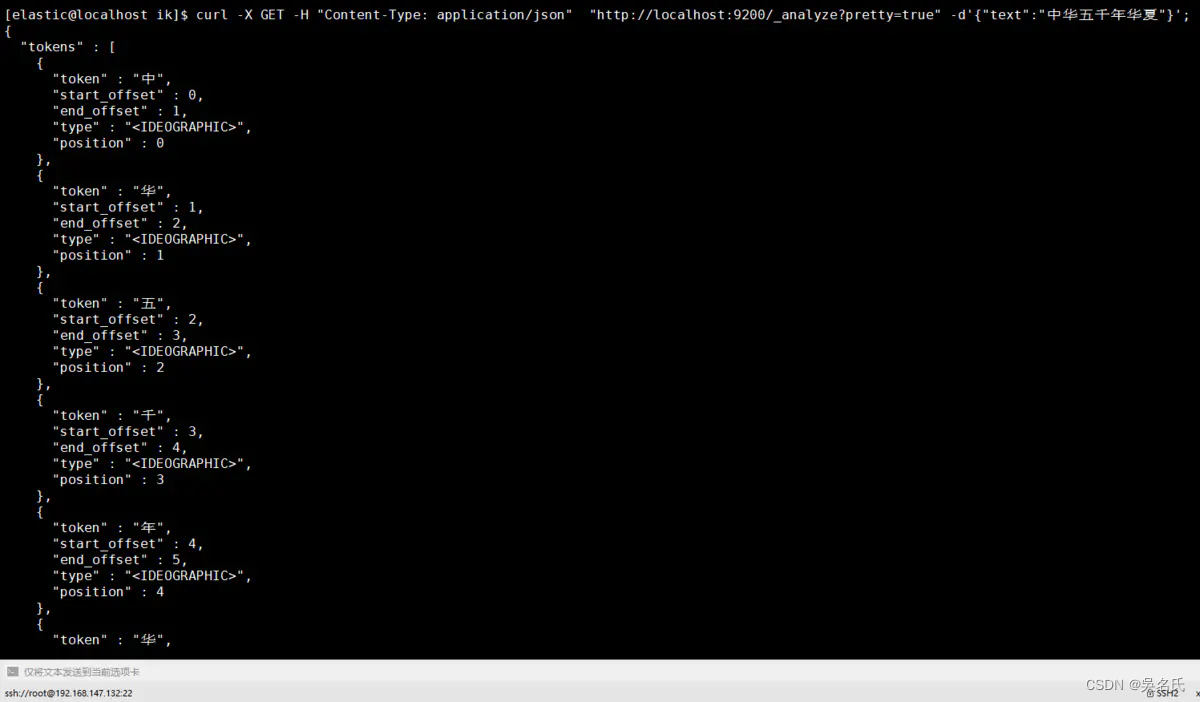
也可以使用Postman
至此我们的中文分词器可以用啦。
ik_max_word: 将文本按最细粒度的组合来拆分,比如会将“中华五千年华夏”拆分为“五千年、五千、五千年华、华夏、千年华夏”,总之是可能的组合;
ik_smart: 最粗粒度的拆分,比如会将“五千年华夏”拆分为“五千年、华夏”
当不添加分词类别,Elastic对于汉字默认使用standard只是将汉字拆分成一个个的汉字,而我们ik则更加的智能,下面通过几个案例来说明。
在JSON格式中添加analyzer节点内容为ik_smart
[elastic@localhost elastic]$ curl -X GET -H "Content-Type: application/json" "http://localhost:9200/_analyze?pretty=true" -d'{"text":"中华五千年华夏","analyzer": "ik_smart"}';
在JSON格式中添加analyzer节点内容为ik_max_word
[elastic@localhost elastic]$ curl -X GET -H "Content-Type: application/json" "http://localhost:9200/_analyze?pretty=true" -d'{"text":"中华五千年华夏","analyzer": "ik_max_word"}';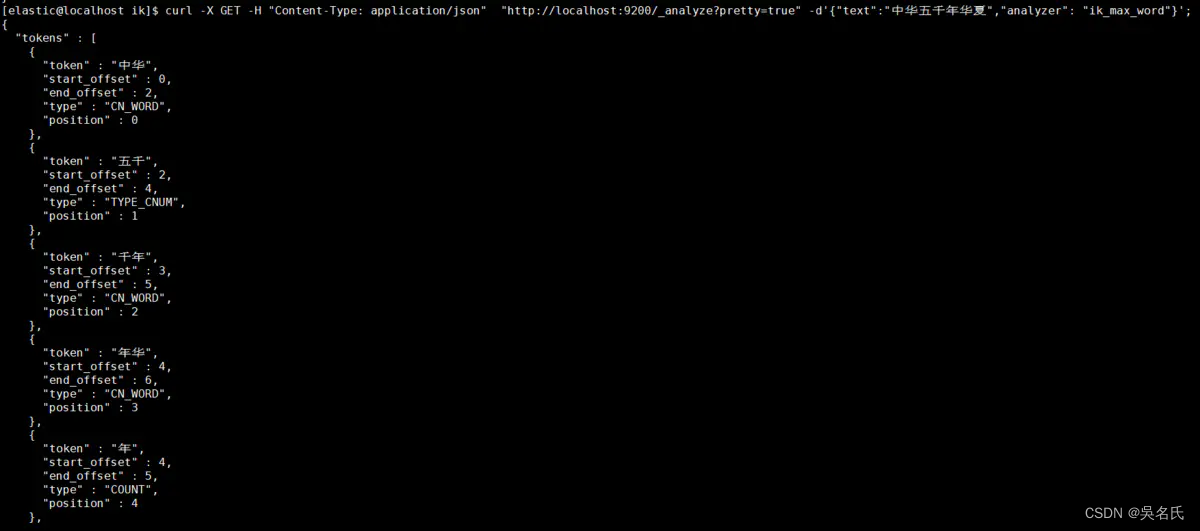
IK 很友好,为我们提供热更新 IK 分词,在配置文件 {ES_HOME}/plugins/ik/config/IKAnalyzer.cfg.xml
<?xml version="1.0" encoding="UTF-8"?>
<!DOCTYPE properties SYSTEM "http://java.sun.com/dtd/properties.dtd">
<properties>
    <comment>IK Analyzer 扩展配置</comment>
    <!--用户可以在这里配置自己的扩展字典 -->
    <entry key="ext_dict">custom/mydict.dic;custom/single_word_low_freq.dic</entry>
     <!--用户可以在这里配置自己的扩展停止词字典-->
    <entry key="ext_stopwords">custom/ext_stopword.dic</entry>
    <!--用户可以在这里配置远程扩展字典 -->
    <entry key="remote_ext_dict">location</entry>
    <!--用户可以在这里配置远程扩展停止词字典-->
    <entry key="remote_ext_stopwords">http://xxx.com/xxx.dic</entry>
</properties>
我们一般将需要自动更新的热词放在一个UTF8的txt文件里,再利用 nginx ,当 .txt 文件修改时,http server 会在客户端请求该文件时自动返回相应的 Last-Modified 和 ETag。可以另外做一个工具来从业务系统提取相关词汇,并更新这个 .txt 文件。
写到现在,终于到了索引(Index)这块啦,我们先弄清楚索引的基本概念以及索引到底是什么?
ElasticSearch 是文档型数据库,索引(Index)定义了文档的逻辑存储和字段类型,每个索引可以包含多个文档类型,文档类型是文档的集合,文档以索引定义的逻辑存储模型,比如,指定分片和副本的数量,配置刷新频率,分配分析器等,存储在索引中的海量文档分布式存储在ElasticSearch集群中。
ElasticSearch是基于Lucene框架的全文搜索引擎,将所有文档的信息写入到倒排索引(Inverted Index)的数据结构中,倒排索引建立的是索引中词和文档之间的映射关系,在倒排索引中,数据是面向词(Term)而不是面向文档的。
由于在ElasticSearch 7.x之后就默认不在支持指定索引类型,所以在在elasticsearch7.x上执行:
{
    "settings" : {
        "index" : {
            "number_of_shards" : 3,
            "number_of_replicas" : 2
        }
    },
    "mappings" : {
        "twitter":{
            ......
        }
    }
执行结果则会出错:Root mapping definition has unsupported parameters(刚开始接触就踩了这个坑,折煞劳资好久)。如果在6.x上执行,则会正常执行。
出现这个的原因是,elasticsearch7默认不在支持指定索引类型,默认索引类型是_doc,如果想改变,则配置include_type_name: true 即可(这个没有测试,官方文档说的,无论是否可行,建议不要这么做,因为elasticsearch8后就不在提供该字段)。
https://www.elastic.co/guide/en/elasticsearch/reference/current/removal-of-types.html
curl -X PUT "localhost:9200/twitter" -H 'Content-Type: application/json' -d'
{
    "settings" : {
        "index" : {
            "number_of_shards" : 3,
            "number_of_replicas" : 2
        }
    }
}
'
-d指定了你的参数,这里将这些参数放到了 JSON 文件中
settings设置内容含义
name | 价格 |
number_of_shards | 分片数 |
number_of_replicas | 副本数 |
mappings | 结构化数据设置 下面的一级属性 是自定义的类型 |
properties | 类型的属性设置节点,下面都是属性 |
epoch_millis | 表示时间戳 |
使用 JSON 文件创建索引
使用 -d‘@your jsonFile’指定你的 JSON 文件。下边我创建了一个索引名称为 product(可自己定义)的索引。
[elastic@localhost elastic]$ curl -H "Content-Type: application/json" -X PUT "http://localhost:9200/twitter?pretty=true" -d'@prod.json'
参数形式创建索引
[elastic@localhost elastic]$ curl -H "Content-Type: application/json" -X PUT "http://localhost:9200/twitter?pretty=true"  -d'
{
    "settings" : {
        "index" : {
            "number_of_shards" : 3,
            "number_of_replicas" : 2
        }
    },
    "mappings" : {
            "dynamic": false,
            "properties" : {
                "productid":{
                    "type" : "long"
                },
                "name":{
                    "type":"text",
                    "index":true,
                    "analyzer":"ik_max_word"
                },
                "short_name":{
                    "type":"text",
                    "index":true,
                    "analyzer":"ik_max_word"
                },
                "desc":{
                    "type":"text",
                    "index":true,
                    "analyzer":"ik_max_word"
                }
            }
    }
}
'
[elastic@localhost elastic]$ curl -H "Content-Type: application/json" -X GET "http://localhost:9200/_cat/indices?v"
health status index   uuid                   pri rep docs.count docs.deleted store.size pri.store.size
yellow open twitter scSSD1SfRCio4F77Hh8aqQ 3 2 0 0 690b 690b[elastic@localhost elastic]$ curl -H "Content-Type: application/json" -X GET "http://localhost:9200/twitter?pretty=true"
{
"twitter" : {
"aliases" : { },
"mappings" : {
"dynamic" : "false",
"properties" : {
"desc" : {
"type" : "text",
"analyzer" : "ik_max_word"
},
"name" : {
"type" : "text",
"analyzer" : "ik_max_word"
},
"productid" : {
"type" : "long"
},
"short_name" : {
"type" : "text",
"analyzer" : "ik_max_word"
}
}
},
"settings" : {
"index" : {
"creation_date" : "1571153735610",
"number_of_shards" : "3",
"number_of_replicas" : "2",
"uuid" : "scSSD1SfRCio4F77Hh8aqQ",
"version" : {
"created" : "7040099"
},
"provided_name" : "twitter"
}
}
}
}
[elastic@localhost elastic]$ curl -H "Content-Type: application/json" -X GET "http://localhost:9200/twitter/_analyze?pretty=true" -d'
{
  "field": "text",
  "text": "秦皇汉武."
}
'
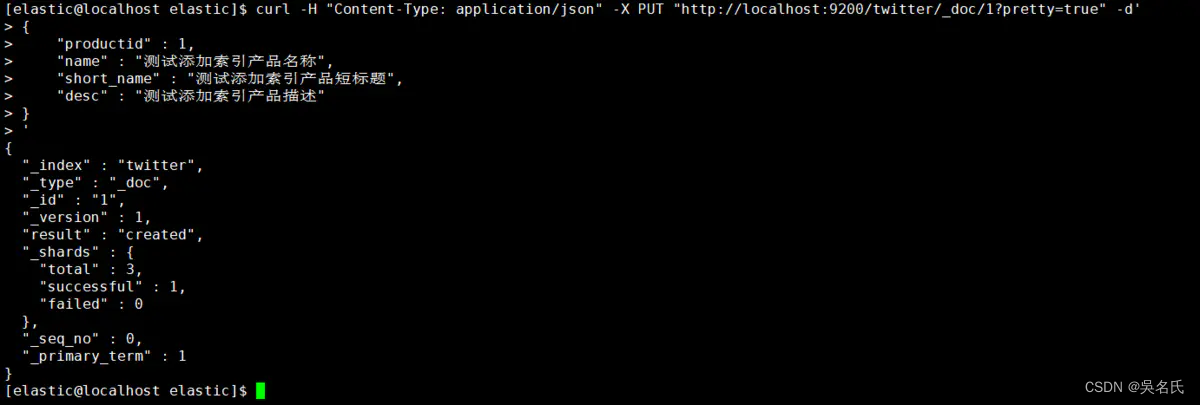
[elastic@localhost elastic]$ curl -H"Content-Type: application/json"-XDELETE"http://localhost:9200/twitter?pretty=true"这里演示PUT方式为twitter索引添加数据,并且指定id,应当注意此处的默认类型为<font color=red>_doc</font>,还有一种就是采用POST方式添加数据,并且自动生成主键,本文就不再演示,请自行查阅相关材料。
[elastic@localhost elastic]$ curl -H "Content-Type: application/json" -X PUT "http://localhost:9200/twitter/_doc/1?pretty=true" -d'
{
    "productid" : 1,
    "name" : "测试添加索引产品名称",
    "short_name" : "测试添加索引产品短标题",
    "desc" : "测试添加索引产品描述"
}
'
执行返回结果如图,则添加数据成功。
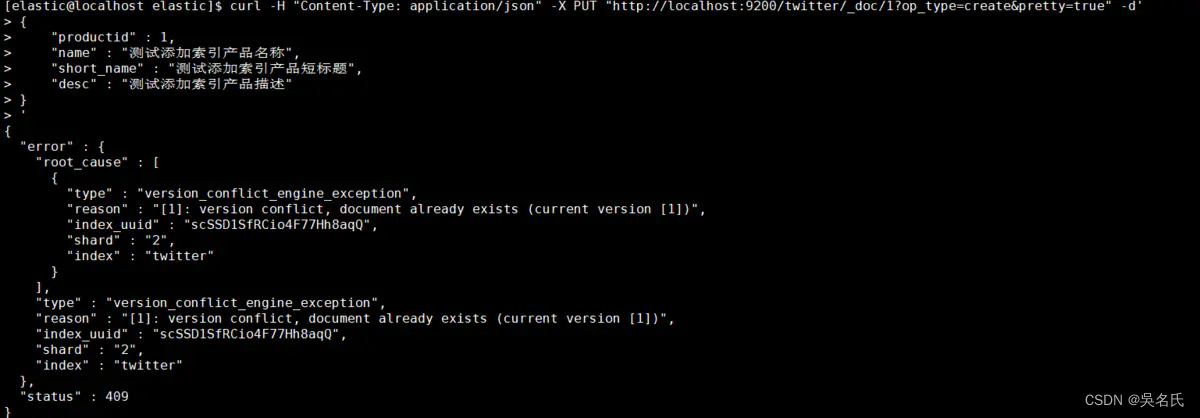
指定id为1,还可以加上参数op_type=create,这样在创建重复id时会报错导致创建失败,否则会更新该id的属性值。
[elastic@localhost elastic]$ curl -H "Content-Type: application/json" -X PUT "http://localhost:9200/twitter/_doc/1?op_type=create&pretty=true" -d'
{
    "productid" : 1,
    "name" : "测试添加索引产品名称",
    "short_name" : "测试添加索引产品短标题",
    "desc" : "测试添加索引产品描述"
}
'
[elastic@localhost elastic]$ curl -H "Content-Type: application/json" -X GET "http://localhost:9200/twitter/_search?pretty=true"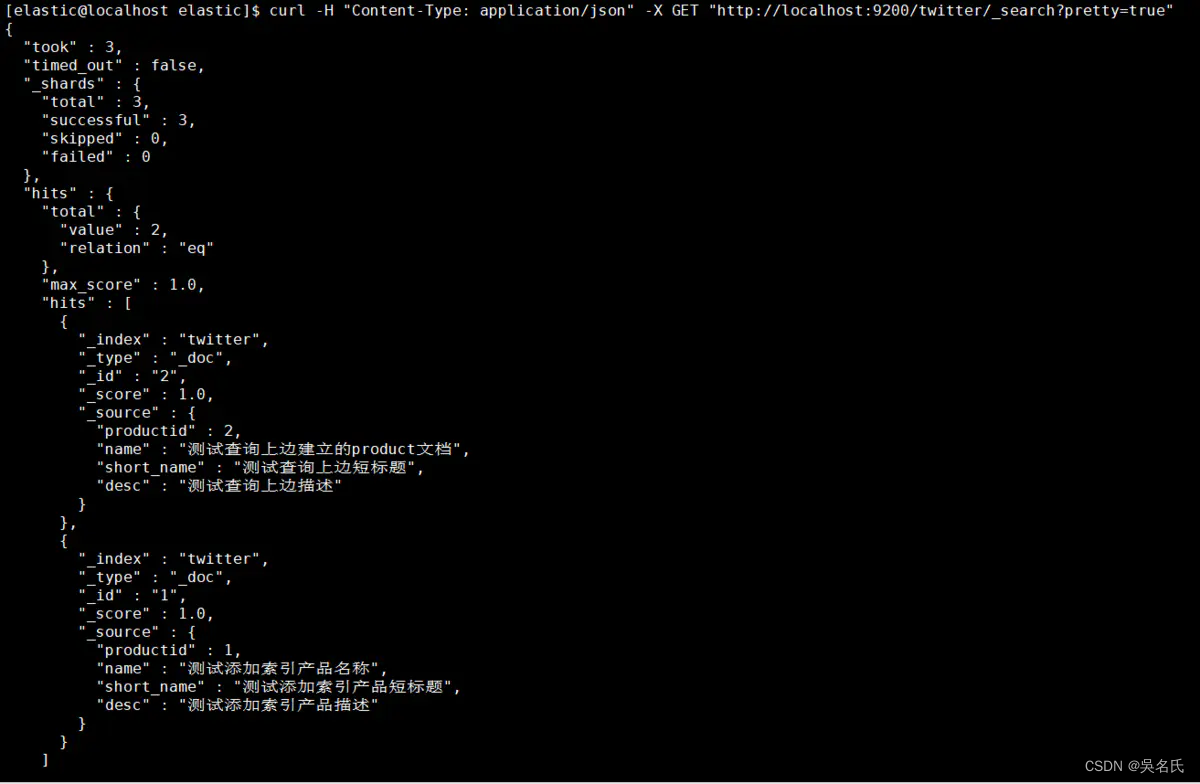
条件查询会涉及到精确词查询、匹配查询、多条件查询、聚合查询四种,分别为"term"、"match"、"multi_match"、"multi_match"。
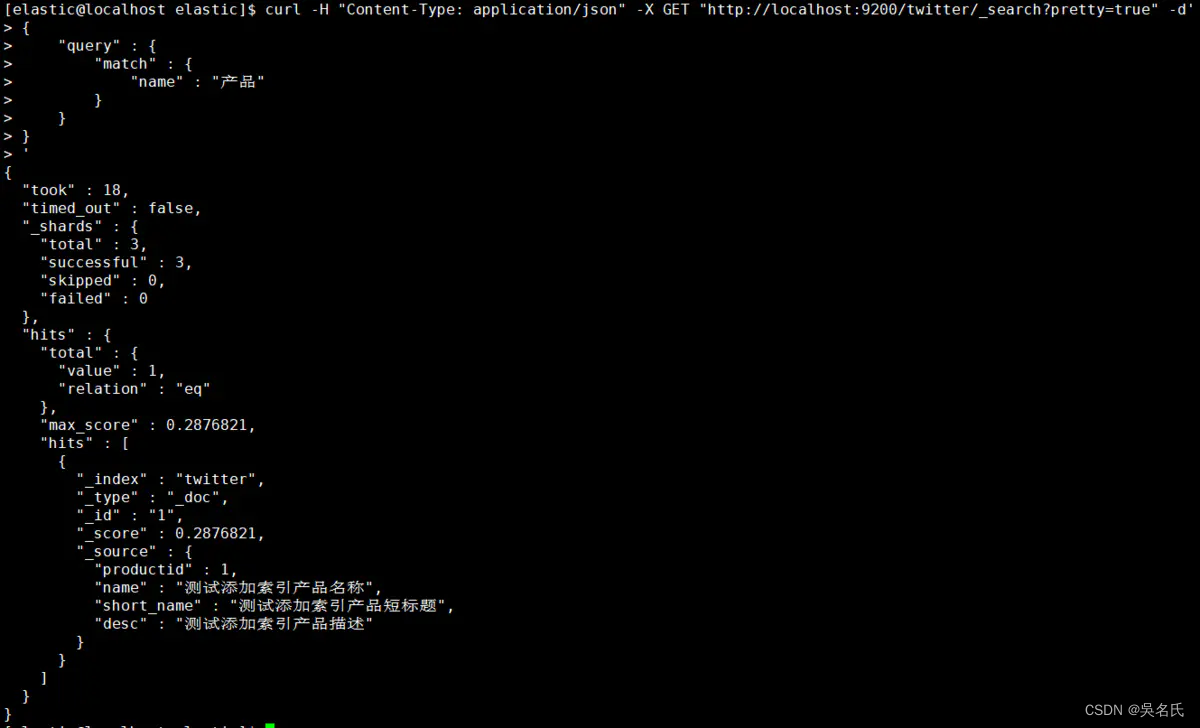
按找数据的名称作为条件查询匹配
[elastic@localhost elastic]$ curl -H "Content-Type: application/json" -X GET "http://localhost:9200/twitter/_search?pretty=true" -d'
{
    "query" : {
        "match" : {
            "name" : "产品"
        }
    }
}
'
按找数据的标识作为条件查询匹配
[elastic@localhost elastic]$ curl -H "Content-Type: application/json" -X GET "http://localhost:9200/twitter/_search?pretty=true" -d'
{
    "query" : {
        "match" : {
            "productid" : 100
        }
    }
}
'
多条件匹配
选择匹配desc、short_name列作为多条件
[elastic@localhost elastic]$ curl -H "Content-Type: application/json" -X GET "http://localhost:9200/twitter/_search?pretty=true" -d'
{
    "query" : {
        "multi_match" : {
            "query":"产品",
            "fields" : ["desc","short_name"]
        }
    }
}
'
当没有匹配任何数据适合则如下:
[elastic@localhost elastic]$ curl -H "Content-Type: application/json" -X GET "http://localhost:9200/twitter/_search?pretty=true" -d'
> {
>     "query" : {
>         "match" : {
>             "productid" : 100
>         }
>     }
> }
> '
{
  "took" : 1,
  "timed_out" : false,
  "_shards" : {
    "total" : 3,
    "successful" : 3,
    "skipped" : 0,
    "failed" : 0
  },
  "hits" : {
    "total" : {
      "value" : 0,
      "relation" : "eq"
    },
    "max_score" : null,
    "hits" : [ ]
  }
}指定一个boost值来控制每个查询子句的相对权重,该值默认为1。一个大于1的boost会增加该查询子句的相对权重。
索引映射定义的时候指定boost在elasticsearch5之后已经弃用。建议在查询的时候使用。
[elastic@localhost elastic]$ curl -H "Content-Type: application/json" -X GET "http://localhost:9200/twitter/_search?pretty=true" -d'
{
    "query": {
        "match" : {
            "title": {
                "query": "quick brown fox",
                "boost": 2
            }
        }
    }
}
'数据不总是我们想要的,由于在转换JSON body为真正JSON 的时候,整型数字5有可能会被写成字符串"5"或者浮点数5.0。coerce属性可以用来清除脏数据。
一般在以下场景中:
字符串会被强制转换为整数
浮点数被强制转换为整数
[elastic@localhost elastic]$ curl -H "Content-Type: application/json" -X PUT "http://localhost:9200/wongs?pretty=true"  -d'
{
    "settings" : {
        "index" : {
            "number_of_shards" : 3,
            "number_of_replicas" : 2
        }
    },
    "mappings" : {
            "properties" : {
                "col_1":{
                    "type" : "integer"
                },
                "col_2":{
                    "type":"integer",
                    "coerce": false
                }
            }
    }
}
'[elastic@localhost elastic]$ curl -H "Content-Type: application/json" -X PUT "http://localhost:9200/wongs/_doc/1?pretty=true" -d'
{
"col_1" : "20"
}
'结果为成功,说明col_1列数据没问题。
[elastic@localhost elastic]$ curl -H "Content-Type: application/json" -X PUT "http://localhost:9200/wongs/_doc/1?pretty=true" -d'
> {
>     "col_2" : "20"
> }
> '
{
  "error" : {
    "root_cause" : [
      {
        "type" : "mapper_parsing_exception",
        "reason" : "failed to parse field [col_2] of type [integer] in document with id '1'. Preview of field's value: '20'"
      }
    ],
    "type" : "mapper_parsing_exception",
    "reason" : "failed to parse field [col_2] of type [integer] in document with id '1'. Preview of field's value: '20'",
    "caused_by" : {
      "type" : "illegal_argument_exception",
      "reason" : "Integer value passed as String"
    }
  },
  "status" : 400
}
由于不能被格式化,数据新增失败。
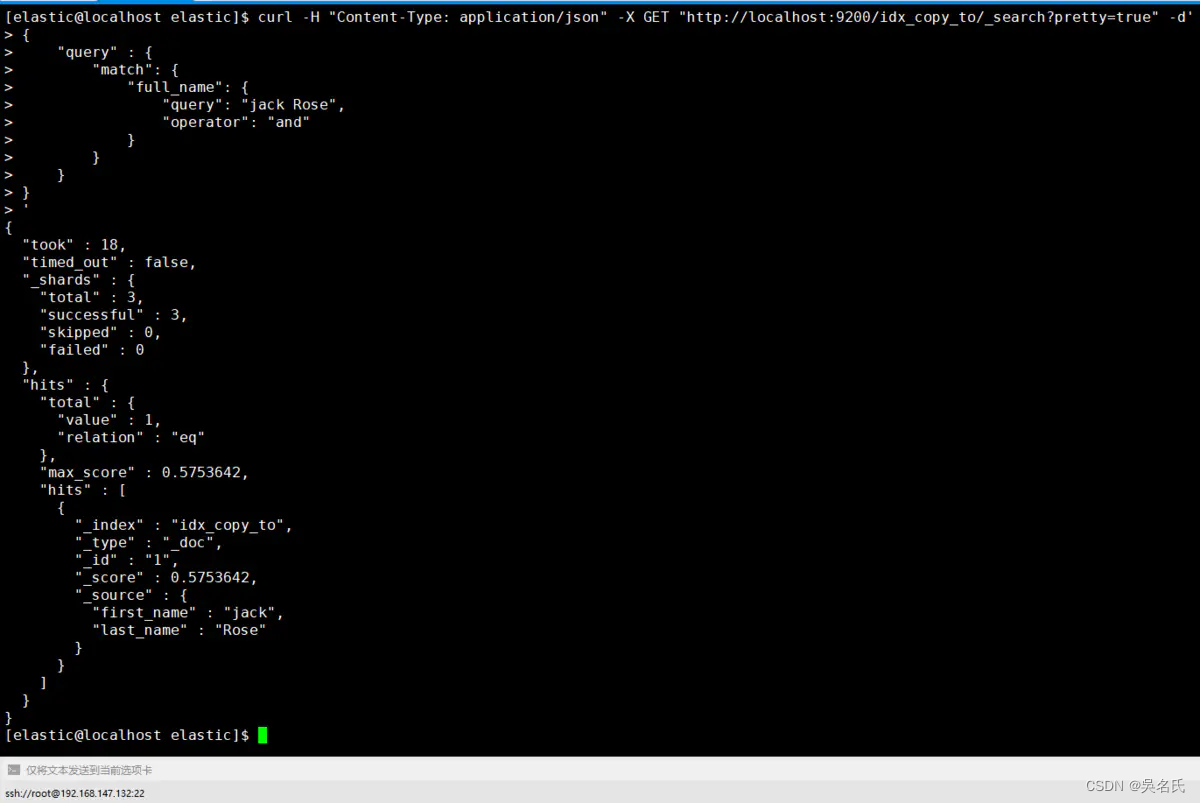
copy_to允许你创造自定义超级字段_all. 也就是说,多字段的取值被复制到一个字段并且取值所有字段的取值组合, 并且可以当成一个单独的字段查询.
如,first_name和last_name可以合并为full_name字段。
[elastic@localhost elastic]$ curl -H "Content-Type: application/json" -X PUT "http://localhost:9200/idx_copy_to?pretty=true"  -d'
{
    "settings" : {
        "index" : {
            "number_of_shards" : 3,
            "number_of_replicas" : 2
        }
    },
    "mappings" : {
            "properties" : {
                "first_name":{
                    "type" : "text",
                    "copy_to": "full_name"
                },
                "last_name":{
                    "type":"text",
                    "copy_to": "full_name"
                },
                "full_name":{
                    "type": "text"
                }
            }
    }
}
'[elastic@localhost elastic]$ curl -H "Content-Type: application/json" -X PUT "http://localhost:9200/idx_copy_to/_doc/1?pretty=true" -d'
> {
> "first_name" : "jack",
> "last_name" : "Rose"
> }
> '
{
"_index" : "idx_copy_to",
"_type" : "_doc",
"_id" : "1",
"_version" : 1,
"result" : "created",
"_shards" : {
"total" : 3,
"successful" : 1,
"failed" : 0
},
"_seq_no" : 0,
"_primary_term" : 1
}
[elastic@localhost elastic]$ curl -H "Content-Type: application/json" -X GET "http://localhost:9200/idx_copy_to/_search?pretty=true" -d'
{
    "query" : {
        "match": {
            "full_name": {
                "query": "jack Rose",
                "operator": "and"
            }
        }
    }
}
'
从下图中得知first_name和 last_name字段取值都被复制到 full_name 字段。
是为了加快排序、聚合操作,在建立倒排索引的时候,额外增加一个列式存储映射,是一个空间换时间的做法。默认是开启的,对于确定不需要聚合或者排序的字段可以关闭。
[elastic@localhost elastic]$ curl -H "Content-Type: application/json" -X PUT "http://localhost:9200/idx_doc_val?pretty=true"  -d'
{
    "settings" : {
        "index" : {
            "number_of_shards" : 3,
            "number_of_replicas" : 2
        }
    },
    "mappings" : {
            "properties" : {
                "first_name":{
                    "type" : "text"
                },
                "last_name":{
                    "type":"text",
                    "doc_values": false
                }
            }
    }
}
'默认情况下,字段可以自动添加到文档或者文档的内部对象,elasticsearc也会自动索引映射字段。
[elastic@localhost elastic]$ curl -H "Content-Type: application/json"-X PUT "http://localhost:9200/idx_dynamic?pretty=true"-d'{"settings":{"index":{"number_of_shards":3,"number_of_replicas":2}},"mappings":{"properties":{"first_name":{"type":"text"},"last_name":{"type":"text","doc_values":false}}}}
'一、SpringBoot集成Elasticsearch7.4 实战(一)
我在app/helpers/sessions_helper.rb中有一个帮助程序文件,其中包含一个方法my_preference,它返回当前登录用户的首选项。我想在集成测试中访问该方法。例如,这样我就可以在测试中使用getuser_path(my_preference)。在其他帖子中,我读到这可以通过在测试文件中包含requiresessions_helper来实现,但我仍然收到错误NameError:undefinedlocalvariableormethod'my_preference'.我做错了什么?require'test_helper'require'sessions_hel
我一直很高兴地使用DelayedJob习惯用法:foo.send_later(:bar)这会调用DelayedJob进程中对象foo的方法bar。我一直在使用DaemonSpawn在我的服务器上启动DelayedJob进程。但是...如果foo抛出异常,Hoptoad不会捕获它。这是任何这些包中的错误...还是我需要更改某些配置...或者我是否需要在DS或DJ中插入一些异常处理来调用Hoptoad通知程序?回应下面的第一条评论。classDelayedJobWorker 最佳答案 尝试monkeypatchingDelayed::W
前置步骤我们都操作完了,这篇开始介绍jenkins的集成。话不多说,看操作1、登录进入jenkins后会让你选择安装插件,选择第一个默认的就行。安装完成后设置账号密码,重新登录。2、配置JDK和Git都需要执行路径,所以需要先把执行路径找到,先进入服务器的docker容器,2.1JDK的路径root@69eef9ee86cf:/usr/bin#echo$JAVA_HOME/usr/local/openjdk-82.2Git的路径root@69eef9ee86cf:/#whichgit/usr/bin/git3、先配置JDK和Git。点击:ManageJenkins>>GlobalToolCon
@作者:SYFStrive @博客首页:HomePage📜:微信小程序📌:个人社区(欢迎大佬们加入)👉:社区链接🔗📌:觉得文章不错可以点点关注👉:专栏连接🔗💃:感谢支持,学累了可以先看小段由小胖给大家带来的街舞👉微信小程序(🔥)目录自定义组件-behaviors 1、什么是behaviors 2、behaviors的工作方式 3、创建behavior 4、导入并使用behavior 5、behavior中所有可用的节点 6、同名字段的覆盖和组合规则总结最后自定义组件-behaviors 1、什么是behaviorsbehaviors是小程序中,用于实现
不知何故,我似乎无法获得包含我的聚合的响应...使用curl它按预期工作:HBZUMB01$curl-XPOST"http://localhost:9200/contents/_search"-d'{"size":0,"aggs":{"sport_count":{"value_count":{"field":"dwid"}}}}'我收到回复:{"took":4,"timed_out":false,"_shards":{"total":5,"successful":5,"failed":0},"hits":{"total":90,"max_score":0.0,"hits":[]},"a
三分钟集成Tap防沉迷SDK(Unity版)一、SDK介绍基于国家对上线所有游戏必须增加防沉迷功能的政策下,TapTap推出防沉迷SDK,供游戏开发者进行接入;允许未成年用户在周五、六、日以及法定节假日晚上8:00-9:00进行游戏,防沉谜时间段进入游戏会弹窗进行提示!开发环境要求:Unity2019.4或更高版本iOS10或更高版本Android5.0(APIlevel21)或更高版本🔗Unity集成Demo参考链接🔗UnityTapSDK功能体验APK下载链接二、集成前准备1.创建应用进入开发者后台,按照提示开始创建应用;2.开通服务在使用TDS实名认证和防沉迷服务之前,需要在上面创建的应
1.回顾.TransportServicepublicclassTransportServiceextendsAbstractLifecycleComponentTransportService:方法:1publicfinalTextendsTransportResponse>voidsendRequest(finalTransport.Connectionconnection,finalStringaction,finalTransportRequestrequest,finalTransportRequestOptionsoptions,TransportResponseHandlerT>
我被这个难住了。到目前为止教程中的一切都进行得很顺利,但是当我将这段代码添加到我的/spec/requests/users_spec.rb文件中时,事情开始变得糟糕:describe"success"doit"shouldmakeanewuser"dolambdadovisitsignup_pathfill_in"Name",:with=>"ExampleUser"fill_in"Email",:with=>"ryan@example.com"fill_in"Password",:with=>"foobar"fill_in"Confirmation",:with=>"foobar"cl
我有一个Rails应用程序,现在设置了ElasticSearch和Tiregem以在模型上进行搜索,我想知道我应该如何设置我的应用程序以对模型中的某些索引进行模糊字符串匹配。我将我的模型设置为索引标题、描述等内容,但我想对其中一些进行模糊字符串匹配,但我不确定在何处进行此操作。如果您想发表评论,我将在下面包含我的代码!谢谢!在Controller中:defsearch@resource=Resource.search(params[:q],:page=>(params[:page]||1),:per_page=>15,load:true)end在模型中:classResource'Us
我需要一些指导来了解如何将Angular整合到rails中。选择Rails的原因:我喜欢他们偏执的做事方式。还有迁移,gem真的很酷。使用angular的原因:我正在研究和寻找最适合SPA的框架。Backbone似乎太抽象了。我不得不在Angular和Ember之间做出选择。我首先开始阅读Angular,它对我来说很有意义。所以我从来没有去读过关于ember的文章。使用Angular和Rails的原因:我研究并尝试使用小型框架,例如grape、slim(是的,我也使用php)。但我觉得需要坚持项目的长期范围。我个人喜欢用Rails的方式做事。这就是我需要帮助的地方,我在Rails4中有