一幅图像被压缩为直方图后,空间信息丢失了
性质1:一个特定的图像有唯一的直方图,但反之不成立。
性质2:在图象中特定对象的直方图是平移不变的。
性质3:在图象中特定对象的直方图是旋转不变的。
性质4: 图像的面积 $ = \displaystyle\int_0^\infty H(D)$
性质5:对离散图像,\(\sum_{D=0}^{255} H(D) = NL * NS\)
其中NL和NS分别为图像的行和列。
性质6:如果一图像由两个不连接的区域组成,则整幅图像的直方图是两个区域的直方图之和。
\(p_r(r_k)\frac{n_k}{n},k=0,1,2,.....,L-1\)
\(P(r_k) = \sum{_{j=0}^k}p_r(r_j) = \sum{_{j=0}^k} \frac{n_k}{n} ,k=0,1,2,.....,L-1\)
\(s_k = T(r_k) = (L-1)*\sum{_{j=0}^k}p_r(r_j) = \sum{_{j=0}^k} \frac{n_k}{n} ,k=0,1,2,.....,L-1\)
from os import cpu_count
import cv2 as cv
import numpy as np
import sys
import math as m
sys.path.append('./')
class HistogramEqualization:
    def __init__(self):
        pass
    def rgb2hsi(self, img_src):
        # 对于图像不足3通道的,直接返回原图像
        if len(img_src.shape) < 3:
            return img_src

        img = img_src.astype(np.float32)/255                    # 归一化处理
        img_r = img[:, :, 0]          # 获取红色通道图像
        img_g = img[:, :, 1]          # 获取绿色通道图像
        img_b = img[:, :, 2]          # 获取蓝色通道图像

        # 执行转换方程
        sum_rgb = img_r + img_g + img_b      # 求各通道像素值之和
        np.where(sum_rgb > 0, sum_rgb, sys.float_info.min)
        # 计算S分量
        S = 1 - (3 * np.minimum(np.minimum(img_r, img_g), img_b)) / sum_rgb
        # 计算H分量
        den = ((0.5 * (img_r + img_r - img_g - img_b)) / (np.sqrt((img_r - img_g) * (img_r - img_g) + (img_r - img_b) * (img_g - img_b)) + sys.float_info.min))
        # 防止求arccos时参数超出区间[-1, 1]
        den[den > 1] = 1
        den[den < -1] = -1
        H = np.arccos(den)
        index = np.where(img_b > img_g)      # 找出B>G的坐标值
        H[index] = 2 * m.pi - H[index]
        H /= 2 * m.pi
        H[S == 0] = 0
        # 计算I分量
        I = sum_rgb / 3

        # 拼接三个颜色通道并返回
        hsi = np.zeros(img.shape, dtype=np.float32)
        hsi[:, :, 0] = H
        hsi[:, :, 1] = S
        hsi[:, :, 2] = I
        return hsi

    # HSI色彩空间转换为RGB色彩空间
    def hsi2rgb(self, hsi):
        # 对于图像不足3通道的,直接返回原图像
        if len(hsi.shape) < 3:
            return hsi

        H = hsi[:, :, 0]                          # 提取H分量
        S = hsi[:, :, 1]                          # 提取S分量
        I = hsi[:, :, 2]                          # 提取I分量
        R = np.zeros(H.shape, dtype=np.float32)   # 创建红色通道
        G = np.zeros(H.shape, dtype=np.float32)   # 创建绿色通道
        B = np.zeros(H.shape, dtype=np.float32)   # 创建蓝色通道

        H *= 2 * m.pi                          # 扩充弧度范围[0, 2*pi]

        # 色调[0, 2*pi/3)范围内对应红->绿
        boolh = np.where((H >= 0) & (H < 2 * m.pi / 3))                    # 找出符合条件的二维图像数组下标
        # 计算红色通道
        R[boolh] = I[boolh] * (1 + (S[boolh] * np.cos(H[boolh])) / (np.cos(m.pi / 3 - H[boolh]) + sys.float_info.min))
        # 计算蓝色通道
        B[boolh] = I[boolh] * (1 - S[boolh])
        # 计算绿色通道
        G[boolh] = I[boolh] * 3 - (B[boolh] + R[boolh])

        # 色调[2*pi/3, 4*pi/3)范围内对应绿->蓝
        boolh = np.where((H >= 2 * m.pi / 3) & (H < 4 * m.pi / 3))      # 找出符合条件的二维图像数组下标
        H[boolh] -= 2 * m.pi / 3
        # 计算红色通道
        R[boolh] = I[boolh] * (1 - S[boolh])
        # 计算绿色通道
        G[boolh] = I[boolh] * (1 + (S[boolh] * np.cos(H[boolh])) / (np.cos(m.pi / 3 - H[boolh])))
        # 计算蓝色通道
        B[boolh] = I[boolh] * 3 - (R[boolh] + G[boolh])

        # 色调[4*pi/3, 2*pi]范围内对应蓝->红
        boolh = np.where((H >= 4 * m.pi / 3) & (H < 2 * m.pi))          # 找出符合条件的二维图像数组下标
        H[boolh] -= 4 * m.pi / 3
        # 计算绿色通道
        G[boolh] = I[boolh] * (1 - S[boolh])
        # 计算蓝色通道
        B[boolh] = I[boolh] * (1 + (S[boolh] * np.cos(H[boolh])) / (np.cos(m.pi / 3 - H[boolh])))
        # 计算绿色通道
        R[boolh] = I[boolh] * 3 - (B[boolh] + G[boolh])

        # 拼接图像
        rgb = np.zeros(hsi.shape, dtype=np.uint8)
        rgb[:, :, 0] = (R * 255).astype(np.uint8)
        rgb[:, :, 1] = (G * 255).astype(np.uint8)
        rgb[:, :, 2] = (B * 255).astype(np.uint8)

        return rgb
    # 遍历每个像素点,把img里面的像素值转换成initImg的下标索引(0-256),并统计img相同像素点的个数
    def toHisgram(self,img,initImg):
        for i in range(img.shape[0]):
            for j in range(img.shape[1]):
                initImg[img[i,j]] +=1
        return initImg

    # 进行直方图均衡化,并返回最终图像
    def toHist(self,img):
        init_img =np.zeros(256,np.int32)
        #直方图统计,获得概率
        # hist = self.toHisgram(img,init_img)
        hist,den= np.histogram(img,256,[0,255])
        hist = hist/np.sum(hist) #统计的像素点(0-256)个数除以总数
        cdf = np.zeros(256, dtype=np.float32)
       #累计分布函数
        np.cumsum(hist[0 : 256], dtype=np.float32, out=cdf[0 : 256])
        #变换函数
        t =np.zeros(256,np.uint8)
        t[0 : 256] = 255 * cdf[0 : 256]
        #合并
        dstImg = np.zeros(img.shape, dtype=np.uint8)
        dstImg[:,:] = t[img[:,:]]
        return dstImg

    #将RGB转换成HSI色彩空间域,返回HSI图像
    def rgbToHsi(self,img):
        r = img[:,:,0]
        g = img[:,:,1]
        b = img[:,:,2]
        r = r.astype(np.float32)
        g = g.astype(np.float32)
        b = b.astype(np.float32)

        I = (r+g+b)/3
        I = I/255
        img_min = np.min(img,axis=-1)
        S = 1 - (3/(r+g+b)*img_min)
        a = 0.5*((r-g)+(r-b))
        botton = ((r-g)**2+((r-b)*(g-b))+ sys.float_info.min)**0.5
        den =a /botton
        den[den>1]=1
        den[den<-1]=-1
        H = np.arccos(den)
        index = np.where(g<b)
        H[index]= 2*m.pi-H[index]
        H /= 2 * m.pi
        H[S == 0] = 0

        hsi = np.zeros([img.shape[0],img.shape[1],img.shape[2]],dtype=np.float32)
        hsi[:,:,0] = H
        hsi[:,:,1] = S
        hsi[:,:,2] = I
        return hsi

#   将HSI转换成RGB色彩空间域 ,返回RGB图像
    def hsiToRgb(self,hsi):
        H = hsi[:,:,0]
        S = hsi[:,:,1]
        I = hsi[:,:,2]
        H *=2*m.pi

        rgb = np.zeros(hsi.shape,np.uint8)
        R = np.zeros(H.shape, dtype=np.float32)
        G = np.zeros(H.shape, dtype=np.float32)
        B = np.zeros(H.shape, dtype=np.float32)

        index = np.where((H>=0)&(H<2*m.pi/3))
        R[index] = I[index] * (1+(S[index]*np.cos(H[index]))/(np.cos(m.pi/3-H[index])))
        B[index] = I[index]*(1-S[index])
        G[index] = 3*I[index]-(B[index]+R[index])

        index = np.where((H>=2*m.pi/3)&(H<4*m.pi/3))
        R[index] = I[index]*(1-S[index])
        G[index] = I[index] * (1+(S[index]*np.cos(H[index]-2*m.pi/3))/(np.cos(m.pi-H[index])))
        B[index] = 3*I[index]-(R[index]+G[index])

        index = np.where((H>=4*m.pi/3)&(H<2*m.pi))
        B[index] = I[index] * (1+(S[index]*np.cos(H[index]-4*m.pi/3))/(np.cos(5*m.pi/3-H[index])))
        G[index] = I[index]*(1-S[index])
        R[index] = 3*I[index]-(G[index]+B[index])

        rgb[:,:,0] = (255*R).astype(np.uint8)
        rgb[:,:,1] = (255*G).astype(np.uint8)
        rgb[:,:,2] = (255*B).astype(np.uint8)
        return rgb
    # 计算熵,首先统计img像素点的个数,计算每个像素点在img的分布概率,遍历计算p[i]*m.log2(p[i]),乘以-1返回熵
    def solveEntropy(self,img):
        n = img.shape[0] * img.shape[1]

        hist,den= np.histogram(img,256,[0,255])
        p = hist / n
        entropy = 0
        for i in range(0,256):
            if (p[i]==0):
                continue
            entropy += p[i]*m.log2(p[i])
        return -1 * entropy

    #计算图像亮度、对比度、熵值
    def compareResult(self,img,typeName):
        light = np.mean(img)
        contrast = np.std(img)
        entropy = self.solveEntropy(img)
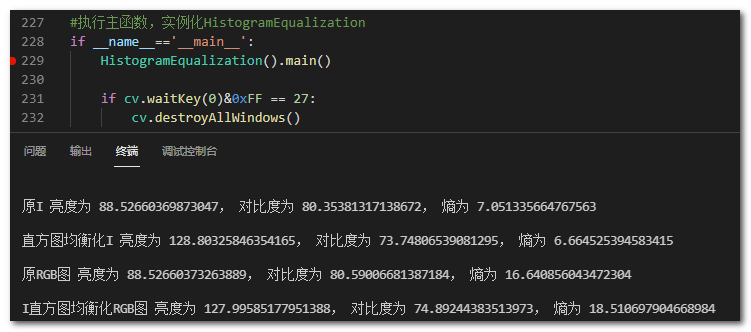
        print(f"{typeName} 亮度为 {np.mean(img)}, 对比度为 {np.std(img)}, 熵为 {self.solveEntropy(img)}\n")

    # 主函数 启动摄像头 处理每一帧的图像
    def main(self):
        cap = cv.VideoCapture(0)
        while cap.isOpened():
            ret,frame = cap.read()
            hsi = self.rgb2hsi(frame)
            # 直方图处理HSI亮度I
            I = hsi[:,:,2]
            I *= 255
            self.compareResult(I,"原I")
            I = I.astype(np.uint8)
            I = self.toHist(I)
            self.compareResult(I,"直方图均衡化I")
            hsi[:,:,2] = I/255

            rgb = self.hsiToRgb(hsi)

            self.compareResult(frame,"原RGB图")
            self.compareResult(rgb,"I直方图均衡化RGB图")
            cv.imshow("Orgin RGB",frame)
            cv.imshow("ToHist RGB",rgb)
            if cv.waitKey(1)&0xFF == ord('q'):
                break
        cap.release()

#执行主函数,实例化HistogramEqualization
if __name__=='__main__':
    HistogramEqualization().main()

    if cv.waitKey(0)&0xFF == 27:
        cv.destroyAllWindows()
很好奇,就使用rubyonrails自动化单元测试而言,你们正在做什么?您是否创建了一个脚本来在cron中运行rake作业并将结果邮寄给您?git中的预提交Hook?只是手动调用?我完全理解测试,但想知道在错误发生之前捕获错误的最佳实践是什么。让我们理所当然地认为测试本身是完美无缺的,并且可以正常工作。下一步是什么以确保他们在正确的时间将可能有害的结果传达给您? 最佳答案 不确定您到底想听什么,但是有几个级别的自动代码库控制:在处理某项功能时,您可以使用类似autotest的内容获得关于哪些有效,哪些无效的即时反馈。要确保您的提
在控制台中反复尝试之后,我想到了这种方法,可以按发生日期对类似activerecord的(Mongoid)对象进行分组。我不确定这是完成此任务的最佳方法,但它确实有效。有没有人有更好的建议,或者这是一个很好的方法?#eventsisanarrayofactiverecord-likeobjectsthatincludeatimeattributeevents.map{|event|#converteventsarrayintoanarrayofhasheswiththedayofthemonthandtheevent{:number=>event.time.day,:event=>ev
我正在编写一个包含C扩展的gem。通常当我写一个gem时,我会遵循TDD的过程,我会写一个失败的规范,然后处理代码直到它通过,等等......在“ext/mygem/mygem.c”中我的C扩展和在gemspec的“扩展”中配置的有效extconf.rb,如何运行我的规范并仍然加载我的C扩展?当我更改C代码时,我需要采取哪些步骤来重新编译代码?这可能是个愚蠢的问题,但是从我的gem的开发源代码树中输入“bundleinstall”不会构建任何native扩展。当我手动运行rubyext/mygem/extconf.rb时,我确实得到了一个Makefile(在整个项目的根目录中),然后当
这是一道面试题,我没有答对,但还是很好奇怎么解。你有N个人的大家庭,分别是1,2,3,...,N岁。你想给你的大家庭拍张照片。所有的家庭成员都排成一排。“我是家里的friend,建议家庭成员安排如下:”1岁的家庭成员坐在这一排的最左边。每两个坐在一起的家庭成员的年龄相差不得超过2岁。输入:整数N,1≤N≤55。输出:摄影师可以拍摄的照片数量。示例->输入:4,输出:4符合条件的数组:[1,2,3,4][1,2,4,3][1,3,2,4][1,3,4,2]另一个例子:输入:5输出:6符合条件的数组:[1,2,3,4,5][1,2,3,5,4][1,2,4,3,5][1,2,4,5,3][
我已经构建了一些serverspec代码来在多个主机上运行一组测试。问题是当任何测试失败时,测试会在当前主机停止。即使测试失败,我也希望它继续在所有主机上运行。Rakefile:namespace:specdotask:all=>hosts.map{|h|'spec:'+h.split('.')[0]}hosts.eachdo|host|begindesc"Runserverspecto#{host}"RSpec::Core::RakeTask.new(host)do|t|ENV['TARGET_HOST']=hostt.pattern="spec/cfengine3/*_spec.r
我们的git存储库中目前有一个Gemfile。但是,有一个gem我只在我的环境中本地使用(我的团队不使用它)。为了使用它,我必须将它添加到我们的Gemfile中,但每次我checkout到我们的master/dev主分支时,由于与跟踪的gemfile冲突,我必须删除它。我想要的是类似Gemfile.local的东西,它将继承从Gemfile导入的gems,但也允许在那里导入新的gems以供使用只有我的机器。此文件将在.gitignore中被忽略。这可能吗? 最佳答案 设置BUNDLE_GEMFILE环境变量:BUNDLE_GEMFI
这似乎非常适得其反,因为太多的gem会在window上破裂。我一直在处理很多mysql和ruby-mysqlgem问题(gem本身发生段错误,一个名为UnixSocket的类显然在Windows机器上不能正常工作,等等)。我只是在浪费时间吗?我应该转向不同的脚本语言吗? 最佳答案 我在Windows上使用Ruby的经验很少,但是当我开始使用Ruby时,我是在Windows上,我的总体印象是它不是Windows原生系统。因此,在主要使用Windows多年之后,开始使用Ruby促使我切换回原来的系统Unix,这次是Linux。Rub
我正在尝试使用ruby编写一个双线程客户端,一个线程从套接字读取数据并将其打印出来,另一个线程读取本地数据并将其发送到远程服务器。我发现的问题是Ruby似乎无法捕获线程内的错误,这是一个示例:#!/usr/bin/rubyThread.new{loop{$stdout.puts"hi"abc.putsefsleep1}}loop{sleep1}显然,如果我在线程外键入abc.putsef,代码将永远不会运行,因为Ruby将报告“undefinedvariableabc”。但是,如果它在一个线程内,则没有错误报告。我的问题是,如何让Ruby捕获这样的错误?或者至少,报告线程中的错误?
我在使用自定义RailsFormBuilder时遇到了问题,从昨天晚上开始我就发疯了。基本上我想对我的构建器方法之一有一个可选block,以便我可以在我的主要content_tag中显示其他内容。:defform_field(method,&block)content_tag(:div,class:'field')doconcatlabel(method,"Label#{method}")concattext_field(method)capture(&block)ifblock_given?endend当我在我的一个Slim模板中调用该方法时,如下所示:=f.form_field:e
我想从rubyrake脚本运行一个可执行文件,比如foo.exe我希望将foo.exe的STDOUT和STDERR输出直接写入我正在运行rake任务的控制台.当进程完成时,我想将退出代码捕获到一个变量中。我如何实现这一目标?我一直在玩backticks、process.spawn、system但我无法获得我想要的所有行为,只有部分更新:我在Windows上,在标准命令提示符下,而不是cygwin 最佳答案 system获取您想要的STDOUT行为。它还返回true作为零退出代码,这可能很有用。$?填充了有关最后一次system调
