运行有问题或需要源码请点赞关注收藏后评论区留言
在实际开发中,普通App很少会开放数据接口给其他应用访问。内容组件能够派上用场的情况往往是App想要访问系统应用的通讯数据,比如查看联系人,短信,通话记录等等,以及对这些通讯数据及逆行增删改查。 首先要给AndroidMaifest.xml中添加响应的权限配置
   <!-- 存储卡读写 -->
    <uses-permission android:name="android.permission.WRITE_EXTERNAL_STORAGE" />
    <uses-permission android:name="android.permission.READ_EXTERNAL_STORAG" />
    <!-- 联系人/通讯录。包括读联系人、写联系人 -->
    <uses-permission android:name="android.permission.READ_CONTACTS" />
    <uses-permission android:name="android.permission.WRITE_CONTACTS" />
    <!-- 短信。包括发送短信、接收短信、读短信 -->
    <uses-permission android:name="android.permission.SEND_SMS" />
    <uses-permission android:name="android.permission.RECEIVE_SMS" />
    <uses-permission android:name="android.permission.READ_SMS" />
    <!-- 通话记录。包括读通话记录、写通话记录 -->
    <uses-permission android:name="android.permission.READ_CALL_LOG" />
    <uses-permission android:name="android.permission.WRITE_CALL_LOG" />
    <!-- 安装应用请求,Android8.0需要 -->
    <uses-permission android:name="android.permission.REQUEST_INSTALL_PACKAGES" />
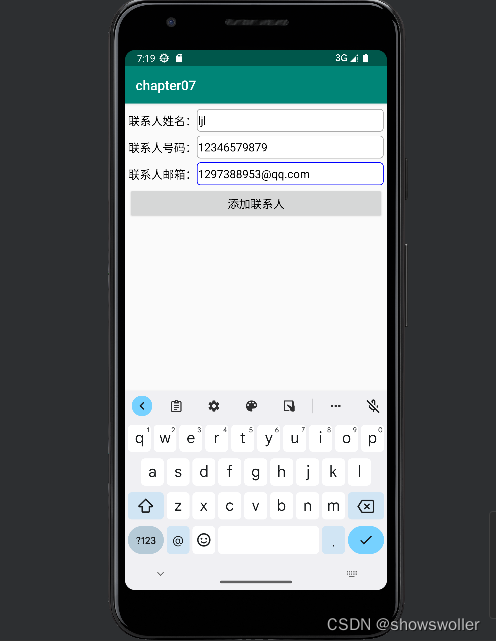
下面是往手机通讯录添加联系人信息的例子 效果如下
分成三个步骤 先查出联系人的基本信息,然后查询联系人号码,再查询联系人邮箱
package com.example.chapter07;

import android.annotation.SuppressLint;
import android.os.Bundle;
import android.view.View;
import android.view.View.OnClickListener;
import android.widget.EditText;

import androidx.appcompat.app.AppCompatActivity;

import com.example.chapter07.bean.Contact;
import com.example.chapter07.util.CommunicationUtil;
import com.example.chapter07.util.ToastUtil;

@SuppressLint("DefaultLocale")
public class ContactAddActivity extends AppCompatActivity implements View.OnClickListener {
    private static final String TAG = "ContactAddActivity";
    private EditText et_contact_name;
    private EditText et_contact_phone;
    private EditText et_contact_email;

    @Override
    protected void onCreate(Bundle savedInstanceState) {
        super.onCreate(savedInstanceState);
        setContentView(R.layout.activity_contact_add);
        et_contact_name = findViewById(R.id.et_contact_name);
        et_contact_phone = findViewById(R.id.et_contact_phone);
        et_contact_email = findViewById(R.id.et_contact_email);
        findViewById(R.id.btn_add_contact).setOnClickListener(this);
    }

    @Override
    public void onClick(View v) {
        if (v.getId() == R.id.btn_add_contact) {
            Contact contact = new Contact(); // 创建一个联系人对象
            contact.name = et_contact_name.getText().toString().trim();
            contact.phone = et_contact_phone.getText().toString().trim();
            contact.email = et_contact_email.getText().toString().trim();
            // 方式一,使用ContentResolver多次写入,每次一个字段
            CommunicationUtil.addContacts(getContentResolver(), contact);
            // 方式二,使用ContentProviderOperation一次写入,每次多个字段
            //CommunicationUtil.addFullContacts(getContentResolver(), contact);
            ToastUtil.show(this, "成功添加联系人信息");
        }
    }

}
package com.example.chapter07;

import androidx.appcompat.app.AppCompatActivity;

import android.graphics.Color;
import android.os.Bundle;
import android.widget.LinearLayout;
import android.widget.TextView;

import com.example.chapter07.bean.Contact;
import com.example.chapter07.util.CommunicationUtil;
import com.example.chapter07.util.ToastUtil;
import com.example.chapter07.util.Utils;

import java.util.List;

public class ContactReadActivity extends AppCompatActivity {
    private TextView tv_desc;
    private LinearLayout ll_list; // 联系人列表的线性布局

    @Override
    protected void onCreate(Bundle savedInstanceState) {
        super.onCreate(savedInstanceState);
        setContentView(R.layout.activity_contact_read);
        tv_desc = findViewById(R.id.tv_desc);
        ll_list = findViewById(R.id.ll_list);
        showContactInfo(); // 显示所有的联系人信息
    }

    // 显示所有的联系人信息
    private void showContactInfo() {
        try {
            // 读取所有的联系人
            List<Contact> contactList = CommunicationUtil.readAllContacts(getContentResolver());
            String contactCount = String.format("当前共找到%d位联系人", contactList.size());
            tv_desc.setText(contactCount);
            for (Contact contact : contactList){
                String contactDesc = String.format("姓名为%s,号码为%s",contact.name, contact.phone);
                TextView tv_contact = new TextView(this); // 创建一个文本视图
                tv_contact.setText(contactDesc);
                tv_contact.setTextColor(Color.BLACK);
                tv_contact.setTextSize(17);
                int pad = Utils.dip2px(this, 5);
                tv_contact.setPadding(pad, pad, pad, pad); // 设置文本视图的内部间距
                ll_list.addView(tv_contact); // 把文本视图添加至联系人列表的线性布局
            }
        } catch (Exception e) {
            e.printStackTrace();
            ToastUtil.show(this, "请检查是否开启了通讯录权限");
        }
    }

}
<LinearLayout xmlns:android="http://schemas.android.com/apk/res/android"
    android:layout_width="match_parent"
    android:layout_height="match_parent"
    android:orientation="vertical"
    android:padding="5dp" >

    <RelativeLayout
        android:layout_width="match_parent"
        android:layout_height="40dp" >

        <TextView
            android:id="@+id/tv_contact_name"
            android:layout_width="wrap_content"
            android:layout_height="match_parent"
            android:gravity="center"
            android:text="联系人姓名:"
            android:textColor="@color/black"
            android:textSize="17sp" />

        <EditText
            android:id="@+id/et_contact_name"
            android:layout_width="match_parent"
            android:layout_height="match_parent"
            android:layout_marginBottom="3dp"
            android:layout_marginTop="3dp"
            android:layout_toRightOf="@+id/tv_contact_name"
            android:background="@drawable/editext_selector"
            android:gravity="left|center"
            android:hint="请输入联系人姓名"
            android:inputType="text"
            android:maxLength="12"
            android:textColor="@color/black"
            android:textSize="17sp" />
    </RelativeLayout>

    <RelativeLayout
        android:layout_width="match_parent"
        android:layout_height="40dp" >

        <TextView
            android:id="@+id/tv_contact_phone"
            android:layout_width="wrap_content"
            android:layout_height="match_parent"
            android:gravity="center"
            android:text="联系人号码:"
            android:textColor="@color/black"
            android:textSize="17sp" />

        <EditText
            android:id="@+id/et_contact_phone"
            android:layout_width="match_parent"
            android:layout_height="match_parent"
            android:layout_marginBottom="3dp"
            android:layout_marginTop="3dp"
            android:layout_toRightOf="@+id/tv_contact_phone"
            android:background="@drawable/editext_selector"
            android:gravity="left|center"
            android:hint="请输入联系人手机号码"
            android:inputType="number"
            android:maxLength="11"
            android:textColor="@color/black"
            android:textSize="17sp" />
    </RelativeLayout>

    <RelativeLayout
        android:layout_width="match_parent"
        android:layout_height="40dp" >

        <TextView
            android:id="@+id/tv_contact_email"
            android:layout_width="wrap_content"
            android:layout_height="match_parent"
            android:gravity="center"
            android:text="联系人邮箱:"
            android:textColor="@color/black"
            android:textSize="17sp" />

        <EditText
            android:id="@+id/et_contact_email"
            android:layout_width="match_parent"
            android:layout_height="match_parent"
            android:layout_marginBottom="3dp"
            android:layout_marginTop="3dp"
            android:layout_toRightOf="@+id/tv_contact_email"
            android:background="@drawable/editext_selector"
            android:gravity="left|center"
            android:hint="请输入联系人邮箱"
            android:inputType="textEmailAddress"
            android:textColor="@color/black"
            android:textSize="17sp" />
    </RelativeLayout>

    <Button
        android:id="@+id/btn_add_contact"
        android:layout_width="match_parent"
        android:layout_height="wrap_content"
        android:gravity="center"
        android:text="添加联系人"
        android:textColor="@color/black"
        android:textSize="17sp" />

</LinearLayout><LinearLayout xmlns:android="http://schemas.android.com/apk/res/android"
android:layout_width="match_parent"
android:layout_height="match_parent"
android:orientation="vertical" >
<TextView
android:id="@+id/tv_desc"
android:layout_width="match_parent"
android:layout_height="wrap_content"
android:padding="5dp"
android:textColor="@color/black"
android:textSize="17sp" />
<ScrollView
android:layout_width="match_parent"
android:layout_height="wrap_content">
<LinearLayout
android:id="@+id/ll_list"
android:layout_width="match_parent"
android:layout_height="wrap_content"
android:orientation="vertical" />
</ScrollView>
</LinearLayout>ContentRslover获取数据采用的是主动查询方式,有查询才有数据否则美哟。为了省事,这时用到了ContentObserver内容观察器,事先给目标内容注册一个观察器,目标内容的数据一旦发生变化,就马上触发观察器的监听事件,从而执行开发者预先定义的代码
内容观察器的用法与内容提供器类似,下面是交互方法说明
registerContentObserver 内容解析器要注册内容观察器
unregisterContentObserver 注销
notifyChange 通知内容观察器发生了数据变化
package com.example.chapter07;

import android.annotation.SuppressLint;
import android.app.AlertDialog;
import android.app.PendingIntent;
import android.content.Context;
import android.content.Intent;
import android.database.ContentObserver;
import android.database.Cursor;
import android.net.Uri;
import android.os.Bundle;
import android.os.Handler;
import android.telephony.SmsManager;
import android.util.Log;
import android.view.View;
import android.widget.TextView;

import androidx.appcompat.app.AppCompatActivity;

@SuppressLint("DefaultLocale")
public class MonitorSmsActivity extends AppCompatActivity implements View.OnClickListener {
    private static final String TAG = "MonitorSmsActivity";
    private static TextView tv_check_flow;
    private static String mCheckResult;

    @Override
    protected void onCreate(Bundle savedInstanceState) {
        super.onCreate(savedInstanceState);
        setContentView(R.layout.activity_monitor_sms);
        tv_check_flow = findViewById(R.id.tv_check_flow);
        tv_check_flow.setOnClickListener(this);
        findViewById(R.id.btn_check_flow).setOnClickListener(this);
        initSmsObserver();
    }

    @Override
    public void onClick(View v) {
        if (v.getId() == R.id.btn_check_flow) {
            //查询数据流量,移动号码的查询方式为发送短信内容“18”给“10086”
            //电信和联通号码的短信查询方式请咨询当地运营商客服热线
            //跳到系统的短信发送页面,由用户手工发短信
            //sendSmsManual("10086", "18");
            //无需用户操作,自动发送短信
            sendSmsAuto("10086", "18");
        } else if (v.getId() == R.id.tv_check_flow) {
            AlertDialog.Builder builder = new AlertDialog.Builder(this);
            builder.setTitle("收到流量校准短信");
            builder.setMessage(mCheckResult);
            builder.setPositiveButton("确定", null);
            builder.create().show();
        }
    }

    // 跳到系统的短信发送页面,由用户手工编辑与发送短信
    public void sendSmsManual(String phoneNumber, String message) {
        Intent intent = new Intent(Intent.ACTION_SENDTO, Uri.parse("smsto:" + phoneNumber));
        intent.putExtra("sms_body", message);
        startActivity(intent);
    }

    // 短信发送事件
    private String SENT_SMS_ACTION = "com.example.storage.SENT_SMS_ACTION";
    // 短信接收事件
    private String DELIVERED_SMS_ACTION = "com.example.storage.DELIVERED_SMS_ACTION";

    // 无需用户操作,由App自动发送短信
    public void sendSmsAuto(String phoneNumber, String message) {
        // 以下指定短信发送事件的详细信息
        Intent sentIntent = new Intent(SENT_SMS_ACTION);
        sentIntent.putExtra("phone", phoneNumber);
        sentIntent.putExtra("message", message);
        PendingIntent sentPI = PendingIntent.getBroadcast(this, 0,
                sentIntent, PendingIntent.FLAG_UPDATE_CURRENT);
        // 以下指定短信接收事件的详细信息
        Intent deliverIntent = new Intent(DELIVERED_SMS_ACTION);
        deliverIntent.putExtra("phone", phoneNumber);
        deliverIntent.putExtra("message", message);
        PendingIntent deliverPI = PendingIntent.getBroadcast(this, 1,
                deliverIntent, PendingIntent.FLAG_UPDATE_CURRENT);
        // 获取默认的短信管理器
        SmsManager smsManager = SmsManager.getDefault();
        // 开始发送短信内容。要确保打开发送短信的完全权限,不是那种还需提示的不完整权限
        smsManager.sendTextMessage(phoneNumber, null, message, sentPI, deliverPI);
    }

    private Handler mHandler = new Handler(); // 声明一个处理器对象
    private SmsGetObserver mObserver; // 声明一个短信获取的观察器对象
    private static Uri mSmsUri; // 声明一个系统短信提供器的Uri对象
    private static String[] mSmsColumn; // 声明一个短信记录的字段数组

    // 初始化短信观察器
    private void initSmsObserver() {
        //mSmsUri = Uri.parse("content://sms/inbox");
        //Android5.0之后似乎无法单独观察某个信箱,只能监控整个短信
        mSmsUri = Uri.parse("content://sms"); // 短信数据的提供器路径
        mSmsColumn = new String[]{"address", "body", "date"}; // 短信记录的字段数组
        // 创建一个短信观察器对象
        mObserver = new SmsGetObserver(this, mHandler);
        // 给指定Uri注册内容观察器,一旦发生数据变化,就触发观察器的onChange方法
        getContentResolver().registerContentObserver(mSmsUri, true, mObserver);
    }

    // 在页面销毁时触发
    protected void onDestroy() {
        super.onDestroy();
        getContentResolver().unregisterContentObserver(mObserver); // 注销内容观察器
    }

    // 定义一个短信获取的观察器
    private static class SmsGetObserver extends ContentObserver {
        private Context mContext; // 声明一个上下文对象
        public SmsGetObserver(Context context, Handler handler) {
            super(handler);
            mContext = context;
        }

        // 观察到短信的内容提供器发生变化时触发
        public void onChange(boolean selfChange) {
            String sender = "", content = "";
            // 构建一个查询短信的条件语句,移动号码要查找10086发来的短信
            String selection = String.format("address='10086' and date>%d",
                    System.currentTimeMillis() - 1000 * 60 * 1); // 查找最近一分钟的短信
            // 通过内容解析器获取符合条件的结果集游标
            Cursor cursor = mContext.getContentResolver().query(
                    mSmsUri, mSmsColumn, selection, null, " date desc");
            // 循环取出游标所指向的所有短信记录
            while (cursor.moveToNext()) {
                sender = cursor.getString(0); // 短信的发送号码
                content = cursor.getString(1); // 短信内容
                Log.d(TAG, "sender="+sender+", content="+content);
                break;
            }
            cursor.close(); // 关闭数据库游标
            mCheckResult = String.format("发送号码:%s\n短信内容:%s", sender, content);
            // 依次解析流量校准短信里面的各项流量数值,并拼接流量校准的结果字符串
            String flow = String.format("流量校准结果如下:总流量为:%s;已使用:%s" +
                            ";剩余流量:%s", findFlow(content, "总流量为"),
                    findFlow(content, "已使用"), findFlow(content, "剩余"));
            if (tv_check_flow != null) { // 离开该页面后就不再显示流量信息
                tv_check_flow.setText(flow); // 在文本视图显示流量校准结果
            }
            super.onChange(selfChange);
        }
    }

    // 解析流量短信里面的流量数值
    private static String findFlow(String sms, String begin) {
        String flow = findString(sms, begin, "GB");
        String temp = flow.replace("GB", "").replace(".", "");
        if (!temp.matches("\\d+")) {
            flow = findString(sms, begin, "MB");
        }
        return flow;
    }

    // 截取指定头尾之间的字符串
    private static String findString(String content, String begin, String end) {
        int begin_pos = content.indexOf(begin);
        if (begin_pos < 0) {
            return "未获取";
        }
        String sub_sms = content.substring(begin_pos);
        int end_pos = sub_sms.indexOf(end);
        if (end_pos < 0) {
            return "未获取";
        }
        if (end.equals(",")) {
            return sub_sms.substring(begin.length(), end_pos);
        } else {
            return sub_sms.substring(begin.length(), end_pos + end.length());
        }
    }

}
<LinearLayout xmlns:android="http://schemas.android.com/apk/res/android"
android:layout_width="match_parent"
android:layout_height="match_parent"
android:orientation="vertical" >
<Button
android:id="@+id/btn_check_flow"
android:layout_width="match_parent"
android:layout_height="wrap_content"
android:gravity="center"
android:text="发送校准短信"
android:textColor="@color/black"
android:textSize="17sp" />
<TextView
android:id="@+id/tv_check_flow"
android:layout_width="match_parent"
android:layout_height="wrap_content"
android:paddingLeft="5dp"
android:textColor="@color/black"
android:textSize="17sp" />
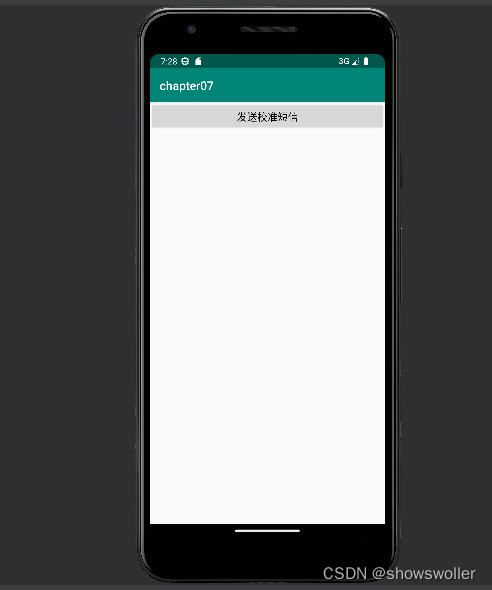
</LinearLayout>创作不易 觉得有帮助请点赞关注收藏~~~~
我在我的项目中添加了一个系统来重置用户密码并通过电子邮件将密码发送给他,以防他忘记密码。昨天它运行良好(当我实现它时)。当我今天尝试启动服务器时,出现以下错误。=>BootingWEBrick=>Rails3.2.1applicationstartingindevelopmentonhttp://0.0.0.0:3000=>Callwith-dtodetach=>Ctrl-CtoshutdownserverExiting/Users/vinayshenoy/.rvm/gems/ruby-1.9.3-p0/gems/actionmailer-3.2.1/lib/action_mailer
我正在编写一个包含C扩展的gem。通常当我写一个gem时,我会遵循TDD的过程,我会写一个失败的规范,然后处理代码直到它通过,等等......在“ext/mygem/mygem.c”中我的C扩展和在gemspec的“扩展”中配置的有效extconf.rb,如何运行我的规范并仍然加载我的C扩展?当我更改C代码时,我需要采取哪些步骤来重新编译代码?这可能是个愚蠢的问题,但是从我的gem的开发源代码树中输入“bundleinstall”不会构建任何native扩展。当我手动运行rubyext/mygem/extconf.rb时,我确实得到了一个Makefile(在整个项目的根目录中),然后当
我已经在Sinatra上创建了应用程序,它代表了一个简单的API。我想在生产和开发上进行部署。我想在部署时选择,是开发还是生产,一些方法的逻辑应该改变,这取决于部署类型。是否有任何想法,如何完成以及解决此问题的一些示例。例子:我有代码get'/api/test'doreturn"Itisdev"end但是在部署到生产环境之后我想在运行/api/test之后看到ItisPROD如何实现? 最佳答案 根据SinatraDocumentation:EnvironmentscanbesetthroughtheRACK_ENVenvironm
有没有办法在这个简单的get方法中添加超时选项?我正在使用法拉第3.3。Faraday.get(url)四处寻找,我只能先发起连接后应用超时选项,然后应用超时选项。或者有什么简单的方法?这就是我现在正在做的:conn=Faraday.newresponse=conn.getdo|req|req.urlurlreq.options.timeout=2#2secondsend 最佳答案 试试这个:conn=Faraday.newdo|conn|conn.options.timeout=20endresponse=conn.get(url
我有一个存储主机名的Ruby数组server_names。如果我打印出来,它看起来像这样:["hostname.abc.com","hostname2.abc.com","hostname3.abc.com"]相当标准。我想要做的是获取这些服务器的IP(可能将它们存储在另一个变量中)。看起来IPSocket类可以做到这一点,但我不确定如何使用IPSocket类遍历它。如果它只是尝试像这样打印出IP:server_names.eachdo|name|IPSocket::getaddress(name)pnameend它提示我没有提供服务器名称。这是语法问题还是我没有正确使用类?输出:ge
我想获取模块中定义的所有常量的值:moduleLettersA='apple'.freezeB='boy'.freezeendconstants给了我常量的名字:Letters.constants(false)#=>[:A,:B]如何获取它们的值的数组,即["apple","boy"]? 最佳答案 为了做到这一点,请使用mapLetters.constants(false).map&Letters.method(:const_get)这将返回["a","b"]第二种方式:Letters.constants(false).map{|c
我们的git存储库中目前有一个Gemfile。但是,有一个gem我只在我的环境中本地使用(我的团队不使用它)。为了使用它,我必须将它添加到我们的Gemfile中,但每次我checkout到我们的master/dev主分支时,由于与跟踪的gemfile冲突,我必须删除它。我想要的是类似Gemfile.local的东西,它将继承从Gemfile导入的gems,但也允许在那里导入新的gems以供使用只有我的机器。此文件将在.gitignore中被忽略。这可能吗? 最佳答案 设置BUNDLE_GEMFILE环境变量:BUNDLE_GEMFI
我安装了ruby版本管理器,并将RVM安装的ruby实现设置为默认值,这样'哪个ruby'显示'~/.rvm/ruby-1.8.6-p383/bin/ruby'但是当我在emacs中打开inf-ruby缓冲区时,它使用安装在/usr/bin中的ruby。有没有办法让emacs像shell一样尊重ruby的路径?谢谢! 最佳答案 我创建了一个emacs扩展来将rvm集成到emacs中。如果您有兴趣,可以在这里获取:http://github.com/senny/rvm.el
这似乎非常适得其反,因为太多的gem会在window上破裂。我一直在处理很多mysql和ruby-mysqlgem问题(gem本身发生段错误,一个名为UnixSocket的类显然在Windows机器上不能正常工作,等等)。我只是在浪费时间吗?我应该转向不同的脚本语言吗? 最佳答案 我在Windows上使用Ruby的经验很少,但是当我开始使用Ruby时,我是在Windows上,我的总体印象是它不是Windows原生系统。因此,在主要使用Windows多年之后,开始使用Ruby促使我切换回原来的系统Unix,这次是Linux。Rub
我正在玩HTML5视频并且在ERB中有以下片段:mp4视频从在我的开发环境中运行的服务器很好地流式传输到chrome。然而firefox显示带有海报图像的视频播放器,但带有一个大X。问题似乎是mongrel不确定ogv扩展的mime类型,并且只返回text/plain,如curl所示:$curl-Ihttp://0.0.0.0:3000/pr6.ogvHTTP/1.1200OKConnection:closeDate:Mon,19Apr201012:33:50GMTLast-Modified:Sun,18Apr201012:46:07GMTContent-Type:text/plain