在生产环境中,对发在的API增加授权保护是非常必要的。JWT作为一个无状态的授权校捡技术,非常适合于分布式系统架构。服务器端不需要保存用户状态,因此,无须采用Redis等技术来实现各个服务节点之间共享Session数据。
本节通过实例讲解如何用JWT技术进行授权认证和保护。
 package com.intehel.jwt.domain;

import lombok.Data;
import org.springframework.security.core.GrantedAuthority;
import org.springframework.security.core.authority.SimpleGrantedAuthority;
import org.springframework.security.core.userdetails.UserDetails;
import javax.persistence.*;
import java.util.ArrayList;
import java.util.Collection;
import java.util.List;

@Entity
@Data
public class User implements UserDetails {
    @Id
    @GeneratedValue(strategy = GenerationType.IDENTITY)
    private long id;
    private String username;
    private String password;
    private Boolean enabled;
    private Boolean accountNonExpired;
    private Boolean accountNonLocked;
    private Boolean credentialsNonExpired;
    @ManyToMany(fetch = FetchType.EAGER,cascade = CascadeType.PERSIST)
    private List<Role> roles;
    @Override
    public Collection<? extends GrantedAuthority> getAuthorities() {
        List<SimpleGrantedAuthority> authorities = new ArrayList<>();
        for (Role role : roles) {
            authorities.add(new SimpleGrantedAuthority(role.getName()));
        }
        return authorities;
    }
    @Override
    public String getPassword() {
        return password;
    }
    @Override
    public String getUsername() {
        return username;
    }
    @Override
    public boolean isAccountNonExpired() {
        return accountNonExpired;
    }
    @Override
    public boolean isAccountNonLocked() {
        return accountNonLocked;
    }
    @Override
    public boolean isCredentialsNonExpired() {
        return credentialsNonExpired;
    }
    @Override
    public boolean isEnabled() {
        return enabled;
    }
} package com.intehel.jwt.domain;
import lombok.Data;
import javax.persistence.Entity;
import javax.persistence.GeneratedValue;
import javax.persistence.GenerationType;
import javax.persistence.Id;
@Data
@Entity(name = "role")
public class Role {
@Id
@GeneratedValue(strategy = GenerationType.IDENTITY)
private Integer id;
private String name;
private String nameZh;
}package com.intehel.jwt.repository;
import com.intehel.jwt.domain.User;
import org.springframework.data.jpa.repository.JpaRepository;
public interface UserRepository extends JpaRepository<User,Integer> {
User findUserByUsername(String username);
}package com.intehel.jwt.repository;
import com.intehel.jwt.domain.Role;
import org.springframework.data.jpa.repository.JpaRepository;
import java.util.Optional;
public interface UserRoleRepository extends JpaRepository<Role,Integer> {
Role findByName(String name);
}package com.intehel.jwt.handler;
import org.springframework.security.core.AuthenticationException;
import org.springframework.security.web.authentication.SimpleUrlAuthenticationFailureHandler;
import org.springframework.stereotype.Component;
import javax.servlet.ServletException;
import javax.servlet.http.HttpServletRequest;
import javax.servlet.http.HttpServletResponse;
import java.io.IOException;
import java.io.PrintWriter;
/**
* @Author:李自航
* @Description:
* @CreateDate:2022/8/5 10:15
* @UPdateDate:2022/8/5 10:15
* @Version:版本号
*/
@Component
public class JwtAuthenticationFailHandler extends SimpleUrlAuthenticationFailureHandler {
@Override
public void onAuthenticationFailure(HttpServletRequest request, HttpServletResponse response, AuthenticationException exception) throws IOException, ServletException {
request.setCharacterEncoding("UTF-8");
String name = request.getParameter("name");
response.setContentType("application/json;charset=utf-8");
PrintWriter out = response.getWriter();
out.write("{\n" +
"\t\"status\":\"error\",\n" +
"\t\"message\":\"用户名或密码错误\"\n" +
"}");
out.flush();
out.close();
}
} package com.intehel.jwt.handler;
import org.springframework.security.core.Authentication;
import org.springframework.security.core.GrantedAuthority;
import org.springframework.security.core.context.SecurityContextHolder;
import org.springframework.security.core.userdetails.UserDetails;
import org.springframework.security.web.authentication.SavedRequestAwareAuthenticationSuccessHandler;
import org.springframework.stereotype.Component;
import javax.servlet.ServletException;
import javax.servlet.http.HttpServletRequest;
import javax.servlet.http.HttpServletResponse;
import java.io.IOException;
import java.io.PrintWriter;
import java.util.Collection;
@Component
public class JwtAuthenticationSuccessHandler extends SavedRequestAwareAuthenticationSuccessHandler {
@Override
public void onAuthenticationSuccess(HttpServletRequest request, HttpServletResponse response, Authentication authentication) throws ServletException, IOException {
Object principal = SecurityContextHolder.getContext().getAuthentication().getPrincipal();
if (principal != null && principal instanceof UserDetails){
UserDetails user = (UserDetails) principal;
request.getSession().setAttribute("userDetail",user);
String role = "";
Collection<? extends GrantedAuthority> authorities = user.getAuthorities();
for (GrantedAuthority authority : authorities){
role = authority.getAuthority();
}
String token = "灌水灌水";
response.setHeader("token",token);
response.setContentType("application/json;charset=utf-8");
PrintWriter out = response.getWriter();
out.write("{\n" +
"\t\"status\":\"ok\",\n" +
"\t\"message\":\"登录成功\"\n" +
"}\n");
out.flush();
out.close();
}
}
}package com.intehel.jwt.config;
import com.intehel.jwt.handler.JwtAuthenticationFailHandler;
import com.intehel.jwt.handler.JwtAuthenticationSuccessHandler;
import com.intehel.jwt.handler.MyAuthenticationFailureHandler;
import com.intehel.jwt.handler.MyAuthenticationSuccessHandler;
import com.intehel.jwt.service.MyUserDetailsService;
import org.springframework.beans.factory.annotation.Autowired;
import org.springframework.context.annotation.Bean;
import org.springframework.context.annotation.Configuration;
import org.springframework.security.config.annotation.authentication.builders.AuthenticationManagerBuilder;
import org.springframework.security.config.annotation.web.builders.HttpSecurity;
import org.springframework.security.config.annotation.web.builders.WebSecurity;
import org.springframework.security.config.annotation.web.configuration.WebSecurityConfigurerAdapter;
import org.springframework.security.crypto.bcrypt.BCryptPasswordEncoder;
@Configuration
public class WebSecurityConfig extends WebSecurityConfigurerAdapter {
@Autowired
private JwtAuthenticationSuccessHandler myAuthenticationSuccessHandler;
@Autowired
private JwtAuthenticationFailHandler myAuthenticationFailureHandler;
@Autowired
MyUserDetailsService jwtDetailsService;
@Bean
public BCryptPasswordEncoder passwordEncoder() {
return new BCryptPasswordEncoder();
}
@Override
protected void configure(HttpSecurity http) throws Exception {
http.antMatcher("/jwt/**")
.formLogin()
.usernameParameter("username")
.passwordParameter("password")
.loginProcessingUrl("/doLogin")
.loginPage("/mylogin.html")
.successHandler(myAuthenticationSuccessHandler)
.failureHandler(myAuthenticationFailureHandler)
.and()
.authorizeRequests()
.antMatchers("/register/mobile").permitAll()
.antMatchers("/article/**").authenticated()
.antMatchers("/jwt/tasks/**").hasRole("USER")
.anyRequest().authenticated()
.and()
.csrf().disable();
http.logout().permitAll();
http.cors().and().csrf().ignoringAntMatchers("/jwt/**");
}
@Override
protected void configure(AuthenticationManagerBuilder auth) throws Exception {
auth.userDetailsService(jwtDetailsService).passwordEncoder(new BCryptPasswordEncoder());
}
@Override
public void configure(WebSecurity web) throws Exception {
web.ignoring().antMatchers("/jwt/register/mobile");
}
}从上面代码可以看出,此处JWT的安全配置和上面已经讲解过的安全配置并无区别,没有特别的参数需要配置。
 <!DOCTYPE html>
<html lang="en" xmlns:th="http://www.thymeleaf.org">
<head>
    <meta charset="UTF-8">
    <title>登录</title>
    <link href="//maxcdn.bootstrapcdn.com/bootstrap/4.1.1/css/bootstrap.min.css" rel="stylesheet" id="bootstrap-css">
    <script src="//maxcdn.bootstrapcdn.com/bootstrap/4.1.1/js/bootstrap.min.js"></script>
    <script src="//cdnjs.cloudflare.com/ajax/libs/jquery/3.2.1/jquery.min.js"></script>
</head>
<style>
    #login .container #login-row #login-column #login-box {
        border: 1px solid #9c9c9c;
        background-color: #EAEAEA;
    }
</style>
<body>
<div id="login">
    <div class="container">
        <div id="login-row" class="row justify-content-center align-items-center">
            <div id="login-column" class="col-md-6">
                <div id="login-box" class="col-md-12">
                    <form id="login-form" class="form" action="/doLogin" method="post">
                        <h3 class="text-center text-info">登录</h3>
                        <!--/*@thymesVar id="SPRING_SECURITY_LAST_EXCEPTION" type="com"*/-->
                        <div th:text="${SPRING_SECURITY_LAST_EXCEPTION}"></div>
                        <div class="form-group">
                            <label for="username" class="text-info">用户名:</label><br>
                            <input type="text" name="username" id="username" class="form-control">
                        </div>
                        <div class="form-group">
                            <label for="password" class="text-info">密码:</label><br>
                            <input type="text" name="password" id="password" class="form-control">
                        </div>
                        <div class="form-group">
                            <input type="submit" name="submit" class="btn btn-info btn-md" value="登录">
                        </div>
                    </form>
                </div>
            </div>
        </div>
    </div>
</div>
</body>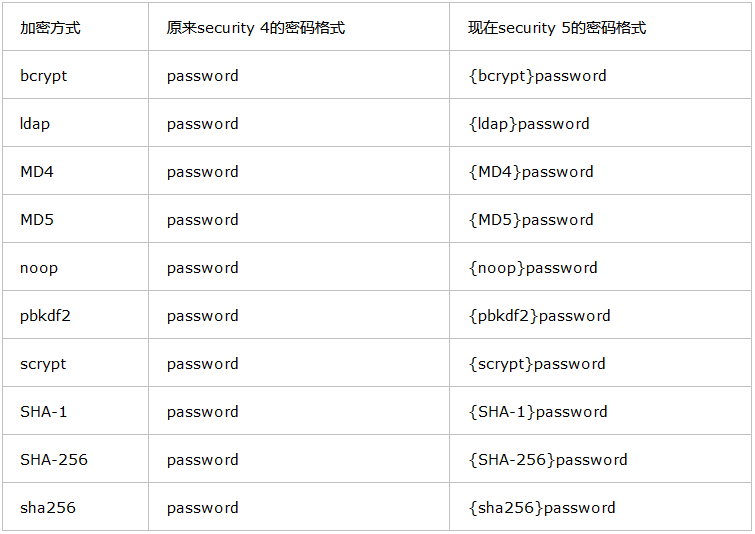
</html>在注册时为了安全,需要将注册的密码经过加密再写入数据库中。
spring security 5之后,需要对密码添加这个类型(id),可参考文章www.cnblogs.com/majianming/p/7923604.html
查看代码
package com.intehel.jwt.controller;
import com.intehel.jwt.domain.Role;
import com.intehel.jwt.domain.User;
import com.intehel.jwt.repository.UserRepository;
import com.intehel.jwt.repository.UserRoleRepository;
import org.springframework.beans.factory.annotation.Autowired;
import org.springframework.security.crypto.bcrypt.BCryptPasswordEncoder;
import org.springframework.stereotype.Controller;
import org.springframework.web.bind.annotation.RequestBody;
import org.springframework.web.bind.annotation.RequestMapping;
import org.springframework.web.bind.annotation.RestController;
import java.util.ArrayList;
import java.util.List;
@RestController
@RequestMapping("/jwt")
public class JwtUserController {
@Autowired
private UserRepository userRepository;
@Autowired
private UserRoleRepository userRoleRepository;
@RequestMapping(value = "/register/mobile")
public String register(User user){
try {
User userName = userRepository.findUserByUsername(user.getUsername());
if (userName != null){
return "用户名已存在";
}
BCryptPasswordEncoder encoder = new BCryptPasswordEncoder();
user.setPassword("{bcrypt}"+encoder.encode(user.getPassword()));
List<Role> roles = new ArrayList<>();
Role role = userRoleRepository.findByName("ROLE_admin");
roles.add(role);
user.setRoles(roles);
userRepository.save(user);
}catch (Exception e){
return "出现了异常";
}
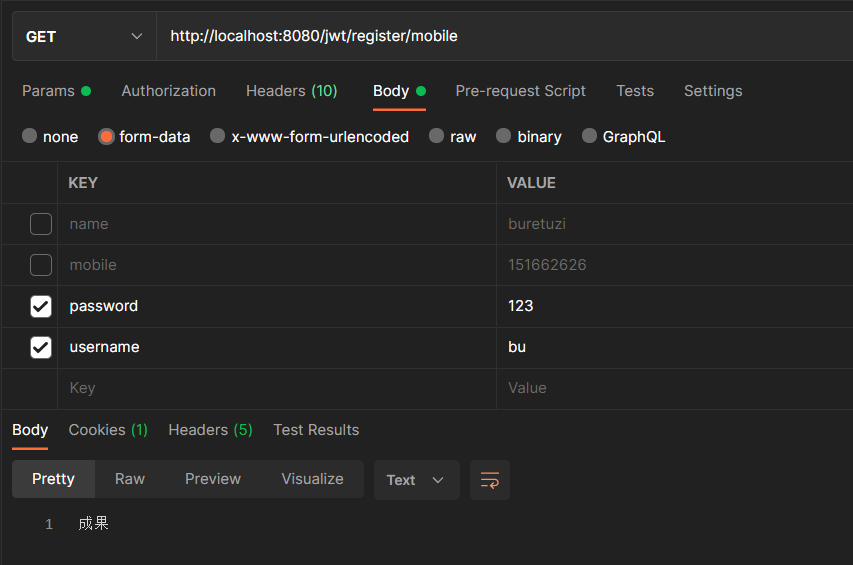
return "成果";
}
}
 package com.intehel.jwt.service;

import com.intehel.jwt.domain.User;
import com.intehel.jwt.repository.UserRepository;
import org.springframework.beans.factory.annotation.Autowired;
import org.springframework.security.core.userdetails.UserDetails;
import org.springframework.security.core.userdetails.UserDetailsService;
import org.springframework.security.core.userdetails.UsernameNotFoundException;
import org.springframework.stereotype.Service;

@Service
public class MyUserDetailsService implements UserDetailsService {
    @Autowired
    UserRepository userRepository;
    @Override
    public UserDetails loadUserByUsername(String username)throws UsernameNotFoundException {
        User user = userRepository.findUserByUsername(username);
        if (user == null) {
            throw new UsernameNotFoundException("用户不存在");
        }
        return user;
    }
}这里使用测试工具Postman提交POST注册请求
数据库插入信息如下

浏览器输入http://localhost:8080/jwt自动跳转至登录界面,输入使用postman注册的账号即可
以本博客对spring security的随笔,可实现使用token授权登录,这里不多做解释
我正在尝试将ruby-debug19与Ruby1.9.1p376一起使用,但出现以下错误:test.rb:2:in`require':nosuchfiletoload--ruby-debug19(LoadError)fromtest.rb:2:in`'这是测试.rb:require'rubygems'require'ruby-debug19'这是“gemlist”的输出:***LOCALGEMS***ruby-debug19(0.11.6)(etc.)因此运行“rubytest.rb”会产生上述错误。我做错了吗?我认为这是运行ruby-debug19的正确方法(通过包含gem并
如果您希望在Spring中启用定时任务功能,则需要在主类上添加 @EnableScheduling 注解。这样Spring才会扫描 @Scheduled 注解并执行定时任务。在大多数情况下,只需要在主类上添加 @EnableScheduling 注解即可,不需要在Service层或其他类中再次添加。以下是一个示例,演示如何在SpringBoot中启用定时任务功能:@SpringBootApplication@EnableSchedulingpublicclassApplication{publicstaticvoidmain(String[]args){SpringApplication.ru
软件特点部署后能通过浏览器查看线上日志。支持Linux、Windows服务器。采用随机读取的方式,支持大文件的读取。支持实时打印新增的日志(类终端)。支持日志搜索。使用手册基本页面配置路径配置日志所在的目录,配置后按回车键生效,下拉框选择日志名称。选择日志后点击生效,即可加载日志。windows路径E:\java\project\log-view\logslinux路径/usr/local/XX历史模式历史模式下,不会读取新增的日志。针对历史文件可以分页读取,配置分页大小、跳转。历史模式下,支持根据关键词搜索。目前搜索引擎使用的是jdk自带类库,搜索速度相对较低,优点是比较简单。2G日志全文搜
1.依赖导入org.springframework.bootspring-boot-starter-weborg.springframework.bootspring-boot-starter-validation2.validation常用注解@Null被注释的元素必须为null@NotNull被注释的元素不能为null,可以为空字符串@AssertTrue被注释的元素必须为true@AssertFalse被注释的元素必须为false@Min(value)被注释的元素必须是一个数字,其值必须大于等于指定的最小值@Max(value)被注释的元素必须是一个数字,其值必须小于等于指定的最大值@D
Iparking停车收费管理系统-可商用介绍Iparking是一款基于springBoot的停车收费管理系统,支持封闭车场和路边车场,支持微信支付宝多种支付渠道,支持多种硬件,涵盖了停车场管理系统的所有基础功能。技术栈Springboot,MybatisPlus,Beetl,Mysql,Redis,RabbitMQ,UniApp功能云端功能序号模块功能描述1系统管理菜单管理配置系统菜单2系统管理组织管理管理组织机构3系统管理角色管理配置系统角色,包含数据权限和功能权限配置4系统管理用户管理管理后台用户5系统管理租户管理多租户管理6系统管理公众号配置租户公众号配置7系统管理操作日志审计日志8系统
昨天我安装了Ubuntu16.04.1。ruby2.3.1p112(2016-04-26修订版54768)[x86_64-linux]rails-v'4.2.6'创建一个Rails项目运行bundle出现错误:Errno::EACCES:Permissiondenied@rb_sysopen-/home/zeus/.rbenv/versions/2.3.1/lib/ruby/gems/2.3.0/gems/pg-0.19.0/.gemtestAnerroroccurredwhileinstallingpg(0.19.0),andBundlercannotcontinue.Makesur
https://cloud.189.cn/t/BJbYreYbmUj2(访问码:djz6)(网盘2022-4-1更新)一、刷入armbian。1.1使用AmlBurnTool软件烧录首选底包至固件。烧录完成后断开玩客云电源备用。(靠近hdmi的那个口子。)1.2使用WIn32diskimager软件将emmc固件写入U盘。1.3写入成功后,先将U盘插入玩客云靠近网线接口端的USB口,再接入电源。玩客云通电后指示灯会先亮绿灯,再亮蓝灯,红蓝闪烁,最后蓝灯常亮。等到确定蓝灯常亮后,再拔掉U盘、电源。(最好蓝灯常亮后,启动一次玩客云,看看ssh是否正常。)1.4使用WIn32diskimager写入
这个问题在这里已经有了答案:关闭10年前。PossibleDuplicate:Rails3.1andRuby1.9.3p125:ruby-debug19stillcrasheswith“Symbolnotfound:_ruby_threadptr_data_type”我在调试ruby1.9.3preview1版本时遇到了一些问题。我已经使用rvm和以下命令安装了1.9.3:rvminstall1.9.3--reconfigure--debug-C--enable-pthread并安装了ruby-debug19:geminstallruby-debug19----with-rub
这个问题在这里已经有了答案:关闭10年前。PossibleDuplicate:ruby-debugwithRuby1.9.3?我听说ruby1.9.3p125有解决ruby-debug19问题的传言,所以根据RVM站点上的说明,我重新安装了1.9.3:$rvmreinstall1.9.3--patchdebug--force-autoconf$ruby-vruby1.9.3p125(2012-02-16revision34643)[x86_64-darwin11.2.0]然后:geminstallruby-debug19将此条目添加到我的Gemfile中:gem'ruby-de
借鉴网址:PacketTracer思科模拟器入门教程之十八网络端口地址转换NAPT配置_柚子君.的博客-CSDN博客姓名彭彭头实验日期2022.06.07学号实验序号19实验名称网络端口地址转换NAPT配置一、实验目的及要求理解NAT网络地址转换的原理及功能;掌握静态NAPT的配置,实现局域网访问互联网。二、实验环境Cisco软件、2台主机、1台服务器、1台交换机、2台路由器、直连线、交叉线、DCE串口线三、实验内容1.建立拓扑图2.配置主机、服务器、路由器接口IP地址3.配置路由器:配置静态路由协议,让PC间能相互ping通4.在R1上配置NAPT5.在R1上定义内外网络接口6.测试主机之间