tar xvf nagios-cn-3.2.3.tar.bz2
cd nagios-cn-3.2.3
useradd -m -s /bin/bash nagios
usermod -a -G nagcmd nagios
./configure --prefix=/usr/local/nagios --with-command-group=nagcmd
make
make all
make install
make install-init     # 生成init启动脚本
make install-config     # 安装示例配置文件
make install-commandmode     # 设置相应的目录权限
chmod o+rwx /usr/local/nagios/var/rw2.nagios-plugins安装wget http://prdownloads.sourceforge.net/sourceforge/nagiosplug/nagios-plugins
tar zxvf nagios-plugins-1.4.16.tar.gz
cd nagios-plugins-1.4.16
yum install make apr* autoconf automake curl curl-devel gcc gcc-c++ zlib-devel \
openssl openssl-devel pcre-devel gd gd-devel kernel keyutils patch perl perl-devel \
kernel keyutils kernel-headers compat* mpfr cpp glibc libgomp libstdc++-devel ppl \
cloog-ppl keyutils-libs-devel libcom_err-devel libsepol-devel libselinux-devel \
krb5-devel zlib-devel libXpm* freetype libjpeg* libpng* php-common php-gd ncurses* libtool* libxml2 libxml2-devel patch -y./configure --prefix=/usr/local/nagios --with-mysql=/home/mysql/
make
make installtar xzvf nrpe-2.12.tar.gz
cd nrpe-2.12
./configure
make
./configure
make all
make install-plugin
make install-daemon
make install-daemon-config
\cp src/check_nrpe /usr/local/nagios/libexec/
/usr/local/nagios/bin/nrpe -c /usr/local/nagios/etc/nrpe.cfg -d
echo '/usr/local/nagios/bin/nrpe -c /usr/local/nagios/etc/nrpe.cfg -d' >> /etc/rc.local要重启nrpe进行就先杀掉进行,然后重启
kill `ps aux |grep nrpe |grep -v grep |awk '{print $2}'`
/usr/local/nagios/bin/nrpe -c /usr/local/nagios/etc/nrpe.cfg -d
本机测试下:
/usr/local/nagios/libexec/check_nrpe -H localhost -c check_users加入系统服务并设为开机自动
chkconfig --add nagios
chkconfig nagios on
chown nagios.nagios /usr/local/nagios/var/rw
# 测试配置文件是否正确
/usr/local/nagios/bin/nagios -v /usr/local/nagios/etc/nagios.cfgvi ~/.bashrc
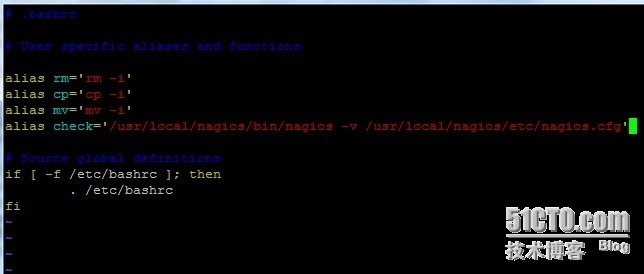
在里面用alias 来自定义一个命令来代替,这里我用check
alias check='/usr/local/nagios/bin/nagios -v /usr/local/nagios/etc/nagios.cfg'
source ~/.bashrc
此时可以用check命令来检测配置文件了vi /usr/local/nagios/etc/objects/contacts.cfg
###############################################################################
# CONTACTS.CFG - SAMPLE CONTACT/CONTACTGROUP DEFINITIONS
#
# Last Modified: 05-31-2007
#
# NOTES: This config file provides you with some example contact and contact
# group definitions that you can reference in host and service
# definitions.
#
# You don't need to keep these definitions in a separate file from your
# other object definitions. This has been done just to make things
# easier to understand.
#
###############################################################################
###############################################################################
###############################################################################
#
# CONTACTS
#
###############################################################################
###############################################################################
# Just one contact defined by default - the Nagios admin (that's you)
# This contact definition inherits a lot of default values from the 'generic-contact'
# template which is defined elsewhere.
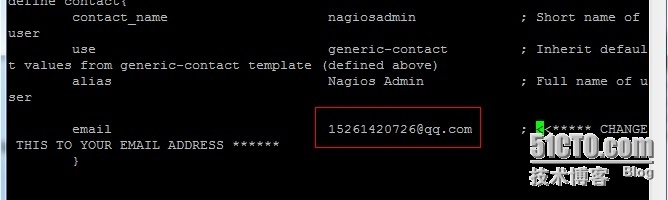
define contact{
contact_name nagiosadmin ; Short name of user
use generic-contact ; Inherit default values from generic-contact template (defined above)
alias Nagios Admin ; Full name of user
email nagios@localhost ; <<***** CHANGE THIS TO YOUR EMAIL ADDRESS ******
}
###############################################################################
###############################################################################
#
# CONTACT GROUPS
#
###############################################################################
###############################################################################
# We only have one contact in this simple configuration file, so there is
# no need to create more than one contact group.
define contactgroup{
contactgroup_name admins
alias Nagios Administrators
members nagiosadmin
}
定义check_nrpe命令
vi /usr/local/nagios/etc/objects/commands.cfg
define command{
command_name check_nrpe
command_line /usr/local/nagios/libexec/check_nrpe -H $HOSTADDRESS$ -c $ARG1$
}检测配置文件是否有误check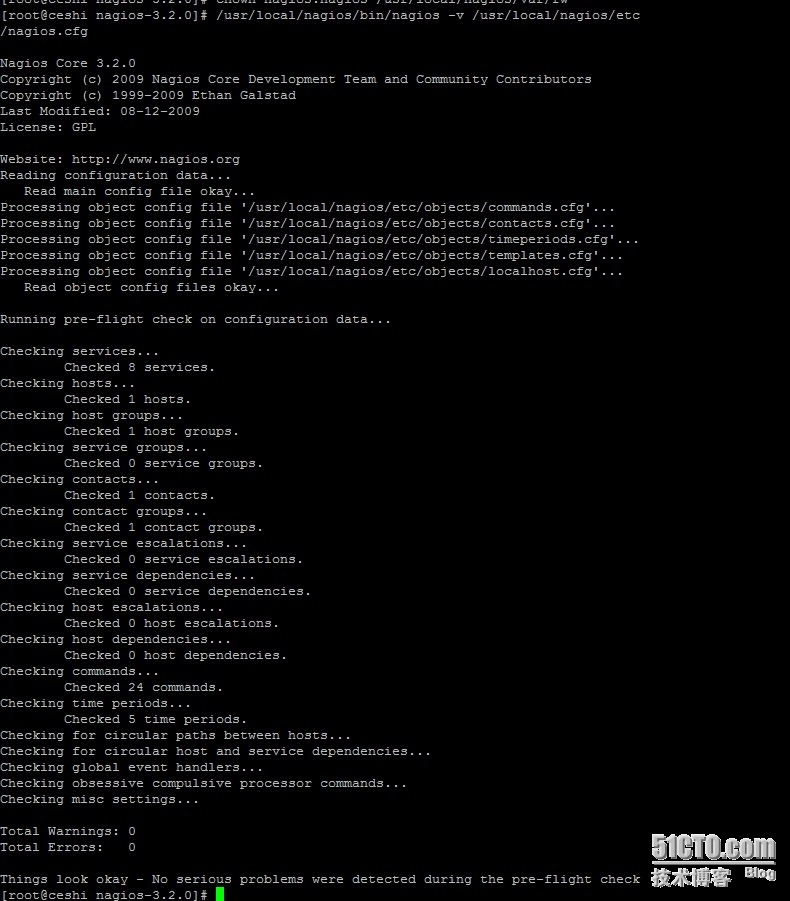
nginx 配置,Nginx fastcgi perl (pl、cgi)支持
安装FCGI模块
cd
tar zxvf FCGI-0.70.tar.gz
cd FCGI-0.70
perl Makefile.PL
make
make install
cd
安装 IO 和 IO::ALL模块
tar zxvf IO-1.25.tar.gz
cd IO-1.25
perl Makefile.PL
make
make install
cd
tar zxvf IO-All-0.41.tar.gz
cd IO-All-0.41
perl Makefile.PL
make
make install
cd
unzip perl-fcgi.zip
cp perl-fcgi.pl /usr/local/nginx/
chmod 755 /usr/local/nginx/perl-fcgi.pl
vi /usr/local/nginx/start_perl_cgi.sh
#!/bin/bash
#set -x
dir=/usr/local/nginx/
stop ()
{
#pkill -f $dir/perl-fcgi.pl
kill $(cat $dir/logs/perl-fcgi.pid)
rm $dir/logs/perl-fcgi.pid 2>/dev/null
rm $dir/logs/perl-fcgi.sock 2>/dev/null
echo "stop perl-fcgi done"
}
start ()
{
rm $dir/now_start_perl_fcgi.sh 2>/dev/null
chown nobody.root $dir/logs
echo "$dir/perl-fcgi.pl -l $dir/logs/perl-fcgi.log -pid $dir/logs/perl-fcgi.pid -S $dir/logs/perl-fcgi.sock" >>$dir/now_start_perl_fcgi.sh
chown nobody.nobody $dir/now_start_perl_fcgi.sh
chmod u+x $dir/now_start_perl_fcgi.sh
sudo -u nobody $dir/now_start_perl_fcgi.sh
echo "start perl-fcgi done"
}
case $1 in
stop)
stop
;;
start)
start
;;
restart)
stop
start
;;
esacsed -i 's@nobody@nagios@g' /usr/local/nginx/start_perl_cgi.sh
chmod 755 /usr/local/nginx/start_perl_cgi.sh
/usr/local/nginx/start_perl_cgi.sh start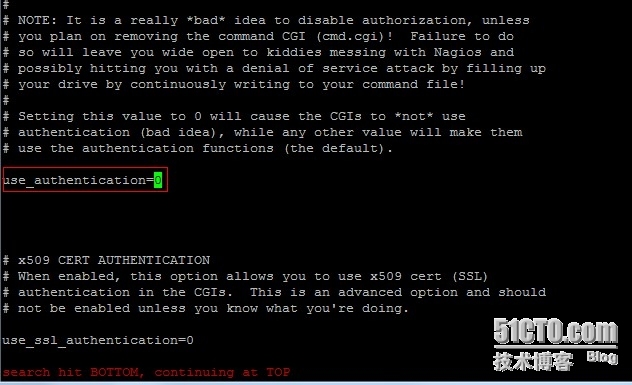
# 取消用户认证(方便调试)
vi /usr/local/nagios/etc/cgi.cfg
找到use_authentication=1并把值改为0
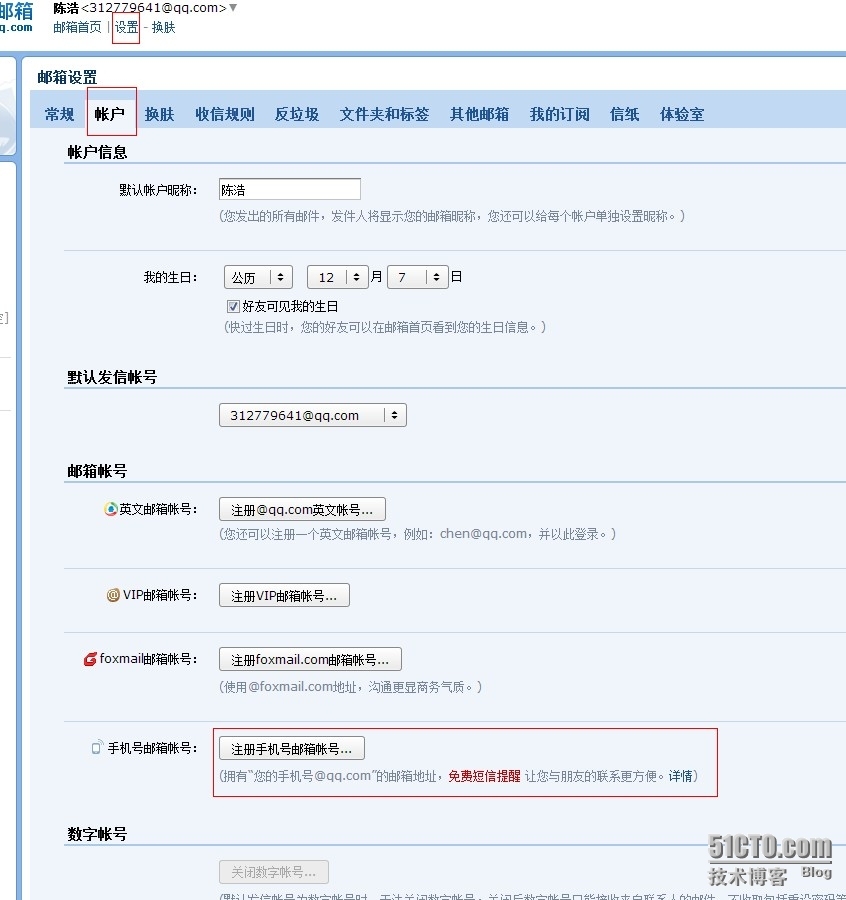
修改联系人邮箱,修改为用于报警接收的邮件地址
vi /usr/local/nagios/etc/objects/contacts.cfg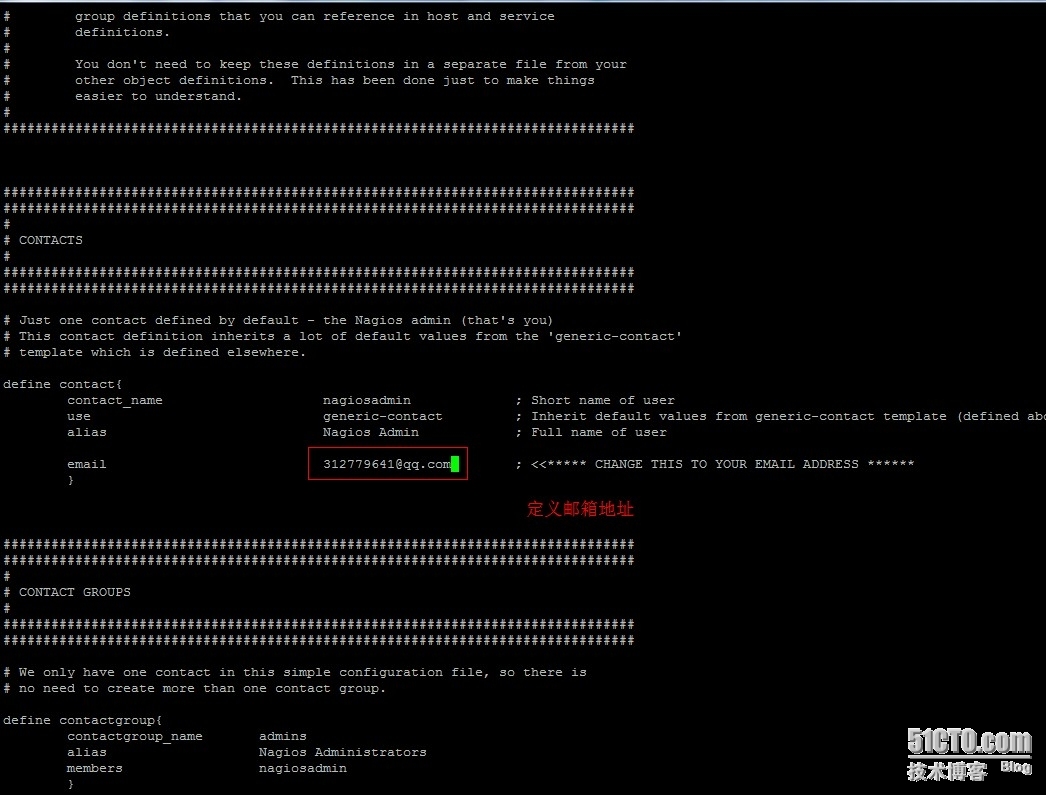
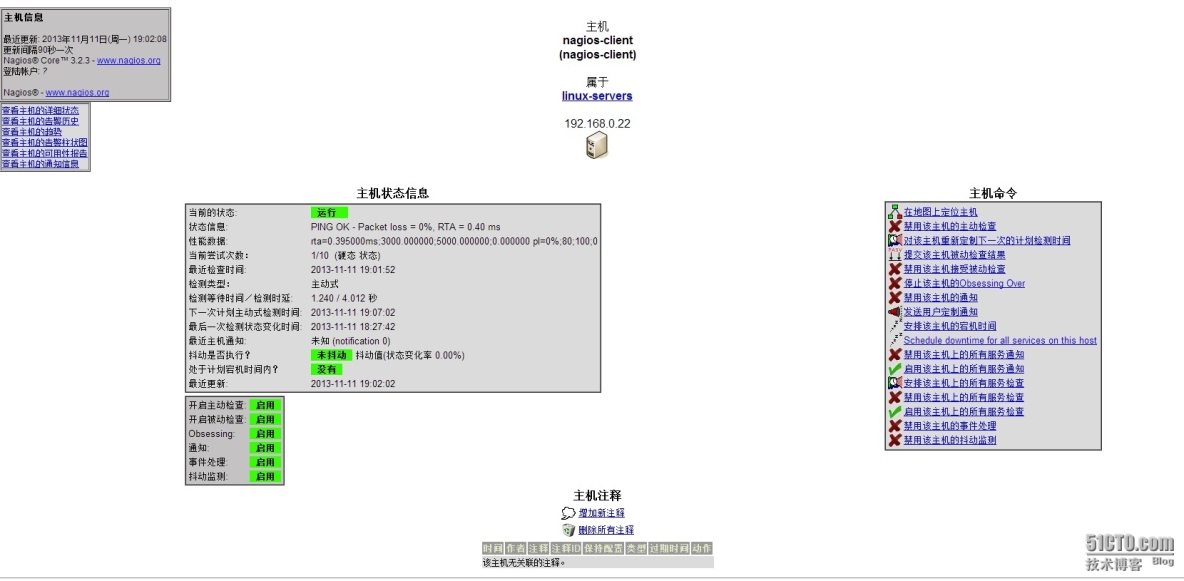
 到这一步就是正常的下面nginx 配置 我把监听改成80的了
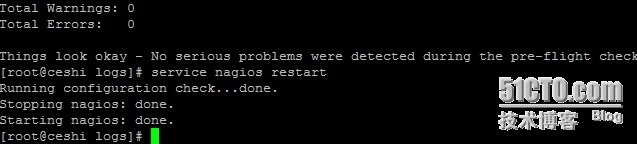
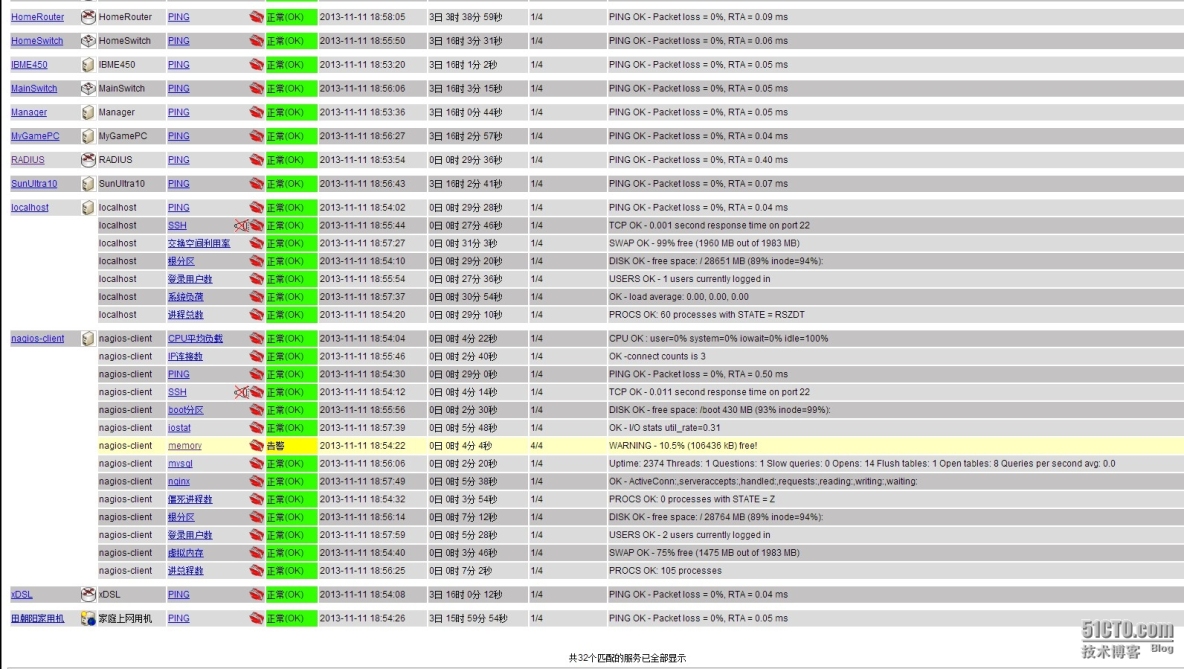
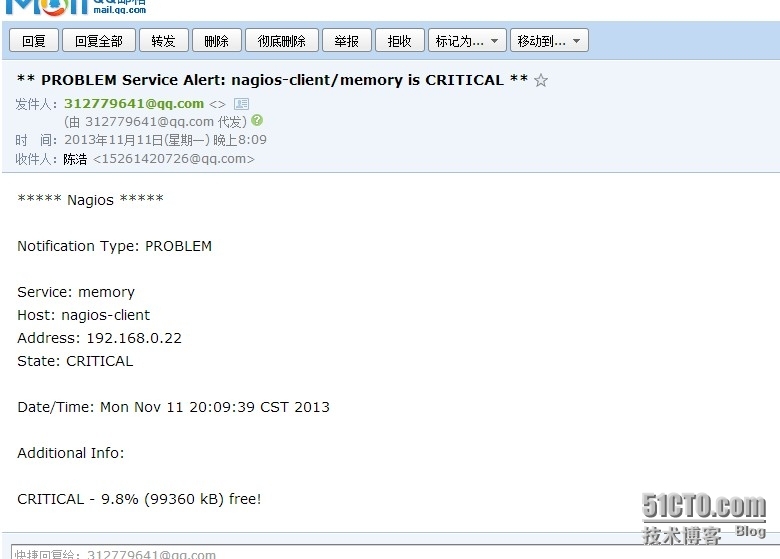
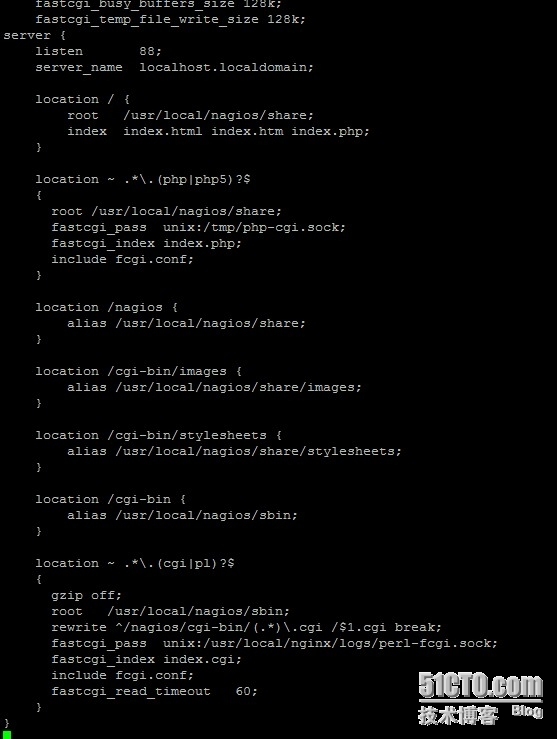 然后开启服务就可以访问了,然后继续安装客户端,最后给大家截图看效果service nagios start
yum install openssl-devel -y
1. nagios-plugins安装
groupadd nagios
useradd nagios -M -s /sbin/nologin -g nagios
tar xvf nagios-plugins-1.4.16.tar.gz
cd nagios-plugins-1.4.16
./configure --prefix=/usr/local/nagios --with-nagios-user=nagios --with-nagios-gourp=nagios --with-mysql=/usr/local/mysql && make && make install
cd
2. nrpe安装
tar zxvf nrpe-2.13.tar.gz
cd nrpe-2.13
./configure
make all
make install-plugin
make install-daemon
make install-daemon-config
启动nrpe
/usr/local/nagios/bin/nrpe -c /usr/local/nagios/etc/nrpe.cfg -d
echo '/usr/local/nagios/bin/nrpe -c /usr/local/nagios/etc/nrpe.cfg -d' >> /etc/rc.localunzip libexec.zip
\cp libexec/* /usr/local/nagios/libexec
chmod -R +x /usr/local/nagios/libexec装插件创建一个空的数据库nagios,授权nagios这个用户从任何地方访问nagios这个数据库,刷新授权设置,查询下nagios这个用户是否创建成功
create database nagios;
grant select on nagios.* to nagios @'%' identified by '123456';
flush privileges;
select User,Password,Host from mysql.user;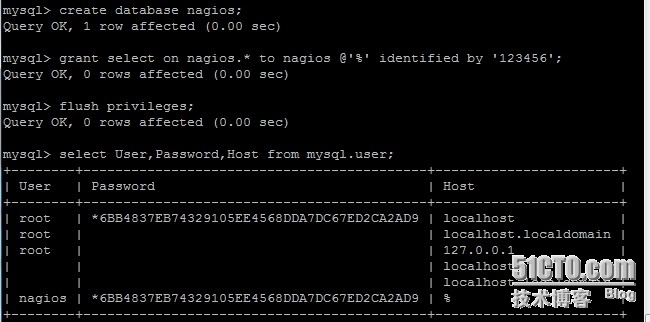
添加mysql库到系统搜索库
vim /etc/ld.so.conf
/usr/local/mysql/lib
ldconfig
要监控磁盘io,还得安装sysstat这个工具包
yum install sysstat -y
配置客户端上面的nrpe
vim /usr/local/nagios/etc/nrpe.cfg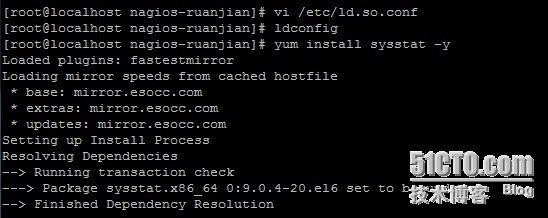
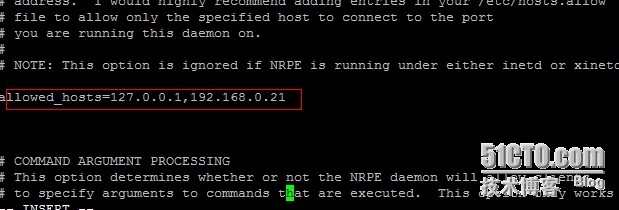
配置客户端上面的nrpe
vim /usr/local/nagios/etc/nrpe.cfg
command[check_users]=/usr/local/nagios/libexec/check_users -w 5 -c 10
command[check_load]=/usr/local/nagios/libexec/check_cpu.sh -w 80% -c 90%
command[check_sda1]=/usr/local/nagios/libexec/check_disk -w 20% -c 10% -p /dev/sda1
command[check_sda2]=/usr/local/nagios/libexec/check_disk -w 20% -c 10% -p /dev/sda2
command[check_zombie_procs]=/usr/local/nagios/libexec/check_procs -w 5 -c 10 -s Z
command[check_total_procs]=/usr/local/nagios/libexec/check_procs -w 150 -c 200
command[check_swap]=/usr/local/nagios/libexec/check_swap -w 20% -c 10%
command[check_iostat]=/usr/local/nagios/libexec/check_iostat.sh -d sda -w 6 -c 10
command[check_mysql]=/usr/local/nagios/libexec/check_mysql -H 192.168.0.22 -u nagios -p 123456 -d nagios
command[check_nginx]=/usr/local/nagios/libexec/check_nginx.sh -u 192.168.0.22 -p /status -w 4000 -c 5000
command[check_mem]=/usr/local/nagios/libexec/check_memory.pl -f -w 20 -c 10
command[check_ip_conn]=/usr/local/nagios/libexec/ip_conn.sh 200 250
command[check_ssh]=/usr/local/nagios/libexec/check_tcp -p 22 -w 1.0 -c 10.0
配置完成后,重启nrpe
kill `ps aux |grep nrpe |grep -v grep |awk '{print $2}'`
/usr/local/nagios/bin/nrpe -c /usr/local/nagios/etc/nrpe.cfg -d
服务端配置:
监控服务端本机的配置:
vim /usr/local/nagios/etc/objects/localhost.cfg
修改里面的配置,最后修改完成的配置如下
define host{
use linux-server
host_name localhost
alias localhost
address 127.0.0.1
icon_p_w_picpath server.gif
statusmap_p_w_picpath server.gd2
2d_coords 500,200
3d_coords 500,200,100
}
define hostgroup{
hostgroup_name linux-servers ; The name of the hostgroup
alias Linux Servers ; Long name of the group
members * ; Comma separated list of hosts that belong to this group
}
define servicegroup{
servicegroup_name 全部联通性检查
alias 联通性检查
members localhost,PING,nagios-client,PING
}
define service{
use local-service ; Name of service template to use
host_name *
service_description PING
check_command check_ping!100.0,20%!500.0,60%
}
define service{
use local-service ; Name of service template to use
host_name localhost
service_description 根分区
check_command check_local_disk!20%!10%!/
}
define service{
use local-service ; Name of service template to use
host_name localhost
service_description 登录用户数
check_command check_local_users!20!50
}
define service{
use local-service ; Name of service template to use
host_name localhost
service_description 进程总数
check_command check_local_procs!250!400!RSZDT
}
define service{
use local-service ; Name of service template to use
host_name localhost
service_description 系统负荷
check_command check_local_load!5.0,4.0,3.0!10.0,6.0,4.0
}
define service{
use local-service ; Name of service template to use
host_name localhost
service_description 交换空间利用率
check_command check_local_swap!20!10
}
define service{
use local-service ; Name of service template to use
host_name localhost
service_description SSH
check_command check_tcp!22!1.0!10.0
notifications_enabled 0
}
服务器监控客户端的配置:
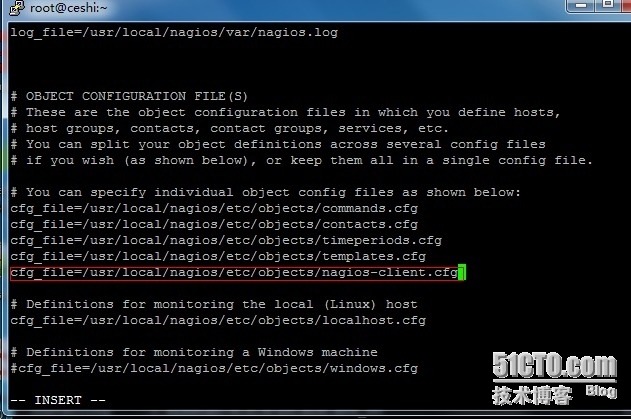
保存退出后复制这个文件一份,作为nagios-client的监控模版文件
cp /usr/local/nagios/etc/objects/localhost.cfg /usr/local/nagios/etc/objects/nagios-client.cfg
vim /usr/local/nagios/etc/objects/nagios-client.cfg 修改完成后的配置如下
define host{
use linux-server
host_name nagios-client
alias nagios-client
address 192.168.0.22
icon_p_w_picpath server.gif
statusmap_p_w_picpath server.gd2
2d_coords 500,200
3d_coords 500,200,100
}
define service{
use local-service ; Name of service template to use
host_name *
service_description PING
check_command check_ping!100.0,20%!500.0,60%
}
define service{
use local-service ; Name of service template to use
host_name nagios-client
service_description boot分区
check_command check_nrpe!check_sda1
}
define service{
use local-service ; Name of service template to use
host_name nagios-client
service_description 根分区
check_command check_nrpe!check_sda2
}
define service{
use local-service ; Name of service template to use
host_name nagios-client
service_description 登录用户数
check_command check_nrpe!check_users
}
define service{
use local-service ; Name of service template to use
host_name nagios-client
service_description 进总程数
check_command check_nrpe!check_total_procs
}
define service{
use local-service ; Name of service template to use
host_name nagios-client
service_description CPU平均负载
check_command check_nrpe!check_load
}
define service{
use local-service ; Name of service template to use
host_name nagios-client
service_description 虚拟内存
check_command check_nrpe!check_swap
}
define service{
use local-service ; Name of service template to use
host_name nagios-client
service_description SSH
check_command check_nrpe!check_ssh
notifications_enabled 0
}
define service{
use local-service ; Name of service template to use
host_name nagios-client
service_description 僵死进程数
check_command check_nrpe!check_zombie_procs
}
define service{
use local-service ; Name of service template to use
host_name nagios-client
service_description iostat
check_command check_nrpe!check_iostat
}
define service{
use local-service ; Name of service template to use
host_name nagios-client
service_description mysql
check_command check_nrpe!check_mysql
}
define service{
use local-service ; Name of service template to use
host_name nagios-client
service_description nginx
check_command check_nrpe!check_nginx
}
define service{
use local-service ; Name of service template to use
host_name nagios-client
service_description memory
check_command check_nrpe!check_mem
}
define service{
use local-service ; Name of service template to use
host_name nagios-client
service_description IP连接数
check_command check_nrpe!check_ip_conn
}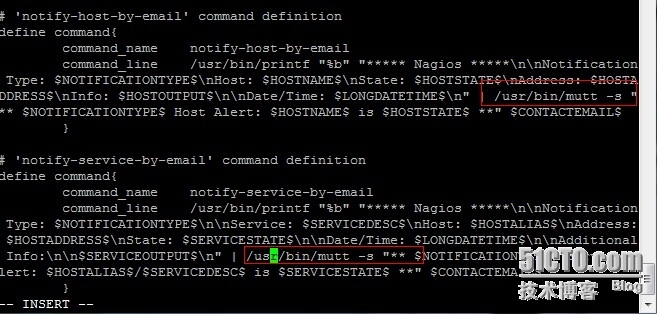
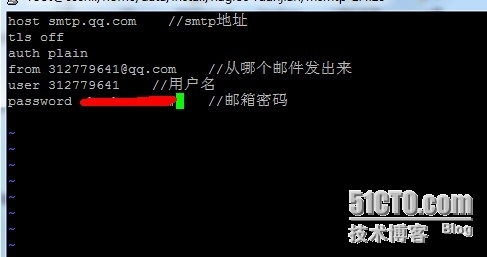
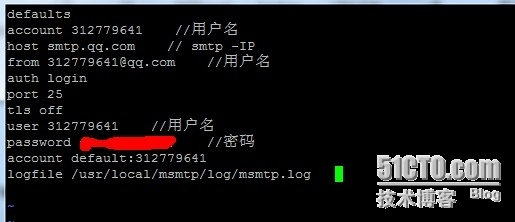
直接把原来的邮件报警的两条命令中的/bin/mail修改为/usr/bin/mutt即可,如下图

加快nagios的报警时间设置:
1.修改模版文件:
vim /usr/local/nagios/etc/objects/templates.cfg
修改所有normal_check_interval项的值为1,既发现故障后1分钟就报警
修改所有check_interval项的值为1,即正常情况下每分钟检查一次
修改所有notification_interval  的值为20分钟         #在主机出现异常后,故障一直没有解决,nagios再次对使用者发出通知的时间
service nagios restart    重启nagios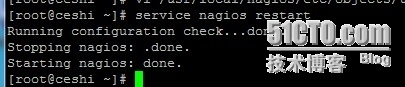


 试验完成!附上软件包所需软件地址缺的软件可以直接找我要!http://down.51cto.com/data/1007210
我的瘦服务器配置了nginx,我的ROR应用程序正在它们上运行。在我发布代码更新时运行thinrestart会给我的应用程序带来一些停机时间。我试图弄清楚如何优雅地重启正在运行的Thin实例,但找不到好的解决方案。有没有人能做到这一点? 最佳答案 #Restartjustthethinserverdescribedbythatconfigsudothin-C/etc/thin/mysite.ymlrestartNginx将继续运行并代理请求。如果您将Nginx设置为使用多个上游服务器,例如server{listen80;server
我正在尝试在我的centos服务器上安装therubyracer,但遇到了麻烦。$geminstalltherubyracerBuildingnativeextensions.Thiscouldtakeawhile...ERROR:Errorinstallingtherubyracer:ERROR:Failedtobuildgemnativeextension./usr/local/rvm/rubies/ruby-1.9.3-p125/bin/rubyextconf.rbcheckingformain()in-lpthread...yescheckingforv8.h...no***e
其实做自媒体的成本并不高,入门只需要一部手机即可!在手机上找视频素材、使用手机剪辑视频、最后使用手机发布视频作品获得收益!方法并不难,今天这期内容就来给粉丝们分享一种小方法,每天稳定收益100-300,抓紧点赞收藏!1、找素材(1)使用手机拍摄自己喜欢的经典段落,使用程序把文案内容提取出来(2)也可以在豆瓣、知乎、微博等网站中找一些自己需要的文案素材(3)把文案进行润色修改,可以加入一些自己的观点(4)视频素材可以使用软件中自带的素材,也可以在素材网站中下载完整版的素材2、文案配音(1)把复制好的文案直接导入小程序中(2)调整音色、音调后一键合成音频即可(3)可以选择自己朗读配音,需要花一点时
需求:要创建虚拟机,就需要给他提供一个虚拟的磁盘,我们就在/opt目录下创建一个10G大小的raw格式的虚拟磁盘CentOS-7-x86_64.raw命令格式:qemu-imgcreate-f磁盘格式磁盘名称磁盘大小qemu-imgcreate-f磁盘格式-o?1.创建磁盘qemu-imgcreate-fraw/opt/CentOS-7-x86_64.raw10G执行效果#ls/opt/CentOS-7-x86_64.raw2.安装虚拟机使用virt-install命令,基于我们提供的系统镜像和虚拟磁盘来创建一个虚拟机,另外在创建虚拟机之前,提前打开vnc客户端,在创建虚拟机的时候,通过vnc
A/ctohttp://wiki.nginx.org/CoreModule#usermaster进程曾经以root用户运行,是否可以以不同的用户运行nginxmaster进程? 最佳答案 只需以非root身份运行init脚本(即/etc/init.d/nginxstart),就可以用不同的用户运行nginxmaster进程。如果这真的是你想要做的,你将需要确保日志和pid目录(通常是/var/log/nginx&/var/run/nginx.pid)对该用户是可写的,并且您所有的listen调用都是针对大于1024的端口(因为绑定(
我有带有gemwebsocket-rails0.7的Rails3.2应用程序。在开发机上,一切正常在生产环境中,我使用Nginx/1.6作为代理服务器,Unicorn作为http服务器。Thin用于独立模式(在https://github.com/websocket-rails/websocket-rails/wiki/Standalone-Server-Mode之后)。nginx配置:location/websocket{proxy_passhttp://localhost:3001/websocket;proxy_http_version1.1;proxy_set_headerUp
Nginx在生产中的重要性通常基于它为慢速客户端提供服务的能力;在RESTfulAPI的设置中,它似乎是生产堆栈的一个不必要的层,尤其是Puma(不像广泛使用的unicorn可以处理nginx工作)。Pumacanallowmultipleslowclientstoconnectwithoutrequiringaworkertobeblockedontherequesttransaction.Becauseofthis,Pumahandlesslowclientsgracefully.HerokurecommendsPumaforuseinscenarioswhereyouexpect
我目前正在运行Foreman在暂存(Ubuntu)上,一旦我开始工作,就会切换到使用upstart。我的Procfile.staging看起来像这样:nginx:sudoservicenginxstartunicorn:bundleexecunicorn-c./config/unicorn.rbredis:bundleexecredis-serversidekiq:bundleexecsidekiq-v-C./config/sidekiq.yml我可以使用以下方法成功启动nginx:$sudoservicenginxstart然而,当我运行$foremanstart时,当其他三个进程成
手机访问电脑后AnyViewer可以做什么? 您成功将手机连接到Windows电脑后,然后您可以做任何您想做的事情,例如:查看文件和运行应用程序。电源管理:在远程会话中,点击电源管理,您可以看到三个项目:锁定、重启和关机,供您在不同情况下管理计算机。如果您需要暂时离开远程会话,可以锁定计算机。如果计算机死机,您可以重新启动它,然后再次连接。如果您已完成计算机上的所有工作,您可以使用手机远程关闭它。更改图像质量:当电脑和手机的网络都处于良好状态时,您可以选择高图像质量以获得更好的体验。当网络状况不佳时,您可以选择低图像质量以获得更流畅的操作。 显示桌面:我们无法在手机上按Windows+
恢复出厂设置后数据还在吗?格式化真的彻底吗?数据到底该怎么删?文章目录前言为什么不能彻底删除数据?手机如何彻底删除数据?第一步:恢复出厂设置第二步:手动覆写数据电脑如何彻底删除数据?方法一:命令提示符方法二:文件粉碎方法三:低级格式化硬盘总结前言个人数据安全再次成为大家关注的热门话题:在日常使用手机和电脑时,我们可能需要删除一些敏感数据,例如银行账户信息、个人照片、聊天记录等。数据删除的目的是保护个人隐私,避免泄露。以下是一些关于如何删除数据的方法。恢复出厂设置,不一定彻底清除手机数据电子产品迭代升级速度越来越快,大家家中的旧手机、旧电脑也越来越多,一键删除、格式化、恢复出厂设置能彻底清除个人