
最近公司出了一个新的功能模块(如下图),大提上可以描述为实现拍照完上传图片,拖动四方框拍照完成上传功能,大体样子如下图。但是我找遍了 dcloud 插件市场,找到的插件都是移动背景图片来实现裁剪的,跟京东的功能是相反的,没办法只能自己来实现这么一个插件。

首先就需要实现一个四方框的功能了。从上图可知,四方框有一下几个特点
那么我们根据这个特性来实现下这个功能,对于 css 规范的话使用 bem 规范
<div class="clip__content">
  <div v-for="(item, index) in 4" :key="index" class="clip__edge"></div>
</div>
/more
$edge-border-width: 6rpx;
.clip {
  &__content {
    position: fixed;
    width: 400rpx;
    height: 400rpx;
    left: 0;
    top: 0;
    border: 1px solid red;
    z-index: 4;
    overflow: hidden;
    box-shadow: rgba(0, 0, 0, 0.5) 0 0 0 200vh;
  }
  &__edge {
    position: absolute;
    width: 34rpx;
    height: 34rpx;
    border: 10rpx solid red;
    pointer-events: auto;
    z-index: 2;
    &::before {
      content: "";
      position: absolute;
      z-index: 2;
      width: 40rpx;
      height: 40rpx;
      background-color: transparent;
    }
    &:nth-child(1) {
      left: $edge-border-width;
      top: $edge-border-width;
      border-bottom-width: 0 !important;
      border-right-width: 0 !important;
      &:before {
        top: -50%;
        left: -50%;
      }
    }
    &:nth-child(2) {
      right: $edge-border-width;
      top: $edge-border-width;
      border-bottom-width: 0 !important;
      border-left-width: 0 !important;
      &:before {
        top: -50%;
        left: 50%;
      }
    }
    &:nth-child(3) {
      left: $edge-border-width;
      bottom: $edge-border-width;
      border-top-width: 0 !important;
      border-right-width: 0 !important;
      &:before {
        bottom: -50%;
        left: -50%;
      }
    }
    &:nth-child(4) {
      right: $edge-border-width;
      bottom: $edge-border-width;
      border-top-width: 0 !important;
      border-left-width: 0 !important;
      &:before {
        bottom: -50%;
        left: 50%;
      }
    }
  }
根据上面的 html 和 css 出来的样式大概如下图 外部的阴影效果我们用: box-shadow: rgba(0, 0, 0, 0.5) 0 0 0 200vh 来达成
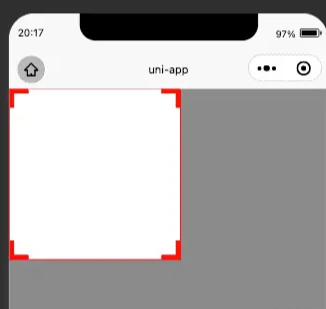
第二步的话就要实现移动功能了,这里是一个比较考验耐心的地方,因为涉及到多个方向的变化,需要不断地进行调试,在此之前需要先分析下四个角变化的特性,下面先看 4 个角的移动特性(以 H5 思维)
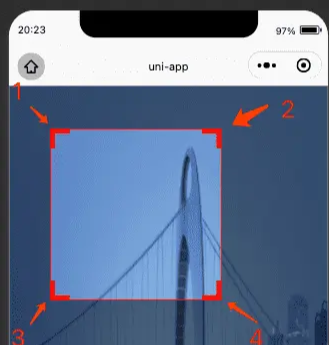
首先需要获取下屏幕宽度,区域高度(因为头部可能会有导航栏目占位,所以不拿屏幕高度),四方框初始宽高,
uni.getSystemInfo({
  success: res => {
    console.log(res)
    this.systemInfo = res
  }
})
uni
  .createSelectorQuery()
  .select('.clip__content')
  .fields({ size: true }, data => {
    this.width = data.width
    this.height = data.height
  })
  .exec()
uni
  .createSelectorQuery()
  .select('.clip')
  .fields({ size: true }, data => {
    this.screenHeight = data.height
  })
  .exec()
后续的话就可以进行四个角拖拽了,这里用到了 touchStart 和 touchMove,动态地为方框绑定样式
<div
  v-for="(item, index) in 4"
  class="clip__edge"
  @touchstart.stop.prevent="edgeTouchStart"
  @touchmove.stop.prevent="e => edgeTouchMove(e, index)"
  @touchend.stop.prevent="edgeTouchEnd"
></div>
接下来开始写逻辑
edgeTouchStart(e) {
  // 记录坐标xy初始位置
  this.clientX = e.changedTouches[0].clientX;
  this.clientY = e.changedTouches[0].clientY;
},
edgeTouchMove(e, index) {
  const currX = e.changedTouches[0].clientX;
  const currY = e.changedTouches[0].clientY;
  // 记录坐标差
  const moveX = currX - this.clientX;
  const moveY = currY - this.clientY;
  // 更新坐标位置
  this.clientX = currX;
  this.clientY = currY;
  const { width, height, left, top, screenHeight } = this;
  const { screenWidth } = this.systemInfo;
  // 初始化最大宽高
  let maxWidth = 0,
    maxHeight = 0,
    maxTop = top + moveY < 0 ? 0 : top + moveY,
    maxLeft = left + moveX < 0 ? 0 : left + moveX;
  // 四个角的宽高限制
  if (index % 2 === 0) {
    maxWidth = width - moveX > screenWidth ? screenWidth : width - moveX;
  } else {
    maxWidth = width + moveX > screenWidth ? screenWidth : width + moveX;
  }
  if (index < 2) {
    maxHeight =
      height - moveY > screenHeight ? screenHeight : height - moveY;
  } else {
    maxHeight =
      height + moveY > screenHeight ? screenHeight : height + moveY;
  }

  // 四个角的规则计算逻辑 四边方框暂定40 更详细的要用.createSelectorQuery()去拿
  if (index === 0) {
    if (width - moveX <= 40 || height - moveY <= 40) return;
    console.log(maxLeft);
    this.clipStyle = {
      width: maxWidth,
      height: maxHeight,
      left: maxLeft,
      top: maxTop,
    };
    this.width = maxWidth;
    this.height = maxHeight;
    this.top = maxTop;
    this.left = maxLeft;
    // 右上角
  } else if (index === 1) {
    if (width + moveX <= 40 || height - moveY <= 40) return;
    this.clipStyle = {
      width: maxWidth,
      height: maxHeight,
      left,
      top: maxTop,
    };

    this.width = maxWidth;
    this.height = maxHeight;
    this.top = maxTop;
  } else if (index === 2) {
    if (width - moveX <= 40 || height + moveY <= 40) return;
    this.clipStyle = {
      width: maxWidth,
      height: maxHeight,
      left: maxLeft,
      top,
    };

    this.width = maxWidth;
    this.height = maxHeight;
    this.left = maxLeft;
  } else if (index === 3) {
    if (width + moveX <= 40 || height + moveY <= 40) return;
    this.clipStyle = {
      width: maxWidth,
      height: maxHeight,
      left,
      top,
    };

    this.width = maxWidth;
    this.height = maxHeight;
  }
}
效果如下图
四个角拖拽逻辑完善之后,下一步目标就是做四方框的拖拽,这边需要对四方框的拖拽做一次限制
<div
  class="clip__content"
  :style="style"
  @touchstart.stop.prevent="clipTouchStart"
  @touchmove.stop.prevent="clipTouchMove"
>
  ...
</div>
clipTouchStart(e) {
  this.touchX = e.changedTouches[0].pageX;
  this.touchY = e.changedTouches[0].pageY;
},
clipTouchMove(e) {
  const { screenWidth } = this.systemInfo;
  const currX = e.changedTouches[0].pageX;
  const currY = e.changedTouches[0].pageY;
  const moveX = currX - this.touchX;
  const moveY = currY - this.touchY;
  this.touchX = currX;
  this.touchY = currY;
  // 边框限制逻辑
  if (this.left + moveX < 0) {
    this.left = 0;
  } else if (this.left + moveX > screenWidth - this.width) {
    this.left = screenWidth - this.width;
  } else {
    this.left = this.left + moveX;
  }
  if (this.top + moveY < 0) {
    this.top = 0;
  } else if (this.top + moveY > this.screenHeight - this.height) {
    this.top = this.screenHeight - this.height;
  } else {
    this.top = this.top + moveY;
  }
  this.clipStyle = {
    ...this.clipStyle,
    left: this.left,
    top: this.top,
  };
},
效果如下图:
<div class="clip__content">
  ...
  <canvas class="clip-canvas" canvas-id="clip-canvas"></canvas>
</div>
逻辑的话目前这个例子是使用了网络的 url 图片 所以要进行 download,如果是不用网络图片,那么这一句可以删除换成其他的获取图片 api
initCanvas() {
  uni.showLoading({
    title: "加载中...",
  });
  uni
    .createSelectorQuery()
    .select(".clip__content")
    .fields(
      {
        size: true,
        scrollOffset: true,
        rect: true,
        context: true,
        computedStyle: ["transform", "translateX"],
        scrollOffset: true,
      },
      (data) => {
        uni.downloadFile({
          url: this.imageUrl,
          success: (res) => {
            this.canvasInstance = uni.createCanvasContext(
              "clip-canvas",
              this
            );
            this.canvasInstance.drawImage(
              res.tempFilePath,
              -data.left,
              -data.top,
              this.systemInfo.screenWidth,
              this.screenHeight,
              0,
              0
            );
            this.canvasInstance.draw(
              false,
              (() => {
                setTimeout(() => {
                  uni.canvasToTempFilePath(
                    {
                      x: 0,
                      y: 0,
                      width: data.width,
                      height: data.height,
                      dWidth: data.width,
                      dHeight: data.height,
                      fileType: "jpg",
                      canvasId: "clip-canvas",
                      success: (data) => {
                        uni.hideLoading();

                        this.url = data.tempFilePath;
                        // this.canvasInstance.save();
                      },
                    },
                    this
                  );
                }, 500);
              })()
            );
          },
        });
      }
    )
    .exec();
},
效果如图所示:

Sinatra新手;我正在运行一些rspec测试,但在日志中收到了一堆不需要的噪音。如何消除日志中过多的噪音?我仔细检查了环境是否设置为:test,这意味着记录器级别应设置为WARN而不是DEBUG。spec_helper:require"./app"require"sinatra"require"rspec"require"rack/test"require"database_cleaner"require"factory_girl"set:environment,:testFactoryGirl.definition_file_paths=%w{./factories./test/
我收到这个错误:RuntimeError(自动加载常量Apps时检测到循环依赖当我使用多线程时。下面是我的代码。为什么会这样?我尝试多线程的原因是因为我正在编写一个HTML抓取应用程序。对Nokogiri::HTML(open())的调用是一个同步阻塞调用,需要1秒才能返回,我有100,000多个页面要访问,所以我试图运行多个线程来解决这个问题。有更好的方法吗?classToolsController0)app.website=array.join(',')putsapp.websiteelseapp.website="NONE"endapp.saveapps=Apps.order("
我有一个用户工厂。我希望默认情况下确认用户。但是鉴于unconfirmed特征,我不希望它们被确认。虽然我有一个基于实现细节而不是抽象的工作实现,但我想知道如何正确地做到这一点。factory:userdoafter(:create)do|user,evaluator|#unwantedimplementationdetailshereunlessFactoryGirl.factories[:user].defined_traits.map(&:name).include?(:unconfirmed)user.confirm!endendtrait:unconfirmeddoenden
我是Google云的新手,我正在尝试对其进行首次部署。我的第一个部署是RubyonRails项目。我基本上是在关注thisguideinthegoogleclouddocumentation.唯一的区别是我使用的是我自己的项目,而不是他们提供的“helloworld”项目。这是我的app.yaml文件runtime:customvm:trueentrypoint:bundleexecrackup-p8080-Eproductionconfig.ruresources:cpu:0.5memory_gb:1.3disk_size_gb:10当我转到我的项目目录并运行gcloudprevie
我有两个Rails模型,即Invoice和Invoice_details。一个Invoice_details属于Invoice,一个Invoice有多个Invoice_details。我无法使用accepts_nested_attributes_forinInvoice通过Invoice模型保存Invoice_details。我收到以下错误:(0.2ms)BEGIN(0.2ms)ROLLBACKCompleted422UnprocessableEntityin25ms(ActiveRecord:4.0ms)ActiveRecord::RecordInvalid(Validationfa
当我在我的Rails应用程序根目录中运行rakedoc:app时,API文档是使用/doc/README_FOR_APP作为主页生成的。我想向该文件添加.rdoc扩展名,以便它在GitHub上正确呈现。更好的是,我想将它移动到应用程序根目录(/README.rdoc)。有没有办法通过修改包含的rake/rdoctask任务在我的Rakefile中执行此操作?是否有某个地方可以查找可以修改的主页文件的名称?还是我必须编写一个新的Rake任务?额外的问题:Rails应用程序的两个单独文件/README和/doc/README_FOR_APP背后的逻辑是什么?为什么不只有一个?
只是想确保我理解了事情。据我目前收集到的信息,Cucumber只是一个“包装器”,或者是一种通过将事物分类为功能和步骤来组织测试的好方法,其中实际的单元测试处于步骤阶段。它允许您根据事物的工作方式组织您的测试。对吗? 最佳答案 有点。它是一种组织测试的方式,但不仅如此。它的行为就像最初的Rails集成测试一样,但更易于使用。这里最大的好处是您的session在整个Scenario中保持透明。关于Cucumber的另一件事是您(应该)从使用您的代码的浏览器或客户端的角度进行测试。如果您愿意,您可以使用步骤来构建对象和设置状态,但通常您
华为OD机试题本篇题目:明明的随机数题目输入描述输出描述:示例1输入输出说明代码编写思路最近更新的博客华为od2023|什么是华为od,od薪资待遇,od机试题清单华为OD机试真题大全,用Python解华为机试题|机试宝典【华为OD机试】全流程解析+经验分享,题型分享,防作弊指南华为o
C#实现简易绘图工具一.引言实验目的:通过制作窗体应用程序(C#画图软件),熟悉基本的窗体设计过程以及控件设计,事件处理等,熟悉使用C#的winform窗体进行绘图的基本步骤,对于面向对象编程有更加深刻的体会.Tutorial任务设计一个具有基本功能的画图软件**·包括简单的新建文件,保存,重新绘图等功能**·实现一些基本图形的绘制,包括铅笔和基本形状等,学习橡皮工具的创建**·设计一个合理舒适的UI界面**注明:你可能需要先了解一些关于winform窗体应用程序绘图的基本知识,以及关于GDI+类和结构的知识二.实验环境Windows系统下的visualstudio2017C#窗体应用程序三.
我正在使用Postgres.app在OSX(10.8.3)上。我已经修改了我的PATH,以便应用程序的bin文件夹位于所有其他文件夹之前。Rammy:~phrogz$whichpg_config/Applications/Postgres.app/Contents/MacOS/bin/pg_config我已经安装了rvm并且可以毫无错误地安装pggem,但是当我需要它时我得到一个错误:Rammy:~phrogz$gem-v1.8.25Rammy:~phrogz$geminstallpgFetching:pg-0.15.1.gem(100%)Buildingnativeextension
