最近研究pygame游戏制作板块,本次对于简单的俄罗斯方块进行介绍。
1.首先引入我们需要用到的pygame库和random库(pygame库基础知识请移步首页)
import pygame
import random
2.对pygame库进行初始化(一般来说,使用pygame库时先进行初始化,保证pygame的代码块可以正常运行)
pygame.init()
3.设置一些初始数据(比如俄罗斯方块的每一个正方形边长box_size、行列数、rgb颜色块)
box_size = 30                       #小方格
box_width = 15                      #小方格列数
box_height = 20                     #小方格行数
width = box_size * box_width        #游戏区域宽度
height =  box_size * box_height     #游戏区域高度
side_width = 200                    #旁白区域宽度
screen_width = width + side_width   #屏幕总宽度
white = (245,245,245)               #rgb表白色
black = (0, 0, 0)                   #黑色
line_color= (139,125,107)           #边线颜色  暗灰色
cube_colors = [(255,245,40),(175,175,20),(185,185,185),(155,0,0),(175,20,20),(0, 155,0),(20,175,20),(0,0,155),(20,20,175)]  #俄罗斯方块颜色组,在后续随机生成俄罗斯方块时会进行调用
4.设置屏幕(此处我们规定的屏幕为(650,600),规定标题栏,屏幕刷新频率)
pygame.display.set_mode() 创建窗口
pygame.display.set_caption() 标题栏
screen = pygame.display.set_mode((screen_width, height))    #屏幕(650,600)
pygame.display.set_caption("俄罗斯方块")      #标题栏
clock = pygame.time.Clock()        #创建时钟对象 (可以控制游戏循环频率)
FPS = 30      #设置屏幕刷新率
5.下面进行窗口主页面的绘画,先来一个例图。
①先绘制游戏区域横竖线,以及游戏区域最右侧分割线
pygame.draw.line(a,b,(c,d),(e,f)) 画线,a为画线的范围(即screen屏幕),b为颜色(本程序游戏区域内部线为暗灰色,饱和度较低),(c,d)为所画线的起点坐标,(e,f)为所画线的终点坐标,线就是(c,d)和(e,f)所连成的线。
def draw_grids():                    #游戏区方格线
    for i in range(box_width):
        pygame.draw.line(screen, line_color,(i * box_size, 0), (i * box_size, height))     #横线

    for i in range(box_height):
        pygame.draw.line(screen, line_color,(0, i * box_size), (width, i * box_size))   #竖线

    pygame.draw.line(screen, white,(box_size * box_width, 0),(box_size * box_width, box_size * box_height))   #最右侧竖线
②设置类show_text用于展示后续的文本
def show_text(surf, text, size, x, y, color=white):    #图像 文本 字体大小 位置 颜色
    font = pygame.font.SysFont("方正粗黑宋简体", size)  #字体字号
    text_surface = font.render(text, True, color)      #文本 光滑 颜色
    text_rect = text_surface.get_rect()                #get_rect获取text_surface所在区域块
    text_rect.midtop = (x, y)                          #获取顶部的中间坐标
    surf.blit(text_surface, text_rect)                 #刷新surf本身的(text_surface\text_rect)字、区域
③对show_text进行调用,显示汉字部分
score = 0 #初始分数0
high_score = 0 #初始最高分0
historyscore = 0 #历史最高分
level = 1 #初始层数1
def draw_score(): #得分
show_text(screen, u'得分:{}'.format(score), 20, width + side_width // 2,200) #得分,,20是size字号
def draw_maxscore(): #得分
show_text(screen, u'历史最高得分:{}'.format(high_score), 20, width + side_width // 2,100) #最高得分
def draw_historyscore(): #历史记录
show_text(screen, u'历史记录:{}'.format(historyscore) ,13, width + side_width // 4,300)
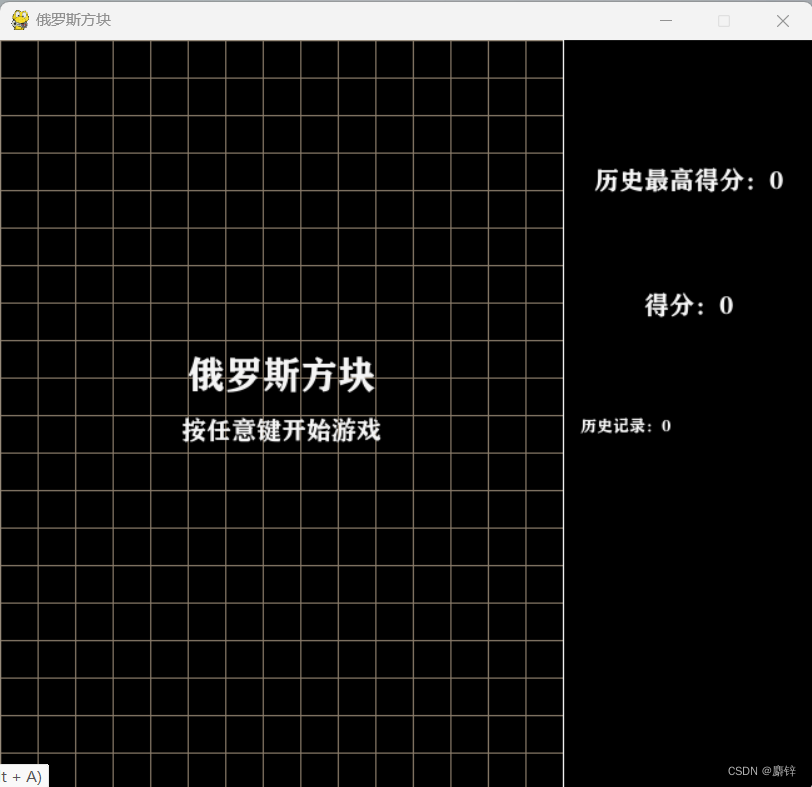
def show_gameover(screen): #开局界面展示
show_text(screen, '俄罗斯方块', 30, 225,250 )
show_text(screen, '按任意键开始游戏', 20,225, 300)
6.规定全局屏幕矩阵为0(表示屏幕上此时没有任何俄罗斯方块在)
screen_color_matrix = []          #屏幕颜色矩阵 将整个屏幕的每一个小方格规定为0
for i in range(box_height):
    screen_color_matrix.append([0 ]*box_width)
到此,我们简单的前期构造界面已经完成,下面我们进行俄罗斯方块类的构建。
7.俄罗斯方块类

①对每一个俄罗斯方块的形状进行定义,并归于元组
class CubeShape(object):                               #创建一个俄罗斯方块形状类(基类object)
    shapes = ['I', 'J', 'L', 'O', 'S', 'T', 'Z']       #其中形状,坐标,旋转,下落
    I = [[(0, -1), (0, 0), (0, 1), (0, 2)],
         [(-1, 0), (0, 0), (1, 0), (2, 0)]]
    J = [[(-2, 0), (-1, 0), (0, 0), (0, -1)],
         [(-1, 0), (0, 0), (0, 1), (0, 2)],
         [(0, 1), (0, 0), (1, 0), (2, 0)],
         [(0, -2), (0, -1), (0, 0), (1, 0)]]
    L = [[(-2, 0), (-1, 0), (0, 0), (0, 1)],
         [(1, 0), (0, 0), (0, 1), (0, 2)],
         [(0, -1), (0, 0), (1, 0), (2, 0)],
         [(0, -2), (0, -1), (0, 0), (-1, 0)]]
    O = [[(0, 0), (0, 1), (1, 0), (1, 1)]]
    S = [[(-1, 0), (0, 0), (0, 1), (1, 1)],
         [(1, -1), (1, 0), (0, 0), (0, 1)]]
    T = [[(0, -1), (0, 0), (0, 1), (-1, 0)],
         [(-1, 0), (0, 0), (1, 0), (0, 1)],
         [(0, -1), (0, 0), (0, 1), (1, 0)],
         [(-1, 0), (0, 0), (1, 0), (0, -1)]]
    Z = [[(0, -1), (0, 0), (1, 0), (1, 1)],
         [(-1, 0), (0, 0), (0, -1), (1, -1)]]
    shapes_with_dir = {                                           #存储形状的字典
        'I': I, 'J': J, 'L': L, 'O': O, 'S': S, 'T': T, 'Z': Z
    }
②在class类中,设置初始化类(随机生成一种颜色,确定俄罗斯方块的随机形状)
    def __init__(self):        #创建类,初始化类
        self.shape = self.shapes[random.randint(0, len(self.shapes) - 1)]    #随机生成任意一种形状
        self.center = (2, box_width // 2)     #俄罗斯方块(0,0)在屏幕上(2,8)
        self.dir = random.randint(0, len(self.shapes_with_dir[self.shape]) - 1)  #任意方块的任意一种例如I[0]或I[1]中的0、1
        self.color = cube_colors[random.randint(0, len(cube_colors) - 1)]    #随机生成任意一种颜色
③确定旋转后的每一个小方格放到游戏区域中间的绝对坐标位置
    def get_all_gridpos(self, center=None):      #将俄罗斯方块的相对位置转换为屏幕中的绝对位置
        curr_shape = self.shapes_with_dir[self.shape][self.dir]       #确定旋转后的形状
        if center is None:
            center = [self.center[0], self.center[1]]   #中心点[2,8]

        return [(cube[0] + center[0], cube[1] + center[1])          #旋转后的相对坐标的位置+中心点位置 ,即确定每一个小方格的位置
                for cube in curr_shape]
④设置冲突(碰壁无法旋转,下一个位置上有方块无法移动)
    def conflict(self, center):                                #设置冲突
        for cube in self.get_all_gridpos(center):               #从确定中心的俄罗斯方块中选择一个小方格
            if cube[0] < 0 or cube[1] < 0 or cube[0] >= box_height or cube[1] >= box_width:  #超出屏幕之外,不合法
                return True
            if screen_color_matrix[cube[0]][cube[1]] is not 0:         # 不为0,说明之前已经有小方块存在了,也不合法,即不能旋转
                return True
        return False
⑤设置旋转、向下、向左、向右、p键规则
    def rotate(self):                  #旋转
        new_dir = self.dir + 1        #下一个图像
        new_dir %= len(self.shapes_with_dir[self.shape])  #任意一种形状有几种旋转,例如I有两种,new_dir=2 =2/2余0,即new=0即第一个形状
        old_dir = self.dir     #old为初始形状   #因为不知道转动是否合法,需要先保存原先的方向
        self.dir = new_dir     #self现在为新形状
        if self.conflict(self.center):   #设置冲突,新老一样针对0形状
            self.dir = old_dir
            return False

    def down(self):       #向下
        # import pdb; pdb.set_trace()
        center = (self.center[0] + 1, self.center[1])  #中心点变化
        if self.conflict(center):    #如果冲突,返回f
            return False
        self.center = center       #确定新的中心
        return True

    def left(self):      #向左
        center = (self.center[0], self.center[1] - 1)
        if self.conflict(center):
            return False
        self.center = center
        return True

    def right(self):    #向右
        center = (self.center[0], self.center[1] + 1)
        if self.conflict(center):
            return False
        self.center = center
        return True
    def pause(self):   #p暂停 p继续
        is_pause = True
        while is_pause:
            for event in pygame.event.get():
                if event.type == pygame.QUIT:
                    pygame.quit()
                    quit()
                if event.type == pygame.KEYDOWN:
                    if event.key == pygame.K_p:
                        is_pause =False
                    elif event.key == pygame.K_p:
                        is_pause =True
            pygame.display.update()
⑥对于俄罗斯方块的下降“过程”中的颜色以及边框进行绘画
    def draw(self):       #对于下落过程中的每一个小方块进行填色和边框线绘画
        for cube in self.get_all_gridpos():  #俄罗斯方块的每一个小方格
            pygame.draw.rect(screen, self.color,
                             (cube[1] * box_size, cube[0] * box_size,      #内部颜色
                              box_size, box_size))
            pygame.draw.rect(screen, white,
                             (cube[1] * box_size, cube[0] * box_size,     #线条框颜色
                              box_size, box_size),
                             1)
8.绘制静止后的颜色以及边框线
def draw_matrix():  #静止固定后的颜色及边框线
    for i, row in zip(range(box_height), screen_color_matrix):  #i=第几个小方格 row=屏幕颜色矩阵
        for j, color in zip(range(box_width), row):        #j=小方格宽度随机   color=row颜色
            if color is not 0:
                pygame.draw.rect(screen, color,            #落到底部固定后
                                 (j * box_size, i * box_size,    #俄罗斯方块内部颜色填充
                                  box_size, box_size))
                pygame.draw.rect(screen, white,
                                 (j * box_size, i * box_size,    #外部线条填充
                                  box_size, box_size), 2)
9.设置消除满行规则
def remove_full_line():        #消除满行
    global screen_color_matrix  #全局方块(判断是否为0)
    global score       #分数

    new_matrix = [[0] * box_width for i in range(box_height)]
    index = box_height - 1  #剩余行数
    n_full_line = 0   #满行数
    for i in range(box_height - 1, -1, -1):  #(24,-1)步进值为-1,输出0,1,2,3,4,5,6,7,8,9...24
        is_full = True
        for j in range(box_width):
            if screen_color_matrix[i][j] is 0:     #判断第i行的每一个j是否为0
                is_full = False
                continue
        if not is_full:
            new_matrix[index] = screen_color_matrix[i]
            index -= 1     #行数减一
        else:
            n_full_line += 1   #满行数+1
    score += n_full_line     #分数
    screen_color_matrix = new_matrix    #全局0更新
10.对于事件进行定义,并且获取运行事件(包括移动旋转p暂停o重新开始space空格功能)
running = True
stop = False
gameover = True
counter = 0  #计数器
live_cube = 0  #当前方块


while running:     #获取事件
    clock.tick(FPS)   #帧率
    for event in pygame.event.get():  #结束事件触发结束操作
        if event.type == pygame.QUIT:
            running = False    #如果鼠标点关闭,运行结束
        elif event.type == pygame.KEYDOWN:   #如果点击键盘
            if gameover:
                gameover = False  #游戏没有结束
                live_cube = CubeShape()
                break
            if event.key == pygame.K_LEFT:   #左  左移
                live_cube.left()
            elif event.key == pygame.K_RIGHT:   #右  右移
                live_cube.right()
            elif event.key == pygame.K_DOWN:  #下  下移
                live_cube.down()
            elif event.key == pygame.K_UP:  #上  旋转
                live_cube.rotate()
            elif event.key ==pygame.K_p:  #p暂停游戏
                live_cube.pause()
            elif event.key == pygame.K_SPACE:  #空格  加速下降
                while live_cube.down() == True:
                    pass
            elif event.key == pygame.K_o:    #o重新开始游戏
                gameover = True
                score = 0
                live_cube = 0
                screen_color_matrix = [[0] * box_width for i in range(box_height)]  #游戏矩阵为0
            remove_full_line()

    if gameover is False and counter % (FPS // level) == 0:
        if live_cube.down() == False:               #如果当前物块不能下降
            for cube in live_cube.get_all_gridpos():   #从当前俄罗斯方块选择一个小方格
                screen_color_matrix[cube[0]][cube[1]] = live_cube.color  #屏幕颜色矩阵、确定静止颜色
            live_cube = CubeShape()
            if live_cube.conflict(live_cube.center):  #冲突
                gameover = True   #游戏结束
                historyscore = score
                score = 0
                live_cube = 0
                screen_color_matrix = [[0] * box_width for i in range(box_height)]  #游戏矩阵为0

                # 消除满行
        remove_full_line()
11.最后对前期所有的绘画即其他函数进行调用,对历史分数和历史最高分记录进行规定。
    counter += 1
    # 更新屏幕
    screen.fill(black)
    draw_grids()  #调用画出游戏区域方格线
    draw_matrix()   #画出静止后的俄罗斯方块
    draw_score()   #分数
    draw_historyscore()
    draw_maxscore()  #最高分数
    if high_score <= score:
        high_score = score
    else:
        high_score =high_score
    if live_cube is not 0:  #最后显示游戏结束界面
        live_cube.draw()
    if gameover:
        show_gameover(screen)
    pygame.display.update()  #刷新屏幕
到此,本次俄罗斯方块的完整代码已经分块讲述完毕。
程序bug:
①只有俄罗斯方块到(2,8)点,就是在(2,8)点产生物块时,无法再次进行移动,游戏结束。
②下落速度变化过慢。
③无法继续上次游戏(需要用到file存储),但是此次代码只要放到一个py中就可以应用。
关闭。这个问题是opinion-based.它目前不接受答案。想要改进这个问题?更新问题,以便editingthispost可以用事实和引用来回答它.关闭4年前。Improvethisquestion我想在固定时间创建一系列低音和高音调的哔哔声。例如:在150毫秒时发出高音调的蜂鸣声在151毫秒时发出低音调的蜂鸣声200毫秒时发出低音调的蜂鸣声250毫秒的高音调蜂鸣声有没有办法在Ruby或Python中做到这一点?我真的不在乎输出编码是什么(.wav、.mp3、.ogg等等),但我确实想创建一个输出文件。
这个问题在这里已经有了答案:关闭10年前。PossibleDuplicate:Pythonconditionalassignmentoperator对于这样一个简单的问题表示歉意,但是谷歌搜索||=并不是很有帮助;)Python中是否有与Ruby和Perl中的||=语句等效的语句?例如:foo="hey"foo||="what"#assignfooifit'sundefined#fooisstill"hey"bar||="yeah"#baris"yeah"另外,类似这样的东西的通用术语是什么?条件分配是我的第一个猜测,但Wikipediapage跟我想的不太一样。
什么是ruby的rack或python的Java的wsgi?还有一个路由库。 最佳答案 来自Python标准PEP333:Bycontrast,althoughJavahasjustasmanywebapplicationframeworksavailable,Java's"servlet"APImakesitpossibleforapplicationswrittenwithanyJavawebapplicationframeworktoruninanywebserverthatsupportstheservletAPI.ht
华为OD机试题本篇题目:明明的随机数题目输入描述输出描述:示例1输入输出说明代码编写思路最近更新的博客华为od2023|什么是华为od,od薪资待遇,od机试题清单华为OD机试真题大全,用Python解华为机试题|机试宝典【华为OD机试】全流程解析+经验分享,题型分享,防作弊指南华为o
我想解析一个已经存在的.mid文件,改变它的乐器,例如从“acousticgrandpiano”到“violin”,然后将它保存回去或作为另一个.mid文件。根据我在文档中看到的内容,该乐器通过program_change或patch_change指令进行了更改,但我找不到任何在已经存在的MIDI文件中执行此操作的库.他们似乎都只支持从头开始创建的MIDI文件。 最佳答案 MIDIpackage会为您完成此操作,但具体方法取决于midi文件的原始内容。一个MIDI文件由一个或多个音轨组成,每个音轨是十六个channel中任何一个上的
本文主要介绍在使用Selenium进行自动化测试或者任务时,对于使用了iframe的页面,如何定位iframe中的元素文章目录场景描述解决方案具体代码场景描述当我们在使用Selenium进行自动化测试的时候,可能会遇到一些界面或者窗体是使用HTML的iframe标签进行承载的。对于iframe中的标签,如果直接查找是无法找到的,会抛出没有找到元素的异常。比如近在咫尺的例子就是,CSDN的登录窗体就是使用的iframe,大家可以尝试通过F12开发者模式查看到的tag_name,class_name,id或者xpath来定位中的页面元素,会抛出NoSuchElementException异常。解决
2022/8/4更新支持加入水印水印必须包含透明图像,并且水印图像大小要等于原图像的大小pythonconvert_image_to_video.py-f30-mwatermark.pngim_dirout.mkv2022/6/21更新让命令行参数更加易用新的命令行使用方法pythonconvert_image_to_video.py-f30im_dirout.mkvFFMPEG命令行转换一组JPG图像到视频时,是将这组图像视为MJPG流。我需要转换一组PNG图像到视频,FFMPEG就不认了。pyav内置了ffmpeg库,不需要系统带有ffmpeg工具因此我使用ffmpeg的python包装p
ValidPalindromeGivenastring,determineifitisapalindrome,consideringonlyalphanumericcharactersandignoringcases. [#125]Example:"Aman,aplan,acanal:Panama"isapalindrome."raceacar"isnotapalindrome.Haveyouconsiderthatthestringmightbeempty?Thisisagoodquestiontoaskduringaninterview.Forthepurposeofthisproblem
是否可以在PyYAML或Ruby的Psych引擎中禁用创建anchor和引用(并有效地显式列出冗余数据)?也许我在网上搜索时遗漏了一些东西,但在Psych中似乎没有太多可用的选项,而且我也无法确定PyYAML是否允许这样做.基本原理是我必须序列化一些数据并将其以可读的形式传递给一个不是真正的技术同事进行手动验证。有些数据是多余的,但我需要以最明确的方式列出它们以提高可读性(anchor和引用是提高效率的好概念,但不是人类可读性)。Ruby和Python是我选择的工具,但如果有其他一些相当简单的方法来“展开”YAML文档,它可能就可以了。 最佳答案
我很好奇.NET将如何影响Python和Ruby应用程序。用IronPython/IronRuby编写的应用程序是否会非常特定于.NET环境,以至于它们实际上将变得特定于平台?如果他们不使用任何.NET功能,那么IronPython/IronRuby相对于非.NET同类产品的优势是什么? 最佳答案 我不能说任何关于IronRuby的东西,但是大多数Python实现(如IronPython、Jython和PyPy)都试图尽可能忠实于CPython实现。不过,IronPython正在迅速成为这方面的佼佼者之一,并且在PlanetPyth