其他章节请看:
本系列已近尾声,权限是后台系统必不可少的一部分,本篇首先分析spug项目中权限的实现,最后在将权限加入到我们的项目中来。
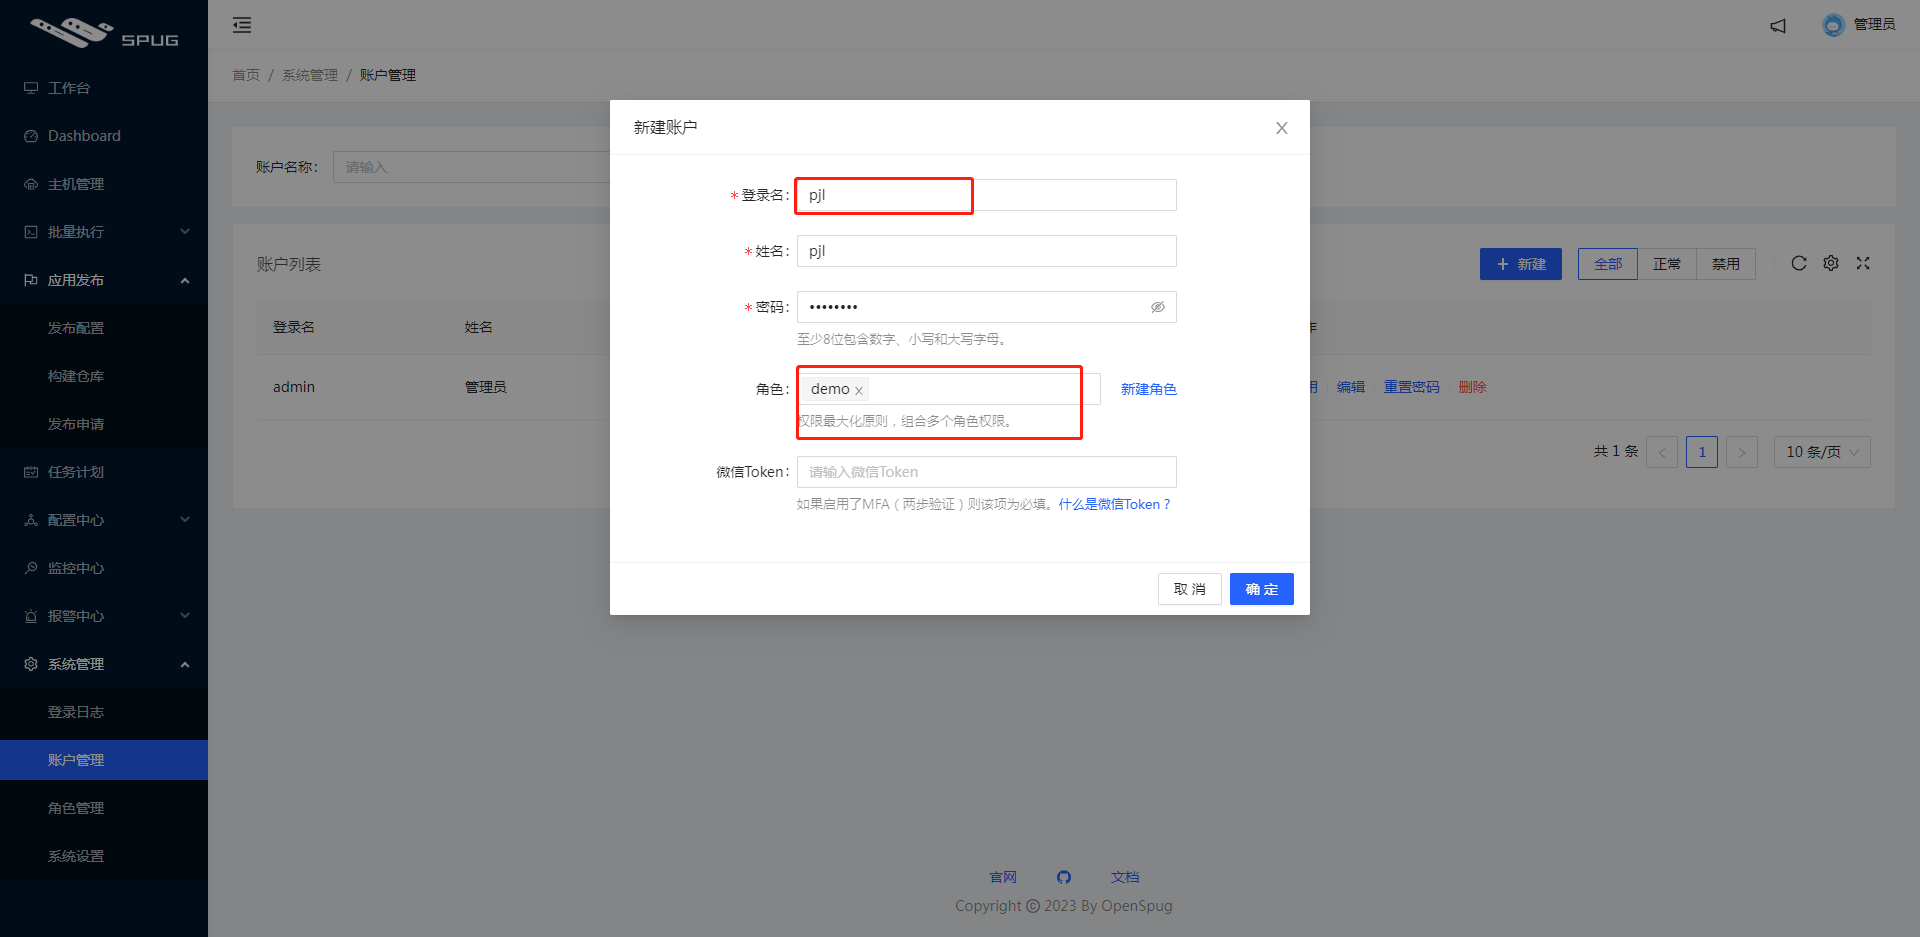
比如我要将应用发布模块的查看权限分给某用户(例如 pjl),可以这样操作:
在角色管理中新建一角色(例如 demo),然后给该角色配置权限:

新建用户(pjl)并赋予其 demo 权限
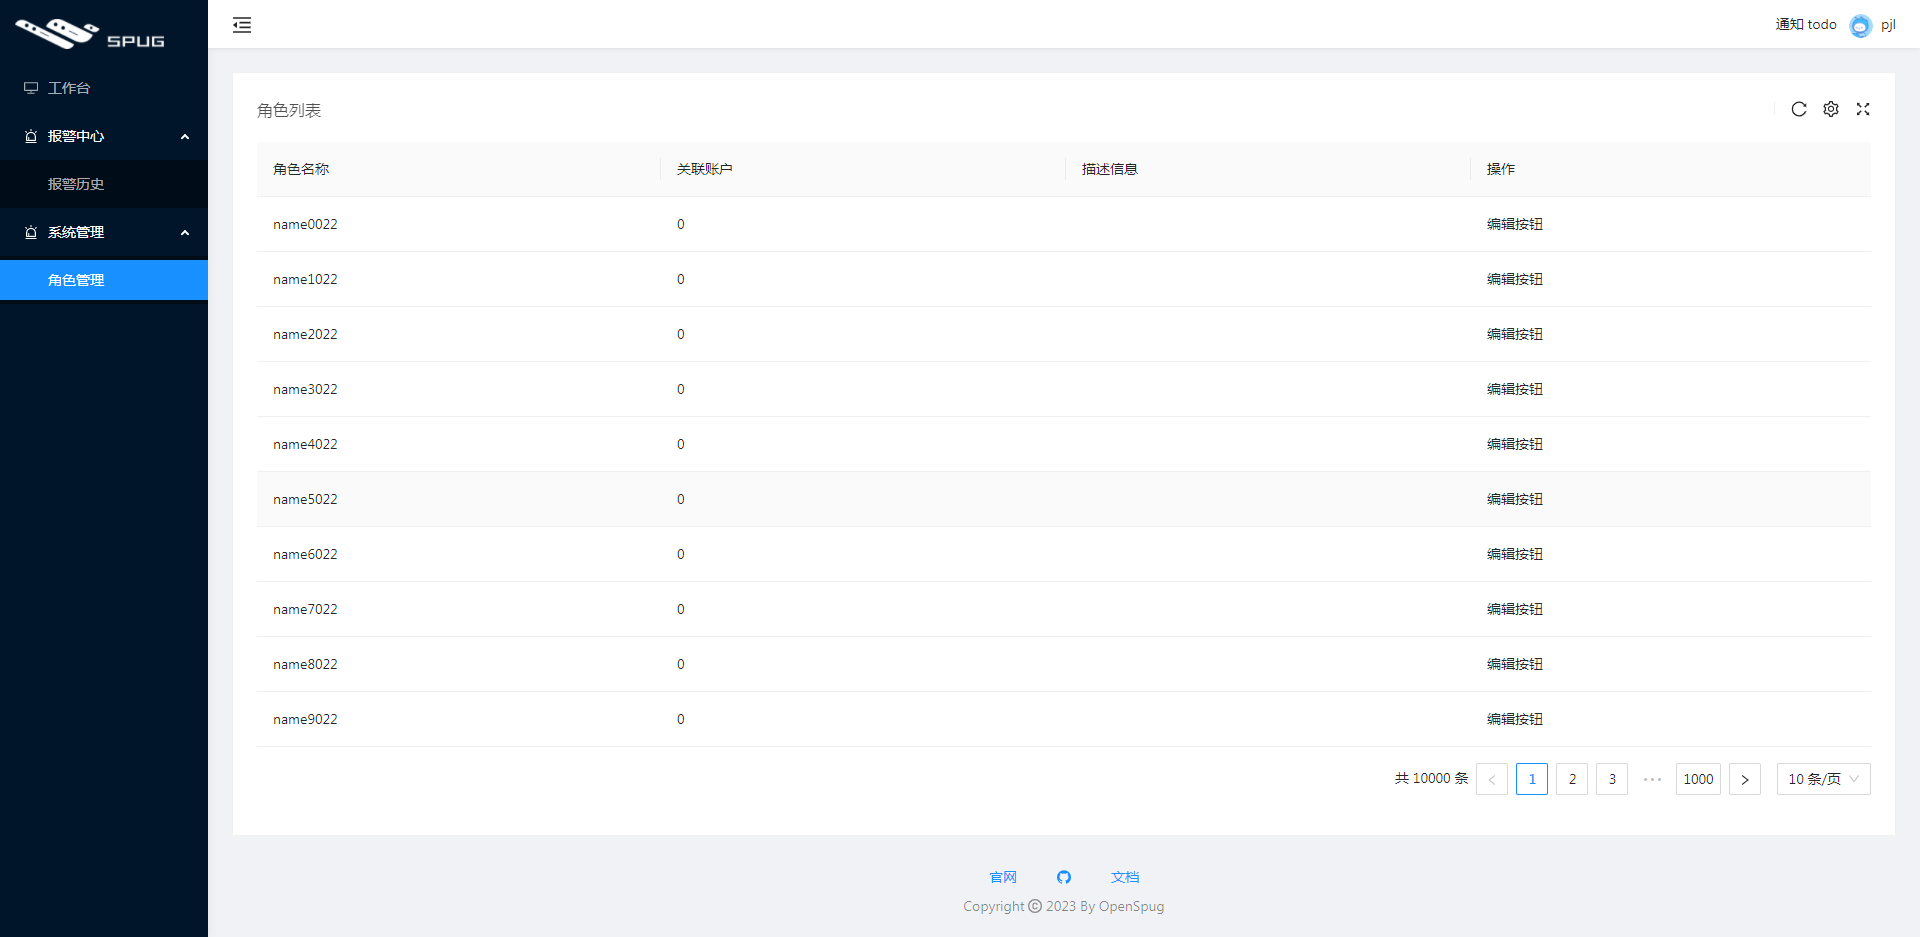
pjl 登录后就只能看到自己有权限的页面和操作:

上述示例中,以 pjl 登录成功后返回如下数据:
{
    "data": {
        "id": 2,
        "access_token": "74b0fe67d09646ee9ca44fc48c6b457a",
        "nickname": "pjl",
        "is_supper": false,
        "has_real_ip": true,
        "permissions": [
            "deploy.app.view",
            "deploy.repository.view"
        ]
    },
    "error": ""
}
其中 permissions 表示该用户的权限。
vscode 搜索 deploy.app.view 有两处:
deploy.app.view)就不展示该页面内容。// spug\src\pages\deploy\app\index.js
export default observer(function () {
return (
<AuthDiv auth="deploy.app.view">
<Breadcrumb>
<Breadcrumb.Item>首页</Breadcrumb.Item>
<Breadcrumb.Item>应用发布</Breadcrumb.Item>
<Breadcrumb.Item>应用管理</Breadcrumb.Item>
</Breadcrumb>
<ComTable/>
</AuthDiv>
);
})
Tip:AuthDiv 用于控制页内组件的权限,里面通过 hasPermission 判断是否有对应的权限,如果没有,该组件内的子元素则不会显示。
export default function AuthDiv(props) {
  let disabled = props.disabled === undefined ? false : props.disabled;
  if (props.auth && !hasPermission(props.auth)) {
    disabled = true;
  }
  return disabled ? null : <div {...props}>{props.children}</div>
}
// 前端页面的权限判断(仅作为前端功能展示的控制,具体权限控制应在后端实现)
export function hasPermission(strCode) {
  const {isSuper, permissions} = Permission;
  if (!strCode || isSuper) return true;
  for (let or_item of strCode.split('|')) {
    if (isSubArray(permissions, or_item.split('&'))) {
      return true
    }
  }
  return false
}
auth指授权,这里定义的是模块和页面的查看权限。其中deploy.app.view|deploy.repository.view|deploy.request.view表示只要有其中一个权限,“应用发布”就会展示。// spug\src\routes.js
{
icon: <FlagOutlined />, title: '应用发布', auth: 'deploy.app.view|deploy.repository.view|deploy.request.view', child: [
{ title: '应用管理', auth: 'deploy.app.view', path: '/deploy/app', component: DeployApp },
{ title: '构建仓库', auth: 'deploy.repository.view', path: '/deploy/repository', component: DeployRepository },
{ title: '发布申请', auth: 'deploy.request.view', path: '/deploy/request', component: DeployRequest },
]
},
现在我们已经知道页面级的权限解决思路:
查看(spug 中是 xx.xx.view)权限。如果没有 auth 则说明该页面任何人都可以访问// spug\src\layout\Sider.js
function makeMenu(menu) {
// 仅取出有权限的菜单
if (menu.auth && !hasPermission(menu.auth)) return null;
if (!menu.title) return null;
return menu.child ? _makeSubMenu(menu) : _makeItem(menu)
}
如果直接通过 url 去访问没有权限的页面会如何:

直接 404。
为什么是 404?因为路由数组(Routes)中只取了有权限的菜单页面。
// spug\src\layout\index.js
<Switch>
  {/* 路由数组。里面每项类似这样:<Route exact key={route.path} path='/home' component={HomeComponent}/> */}
  {Routes}
  {/* 没有匹配则进入 NotFound */}
  <Route component={NotFound}/>
</Switch>
Routes 的内容请看路由初始化方法:
// 将 routes 中有权限的路由提取到 Routes 中
function initRoutes(Routes, routes) {
  for (let route of routes) {
    if (route.component) {
      // 如果不需要权限,或有权限则放入 Routes
      if (!route.auth || hasPermission(route.auth)) {
        Routes.push(<Route exact key={route.path} path={route.path} component={route.component}/>)
      }
    } else if (route.child) {
      initRoutes(Routes, route.child)
    }
  }
}
新增、删除等页内的权限如何实现的呢?我们把发布配置页内的新建权限放开,后端权限返回列表中将有: deploy.app.add

vscode 只搜索到一处匹配deploy.app.add。
<TableCard
      tKey="da"
      ...
      actions={[
        <AuthButton
          auth="deploy.app.add"
          type="primary"
          icon={<PlusOutlined/>}
          onClick={() => store.showForm()}>新建</AuthButton>
      ]}
其中 AuthButton 和上文的 AuthDiv 一样,如果有权限则显示其中内容
// spug\src\components\AuthButton.js

export default function AuthButton(props) {
  let disabled = props.disabled;
  if (props.auth && !hasPermission(props.auth)) {
    disabled = true;
  }
  return disabled ? null : <Button {...props}>{props.children}</Button>
}
于是我们知道页内级的权限解决思路:
功能权限设置中定义对应操作权限的值,选中后把该值传递给后端
权限的值在 codes.js 中定义如下:
// codes.js
{
  key: 'deploy',
  label: '应用发布',
  pages: [
    {
      key: 'app',
      label: '应用管理',
      perms: [
        { key: 'view', label: '查看应用' },
        { key: 'add', label: '新建应用' },
        { key: 'edit', label: '编辑应用' },
        { key: 'del', label: '删除应用' },
        { key: 'config', label: '查看配置' },
      ]
    },
    {
      key: 'repository',
      label: '构建仓库',
      perms: [
        { key: 'view', label: '查看构建' },
        { key: 'add', label: '新建版本' },
      ]
    },
    ...
  ]
},
登录后返回权限中还有个字段 is_supper。数据格式就像这样:
{
    "data": {
        "id": 1,
        "access_token": "6a0cef69a7d64b6f8c755ff341266e76",
        "nickname": "管理员",
        "is_supper": true,
        "has_real_ip": true,
        "permissions": [ ]
    },
    "error": ""
}
is_supper 是 true,permissions 为空数组。猜测 is_supper 的作用有2个:
isSuper)直接返回有权限,无需其他判断。就像这样:// 前端页面的权限判断(仅作为前端功能展示的控制,具体权限控制应在后端实现)
export function hasPermission(strCode) {
const {isSuper, permissions} = Permission;
if (!strCode || isSuper) return true;
for (let or_item of strCode.split('|')) {
if (isSubArray(permissions, or_item.split('&'))) {
return true
}
}
return false
}
is_supper)是作为最大的权限再做一些页面上的操作。例如这里隐藏该片段:<Form.Item hidden={store.record.is_supper} label="角色" style={{marginBottom: 0}}>
<Form.Item name="role_ids" style={{display: 'inline-block', width: '80%'}} extra="权限最大化原则,组合多个角色权限。">
<Select mode="multiple" placeholder="请选择">
{roleStore.records.map(item => (
<Select.Option value={item.id} key={item.id}>{item.name}</Select.Option>
))}
</Select>
</Form.Item>
<Form.Item style={{display: 'inline-block', width: '20%', textAlign: 'right'}}>
<Link to="/system/role">新建角色</Link>
</Form.Item>
</Form.Item>
spug 中的权限整体思路:
功能权限设置弹框)将某些权限(页面级和页内级)赋予某角色,再让某用户属于该角色permissions、is_supper字段)告诉前端该用户的权限所以权限这里包含两条线:
需求:用户没有以下三个权限(报警联系人、报警联系组、角色管理中的新增)。见下图3个红框:

最终效果如下:
在 routes.js 中定义每个菜单(也是路由)的权限:
export default [
  // 无需权限
  { icon: <DesktopOutlined />, title: '工作台', path: '/home', component: HomeIndex },
  {
    icon: <AlertOutlined />, title: '报警中心', auth: 'alarm.alarm.view|alarm.contact.view|alarm.group.view', child: [
      { title: '报警历史', auth: 'alarm.alarm.view', path: '/alarm/alarm', component: AlarmCenter },
      { title: '报警联系人', auth: 'alarm.contact.view', path: '/alarm/contact', component: AlarmCenter },
      { title: '报警联系组', auth: 'alarm.group.view', path: '/alarm/group', component: AlarmCenter },
    ]
  },
  {
    icon: <AlertOutlined />, title: '系统管理', auth: "system.role.view", child: [
      { title: '角色管理', auth: 'system.role.view', path: '/system/role', component: SystemRole },
    ]
  },
  { path: '/welcome/info', component: WelcomeInfo },
]
Tip:例如角色管理页面需要system.role.view这个权限。命名任意,因为后端返回的权限是前端发送给的后端。
更新权限判断逻辑。之前统统返回 true:
// 之前
export function hasPermission(strCode) {
    return true
}
现在看后端是否返回该权限:
// 前端页面的权限判断(仅作为前端功能展示的控制,具体权限控制应在后端实现)
export function hasPermission(strCode) {
    const { isSuper, permissions } = Permission;

    if (!strCode || isSuper) return true;
    for (let or_item of strCode.split('|')) {
        if (isSubArray(permissions, or_item.split('&'))) {
            return true
        }
    }
    return false
}

//  数组包含关系判断
export function isSubArray(parent, child) {
    for (let item of child) {
        if (!parent.includes(item.trim())) {
            return false
        }
    }
    return true
}
定义两个组件(AuthButton、AuthDiv),并导出:
import React from 'react';
import { Button } from 'antd';
import { hasPermission } from '@/libs';

export default function AuthButton(props) {
  let disabled = props.disabled;
  if (props.auth && !hasPermission(props.auth)) {
    disabled = true;
  }
  return disabled ? null : <Button {...props}>{props.children}</Button>
}
import React from 'react';
import { hasPermission } from '@/libs';

export default function AuthDiv(props) {
    let disabled = props.disabled === undefined ? false : props.disabled;
    if (props.auth && !hasPermission(props.auth)) {
        disabled = true;
    }
    return disabled ? null : <div {...props}>{props.children}</div>
}
//  myspug\src\compoments\index.js
import NotFound from './NotFound';
import TableCard from './TableCard';
import AuthButton from './AuthButton'
import AuthDiv from './AuthDiv'

export {
    NotFound,
    TableCard,
    AuthButton,
    AuthDiv,
}
例如新建按钮就放入 AuthButton 组件中,而整个角色管理的入口模块就放入 AuthDiv 中。
// mock/index.js
{
	"data": {
		"id": 2,
		"access_token": "74b0fe67d09646ee9ca44fc48c6b457a",
		"nickname": "pjl",
		"is_supper": false,
		"has_real_ip": true,
		"permissions": ["system.role.view", "alarm.alarm.view"]
	},
	"error": ""
}
// myspug\src\pages\system\role\index.js

export default function () {
  return (
    <AuthDiv auth="system.role.view">
      <ComTable />
    </AuthDiv>
  )
}
// myspug\src\pages\system\role\Table.js
<TableCard
      rowKey="id"
      title="角色列表"
      actions={[
        <AuthButton type="primary" icon={<PlusOutlined/>} auth="system.role.add" >新增</AuthButton>
      ]}
spug 中权限虽然简单,其中一个缺点是每开发一个新模块,就得更新权限配置页面(即功能权限设置)和路由(routes.js)配置:
如果将其改为可配置,将减小这部分的工作。
其他章节请看:
关闭。这个问题是opinion-based.它目前不接受答案。想要改进这个问题?更新问题,以便editingthispost可以用事实和引用来回答它.关闭4年前。Improvethisquestion我想在固定时间创建一系列低音和高音调的哔哔声。例如:在150毫秒时发出高音调的蜂鸣声在151毫秒时发出低音调的蜂鸣声200毫秒时发出低音调的蜂鸣声250毫秒的高音调蜂鸣声有没有办法在Ruby或Python中做到这一点?我真的不在乎输出编码是什么(.wav、.mp3、.ogg等等),但我确实想创建一个输出文件。
这里是Ruby新手。完成一些练习后碰壁了。练习:计算一系列成绩的字母等级创建一个方法get_grade来接受测试分数数组。数组中的每个分数应介于0和100之间,其中100是最大分数。计算平均分并将字母等级作为字符串返回,即“A”、“B”、“C”、“D”、“E”或“F”。我一直返回错误:avg.rb:1:syntaxerror,unexpectedtLBRACK,expecting')'defget_grade([100,90,80])^avg.rb:1:syntaxerror,unexpected')',expecting$end这是我目前所拥有的。我想坚持使用下面的方法或.join,
电脑0x0000001A蓝屏错误怎么U盘重装系统教学分享。有用户电脑开机之后遇到了系统蓝屏的情况。系统蓝屏问题很多时候都是系统bug,只有通过重装系统来进行解决。那么蓝屏问题如何通过U盘重装新系统来解决呢?来看看以下的详细操作方法教学吧。 准备工作: 1、U盘一个(尽量使用8G以上的U盘)。 2、一台正常联网可使用的电脑。 3、ghost或ISO系统镜像文件(Win10系统下载_Win10专业版_windows10正式版下载-系统之家)。 4、在本页面下载U盘启动盘制作工具:系统之家U盘启动工具。 U盘启动盘制作步骤: 注意:制作期间,U盘会被格式化,因此U盘中的重要文件请注
在应用开发中,有时候我们需要获取系统的设备信息,用于数据上报和行为分析。那在鸿蒙系统中,我们应该怎么去获取设备的系统信息呢,比如说获取手机的系统版本号、手机的制造商、手机型号等数据。1、获取方式这里分为两种情况,一种是设备信息的获取,一种是系统信息的获取。1.1、获取设备信息获取设备信息,鸿蒙的SDK包为我们提供了DeviceInfo类,通过该类的一些静态方法,可以获取设备信息,DeviceInfo类的包路径为:ohos.system.DeviceInfo.具体的方法如下:ModifierandTypeMethodDescriptionstatic StringgetAbiList()Obt
需求:要创建虚拟机,就需要给他提供一个虚拟的磁盘,我们就在/opt目录下创建一个10G大小的raw格式的虚拟磁盘CentOS-7-x86_64.raw命令格式:qemu-imgcreate-f磁盘格式磁盘名称磁盘大小qemu-imgcreate-f磁盘格式-o?1.创建磁盘qemu-imgcreate-fraw/opt/CentOS-7-x86_64.raw10G执行效果#ls/opt/CentOS-7-x86_64.raw2.安装虚拟机使用virt-install命令,基于我们提供的系统镜像和虚拟磁盘来创建一个虚拟机,另外在创建虚拟机之前,提前打开vnc客户端,在创建虚拟机的时候,通过vnc
基础版云数据库RDS的产品系列包括基础版、高可用版、集群版、三节点企业版,本文介绍基础版实例的相关信息。RDS基础版实例也称为单机版实例,只有单个数据库节点,计算与存储分离,性价比超高。说明RDS基础版实例只有一个数据库节点,没有备节点作为热备份,因此当该节点意外宕机或者执行重启实例、变更配置、版本升级等任务时,会出现较长时间的不可用。如果业务对数据库的可用性要求较高,不建议使用基础版实例,可选择其他系列(如高可用版),部分基础版实例也支持升级为高可用版。基础版与高可用版的对比拓扑图如下所示。优势 性能由于不提供备节点,主节点不会因为实时的数据库复制而产生额外的性能开销,因此基础版的性能相对于
我是ruby的新手,我认为重新构建一个我用C#编写的简单聊天程序是个好主意。我正在使用Ruby2.0.0MRI(Matz的Ruby实现)。问题是我想在服务器运行时为简单的服务器命令提供I/O。这是从示例中获取的服务器。我添加了使用gets()获取输入的命令方法。我希望此方法在后台作为线程运行,但该线程正在阻塞另一个线程。require'socket'#Getsocketsfromstdlibserver=TCPServer.open(2000)#Sockettolistenonport2000defcommandsx=1whilex==1exitProgram=gets.chomp
我有一个应用需要发送用户事件邀请。当用户邀请friend(用户)参加事件时,如果尚不存在将用户连接到该事件的新记录,则会创建该记录。我的模型由用户、事件和events_user组成。classEventdefinvite(user_id,*args)user_id.eachdo|u|e=EventsUser.find_or_create_by_event_id_and_user_id(self.id,u)e.save!endendend用法Event.first.invite([1,2,3])我不认为以上是完成我的任务的最有效方法。我设想了一种方法,例如Model.find_or_cr
因为我现在正在做一些时间测量,我想知道是否可以在不使用Benchmark类或命令行实用程序time的情况下测量用户时间或系统时间。使用Time类只显示挂钟时间,而不显示系统和用户时间,但是我正在寻找具有相同灵active的解决方案,例如time=TimeUtility.now#somecodeuser,system,real=TimeUtility.now-time原因是我有点不喜欢Benchmark,因为它不能只返回数字(编辑:我错了-它可以。请参阅下面的答案。)。当然,我可以解析输出,但感觉不对。*NIX系统的time实用程序也应该可以解决我的问题,但我想知道是否已经在Ruby中实
在Ruby中,以毫秒为单位获取自纪元(1970)以来的当前系统时间的正确方法是什么?我试过了Time.now.to_i,好像不是我想要的结果。我需要结果显示毫秒并且使用long类型,而不是float或double。 最佳答案 (Time.now.to_f*1000).to_iTime.now.to_f显示包含十进制数字的时间。要获得毫秒数,只需将时间乘以1000。 关于ruby-以毫秒为单位获取当前系统时间,我们在StackOverflow上找到一个类似的问题: