文章目录
开发工具:Pycharm 2020.1.1
开发语言:Python 3.8.5
Web框架:Djanjo 3.0.3
前端框架:bootstrap 3.3.7
数据库:MySQL 8.0.21 + Navicat Premium 15.0.17
操作系统:macOS 10.14.6
技术要学会分享、交流,不建议闭门造车。 本文技术由粉丝群小伙伴分享汇总。源码、数据、技术交流提升,均可加交流群获取,群友已超过2000人,添加时最好的备注方式为:来源+兴趣方向,方便找到志同道合的朋友。
方式①、添加微信号:dkl88191,备注:来自CSDN +学管系统
方式②、微信搜索公众号:Python学习与数据挖掘,后台回复:学管系统
Django项目Pycharm创建Django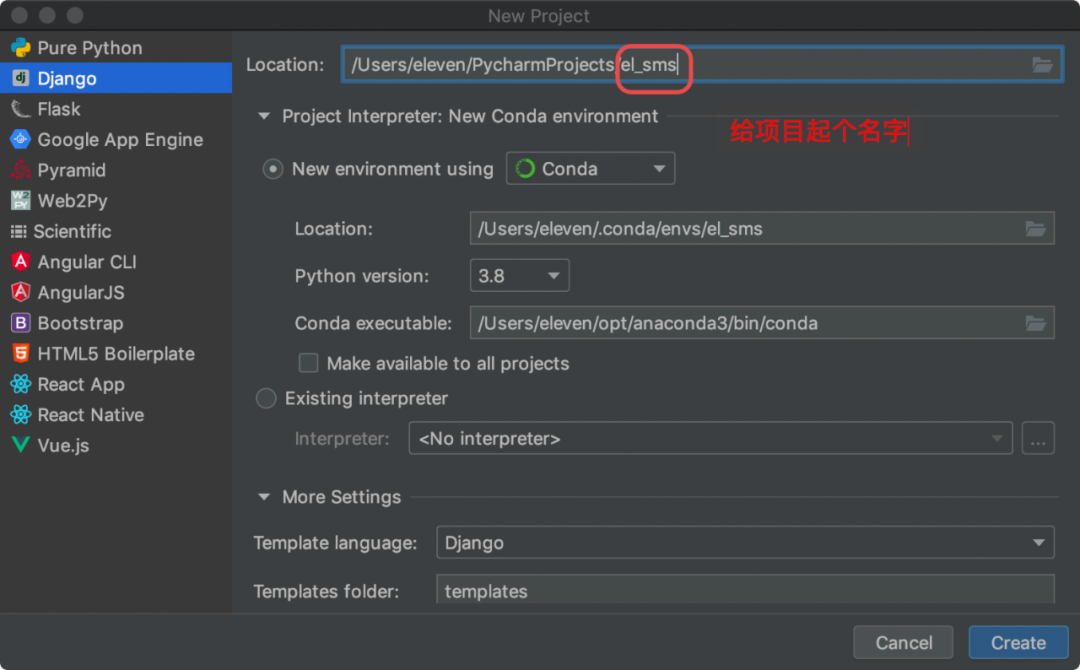

Pycharm的终端,输入如下命令,创建Web应用python manage.py startapp Web # Web名字可以任意取
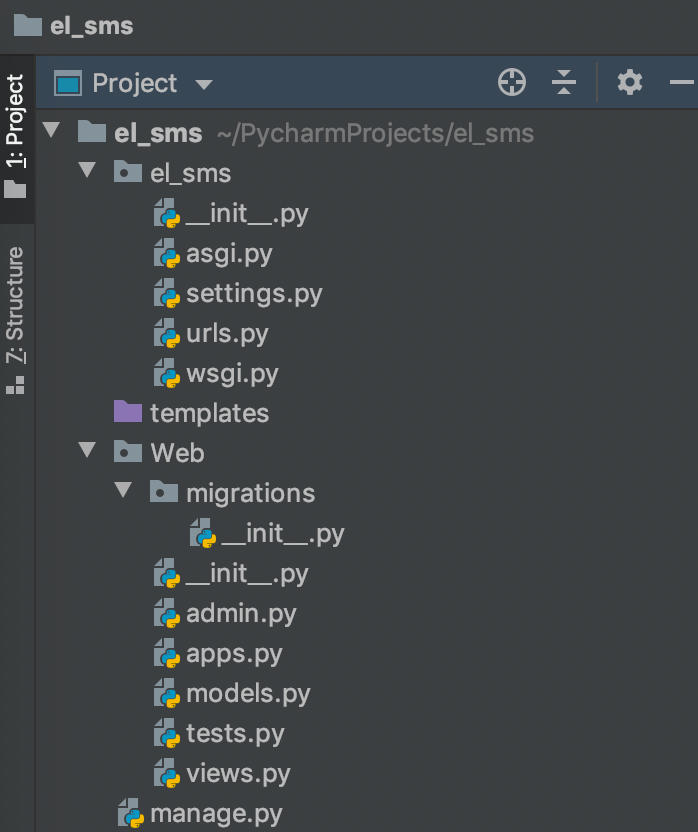
settings.py文件里INSTALLED_APPS下面添加Web完成应用注册
settings.py文件中的sqlite3为MySQL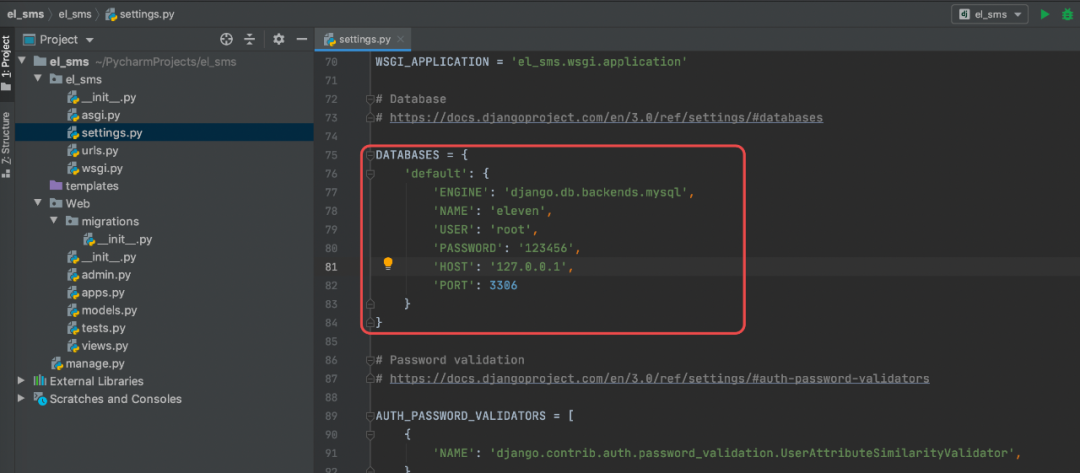
DATABASES = {
    'default': {
        'ENGINE': 'django.db.backends.mysql',
        'NAME': 'eleven',
        'USER': 'root',
        'Pw': '123456',
        'HOST': '127.0.0.1',
        'PORT': 3306
    }
}
Web下的models.py添加Student模型
class Student(models.Model):
    student_no = models.CharField(max_length = 32, unique=True)
    student_name = models.CharField(max_length = 32)
执行如下命令,在数据库生成表结构
# 生成文件记录模型的变化
python manage.py makemigrations Web
# 将模型变化同步至数据库,我们可以在数据库生成对应的表结构
python manage.py migrate Web

数据库中生成的表

在el_sms里面的urls.py里面添加Web的路由配置
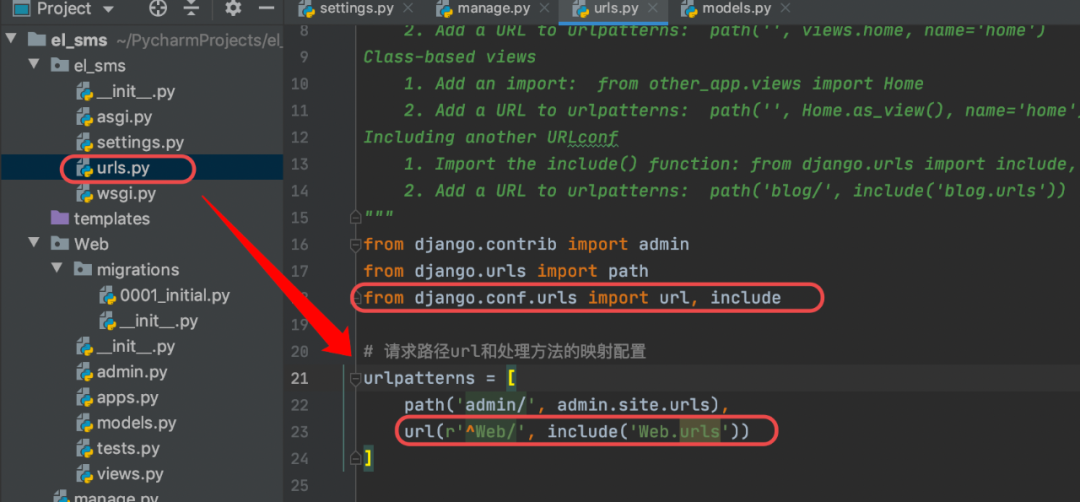
from django.contrib import admin
from django.urls import path
from django.conf.urls import url, include

# 请求路径url和处理方法的映射配置
urlpatterns = [
    path('admin/', admin.site.urls),
    url(r'^Web/', include('Web.urls'))
]
然后在Web创建一个urls.py文件,添加路由配置如下:
# coding=utf-8
from django.conf.urls import url
from . import views

urlpatterns = [
 url(r'^$', views.index),
 url(r'^add/$', views.add),
 url(r'^edit/$', views.edit),
 url(r'^delete/$', views.delete)
]

在应用Web的视图层文件views.py添加对学生信息增删改查的处理函数
import MySQLdb
from django.shortcuts import render, redirect

# Create your views here.

# 连接MySQL数据库
conn = MySQLdb.connect(host="localhost", user="root", pw="123456", db="eleven", charset='utf8')


# 学生信息列表处理函数
def index(request):
    with conn.cursor(cursorclass=MySQLdb.cursors.DictCursor) as cursor:
        cursor.execute("SELECT id,student_no,student_name FROM Web_student")
    students = cursor.fetchall()
    return render(request, 'student/index.html', {'students': students})


# 学生信息新增处理函数
def add(request):
    if request.method == 'GET':
        return render(request, 'student/add.html')
    else:
        student_no = request.POST.get('student_no', '')
    student_name = request.POST.get('student_name', '')
    with conn.cursor(cursorclass=MySQLdb.cursors.DictCursor) as cursor:
        cursor.execute("INSERT INTO Web_student (student_no,student_name) "
                       "values (%s,%s)", [student_no, student_name])
        conn.commit()
    return redirect('../')


# 学生信息修改处理函数
def edit(request):
    if request.method == 'GET':
        id = request.GET.get("id")
        with conn.cursor(cursorclass=MySQLdb.cursors.DictCursor) as cursor:
            cursor.execute("SELECT id,student_no,student_name FROM Web_student where id =%s", [id])
            student = cursor.fetchone()
        return render(request, 'student/edit.html', {'student': student})
    else:
        id = request.POST.get("id")
        student_no = request.POST.get('student_no', '')
        student_name = request.POST.get('student_name', '')
        with conn.cursor(cursorclass=MySQLdb.cursors.DictCursor) as cursor:
            cursor.execute("UPDATE Web_student set student_no=%s,student_name=%s where id =%s",
                           [student_no, student_name, id])
            conn.commit()
        return redirect('../')


# 学生信息删除处理函数
def delete(request):
    id = request.GET.get("id")
    with conn.cursor(cursorclass=MySQLdb.cursors.DictCursor) as cursor:
        cursor.execute("DELETE FROM Web_student WHERE id =%s", [id])
    conn.commit()
    return redirect('../')
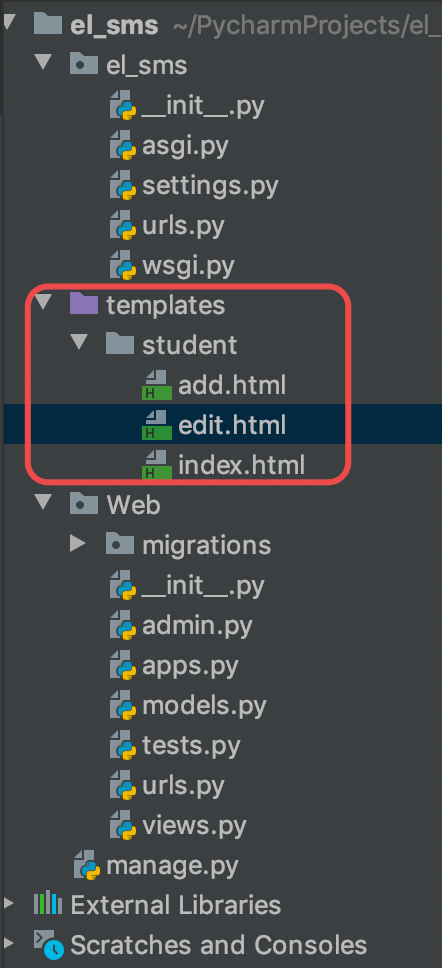
学生信息列表页
<!DOCTYPE html>
<html lang="en">
<head>
    <meta charset="UTF-8">
    <title>学生列表</title>
    <!-- 最新版本的 Bootstrap 核心 CSS 文件 -->
    <link rel="stylesheet" href="https://cdn.jsdelivr.net/npm/bootstrap@3.3.7/dist/css/bootstrap.min.css"
          integrity="sha384-BVYiiSIFeK1dGmJRAkycuHAHRg32OmUcww7on3RYdg4Va+PmSTsz/K68vbdEjh4u" crossorigin="anonymous">

    <!-- 可选的 Bootstrap 主题文件(一般不用引入) -->
    <link rel="stylesheet" href="https://cdn.jsdelivr.net/npm/bootstrap@3.3.7/dist/css/bootstrap-theme.min.css"
          integrity="sha384-rHyoN1iRsVXV4nD0JutlnGaslCJuC7uwjduW9SVrLvRYooPp2bWYgmgJQIXwl/Sp" crossorigin="anonymous">

    <!-- 最新的 Bootstrap 核心 JavaScript 文件 -->
    <script src="https://cdn.jsdelivr.net/npm/bootstrap@3.3.7/dist/js/bootstrap.min.js"
            integrity="sha384-Tc5IQib027qvyjSMfHjOMaLkfuWVxZxUPnCJA7l2mCWNIpG9mGCD8wGNIcPD7Txa"
            crossorigin="anonymous"></script>
</head>
<body>
<div class="container page-header">
    <div class="container page-body">

        <div class="col-md-9" role="main">
            <table class="table table-striped">
                <a class="btn btn-warning" href="../Web/add" role="button">添加</a>
                <tr>
                    <th>编号</th>
                    <th>学号</th>
                    <th>姓名</th>
                    <th>操作</th>
                </tr>
                {% for student in students %}
                    <tr>
                        <td>{{ forloop.counter }}</td>
                        <td>{{ student.student_no }}</td>
                        <td>{{ student.student_name }}</td>
                        <td>
                            <a class="btn btn-danger" href="../Web/delete?id={{ student.id }}">删除</a>
                            <a class="btn btn-warning" href="../Web/edit?id={{ student.id }}">修改</a>
                        </td>
                    </tr>
                     {% endfor %}
            </table>
        </div>
    </div>
</div>

</body>
</html>
学生信息新增页
<!DOCTYPE html>
<html lang="en">
<head>
    <meta charset="UTF-8">
    <title>学生添加</title>
   <!-- ⌘⌥L 格式化代码 -->
    <!-- 最新版本的 Bootstrap 核心 CSS 文件 -->
    <link rel="stylesheet" href="https://cdn.jsdelivr.net/npm/bootstrap@3.3.7/dist/css/bootstrap.min.css"
          integrity="sha384-BVYiiSIFeK1dGmJRAkycuHAHRg32OmUcww7on3RYdg4Va+PmSTsz/K68vbdEjh4u" crossorigin="anonymous">

    <!-- 可选的 Bootstrap 主题文件(一般不用引入) -->
    <link rel="stylesheet" href="https://cdn.jsdelivr.net/npm/bootstrap@3.3.7/dist/css/bootstrap-theme.min.css"
          integrity="sha384-rHyoN1iRsVXV4nD0JutlnGaslCJuC7uwjduW9SVrLvRYooPp2bWYgmgJQIXwl/Sp" crossorigin="anonymous">

    <!-- 最新的 Bootstrap 核心 JavaScript 文件 -->
    <script src="https://cdn.jsdelivr.net/npm/bootstrap@3.3.7/dist/js/bootstrap.min.js"
            integrity="sha384-Tc5IQib027qvyjSMfHjOMaLkfuWVxZxUPnCJA7l2mCWNIpG9mGCD8wGNIcPD7Txa"
            crossorigin="anonymous"></script>
</head>
<body>
<div class="container page-header">
    <div class="container page-body">
        <form class="form-horizontal" method="post" action="../add/">
            {% csrf_token %}
            <div class="form-group">
                <label for="inputEmail3" class="col-sm-2 control-label">学号</label>
                <div class="col-sm-3">
                    <input type="text" class="form-control" placeholder="请输入学号" name="student_no"/>
                </div>
            </div>
            <div class="form-group">
                <label for="inputEmail3" class="col-sm-2 control-label">姓名</label>
                <div class="col-sm-3">
                    <input type="text" class="form-control" placeholder="请输入姓名" name="student_name"/>
                </div>
            </div>
            <div class="form-group">
                <div class="col-sm-offset-2 col-sm-10">
                    <button type="submit" class="btn btn-default">Sign in</button>
                </div>
            </div>
        </form>
    </div>
</div>

</body>
</html>
学生信息编辑页
<!DOCTYPE html>
<html lang="en">
<head>
    <meta charset="UTF-8">
    <title>学生修改</title>
    <!-- 最新版本的 Bootstrap 核心 CSS 文件 -->
    <link rel="stylesheet" href="https://cdn.jsdelivr.net/npm/bootstrap@3.3.7/dist/css/bootstrap.min.css"
          integrity="sha384-BVYiiSIFeK1dGmJRAkycuHAHRg32OmUcww7on3RYdg4Va+PmSTsz/K68vbdEjh4u" crossorigin="anonymous">

    <!-- 可选的 Bootstrap 主题文件(一般不用引入) -->
    <link rel="stylesheet" href="https://cdn.jsdelivr.net/npm/bootstrap@3.3.7/dist/css/bootstrap-theme.min.css"
          integrity="sha384-rHyoN1iRsVXV4nD0JutlnGaslCJuC7uwjduW9SVrLvRYooPp2bWYgmgJQIXwl/Sp" crossorigin="anonymous">

    <!-- 最新的 Bootstrap 核心 JavaScript 文件 -->
    <script src="https://cdn.jsdelivr.net/npm/bootstrap@3.3.7/dist/js/bootstrap.min.js"
            integrity="sha384-Tc5IQib027qvyjSMfHjOMaLkfuWVxZxUPnCJA7l2mCWNIpG9mGCD8wGNIcPD7Txa"
            crossorigin="anonymous"></script>
</head>
<body>
<div class="container page-header">
    <div class="container page-body">
        <form class="form-horizontal" method="post" action="../edit/">
            {% csrf_token %}
            <input type="hidden" name="id" value="{{ student.id }}"/>
            <div class="form-group">
                <label for="inputEmail3" class="col-sm-2 control-label">学号</label>
                <div class="col-sm-3">
                    <input type="text" class="form-control" placeholder="Text input" name="student_no"
                           value="{{ student.student_no }}"/>
                </div>
            </div>

            <div class="form-group">
                <label for="inputEmail3" class="col-sm-2 control-label">姓名</label>
                <div class="col-sm-3">
                    <input type="text" class="form-control" placeholder="Text input" name="student_name"
                           value="{{ student.student_name }}"/>
                </div>
            </div>

            <div class="form-group">
                <div class="col-sm-offset-2 col-sm-10">
                    <button type="submit" class="btn btn-default">修改</button>
                </div>
            </div>

        </form>
    </div>
</div>
</body>
</html>
Terminal终端输入以下命令启动web服务
python manage.py runserver
服务启动后,打开浏览器输入http://127.0.0.1:8000/Web即可进入学生信息管理列表页

我正在使用i18n从头开始构建一个多语言网络应用程序,虽然我自己可以处理一大堆yml文件,但我说的语言(非常)有限,最终我想寻求外部帮助帮助。我想知道这里是否有人在使用UI插件/gem(与django上的django-rosetta不同)来处理多个翻译器,其中一些翻译器不愿意或无法处理存储库中的100多个文件,处理语言数据。谢谢&问候,安德拉斯(如果您已经在rubyonrails-talk上遇到了这个问题,我们深表歉意) 最佳答案 有一个rails3branchofthetolkgem在github上。您可以通过在Gemfi
关闭。这个问题是opinion-based.它目前不接受答案。想要改进这个问题?更新问题,以便editingthispost可以用事实和引用来回答它.关闭4年前。Improvethisquestion我想在固定时间创建一系列低音和高音调的哔哔声。例如:在150毫秒时发出高音调的蜂鸣声在151毫秒时发出低音调的蜂鸣声200毫秒时发出低音调的蜂鸣声250毫秒的高音调蜂鸣声有没有办法在Ruby或Python中做到这一点?我真的不在乎输出编码是什么(.wav、.mp3、.ogg等等),但我确实想创建一个输出文件。
我正在编写一个包含C扩展的gem。通常当我写一个gem时,我会遵循TDD的过程,我会写一个失败的规范,然后处理代码直到它通过,等等......在“ext/mygem/mygem.c”中我的C扩展和在gemspec的“扩展”中配置的有效extconf.rb,如何运行我的规范并仍然加载我的C扩展?当我更改C代码时,我需要采取哪些步骤来重新编译代码?这可能是个愚蠢的问题,但是从我的gem的开发源代码树中输入“bundleinstall”不会构建任何native扩展。当我手动运行rubyext/mygem/extconf.rb时,我确实得到了一个Makefile(在整个项目的根目录中),然后当
我已经在Sinatra上创建了应用程序,它代表了一个简单的API。我想在生产和开发上进行部署。我想在部署时选择,是开发还是生产,一些方法的逻辑应该改变,这取决于部署类型。是否有任何想法,如何完成以及解决此问题的一些示例。例子:我有代码get'/api/test'doreturn"Itisdev"end但是在部署到生产环境之后我想在运行/api/test之后看到ItisPROD如何实现? 最佳答案 根据SinatraDocumentation:EnvironmentscanbesetthroughtheRACK_ENVenvironm
我们的git存储库中目前有一个Gemfile。但是,有一个gem我只在我的环境中本地使用(我的团队不使用它)。为了使用它,我必须将它添加到我们的Gemfile中,但每次我checkout到我们的master/dev主分支时,由于与跟踪的gemfile冲突,我必须删除它。我想要的是类似Gemfile.local的东西,它将继承从Gemfile导入的gems,但也允许在那里导入新的gems以供使用只有我的机器。此文件将在.gitignore中被忽略。这可能吗? 最佳答案 设置BUNDLE_GEMFILE环境变量:BUNDLE_GEMFI
我安装了ruby版本管理器,并将RVM安装的ruby实现设置为默认值,这样'哪个ruby'显示'~/.rvm/ruby-1.8.6-p383/bin/ruby'但是当我在emacs中打开inf-ruby缓冲区时,它使用安装在/usr/bin中的ruby。有没有办法让emacs像shell一样尊重ruby的路径?谢谢! 最佳答案 我创建了一个emacs扩展来将rvm集成到emacs中。如果您有兴趣,可以在这里获取:http://github.com/senny/rvm.el
这似乎非常适得其反,因为太多的gem会在window上破裂。我一直在处理很多mysql和ruby-mysqlgem问题(gem本身发生段错误,一个名为UnixSocket的类显然在Windows机器上不能正常工作,等等)。我只是在浪费时间吗?我应该转向不同的脚本语言吗? 最佳答案 我在Windows上使用Ruby的经验很少,但是当我开始使用Ruby时,我是在Windows上,我的总体印象是它不是Windows原生系统。因此,在主要使用Windows多年之后,开始使用Ruby促使我切换回原来的系统Unix,这次是Linux。Rub
我正在玩HTML5视频并且在ERB中有以下片段:mp4视频从在我的开发环境中运行的服务器很好地流式传输到chrome。然而firefox显示带有海报图像的视频播放器,但带有一个大X。问题似乎是mongrel不确定ogv扩展的mime类型,并且只返回text/plain,如curl所示:$curl-Ihttp://0.0.0.0:3000/pr6.ogvHTTP/1.1200OKConnection:closeDate:Mon,19Apr201012:33:50GMTLast-Modified:Sun,18Apr201012:46:07GMTContent-Type:text/plain
这个问题在这里已经有了答案:关闭10年前。PossibleDuplicate:Pythonconditionalassignmentoperator对于这样一个简单的问题表示歉意,但是谷歌搜索||=并不是很有帮助;)Python中是否有与Ruby和Perl中的||=语句等效的语句?例如:foo="hey"foo||="what"#assignfooifit'sundefined#fooisstill"hey"bar||="yeah"#baris"yeah"另外,类似这样的东西的通用术语是什么?条件分配是我的第一个猜测,但Wikipediapage跟我想的不太一样。
什么是ruby的rack或python的Java的wsgi?还有一个路由库。 最佳答案 来自Python标准PEP333:Bycontrast,althoughJavahasjustasmanywebapplicationframeworksavailable,Java's"servlet"APImakesitpossibleforapplicationswrittenwithanyJavawebapplicationframeworktoruninanywebserverthatsupportstheservletAPI.ht