文章目录
下载地址:https://zookeeper.apache.org/releases.html#download
tar -zxvf zookeeper-3.4.11.tar.gz -C /usr/local
cp /usr/local/zookeeper-3.4.11/conf/zoo_sample.cfg /usr/local/zookeeper-3.4.11/conf/zoo.cfg
vi /usr/local/zookeeper-3.4.11/conf/zoo.cfg

##zoo.cfg内容###
tickTime=2000
initLimit=10
syncLimit=5
dataDir=/usr/local/zookeeper-3.4.11/data/
clientPort=2181
server.0=192.168.28.133:2888:3888
server.1=192.168.28.136:2888:3888
server.2=192.168.28.132:2888:3888
##zoo.cfg内容###
防火墙需要打开相关端口
firewall-cmd --zone=public --add-port=2181/tcp --permanent
firewall-cmd --zone=public --add-port=2888/tcp --permanent
firewall-cmd --zone=public --add-port=3888/tcp --permanent
firewall-cmd --reload
三个节点分别创建目录和myid文件,三个节点的myid值分别为0,1,2,与上边的server.0,server.1,server.2对应
mkdir -p /usr/local/zookeeper-3.4.11/data/
echo 0 > /usr/local/zookeeper-3.4.11/data/myid
三个节点分别启动
# 启动
/usr/local/zookeeper-3.4.11/bin/zkServer.sh start
# 查看状态
/usr/local/zookeeper-3.4.11/bin/zkServer.sh status
# 停止
/usr/local/zookeeper-3.4.11/bin/zkServer.sh stop
# 重启
/usr/local/zookeeper-3.4.11/bin/zkServer.sh restart
https://kafka.apache.org/downloads
tar -zxvf  kafka_2.13-3.2.3.tgz -C /usr/local
cd /usr/local/kafka_2.13-3.2.3
kafka集群安装支持Zookeeper和KRaft两种方式,可选择其中一种方式
编译配置server.properties
vi /usr/local/kafka_2.13-3.2.3/config/server.properties

######## server.properties配置########
# 三个节点的broker.id分别为0,1,2
broker.id=0
# listeners三台机器修改为对应IP
listeners=PLAINTEXT://192.168.28.133:9092
zookeeper.connect=192.168.28.133:2181,192.168.28.136:2181,192.168.28.132:2181
log.dirs=/usr/local/kafka_2.13-3.2.3/logs/
######## server.properties配置########
防火墙
firewall-cmd --zone=public --add-port=9092/tcp --permanent
firewall-cmd --zone=public --add-port=9093/tcp --permanent
firewall-cmd --reload
编译配置server.properties
vi /usr/local/kafka_2.13-3.2.3/config/kraft/server.properties

# server.properties配置##################
process.roles=broker,controller
# 3台机器的node.id分别为1,2,3,不能重复
node.id=1
controller.quorum.voters=1@192.168.28.133:9093,2@192.168.28.136:9093,3@192.168.28.132:9093
# 3台机器的listeners修改为对应的IP
listeners=PLAINTEXT://192.168.28.133:9092,CONTROLLER://192.168.28.133:9093
log.dirs=/usr/local/kafka_2.13-3.2.3/kraft-combined-logs
# server.properties配置##################
生成集群统一UUID号:
./bin/kafka-storage.sh random-uuid
# 生成uuid:rrGzprV0RPyWTVek9gyTcg
用上边生成的UUID格式化kafka存储目录(所有节点都需要执行)
./bin/kafka-storage.sh format -t rrGzprV0RPyWTVek9gyTcg -c ./config/kraft/server.properties
命令
cd /usr/local/kafka_2.13-3.2.3
# 1、启动
# (1)、zookeeper集群启动
bin/kafka-server-start.sh -daemon config/server.properties
# (2)、KRaft集群启动
bin/kafka-server-start.sh -daemon ./config/kraft/server.properties

# 2、关闭
# (1)、zookeeper集群关闭
bin/kafka-server-stop.sh config/server.properties
# (2)、KRaft集群关闭
bin/kafka-server-stop.sh ./config/kraft/server.properties

# 3、主题
# (1)、创建主题  分区数partitions 分区的副本数replication-factor
$ bin/kafka-topics.sh --create --topic topic-test --zookeeper 192.168.28.133:2181,192.168.28.136:2181,192.168.28.132:2181 --replication-factor 3 --partitions 3
# // 2.2版本建议使用--bootstrap-server代替--zookeeper
$ bin/kafka-topics.sh --create --topic topic-test --bootstrap-server 192.168.28.133:9092,192.168.28.136:9092,192.168.28.132:9092 --replication-factor 3 --partitions 3
# (2)列出所有主题
$ bin/kafka-topics.sh --list --bootstrap-server 192.168.28.133:9092,192.168.28.136:9092,192.168.28.132:9092
# (3)查询主题
$ bin/kafka-topics.sh --describe --topic topic-test --bootstrap-server 192.168.28.133:9092,192.168.28.136:9092,192.168.28.132:9092
# (4)增加主题的partition数
$ bin/kafka-topics.sh --bootstrap-server 192.168.28.133:9092,192.168.28.136:9092,192.168.28.132:9092 --alter --topic topic-test --partitions 5
# (5)查看主题指定分区 offset 的最大值或最小值,  time 为 -1 时表示最大值,为 -2 时表示最小值:
$ bin/kafka-run-class.sh kafka.tools.GetOffsetShell --topic topic-test --time -1 --broker-list 192.168.28.133:9092,192.168.28.136:9092,192.168.28.132:9092 --partitions 0

# 4、生产消息
$ bin/kafka-console-producer.sh --topic topic-test --bootstrap-server 192.168.28.133:9092,192.168.28.136:9092,192.168.28.132:9092
This is my first test
This is my second test

# 5、读取消息
# (1)从头开始
$ bin/kafka-console-consumer.sh --bootstrap-server 192.168.28.133:9092,192.168.28.136:9092,192.168.28.132:9092 --topic topic-test --from-beginning
# (2)从尾部开始,需要指定分区
$ bin/kafka-console-consumer.sh --bootstrap-server localhost:9092 --topic topic-test --offset latest --partition 0
# (3)取指定个数
$ bin/kafka-console-consumer.sh --bootstrap-server localhost:9092 --topic topic-test --offset latest --partition 0 --max-messages 1
# (4)指定Group
$ bin/kafka-console-consumer.sh --bootstrap-server 192.168.28.133:9092,192.168.28.136:9092,192.168.28.132:9092 --topic topic-test -group group_test --from-beginning

# 6、消费者Group#
# (2)消费者Group列表
$ bin/kafka-consumer-groups.sh --list --bootstrap-server 192.168.28.133:9092,192.168.28.136:9092,192.168.28.132:9092
# (3)查看Group详情[用来判断是否有延迟数据]
$ bin/kafka-consumer-groups.sh --bootstrap-server 192.168.28.133:9092,192.168.28.136:9092,192.168.28.132:9092 --group test_group --describe
# (4)删除Group
$ bin/kafka-consumer-groups.sh --bootstrap-server 192.168.28.133:9092,192.168.28.136:9092,192.168.28.132:9092 --group test_group --delete

# 7、平衡Leader
$ bin/kafka-preferred-replica-election.sh --bootstrap-server 192.168.28.133:9092,192.168.28.136:9092,192.168.28.132:9092
#或 --partition:指定需要重新分配leader的partition编号
$ bin/kafka-leader-election.sh --bootstrap-server 192.168.28.133:9092,192.168.28.136:9092,192.168.28.132:9092 --topic test --partition=2 --election-type preferred
# 8、自带压测工具
$ bin/kafka-producer-perf-test.sh --topic test --num-records 100 --record-size 1 --throughput 100 --producer-props bootstrap.servers=192.168.28.133:9092,192.168.28.136:9092,192.168.28.132:9092
下载地址:https://github.com/danielqsj/kafka_exporter
# 解压
tar -zxvf kafka_exporter-1.6.0.linux-amd64.tar.gz -C /usr/local
# 启动
/usr/local/kafka_exporter-1.6.0.linux-amd64/kafka_exporter --kafka.server=192.168.28.133:9092 --web.listen-address=:9308
# 查看监控结果
curl http://127.0.0.1:9308/metrics
可用启动参数
| 参数 | 值 | 说明 |
|---|---|---|
| kafka.server | kafka:9092 | Addresses (host:port) of Kafka server |
| kafka.version | 2.0.0 | Kafka broker version |
| sasl.enabled | false | Connect using SASL/PLAIN |
| sasl.handshake | true | Only set this to false if using a non-Kafka SASL proxy |
| sasl.username | SASL user name | |
| sasl.password | SASL user password | |
| sasl.mechanism | SASL mechanism can be plain, scram-sha512, scram-sha256 | |
| sasl.service-name | Service name when using Kerberos Auth | |
| sasl.kerberos-config-path | Kerberos config path | |
| sasl.realm | Kerberos realm | |
| sasl.keytab-path | Kerberos keytab file path | |
| sasl.kerberos-auth-type | Kerberos auth type. Either ‘keytabAuth’ or ‘userAuth’ | |
| tls.enabled | false | Connect to Kafka using TLS |
| tls.server-name | Used to verify the hostname on the returned certificates unless tls.insecure-skip-tls-verify is given. The kafka server’s name should be given | |
| tls.ca-file | The optional certificate authority file for Kafka TLS client authentication | |
| tls.cert-file | The optional certificate file for Kafka client authentication | |
| tls.key-file | The optional key file for Kafka client authentication | |
| tls.insecure-skip-tls-verify | false | If true, the server’s certificate will not be checked for validity |
| server.tls.enabled | false | Enable TLS for web server |
| server.tls.mutual-auth-enabled | false | Enable TLS client mutual authentication |
| server.tls.ca-file | The certificate authority file for the web server | |
| server.tls.cert-file | The certificate file for the web server | |
| server.tls.key-file | The key file for the web server | |
| topic.filter | .* | Regex that determines which topics to collect |
| group.filter | .* | Regex that determines which consumer groups to collect |
| web.listen-address | :9308 | Address to listen on for web interface and telemetry |
| web.telemetry-path | /metrics | Path under which to expose metrics |
| log.enable-sarama | false | Turn on Sarama logging |
| use.consumelag.zookeeper | false | if you need to use a group from zookeeper |
| zookeeper.server | localhost:2181 | Address (hosts) of zookeeper server |
| kafka.labels | Kafka cluster name | |
| refresh.metadata | 30s | Metadata refresh interval |
| offset.show-all | true | Whether show the offset/lag for all consumer group, otherwise, only show connected consumer groups |
| concurrent.enable | false | If true, all scrapes will trigger kafka operations otherwise, they will share results. WARN: This should be disabled on large clusters |
| topic.workers | 100 | Number of topic workers |
| verbosity | 0 | Verbosity log level |
vi /usr/lib/systemd/system/kafka_exporter.service
[Unit]
Description=Prometheus Kafka Exporter
After=network.target
[Service]
Type=simple
User=root
Group=root
ExecStart=/usr/local/kafka_exporter-1.6.0.linux-amd64/kafka_exporter --kafka.server=192.168.28.133:9092 --kafka.server=192.168.28.136:9092 --kafka.server=192.168.28.132:9092 --web.listen-address=:9308
Restart=on-failure
[Install]
WantedBy=multi-user.target
启动服务
systemctl daemon-reload           # 重新加载配置文件
systemctl enable kafka_exporter   # 设置开机启动
systemctl disable kafka_exporter  # 取消开机启动
systemctl start kafka_exporter    # 启动服务
systemctl stop kafka_exporter     # 关闭服务
systemctl status kafka_exporter   # 查看状态
vi /usr/local/prometheus-2.37.0.linux-amd64/prometheus.yml
  - job_name: 'kafka_export'
    static_configs:
    - targets: ['192.168.245.139:9308']
      labels:
        app: 'zxt_prod'
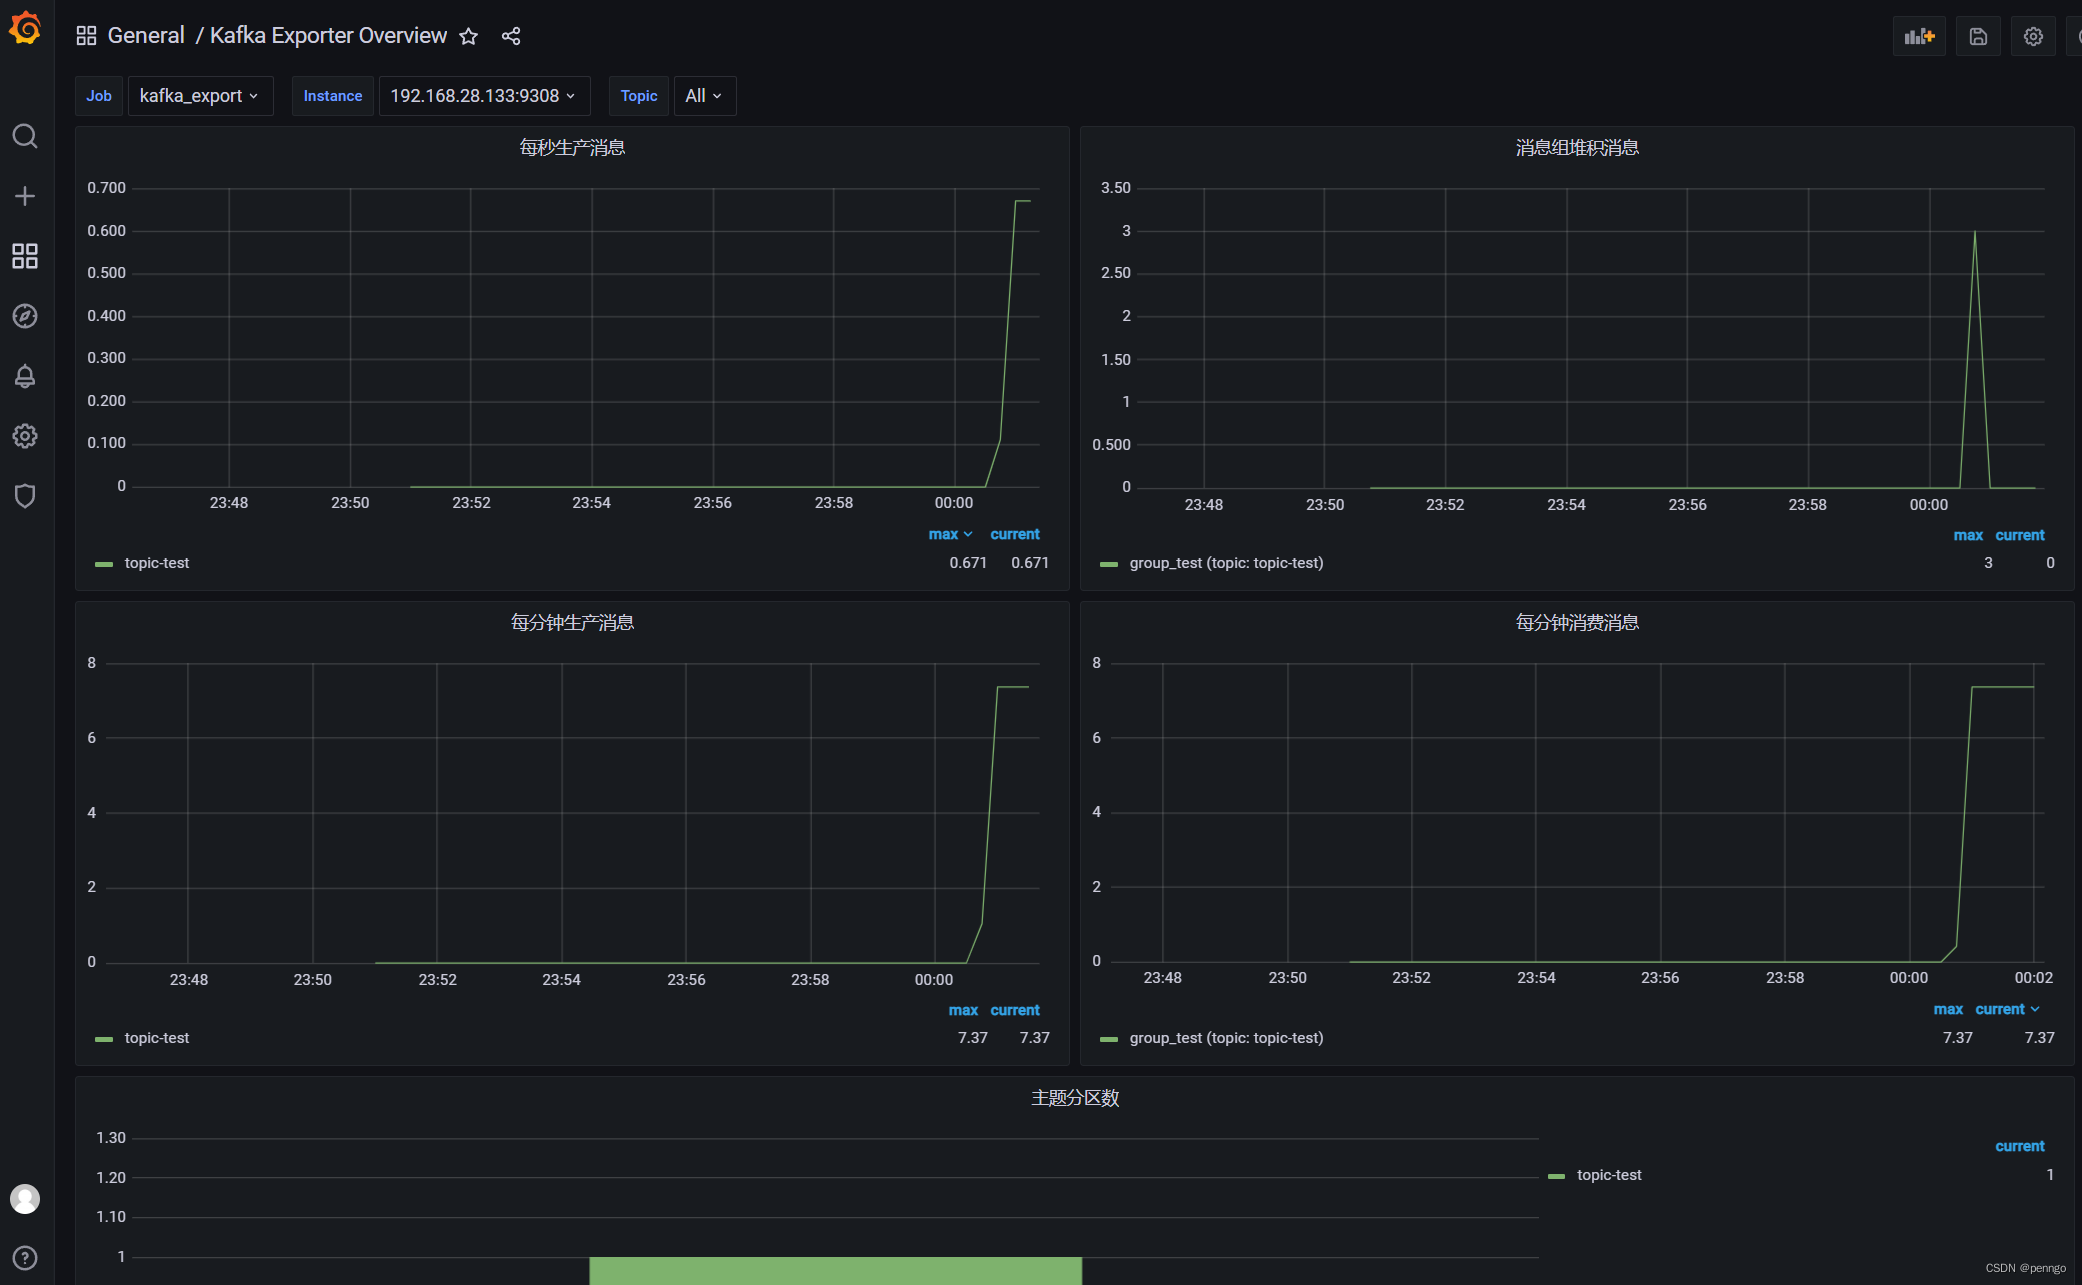
使用监控模板:https://grafana.com/grafana/dashboards/7589
我有一个在Linux服务器上运行的ruby脚本。它不使用rails或任何东西。它基本上是一个命令行ruby脚本,可以像这样传递参数:./ruby_script.rbarg1arg2如何将参数抽象到配置文件(例如yaml文件或其他文件)中?您能否举例说明如何做到这一点?提前谢谢你。 最佳答案 首先,您可以运行一个写入YAML配置文件的独立脚本:require"yaml"File.write("path_to_yaml_file",[arg1,arg2].to_yaml)然后,在您的应用中阅读它:require"yaml"arg
我已经在Sinatra上创建了应用程序,它代表了一个简单的API。我想在生产和开发上进行部署。我想在部署时选择,是开发还是生产,一些方法的逻辑应该改变,这取决于部署类型。是否有任何想法,如何完成以及解决此问题的一些示例。例子:我有代码get'/api/test'doreturn"Itisdev"end但是在部署到生产环境之后我想在运行/api/test之后看到ItisPROD如何实现? 最佳答案 根据SinatraDocumentation:EnvironmentscanbesetthroughtheRACK_ENVenvironm
之前在培训新生的时候,windows环境下配置opencv环境一直教的都是网上主流的vsstudio配置属性表,但是这个似乎对新生来说难度略高(虽然个人觉得完全是他们自己的问题),加之暑假之后对cmake实在是爱不释手,且这样配置确实十分简单(其实都不需要配置),故斗胆妄言vscode下配置CV之法。其实极为简单,图比较多所以很长。如果你看此文还配不好,你应该思考一下是不是自己的问题。闲话少说,直接开始。0.CMkae简介有的人到大二了都不知道cmake是什么,我不说是谁。CMake是一个开源免费并且跨平台的构建工具,可以用简单的语句来描述所有平台的编译过程。它能够根据当前所在平台输出对应的m
这篇文章是继上一篇文章“Observability:从零开始创建Java微服务并监控它(一)”的续篇。在上一篇文章中,我们讲述了如何创建一个Javaweb应用,并使用Filebeat来收集应用所生成的日志。在今天的文章中,我来详述如何收集应用的指标,使用APM来监控应用并监督web服务的在线情况。源码可以在地址 https://github.com/liu-xiao-guo/java_observability 进行下载。摄入指标指标被视为可以随时更改的时间点值。当前请求的数量可以改变任何毫秒。你可能有1000个请求的峰值,然后一切都回到一个请求。这也意味着这些指标可能不准确,你还想提取最小/
注意:本文主要掌握DCN自研无线产品的基本配置方法和注意事项,能够进行一般的项目实施、调试与运维AP基本配置命令AP登录用户名和密码均为:adminAP默认IP地址为:192.168.1.10AP默认情况下DHCP开启AP静态地址配置:setmanagementstatic-ip192.168.10.1AP开启/关闭DHCP功能:setmanagementdhcp-statusup/downAP设置默认网关:setstatic-ip-routegeteway192.168.10.254查看AP基本信息:getsystemgetmanagementgetmanaged-apgetrouteAP配
1.1.1 YARN的介绍 为克服Hadoop1.0中HDFS和MapReduce存在的各种问题⽽提出的,针对Hadoop1.0中的MapReduce在扩展性和多框架⽀持⽅⾯的不⾜,提出了全新的资源管理框架YARN. ApacheYARN(YetanotherResourceNegotiator的缩写)是Hadoop集群的资源管理系统,负责为计算程序提供服务器计算资源,相当于⼀个分布式的操作系统平台,⽽MapReduce等计算程序则相当于运⾏于操作系统之上的应⽤程序。 YARN被引⼊Hadoop2,最初是为了改善MapReduce的实现,但是因为具有⾜够的通⽤性,同样可以⽀持其他的分布式计算模
我是ruby的新手,正在配置IRB。我喜欢pretty-print(需要'pp'),但总是输入pp来漂亮地打印它似乎很麻烦。我想做的是默认情况下让它漂亮地打印出来,所以如果我有一个var,比如说,'myvar',然后键入myvar,它会自动调用pretty_inspect而不是常规检查。我从哪里开始?理想情况下,我将能够向我的.irbrc文件添加一个自动调用的方法。有什么想法吗?谢谢! 最佳答案 irb中默认pretty-print对象正是hirb被迫去做。Theseposts解释hirb如何将几乎所有内容转换为ascii表。虽
我想在IRB中浏览文件系统并让提示更改以反射(reflect)当前工作目录,但我不知道如何在每个命令后进行提示更新。最终,我想在日常工作中更多地使用IRB,让bash溜走。我在我的.irbrc中试过这个:require'fileutils'includeFileUtilsIRB.conf[:PROMPT][:CUSTOM]={:PROMPT_N=>"\e[1m:\e[m",:PROMPT_I=>"\e[1m#{pwd}>\e[m",:PROMPT_S=>"FOO",:PROMPT_C=>"\e[1m#{pwd}>\e[m",:RETURN=>""}IRB.conf[:PROMPT_MO
我正在使用Ruby/Mechanize编写一个“自动填写表格”应用程序。它几乎可以工作。我可以使用精彩CharlesWeb代理以查看服务器和我的Firefox浏览器之间的交换。现在我想使用Charles查看服务器和我的应用程序之间的交换。Charles在端口8888上代理。假设服务器位于https://my.host.com。.一件不起作用的事情是:@agent||=Mechanize.newdo|agent|agent.set_proxy("my.host.com",8888)end这会导致Net::HTTP::Persistent::Error:...lib/net/http/pe
如果特定语言环境中缺少翻译,如何配置i18n以使用en语言环境翻译?当前已插入翻译缺失消息。我正在使用RoR3.1。 最佳答案 找到相似的question这里是答案:#application.rb#railswillfallbacktoconfig.i18n.default_localetranslationconfig.i18n.fallbacks=true#railswillfallbacktoen,nomatterwhatissetasconfig.i18n.default_localeconfig.i18n.fallback