环境说明:
| 主机说明 | ip | 安装服务 | 系统 |
|---|---|---|---|
| nginx | 192.168.222.137 | nginx | centos7,redhat7/centos8,redhat8 |
| mysql | 192.168.222.138 | mysql | centos7,redhat7/centos8,redhat8 |
| php | 192.168.222.139 | php | centos7,redhat7/centos8,redhat8 |
阿里云官网
nginx官网
此处我使用的是nginx-1.22.0
mysql官网
此处我使用的是mysql-5.7.38
php官网
此处我使用的是php-8.1.11
此处我使用的系统是centos8.5
[root@localhost ~]# hostnamectl set-hostname nginx
[root@localhost ~]# bash
[root@nginx ~]# systemctl stop firewalld.service  //关闭防火墙
[root@nginx ~]# sed -ri 's/^(SELINUX=).*/\1disabled/g' /etc/selinux/config
[root@nginx ~]# setenforce 0
[root@nginx ~]# systemctl disable --now firewalld.service
Removed /etc/systemd/system/multi-user.target.wants/firewalld.service.
Removed /etc/systemd/system/dbus-org.fedoraproject.FirewallD1.service.
[root@nginx ~]# dnf -y install wget
[root@nginx ~]# cd /etc/yum.repos.d/        //配置阿里源
[root@nginx yum.repos.d]#wget -O /etc/yum.repos.d/CentOS-Base.repo https://mirrors.aliyun.com/repo/Centos-vault-8.5.2111.repo
[root@nginx yum.repos.d]#sed -i -e '/mirrors.cloud.aliyuncs.com/d' -e '/mirrors.aliyuncs.com/d' /etc/yum.repos.d/CentOS-Base.repo
[root@nginx yum.repos.d]# ls
CentOS-Base.repo
[root@nginx yum.repos.d]# cd
[root@nginx ~]# useradd -rMs /sbin/nologin nginx   //创建用户
[root@nginx ~]# dnf -y install pcre-devel openssl openssl-devel gd-devel gcc gcc-c++ make vim    //安装依赖包
[root@nginx ~]# mkdir -p /var/log/nginx  //创建日志存放目录
[root@nginx ~]# chown -R nginx.nginx /var/log/nginx
[root@nginx ~]# wget http://nginx.org/download/nginx-1.22.0.tar.gz   //下载nginx包
[root@nginx ~]# tar xf nginx-1.22.0.tar.gz   //解压
[root@nginx ~]# ls
anaconda-ks.cfg  nginx-1.22.0  nginx-1.22.0.tar.gz
[root@nginx ~]# cd nginx-1.22.0/
[root@nginx nginx-1.22.0]# ls
CHANGES  CHANGES.ru  LICENSE  README  auto  conf  configure  contrib  html  man  src
[root@nginx nginx-1.22.0]# ./configure \   //进行编译
 --prefix=/usr/local/nginx \
 --user=nginx \
 --group=nginx \
 --with-debug \
 --with-http_ssl_module \
 --with-http_realip_module \
 --with-http_gunzip_module \
 --with-http_gzip_static_module \
 --with-http_stub_status_module
[root@nginx nginx-1.22.0]# make -j $(grep 'processor' /proc/cpuinfo | wc -l) && make install   //安装
[root@nginx nginx-1.22.0]# cd
[root@nginx ~]# echo "export PATH=$PATH:/usr/local/nginx/sbin" > /etc/profile.d/nginx.sh    //配置环境变量
[root@nginx ~]# source /etc/profile.d/nginx.sh  //使其生效
[root@nginx ~]# cp /usr/lib/systemd/system/sshd.service /usr/lib/systemd/system/nginx.service
[root@nginx ~]# vim /usr/lib/systemd/system/nginx.service  //将其加入systemd服务中
[root@nginx ~]# cat /usr/lib/systemd/system/nginx.service
[Unit]
Description=nginx server daemon
After=network.target

[Service]
Type=forking
ExecStart=/usr/local/nginx/sbin/nginx
ExecStop=/usr/local/nginx/sbin/nginx -s stop
ExecReload=/bin/kill -HUP \$MAINPID

[Install]
WantedBy=multi-user.target
[root@nginx ~]# systemctl daemon-reload  //加载一下配置
[root@nginx ~]# systemctl enable --now nginx.service
Created symlink /etc/systemd/system/multi-user.target.wants/nginx.service → /usr/lib/systemd/system/nginx.service.   //设置开机自启
[root@nginx ~]# ss -antl   //查看端口
State      Recv-Q     Send-Q          Local Address:Port           Peer Address:Port     Process
LISTEN     0          128                   0.0.0.0:22                  0.0.0.0:*
LISTEN     0          128                   0.0.0.0:80                  0.0.0.0:*
LISTEN     0          128                      [::]:22                     [::]:*
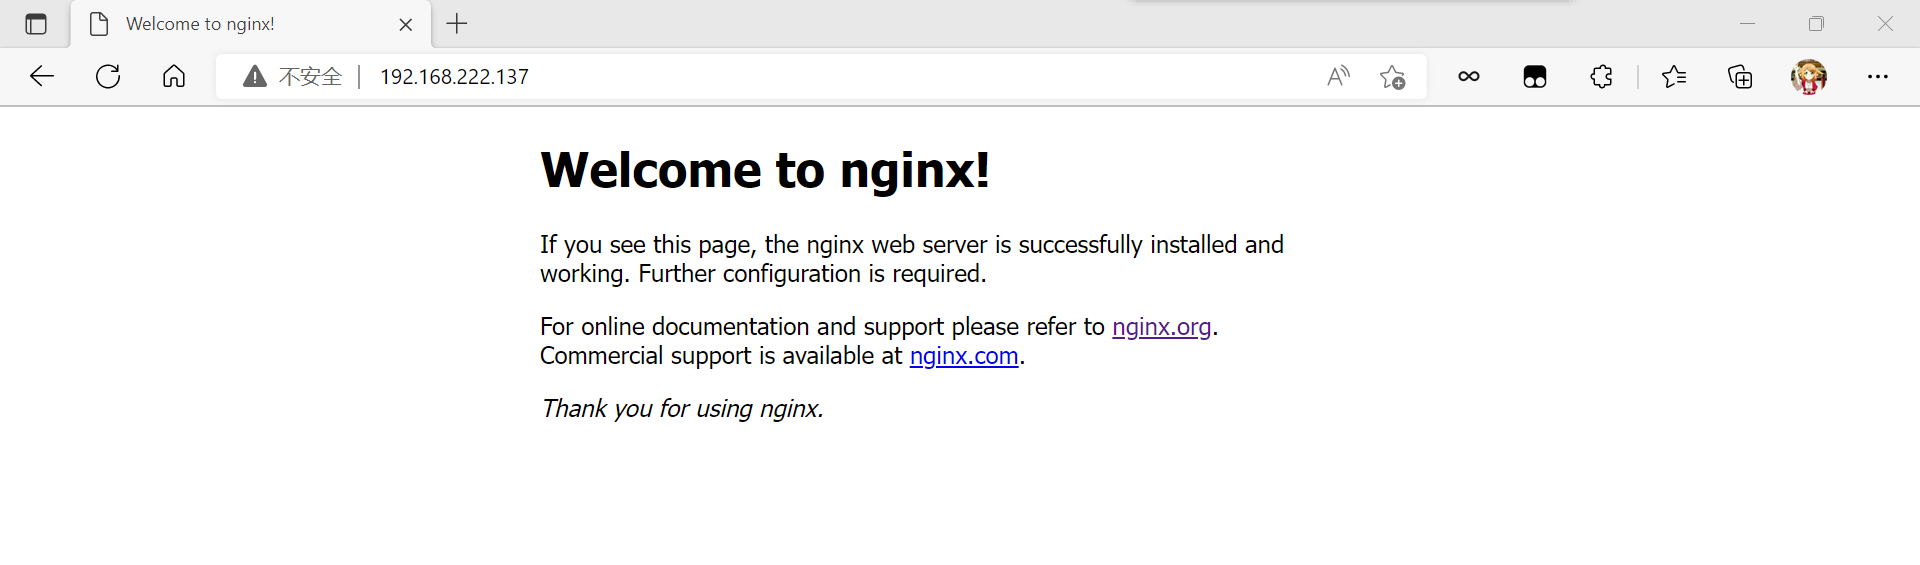
访问:
[root@localhost ~]# hostnamectl set-hostname mysql
[root@localhost ~]# bash
[root@mysql ~]# systemctl stop firewalld.service  //关闭防火墙
[root@mysql ~]# sed -ri 's/^(SELINUX=).*/\1disabled/g' /etc/selinux/config
[root@mysql ~]# setenforce 0
[root@mysql ~]# systemctl disable --now firewalld.service
Removed /etc/systemd/system/multi-user.target.wants/firewalld.service.
Removed /etc/systemd/system/dbus-org.fedoraproject.FirewallD1.service.
[root@mysql ~]# dnf -y install wget
[root@mysql ~]# cd /etc/yum.repos.d/        //配置阿里源
[root@mysql yum.repos.d]#wget -O /etc/yum.repos.d/CentOS-Base.repo https://mirrors.aliyun.com/repo/Centos-vault-8.5.2111.repo
[root@mysql yum.repos.d]#sed -i -e '/mirrors.cloud.aliyuncs.com/d' -e '/mirrors.aliyuncs.com/d' /etc/yum.repos.d/CentOS-Base.repo
[root@mysql yum.repos.d]# ls
CentOS-Base.repo
[root@mysql yum.repos.d]# cd
[root@mysql ~]# useradd -rMs /sbin/nologin mysql  //创建用户
[root@mysql ~]# dnf -y install ncurses-devel openssl-devel openssl cmake mariadb-devel ncurses-compat-libs //安装依赖包
[root@mysql ~]# wget https://downloads.mysql.com/archives/get/p/23/file/mysql-5.7.38-linux-glibc2.12-x86_64.tar.gz  //下载二进制格式的mysql软件包
root@mysql ~]# ls
anaconda-ks.cfg  mysql-5.7.38-linux-glibc2.12-x86_64.tar.gz
[root@mysql ~]# tar -xf mysql-5.7.38-linux-glibc2.12-x86_64.tar.gz -C /usr/local/   //解压
[root@mysql ~]# cd /usr/local/
[root@mysql local]# ls
bin  etc  games  include  lib  lib64  libexec  mysql-5.7.38-linux-glibc2.12-x86_64  sbin  share  src
[root@mysql local]# mv mysql-5.7.38-linux-glibc2.12-x86_64 mysql
//也可以做软链接ln -sv mysql-5.7.38-linux-glibc2.12-x86_64/ mysql
[root@mysql local]# ls
bin  etc  games  include  lib  lib64  libexec  mysql  sbin  share  src
[root@mysql local]# chown -R mysql.mysql mysql //修改目录/usr/local/mysql的属主属组
[root@mysql local]# ll
total 0
drwxr-xr-x. 2 root  root    6 May 19  2020 bin
drwxr-xr-x. 2 root  root    6 May 19  2020 etc
drwxr-xr-x. 2 root  root    6 May 19  2020 games
drwxr-xr-x. 2 root  root    6 May 19  2020 include
drwxr-xr-x. 2 root  root    6 May 19  2020 lib
drwxr-xr-x. 3 root  root   17 Sep 26 23:28 lib64
drwxr-xr-x. 2 root  root    6 May 19  2020 libexec
drwxr-xr-x. 9 mysql mysql 129 Oct 11 20:20 mysql
drwxr-xr-x. 2 root  root    6 May 19  2020 sbin
drwxr-xr-x. 5 root  root   49 Sep 26 23:28 share
drwxr-xr-x. 2 root  root    6 May 19  2020 src
[root@mysql local]# ln -s /usr/local/mysql/include  /usr/include/mysql   //做头文件
[root@mysql local]# echo '/usr/local/mysql/lib' > /etc/ld.so.conf.d/mysql.conf   //配置库文件
[root@mysql local]# vim /etc/man_db.conf    //配置man文档
MANDATORY_MANPATH                       /usr/man
MANDATORY_MANPATH                       /usr/share/man
MANDATORY_MANPATH                       /usr/local/share/man
MANDATORY_MANPATH                       /usr/local/mysql/man //添加这一行
[root@mysql local]# cd
[root@mysql ~]# echo 'export PATH=/usr/local/mysql/bin:$PATH' > /etc/profile.d/mysql.sh    //配置环境变量
[root@mysql ~]# source /etc/profile.d/mysql.sh  //使其生效
[root@mysql ~]# which mysql  //查找mysql
/usr/local/mysql/bin/mysql
[root@mysql ~]# mkdir -p /opt/data   //建立数据存放目录
[root@mysql ~]# chown -R mysql.mysql /opt/data/
[root@mysql ~]# mysqld --initialize --user mysql --datadir /opt/data
2022-10-11T13:11:47.502588Z 0 [Warning] TIMESTAMP with implicit DEFAULT value is deprecated. Please use --explicit_defaults_for_timestamp server option (see documentation for more details).
2022-10-11T13:11:47.668270Z 0 [Warning] InnoDB: New log files created, LSN=45790
2022-10-11T13:11:47.697202Z 0 [Warning] InnoDB: Creating foreign key constraint system tables.
2022-10-11T13:11:47.752786Z 0 [Warning] No existing UUID has been found, so we assume that this is the first time that this server has been started. Generating a new UUID: 42fa08f1-4966-11ed-ae8c-000c29f68357.
2022-10-11T13:11:47.753548Z 0 [Warning] Gtid table is not ready to be used. Table 'mysql.gtid_executed' cannot be opened.
2022-10-11T13:11:47.891548Z 0 [Warning] A deprecated TLS version TLSv1 is enabled. Please use TLSv1.2 or higher.
2022-10-11T13:11:47.891580Z 0 [Warning] A deprecated TLS version TLSv1.1 is enabled. Please use TLSv1.2 or higher.
2022-10-11T13:11:47.892159Z 0 [Warning] CA certificate ca.pem is self signed.
2022-10-11T13:11:47.928429Z 1 [Note] A temporary password is generated for root@localhost: yfHMXUl8go*T  //临时密码
[root@mysql ~]# echo 'yfHMXUl8go*T' > password  //将临时密码保存到这个文件里面
[root@mysql ~]# cat password
yfHMXUl8go*T
[root@mysql ~]# rpm -qa |grep mariadb  //查找mariadb的数据库
mariadb-connector-c-config-3.1.11-2.el8_3.noarch
mariadb-devel-10.3.28-1.module_el8.3.0+757+d382997d.x86_64
mariadb-connector-c-3.1.11-2.el8_3.x86_64
mariadb-connector-c-devel-3.1.11-2.el8_3.x86_64
[root@mysql ~]# dnf -y remove mariadb*   //要卸载掉mariadb数据库不然到时候和mysql数据库发生冲突
[root@mysql ~]# rpm -qa |grep mariadb  //再次查看是否还有
[root@mysql ~]# vim /etc/my.cnf   //编写配置文件
[root@mysql ~]# cat /etc/my.cnf
[mysqld]
basedir = /usr/local/mysql
datadir = /opt/data
socket = /tmp/mysql.sock
port = 3306
pid-file = /opt/data/mysql.pid
user = mysql
skip-name-resolve
[root@mysql ~]# cd /usr/local/mysql/
[root@mysql mysql]# ls
LICENSE  README  bin  docs  include  lib  man  share  support-files
[root@mysql mysql]# cd support-files/
[root@mysql support-files]# ls
magic  mysql-log-rotate  mysql.server  mysqld_multi.server
[root@mysql support-files]# file mysql.server
mysql.server: POSIX shell script, ASCII text executable
//是一个脚本文件
[root@mysql support-files]# cp mysql.server /etc/init.d/mysqld
[root@mysql support-files]# vim /etc/init.d/mysqld
basedir=/usr/local/mysql    //数据库存放位置
datadir=/opt/data    //数据存放位置
[root@mysql support-files]# chmod +x /etc/init.d/mysqld
//赋予执行权限
[root@mysql ~]# cp /usr/lib/systemd/system/sshd.service /usr/lib/systemd/system/mysqld.service  //将其添加到systemd服务中
[root@mysql ~]# vim /usr/lib/systemd/system/mysqld.service
[root@mysql ~]# cat /usr/lib/systemd/system/mysqld.service
[Unit]
Description=mysqld server daemon
After=network.target

[Service]
Type=forking
ExecStart=/usr/local/mysql/support-files/mysql.server start
ExecStop=/usr/local/mysql/support-files/mysql.server stop
ExecReload=/bin/kill -HUP $MAINPID

[Install]
WantedBy=multi-user.target
[root@mysql ~]# systemctl daemon-reload  //加载一下配置
[root@mysql ~]# systemctl enable --now mysqld //设置开机自启
[root@mysql ~]# ss -antl   //查看3306端口
State      Recv-Q     Send-Q          Local Address:Port           Peer Address:Port     Process
LISTEN     0          128                   0.0.0.0:111                 0.0.0.0:*
LISTEN     0          32              192.168.122.1:53                  0.0.0.0:*
LISTEN     0          128                   0.0.0.0:22                  0.0.0.0:*
LISTEN     0          80                          *:3306                      *:*
LISTEN     0          128                      [::]:111                    [::]:*
LISTEN     0          128                      [::]:22                     [::]:*
[root@mysql ~]# cat passwd   //查看密码
yfHMXUl8go*T
[root@mysql ~]# mysql -uroot -p'yfHMXUl8go*T'  //使用临时密码登录
mysql: [Warning] Using a password on the command line interface can be insecure.
Welcome to the MySQL monitor.  Commands end with ; or \g.
Your MySQL connection id is 3
Server version: 5.7.38

Copyright (c) 2000, 2022, Oracle and/or its affiliates.

Oracle is a registered trademark of Oracle Corporation and/or its
affiliates. Other names may be trademarks of their respective
owners.

Type 'help;' or '\h' for help. Type '\c' to clear the current input statement.

mysql> set password = password('123456');  //修改密码
Query OK, 0 rows affected, 1 warning (0.00 sec)

mysql> exit
Bye
[root@mysql ~]# mysql -uroot -p'123456'  //重新登录
mysql: [Warning] Using a password on the command line interface can be insecure.
Welcome to the MySQL monitor.  Commands end with ; or \g.
Your MySQL connection id is 4
Server version: 5.7.38 MySQL Community Server (GPL)

Copyright (c) 2000, 2022, Oracle and/or its affiliates.

Oracle is a registered trademark of Oracle Corporation and/or its
affiliates. Other names may be trademarks of their respective
owners.

Type 'help;' or '\h' for help. Type '\c' to clear the current input statement.

mysql> exit
Bye
[root@localhost ~]# hostnamectl set-hostname php
[root@localhost ~]# bash
[root@php ~]# systemctl stop firewalld.service //关闭防火墙
[root@php ~]# sed -ri 's/^(SELINUX=).*/\1disabled/g' /etc/selinux/config
[root@php ~]# setenforce 0
[root@php ~]# systemctl disable --now firewalld.service
Removed /etc/systemd/system/multi-user.target.wants/firewalld.service.
Removed /etc/systemd/system/dbus-org.fedoraproject.FirewallD1.service.
[root@php ~]# dnf -y install wget
[root@php ~]# cd /etc/yum.repos.d/        //配置阿里源
[root@php yum.repos.d]#wget -O /etc/yum.repos.d/CentOS-Base.repo https://mirrors.aliyun.com/repo/Centos-vault-8.5.2111.repo
[root@php yum.repos.d]#sed -i -e '/mirrors.cloud.aliyuncs.com/d' -e '/mirrors.aliyuncs.com/d' /etc/yum.repos.d/CentOS-Base.repo
[root@php yum.repos.d]# ls
CentOS-Base.repo
[root@php yum.repos.d]# cd
[root@php ~]# dnf -y install epel-release  //安装epel源
[root@php ~]# dnf -y install gcc gcc-c++ make libxml2 libxml2-devel openssl openssl-devel bzip2 bzip2-devel libcurl libcurl-devel libicu-devel libjpeg libjpeg-devel libpng libpng-devel openldap-devel  pcre-devel freetype freetype-devel gmp gmp-devel libmcrypt libmcrypt-devel readline readline-devel libxslt libxslt-devel mhash mhash-devel php-mysqlnd libsqlite3x-devel http://mirror.centos.org/centos/8-stream/PowerTools/x86_64/os/Packages/oniguruma-devel-6.8.2-2.el8.x86_64.rpm libzip-devel   //安装依赖包
[root@php ~]# wget https://www.php.net/distributions/php-8.1.11.tar.gz   //下载php的包
[root@php ~]# ls
anaconda-ks.cfg  php-8.1.11.tar.gz
root@php ~]# tar xf php-8.1.11.tar.gz  //解压
[root@php ~]# ls
anaconda-ks.cfg  php-8.1.11  php-8.1.11.tar.gz
[root@php ~]# cd php-8.1.11/                //进行编译
[root@php php-8.1.11]# ./configure --prefix=/usr/local/php8 \
--with-config-file-path=/usr/local/php8/etc \
--enable-fpm \
--enable-mysqlnd \
--with-mysqli \
--with-pdo-mysql \
--enable-opcache \
--with-pcre-jit \
--enable-gd \
--with-jpeg \
--with-freetype \
--with-gettext \
--with-curl \
--with-openssl \
--enable-sockets \
--enable-mbstring \
--enable-xml \
--with-zip \
--with-zlib \
--with-snmp \
--with-mhash \
--enable-ftp \
--enable-bcmath \
--enable-soap \
--enable-shmop \
--enable-sysvsem \
--enable-pcntl \
--with-gmp
...
+--------------------------------------------------------------------+
| License:                                                           |
| This software is subject to the PHP License, available in this     |
| distribution in the file LICENSE. By continuing this installation  |
| process, you are bound by the terms of this license agreement.     |
| If you do not agree with the terms of this license, you must abort |
| the installation process at this point.                            |
+--------------------------------------------------------------------+

Thank you for using PHP.
[root@php php-8.1.11]# make && make install   //安装
[root@php php-8.1.11]# cd /usr/local/php8/
[root@php php8]# ls
bin  etc  include  lib  php  sbin  var
[root@php php8]# echo 'export PATH=/usr/local/php8/bin:$PATH' > /etc/profile.d/php8.sh   //配置环境变量
[root@php php8]# source /etc/profile.d/php8.sh  //使其生效
[root@php php8]# ln -s /usr/local/php8/include /usr/include/php8 //配置头文件
[root@php php8]# ll -d /usr/include/php8
lrwxrwxrwx. 1 root root 23 Oct 11 23:07 /usr/include/php8 -> /usr/local/php8/include
root@php php8]# cd
[root@php ~]# cd php-8.1.11/
[root@php php-8.1.11]# ls
CODING_STANDARDS.md  README.md            buildconf      include              sapi
CONTRIBUTING.md      TSRM                 buildconf.bat  libs                 scripts
EXTENSIONS           UPGRADING            config.log     libtool              tests
LICENSE              UPGRADING.INTERNALS  config.nice    main                 travis
Makefile             Zend                 config.status  modules              win32
Makefile.fragments   appveyor             configure      pear
Makefile.objects     azure                configure.ac   php.ini-development
NEWS                 azure-pipelines.yml  docs           php.ini-production
README.REDIST.BINS   build                ext            run-tests.php
[root@php php-8.1.11]# cp php.ini-production /etc/php.ini
cp: overwrite '/etc/php.ini'? y
[root@php php-8.1.11]# cp sapi/fpm/init.d.php-fpm /etc/init.d/php-fpm
[root@php php-8.1.11]# chmod +x /etc/rc.d/init.d/php-fpm
[root@php php-8.1.11]# cp /usr/local/php8/etc/php-fpm.conf.default /usr/local/php8/etc/php-fpm.conf
[root@php php-8.1.11]# cp /usr/local/php8/etc/php-fpm.d/www.conf.default /usr/local/php8/etc/php-fpm.d/www.conf
[root@php php-8.1.11]# cd
[root@php ~]# cp /usr/lib/systemd/system/sshd.service /usr/lib/systemd/system/php-fpm.service  //将其加入systemd服务中
[root@php ~]# vim /usr/lib/systemd/system/php-fpm.service
[root@php ~]# cat /usr/lib/systemd/system/php-fpm.service
[Unit]
Description=php-fpm server daemon
After=network.target

[Service]
Type=forking
ExecStart=/usr/local/php8/bin/php-fpm start
ExecStop=/usr/local/php8/bin/php-fpm stop
ExecReload=/bin/kill -HUP $MAINPID

[Install]
WantedBy=multi-user.target
[root@php ~]# systemctl daemon-reload   //加载配置文件
[root@php ~]# systemctl enable --now php-fpm.service //设置开机自启
Created symlink /etc/systemd/system/multi-user.target.wants/php-fpm.service → /usr/lib/systemd/system/php-fpm.service.
[root@php ~]# ss -antl   //查看端口
State      Recv-Q     Send-Q          Local Address:Port           Peer Address:Port     Process
LISTEN     0          128                   0.0.0.0:22                  0.0.0.0:*
LISTEN     0          128                 127.0.0.1:9000                0.0.0.0:*
LISTEN     0          128                      [::]:22                     [::]:*
[root@nginx ~]# cd /usr/local/nginx/
[root@nginx nginx]# ls
client_body_temp conf fastcgi_temp html logs proxy_temp sbin scgi_temp uwsgi_temp
[root@nginx nginx]# cd conf/
[root@nginx conf]# ls
fastcgi.conf fastcgi_params koi-utf mime.types nginx.conf scgi_params uwsgi_params win-utf
fastcgi.conf.default fastcgi_params.default koi-win mime.types.default nginx.conf.default scgi_params.default uwsgi_params.default
[root@nginx conf]# vim nginx.conf
location / {
root html;
index index.php index.html index.htm ; //添加index.php
}
取消下面的注释并进行修改:
#location ~ \.php$ {
# root html;
# fastcgi_pass 127.0.0.1:9000;
# fastcgi_index index.php;
# fastcgi_param SCRIPT_FILENAME /scripts$fastcgi_script_name;
# include fastcgi_params;
#}
修改:
location ~ \.php$ {
root html; //指向php端index.php文件位置
fastcgi_pass 192.168.222.139:9000; //监听php端的9000端口
fastcgi_index index.php;
fastcgi_param SCRIPT_FILENAME /usr/local/nginx/html/$fastcgi_script_name; // 将/scripts更改为/usr/local/nginx/html
include fastcgi_params;
[root@nginx conf]# cd
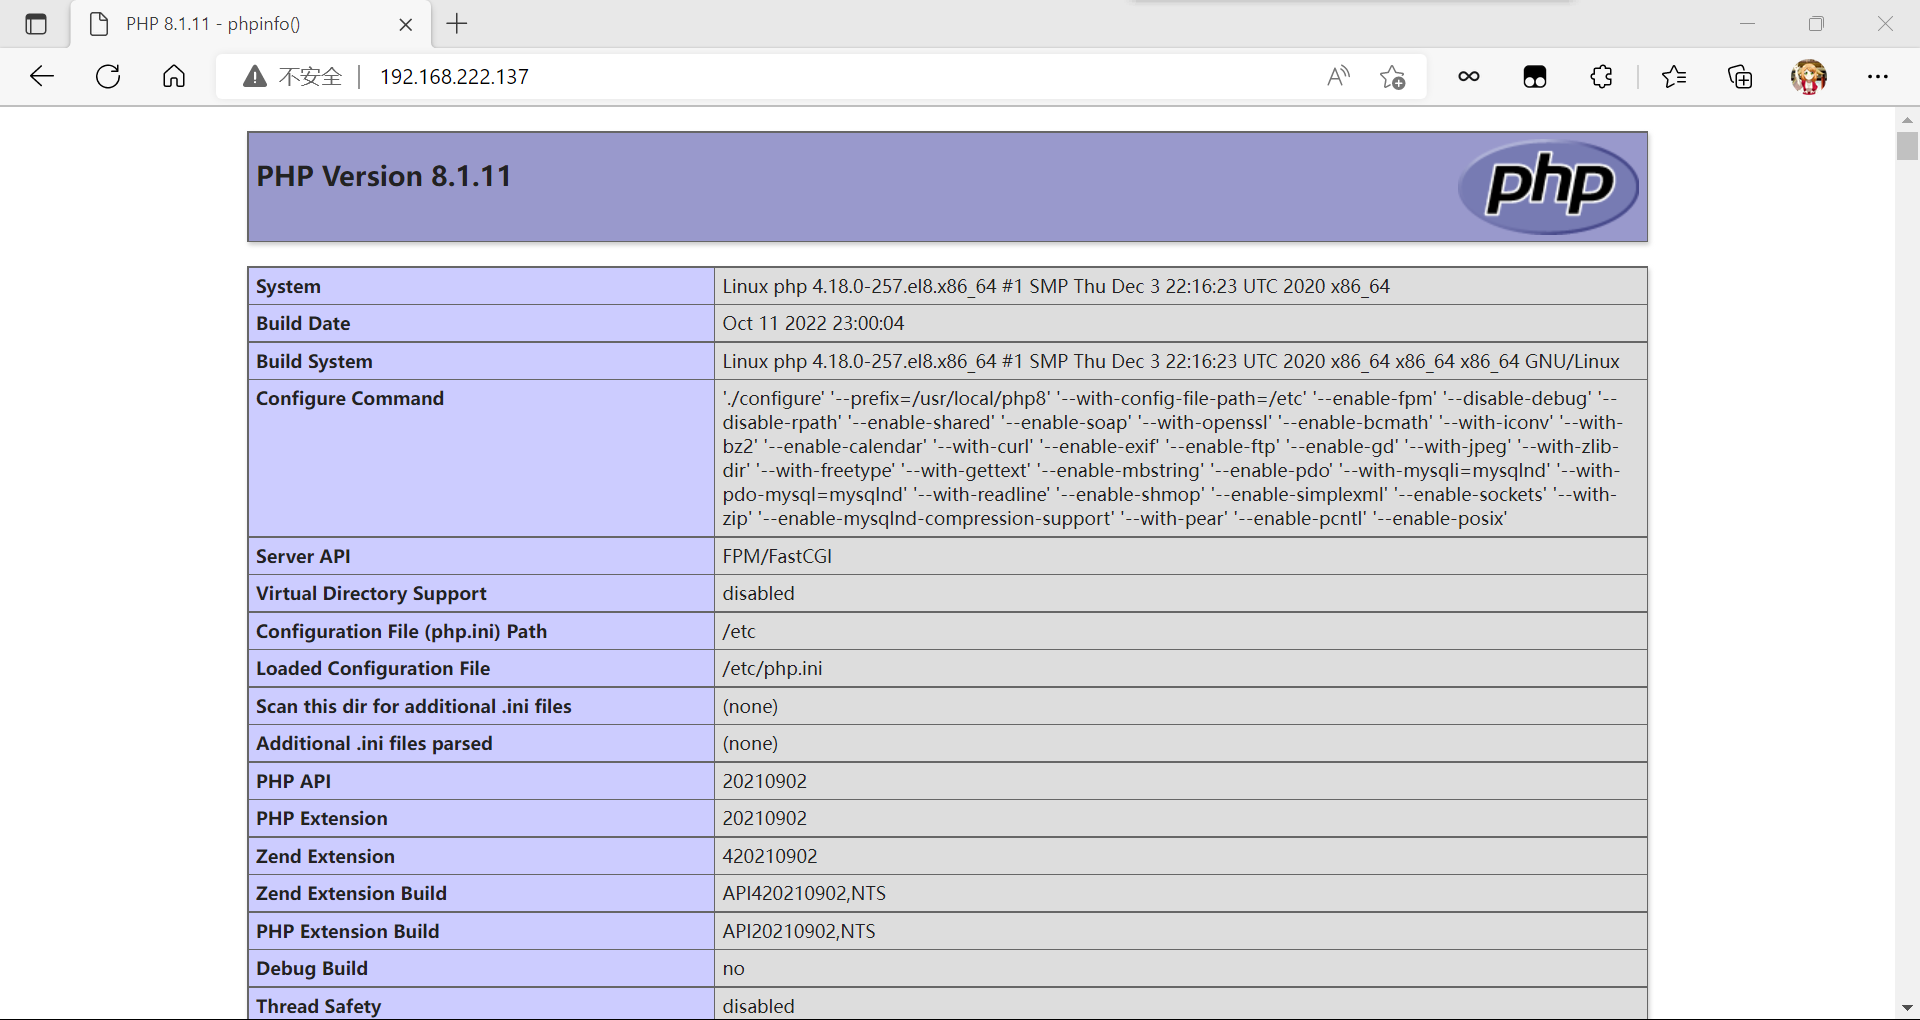
[root@nginx ~]# vim /usr/local/nginx/html/index.php //编写php测试页面
[root@nginx ~]# cat /usr/local/nginx/html/index.php
<?php
phpinfo();
?>
[root@nginx nginx]# systemctl restart nginx.service //重启服务
[root@php ~]# cd /usr/local/php8/etc/php-fpm.d/
[root@php php-fpm.d]# ls
www.conf  www.conf.default
[root@php php-fpm.d]# vim www.conf
listen = 192.168.222.139:9000    //php主机ip
listen.allowed_clients = 192.168.222.137   //允许ip访问(nginx主机ip)
[root@php php-fpm.d]# cd
[root@php ~]# cat > /usr/local/nginx/html/index.php << EOF
//编写php端网站
> <?php
>     phpinfo();
> ?>
> EOF
[root@php ~]# systemctl restart php-fpm.service  //重启服务
[root@php ~]# ss -antl   //查看端口
State      Recv-Q     Send-Q           Local Address:Port          Peer Address:Port     Process
LISTEN     0          128                    0.0.0.0:22                 0.0.0.0:*
LISTEN     0          128            192.168.222.139:9000               0.0.0.0:*
LISTEN     0          128                       [::]:22                    [::]:*
访问:
这里是使用你在刚刚配置里面允许的主机ip进行访问,一般是允许nginx这台主机的ip进行访问
我已经构建了一些serverspec代码来在多个主机上运行一组测试。问题是当任何测试失败时,测试会在当前主机停止。即使测试失败,我也希望它继续在所有主机上运行。Rakefile:namespace:specdotask:all=>hosts.map{|h|'spec:'+h.split('.')[0]}hosts.eachdo|host|begindesc"Runserverspecto#{host}"RSpec::Core::RakeTask.new(host)do|t|ENV['TARGET_HOST']=hostt.pattern="spec/cfengine3/*_spec.r
我有一个存储主机名的Ruby数组server_names。如果我打印出来,它看起来像这样:["hostname.abc.com","hostname2.abc.com","hostname3.abc.com"]相当标准。我想要做的是获取这些服务器的IP(可能将它们存储在另一个变量中)。看起来IPSocket类可以做到这一点,但我不确定如何使用IPSocket类遍历它。如果它只是尝试像这样打印出IP:server_names.eachdo|name|IPSocket::getaddress(name)pnameend它提示我没有提供服务器名称。这是语法问题还是我没有正确使用类?输出:ge
在VMware16.2.4安装Ubuntu一、安装VMware1.打开VMwareWorkstationPro官网,点击即可进入。2.进入后向下滑动找到Workstation16ProforWindows,点击立即下载。3.下载完成,文件大小615MB,如下图:4.鼠标右击,以管理员身份运行。5.点击下一步6.勾选条款,点击下一步7.先勾选,再点击下一步8.去掉勾选,点击下一步9.点击下一步10.点击安装11.点击许可证12.在百度上搜索VM16许可证,复制填入,然后点击输入即可,亲测有效。13.点击完成14.重启系统,点击是15.双击VMwareWorkstationPro图标,进入虚拟机主
需求:要创建虚拟机,就需要给他提供一个虚拟的磁盘,我们就在/opt目录下创建一个10G大小的raw格式的虚拟磁盘CentOS-7-x86_64.raw命令格式:qemu-imgcreate-f磁盘格式磁盘名称磁盘大小qemu-imgcreate-f磁盘格式-o?1.创建磁盘qemu-imgcreate-fraw/opt/CentOS-7-x86_64.raw10G执行效果#ls/opt/CentOS-7-x86_64.raw2.安装虚拟机使用virt-install命令,基于我们提供的系统镜像和虚拟磁盘来创建一个虚拟机,另外在创建虚拟机之前,提前打开vnc客户端,在创建虚拟机的时候,通过vnc
我正在使用DMOZ的listofurltopics,其中包含一些具有包含下划线的主机名的url。例如:608609TheOuterHeaven610InformationandimagegalleryofMcFarlane'sactionfiguresforTrigun,Akira,TenchiMuyoandotherJapaneseSci-Fianimations.611Top/Arts/Animation/Anime/Collectibles/Models_and_Figures/Action_Figures612虽然此url可以在网络浏览器中使用(或者至少在我的浏览器中可以使用:
我刚刚在我的Ubuntu9.10服务器上安装了TeamBox。我使用提供的服务器脚本在端口3000上启动并运行它。它的运行速度非常慢,从另一台计算机连接时每个HTTP请求最多需要30秒。我使用链接从shell加载TeamBox,一点也不花时间。然后我设置了一个SSH隧道,它再次运行得非常快。我通过此服务器上的apache以及SAMBA等运行了大约30个虚拟主机,没有任何问题。我该如何解决这个问题? 最佳答案 我的redmine(ruby,webrick)太慢了。现在我解决了这个问题:apt-getinstallmongrelruby
当我运行服务器并转到localhost:3000时,我收到此错误:ActiveRecord::ConnectionNotEstablishedNoconnectionpoolwithidprimaryfound.有问题的代码:activerecord(5.0.0)lib/active_record/connection_adapters/abstract/connection_pool.rb:874:in`retrieve_connection' 最佳答案 我会发表评论,但我缺乏声誉。反正这个错误有时候是sqlite版本导致的。我建
我这个模型:classBunny每当我提交一个表单来创建这个模型时,我都会收到以下错误:#的未定义方法“number_before_type_cast” 最佳答案 我通过将此方法添加到我的Bunny模型中解决了这个问题:defnumber_before_type_castnumberend我不喜欢它,但我想在有人发布更好的解决方案之前它会起作用。 关于ruby-on-rails-Rails验证虚拟属性,我们在StackOverflow上找到一个类似的问题: h
我正在尝试使用以下方法更新rubygems:gemupdate--system但是我得到了错误:ERROR:Whileexecutinggem...(Gem::RemoteFetcher::UnknownHostError)nosuchname(https://rubygems.org/specs.4.8.gz). 最佳答案 不确定您安装的是哪个版本的rubygems,但是可以通过三种方式修复:网络问题-稍后重试。您的版本已变砖无法更新,您需要以其他方式安装NOTE:RubyGems1.1and1.2haveproblems
我已经解决了标题中描述的错误的众多解决方案。ActionView::Template::Error(缺少要链接的主机!请提供:host参数,设置default_url_options[:host],或将:only_path设置为true):但是,该项目还修改了url_for函数以使用子域,如本railscast所示:http://railscasts.com/episodes/221-subdomains-in-rails-3因此,这个错误的传统答案,例如在我的环境设置中设置变量似乎不是解决方案。这里有一些其他的提示:这是一个全新的设置,我刚刚克隆了一个项目并安装了ruby、rai