很惭愧,这竟然是老衲在csdn的首次内容输出,还请看官,高抬贵手,多喷两句, 反正我也不听~👀
首先声明,我是最近才刚开始写uniapp……
言归正传,最近给公司要做一个小程序,由于之前并没有实际从0开始构建开发经验,故记录下遇到的一些小难点,方便之后查阅,希望也能帮到其他小朋友,目标项目主界面如下图所示
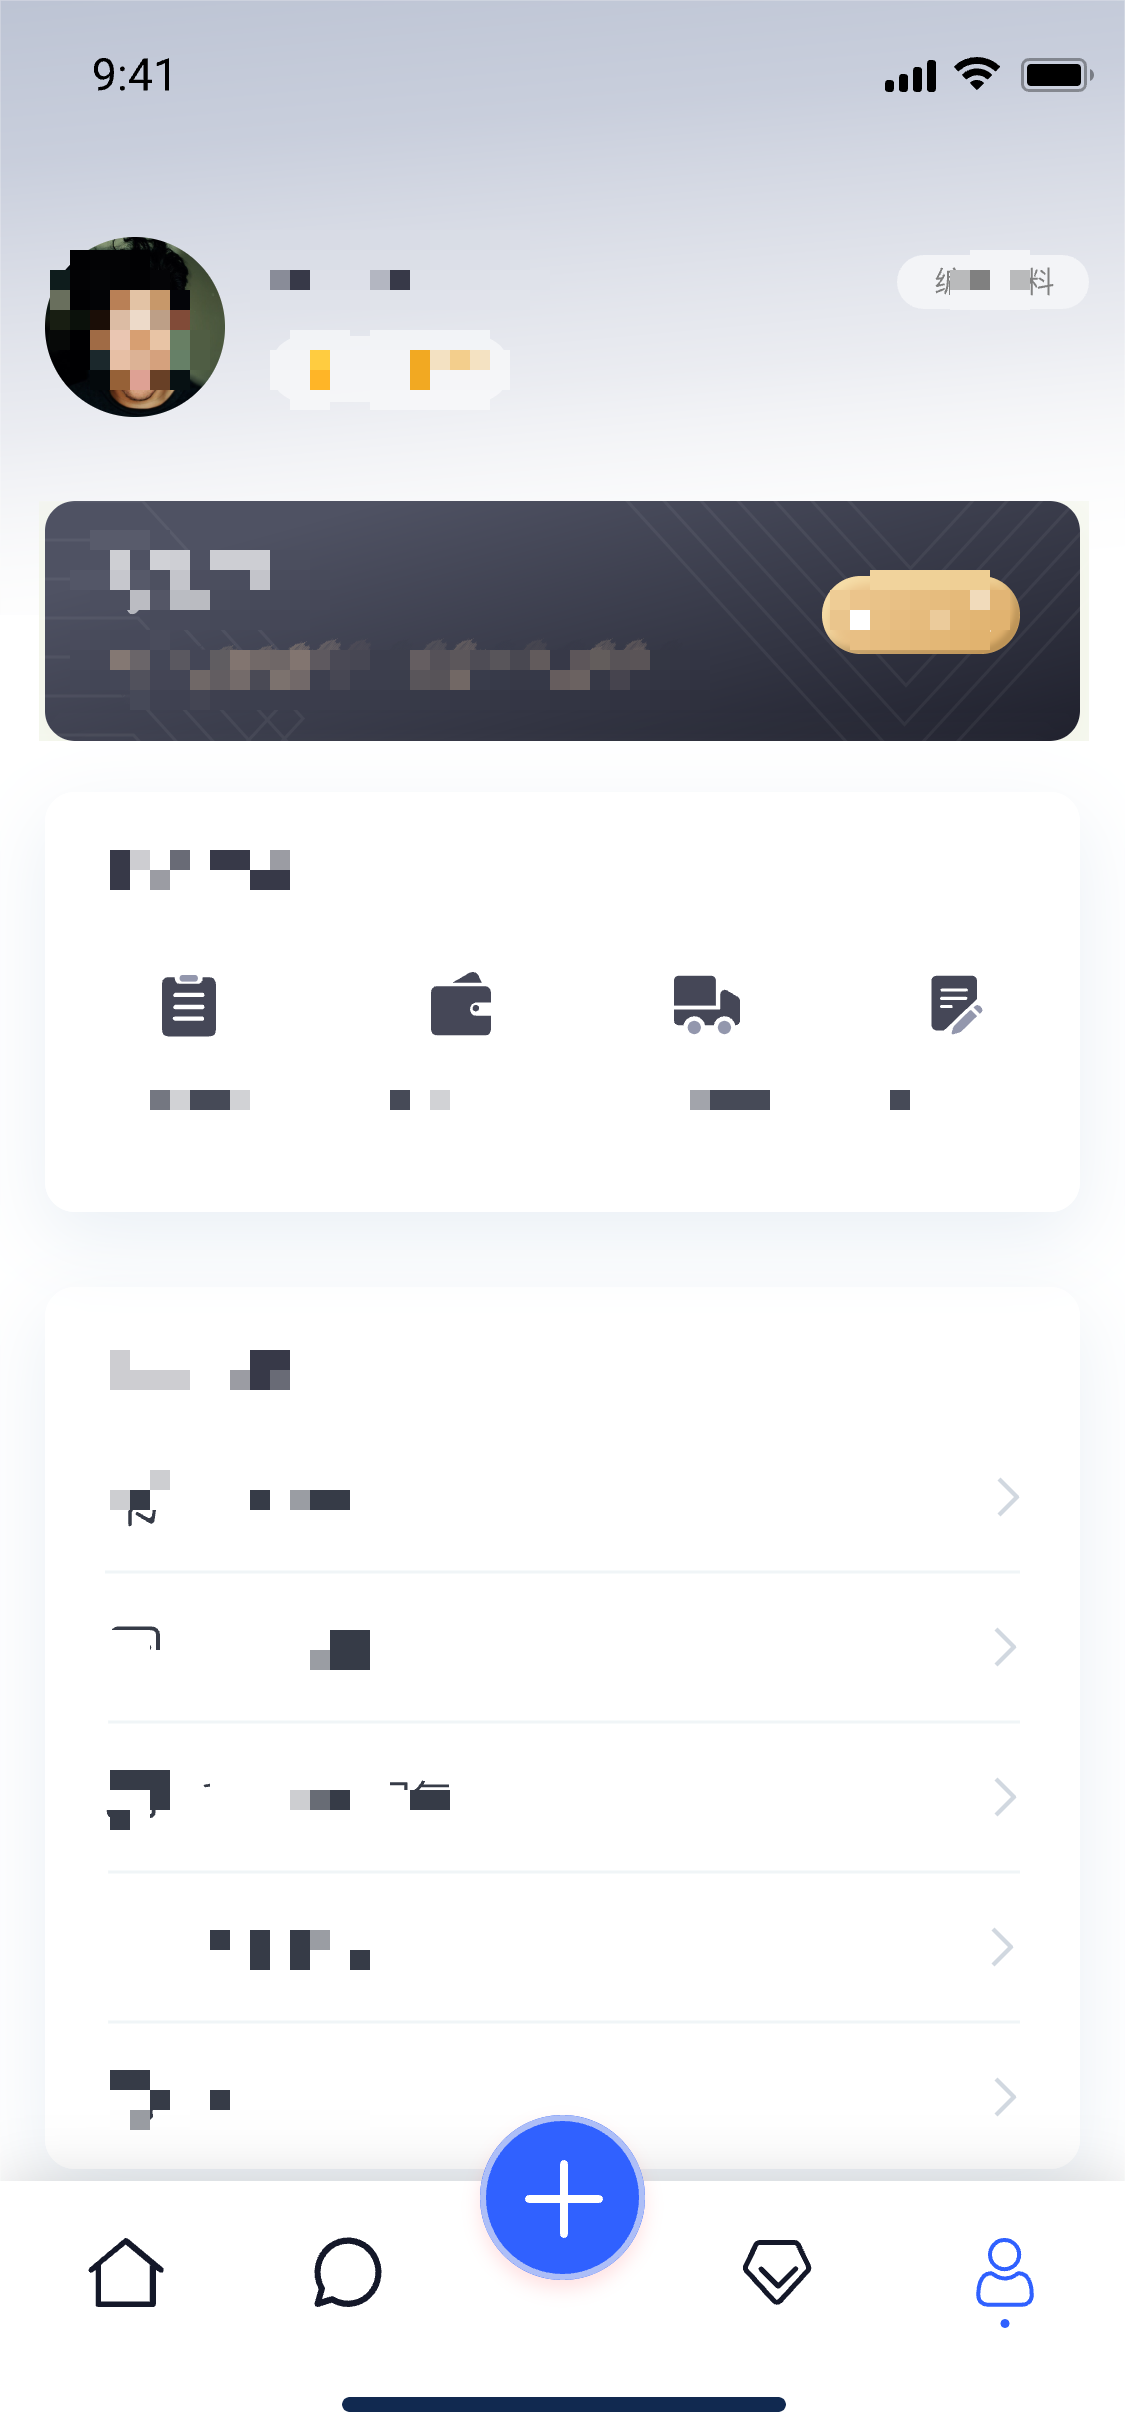
如果想实现这个效果的tabbar,那我们就只能舍弃小程序本身自带的了,在网上疯狂找了一圈,没有找到相对比较满意的解决办法,尝试后基本卡在首次加载切换时,每个页面都要初始化闪烁一下,不是很美丽,程序猿的强迫症怎么能允许!!最后结合查阅的资料结合自己的一些理解,算是比较完美的解决。
思路大概是这样
首先封装一个自己用的tabbar组件
然后配置page.js
全局引用自定义tabbar
每个tabbar页面引用组件
最后进入主题:解决初次加载闪屏
话不多说,直接上代码……
<template>
  <view class="tabbar-container">
    <block>
      <view class="tabbar-item" v-for="(item, index) in tabbarList" :class="[item.centerItem ? ' center-item' : '']" @click="changeItem(item)">
        <view class="item-top"><image :src="currentItem == item.id ? item.selectIcon : item.icon"></image></view>
        <view class="item-bottom" :class="[currentItem == item.id ? 'item-active' : '']">
          <text>{{ item.text }}</text>
        </view>
      </view>
    </block>
  </view>
</template>

<script>
export default {
  props: {
    currentPage: {
      type: Number,
      default: 0
    }
  },
  data() {
    return {
      currentItem: 0,
      tabbarList: [
        {
          id: 0,
          path: '/pages/index/index',
          icon: '/static/home.png',
          selectIcon: '/static/homeSelected.png',
          text: '简介',
          centerItem: false
        },
        {
          id: 1,
          path: '/pages/discount/discount',
          icon: '/static/gift.png',
          selectIcon: '/static/giftSelected.png',
          text: '优惠',
          centerItem: false
        },
        {
          id: 2,
          path: '/pages/code/code',
          icon: '/static/code.png',
          selectIcon: '/static/codeSelected.png',
          text: '二维码',
          centerItem: true
        },
        {
          id: 3,
          path: '/pages/search/search',
          icon: '/static/search.png',
          selectIcon: '/static/searchSelected.png',
          text: '探索',
          centerItem: false
        },
        {
          id: 4,
          path: '/pages/mine/mine',
          icon: '/static/mine.png',
          selectIcon: '/static/mineSelected.png',
          text: '我的',
          centerItem: false
        }
      ]
    };
  },
  mounted() {
    this.currentItem = this.currentPage;
    uni.hideTabBar();
  },
  methods: {
    changeItem(item) {
      let _this = this;
      //_this.currentItem = item.id;
      uni.switchTab({
        url: item.path
      });
    }
  }
};
</script>
<style>
view {
  padding: 0;
  margin: 0;
  box-sizing: border-box;
}
.tabbar-container {
  position: fixed;
  bottom: 0;
  left: 0;
  width: 100%;
  height: 110rpx;
  box-shadow: 0 0 5px #999;
  display: flex;
  align-items: center;
  padding: 5rpx 0;
  color: #999999;
}
.tabbar-container .tabbar-item {
  width: 20%;
  height: 100rpx;
  display: flex;
  flex-direction: column;
  justify-content: center;
  align-items: center;
  text-align: center;
}
.tabbar-container .item-active {
  color: #f00;
}
.tabbar-container .center-item {
  display: block;
  position: relative;
}
.tabbar-container .tabbar-item .item-top {
  width: 70rpx;
  height: 70rpx;
  padding: 10rpx;
}
.tabbar-container .center-item .item-top {
  flex-shrink: 0;
  width: 100rpx;
  height: 100rpx;
  position: absolute;
  top: -50rpx;
  left: calc(50% - 50rpx);
  border-radius: 50%;
  box-shadow: 0 0 5px #999;
  background-color: #ffffff;
}
.tabbar-container .tabbar-item .item-top image {
  width: 100%;
  height: 100%;
}
.tabbar-container .tabbar-item .item-bottom {
  font-size: 28rpx;
  width: 100%;
}
.tabbar-container .center-item .item-bottom {
  position: absolute;
  bottom: 5rpx;
}
</style>{
"pages": [{
"path": "pages/index/index",
"style": {
"navigationBarTitleText": "简介"
}
}, {
"path": "pages/discount/discount",
"style": {
"navigationBarTitleText": "优惠"
}
}, {
"path": "pages/code/code",
"style": {
"navigationBarTitleText": "二维码"
}
}, {
"path": "pages/search/search",
"style": {
"navigationBarTitleText": "探索"
}
}, {
"path": "pages/mine/mine",
"style": {
"navigationBarTitleText": "我的"
}
}],
"globalStyle": {
"navigationBarTextStyle": "black",
"navigationBarTitleText": "CRM",
"navigationBarBackgroundColor": "#F8F8F8",
"backgroundColor": "#F8F8F8",
"app-plus": {
"background": "#efeff4"
}
},
"tabBar": {
"color": "#999999",
"selectedColor": "#f00",
"borderStyle": "black",
"backgroundColor": "#ffffff",
"midButton":{
"text":"二维码",
"pagePath":"pages/code/code",
"iconPath":"static/code.png",
"selectedIconPath":"static/codeSelected.png"
},
"list":[
{
"pagePath":"pages/index/index",
"iconPath":"static/home.png",
"selectedIconPath":"static/homeSelected.png",
"text":"简介"
},
{
"pagePath":"pages/discount/discount",
"iconPath":"static/gift.png",
"selectedIconPath":"static/giftSelected.png",
"text":"优惠"
},
{
"pagePath":"pages/code/code",
"iconPath":"static/code.png",
"selectedIconPath":"static/codeSelected.png",
"text":"二维码"
},
{
"pagePath":"pages/search/search",
"iconPath":"static/search.png",
"selectedIconPath":"static/searchSelected.png",
"text":"探索"
},
{
"pagePath":"pages/mine/mine",
"iconPath":"static/mine.png",
"selectedIconPath":"static/mineSelected.png",
"text":"我的"
}
]
}
}import Vue from 'vue'
import App from './App'
import diyTabbar from "components/zdy-tabbar.vue"
// 注册全局组件
Vue.component('diy-tabbar', diyTabbar)
Vue.config.productionTip = false
App.mpType = 'app'
const app = new Vue({
...App
})
app.$mount()<diy-tabbar :current-page="0"></diy-tabbar> // current-page 对应的就是tabbar的index
至此,我们完成了第一步这个伟大的壮举,兴冲冲的启动程序,激动的心,颤抖的手点击第一个tabbar~
咦?是什么在闪烁呀,于是我们疯狂的点击了每一个却发现都在闪,当我们再次点击每个一个tabbar,又都好了...
于是我们心安理得的想,这样就可以了,毕竟整个这个确实没有原生的用着爽,老子已经尽力了....
然后只过了两分钟,我那份强迫症就犯了,这也太丑了,与我前端大神的身份不搭啊
于是只能自己造小三轮车了,思路就是
创建一个主页面
将所有tabbar组件和页面都引入其中,
这样共用一个tabbar就不会出现闪屏的问题
这样就能稍微优雅的坐上三轮车,诶?不对,我在说什么...
<template>
<view>
<view class="main_box">
<index v-if="currentIndex === 0"></index>
<message v-if="currentIndex === 1"></message>
<!-- <midBtn v-if="currentIndex === 2"></midBtn> -->
<member v-if="currentIndex === 3"></member>
<my v-if="currentIndex === 4"></my>
</view>
<view class="foot_box">
<diy-tabbar :current-page="currentIndex" @changeItem="changeItem"></diy-tabbar>
</view>
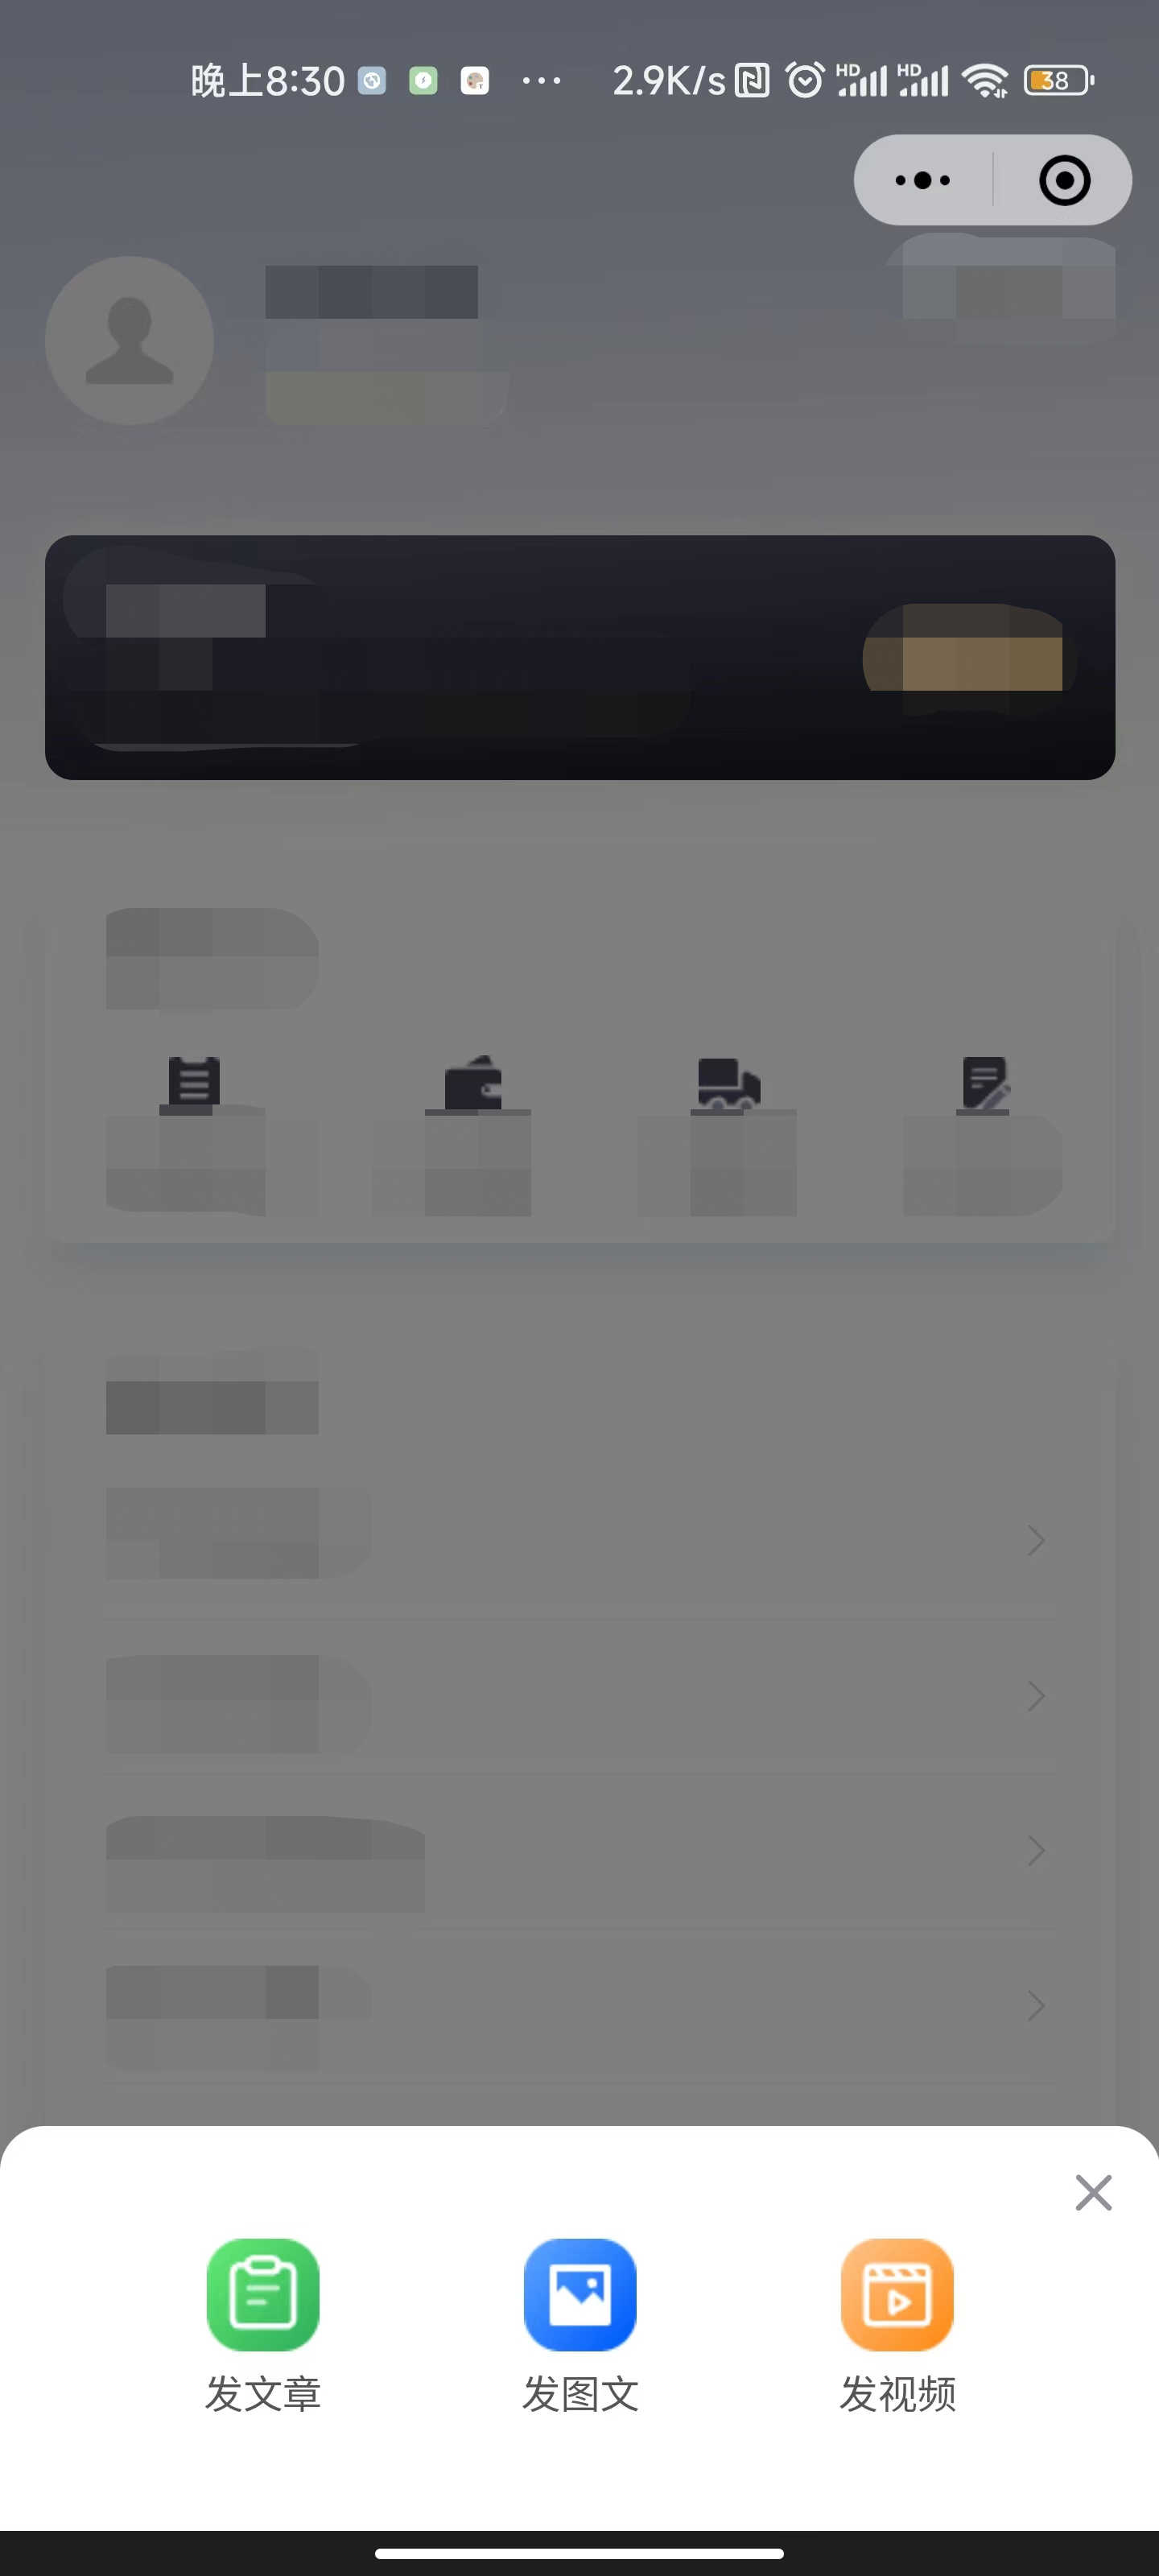
<u-popup class="firstPagePopup" :show="active" :closeable="true" @close="close" @open="open">
<view>
<view class="tabbar-box-wrap">
<view class="tabbar-box">
<view class="tabbar-box-item" @click="goToPage('/pages/tabbar-3-detial/tabbar-3-release/tabbar-3-release')">
<image class="box-image" src="@/static/img/mid_btn1.png" mode="aspectFit"></image>
<text class="explain">发文章</text>
</view>
<view class="tabbar-box-item" @click="goToPage('/pages/tabbar-3-detial/tabbar-3-video/tabbar-3-video')">
<image class="box-image" src="@/static/img/mid_btn2.png" mode="aspectFit"></image>
<text class="explain">发图文</text>
</view>
<view class="tabbar-box-item" @click="goToPage('/pages/tabbar-3-detial/tabbar-3-qa/tabbar-3-qa')">
<image class="box-image" src="@/static/img/mid_btn3.png" mode="aspectFit"></image>
<text class="explain">发视频</text>
</view>
</view>
</view>
</view>
</u-popup>
</view>
</template>
<script>
import index from '@/pages/index/index.vue'
import my from '@/pages/my/index.vue'
import message from '@/pages/message/index.vue'
import member from '@/pages/memberCenter/index.vue'
export default {
components:{
index,
my,
message,
member
},
data() {
return {
active:false,
currentIndex:4
}
},
onLoad() {
},
methods: {
// 如果
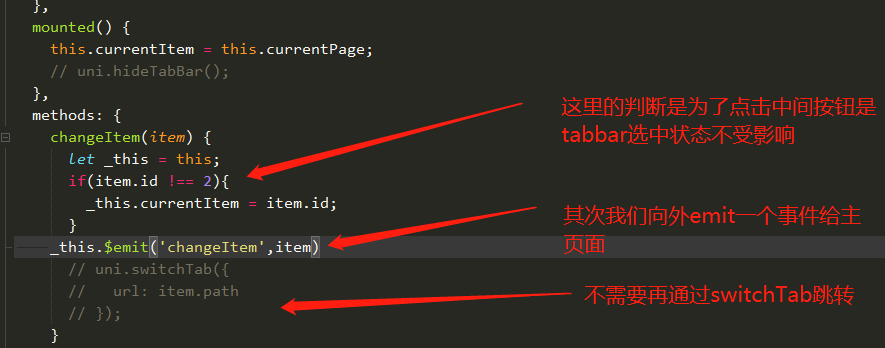
changeItem(item){
if(item.id === 2){
this.active = true
}else{
this.currentIndex = item.id
}
// uni.switchTab({
// url: item.path
// });
// console.log(item)
},
close(){
debugger
this.active=false
},
open(){}
}
}
</script>
<style lang="scss" scoped>
.main_box{
height: calc(100vh - 110rpx);
overflow: scroll;
}
.foot_box{
height: 110rpx;
}
.content {
display: flex;
align-items: center;
justify-content: center;
width: 100%;
/* #ifdef H5 */
height: calc(100vh - var(--window-bottom) - var(--window-top));
/* #endif */
/* #ifndef H5 */
height: 100vh;
/* #endif */
transition: opacity 0.3s;
background: #999;
opacity: 0;
&.active {
opacity: 1;
}
.logo {
position: relative;
margin-top: -400upx;
width: 200upx;
height: 200upx;
// z-index: -1;
opacity: 0;
transition: opacity 0.3s;
&.active {
opacity: 1;
}
}
}
.tabbar-box-wrap {
width: 100%;
padding: 50upx;
box-sizing: border-box;
.tabbar-box {
display: flex;
width: 100%;
background: #fff;
border-radius: 20upx;
padding: 15upx 20upx;
box-sizing: border-box;
z-index: 2;
.tabbar-box-item {
// position: relative;
width: 100%;
z-index: 3;
margin: 10upx;
color: $uni-color-subtitle;
text-align: center;
font-size: $uni-font-size-base;
.box-image {
width: 100%;
height: $uni-img-size-lg;
}
}
}
}
/deep/ .u-popup__content{
border-radius: 30rpx 30rpx 0 0;
}
</style>
首先我们先将主页面放到page.js的第一个,作为入口文件
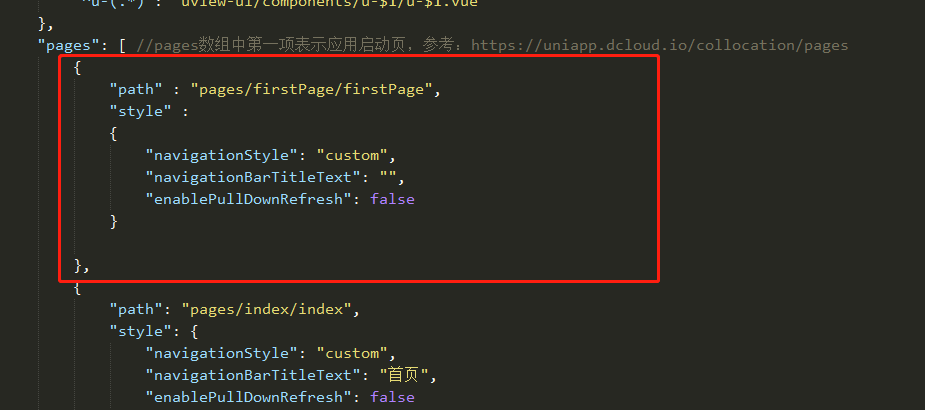
补充:到这一步,page.js中的tabbar整个就可以删除了
大功告成,目前这种方式,我还没有遇到什么问题和坑,希望评论区大神可以指点一二,初次分享,不吝赐教,谢谢大家,如果大家喜欢,多点赞评论,这也是我继续创作的强劲动力~
我正在尝试设置一个puppet节点,但rubygems似乎不正常。如果我通过它自己的二进制文件(/usr/lib/ruby/gems/1.8/gems/facter-1.5.8/bin/facter)在cli上运行facter,它工作正常,但如果我通过由rubygems(/usr/bin/facter)安装的二进制文件,它抛出:/usr/lib/ruby/1.8/facter/uptime.rb:11:undefinedmethod`get_uptime'forFacter::Util::Uptime:Module(NoMethodError)from/usr/lib/ruby
我需要在客户计算机上运行Ruby应用程序。通常需要几天才能完成(复制大备份文件)。问题是如果启用sleep,它会中断应用程序。否则,计算机将持续运行数周,直到我下次访问为止。有什么方法可以防止执行期间休眠并让Windows在执行后休眠吗?欢迎任何疯狂的想法;-) 最佳答案 Here建议使用SetThreadExecutionStateWinAPI函数,使应用程序能够通知系统它正在使用中,从而防止系统在应用程序运行时进入休眠状态或关闭显示。像这样的东西:require'Win32API'ES_AWAYMODE_REQUIRED=0x0
Rackup通过Rack的默认处理程序成功运行任何Rack应用程序。例如:classRackAppdefcall(environment)['200',{'Content-Type'=>'text/html'},["Helloworld"]]endendrunRackApp.new但是当最后一行更改为使用Rack的内置CGI处理程序时,rackup给出“NoMethodErrorat/undefinedmethod`call'fornil:NilClass”:Rack::Handler::CGI.runRackApp.newRack的其他内置处理程序也提出了同样的反对意见。例如Rack
我想用ruby编写一个小的命令行实用程序并将其作为gem分发。我知道安装后,Guard、Sass和Thor等某些gem可以从命令行自行运行。为了让gem像二进制文件一样可用,我需要在我的gemspec中指定什么。 最佳答案 Gem::Specification.newdo|s|...s.executable='name_of_executable'...endhttp://docs.rubygems.org/read/chapter/20 关于ruby-在Ruby中编写命令行实用程序
我在我的项目中添加了一个系统来重置用户密码并通过电子邮件将密码发送给他,以防他忘记密码。昨天它运行良好(当我实现它时)。当我今天尝试启动服务器时,出现以下错误。=>BootingWEBrick=>Rails3.2.1applicationstartingindevelopmentonhttp://0.0.0.0:3000=>Callwith-dtodetach=>Ctrl-CtoshutdownserverExiting/Users/vinayshenoy/.rvm/gems/ruby-1.9.3-p0/gems/actionmailer-3.2.1/lib/action_mailer
我构建了两个需要相互通信和发送文件的Rails应用程序。例如,一个Rails应用程序会发送请求以查看其他应用程序数据库中的表。然后另一个应用程序将呈现该表的json并将其发回。我还希望一个应用程序将存储在其公共(public)目录中的文本文件发送到另一个应用程序的公共(public)目录。我从来没有做过这样的事情,所以我什至不知道从哪里开始。任何帮助,将不胜感激。谢谢! 最佳答案 无论Rails是什么,几乎所有Web应用程序都有您的要求,大多数现代Web应用程序都需要相互通信。但是有一个小小的理解需要你坚持下去,网站不应直接访问彼此
我尝试运行2.x应用程序。我使用rvm并为此应用程序设置其他版本的ruby:$rvmuseree-1.8.7-head我尝试运行服务器,然后出现很多错误:$script/serverNOTE:Gem.source_indexisdeprecated,useSpecification.Itwillberemovedonorafter2011-11-01.Gem.source_indexcalledfrom/Users/serg/rails_projects_terminal/work_proj/spohelp/config/../vendor/rails/railties/lib/r
在MRIRuby中我可以这样做:deftransferinternal_server=self.init_serverpid=forkdointernal_server.runend#Maketheserverprocessrunindependently.Process.detach(pid)internal_client=self.init_client#Dootherstuffwithconnectingtointernal_server...internal_client.post('somedata')ensure#KillserverProcess.kill('KILL',
鉴于我有以下迁移:Sequel.migrationdoupdoalter_table:usersdoadd_column:is_admin,:default=>falseend#SequelrunsaDESCRIBEtablestatement,whenthemodelisloaded.#Atthispoint,itdoesnotknowthatusershaveais_adminflag.#Soitfails.@user=User.find(:email=>"admin@fancy-startup.example")@user.is_admin=true@user.save!ende
刚入门rails,开始慢慢理解。有人可以解释或给我一些关于在application_controller中编码的好处或时间和原因的想法吗?有哪些用例。您如何为Rails应用程序使用应用程序Controller?我不想在那里放太多代码,因为据我了解,每个请求都会调用此Controller。这是真的? 最佳答案 ApplicationController实际上是您应用程序中的每个其他Controller都将从中继承的类(尽管这不是强制性的)。我同意不要用太多代码弄乱它并保持干净整洁的态度,尽管在某些情况下ApplicationContr