前言:本文将介绍Qt5源码方式的交叉编译及安装
下载源码包:qt-everywhere-src-5.12.8.tar.xz
官网下载网址:Index of /
依次选择:
【official_releases】 =>【qt】 =>【5.12】 =>【5.12.8】 =>【single】 =>【qt-everywhere-src-5.12.8.tar.xz】
先解压QT库压缩包出来,并进入解压出来的库目录。
接下来请按以下步骤进行:
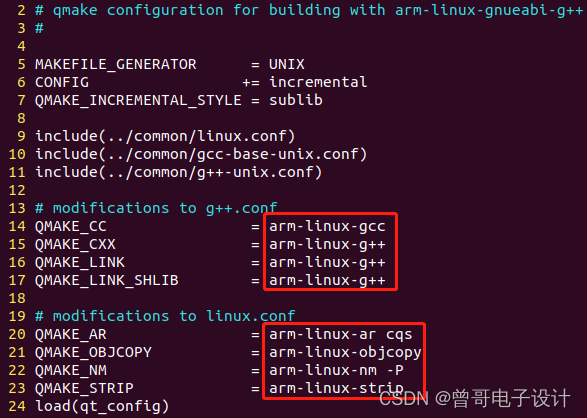
配置编译工具链:
$ vi qtbase/mkspecs/linux-arm-gnueabi-g++/qmake.conf
请回到库的根目录下操作。
有以下2种情况:
配置如下:
$ ./configure -prefix /data/arm-linux/libs/qt-5.6.0-arm -opensource -confirm-license -release -make libs -xplatform  linux-arm-gnueabi-g++ -pch -sql-sqlite -qt-libjpeg -qt-libpng -qt-zlib -no-opengl -no-sse2 -no-openssl -no-cups -no-glib -no-iconv -no-separate-debug-info -nomake tests -nomake examples -nomake tools -no-pkg-config

配置完成输出如下:
Qt is now configured for building. Just run 'make'.
Once everything is built, you must run 'make install'.
Qt will be installed into /data/arm-linux/libs/qt-5.6.0-arm

Prior to reconfiguration, make sure you remove any leftovers from
the previous build.
1.2.2 支持触摸屏tslib
若要支持触摸屏,请先移植触摸屏tslib,请参考以下博文:
触摸屏tslib库交叉编译并移植ARM校准测试_曾哥电子设计的博客-CSDN博客。
首先添加-tslib项,如tslib安装在/data/arm-linux/libs/tslib-1.12-arm目录下,还需通过-I和-L指定include和lib路径,配置如下:
$ ./configure -prefix /data/arm-linux/libs/qt-5.6.0-arm -opensource -confirm-license -release -make libs -xplatform linux-arm-gnueabi-g++ -pch -sql-sqlite -qt-libjpeg -qt-libpng -tslib -qt-zlib -no-opengl -no-sse2 -no-openssl -no-cups -no-glib -no-iconv -no-separate-debug-info -nomake tests -nomake examples -nomake tools -no-pkg-config -I /data/arm-linux/libs/tslib-1.12-arm/include -L /data/arm-linux/libs/tslib-1.12-arm/lib
执行编译命令:
$ makeMake过程可能发生以下错误:
错误1:
In file included from qtiffhandler.cpp:40:0:
tiffio.h:33:18: fatal error: tiff.h: No such file or directory
compilation terminated.
Makefile:1357: recipe for target '.obj/qtiffhandler.o' failed
解决1:
找不到tiff.h头文件,在库源码可搜索到此文件,将其复制到qtiffhandler.cpp同目录下:
$ cp ./qtimageformats/src/3rdparty/libtiff/libtiff/tiff.h ./qtimageformats/src/plugins/imageformats/tiff/错误2:
In file included from main.cpp:37:0:
socketcanbackend.h:83:5: error: ‘canfd_frame’ does not name a type
     canfd_frame m_frame;
     ^
Makefile:944: recipe for target '.obj/main.o' failed
make[5]: *** [.obj/main.o] Error 1
make[5]: Leaving directory '/data/open_source/qt-everywhere-src-5.12.8/qtserialbus/src/plugins/canbus/socketcan'
Makefile:75: recipe for target 'sub-socketcan-make_first' failed
make[4]: *** [sub-socketcan-make_first] Error 2
解决2:
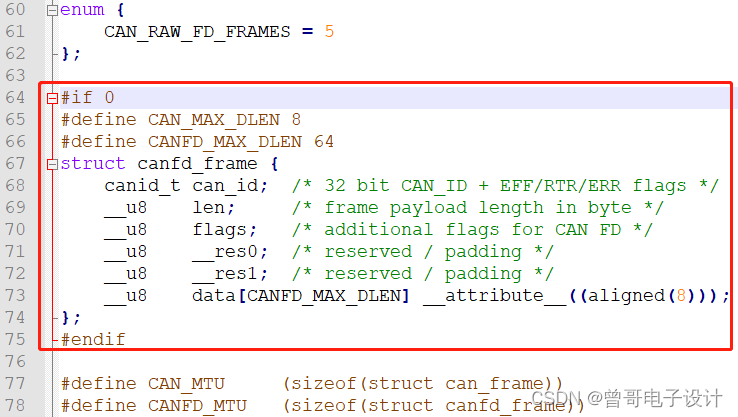
我们可以/qtserialbus/src/plugins/canbus/socketcan/socketcanbackend.cpp中找到canfd_frame的定义,报错信息显示在socketcanbackend.h中找不到其定义,因此将该定义从.cpp移到.h。
$ vi qtserialbus/src/plugins/canbus/socketcan/socketcanbackend.cpp再次编译发生以下错误:
In file included from main.cpp:37:0:
socketcanbackend.h:63:18: error: ‘CANFD_MAX_DLEN’ was not declared in this scope
     __u8    data[CANFD_MAX_DLEN] __attribute__((aligned(8)));
                  ^
Makefile:944: recipe for target '.obj/main.o' failed
make[5]: *** [.obj/main.o] Error 1
同样,该CANFD_MAX_DLEN移到从.cpp移到.h。
修改后:socketcanbackend.cpp
socketcanbackend.h
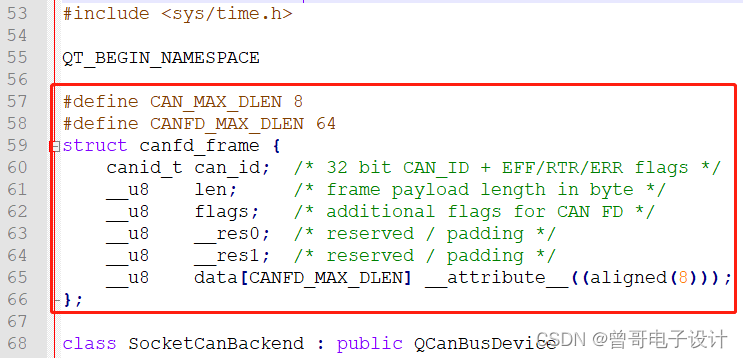
注:若.cpp和.h中没有这几行代码,则手动输入到.h中即可。
此外,还可能还提示类似未定义,则手动给它定义,如下:
typedef unsigned char __u8;
typedef unsigned int __u32;
typedef __u32 canid_t;
$ make installInstall过程发生以下错误:
make[5]: Entering directory '/data/open_source/qt-everywhere-opensource-src-5.6.0/qtimageformats/src/plugins/imageformats/tiff'
arm-linux-g++ -c -pipe -O2 -std=c++0x -fvisibility=hidden -fvisibility-inlines-hidden -fno-exceptions -Wall -W -D_REENTRANT -fPIC -DQT_NO_MTDEV -DQT_NO_LIBUDEV -DQT_NO_LIBINPUT -DQT_NO_EXCEPTIONS -D_LARGEFILE64_SOURCE -D_LARGEFILE_SOURCE -DQT_NO_DEBUG -DQT_PLUGIN -DQT_GUI_LIB -DQT_CORE_LIB -I. -I/data/arm-linux/libs/tslib-1.12-arm/include -I/data/open_source/qt-everywhere-opensource-src-5.6.0/qtbase/include -I/data/open_source/qt-everywhere-opensource-src-5.6.0/qtbase/include/QtGui -I/data/open_source/qt-everywhere-opensource-src-5.6.0/qtbase/include/QtCore -I.moc -I/data/open_source/qt-everywhere-opensource-src-5.6.0/qtbase/mkspecs/linux-arm-gnueabi-g++ -o .obj/qtiffhandler.o qtiffhandler.cpp
qtiffhandler.cpp:40:20: fatal error: tiffio.h: No such file or directory
compilation terminated.
Makefile:1357: recipe for target '.obj/qtiffhandler.o' failed
make[5]: *** [.obj/qtiffhandler.o] Error 1
make[5]: Leaving directory '/data/open_source/qt-everywhere-opensource-src-5.6.0/qtimageformats/src/plugins/imageformats/tiff'
Makefile:134: recipe for target 'sub-tiff-install_subtargets' failed
make[4]: *** [sub-tiff-install_subtargets] Error 2
make[4]: Leaving directory '/data/open_source/qt-everywhere-opensource-src-5.6.0/qtimageformats/src/plugins/imageformats'
Makefile:54: recipe for target 'sub-imageformats-install_subtargets' failed
make[3]: *** [sub-imageformats-install_subtargets] Error 2
make[3]: Leaving directory '/data/open_source/qt-everywhere-opensource-src-5.6.0/qtimageformats/src/plugins'
Makefile:55: recipe for target 'sub-plugins-install_subtargets' failed
make[2]: *** [sub-plugins-install_subtargets] Error 2
make[2]: Leaving directory '/data/open_source/qt-everywhere-opensource-src-5.6.0/qtimageformats/src'
Makefile:55: recipe for target 'sub-src-install_subtargets' failed
make[1]: *** [sub-src-install_subtargets] Error 2
make[1]: Leaving directory '/data/open_source/qt-everywhere-opensource-src-5.6.0/qtimageformats'
Makefile:159: recipe for target 'module-qtimageformats-install_subtargets' failed
make: *** [module-qtimageformats-install_subtargets] Error 2
未解待解
注:虽然报错了,但在安装目录下也安装了库,可当作安装成功,暂跳过此步,实验证明库可以正常使用,可能未安装完全而已。继续下面的操作,回来再解。
编写测试程序如下:
$ vi qt_ts.cpp
#include <QApplication>
#include <QWidget>
#include <QLabel>
#include <QSlider>
#include <QHBoxLayout>

int main(int argc, char **argv)
{
	QApplication app(argc, argv);
	QWidget *window  = new QWidget;
	window->setWindowTitle("I am a slider");

	QLabel *label = new QLabel;		// QLabel控件,用于显示数字
	QSlider *slider = new QSlider(Qt::Horizontal);		// 滑动条
	slider->setRange(0, 100);

	QObject::connect(slider, SIGNAL(valueChanged(int)), label, SLOT(setNum(int)));
	slider->setValue(50);

	QHBoxLayout *layout = new QHBoxLayout;	//level
	layout->addWidget(label);
	layout->addWidget(slider);
	window->setLayout(layout);

	window->resize(400, 240);

	window->show();

	return app.exec();
}
可先在PC端测试:(若ubuntu未安装qt则跳过此步)
$ qmake –project
$ vi qt_ts.pro
在qt_ts.pro中加入一行:QT += widgets
$ qmake
$ make
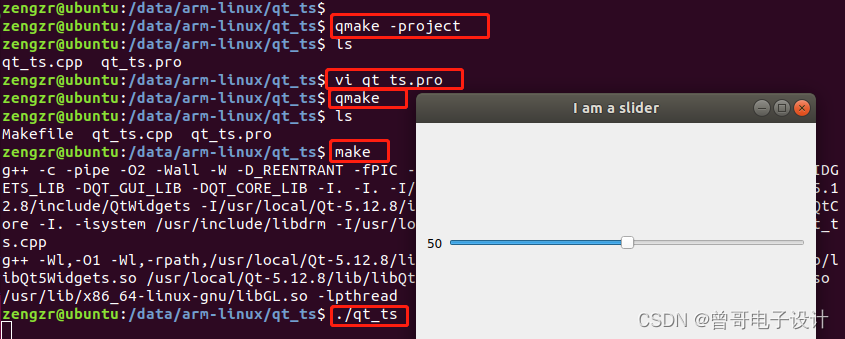
PC端验证成功!
3.2 交叉编译
qmake用交叉编译出来的库的bin目录下的,如/data/arm-linux/libs/qt-5.6.0-arm/bin/qmake
相同的步骤:
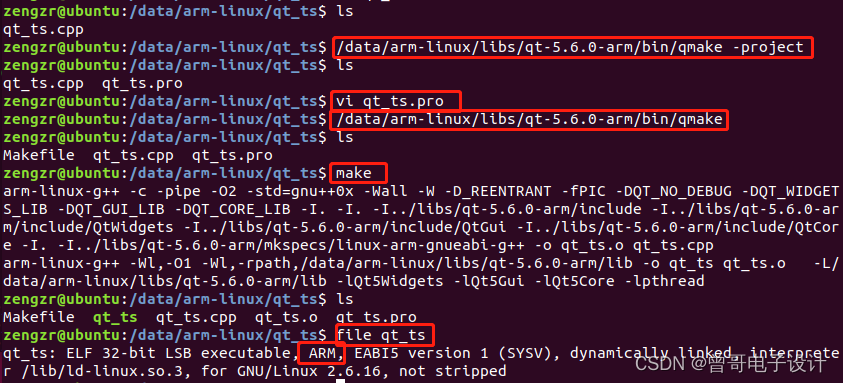
最后编译出来的可执行文件为qt_ts,通过file命令可知其是ARM格式的。
交叉编译出来的QT库有以下目录:
bin doc include lib mkspecs plugins将交叉编译出来的库移植到开发板的/lib目录下,或其他目录(需设置环境变量LD_LIBRARY_PATH)。
如将整个库qt-5.6.0-arm(或lib和plugins)移到开发板的/lib/下,并命名为qt-5.6.0。
Qt库在开发板下的路径:/lib/qt-5.6.0
编译程序时要链接的为.so动态库文件,在lib目录下,因此配置环境变量:
$ export LD_LIBRARY_PATH=$LD_LIBRARY_PATH: /lib/qt-5.6.0/lib
将测试程序qt_ts也放于开发板上。
移植好库及设置好环境变量后,运行程序:
[root@GEC210 mnt]#./qt_ts
This application failed to start because it could not find or load the Qt platform plugin "xcb"
in "".

Reinstalling the application may fix this problem.
Aborted
这是因为运行环境还没有配置好,详见下节。
在/etc/profile中添加以下环境变量:
不带触摸屏tslib的:
# qt-lib environment variables

export QT_ROOT=/lib/qt-5.6.0

export LD_LIBRARY_PATH=$LD_LIBRARY_PATH:$QT_ROOT/lib/

export QT_QPA_PLATFORM_PLUGIN_PATH=$QT_ROOT/plugins

export QT_QPA_PLATFORM=linuxfb:tty=/dev/fb0

export QT_QPA_FONTDIR=/usr/share/fonts/SourceHanSans带触摸屏tslib的:
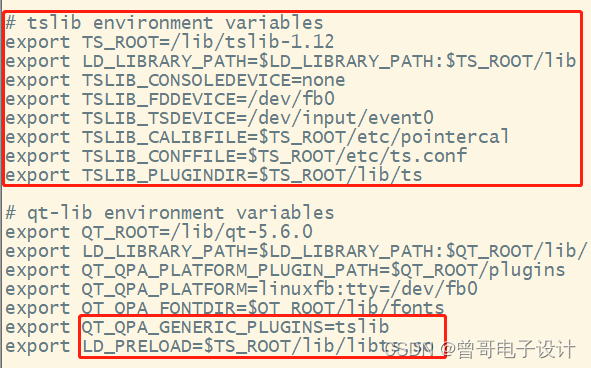
# qt-lib environment variables
export QT_ROOT=/lib/qt-5.6.0
export LD_LIBRARY_PATH=$LD_LIBRARY_PATH:$QT_ROOT/lib/
export QT_QPA_PLATFORM_PLUGIN_PATH=$QT_ROOT/plugins
export QT_QPA_PLATFORM=linuxfb:tty=/dev/fb0
export QT_QPA_FONTDIR=/usr/share/fonts/SourceHanSans
export QT_QPA_GENERIC_PLUGINS=tslib
export LD_PRELOAD=$TS_ROOT/lib/libts.so
其中,QT_QPA_FONTDIR项,指定字体,为/usr/share/fonts/下某一字体,请检查该目录文件是否存在字体,若无则可从其他路径复制过来。PS: 附件有提供该文件。
否则,可能出现如下错误:找不到字体
QFontDatabase: Cannot find font directory /lib/qt-5.12.8/lib/fonts.
Note that Qt no longer ships fonts. Deploy some (from https://dejavu-fonts.github.io/ for example) or switch to fontconfig.
QFontDatabase: Cannot find font directory /lib/qt-5.12.8/lib/fonts.
Note that Qt no longer ships fonts. Deploy some (from https://dejavu-fonts.github.io/ for example) or switch to fontconfig.
QFontDatabase: Cannot find font directory /lib/qt-5.12.8/lib/fonts.
Note that Qt no longer ships fonts. Deploy some (from https://dejavu-fonts.github.io/ for example) or switch to fontconfig.
注意,包含了tslib的变量,请自行修改为对应的路径,如下:
配置好环境后,更新:
#source /etc/profile
重新运行测试程序:
#./qt_ts
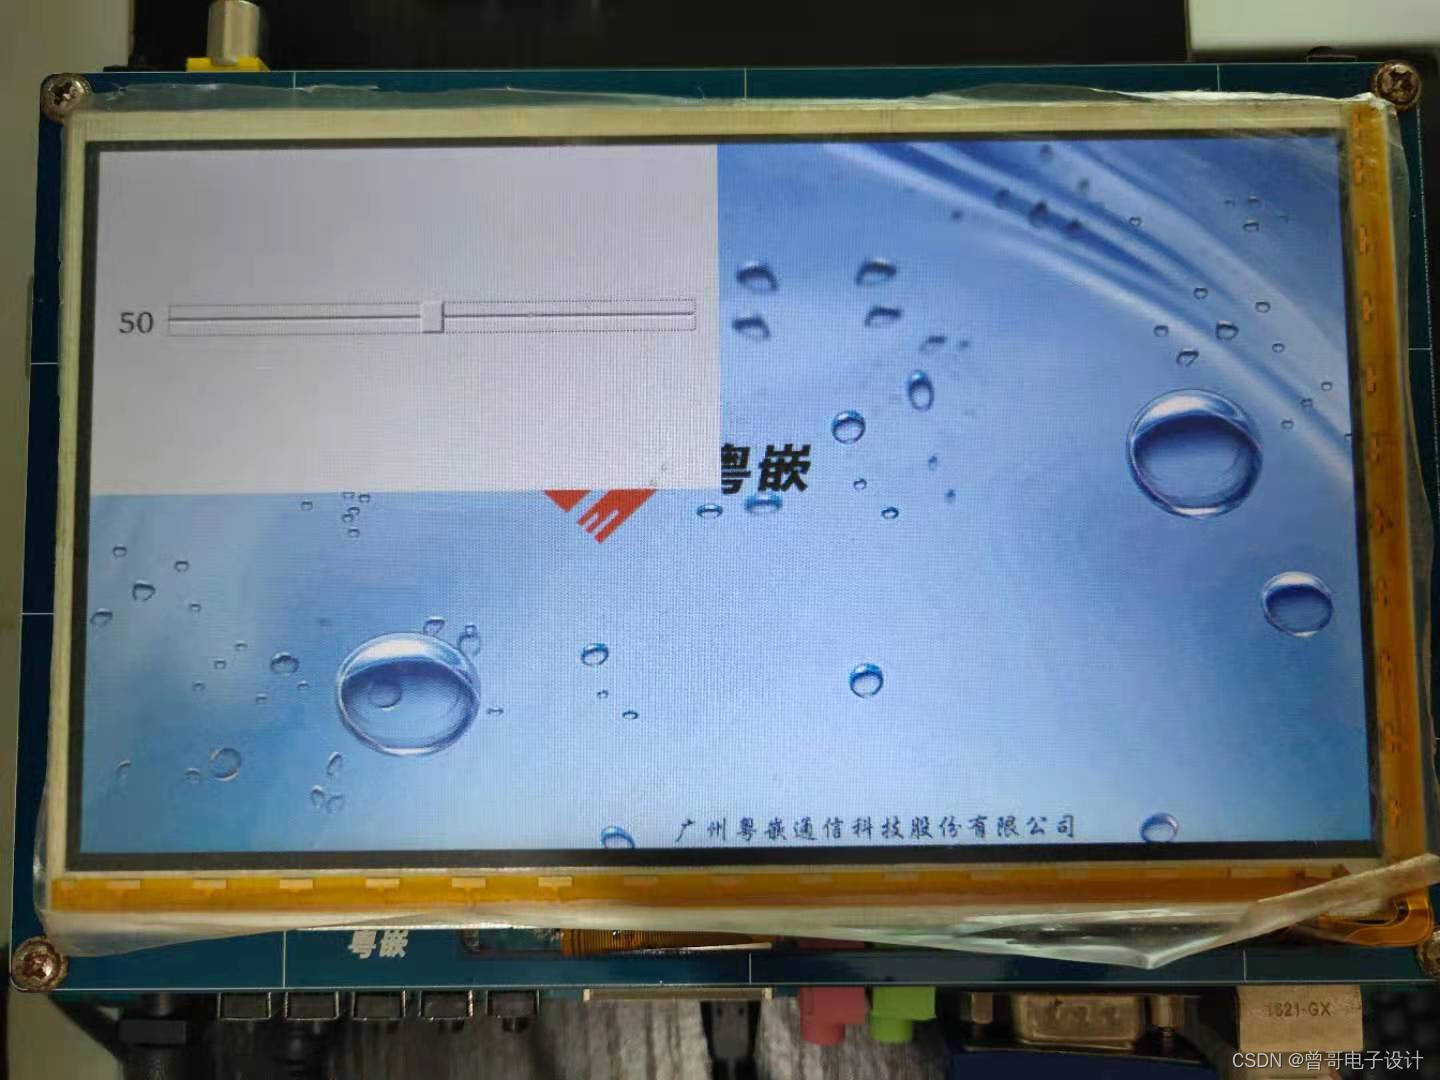
用手操控滑动条是可以的,成功!
若QT插件出现问题,如:
This application failed to start because it could not find or load the Qt platform plugin "linuxfb"
in "/lib/qt-5.6.0/plugins".

Available platform plugins are: linuxfb, minimal, offscreen.

Reinstalling the application may fix this problem.
可通过以下变量来调试追踪:
$ export QT_DEBUG_PLUGINS=1
QFactoryLoader::QFactoryLoader() checking directory path "/face_sys/platforms" ...
loaded library "/lib/qt-5.6.0/plugins/platforms/libqlinuxfb.so"
QLibraryPrivate::loadPlugin failed on "/lib/qt-5.6.0/plugins/platforms/libqlinuxfb.so" : "Cannot load library /lib/qt-5.6.0/plugins/platforms/libqlinuxfb.so: (libts.so.0: cannot open shared object file: No such file or directory)"
This application failed to start because it could not find or load the Qt platform plugin "linuxfb"
in "/lib/qt-5.6.0/plugins".

Available platform plugins are: linuxfb, minimal, offscreen.

Reinstalling the application may fix this problem.
由上可知:缺少libts.so.0库,补上即可。
我试过重新启动apache,缓存的页面仍然出现,所以一定有一个文件夹在某个地方。我没有“公共(public)/缓存”,那么我还应该查看哪些其他地方?是否有一个URL标志也可以触发此效果? 最佳答案 您需要触摸一个文件才能清除phusion,例如:touch/webapps/mycook/tmp/restart.txt参见docs 关于ruby-如何在Ubuntu中清除RubyPhusionPassenger的缓存?,我们在StackOverflow上找到一个类似的问题:
我不知道为什么,但是当我设置这个设置时它无法编译设置:static_cache_control,[:public,:max_age=>300]这是我得到的syntaxerror,unexpectedtASSOC,expecting']'(SyntaxError)set:static_cache_control,[:public,:max_age=>300]^我只想将“过期”header设置为css、javaascript和图像文件。谢谢。 最佳答案 我猜您使用的是Ruby1.8.7。Sinatra文档中显示的语法似乎是在Ruby1.
之前在培训新生的时候,windows环境下配置opencv环境一直教的都是网上主流的vsstudio配置属性表,但是这个似乎对新生来说难度略高(虽然个人觉得完全是他们自己的问题),加之暑假之后对cmake实在是爱不释手,且这样配置确实十分简单(其实都不需要配置),故斗胆妄言vscode下配置CV之法。其实极为简单,图比较多所以很长。如果你看此文还配不好,你应该思考一下是不是自己的问题。闲话少说,直接开始。0.CMkae简介有的人到大二了都不知道cmake是什么,我不说是谁。CMake是一个开源免费并且跨平台的构建工具,可以用简单的语句来描述所有平台的编译过程。它能够根据当前所在平台输出对应的m
在前面两节的例子中,主界面窗口的尺寸和标签控件显示的矩形区域等,都是用C++代码编写的。窗口和控件的尺寸都是预估的,控件如果多起来,那就不好估计每个控件合适的位置和大小了。用C++代码编写图形界面的问题就是不直观,因此Qt项目开发了专门的可视化图形界面编辑器——QtDesigner(Qt设计师)。通过QtDesigner就可以很方便地创建图形界面文件*.ui,然后将ui文件应用到源代码里面,做到“所见即所得”,大大方便了图形界面的设计。本节就演示一下QtDesigner的简单使用,学习拖拽控件和设置控件属性,并将ui文件应用到Qt程序代码里。使用QtDesigner设计界面在开始菜单中找到「Q
在VMware16.2.4安装Ubuntu一、安装VMware1.打开VMwareWorkstationPro官网,点击即可进入。2.进入后向下滑动找到Workstation16ProforWindows,点击立即下载。3.下载完成,文件大小615MB,如下图:4.鼠标右击,以管理员身份运行。5.点击下一步6.勾选条款,点击下一步7.先勾选,再点击下一步8.去掉勾选,点击下一步9.点击下一步10.点击安装11.点击许可证12.在百度上搜索VM16许可证,复制填入,然后点击输入即可,亲测有效。13.点击完成14.重启系统,点击是15.双击VMwareWorkstationPro图标,进入虚拟机主
需求:要创建虚拟机,就需要给他提供一个虚拟的磁盘,我们就在/opt目录下创建一个10G大小的raw格式的虚拟磁盘CentOS-7-x86_64.raw命令格式:qemu-imgcreate-f磁盘格式磁盘名称磁盘大小qemu-imgcreate-f磁盘格式-o?1.创建磁盘qemu-imgcreate-fraw/opt/CentOS-7-x86_64.raw10G执行效果#ls/opt/CentOS-7-x86_64.raw2.安装虚拟机使用virt-install命令,基于我们提供的系统镜像和虚拟磁盘来创建一个虚拟机,另外在创建虚拟机之前,提前打开vnc客户端,在创建虚拟机的时候,通过vnc
最近因为项目需要,需要将Android手机系统自带的某个系统软件反编译并更改里面某个资源,并重新打包,签名生成新的自定义的apk,下面我来介绍一下我的实现过程。APK修改,分为以下几步:反编译解包,修改,重打包,修改签名等步骤。安卓apk修改准备工作1.系统配置好JavaJDK环境变量2.需要root权限的手机(针对系统自带apk,其他软件免root)3.Auto-Sign签名工具4.apktool工具安卓apk修改开始反编译本文拿Android系统里面的Settings.apk做demo,具体如何将apk获取出来在此就不过多介绍了,直接进入主题:按键win+R输入cmd,打开命令窗口,并将路
我正在运行Ubuntu11.10并像这样安装Ruby1.9:$sudoapt-getinstallruby1.9rubygems一切都运行良好,但ri似乎有空文档。ri告诉我文档是空的,我必须安装它们。我执行此操作是因为我读到它会有所帮助:$rdoc--all--ri现在,当我尝试打开任何文档时:$riArrayNothingknownaboutArray我搜索的其他所有内容都是一样的。 最佳答案 这个呢?apt-getinstallri1.8编辑或者试试这个:(非rvm)geminstallrdocrdoc-datardoc-da
我试图在Ubuntu14.04中使用Curl安装RVM。我运行了以下命令:\curl-sSLhttps://get.rvm.io|bash-sstable出现如下错误:curl:(7)Failedtoconnecttoget.rvm.ioport80:Networkisunreachable非常感谢解决此问题的任何帮助。谢谢 最佳答案 在执行curl之前尝试这个:echoipv4>>~/.curlrc 关于ruby-在Ubuntu14.04中使用Curl安装RVM时出错,我们在Stack
是否有适用于Ruby语言的.NETFramework编译器?我听说过DLR(动态语言运行时),这是否将使Ruby能够用于.NET开发? 最佳答案 IronRuby是Microsoft支持的项目,建立在动态语言运行时之上。 关于.net-是否有Ruby.NET编译器?,我们在StackOverflow上找到一个类似的问题: https://stackoverflow.com/questions/199638/