正如上图所显示的一样,我们改如何控制一行显示几个图形呢?
首先第一种方法,数量少的可以自己一行一行的写,但是当数据很多的时候呢?
这时候就需要我们区使用循环进行代码的编写。废话不多数,直接写代码。
.demo-item{
width: 40%;
}
.demo-item .screen-data{
padding: 10rpx;
text-align: center;
}
json文件
{
“navigationStyle”: “custom”,
“navigationBarTextStyle”: “white”,
“usingComponents”: {
“tabchange”: “/components/tabchange/index”,
“search-bar”: “/base-ui/ms-search-bar/index”,
“ms-add-btn”: “/base-ui/ms-add-btn/index”,
“van-tab”: “@vant/weapp/tab/index”,
“van-tabs”: “@vant/weapp/tabs/index”,
“ms-main-navbar”: “/base-ui/ms-main-navbar/index”,
“van-sticky”: “@vant/weapp/sticky/index”,
“van-icon”: “@vant/weapp/icon/index”,
“form-item”: “/components/form-item/index”,
“van-popup”: “@vant/weapp/popup/index”,
“ms-button”: “/base-ui/ms-button/index”
}
}
js文件
 /**
     * 页面的初始数据
     */
    data: {
        Authorization: "",
        taskDetailParams: {
            "currentPage": 1,
            "filters": {
                "status": ""
            },
            "orderBys": [],
            "pageSize": 10
        },
        // navigationBarAndStatusBarHeight: 0,

        dataitem: {
            name: "数据",
            faren: "王五"
        },
        active: 0,
        totalCount: 0,
        tabs: ['全部', '入库', '出库'],
        tabIndex: 0,
        //状态栏高度
        statusBarHeight: Cache.getCacheSync(STATUSBARHEIGHT),
        //导航栏高度
        navigationBarHeight: Cache.getCacheSync(MENUBUTTONHEIGHT),
        //胶囊按钮的高度
        menuButtonHeight: Cache.getCacheSync(NAVIGATIONBARHEIGHT),
        //状态栏加导航栏高度
        navigationBarAndStatusBarHeight: Cache.getCacheSync(NAVIGATIONBARANDSTATUSBARHEIGHT),
        SAFEBOTTOM: Cache.getCacheSync(SAFEBOTTOM),

        filter:false,
        changecolor:[
          {name:'借入',changecolor:false},
          {name:'借出归还',changecolor:false},
          {name:'来料加工',changecolor:false},
          {name:'借出归还',changecolor:false},
          {name:'借出',changecolor:false},
          {name:'退料',changecolor:false},
        ]
    },


    onClose(){
      this.setData({
        filter:false
      })
    },
    changecolor(e){
      console.log(e,1)
      let sum=parseInt(e.currentTarget.dataset.item)
      console.log(typeof(sum))
      console.log(this.data.changecolor[sum].changecolor)
      this.data.changecolor.map((i,index)=>{
        console.log(i)
        this.setData({
          ['changecolor['+index+'].changecolor']:false
        })
      })
       this.setData({
        ['changecolor['+sum+'].changecolor']:true
       })
       console.log(this.data.changecolor)
    },
    queren(){
       this.setData({
         filter:false
       })
    },
    cancel(){
       this.setData({
         filter:false
       })
    },
    filter(){
       this.setData({
         filter:true
       })
    },
<van-popup show="{{ filter }}" position="right" custom-style="height: 100%; width:60%;padding-top:{{navigationBarAndStatusBarHeight+50}}px;" bind:close="onClose" catchtouchmove='ture'>
<view>
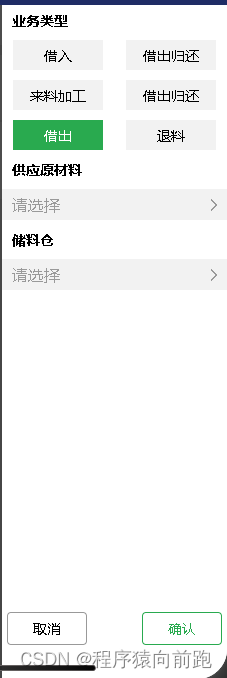
<view class="margin-left-10 margin-top-10 font-size-14" style="font-weight: 700;">业务类型</view>
<!-- <view wx:for="{{changecolor}}">
<view class="flex jc-around margin-top-10">
<view class="padding-10 font-size-14" style="background-color:{{changecolor[index].changecolor?'#29AA4F':'#F2F2F2'}};color:{{changecolor[index].changecolor?'white':'black'}};" bindtap="changecolor" data-item="{{index}}">{{changecolor[index].name}}</view>
</view>
<view class="flex jc-around margin-top-10">
<view class="padding-10 font-size-14" style="background-color: #F2F2F2;" bindtap="changecolor"
style="background-color:{{changecolor[2].changecolor?'#29AA4F':'#F2F2F2'}};color:{{changecolor[2].changecolor?'white':'black'}};"
bindtap="changecolor" data-item="2">现款合同</view>
<view class="padding-10 font-size-14" style="background-color: #F2F2F2;" bindtap="changecolor"
style="background-color:{{changecolor[3].changecolor?'#29AA4F':'#F2F2F2'}};color:{{changecolor[3].changecolor?'white':'black'}};"
bindtap="changecolor" data-item="3">来料合同</view>
</view>
</view> -->
<block wx:for="{{changecolor.length/2}}" wx:for-index="i" wx:for-key="{{i}}" wx:key="i">
<view class="flex jc-around margin-top-10">
<!--每行循序2次,index参数赋值在j变量上-->
<block wx:for="{{2}}" wx:for-index="j" wx:for-item="item_j" wx:for-key="key_j" wx:key="j">
<!--此时数据的条数为i*2+j行数*2+第几行-->
<block wx:if="{{changecolor[i*2+j].name}}">
<view class="demo-item">
<view class="screen-data font-size-14" data-item="{{i*2+j}}" style="background-color:{{changecolor[i*2+j].changecolor?'#29AA4F':'#F2F2F2'}};color:{{changecolor[i*2+j].changecolor?'white':'black'}};"
bindtap="changecolor">{{changecolor[i*2+j].name}}</view>
</view>
</block>
</block>
</view>
</block>
</view>
<view class="margin-top-10">
<view class="margin-left-10 font-size-14" style="font-weight: 700;">供应原材料</view>
<view class="flex jc-between grey padding-left-10 padding-top-5 padding-bottom-5 padding-right-5 margin-top-10" style="background-color: #F2F2F2;">
<view>请选择</view>
<van-icon name="arrow" />
</view>
</view>
<view class="margin-top-10">
<view class="margin-left-10 font-size-14" style="font-weight: 700;">储料仓</view>
<view class="flex jc-between grey padding-left-10 padding-top-5 padding-bottom-5 padding-right-5 margin-top-10" style="background-color: #F2F2F2;">
<view>请选择</view>
<van-icon name="arrow" />
</view>
</view>
<view class="flex jc-between" style="position: fixed; width: 100%; bottom: 0; padding-bottom:{{SAFEBOTTOM}}px;">
<ms-button buttonType="ms-grey" class="margin-left-5" bindtap="cancel">取消</ms-button>
<ms-button buttonType="ms-green" class="margin-right-5" bindtap="queren">确认</ms-button>
</view>
</van-popup>
其中控制循环的代码就是下面这一部分
<block wx:for="{{changecolor.length/2}}" wx:for-index="i" wx:for-key="{{i}}" wx:key="i">
        <view class="flex jc-around margin-top-10">
          <!--每行循序2次,index参数赋值在j变量上-->
          <block wx:for="{{2}}" wx:for-index="j" wx:for-item="item_j" wx:for-key="key_j" wx:key="j">
            <!--此时数据的条数为i*2+j行数*2+第几行-->
            <block wx:if="{{changecolor[i*2+j].name}}">
              <view class="demo-item">
                <view class="screen-data font-size-14" data-item="{{i*2+j}}" style="background-color:{{changecolor[i*2+j].changecolor?'#29AA4F':'#F2F2F2'}};color:{{changecolor[i*2+j].changecolor?'white':'black'}};"
             bindtap="changecolor">{{changecolor[i*2+j].name}}</view>
              </view>
            </block>
          </block>
        </view>
      </block>
我正在学习如何使用Nokogiri,根据这段代码我遇到了一些问题:require'rubygems'require'mechanize'post_agent=WWW::Mechanize.newpost_page=post_agent.get('http://www.vbulletin.org/forum/showthread.php?t=230708')puts"\nabsolutepathwithtbodygivesnil"putspost_page.parser.xpath('/html/body/div/div/div/div/div/table/tbody/tr/td/div
总的来说,我对ruby还比较陌生,我正在为我正在创建的对象编写一些rspec测试用例。许多测试用例都非常基础,我只是想确保正确填充和返回值。我想知道是否有办法使用循环结构来执行此操作。不必为我要测试的每个方法都设置一个assertEquals。例如:describeitem,"TestingtheItem"doit"willhaveanullvaluetostart"doitem=Item.new#HereIcoulddotheitem.name.shouldbe_nil#thenIcoulddoitem.category.shouldbe_nilendend但我想要一些方法来使用
关闭。这个问题是opinion-based.它目前不接受答案。想要改进这个问题?更新问题,以便editingthispost可以用事实和引用来回答它.关闭4年前。Improvethisquestion我想在固定时间创建一系列低音和高音调的哔哔声。例如:在150毫秒时发出高音调的蜂鸣声在151毫秒时发出低音调的蜂鸣声200毫秒时发出低音调的蜂鸣声250毫秒的高音调蜂鸣声有没有办法在Ruby或Python中做到这一点?我真的不在乎输出编码是什么(.wav、.mp3、.ogg等等),但我确实想创建一个输出文件。
给定这段代码defcreate@upgrades=User.update_all(["role=?","upgraded"],:id=>params[:upgrade])redirect_toadmin_upgrades_path,:notice=>"Successfullyupgradeduser."end我如何在该操作中实际验证它们是否已保存或未重定向到适当的页面和消息? 最佳答案 在Rails3中,update_all不返回任何有意义的信息,除了已更新的记录数(这可能取决于您的DBMS是否返回该信息)。http://ar.ru
我在我的项目目录中完成了compasscreate.和compassinitrails。几个问题:我已将我的.sass文件放在public/stylesheets中。这是放置它们的正确位置吗?当我运行compasswatch时,它不会自动编译这些.sass文件。我必须手动指定文件:compasswatchpublic/stylesheets/myfile.sass等。如何让它自动运行?文件ie.css、print.css和screen.css已放在stylesheets/compiled。如何在编译后不让它们重新出现的情况下删除它们?我自己编译的.sass文件编译成compiled/t
我脑子里浮现出一些关于一种新编程语言的想法,所以我想我会尝试实现它。一位friend建议我尝试使用Treetop(Rubygem)来创建一个解析器。Treetop的文档很少,我以前从未做过这种事情。我的解析器表现得好像有一个无限循环,但没有堆栈跟踪;事实证明很难追踪到。有人可以指出入门级解析/AST指南的方向吗?我真的需要一些列出规则、常见用法等的东西来使用像Treetop这样的工具。我的语法分析器在GitHub上,以防有人希望帮助我改进它。class{initialize=lambda(name){receiver.name=name}greet=lambda{IO.puts("He
我有多个ActiveRecord子类Item的实例数组,我需要根据最早的事件循环打印。在这种情况下,我需要打印付款和维护日期,如下所示:ItemAmaintenancerequiredin5daysItemBpaymentrequiredin6daysItemApaymentrequiredin7daysItemBmaintenancerequiredin8days我目前有两个查询,用于查找maintenance和payment项目(非排他性查询),并输出如下内容:paymentrequiredin...maintenancerequiredin...有什么方法可以改善上述(丑陋的)代
我正在寻找执行以下操作的正确语法(在Perl、Shell或Ruby中):#variabletoaccessthedatalinesappendedasafileEND_OF_SCRIPT_MARKERrawdatastartshereanditcontinues. 最佳答案 Perl用__DATA__做这个:#!/usr/bin/perlusestrict;usewarnings;while(){print;}__DATA__Texttoprintgoeshere 关于ruby-如何将脚
Rackup通过Rack的默认处理程序成功运行任何Rack应用程序。例如:classRackAppdefcall(environment)['200',{'Content-Type'=>'text/html'},["Helloworld"]]endendrunRackApp.new但是当最后一行更改为使用Rack的内置CGI处理程序时,rackup给出“NoMethodErrorat/undefinedmethod`call'fornil:NilClass”:Rack::Handler::CGI.runRackApp.newRack的其他内置处理程序也提出了同样的反对意见。例如Rack
在选择我想要运行操作的频率时,唯一的选项是“每天”、“每小时”和“每10分钟”。谢谢!我想为我的Rails3.1应用程序运行调度程序。 最佳答案 这不是一个优雅的解决方案,但您可以安排它每天运行,并在实际开始工作之前检查日期是否为当月的第一天。 关于ruby-如何每月在Heroku运行一次Scheduler插件?,我们在StackOverflow上找到一个类似的问题: https://stackoverflow.com/questions/8692687/