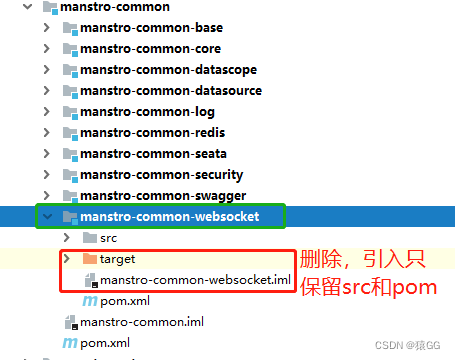
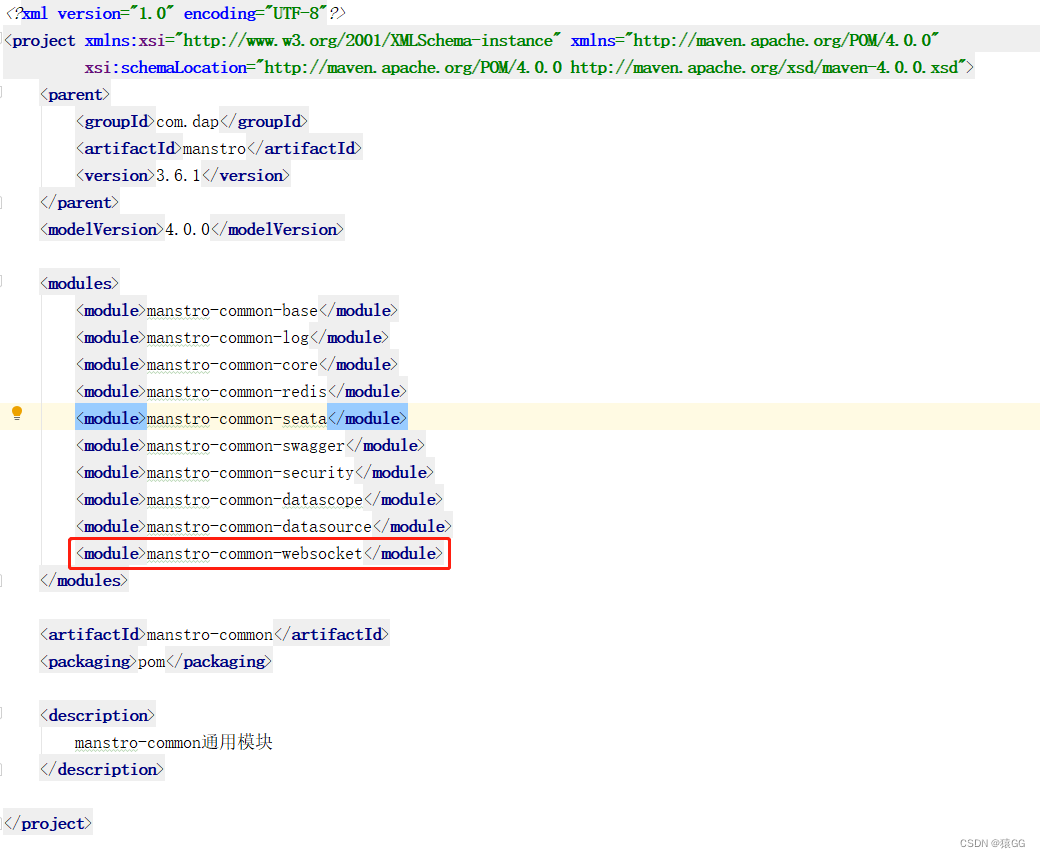
可以复制一份本模块其他的子模块,把除了src和pom之外的文件全删除
<!--websocket-->
<dependency>
   <groupId>org.springframework.boot</groupId>
   <artifactId>spring-boot-starter-websocket</artifactId>
</dependency>
import org.springframework.context.annotation.Bean;
import org.springframework.context.annotation.Configuration;
import org.springframework.web.socket.server.standard.ServerEndpointExporter;

@Configuration
public class WebSocketConfig {
    @Bean
    public ServerEndpointExporter serverEndpointExporter() {
        return new ServerEndpointExporter();
    }
}
import org.slf4j.Logger;
import org.slf4j.LoggerFactory;
import org.springframework.stereotype.Component;
import javax.websocket.*;
import javax.websocket.server.PathParam;
import javax.websocket.server.ServerEndpoint;
import java.io.IOException;
import java.util.concurrent.CopyOnWriteArraySet;

/**
 * @ Description:
 * @ ServerEndpoint 注解是一个类层次的注解,它的功能主要是将目前的类定义成一个websocket服务器端,
 * 注解的值将被用于监听用户连接的终端访问URL地址,客户端可以通过这个URL来连接到WebSocket服务器端
 */
@Component
@ServerEndpoint("/api/websocket/{sid}")
public class WebSocketServer {

    private static final Logger log = LoggerFactory.getLogger(WebSocketServer.class);
    //静态变量,用来记录当前在线连接数。应该把它设计成线程安全的。
    private static int onlineCount = 0;
    //concurrent包的线程安全Set,用来存放每个客户端对应的MyWebSocket对象。
    private static CopyOnWriteArraySet<WebSocketServer> webSocketSet = new CopyOnWriteArraySet<WebSocketServer>();

    //与某个客户端的连接会话,需要通过它来给客户端发送数据
    private Session session;

    //接收sid
    private String sid = "";

    /**
     * 连接建立成功调用的方法
     */
    @OnOpen
    public void onOpen(Session session, @PathParam("sid") String sid) {
        this.session = session;
        webSocketSet.add(this);     //加入set中
        this.sid = sid;
        addOnlineCount();           //在线数加1
        try {
            sendMessage("conn_success");
            log.info("有新窗口开始监听:[ " + sid + " ],当前在线人数为:" + getOnlineCount());
        } catch (IOException e) {
            log.error("websocket IO Exception");
        }
    }

    /**
     * 连接关闭调用的方法
     */
    @OnClose
    public void onClose() {
        webSocketSet.remove(this);  //从set中删除
        subOnlineCount();              //在线数减1
        //断开连接情况下,更新主板占用情况为释放
        log.info("释放的sid为:"+sid);
        //这里写你 释放的时候,要处理的业务
        log.info("有一连接关闭!当前在线人数为" + getOnlineCount());

    }

    /**
     * 收到客户端消息后调用的方法
     * @ Param message 客户端发送过来的消息
     */
    @OnMessage
    public void onMessage(String message, Session session) {
        log.info("收到来自窗口[ " + sid + " ]的信息:" + message);
        //群发消息测试,处理收到消息的业务逻辑
        try {
            sendInfo(Math.random()+"ml",sid);
        } catch (Exception e) {
            e.printStackTrace();
        }

    }

    /**
     * @ Param session
     * @ Param error
     */
    @OnError
    public void onError(Session session, Throwable error) {
        log.error("websocket 发生错误");
        error.printStackTrace();
    }

    /**
     * 群发消息
     */
    public void sendMessage(String message) throws IOException {
        this.session.getBasicRemote().sendText(message);
    }

    /**
     * 判断sid发送消息
     */
    public static void sendInfo(String message,  String sid) throws IOException {
        log.info("推送消息到窗口[ " + sid + " ],推送内容:" + message);
        for (WebSocketServer item : webSocketSet) {
            try {
                //这里可以设定只推送给这个sid的,为null则全部推送
                if (sid == null) {
                // item.sendMessage(message);
                } else if (item.sid.equals(sid)) {
                    item.sendMessage(message);
                }
            } catch (IOException e) {
                continue;
            }
        }
    }

    public static synchronized int getOnlineCount() {
        return onlineCount;
    }

    public static synchronized void addOnlineCount() {
        WebSocketServer.onlineCount++;
    }

    public static synchronized void subOnlineCount() {
        WebSocketServer.onlineCount--;
    }

    public static CopyOnWriteArraySet<WebSocketServer> getWebSocketSet() {
        return webSocketSet;
    }
}
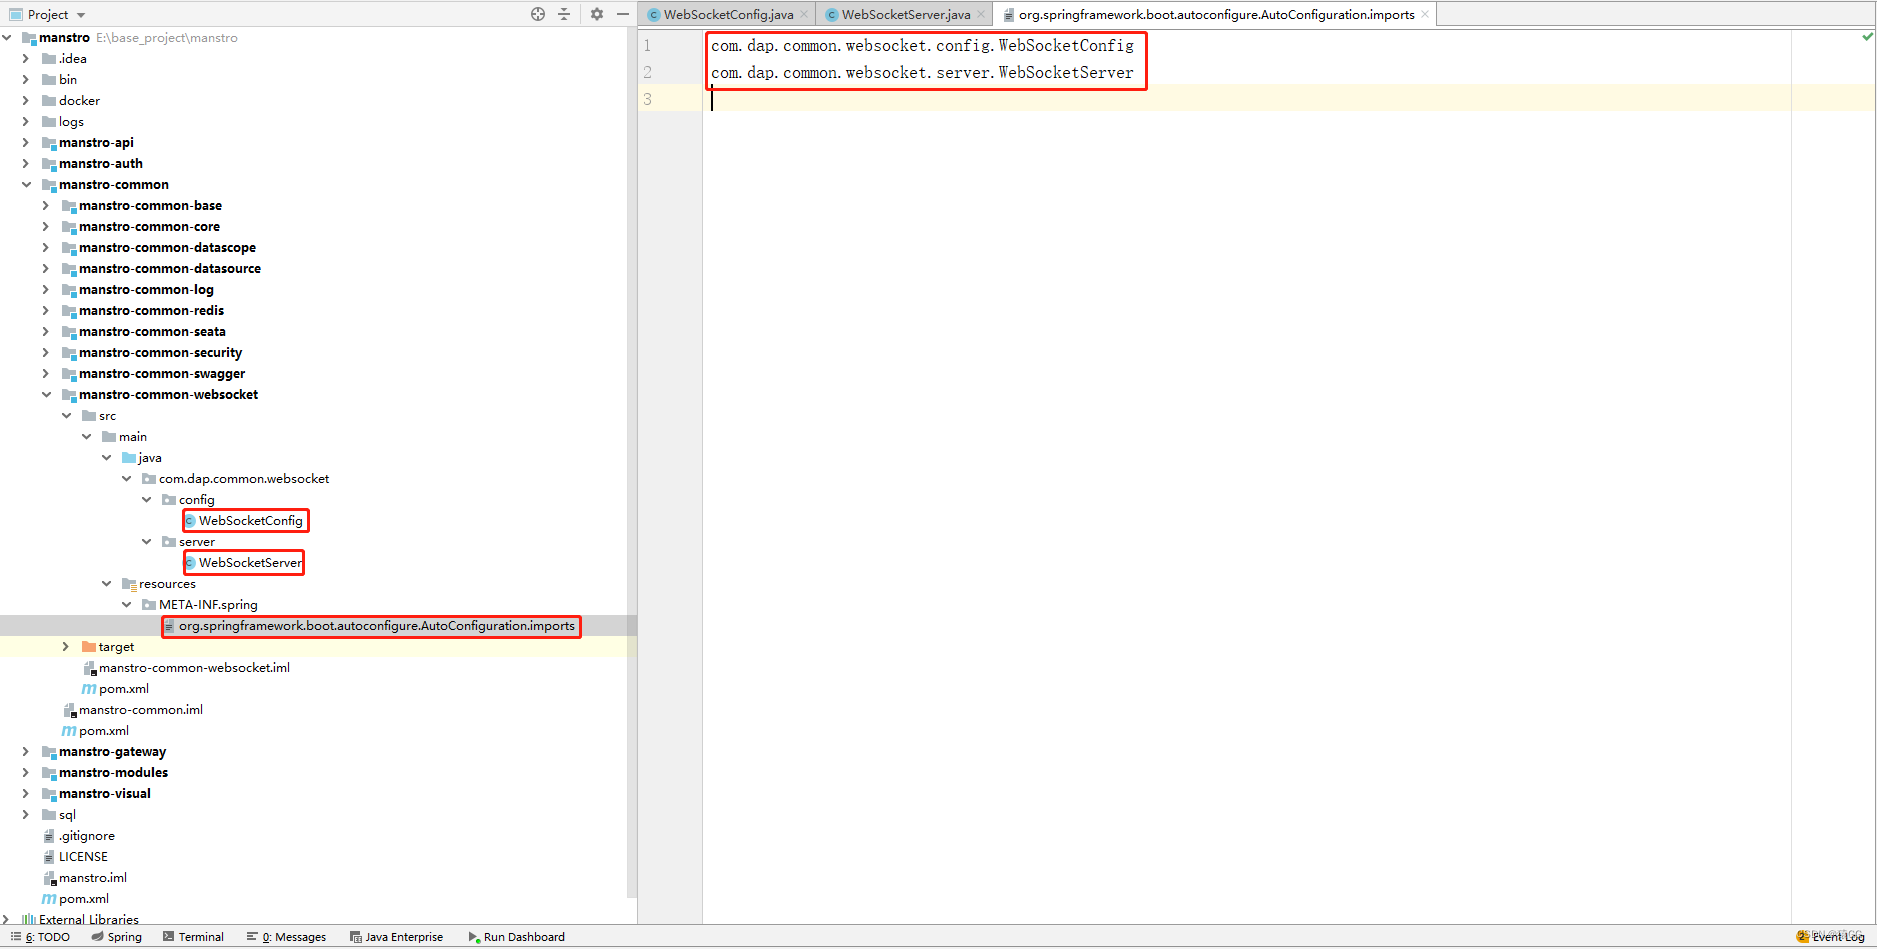
在resources\META-INF\spring文件夹下的org.springframework.boot.autoconfigure.AutoConfiguration.imports文件中配置以上两个类
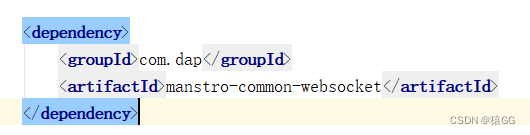
1.在modules-system模块下引入pom,
2.在gateway网关配置文件中配置路径白名单
3.到此就可以直接在websocket在线测试网站中自行测试了,
测试地址为:网关IP:端口/网关中配置的system模块路由/api/websocket/{sid}
或者直接访问system模块:system模块IP:端口/api/websocket/{sid}

<!-- websocket测试  start -->
  <div>
    <el-row :gutter="10" >
      <el-col :span="4" :xs="24">
         <el-button
            type="primary"
            size="mini"
            @click="send"
            >测试WebSocket
        </el-button>
      </el-col>
      <el-col :span="4" :xs="24">
        <div class="head-container">
            <el-input
              v-model="message"
              clearable
              size="small"
              style="margin-bottom: 20px"
            />
        </div>
      </el-col>
    </el-row>
  </div>
  <!-- websocket测试   end -->
//======websocket测试=======start
url: "ws://127.0.0.1:8080/system/api/websocket/message",
message: "",
ws: null,
//======websocket测试========end
//======websocket测试=======start
    join() {
      this.ws = new WebSocket(this.url);
      //非Vue所管理的函数,需要保存this
      const v_this = this;
      this.ws.onopen = function (event) {
        v_this.message = v_this.message + "已经打开连接!" + "\n";
      };
      this.ws.onmessage = function (event) {
        v_this.message = event.data + "\n";
      };
      this.ws.onclose = function (event) {
        v_this.message = v_this.message + "已经关闭连接!" + "\n";
      };
    },
    exit() {
      if (this.ws) {
        this.ws.close();
        this.ws = null;
      }
    },
    send() {
      if (this.ws) {
        this.ws.send(this.message);
      } else {
        alert("未连接到服务器");
      }
    },
//======websocket测试========end
我在app/helpers/sessions_helper.rb中有一个帮助程序文件,其中包含一个方法my_preference,它返回当前登录用户的首选项。我想在集成测试中访问该方法。例如,这样我就可以在测试中使用getuser_path(my_preference)。在其他帖子中,我读到这可以通过在测试文件中包含requiresessions_helper来实现,但我仍然收到错误NameError:undefinedlocalvariableormethod'my_preference'.我做错了什么?require'test_helper'require'sessions_hel
我一直很高兴地使用DelayedJob习惯用法:foo.send_later(:bar)这会调用DelayedJob进程中对象foo的方法bar。我一直在使用DaemonSpawn在我的服务器上启动DelayedJob进程。但是...如果foo抛出异常,Hoptoad不会捕获它。这是任何这些包中的错误...还是我需要更改某些配置...或者我是否需要在DS或DJ中插入一些异常处理来调用Hoptoad通知程序?回应下面的第一条评论。classDelayedJobWorker 最佳答案 尝试monkeypatchingDelayed::W
这篇文章是继上一篇文章“Observability:从零开始创建Java微服务并监控它(一)”的续篇。在上一篇文章中,我们讲述了如何创建一个Javaweb应用,并使用Filebeat来收集应用所生成的日志。在今天的文章中,我来详述如何收集应用的指标,使用APM来监控应用并监督web服务的在线情况。源码可以在地址 https://github.com/liu-xiao-guo/java_observability 进行下载。摄入指标指标被视为可以随时更改的时间点值。当前请求的数量可以改变任何毫秒。你可能有1000个请求的峰值,然后一切都回到一个请求。这也意味着这些指标可能不准确,你还想提取最小/
前置步骤我们都操作完了,这篇开始介绍jenkins的集成。话不多说,看操作1、登录进入jenkins后会让你选择安装插件,选择第一个默认的就行。安装完成后设置账号密码,重新登录。2、配置JDK和Git都需要执行路径,所以需要先把执行路径找到,先进入服务器的docker容器,2.1JDK的路径root@69eef9ee86cf:/usr/bin#echo$JAVA_HOME/usr/local/openjdk-82.2Git的路径root@69eef9ee86cf:/#whichgit/usr/bin/git3、先配置JDK和Git。点击:ManageJenkins>>GlobalToolCon
我有一个super简单的脚本,它几乎包含了FayeWebSocketGitHub页面上用于处理关闭连接的内容:ws=Faye::WebSocket::Client.new(url,nil,:headers=>headers)ws.on:opendo|event|p[:open]#sendpingcommand#sendtestcommand#ws.send({command:'test'}.to_json)endws.on:messagedo|event|#hereistheentrypointfordatacomingfromtheserver.pJSON.parse(event.d
我想在随机字符串前后添加一个空格。我试过使用"Random_string".center(1,"")但它不起作用。谢谢 最佳答案 我发现这是最优雅的解决方案:padded_string="#{random_string}"走简单的路没有错。 关于ruby-在ruby中的字符串前后添加空格?,我们在StackOverflow上找到一个类似的问题: https://stackoverflow.com/questions/3357897/
三分钟集成Tap防沉迷SDK(Unity版)一、SDK介绍基于国家对上线所有游戏必须增加防沉迷功能的政策下,TapTap推出防沉迷SDK,供游戏开发者进行接入;允许未成年用户在周五、六、日以及法定节假日晚上8:00-9:00进行游戏,防沉谜时间段进入游戏会弹窗进行提示!开发环境要求:Unity2019.4或更高版本iOS10或更高版本Android5.0(APIlevel21)或更高版本🔗Unity集成Demo参考链接🔗UnityTapSDK功能体验APK下载链接二、集成前准备1.创建应用进入开发者后台,按照提示开始创建应用;2.开通服务在使用TDS实名认证和防沉迷服务之前,需要在上面创建的应
IntrductionLibwebsocketsisasimple-to-use,MIT-license,pureClibraryprovidingclientandserverforhttp/1,http/2,websockets,MQTTandotherprotocolsinasecurity-minded,lightweight,configurable,scalableandflexibleway.It’seasytobuildandcross-buildviacmakeandissuitablefortasksfromembeddedRTOSthroughmasscloudservi
我被这个难住了。到目前为止教程中的一切都进行得很顺利,但是当我将这段代码添加到我的/spec/requests/users_spec.rb文件中时,事情开始变得糟糕:describe"success"doit"shouldmakeanewuser"dolambdadovisitsignup_pathfill_in"Name",:with=>"ExampleUser"fill_in"Email",:with=>"ryan@example.com"fill_in"Password",:with=>"foobar"fill_in"Confirmation",:with=>"foobar"cl
我需要一些指导来了解如何将Angular整合到rails中。选择Rails的原因:我喜欢他们偏执的做事方式。还有迁移,gem真的很酷。使用angular的原因:我正在研究和寻找最适合SPA的框架。Backbone似乎太抽象了。我不得不在Angular和Ember之间做出选择。我首先开始阅读Angular,它对我来说很有意义。所以我从来没有去读过关于ember的文章。使用Angular和Rails的原因:我研究并尝试使用小型框架,例如grape、slim(是的,我也使用php)。但我觉得需要坚持项目的长期范围。我个人喜欢用Rails的方式做事。这就是我需要帮助的地方,我在Rails4中有