


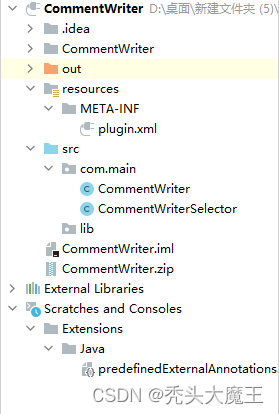
创建后的文件结构,CommentWriter是自己添加的
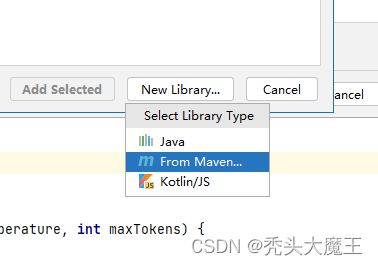
 开发准备,导入OKHttp(原生的http访问在打包后会报400错误,HttpClient访问的接口在参数一致的情况下获取的结果非常蠢,无法之间使用)



<idea-plugin>
    <id>com.main.CommentWriter</id>
    <name>CommentWriter</name>
    <description><![CDATA[
      Use the GPT create a auto comment writer.
    ]]></description>
    <version>1.5</version>
    <vendor email="" url=""></vendor>
    <change-notes><![CDATA[no.]]>
    </change-notes>

    <!-- please see https://plugins.jetbrains.com/docs/intellij/build-number-ranges.html for description -->
    <idea-version since-build="173.0"/>

    <!-- please see https://plugins.jetbrains.com/docs/intellij/plugin-compatibility.html
         on how to target different products -->
    <depends>com.intellij.modules.platform</depends>

    <extensions defaultExtensionNs="com.intellij">

    </extensions>
    <actions>
        <action id="AddCommentAction" class="com.main.CommentWriter" text="Add Comment">
            <add-to-group group-id="EditorPopupMenu" anchor="first"/>
        </action>
        <action id="AddCommentActionSelect" class="com.main.CommentWriterSelector" text="Add Comment To Select Code">
            <add-to-group group-id="EditorPopupMenu" anchor="first"/>
        </action>
    </actions>

</idea-plugin>
package com.main;

import com.google.gson.Gson;
import com.intellij.openapi.actionSystem.AnAction;
import com.intellij.openapi.actionSystem.AnActionEvent;
import com.intellij.openapi.actionSystem.LangDataKeys;
import com.intellij.openapi.application.ApplicationManager;
import com.intellij.openapi.editor.Editor;
import com.intellij.openapi.fileEditor.FileEditorManager;
import com.intellij.openapi.project.Project;
import com.intellij.openapi.wm.StatusBar;
import com.intellij.openapi.wm.WindowManager;
import net.minidev.json.JSONArray;
import net.minidev.json.JSONObject;
import net.minidev.json.JSONValue;
import okhttp3.*;

import java.io.*;
import java.util.HashMap;
import java.util.Map;
import java.util.concurrent.TimeUnit;

public class CommentWriter extends AnAction {


    @Override
    public void actionPerformed(AnActionEvent e) {
        Editor editor = e.getData(LangDataKeys.EDITOR); // 获取编辑器
        if (editor != null) {
            StatusBar statusBar = WindowManager.getInstance().getStatusBar(editor.getProject()); // 获取状态栏
            ApplicationManager.getApplication().runWriteAction(() -> {
                statusBar.setInfo("正在添加"); // 设置状态栏信息
                System.out.println(editor.getDocument().getText().length()); // 输出文本长度
                System.out.println(editor.getDocument().getText()); // 输出文本
                if (editor.getDocument().getText().length() < 2000) { // 判断文本长度是否小于2000
                    String code = Comment_4(editor.getDocument().getText()); // 调用Comment_4函数
                    System.out.println(code); // 输出code
                    if (code.length() >= editor.getDocument().getText().length()) { // 判断code长度是否大于等于文本长度
                        editor.getDocument().setText(code); // 设置文本
                    }
                    statusBar.setInfo("添加完毕"); // 设置状态栏信息
                } else {
                    statusBar.setInfo("选中的文本太长无法添加注释"); // 设置状态栏信息
                }
            });
        }
    }


    public static String Comment_4(String code) {
        // 获取需要输出的文本
        String prompt = "Please add Chinese comments above each line of the following Java code. Do not add comment symbols before import and package statements. Then return the complete code with comments. The code must not have fewer lines than the original." + code;
        // 调用generateText_3方法,获取返回的文本
        String result = generateText_3(prompt);
        // 解析JSON
        JSONObject jsonObject = (JSONObject) JSONValue.parse(result);
        JSONArray choices = (JSONArray) jsonObject.get("choices");
        JSONObject firstChoice = (JSONObject) choices.get(0);
        Object textObj = firstChoice.get("text");
        String textStr = textObj.toString();
        // 返回带中文注释的代码
        return textStr;
    }

    private static String generateText_3(String prompt) {
        // API相关参数
        String API_KEY = "替换成你自己的APIkey";
        String MODEL_ENDPOINT = "https://api.openai.com/v1/";
        String MODEL_NAME = "text-davinci-003";
        int MAX_TOKENS = 2048;
        double TEMPERATURE = 0;
        String response = "";
        try {
            // 创建OkHttpClient
            OkHttpClient client = new OkHttpClient.Builder()
                    .readTimeout(500, TimeUnit.SECONDS)
                    .build();
            // 创建RequestBody
            RequestBody requestBody = RequestBody.create(MediaType.parse("application/json"), createRequestBody(prompt, TEMPERATURE, MAX_TOKENS));
            // 创建Request
            Request request = new Request.Builder()
                    .url(MODEL_ENDPOINT + "engines/" + MODEL_NAME + "/completions")
                    .post(requestBody)
                    .addHeader("Content-Type", "application/json")
                    .addHeader("Authorization", "Bearer " + API_KEY).build();

            // 发送请求
            Response httpResponse = client.newCall(request).execute();
            // 判断请求是否成功
            if (httpResponse.isSuccessful()) {
                response = httpResponse.body().string();
            } else {
                throw new RuntimeException("Failed : HTTP error code : " + httpResponse.code());
            }
        } catch (IOException e) {
            e.printStackTrace();
        }
        // 返回响应
        return response;
    }

    private static String createRequestBody(String prompt, double temperature, int maxTokens) {
        // 创建Map
        Map<String, Object> requestBody = new HashMap<>();
        // 添加参数
        requestBody.put("prompt", prompt);
        requestBody.put("temperature", temperature);
        requestBody.put("max_tokens", maxTokens);
        // 转换为JSON
        return new Gson().toJson(requestBody);
    }


}
package com.main;

import com.google.gson.Gson;
import com.intellij.openapi.actionSystem.AnAction;
import com.intellij.openapi.actionSystem.AnActionEvent;
import com.intellij.openapi.actionSystem.LangDataKeys;
import com.intellij.openapi.application.ApplicationManager;
import com.intellij.openapi.editor.Document;
import com.intellij.openapi.editor.Editor;
import com.intellij.openapi.editor.SelectionModel;
import com.intellij.openapi.fileEditor.FileEditorManager;
import com.intellij.openapi.project.Project;
import com.intellij.openapi.wm.StatusBar;
import com.intellij.openapi.wm.WindowManager;
import net.minidev.json.JSONArray;
import net.minidev.json.JSONObject;
import net.minidev.json.JSONValue;
import okhttp3.*;

import java.io.IOException;
import java.util.HashMap;
import java.util.Map;
import java.util.concurrent.TimeUnit;

public class CommentWriterSelector extends AnAction {

    @Override
    public void actionPerformed(AnActionEvent e) {

        ApplicationManager.getApplication().runWriteAction(() -> {
            Project project = e.getProject();
            if (project == null) {
                return;
            }
            StatusBar statusBar = WindowManager.getInstance().getStatusBar(project);
            statusBar.setInfo("正在局部添加");
            Editor editor = e.getData(LangDataKeys.EDITOR);
            if (editor != null) {

                SelectionModel selectionModel = editor.getSelectionModel();
                String selectedText = selectionModel.getSelectedText();
                System.out.println(selectedText.length());
                System.out.println(selectedText);
                if (selectedText != null) {
                    Document document = editor.getDocument();
                    if (editor.getSelectionModel().getSelectedText().length() > 2000) {
                        statusBar.setInfo("文本过长");
                        return;
                    }
                    String code = Comment_4(editor.getSelectionModel().getSelectedText());
                    System.out.println(code);
                    if (code.length() >= editor.getSelectionModel().getSelectedText().length()) {

                        String allCode = document.getText();
                        System.out.println(allCode);
                        allCode = allCode.replace(selectedText, code);
                        System.out.println(allCode);
                        document.setText(allCode);
                    }
                    statusBar.setInfo("局部添加完毕");
                }
            }
        });
    }


    public static String Comment_4(String code) {
        String prompt = "Please add Chinese comments above each line of the following Java code. Do not add comment symbols before import and package statements. Then return the complete code with comments. The code must not have fewer lines than the original." + code;
        String result = generateText_3(prompt);
        JSONObject jsonObject = (JSONObject) JSONValue.parse(result);
        JSONArray choices = (JSONArray) jsonObject.get("choices");
        JSONObject firstChoice = (JSONObject) choices.get(0);
        Object textObj = firstChoice.get("text");
        String textStr = textObj.toString();
        return textStr;
    }

    private static String generateText_3(String prompt) {
        // API相关参数
        String API_KEY = "替换成你自己的APIkey";
        String MODEL_ENDPOINT = "https://api.openai.com/v1/";
        String MODEL_NAME = "text-davinci-003";
        int MAX_TOKENS = 2048;
        double TEMPERATURE = 0;
        String response = "";
        try {
            // 创建OkHttpClient
            OkHttpClient client = new OkHttpClient.Builder()
                    .readTimeout(500, TimeUnit.SECONDS)
                    .build();
            // 创建RequestBody
            RequestBody requestBody = RequestBody.create(MediaType.parse("application/json"), createRequestBody(prompt, TEMPERATURE, MAX_TOKENS));
            // 创建Request
            Request request = new Request.Builder()
                    .url(MODEL_ENDPOINT + "engines/" + MODEL_NAME + "/completions")
                    .post(requestBody)
                    .addHeader("Content-Type", "application/json")
                    .addHeader("Authorization", "Bearer " + API_KEY).build();

            // 发送请求
            Response httpResponse = client.newCall(request).execute();
            // 判断请求是否成功
            if (httpResponse.isSuccessful()) {
                response = httpResponse.body().string();
            } else {
                throw new RuntimeException("Failed : HTTP error code : " + httpResponse.code());
            }
        } catch (IOException e) {
            e.printStackTrace();
        }
        // 返回响应
        return response;
    }


    // 创建一个请求体
    private static String createRequestBody(String prompt, double temperature, int maxTokens) {
        // 创建一个Map对象
        Map<String, Object> requestBody = new HashMap<>();
        // 将prompt放入Map中
        requestBody.put("prompt", prompt);
        // 将temperature放入Map中
        requestBody.put("temperature", temperature);
        // 将maxTokens放入Map中
        requestBody.put("max_tokens", maxTokens);
        // 将Map转换为Json格式
        return new Gson().toJson(requestBody);
    }


}
然后就可以直接打包了右键点击项目,点击最下面那个,然后过一会就会自动打包好一个zip文件,就在项目的目录。

测试:有两种方法,一种是直接部署试试,但是会有代码被直接替换的风险,建议先备份
第一种;直接部署
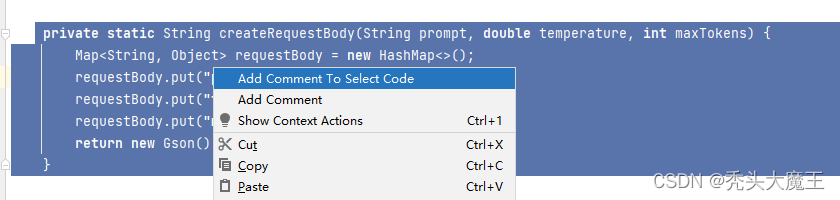
点击File-》Settings-》plugins-》instelled右边的设置图标,然后点击install plugin from disk,选中那个打包好的zip,点击OK,然后重启IDEA,然后鼠标右键点击任意一个代码,就出现两个按钮,第一格是为选中片段添加注释,第二个是全文添加注释,由于OpenAI的API访问限制,一次最大只能接收2048长度的字符串,所以对于过长的代码无法添加注释。
第二种运行方法是测试运行,直接部署的是没有办法看到除了报错以外的其他信息的,但是测试运行可以看到打印在控制台的内容,
首先点击run-》然后edit configurations
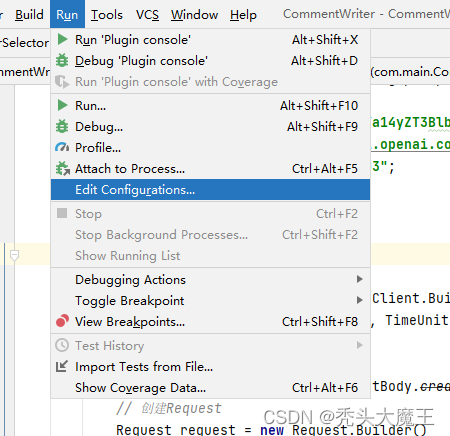
进入后点击左侧的加号,点击plugins,然后点击plugins,在右侧页面点击add new run plugins,
然后再VM option写入-Didea.is.internal=true -Didea.plugin.name=CommentWriter,name可以随便写。点击ok。
然后再点击run后就会出现一个新的选项

点击后就可以运行了。然后会弹出一个测试使用的idea窗口,就可以在里面操作右键的菜单,然后主题窗口的控制台就会输出打印的内容。
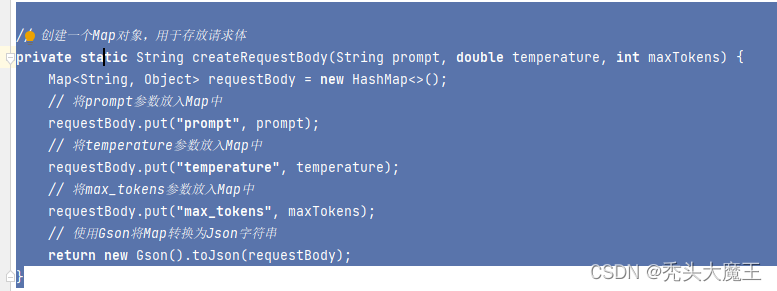
效果: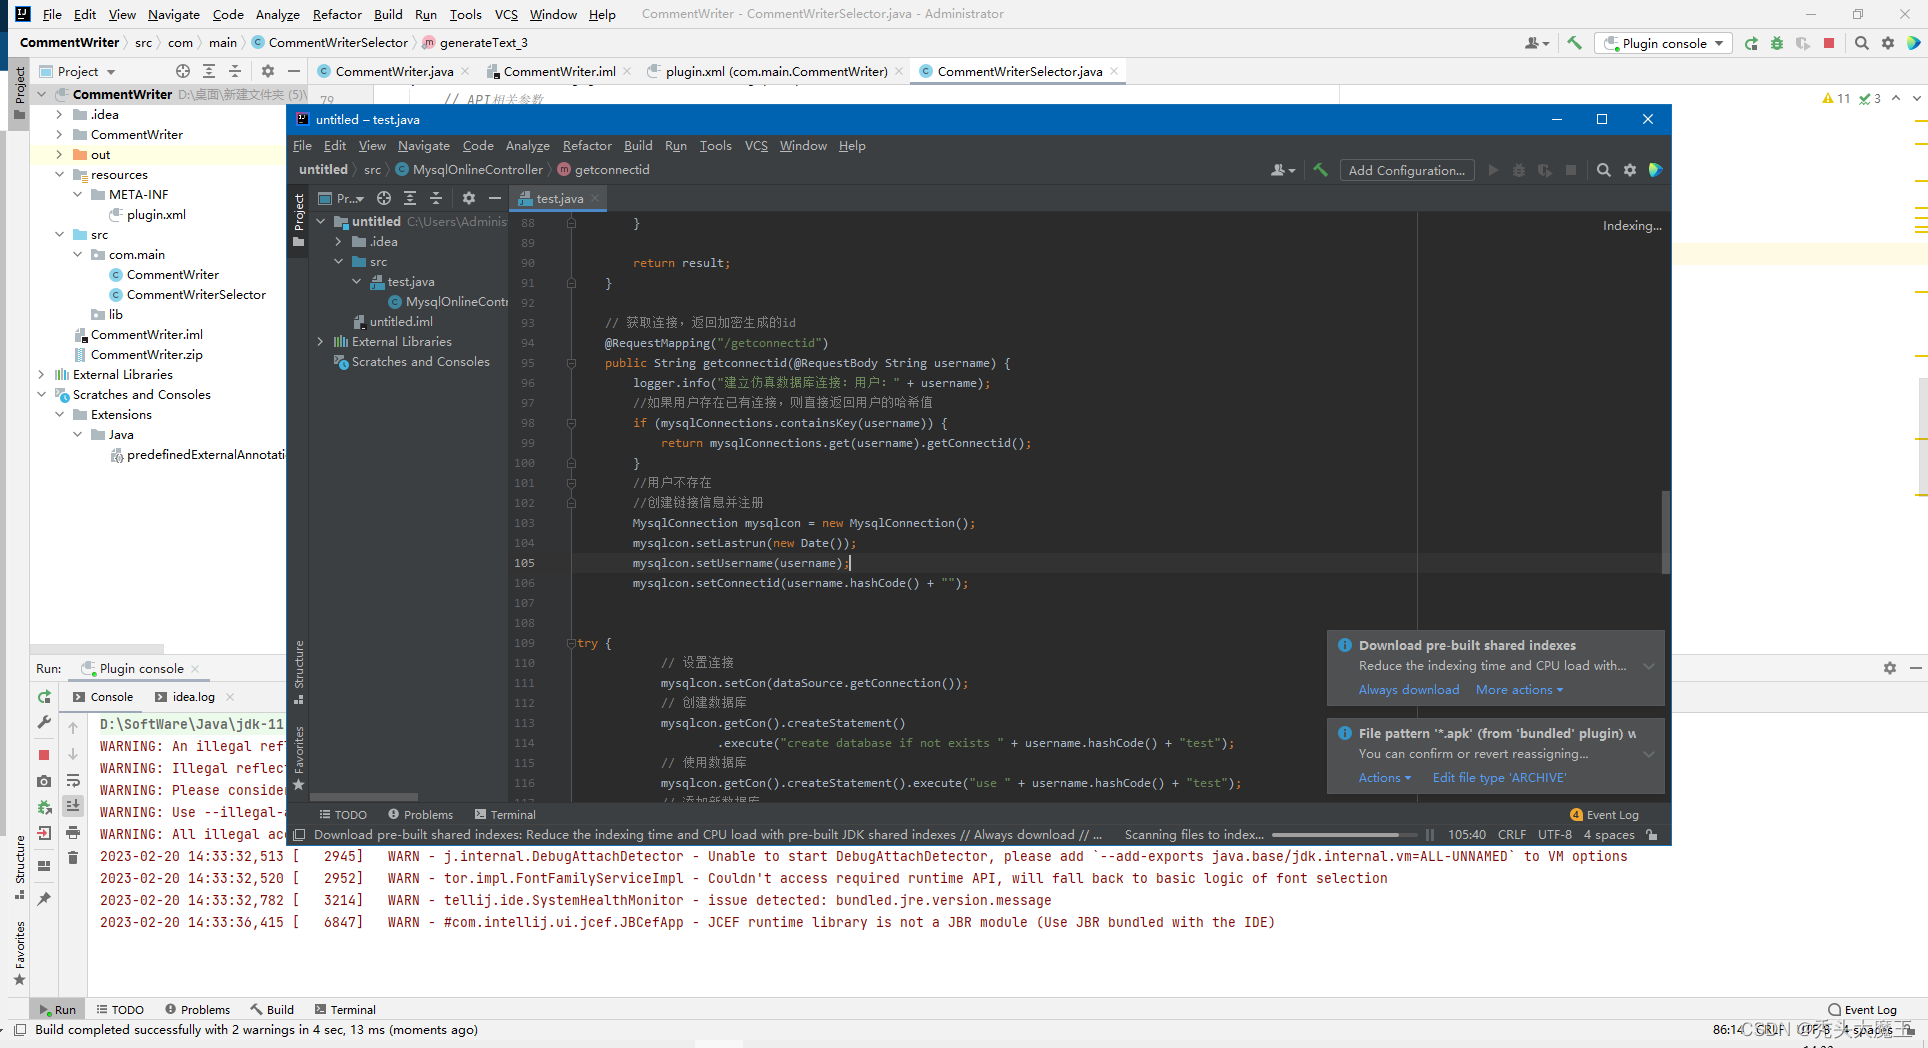
添加注释有时候会添加不进去,因为chatGPT不会给所有语句都写注释,
目前写的很简陋可以自己优化。
我正在学习如何使用Nokogiri,根据这段代码我遇到了一些问题:require'rubygems'require'mechanize'post_agent=WWW::Mechanize.newpost_page=post_agent.get('http://www.vbulletin.org/forum/showthread.php?t=230708')puts"\nabsolutepathwithtbodygivesnil"putspost_page.parser.xpath('/html/body/div/div/div/div/div/table/tbody/tr/td/div
我有一个Ruby程序,它使用rubyzip压缩XML文件的目录树。gem。我的问题是文件开始变得很重,我想提高压缩级别,因为压缩时间不是问题。我在rubyzipdocumentation中找不到一种为创建的ZIP文件指定压缩级别的方法。有人知道如何更改此设置吗?是否有另一个允许指定压缩级别的Ruby库? 最佳答案 这是我通过查看rubyzip内部创建的代码。level=Zlib::BEST_COMPRESSIONZip::ZipOutputStream.open(zip_file)do|zip|Dir.glob("**/*")d
类classAprivatedeffooputs:fooendpublicdefbarputs:barendprivatedefzimputs:zimendprotecteddefdibputs:dibendendA的实例a=A.new测试a.foorescueputs:faila.barrescueputs:faila.zimrescueputs:faila.dibrescueputs:faila.gazrescueputs:fail测试输出failbarfailfailfail.发送测试[:foo,:bar,:zim,:dib,:gaz].each{|m|a.send(m)resc
很好奇,就使用rubyonrails自动化单元测试而言,你们正在做什么?您是否创建了一个脚本来在cron中运行rake作业并将结果邮寄给您?git中的预提交Hook?只是手动调用?我完全理解测试,但想知道在错误发生之前捕获错误的最佳实践是什么。让我们理所当然地认为测试本身是完美无缺的,并且可以正常工作。下一步是什么以确保他们在正确的时间将可能有害的结果传达给您? 最佳答案 不确定您到底想听什么,但是有几个级别的自动代码库控制:在处理某项功能时,您可以使用类似autotest的内容获得关于哪些有效,哪些无效的即时反馈。要确保您的提
假设我做了一个模块如下:m=Module.newdoclassCendend三个问题:除了对m的引用之外,还有什么方法可以访问C和m中的其他内容?我可以在创建匿名模块后为其命名吗(就像我输入“module...”一样)?如何在使用完匿名模块后将其删除,使其定义的常量不再存在? 最佳答案 三个答案:是的,使用ObjectSpace.此代码使c引用你的类(class)C不引用m:c=nilObjectSpace.each_object{|obj|c=objif(Class===objandobj.name=~/::C$/)}当然这取决于
我正在尝试使用ruby和Savon来使用网络服务。测试服务为http://www.webservicex.net/WS/WSDetails.aspx?WSID=9&CATID=2require'rubygems'require'savon'client=Savon::Client.new"http://www.webservicex.net/stockquote.asmx?WSDL"client.get_quotedo|soap|soap.body={:symbol=>"AAPL"}end返回SOAP异常。检查soap信封,在我看来soap请求没有正确的命名空间。任何人都可以建议我
关闭。这个问题是opinion-based.它目前不接受答案。想要改进这个问题?更新问题,以便editingthispost可以用事实和引用来回答它.关闭4年前。Improvethisquestion我想在固定时间创建一系列低音和高音调的哔哔声。例如:在150毫秒时发出高音调的蜂鸣声在151毫秒时发出低音调的蜂鸣声200毫秒时发出低音调的蜂鸣声250毫秒的高音调蜂鸣声有没有办法在Ruby或Python中做到这一点?我真的不在乎输出编码是什么(.wav、.mp3、.ogg等等),但我确实想创建一个输出文件。
我在我的项目目录中完成了compasscreate.和compassinitrails。几个问题:我已将我的.sass文件放在public/stylesheets中。这是放置它们的正确位置吗?当我运行compasswatch时,它不会自动编译这些.sass文件。我必须手动指定文件:compasswatchpublic/stylesheets/myfile.sass等。如何让它自动运行?文件ie.css、print.css和screen.css已放在stylesheets/compiled。如何在编译后不让它们重新出现的情况下删除它们?我自己编译的.sass文件编译成compiled/t
我想将html转换为纯文本。不过,我不想只删除标签,我想智能地保留尽可能多的格式。为插入换行符标签,检测段落并格式化它们等。输入非常简单,通常是格式良好的html(不是整个文档,只是一堆内容,通常没有anchor或图像)。我可以将几个正则表达式放在一起,让我达到80%,但我认为可能有一些现有的解决方案更智能。 最佳答案 首先,不要尝试为此使用正则表达式。很有可能你会想出一个脆弱/脆弱的解决方案,它会随着HTML的变化而崩溃,或者很难管理和维护。您可以使用Nokogiri快速解析HTML并提取文本:require'nokogiri'h
我想为Heroku构建一个Rails3应用程序。他们使用Postgres作为他们的数据库,所以我通过MacPorts安装了postgres9.0。现在我需要一个postgresgem并且共识是出于性能原因你想要pggem。但是我对我得到的错误感到非常困惑当我尝试在rvm下通过geminstall安装pg时。我已经非常明确地指定了所有postgres目录的位置可以找到但仍然无法完成安装:$envARCHFLAGS='-archx86_64'geminstallpg--\--with-pg-config=/opt/local/var/db/postgresql90/defaultdb/po
