在项目中使用Drools时往往会跟Spring整合来使用。具体整合步骤如下:
第一步:创建maven工程drools_spring并配置pom.xml
<?xml version="1.0" encoding="UTF-8"?>
<project xmlns="http://maven.apache.org/POM/4.0.0"
         xmlns:xsi="http://www.w3.org/2001/XMLSchema-instance"
         xsi:schemaLocation="http://maven.apache.org/POM/4.0.0 http://maven.apache.org/xsd/maven-4.0.0.xsd">
    <modelVersion>4.0.0</modelVersion>
    <groupId>com.itheima</groupId>
    <artifactId>drools_spring</artifactId>
    <version>1.0-SNAPSHOT</version>
    <properties>
        <drools.version>7.10.0.Final</drools.version>
        <spring.version>5.0.5.RELEASE</spring.version>
    </properties>
    <dependencies>
        <dependency>
            <groupId>org.drools</groupId>
            <artifactId>drools-compiler</artifactId>
            <version>${drools.version}</version>
        </dependency>
        <dependency>
            <groupId>junit</groupId>
            <artifactId>junit</artifactId>
            <version>4.12</version>
        </dependency>
        <dependency>
            <groupId>org.kie</groupId>
            <artifactId>kie-spring</artifactId>
            <version>${drools.version}</version>
            <!--注意:此处必须排除传递过来的依赖,否则会跟我们自己导入的Spring jar包产生冲突-->
            <exclusions>
                <exclusion>
                    <groupId>org.springframework</groupId>
                    <artifactId>spring-tx</artifactId>
                </exclusion>
                <exclusion>
                    <groupId>org.springframework</groupId>
                    <artifactId>spring-beans</artifactId>
                </exclusion>
                <exclusion>
                    <groupId>org.springframework</groupId>
                    <artifactId>spring-core</artifactId>
                </exclusion>
                <exclusion>
                    <groupId>org.springframework</groupId>
                    <artifactId>spring-context</artifactId>
                </exclusion>
            </exclusions>
        </dependency>
        <dependency>
            <groupId>org.springframework</groupId>
            <artifactId>spring-context</artifactId>
            <version>${spring.version}</version>
        </dependency>
        <dependency>
            <groupId>org.springframework</groupId>
            <artifactId>spring-context-support</artifactId>
            <version>${spring.version}</version>
        </dependency>
        <dependency>
            <groupId>org.springframework</groupId>
            <artifactId>spring-test</artifactId>
            <version>${spring.version}</version>
        </dependency>
        <dependency>
            <groupId>org.springframework</groupId>
            <artifactId>spring-tx</artifactId>
            <version>${spring.version}</version>
        </dependency>
    </dependencies>
</project>
第二步:创建规则目录/resources/rules,中rules目录中创建规则文件helloworld.drl
package helloworld

rule "rule_helloworld"
    when
        eval(true)
    then
        System.out.println("规则:rule_helloworld触发...");
end
第三步:创建Spring配置文件/resources/spring.xml
<?xml version="1.0" encoding="UTF-8"?>
<beans xmlns="http://www.springframework.org/schema/beans"
       xmlns:xsi="http://www.w3.org/2001/XMLSchema-instance"
       xmlns:kie="http://drools.org/schema/kie-spring"
       xsi:schemaLocation="http://www.springframework.org/schema/beans
                            http://www.springframework.org/schema/beans/spring-beans.xsd
                            http://drools.org/schema/kie-spring
                            http://drools.org/schema/kie-spring.xsd">
    <kie:kmodule id="kmodule">
        <kie:kbase name="kbase" packages="rules">
            <kie:ksession name="ksession"></kie:ksession>
        </kie:kbase>
    </kie:kmodule>
    <bean class="org.kie.spring.annotations.KModuleAnnotationPostProcessor"></bean>
</beans>
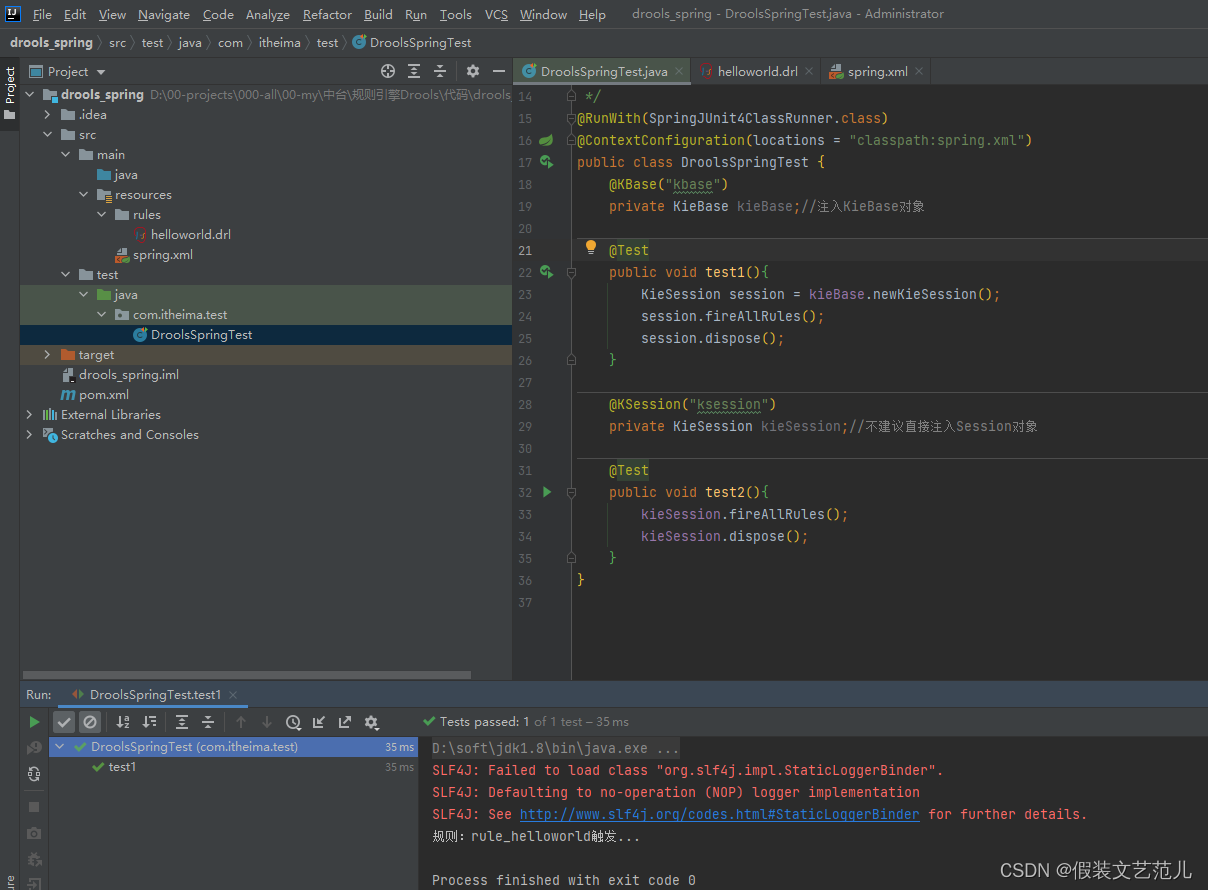
第四步:编写单元测试类
package com.itheima.test;

import org.junit.Test;
import org.junit.runner.RunWith;
import org.kie.api.KieBase;
import org.kie.api.cdi.KBase;
import org.springframework.test.context.ContextConfiguration;
import org.springframework.test.context.junit4.SpringJUnit4ClassRunner;

@RunWith(SpringJUnit4ClassRunner.class)
@ContextConfiguration(locations = "classpath:spring.xml")
public class DroolsSpringTest {
    @KBase("kbase")
    private KieBase kieBase;//注入KieBase对象
    @Test
    public void test1(){
        KieSession kieSession = kieBase.newKieSession();
        kieSession.fireAllRules();
        kieSession.dispose();
    }
}
本小节我们来进行Drools和Spring Web的整合。具体操作步骤如下:
第一步:创建maven的war工程drools_springweb并在pom.xml文件中导入相关maven坐标
<?xml version="1.0" encoding="UTF-8"?>
<project xmlns="http://maven.apache.org/POM/4.0.0" xmlns:xsi="http://www.w3.org/2001/XMLSchema-instance"
  xsi:schemaLocation="http://maven.apache.org/POM/4.0.0 http://maven.apache.org/xsd/maven-4.0.0.xsd">
  <modelVersion>4.0.0</modelVersion>
  <groupId>com.itheima</groupId>
  <artifactId>drools_springweb</artifactId>
  <version>1.0-SNAPSHOT</version>
  <packaging>war</packaging>
  <properties>
    <project.build.sourceEncoding>UTF-8</project.build.sourceEncoding>
    <maven.compiler.source>1.8</maven.compiler.source>
    <maven.compiler.target>1.8</maven.compiler.target>
    <drools.version>7.10.0.Final</drools.version>
    <spring.version>5.0.5.RELEASE</spring.version>
  </properties>
  <dependencies>
    <dependency>
      <groupId>org.drools</groupId>
      <artifactId>drools-compiler</artifactId>
      <version>${drools.version}</version>
    </dependency>
    <dependency>
      <groupId>junit</groupId>
      <artifactId>junit</artifactId>
      <version>4.12</version>
    </dependency>
    <dependency>
      <groupId>org.kie</groupId>
      <artifactId>kie-spring</artifactId>
      <version>${drools.version}</version>
      <!--注意:此处必须排除传递过来的依赖,否则会跟我们自己导入的Spring jar包产生冲突-->
      <exclusions>
        <exclusion>
          <groupId>org.springframework</groupId>
          <artifactId>spring-tx</artifactId>
        </exclusion>
        <exclusion>
          <groupId>org.springframework</groupId>
          <artifactId>spring-beans</artifactId>
        </exclusion>
        <exclusion>
          <groupId>org.springframework</groupId>
          <artifactId>spring-core</artifactId>
        </exclusion>
        <exclusion>
          <groupId>org.springframework</groupId>
          <artifactId>spring-context</artifactId>
        </exclusion>
      </exclusions>
    </dependency>
    <dependency>
      <groupId>org.springframework</groupId>
      <artifactId>spring-context</artifactId>
      <version>${spring.version}</version>
    </dependency>
    <dependency>
      <groupId>org.springframework</groupId>
      <artifactId>spring-context-support</artifactId>
      <version>${spring.version}</version>
    </dependency>
    <dependency>
      <groupId>org.springframework</groupId>
      <artifactId>spring-test</artifactId>
      <version>${spring.version}</version>
    </dependency>
    <dependency>
      <groupId>org.springframework</groupId>
      <artifactId>spring-tx</artifactId>
      <version>${spring.version}</version>
    </dependency>
    <dependency>
      <groupId>org.springframework</groupId>
      <artifactId>spring-web</artifactId>
      <version>${spring.version}</version>
    </dependency>
    <dependency>
      <groupId>org.springframework</groupId>
      <artifactId>spring-webmvc</artifactId>
      <version>${spring.version}</version>
    </dependency>
  </dependencies>
  <build>
    <plugins>
      <plugin>
        <groupId>org.apache.tomcat.maven</groupId>
        <artifactId>tomcat7-maven-plugin</artifactId>
        <configuration>
          <!-- 指定端口 -->
          <port>80</port>
          <!-- 请求路径 -->
          <path>/</path>
        </configuration>
      </plugin>
    </plugins>
  </build>
</project>
第二步:配置web.xml
<!DOCTYPE web-app PUBLIC
 "-//Sun Microsystems, Inc.//DTD Web Application 2.3//EN"
 "http://java.sun.com/dtd/web-app_2_3.dtd" >
<web-app>
  <display-name>Archetype Created Web Application</display-name>
  <servlet>
    <servlet-name>springmvc</servlet-name>
    <servlet-class>org.springframework.web.servlet.DispatcherServlet</servlet-class>
    <!-- 指定加载的配置文件 ,通过参数contextConfigLocation加载 -->
    <init-param>
      <param-name>contextConfigLocation</param-name>
      <param-value>classpath:springmvc.xml</param-value>
    </init-param>
    <load-on-startup>1</load-on-startup>
  </servlet>
  <servlet-mapping>
    <servlet-name>springmvc</servlet-name>
    <url-pattern>*.do</url-pattern>
  </servlet-mapping>
</web-app>
第三步:创建/resources/springmvc.xml文件
<?xml version="1.0" encoding="UTF-8"?>
<beans xmlns="http://www.springframework.org/schema/beans"
       xmlns:xsi="http://www.w3.org/2001/XMLSchema-instance"
       xmlns:context="http://www.springframework.org/schema/context"
       xmlns:mvc="http://www.springframework.org/schema/mvc"
       xmlns:kie="http://drools.org/schema/kie-spring"
       xsi:schemaLocation="http://www.springframework.org/schema/beans
       http://www.springframework.org/schema/beans/spring-beans.xsd
       http://drools.org/schema/kie-spring
       http://drools.org/schema/kie-spring.xsd
       http://www.springframework.org/schema/mvc
	   http://www.springframework.org/schema/mvc/spring-mvc.xsd
	   http://www.springframework.org/schema/context
	   http://www.springframework.org/schema/context/spring-context.xsd">

    <kie:kmodule id="kmodule">
        <kie:kbase name="kbase" packages="rules">
            <kie:ksession name="ksession"></kie:ksession>
        </kie:kbase>
    </kie:kmodule>

    <bean class="org.kie.spring.annotations.KModuleAnnotationPostProcessor"/>

    <!--spring批量扫描-->
    <context:component-scan base-package="com.itheima" />
    <context:annotation-config/>
    <!--springMVC注解驱动-->
    <mvc:annotation-driven/>
</beans>
第四步:创建规则文件/resources/rules/helloworld.drl
package helloworld

rule "rule_helloworld"
    when
        eval(true)
    then
        System.out.println("规则:rule_helloworld触发...");
end
第五步:创建RuleService
package com.itheima.service;

import org.kie.api.KieBase;
import org.kie.api.cdi.KBase;
import org.kie.api.runtime.KieSession;
import org.springframework.stereotype.Service;

@Service
public class RuleService {
    @KBase("kbase")
    private KieBase kieBase;
    public void rule(){
        KieSession kieSession = kieBase.newKieSession();
        kieSession.fireAllRules();
        kieSession.dispose();
    }
}
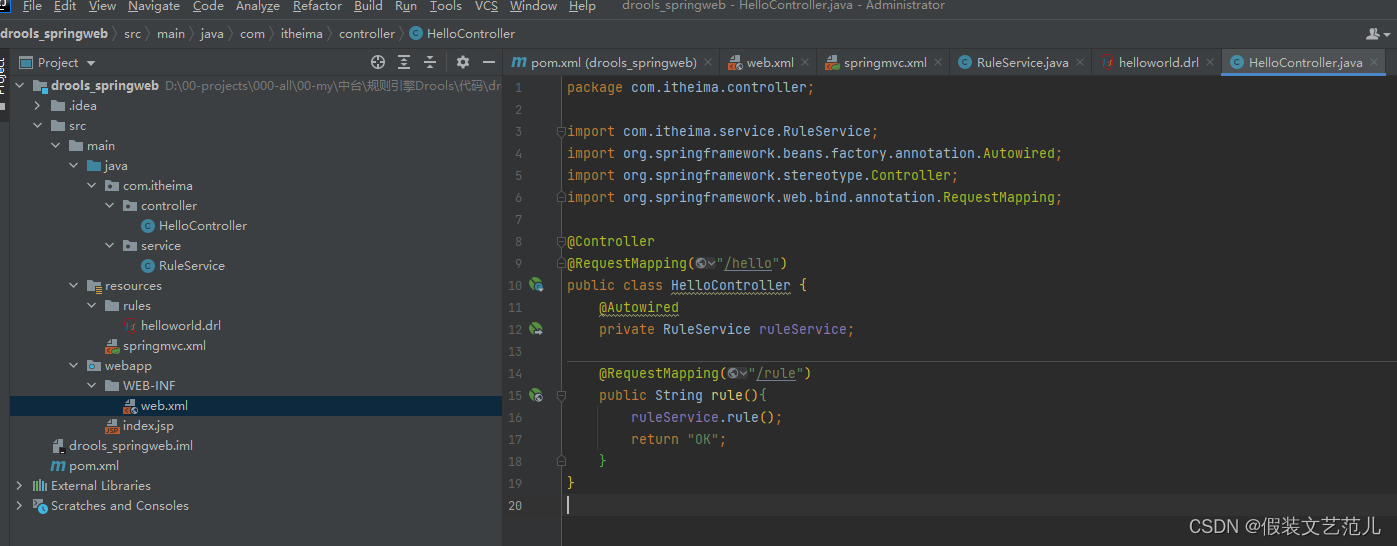
第六步:创建HelloController
package com.itheima.controller;

import com.itheima.service.RuleService;
import org.springframework.beans.factory.annotation.Autowired;
import org.springframework.web.bind.annotation.RequestMapping;
import org.springframework.web.bind.annotation.RestController;

@RestController
@RequestMapping("/hello")
public class HelloController {
    @Autowired
    private RuleService ruleService;
    @RequestMapping("/rule")
    public String rule(){
        ruleService.rule();
        return "OK";
    }
}
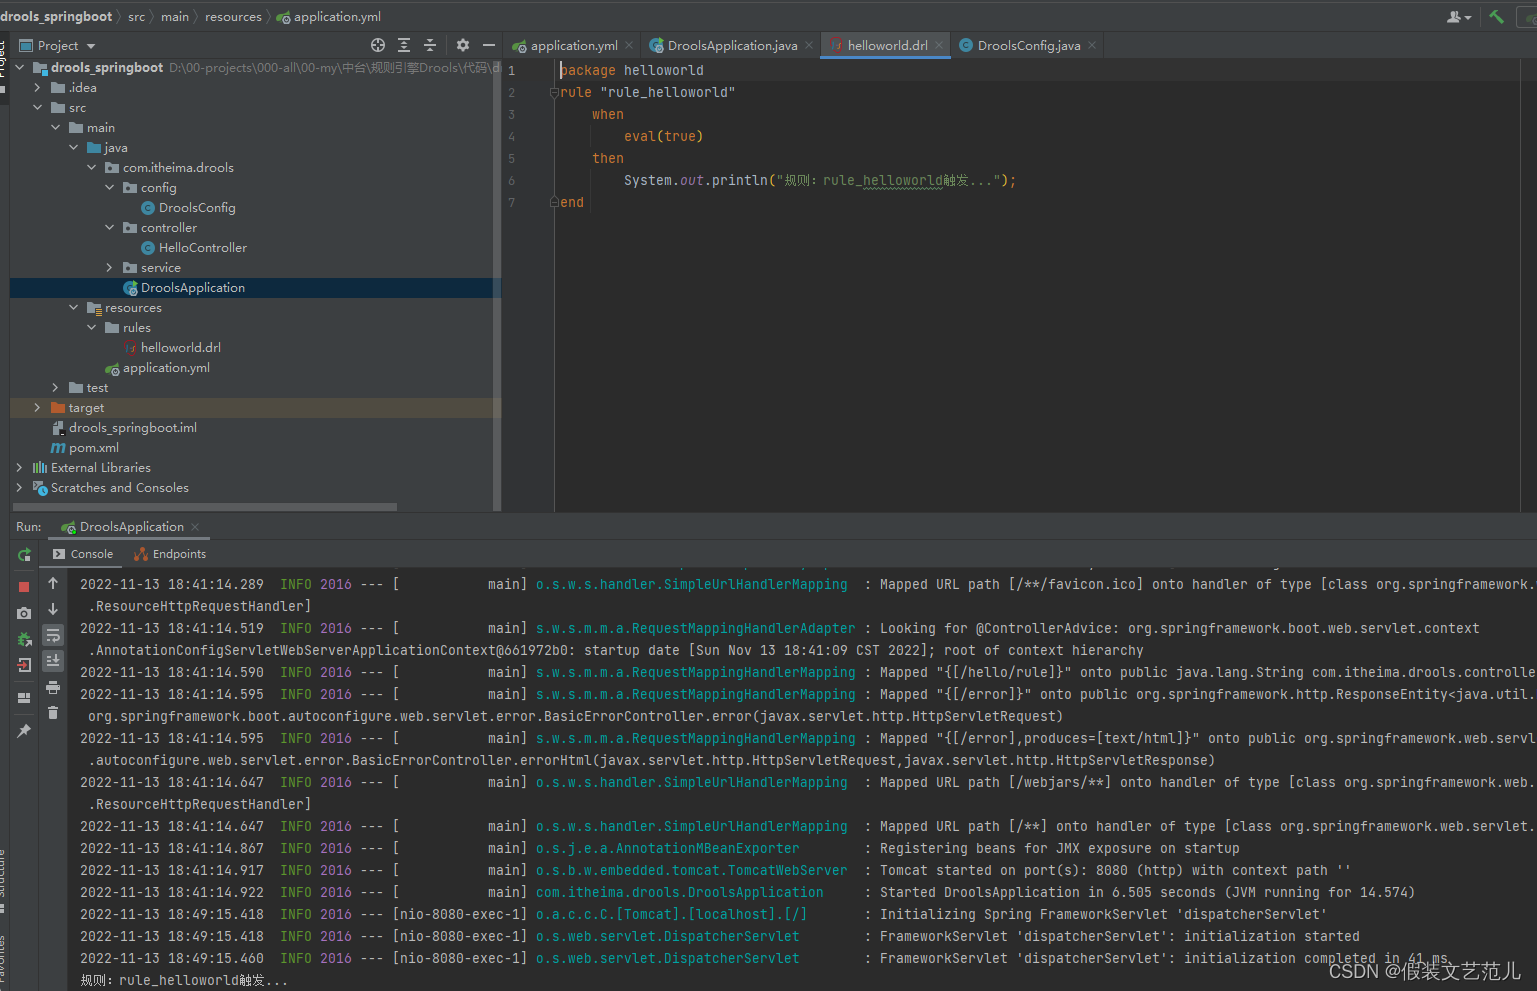
目前在企业开发中Spring Boot已经成为主流,本小节我们来进行Spring Boot整合Drools。具体操作步骤:
第一步:创建maven工程drools_springboot并配置pom.xml
<?xml version="1.0" encoding="UTF-8"?>
<project xmlns="http://maven.apache.org/POM/4.0.0"
         xmlns:xsi="http://www.w3.org/2001/XMLSchema-instance"
         xsi:schemaLocation="http://maven.apache.org/POM/4.0.0 http://maven.apache.org/xsd/maven-4.0.0.xsd">
    <parent>
        <groupId>org.springframework.boot</groupId>
        <artifactId>spring-boot-starters</artifactId>
        <version>2.0.6.RELEASE</version>
    </parent>
    <modelVersion>4.0.0</modelVersion>
    <groupId>com.itheima</groupId>
    <artifactId>drools_springboot</artifactId>
    <version>1.0-SNAPSHOT</version>
    <dependencies>
        <dependency>
            <groupId>org.springframework.boot</groupId>
            <artifactId>spring-boot-starter-web</artifactId>
        </dependency>
        <dependency>
            <groupId>org.springframework.boot</groupId>
            <artifactId>spring-boot-starter-aop</artifactId>
        </dependency>
        <dependency>
            <groupId>org.springframework.boot</groupId>
            <artifactId>spring-boot-starter-test</artifactId>
        </dependency>
        <dependency>
            <groupId>commons-lang</groupId>
            <artifactId>commons-lang</artifactId>
            <version>2.6</version>
        </dependency>
        <!--drools规则引擎-->
        <dependency>
            <groupId>org.drools</groupId>
            <artifactId>drools-core</artifactId>
            <version>7.6.0.Final</version>
        </dependency>
        <dependency>
            <groupId>org.drools</groupId>
            <artifactId>drools-compiler</artifactId>
            <version>7.6.0.Final</version>
        </dependency>
        <dependency>
            <groupId>org.drools</groupId>
            <artifactId>drools-templates</artifactId>
            <version>7.6.0.Final</version>
        </dependency>
        <dependency>
            <groupId>org.kie</groupId>
            <artifactId>kie-api</artifactId>
            <version>7.6.0.Final</version>
        </dependency>
        <dependency>
            <groupId>org.kie</groupId>
            <artifactId>kie-spring</artifactId>
            <exclusions>
                <exclusion>
                    <groupId>org.springframework</groupId>
                    <artifactId>spring-tx</artifactId>
                </exclusion>
                <exclusion>
                    <groupId>org.springframework</groupId>
                    <artifactId>spring-beans</artifactId>
                </exclusion>
                <exclusion>
                    <groupId>org.springframework</groupId>
                    <artifactId>spring-core</artifactId>
                </exclusion>
                <exclusion>
                    <groupId>org.springframework</groupId>
                    <artifactId>spring-context</artifactId>
                </exclusion>
            </exclusions>
            <version>7.6.0.Final</version>
        </dependency>
    </dependencies>
    <build>
        <finalName>${project.artifactId}</finalName>
        <resources>
            <resource>
                <directory>src/main/java</directory>
                <includes>
                    <include>**/*.xml</include>
                </includes>
                <filtering>false</filtering>
            </resource>
            <resource>
                <directory>src/main/resources</directory>
                <includes>
                    <include>**/*.*</include>
                </includes>
                <filtering>false</filtering>
            </resource>
        </resources>
        <plugins>
            <plugin>
                <groupId>org.apache.maven.plugins</groupId>
                <artifactId>maven-compiler-plugin</artifactId>
                <version>2.3.2</version>
                <configuration>
                    <source>1.8</source>
                    <target>1.8</target>
                </configuration>
            </plugin>
        </plugins>
    </build>
</project>
第二步:创建/resources/application.yml文件
server:
  port: 8080
spring:
  application:
    name: drools_springboot
第三步:创建规则文件/resources/rules/helloworld.drl
package helloworld
rule "rule_helloworld"
    when
        eval(true)
    then
        System.out.println("规则:rule_helloworld触发...");
end
第四步:编写配置类DroolsConfig
package com.itheima.drools.config;
import org.kie.api.KieBase;
import org.kie.api.KieServices;
import org.kie.api.builder.KieBuilder;
import org.kie.api.builder.KieFileSystem;
import org.kie.api.builder.KieRepository;
import org.kie.api.runtime.KieContainer;
import org.kie.api.runtime.KieSession;
import org.kie.internal.io.ResourceFactory;
import org.kie.spring.KModuleBeanFactoryPostProcessor;
import org.springframework.boot.autoconfigure.condition.ConditionalOnMissingBean;
import org.springframework.context.annotation.Bean;
import org.springframework.context.annotation.Configuration;
import org.springframework.core.io.support.PathMatchingResourcePatternResolver;
import org.springframework.core.io.support.ResourcePatternResolver;
import org.springframework.core.io.Resource;
import java.io.IOException;
/**
 * 规则引擎配置类
 */
@Configuration
public class DroolsConfig {
    //指定规则文件存放的目录
    private static final String RULES_PATH = "rules/";
    private final KieServices kieServices = KieServices.Factory.get();
    @Bean
    @ConditionalOnMissingBean
    public KieFileSystem kieFileSystem() throws IOException {
        KieFileSystem kieFileSystem = kieServices.newKieFileSystem();
        ResourcePatternResolver resourcePatternResolver =
            new PathMatchingResourcePatternResolver();
        Resource[] files =
            resourcePatternResolver.getResources("classpath*:" + RULES_PATH + "*.*");
        String path = null;
        for (Resource file : files) {
            path = RULES_PATH + file.getFilename();
            kieFileSystem.write(ResourceFactory.newClassPathResource(path, "UTF-8"));
        }
        return kieFileSystem;
    }
    @Bean
    @ConditionalOnMissingBean
    public KieContainer kieContainer() throws IOException {
        KieRepository kieRepository = kieServices.getRepository();
        kieRepository.addKieModule(kieRepository::getDefaultReleaseId);
        KieBuilder kieBuilder = kieServices.newKieBuilder(kieFileSystem());
        kieBuilder.buildAll();
        return kieServices.newKieContainer(kieRepository.getDefaultReleaseId());
    }
    @Bean
    @ConditionalOnMissingBean
    public KieBase kieBase() throws IOException {
        return kieContainer().getKieBase();
    }
    @Bean
    @ConditionalOnMissingBean
    public KModuleBeanFactoryPostProcessor kiePostProcessor() {
        return new KModuleBeanFactoryPostProcessor();
    }
}
第五步:创建RuleService类
package com.itheima.drools.service;

import org.kie.api.KieBase;
import org.kie.api.runtime.KieSession;
import org.springframework.beans.factory.annotation.Autowired;
import org.springframework.stereotype.Service;

@Service
public class RuleService {
    @Autowired
    private KieBase kieBase;
    public void rule(){
        KieSession kieSession = kieBase.newKieSession();
        kieSession.fireAllRules();
        kieSession.dispose();
    }
}
第六步:创建HelloController类
package com.itheima.drools.controller;

import com.itheima.drools.service.RuleService;
import org.springframework.beans.factory.annotation.Autowired;
import org.springframework.web.bind.annotation.RequestMapping;
import org.springframework.web.bind.annotation.RestController;

@RestController
@RequestMapping("/hello")
public class HelloController {
    @Autowired
    private RuleService ruleService;
    @RequestMapping("/rule")
    public String rule(){
        ruleService.rule();
        return "OK";
    }
}
第七步:创建启动类DroolsApplication
package com.itheima.drools;

import org.springframework.boot.SpringApplication;
import org.springframework.boot.autoconfigure.SpringBootApplication;

@SpringBootApplication
public class DroolsApplication {
    public static void main(String[] args) {
        SpringApplication.run(DroolsApplication.class,args);
    }
}
第八步:启动服务,访问http://localhost:8080/hello/rule
我想在一个没有Sass引擎的类中使用Sass颜色函数。我已经在项目中使用了sassgem,所以我认为搭载会像以下一样简单:classRectangleincludeSass::Script::FunctionsdefcolorSass::Script::Color.new([0x82,0x39,0x06])enddefrender#hamlengineexecutedwithcontextofself#sothatwithintemlateicouldcall#%stop{offset:'0%',stop:{color:lighten(color)}}endend更新:参见上面的#re
我想为我的Rails网络应用程序提供推荐功能。特别是,我想向新注册的用户推荐他可能想要关注的其他用户。Rails中是否有用于此目的的引擎/gem?如果没有,我应该从哪里开始构建它?谢谢。 最佳答案 有Coletivogemhttps://github.com/diogenes/coletivo我试了一下。在MySQL上运行。Neo4jhttp://neo4j.org真的很容易实现一个“跟随谁”。事实上,大多数展示其能力的样本都涉及“跟随谁”。快速提示-只有在JRuby上运行时,Neo4j.rb才会很酷。如果不是-使用Neograph
无论您是想搭建桌面端、WEB端或者移动端APP应用,HOOPSPlatform组件都可以为您提供弹性的3D集成架构,同时,由工业领域3D技术专家组成的HOOPS技术团队也能为您提供技术支持服务。如果您的客户期望有一种在多个平台(桌面/WEB/APP,而且某些客户端是“瘦”客户端)快速、方便地将数据接入到3D应用系统的解决方案,并且当访问数据时,在各个平台上的性能和用户体验保持一致,HOOPSPlatform将帮助您完成。利用HOOPSPlatform,您可以开发在任何环境下的3D基础应用架构。HOOPSPlatform可以帮您打造3D创新型产品,HOOPSSDK包含的技术有:快速且准确的CAD
导读:随着叮咚买菜业务的发展,不同的业务场景对数据分析提出了不同的需求,他们希望引入一款实时OLAP数据库,构建一个灵活的多维实时查询和分析的平台,统一数据的接入和查询方案,解决各业务线对数据高效实时查询和精细化运营的需求。经过调研选型,最终引入ApacheDoris作为最终的OLAP分析引擎,Doris作为核心的OLAP引擎支持复杂地分析操作、提供多维的数据视图,在叮咚买菜数十个业务场景中广泛应用。作者|叮咚买菜资深数据工程师韩青叮咚买菜创立于2017年5月,是一家专注美好食物的创业公司。叮咚买菜专注吃的事业,为满足更多人“想吃什么”而努力,通过美好食材的供应、美好滋味的开发以及美食品牌的孵
一、引擎主循环UE版本:4.27一、引擎主循环的位置:Launch.cpp:GuardedMain函数二、、GuardedMain函数执行逻辑:1、EnginePreInit:加载大多数模块int32ErrorLevel=EnginePreInit(CmdLine);PreInit模块加载顺序:模块加载过程:(1)注册模块中定义的UObject,同时为每个类构造一个类默认对象(CDO,记录类的默认状态,作为模板用于子类实例创建)(2)调用模块的StartUpModule方法2、FEngineLoop::Init()1、检查Engine的配置文件找出使用了哪一个GameEngine类(UGame
随着ruby被引入为新的编程救世主,我想知道是否有人基于易用性、运行所需的资源、可用性和易定制性而有偏好。两者有更好的吗? 最佳答案 好吧,任何基于Rails的社交网络应用程序的比较都应该包括insoshi(http://portal.insoshi.com/)。话虽这么说,这三个都非常相似,区别在于实现细节。Lovd和Insoshi都是完整的Rails应用程序;它旨在供您将它们用作入门工具包,并使用您自己的自定义功能对其进行扩展。另一方面,CommunityEngine是一个Rails插件。这意味着您可以更轻松地向现有Rail
一般来说,我是Middleman和ruby的新手。我已经安装了Ruby我已经安装了Middleman和gem以使其运行。我需要使用slim而不是默认的模板系统。所以我安装了Slimgem。Slim的网站只说我需要'slim'才能让它工作。中间人网站说我只需要在config.rb文件中添加模板引擎,但是没有给出例子...对于没有ruby背景的人来说,这没有帮助。我在git上找了几个config.rb,它们都有:require'slim'和#Setslim-langoutputstyleSlim::Engine.set_default_options:pretty=>true#Se
关闭。这个问题不符合StackOverflowguidelines.它目前不接受答案。要求我们推荐或查找工具、库或最喜欢的场外资源的问题对于StackOverflow来说是偏离主题的,因为它们往往会吸引自以为是的答案和垃圾邮件。相反,describetheproblem以及迄今为止为解决该问题所做的工作。关闭9年前。Improvethisquestion是否有适用于这些的3d游戏引擎?
我有以下代码#coloursarandomcellwithacorrectcolourdefcolour_random!whiletruedocol,row=rand(columns),rand(rows)cell=self[row,col]ifcell.empty?thencell.should_be_filled??cell.colour!(1):cell.colour!(0)breakendendend做什么并不重要,尽管它应该很明显。关键是Rubocop给了我一个警告Neveruse'do'withmulti-line'while为什么我不应该那样做?那我该怎么办呢?
我有一个PORO(普通旧Ruby对象)来处理一些业务逻辑。它接收一个ActiveRecord对象并对其进行分类。为了简单起见,以下面为例:classClassificatorSTATES={1=>"Positive",2=>"Neutral",3=>"Negative"}definitializer(item)@item=itemenddefnameSTATES.fetch(state_id)endprivatedefstate_idreturn1if@item.value>0return2if@item.value==0return3if@item.value但是,我还想根据这些st