目录
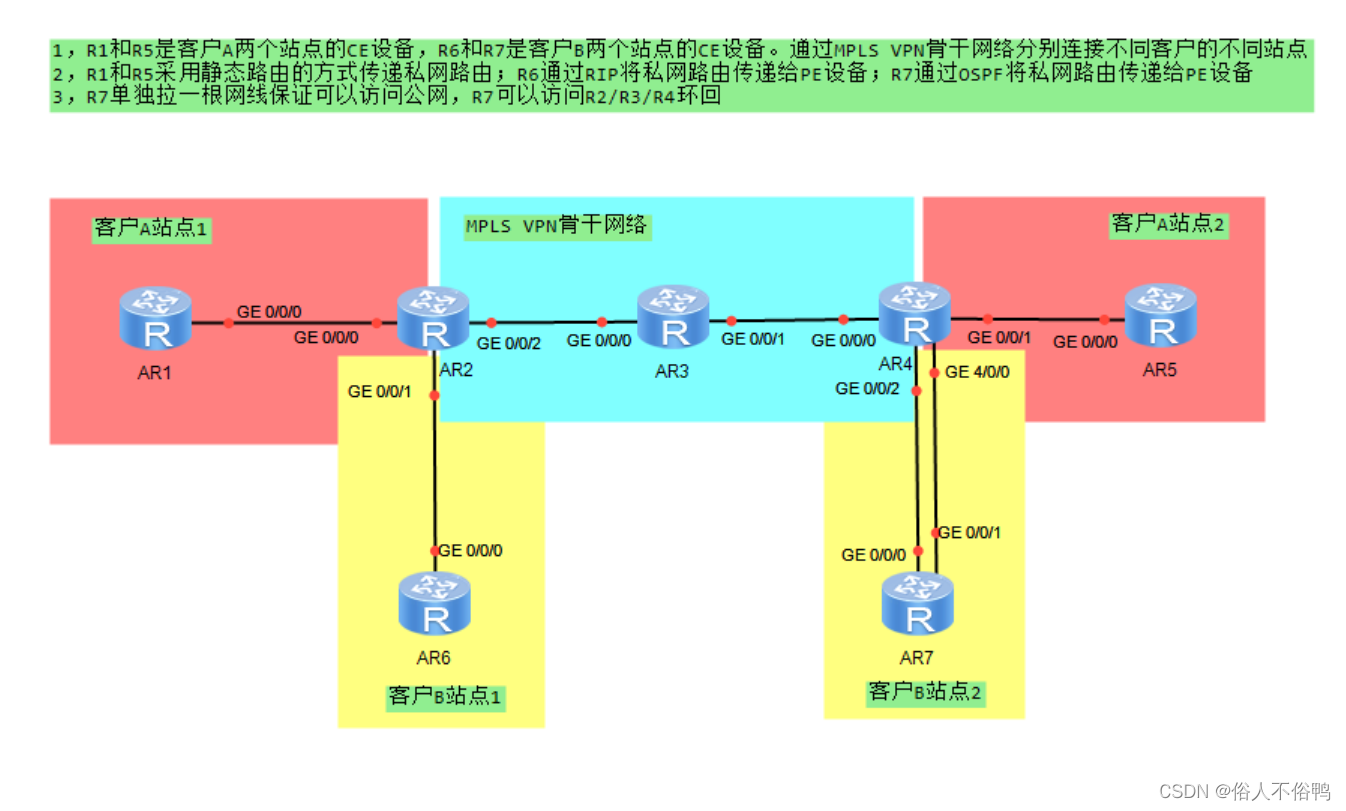
由题目可知,实验目的是要将客户A的站点1和站点2通过MPLS VPN连成一个私网,将客户B的站点1和站点2通过MPLS VPN连成另一个私网,MPLS VPN骨干网络和R4与R7之间的一条网线(这里假设是R4-GE4/0/0与R7-GE0/0/1这根网线)构成公网部分。
那么,首先要将公网做通和配置MPLS和配置BGP,即配置IP地址 ——> 配置OSPF路由 ——> 配置BGP(建立R2/R4对等体关系)——> 配置MPLS ,然后在R2、R4上配置VRF,为VRF接口配置IP地址,再分别为客户A和客户B的私网部分配置IP地址、使用静态或动态方式传递路由,最后在R2、R4上的各自VRF空间中通过双向重发布或BGP路由发布(BGP需配置为MP-BGP)。
至于R7访问R2/R3/R4的环回,在R7写缺省路由即可。
1. 配置IP地址
[r2]interface g0/0/2
[r2-GigabitEthernet0/0/2]ip address 23.0.0.1 24
[r2]interface LoopBack 0
[r2-LoopBack0]ip address 2.2.2.2 24
[r3]interface g0/0/0
[r3-GigabitEthernet0/0/0]ip address 23.0.0.2 24
[r3]interface g0/0/1
[r3-GigabitEthernet0/0/1]ip address 34.0.0.1 24
[r3]interface LoopBack 0
[r3-LoopBack0]ip address 3.3.3.3 24[r4]int g0/0/0
[r4-GigabitEthernet0/0/0]ip address 34.0.0.2 24
[r4]int g4/0/0
[r4-GigabitEthernet4/0/0]ip address 47.0.0.1 24
[r4]interface LoopBack 0
[r4-LoopBack0]ip address 4.4.4.4 24[r7]int g0/0/1
[r7-GigabitEthernet0/0/1]ip address 47.0.0.2 242. 配置OSPF
[r2]ospf 1 router-id 2.2.2.2
[r2-ospf-1]a 0
[r2-ospf-1-area-0.0.0.0]network 23.0.0.0 0.0.0.255
[r2-ospf-1-area-0.0.0.0]network 2.2.2.2 0.0.0.0
[r3]ospf 1 router-id 3.3.3.3
[r3-ospf-1]a 0
[r3-ospf-1-area-0.0.0.0]network 23.0.0.0 0.0.0.255
[r3-ospf-1-area-0.0.0.0]network 34.0.0.0 0.0.0.255
[r3-ospf-1-area-0.0.0.0]network 3.3.3.3 0.0.0.0[r4]ospf 1 router-id 4.4.4.4
[r4-ospf-1]a 0
[r4-ospf-1-area-0.0.0.0]network 34.0.0.0 0.0.0.255
[r4-ospf-1-area-0.0.0.0]network 47.0.0.0 0.0.0.255
[r4-ospf-1-area-0.0.0.0]network 4.4.4.4 0.0.0.03. 配置BGP
[r2]bgp 1
[r2-bgp]router-id 2.2.2.2
[r2-bgp]peer 4.4.4.4 as 1
[r2-bgp]peer 4.4.4.4 connect-interface LoopBack 0
[r4]bgp 1
[r4-bgp]router-id 4.4.4.4
[r4-bgp]peer 2.2.2.2 as 1
[r4-bgp]peer 2.2.2.2 connect-interface LoopBack 04. 配置MPLS
[r2]mpls lsr-id 2.2.2.2
[r2]mpls
Info: Mpls starting, please wait... OK!
[r2-mpls]mpls ldp
[r2-mpls-ldp]q
[r2]int g0/0/0
[r2-GigabitEthernet0/0/0]mpls
[r2-GigabitEthernet0/0/0]mpls ldp
[r3]mpls lsr-id 3.3.3.3
[r3]mpls
Info: Mpls starting, please wait... OK!
[r3-mpls]mpls ldp
[r3-mpls-ldp]q
[r3]interface g0/0/0
[r3-GigabitEthernet0/0/0]mpls
[r3-GigabitEthernet0/0/0]mpls ldp
[r3-GigabitEthernet0/0/0]int g0/0/1
[r3-GigabitEthernet0/0/1]mpls
[r3-GigabitEthernet0/0/1]mpls ldp[r4]mpls lsr-id 4.4.4.4
[r4]mpls
Info: Mpls starting, please wait... OK!
[r4-mpls]mpls ldp
[r4-mpls-ldp]q
[r4]int g0/0/0
[r4-GigabitEthernet0/0/0]mpls
[r4-GigabitEthernet0/0/0]mpls ldp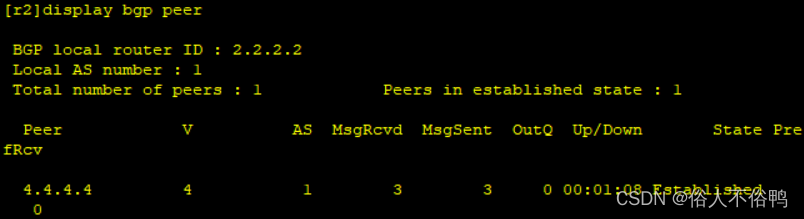
公网部分完成
1. 创建VRF空间
[r2]ip vpn-instance a1
[r2-vpn-instance-a1]route-distinguisher 100:1
[r2-vpn-instance-a1-af-ipv4]vpn-target 100:1 both
 IVT Assignment result:
Info: VPN-Target assignment is successful.
 EVT Assignment result:
Info: VPN-Target assignment is successful.
[r4]ip vpn-instance a2
[r4-vpn-instance-a2]route-distinguisher 100:1
[r4-vpn-instance-a2-af-ipv4]vpn-target 100:1 both
IVT Assignment result:
Info: VPN-Target assignment is successful.
EVT Assignment result:
Info: VPN-Target assignment is successful.2. 划分接口到VRF并配置IP地址
[r2]interface g0/0/0
[r2-GigabitEthernet0/0/0]ip binding vpn-instance a1
Info: All IPv4 related configurations on this interface are removed!
Info: All IPv6 related configurations on this interface are removed!
[r2-GigabitEthernet0/0/0]ip address 192.168.2.2 24
[r4]interface g0/0/1
[r4-GigabitEthernet0/0/1]ip binding vpn-instance a2
Info: All IPv4 related configurations on this interface are removed!
Info: All IPv6 related configurations on this interface are removed!
[r4-GigabitEthernet0/0/1]ip address 192.168.3.1 24
3. 客户A私网配置IP地址并使用静态方式传递路由
[r1]int g0/0/0
[r1-GigabitEthernet0/0/0]ip address 192.168.2.1 24
[r1]int LoopBack 0
[r1-LoopBack0]ip address 192.168.1.1 24
[r1]ip route-static 192.168.3.0 24 192.168.2.2
[r1]ip route-static 192.168.4.0 24 192.168.2.2
[r2]ip route-static vpn-instance a1 192.168.1.0 24 192.168.2.1[r5]int g0/0/0
[r5-GigabitEthernet0/0/0]ip address 192.168.3.2 24
[r5]interface LoopBack 0
[r5-LoopBack0]ip address 192.168.4.1 24
[r5]ip route-static 192.168.1.0 24 192.168.3.1
[r5]ip route-static 192.168.2.0 24 192.168.3.1[r4]ip route-static vpn-instance a2 192.168.4.0 24 192.168.3.24. 配置MP-BGP并发布路由
[r2]bgp 1
[r2-bgp]ipv4-family vpnv4
[r2-bgp-af-vpnv4]peer 4.4.4.4 enable
[r2-bgp-af-vpnv4]q
[r2-bgp]ipv4-family vpn-instance a1
[r2-bgp-a1]network 192.168.1.0 24
[r2-bgp-a1]network 192.168.2.0 24
[r4]bgp 1
[r4-bgp]ipv4-family vpnv4
[r4-bgp-af-vpnv4]peer 2.2.2.2 enable
[r4-bgp-af-vpnv4]q
[r4-bgp]ipv4-family vpn-instance a2
[r4-bgp-a2]network 192.168.3.0 24
[r4-bgp-a2]network 192.168.4.0 24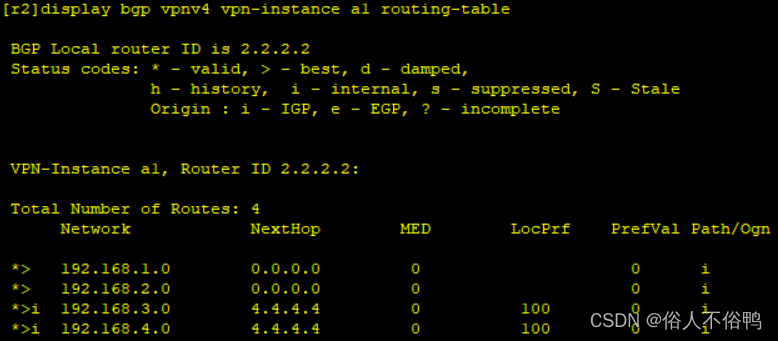
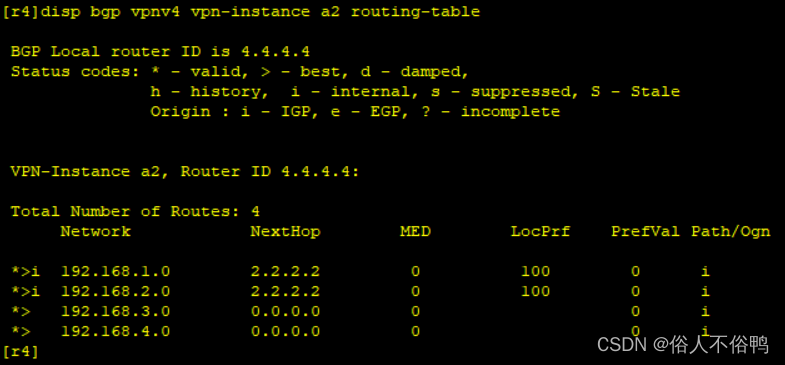
客户A的MPLS VPN私网完成
1. 创建VRF空间
[r2]ip vpn-instance b1
[r2-vpn-instance-b1]route-distinguisher 200:1
[r2-vpn-instance-b1-af-ipv4]vpn-target 200:1 b
 IVT Assignment result:
Info: VPN-Target assignment is successful.
 EVT Assignment result:
Info: VPN-Target assignment is successful.
[r4]ip vpn-instance b2
[r4-vpn-instance-b2]route-distinguisher 200:1
[r4-vpn-instance-b2-af-ipv4]vpn-target 200:1 b
[r4-vpn-instance-b2-af-ipv4]vpn-target 200:1 both
IVT Assignment result:
Info: VPN-Target assignment is successful.
EVT Assignment result:
Info: VPN-Target assignment is successful.2. 划分接口到VRF并配置IP地址
[r2]interface g0/0/1
[r2-GigabitEthernet0/0/1]ip binding vpn-instance b1
Info: All IPv4 related configurations on this interface are removed!
Info: All IPv6 related configurations on this interface are removed!
[r2-GigabitEthernet0/0/1]ip address 172.10.2.2 24
[r4]interface g0/0/2
[r4-GigabitEthernet0/0/2]ip binding vpn-instance b2
Info: All IPv4 related configurations on this interface are removed!
Info: All IPv6 related configurations on this interface are removed!
[r4-GigabitEthernet0/0/2]ip address 172.10.3.1 243. 客户B私网配置IP地址并使用动态方式传递路由
[r6]int g0/0/0
[r6-GigabitEthernet0/0/0]ip address 172.10.2.1 24
[r6]int LoopBack 0
[r6-LoopBack0]ip address 172.10.1.1 24
[r6]rip 1
[r6-rip-1]v 2
[r6-rip-1]network 172.10.0.0
[r2]rip 1 vpn-instance b1
[r2-rip-1]v 2
[r2-rip-1]network 172.10.0.0[r7]interface g0/0/0
[r7-GigabitEthernet0/0/0]ip address 172.10.3.2 24
[r7]int LoopBack 0
[r7-LoopBack0]ip address 172.10.4.1 24
[r7]ospf 2 router-id 7.7.7.7
[r7-ospf-2]a 0
[r7-ospf-2-area-0.0.0.0]network 172.10.3.0 0.0.0.255
[r7-ospf-2-area-0.0.0.0]network 172.10.4.1 0.0.0.0[r4]ospf 2 vpn-instance b2 router-id 4.4.4.4
[r4-ospf-2]a 0
[r4-ospf-2-area-0.0.0.0]network 172.10.3.0 0.0.0.2554. 配置MP-BGP并双向重发布路由
[r2]bgp 1
[r2-bgp]ipv4-family vpn-instance b1
[r2-bgp-b1]import-route rip 1

[r2]rip 1
[r2-rip-1]import-route bgp
[r4]bgp 1
[r4-bgp]ipv4-family vpn-instance b2
[r4-bgp-b2]import-route ospf 2
[r4]ospf 2 vpn-instance b2
[r4-ospf-2]import-route bgp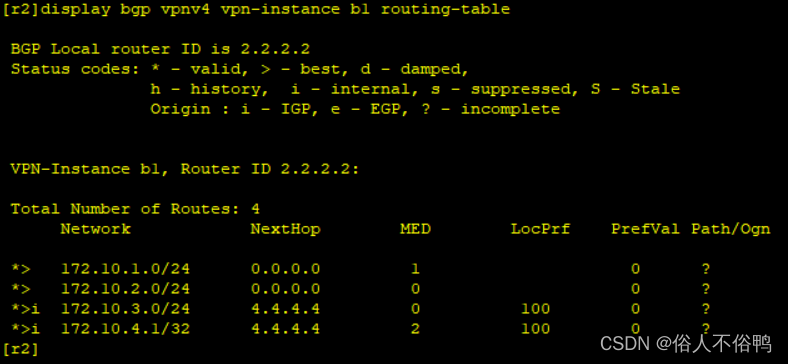
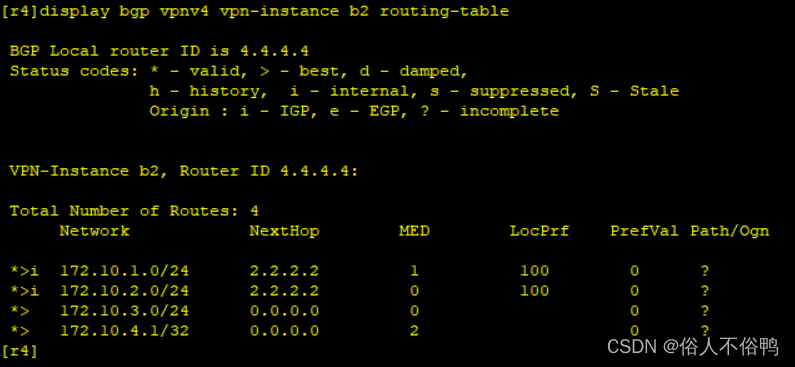

客户B的MPLS VPN私网完成
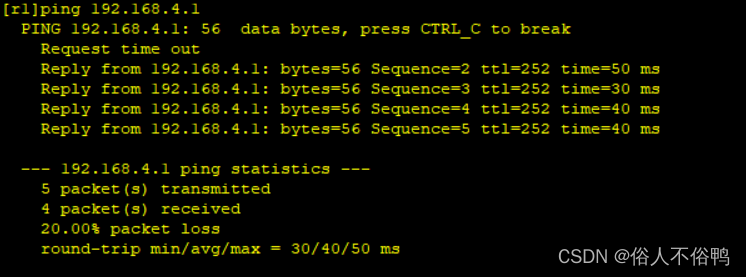
[r7]ip route-static 0.0.0.0 0 47.0.0.1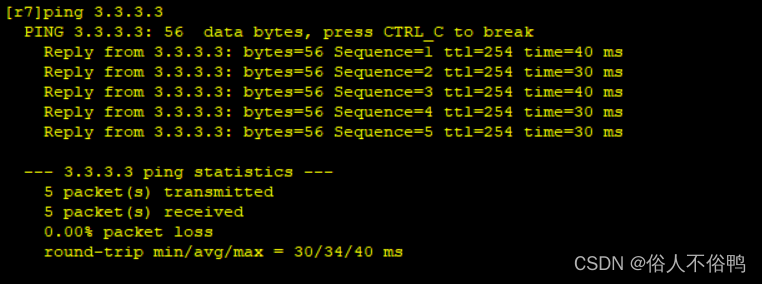
至此,实验全部完成!
Rails2.3可以选择随时使用RouteSet#add_configuration_file添加更多路由。是否可以在Rails3项目中做同样的事情? 最佳答案 在config/application.rb中:config.paths.config.routes在Rails3.2(也可能是Rails3.1)中,使用:config.paths["config/routes"] 关于ruby-on-rails-Rails3中的多个路由文件,我们在StackOverflow上找到一个类似的问题
我没有找到太多关于如何执行此操作的信息,尽管有很多关于如何使用像这样的redirect_to将参数传递给重定向的建议:action=>'something',:controller=>'something'在我的应用程序中,我在路由文件中有以下内容match'profile'=>'User#show'我的表演Action是这样的defshow@user=User.find(params[:user])@title=@user.first_nameend重定向发生在同一个用户Controller中,就像这样defregister@title="Registration"@user=Use
我真的为这个而疯狂。我一直在搜索答案并尝试我找到的所有内容,包括相关问题和stackoverflow上的答案,但仍然无法正常工作。我正在使用嵌套资源,但无法使表单正常工作。我总是遇到错误,例如没有路线匹配[PUT]"/galleries/1/photos"表格在这里:/galleries/1/photos/1/edit路线.rbresources:galleriesdoresources:photosendresources:galleriesresources:photos照片Controller.rbdefnew@gallery=Gallery.find(params[:galle
华为OD机试题本篇题目:明明的随机数题目输入描述输出描述:示例1输入输出说明代码编写思路最近更新的博客华为od2023|什么是华为od,od薪资待遇,od机试题清单华为OD机试真题大全,用Python解华为机试题|机试宝典【华为OD机试】全流程解析+经验分享,题型分享,防作弊指南华为o
system-view进入系统视图quit退到系统视图sysname交换机命名vlan20创建vlan(进入vlan20)displayvlan显示vlanundovlan20删除vlan20displayvlan20显示vlan里的端口20Interfacee1/0/24进入端口24portlink-typeaccessvlan20把当前端口放入vlan20undoporte1/0/10删除当前VLAN端口10displaycurrent-configuration显示当前配置02配置交换机支持TELNETinterfacevlan1进入VLAN1ipaddress192.168.3.100
Rails中有没有一种方法可以提取与路由关联的HTTP动词?例如,给定这样的路线:将“users”匹配到:“users#show”,通过:[:get,:post]我能实现这样的目标吗?users_path.respond_to?(:get)(显然#respond_to不是正确的方法)我最接近的是通过执行以下操作,但它似乎并不令人满意。Rails.application.routes.routes.named_routes["users"].constraints[:request_method]#=>/^GET$/对于上下文,我有一个设置cookie然后执行redirect_to:ba
路由有如下代码:resources:orders,only:[:create],defaults:{format:'json'}resources:users,only:[:create,:update],defaults:{format:'json'}resources:delivery_types,only:[:index],defaults:{format:'json'}resources:time_corrections,only:[:index],defaults:{format:'json'}是否可以使用1个字符串为所有资源设置默认格式,每行不带“默认值”散列?谢谢。
我正在使用rails3和cucumber,除了这个小问题,一切都很顺利GivenIamonthe"editautomobile"pageNoroutematches{:controller=>"automobiles",:action=>"edit"}(ActionController::RoutingError)现在路径在paths.rb中设置为edit_automobile_path在routes.rb中我有汽车作为资源,我搭建了它所以请告诉我我遗漏了什么,清楚地定义了路线并且匹配,因为我运行了rake路线并看到了路线。请指出正确的方向 最佳答案
有什么方法可以为url/path助手提供默认值吗?我有一个可选范围环绕我的所有路线:#config/routes.rbFoo::Application.routes.drawdoscope"(:current_brand)",:constraints=>{:current_brand=>/(foo)|(bar)/}do#...allotherroutesgohereendend我希望用户能够使用这些URL访问网站:/foo/some-place/bar/some-place/some-place为了方便起见,我在我的ApplicationController中设置了一个@current
我如何将像“root_path”这样的Rails路由助手作为类方法添加到像my_model.rb这样的类中?所以我的课是这样的:ClassMyModeldefself.fooreturnself.root_pathendendMyModel.foo以上不起作用,因为ClassMyModel不响应root_path这是我所知道的:我可以使用includeRails.application.routes.url_helpers,但这只会将模块的方法添加为实例方法我试过扩展Rails.application.routes.url_helpers但它没用请随时给我上课:)