目录
详见课件
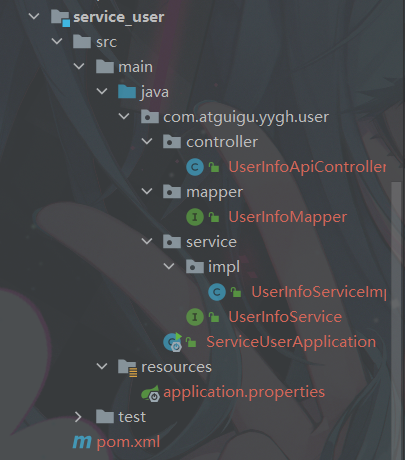
# 服务端口
server.port=8203
# 服务名
spring.application.name=service-user

# 环境设置:dev、test、prod
spring.profiles.active=dev

# mysql数据库连接
spring.datasource.driver-class-name=com.mysql.cj.jdbc.Driver
spring.datasource.url=jdbc:mysql://localhost:3306/yygh_user?characterEncoding=utf-8&useSSL=false&serverTimezone=GMT%2B8
spring.datasource.username=root
spring.datasource.password=********

#返回json的全局时间格式
spring.jackson.date-format=yyyy-MM-dd HH:mm:ss
spring.jackson.time-zone=GMT+8

#mybatis日志
mybatis-plus.configuration.log-impl=org.apache.ibatis.logging.stdout.StdOutImpl

#mongo 配置
#spring.data.mongodb.uri=mongodb://192.168.86.86:27017/test

# nacos服务地址
spring.cloud.nacos.discovery.server-addr=127.0.0.1:8848

#配置mapper xml文件的路径
mybatis-plus.mapper-locations=classpath:com/atguigu/yygh/user/mapper/xml/*.xml1. 分析接口
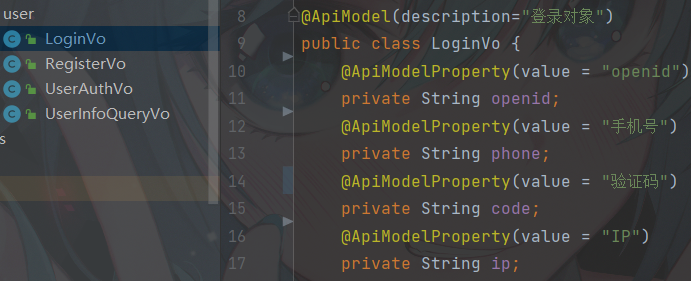
*参数:LoginVo,请求
*返回值:map(登录标识、用户名)
2. controller
@Api(tags = "用户接口")
@RestController
@RequestMapping("/api/user")
public class UserInfoApiController {

    @Autowired
    private UserInfoService userInfoService;

    @ApiOperation(value = "会员登录")
    @PostMapping("login")
    public R login(@RequestBody LoginVo loginVo, HttpServletRequest request) {
        loginVo.setIp(IpUtils.getIpAddr(request));
        Map<String, Object> map = userInfoService.login(loginVo);
        return R.ok().data(map);
    }


}
3. service
@Service
public class UserInfoServiceImpl extends
        ServiceImpl<UserInfoMapper, UserInfo> implements UserInfoService {

    //会员登录
    @Override
    public Map<String, Object> login(LoginVo loginVo) {
        //1.数据校验
        String phone = loginVo.getPhone();
        String code = loginVo.getCode();
        if(StringUtils.isEmpty(phone)||StringUtils.isEmpty(code)){
            throw new YyghException(20001,"注册信息有误");
        }
        //2. TODO 校验验证码

        //3.根据手机号查询用户信息
        QueryWrapper<UserInfo> wrapper = new QueryWrapper<>();
        wrapper.eq("phone",phone);
        UserInfo userInfo = baseMapper.selectOne(wrapper);

        //4.用户信息为空,走注册功能
        if(userInfo==null){
            userInfo = new UserInfo();
            userInfo.setPhone(phone);
            userInfo.setStatus(1); //0锁定 1正常
            baseMapper.insert(userInfo);
        }
        //5.判断用户是否被锁定
        if(userInfo.getStatus()==0){
            throw new YyghException(20001,"用户已被锁定");
        }
        //6.补全用户信息
        //返回页面显示名称
        Map<String, Object> map = new HashMap<>();
        String name = userInfo.getName();
        if(StringUtils.isEmpty(name)) {
            name = userInfo.getNickName();
        }
        if(StringUtils.isEmpty(name)) {
            name = userInfo.getPhone();
        }
        //7. TODO 用户登录

        map.put("token", "");
        map.put("name", name);
        return map;
    }

}1.Session广播(广播风暴、浪费带宽)
2.Redis+cookie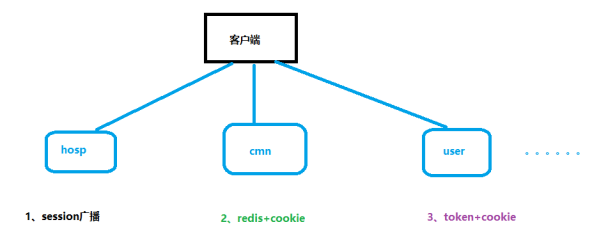
3. token+cookie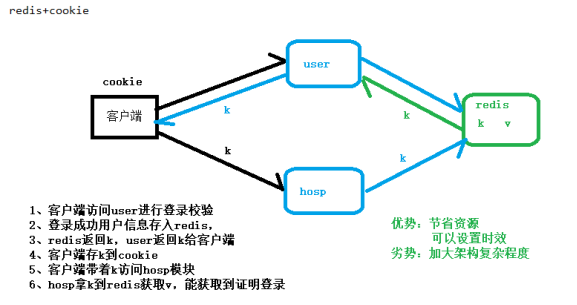
JWT(Json Web Token)是为了在网络应用环境间传递声明而执行的一种基于JSON的开放标准。
JWT的声明一般被用来在身份提供者和服务提供者间传递被认证的用户身份信息,以便于从资源服务器获取资源。比如用在用户登录上
JWT最重要的作用就是对 token信息的防伪作用。
原理:一个JWT由三个部分组成:公共部分、私有部分、签名部分。最后由这三者组合进行base64编码得到JWT。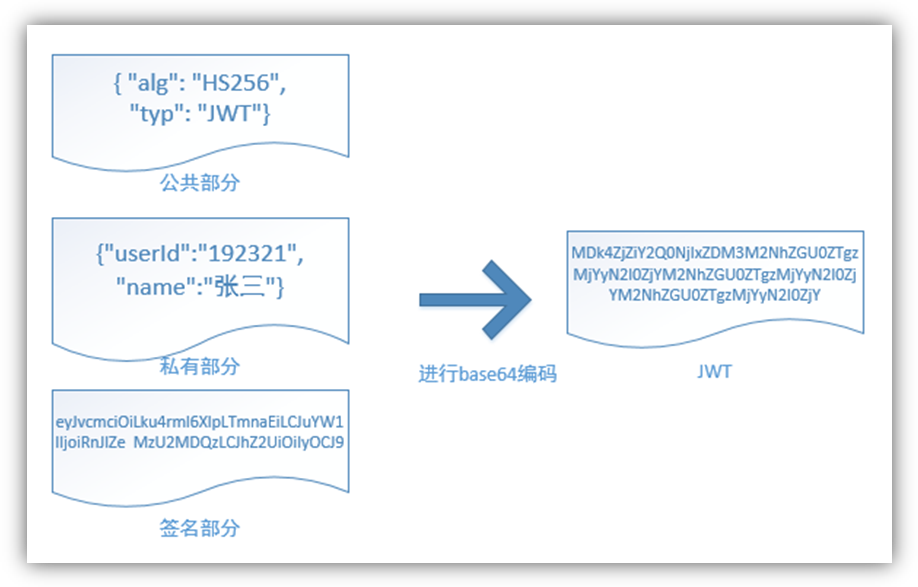
1. common_utils模块添加依赖
        <!--JWP-->
        <dependency>
            <groupId>io.jsonwebtoken</groupId>
            <artifactId>jjwt</artifactId>
        </dependency>
2. 添加JWT工具类
public class JwtHelper {
    private static long tokenExpiration = 24*60*60*1000;
    private static String tokenSignKey = "123456";

    public static String createToken(Long userId, String userName) {
        String token = Jwts.builder()
                .setSubject("YYGH-USER")
                .setExpiration(new Date(System.currentTimeMillis() + tokenExpiration))
                .claim("userId", userId)
                .claim("userName", userName)
                .signWith(SignatureAlgorithm.HS512, tokenSignKey)
                .compressWith(CompressionCodecs.GZIP)
                .compact();
        return token;
    }
    public static Long getUserId(String token) {
        if(StringUtils.isEmpty(token)) return null;
        Jws<Claims> claimsJws = Jwts.parser().setSigningKey(tokenSignKey).parseClaimsJws(token);
        Claims claims = claimsJws.getBody();
        Integer userId = (Integer)claims.get("userId");
        return userId.longValue();
    }
    public static String getUserName(String token) {
        if(StringUtils.isEmpty(token)) return "";
        Jws<Claims> claimsJws
                = Jwts.parser().setSigningKey(tokenSignKey).parseClaimsJws(token);
        Claims claims = claimsJws.getBody();
        return (String)claims.get("userName");
    }

    public static void main(String[] args) {
        String token = JwtHelper.createToken(1L, "55");
        System.out.println(token);
        System.out.println(JwtHelper.getUserId(token));
        System.out.println(JwtHelper.getUserName(token));
    }
}
3. 完善service方法,实现接口功能、
    //会员登录
    @Override
    public Map<String, Object> login(LoginVo loginVo) {
        ...
        //7. TODO 用户登录
        String token = JwtHelper.createToken(userInfo.getId(), userInfo.getName());

        map.put("token", token);
        map.put("name", name);
        return map;
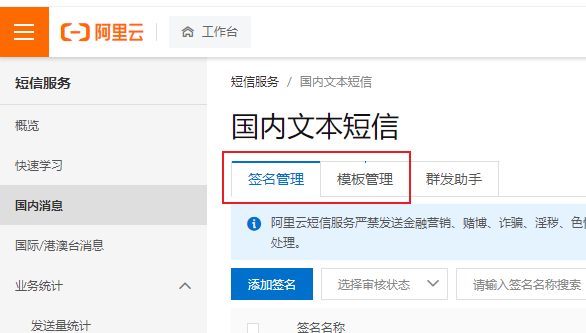
1. 开通鼎信短信服务 鼎信 (参考课件)
需要申请签名、模板
2. 在service模块下创建子模块service_msm
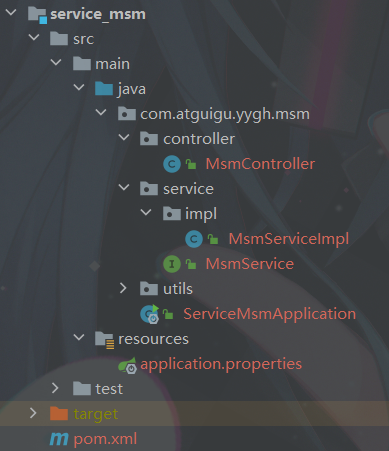
导入依赖:
    <dependencies>
        <!--阿里json工具-->
        <dependency>
            <groupId>com.alibaba</groupId>
            <artifactId>fastjson</artifactId>
        </dependency>
        <!--阿里云核心包-->
        <dependency>
            <groupId>com.aliyun</groupId>
            <artifactId>aliyun-java-sdk-core</artifactId>
        </dependency>
    </dependencies>
application.properties
# 服务端口
server.port=8204
# 服务名
spring.application.name=service-msm

spring.redis.host=192.168.86.86
spring.redis.port=6379
spring.redis.database= 0
spring.redis.timeout=1800000

spring.redis.lettuce.pool.max-active=20
spring.redis.lettuce.pool.max-wait=-1
#最大阻塞等待时间(负数表示没限制)
spring.redis.lettuce.pool.max-idle=5
spring.redis.lettuce.pool.min-idle=0
#最小空闲

#返回json的全局时间格式
spring.jackson.date-format=yyyy-MM-dd HH:mm:ss
spring.jackson.time-zone=GMT+8

# nacos服务地址
spring.cloud.nacos.discovery.server-addr=127.0.0.1:8848
添加网关配置
#设置路由id
spring.cloud.gateway.routes[3].id=service-msm
#设置路由的uri
spring.cloud.gateway.routes[3].uri=lb://service-msm
#设置路由断言,代理servicerId为auth-service的/auth/路径
spring.cloud.gateway.routes[3].predicates= Path=/*/msm/**
3. 实现controller
@Api(description = "发送验证码")
@RestController
@RequestMapping("/api/msm")
public class MsmController {
    @Autowired
    private MsmService msmService;
    @Autowired
    private RedisTemplate<String,String> redisTemplate;

    @ApiOperation(value = "发送验证码短信")
    @GetMapping(value = "/send/{phone}")
    public R send(@PathVariable String phone) {
        //1.根据手机号查询redis,获取验证码进行校验
        String redisCode = redisTemplate.opsForValue().get(phone);
        if(redisCode!=null){
            return R.ok();
        }
        //2。获取新的验证码,封装验证码
        String code = RandomUtil.getFourBitRandom();
        Map<String,String> paramMap = new HashMap<>();
        paramMap.put("code",code);

        //3.调用接口发送短信
        boolean isSend = msmService.send(phone,paramMap);

        //4.将验证码存入Redis,时效五分钟
        if(isSend){
            redisTemplate.opsForValue().set(phone,code,5, TimeUnit.MINUTES);
            return R.ok();
        }else {
            return R.error().message("发送短信失败");
        }
    }
}
4. service
@Service
public class MsmServiceImpl implements MsmService {
    //发送验证码短信
    @Override
    public boolean send(String phone, Map<String, String> paramMap) {
        //1.手机号验空
        if(StringUtils.isEmpty(phone)){
            return false;
        }

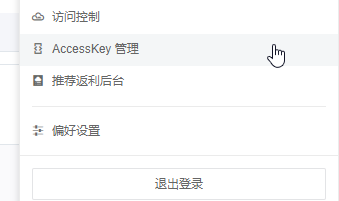
        //2.创建请求对象存入参数  AccessKey id、秘钥
        DefaultProfile profile =
                DefaultProfile.getProfile("default", "LTAI5tMGtK....", "baAdNzxAjnIMKU3....");
        IAcsClient client = new DefaultAcsClient(profile);

        CommonRequest request = new CommonRequest();
        //request.setProtocol(ProtocolType.HTTPS);
        request.setMethod(MethodType.POST);
        request.setDomain("dysmsapi.aliyuncs.com");
        request.setVersion("2017-05-25");
        request.setAction("SendSms");

        request.putQueryParameter("PhoneNumbers", phone);
        //要与申请的签名相同
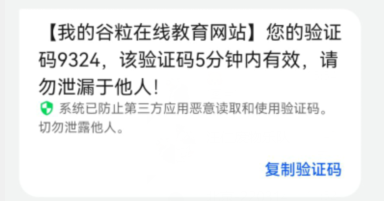
        request.putQueryParameter("SignName", "我的谷粒在线教育网站");
        request.putQueryParameter("TemplateCode", "SMS_183195440");
        request.putQueryParameter("TemplateParam", JSONObject.toJSONString(paramMap));

        try {
            //3.使用客户端对象方法发送请求,获取响应
            CommonResponse response = client.getCommonResponse(request);

            //4.从响应中获取最终结果
            System.out.println(response.getData());
            return response.getHttpResponse().isSuccess();

        } catch (ClientException e) {
            e.printStackTrace();
            throw new YyghException(20001,"短信发送失败");
        }
    }
}
1. user模块导入redis配置
#redis
spring.redis.host=192.168.86.86
spring.redis.port=6379
spring.redis.database= 0
spring.redis.timeout=1800000

spring.redis.lettuce.pool.max-active=20
spring.redis.lettuce.pool.max-wait=-1
#最大阻塞等待时间(负数表示没限制)
spring.redis.lettuce.pool.max-idle=5
spring.redis.lettuce.pool.min-idle=0
2. 修改service方法
@Autowired
    RedisTemplate<String, String> redisTemplate;

    //会员登录
    @Override
    public Map<String, Object> login(LoginVo loginVo) {
        //1.数据校验
        String phone = loginVo.getPhone();
        String code = loginVo.getCode();
        if(StringUtils.isEmpty(phone)||StringUtils.isEmpty(code)){
            throw new YyghException(20001,"注册信息有误");
        }
        //2. TODO 校验验证码
        //2.1 根据手机号从redis取出验证码
        String rediscode = redisTemplate.opsForValue().get(phone);
        //2.2 对比验证码
        //2.2 对比验证码,注意字符串空指针
        if(!code.equals(rediscode)){
            throw new YyghException(20001,"验证码有误");
        }
        //3.根据手机号查询用户信息
        QueryWrapper<UserInfo> wrapper = new QueryWrapper<>();
        wrapper.eq("phone",phone);
        UserInfo userInfo = baseMapper.selectOne(wrapper);

        //4.用户信息为空,走注册功能
        if(userInfo==null){
            userInfo = new UserInfo();
            userInfo.setPhone(phone);
            userInfo.setStatus(1); //0锁定 1正常
            baseMapper.insert(userInfo);
        }
        //5.判断用户是否被锁定
        if(userInfo.getStatus()==0){
            throw new YyghException(20001,"用户已被锁定");
        }
        //6.补全用户信息
        //返回页面显示名称
        Map<String, Object> map = new HashMap<>();
        String name = userInfo.getName();
        if(StringUtils.isEmpty(name)) {
            name = userInfo.getNickName();
        }
        if(StringUtils.isEmpty(name)) {
            name = userInfo.getPhone();
        }
        //7. TODO 用户登录
        String token = JwtHelper.createToken(userInfo.getId(), userInfo.getName());

        map.put("token", token);
        map.put("name", name);
        return map;
    }
1.创建API接口方法
userinfo.js
import request from '@/utils/request'

const api_name = `/api/user`

export default {
    //登录验证
    login(userInfo) {
        return request({
            url: `${api_name}/login`,
            method: `post`,
            data: userInfo
        })
    }
}
msm.js
import request from '@/utils/request'

const api_name = `/api/msm`

export default {
    //发送验证短信
    sendCode(mobile) {
        return request({
            url: `${api_name}/send/${mobile}`,
            method: `get`
        })
    }
}
2. 修改layouts/myheader.vue
<template>
<div class="header-container">
<div class="wrapper">
<!-- logo -->
<div class="left-wrapper v-link selected">
<img style="width: 50px" width="50" height="50" src="~assets/images/logo.png">
<span class="text">尚医通 预约挂号统一平台</span>
</div>
<!-- 搜索框 -->
<div class="search-wrapper">
<div class="hospital-search animation-show">
<el-autocomplete class="search-input small" prefix-icon="el-icon-search" v-model="state"
:fetch-suggestions="querySearchAsync" placeholder="点击输入医院名称" @select="handleSelect">
<span slot="suffix" class="search-btn v-link highlight clickable selected">搜索 </span>
</el-autocomplete>
</div>
</div>
<!-- 右侧 -->
<!-- 右侧 -->
<div class="right-wrapper">
<span class="v-link clickable">帮助中心</span>
<span v-if="name == ''" class="v-link clickable" @click="showLogin()" id="loginDialog">登录/注册</span>
<el-dropdown v-if="name != ''" @command="loginMenu">
<span class="el-dropdown-link">
{{ name }}<i class="el-icon-arrow-down el-icon--right"></i>
</span>
<el-dropdown-menu class="user-name-wrapper" slot="dropdown">
<el-dropdown-item command="/user">实名认证</el-dropdown-item>
<el-dropdown-item command="/order">挂号订单</el-dropdown-item>
<el-dropdown-item command="/patient">就诊人管理</el-dropdown-item>
<el-dropdown-item command="/logout" divided>退出登录</el-dropdown-item>
</el-dropdown-menu>
</el-dropdown>
</div>
</div>
<!-- 登录弹出层 -->
<el-dialog :visible.sync="dialogUserFormVisible" style="text-align: left;" top="50px" :append-to-body="true"
width="960px" @close="closeDialog()">
<div class="container">
<!-- 手机登录 #start -->
<div class="operate-view" v-if="dialogAtrr.showLoginType === 'phone'">
<div class="wrapper" style="width: 100%">
<div class="mobile-wrapper" style="position: static;width: 70%">
<span class="title">{{ dialogAtrr.labelTips }}</span>
<el-form>
<el-form-item>
<el-input v-model="dialogAtrr.inputValue" :placeholder="dialogAtrr.placeholder"
:maxlength="dialogAtrr.maxlength" class="input v-input">
<span slot="suffix" class="sendText v-link" v-if="dialogAtrr.second > 0">{{
dialogAtrr.second }}s </span>
<span slot="suffix" class="sendText v-link highlight clickable selected"
v-if="dialogAtrr.second == 0" @click="getCodeFun()">重新发送 </span>
</el-input>
</el-form-item>
</el-form>
<!--发送验证码或者进行登录 动态-->
<div class="send-button v-button" @click="btnClick()"> {{ dialogAtrr.loginBtn }}</div>
</div>
<div class="bottom">
<div class="wechat-wrapper" @click="weixinLogin()"><span class="iconfont icon"></span>
</div>
<span class="third-text"> 第三方账号登录 </span>
</div>
</div>
</div>
<!-- 手机登录 #end -->
<!-- 微信登录 #start -->
<div class="operate-view" v-if="dialogAtrr.showLoginType === 'weixin'">
<div class="wrapper wechat" style="height: 400px">
<div>
<div id="weixinLogin"></div>
</div>
<div class="bottom wechat" style="margin-top: -80px;">
<div class="phone-container">
<div class="phone-wrapper" @click="phoneLogin()"><span class="iconfont icon"></span>
</div>
<span class="third-text"> 手机短信验证码登录 </span>
</div>
</div>
</div>
</div>
<!-- 微信登录 #end -->
<div class="info-wrapper">
<div class="code-wrapper">
<div><img src="//img.114yygh.com/static/web/code_login_wechat.png" class="code-img">
<div class="code-text"><span class="iconfont icon"></span>微信扫一扫关注
</div>
<div class="code-text"> “快速预约挂号”</div>
</div>
<div class="wechat-code-wrapper"><img src="//img.114yygh.com/static/web/code_app.png"
class="code-img">
<span class="iconfont icon"></span><div class="code-text"> 扫一扫下载</div>
<div class="code-text"> “预约挂号”APP</div>
</div>
</div>
<div class="slogan">
<div>xxxxxx官方指定平台</div>
<div>快速挂号 安全放心</div>
</div>
</div>
</div>
</el-dialog>
</div>
</template>3. JS实现
<script>
    import cookie from 'js-cookie'
    import Vue from 'vue'
    import userInfoApi from '@/api/userinfo'
    import msmApi from '@/api/msm'
    import hospitalApi from '@/api/hospital'
    //常量,默认初始化值
    const defaultDialogAtrr = {
        showLoginType: 'phone', // 控制手机登录与微信登录切换

        labelTips: '手机号码', // 输入框提示

        inputValue: '', // 输入框绑定对象
        placeholder: '请输入您的手机号', // 输入框placeholder
        maxlength: 11, // 输入框长度控制

        loginBtn: '获取验证码', // 登录按钮或获取验证码按钮文本

        sending: true,      // 是否可以发送验证码
        second: -1,        // 倒计时间  second>0 : 显示倒计时 second=0 :重新发送 second=-1 :什么都不显示
        clearSmsTime: null  // 倒计时定时任务引用 关闭登录层清除定时任务
    }

    export default {
        data() {
            return {
                userInfo: {  //登录对象
                    openid: "",
                    phone: "",
                    code: ""
                },
                dialogAtrr: defaultDialogAtrr, //弹出层对象
                dialogUserFormVisible: false, //弹出层是否展示
                name: "" //登录后用户名
            }
        },
        created() {
            //判断用户是否已登录
            this.showInfo()
        },
        methods: {
            //打开登录注册弹出层
            showLogin() {
                this.dialogUserFormVisible = true
                //重新进行初始化
                this.dialogAtrr = { ...defaultDialogAtrr } //对象存储运算符,开辟新内存空间
            },
            //发送验证码或者进行登录
            btnClick() {
                if (this.dialogAtrr.loginBtn == "获取验证码") {
                    //给手机号赋值
                    this.userInfo.phone = this.dialogAtrr.inputValue
                    //调用发送验证码方法
                    this.getCodeFun();
                } else {
                    //调用登录方法
                    this.login();
                }
            },
            //发送验证码
            getCodeFun() {
                //1.校验手机号
                if (!(/^1[34578]\d{9}$/.test(this.userInfo.phone))) {
                    this.$message.error("手机号码不正确")
                    return;
                }
                //2.更改弹出层对象值为登录
                this.dialogAtrr.inputValue = ''
                this.dialogAtrr.placeholder = '请输入验证码'
                this.dialogAtrr.maxlength = 6
                this.dialogAtrr.loginBtn = '立即登录'

                //3.判断是否重复发送验证码 sending
                if (!this.dialogAtrr.sending) {
                    this.$message.error("请勿重复发送")
                    return;
                }
                this.dialogAtrr.sending = false

                //4.发送验证码
                msmApi.sendCode(this.userInfo.phone)
                    .then(response => {

                        //倒计时方法
                        this.timeDown();
                    })
                    .catch(e => {
                        //5.发送失败回退之前界面
                        this.$message.error("发送验证码失败")
                        this.showLogin()
                    })
            },
            timeDown() {
                if (this.clearSmsTime) {
                    clearInterval(this.clearSmsTime);
                }
                this.dialogAtrr.second = 60;

                this.dialogAtrr.labelTips = '验证码已发送至' + this.userInfo.phone
                this.clearSmsTime = setInterval(() => {
                    --this.dialogAtrr.second;
                    if (this.dialogAtrr.second < 1) {
                        //清除定时器,需要成对出现
                        clearInterval(this.clearSmsTime);
                        this.dialogAtrr.sending = true;
                        this.dialogAtrr.second = 0;
                    }
                }, 1000);
            },
            //登录方法
            login() {
                //1.给验证码赋值
                this.userInfo.code = this.dialogAtrr.inputValue

                //2.校验参数合法性
                if (this.dialogAtrr.loginBtn == '正在提交...') {
                    this.$message.error('重复提交')
                    return;
                }
                if (this.userInfo.code == '') {
                    this.$message.error('验证码必须输入')
                    return;
                }
                if (this.userInfo.code.length != 4) {
                    this.$message.error('验证码格式不正确')
                    return;
                }
                this.dialogAtrr.loginBtn = '正在提交...'

                //3.提交登录信息,成功设置登录状态(name,cookie)
                userInfoApi.login(this.userInfo)
                    .then(response => {
                        //设置登录状态
                        this.setCookies(response.data.name, response.data.token)
                    })
                    .catch(e => {
                        //4.失败回退
                        this.dialogAtrr.loginBtn = '马上登录'
                    })
            },
            //设置登录状态
            setCookies(name, token) {
                //domain:作用范围
                cookie.set("name", name, { domain: 'localhost' })
                cookie.set("token", token, { domain: 'localhost' })
                window.location.reload()
            },
            //判断是否已登录
            showInfo() {
                let token = cookie.get("token")
                if (token) {
                    this.name = cookie.get("name")
                    console.log(this.name);
                }
            },
            //菜单方法 登出?
            loginMenu(command) {
                if ('/logout' == command) {
                    cookie.set('name', '', { domain: 'localhost' })
                    cookie.set('token', '', { domain: 'localhost' })

                    //跳转页面
                    window.location.href = '/'
                } else {
                    window.location.href = command
                }
            },

            handleSelect(item) {
                window.location.href = '/hospital/' + item.hoscode
            },
            //切换微信登录
            weixinLogin() {
                this.dialogAtrr.showLoginType = 'weixin'
            },
            //切换手机登录
            phoneLogin() {
                this.dialogAtrr.showLoginType = 'phone'
                this.showLogin()
            }
        }
    };
</script>
4. 测试
我正在尝试使用ruby和Savon来使用网络服务。测试服务为http://www.webservicex.net/WS/WSDetails.aspx?WSID=9&CATID=2require'rubygems'require'savon'client=Savon::Client.new"http://www.webservicex.net/stockquote.asmx?WSDL"client.get_quotedo|soap|soap.body={:symbol=>"AAPL"}end返回SOAP异常。检查soap信封,在我看来soap请求没有正确的命名空间。任何人都可以建议我
我想安装一个带有一些身份验证的私有(private)Rubygem服务器。我希望能够使用公共(public)Ubuntu服务器托管内部gem。我读到了http://docs.rubygems.org/read/chapter/18.但是那个没有身份验证-如我所见。然后我读到了https://github.com/cwninja/geminabox.但是当我使用基本身份验证(他们在他们的Wiki中有)时,它会提示从我的服务器获取源。所以。如何制作带有身份验证的私有(private)Rubygem服务器?这是不可能的吗?谢谢。编辑:Geminabox问题。我尝试“捆绑”以安装新的gem..
最近,当我启动我的Rails服务器时,我收到了一长串警告。虽然它不影响我的应用程序,但我想知道如何解决这些警告。我的估计是imagemagick以某种方式被调用了两次?当我在警告前后检查我的git日志时。我想知道如何解决这个问题。-bcrypt-ruby(3.1.2)-better_errors(1.0.1)+bcrypt(3.1.7)+bcrypt-ruby(3.1.5)-bcrypt(>=3.1.3)+better_errors(1.1.0)bcrypt和imagemagick有关系吗?/Users/rbchris/.rbenv/versions/2.0.0-p247/lib/ru
在Rails4.0.2中,我使用s3_direct_upload和aws-sdkgems直接为s3存储桶上传文件。在开发环境中它工作正常,但在生产环境中它会抛出如下错误,ActionView::Template::Error(noimplicitconversionofnilintoString)在View中,create_cv_url,:id=>"s3_uploader",:key=>"cv_uploads/{unique_id}/${filename}",:key_starts_with=>"cv_uploads/",:callback_param=>"cv[direct_uplo
我想在Ruby中创建一个用于开发目的的极其简单的Web服务器(不,不想使用现成的解决方案)。代码如下:#!/usr/bin/rubyrequire'socket'server=TCPServer.new('127.0.0.1',8080)whileconnection=server.acceptheaders=[]length=0whileline=connection.getsheaders想法是从命令行运行这个脚本,提供另一个脚本,它将在其标准输入上获取请求,并在其标准输出上返回完整的响应。到目前为止一切顺利,但事实证明这真的很脆弱,因为它在第二个请求上中断并出现错误:/usr/b
您如何在Rails中的实时服务器上进行有效调试,无论是在测试版/生产服务器上?我试过直接在服务器上修改文件,然后重启应用,但是修改好像没有生效,或者需要很长时间(缓存?)我也试过在本地做“脚本/服务器生产”,但是那很慢另一种选择是编码和部署,但效率很低。有人对他们如何有效地做到这一点有任何见解吗? 最佳答案 我会回答你的问题,即使我不同意这种热修补服务器代码的方式:)首先,你真的确定你已经重启了服务器吗?您可以通过跟踪日志文件来检查它。您更改的代码显示的View可能会被缓存。缓存页面位于tmp/cache文件夹下。您可以尝试手动删除
只是想确保我理解了事情。据我目前收集到的信息,Cucumber只是一个“包装器”,或者是一种通过将事物分类为功能和步骤来组织测试的好方法,其中实际的单元测试处于步骤阶段。它允许您根据事物的工作方式组织您的测试。对吗? 最佳答案 有点。它是一种组织测试的方式,但不仅如此。它的行为就像最初的Rails集成测试一样,但更易于使用。这里最大的好处是您的session在整个Scenario中保持透明。关于Cucumber的另一件事是您(应该)从使用您的代码的浏览器或客户端的角度进行测试。如果您愿意,您可以使用步骤来构建对象和设置状态,但通常您
其实做自媒体的成本并不高,入门只需要一部手机即可!在手机上找视频素材、使用手机剪辑视频、最后使用手机发布视频作品获得收益!方法并不难,今天这期内容就来给粉丝们分享一种小方法,每天稳定收益100-300,抓紧点赞收藏!1、找素材(1)使用手机拍摄自己喜欢的经典段落,使用程序把文案内容提取出来(2)也可以在豆瓣、知乎、微博等网站中找一些自己需要的文案素材(3)把文案进行润色修改,可以加入一些自己的观点(4)视频素材可以使用软件中自带的素材,也可以在素材网站中下载完整版的素材2、文案配音(1)把复制好的文案直接导入小程序中(2)调整音色、音调后一键合成音频即可(3)可以选择自己朗读配音,需要花一点时
require"socket"server="irc.rizon.net"port="6667"nick="RubyIRCBot"channel="#0x40"s=TCPSocket.open(server,port)s.print("USERTesting",0)s.print("NICK#{nick}",0)s.print("JOIN#{channel}",0)这个IRC机器人没有连接到IRC服务器,我做错了什么? 最佳答案 失败并显示此消息::irc.shakeababy.net461*USER:Notenoughparame
我有一个使用PDFKit呈现网页的pdf版本的Rails应用程序。我使用Thin作为开发服务器。问题是当我处于开发模式时。当我使用“bundleexecrailss”启动我的服务器并尝试呈现任何PDF时,整个过程会陷入僵局,因为当您呈现PDF时,会向服务器请求一些额外的资源,如图像和css,看起来只有一个线程.如何配置Rails开发服务器以运行多个工作线程?非常感谢。 最佳答案 我找到的最简单的解决方案是unicorn.geminstallunicorn创建一个unicorn.conf:worker_processes3然后使用它:
