C#中的表格控件只有一个,那就是datagridview,不像QT中可以用QTableview,QTableWidget。新手拿到datagridview的第一个问题就是数据从哪里来?难道从设计器中一个个手动输入,到时候要变怎办?所以,我们这里说说DataGridView的手动操作。
文章目录
文章原出处:
https://blog.csdn.net/haigear/article/details/128764698
这里我们是没有数据源的纯view控件的操作,后面第二部分我们再讲有数据源的操作。
下面的代码声明并初始化完成列DataGridViewColumn、行DataGridViewRow 、单元格DataGridViewCell 对象,但这里需要注意的是,DataGridView必须先有列后有行,最后才是单元格cell,初始化完成后你就可以直接将他们加入DataGridView的实例中了,如下代码dataGridView1就是在设计器的工具箱中直接拖放到窗体中的DataGridView控件。
  DataGridViewColumn col = new DataGridViewColumn();
  DataGridViewRow row = new DataGridViewRow();
  DataGridViewCell cell = new DataGridViewTextBoxCell();
  cell.Value = "item";
  col.CellTemplate = cell; //设置单元格格式模板
  col.HeaderText = "column01";
  dataGridView1.Columns.Add(col);
效果:
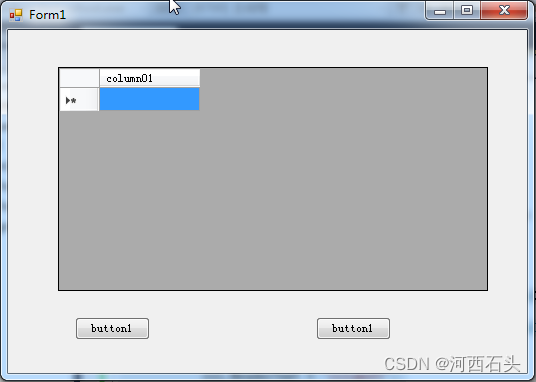
虽然,只有一行一列一个单元格,但如果我们搞懂了原理,那后面批量加入我们需要的行列和单元格就容易了。
这里了重点强调一下,加入的顺序应该是:
1、初始化列
2、初始化行
3、初始化单元格
4、将列column加入DataGridView
5、将行row加入列DataGridView
6、将单元格cell加入行row
注意,一个列必须设定它自己这一列的单元格格式母板,否则就会报错。如:
cell= new DataGridViewTextBoxCell();
 col.CellTemplate = cell;
批量加入无非就是加入了一些循环,过程和单个单元格的加入几乎没有差别,需要注意的是每次加入的行或者列或者单元格都必须是一个新对象,也就是要new一个新的对象,否则就不能成功加入。
 DataGridViewColumn col;
 DataGridViewRow row;
 DataGridViewCell cell= new DataGridViewTextBoxCell();

 for (int i = 0; i < 6; i++)
 {
     col = new DataGridViewColumn();
     col.HeaderText = "col" + i.ToString();
     col.CellTemplate = cell;
     dataGridView1.Columns.Add(col);
     }

 for (int i = 0; i <20; i++)
  {
      row = new DataGridViewRow();
      for (int j = 0; j < 6; j++)
      {
         cell = new DataGridViewTextBoxCell();
         cell.Value = "item" + i.ToString() + j.ToString();
         row.Cells.Add(cell);
      }
      dataGridView1.Rows.Add(row);

   }
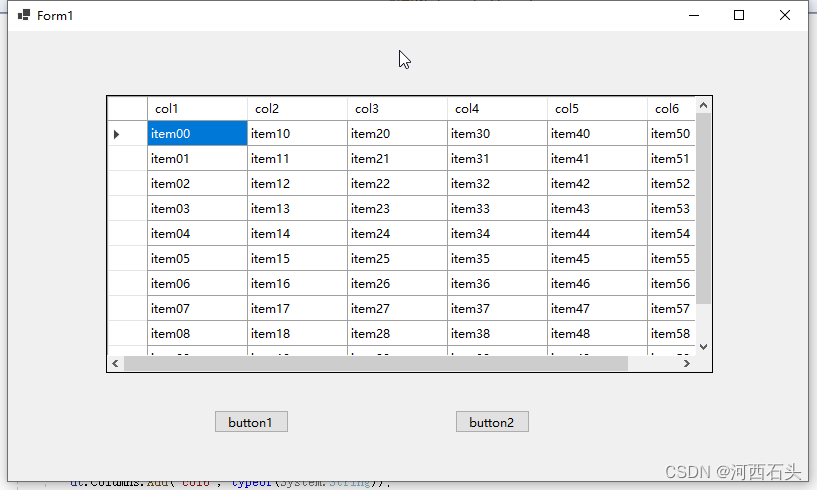
运行的效果如下:
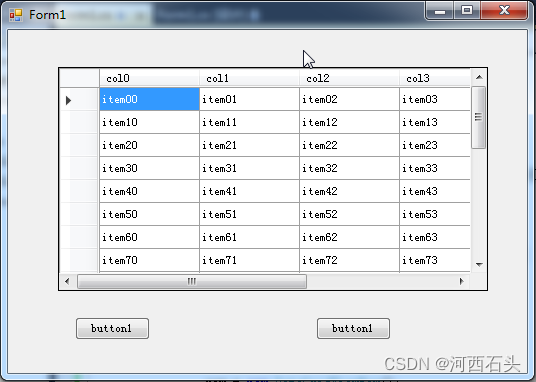
这里,我们将加入行和加入单元格同时进行的,你也可以加入行和加入列完成后,单独对单元格进行赋值,代码如下:
 for (int i = 0; i < 20; i++)
  {
      row = new DataGridViewRow();
      //for (int j = 0; j < 6; j++)
      //{
      //    cell = new DataGridViewTextBoxCell();
      //    cell.Value = "item" + i.ToString() + j.ToString();
      //    row.Cells.Add(cell);
      //}
      dataGridView1.Rows.Add(row);
  }

  for (int i = 0; i < 6; i++)
      for (int j = 0; j < 20; j++)
          dataGridView1.Rows[j].Cells[i].Value = "item" + j.ToString() + i.ToString();
行的加入我们利用add方法来完成,它有三个重载,所以我们可以用多种方式加入,前面我们就已经使用过了它的最常见的重载,直接在add的参数中加入row
如:
dataGridView1.Rows.Add(row);
这里我们使用数组加入也很方便:
    //添加行
     string[] row0 = { "Jack", "1880", "2022-12-5","12.5","true" };
     string[] row1 = { "Smith", "2208", "2022-02-15", "538", "true" };
     dataGridView1.Rows.Add(row0);
     dataGridView1.Rows.Add(row1);
     dataGridView1.Rows.Add(new string[] { "Tome", "1208", "2012-2-15", "1.2", "true" });
     //list转数组后加入
     List<string> values = new List<string>();
     values.Add("Jone");
     values.Add("1222");
     values.Add("2022-05-12");
     values.Add("23.2");
     values.Add("false");
     dataGridView1.Rows.Add(values.ToArray());
运行效果
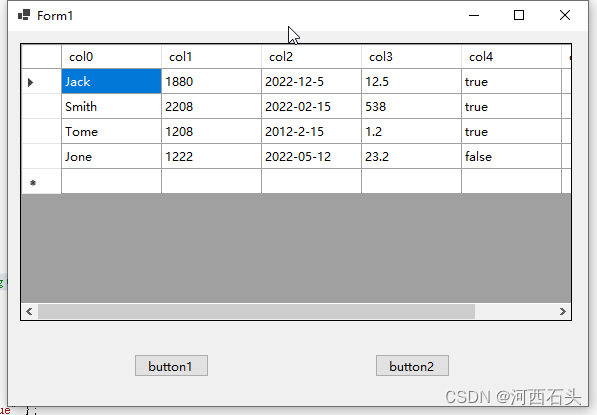
还有一个重载是add(int ),这个专门从来加入空行,比如加入1000个空行,那就直接在参数中输入1000:
dataGridView1.Rows.Add(1000);
数据来源可以是自己从数据库中获取,也可以自己构建一个DataTable,也可以读入字符流或者字符列表等。这里分别演示。DataSource它的特点是:任何实现IListSource接口的类都可以作为它的右值。
我们将列表中装入一个对象,当然,这个对象有多少特征,我们就可以显示在表格中显示多少列
 List<Student> students = new List<Student>()
 {
      new Student() {Name="John", Gender=true, Birthday=new DateTime(2012, 12, 4),Age= 20, Hight=15},
      new Student() {Name="Jack",  Gender=true, Birthday=new DateTime(2022, 10, 12), Age=10, Hight=125}
  };
  dataGridView1.DataSource = students.Select(x => new { x.Name, x.Gender, x.Birthday, x.Age, x.Hight }).ToList();
运行效果:
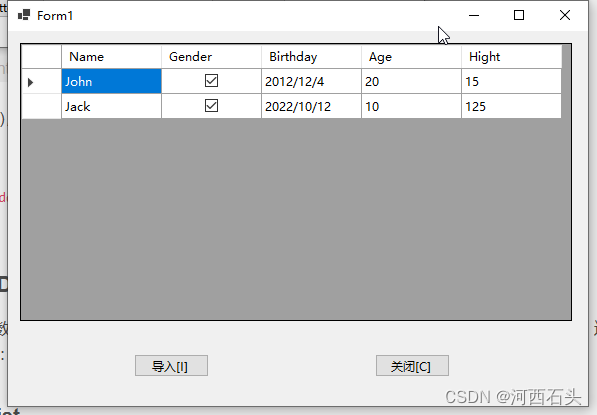
既然是我们手动自定义的一个表,那么我们就必须给它定义行列和单元格内容。这的Datatable只是提供数据,与视图View无关,那么它的责任就是组织好数据给视图来显示,这在MVC中就属于model层。
下面的代码我们初始化了一个DataTable对象后就可以利用columns.add增加列了,增加完列我们用DataTable的newRow()方法直接增加行,没有它法。
     DataTable dt = new DataTable();
     dt.Columns.Add("col1", typeof(System.String));
     dt.Columns.Add("col2", typeof(System.String));
     dt.Columns.Add("col3", typeof(System.String));
     dt.Columns.Add("col4", typeof(System.String));
     dt.Columns.Add("col5", typeof(System.String));
     dt.Columns.Add("col6", typeof(System.String));

     for(int i = 0; i < 10; i++)
     {
         dt.Rows.Add(dt.NewRow());
         for(int j = 0; j < 6; j++)
             dt.Rows[i][j]="item" + j.ToString() + i.ToString();
     }
	dataGridView1.DataSource =dt;
我们上面所有的行,我们使用的格式都是String的,便于统一用循环添加,我们我们想要添加其他的格式的数据可以这样添加:
 DataTable dt = new DataTable();

 dt.Columns.Add("col1", typeof(System.Int32));
 dt.Columns.Add("col2", typeof(System.String));
 dt.Columns.Add("col3", typeof(System.DateTime));
 dt.Columns.Add("col4", typeof(System.Boolean));
 dt.Columns.Add("col5", typeof(System.Int16));
 dt.Columns.Add("col6", typeof(System.Decimal));
关于赋值,使用二维数组的方式直接给单元格赋值即可:
dt.Rows[i][j]="item" + j.ToString() + i.ToString();
最后,我们给DataGridView实例指定数据源DataSource 属性即可,这里我们指定为我们刚刚手动建立的DataTable。
运行效果:
看起来,和前面我们直接对DataGridView手动操作得到的表格没有什么两样,但实际我们此时已经使用了MVC的概念了,一个负责的是视图一个负责的是数据。
我们首先定义两个List分别存放表格的字段类型和值
            //定义一个表格的字段类型
            List<string> typeDef = new List<string>();
            typeDef.Add("System.Int32");
            typeDef.Add("System.String");
            typeDef.Add("System.DateTime");
            typeDef.Add("System.Decimal");
            typeDef.Add("System.Boolean");

            //表格字段内容
            List<string> values = new List<string>();
            values.Add("1222");
            values.Add("Jone");
            values.Add("2022-05-12");
            values.Add("23.2");
            values.Add("false");
            dataGridView1.DataSource = initialDataTable(typeDef,values);
接下来,我们定义一个函数,专门来建立一个表格
  DataTable initialDataTable(List<String> strlist, List<String> vluelist)
        {

            DataTable dt = new DataTable();

            DataColumn col = new DataColumn();
            for (int i = 0; i < strlist.Count; i++)
            {
                col = new DataColumn();
                col.DataType = System.Type.GetType(strlist[i]);
                dt.Columns.Add(col);
            }

            for (int i = 0; i < 10; i++)
            {
                dt.Rows.Add(dt.NewRow());
                for (int j = 0; j < strlist.Count; j++)
                    dt.Rows[i][j] = vluelist[j];
            }

            return dt;

        }
    }
运行效果:
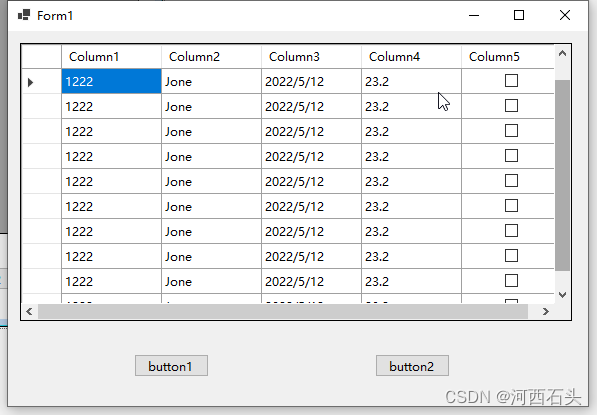
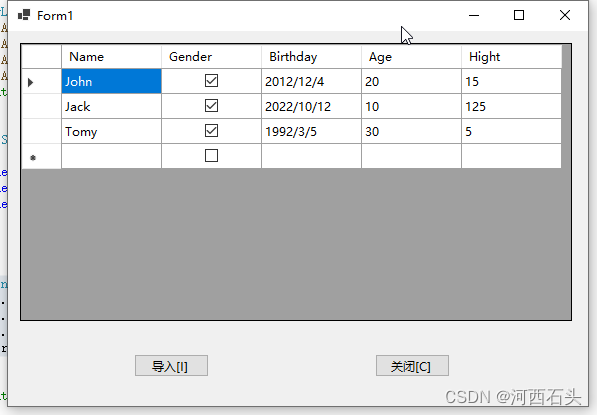
类的特征属性直接显示在表格里可以通过BindingList来实现
BindingList<Student> list2 = new BindingList<Student>();
list2.Add(new Student("John", true, new DateTime(2012, 12, 4), 20, 15));
list2.Add(new Student("Jack", true, new DateTime(2022, 10, 12), 10, 125));
list2.Add(new Student("Tomy", true, new DateTime(1992, 3, 5), 30, 5));
dataGridView1.DataSource= list2;
运行效果:
有了上面的基础后,我们就可以建立一个导入文本文件的表格,并且可以自动识别文本文件中的字段类型。我们首先来看看效果:
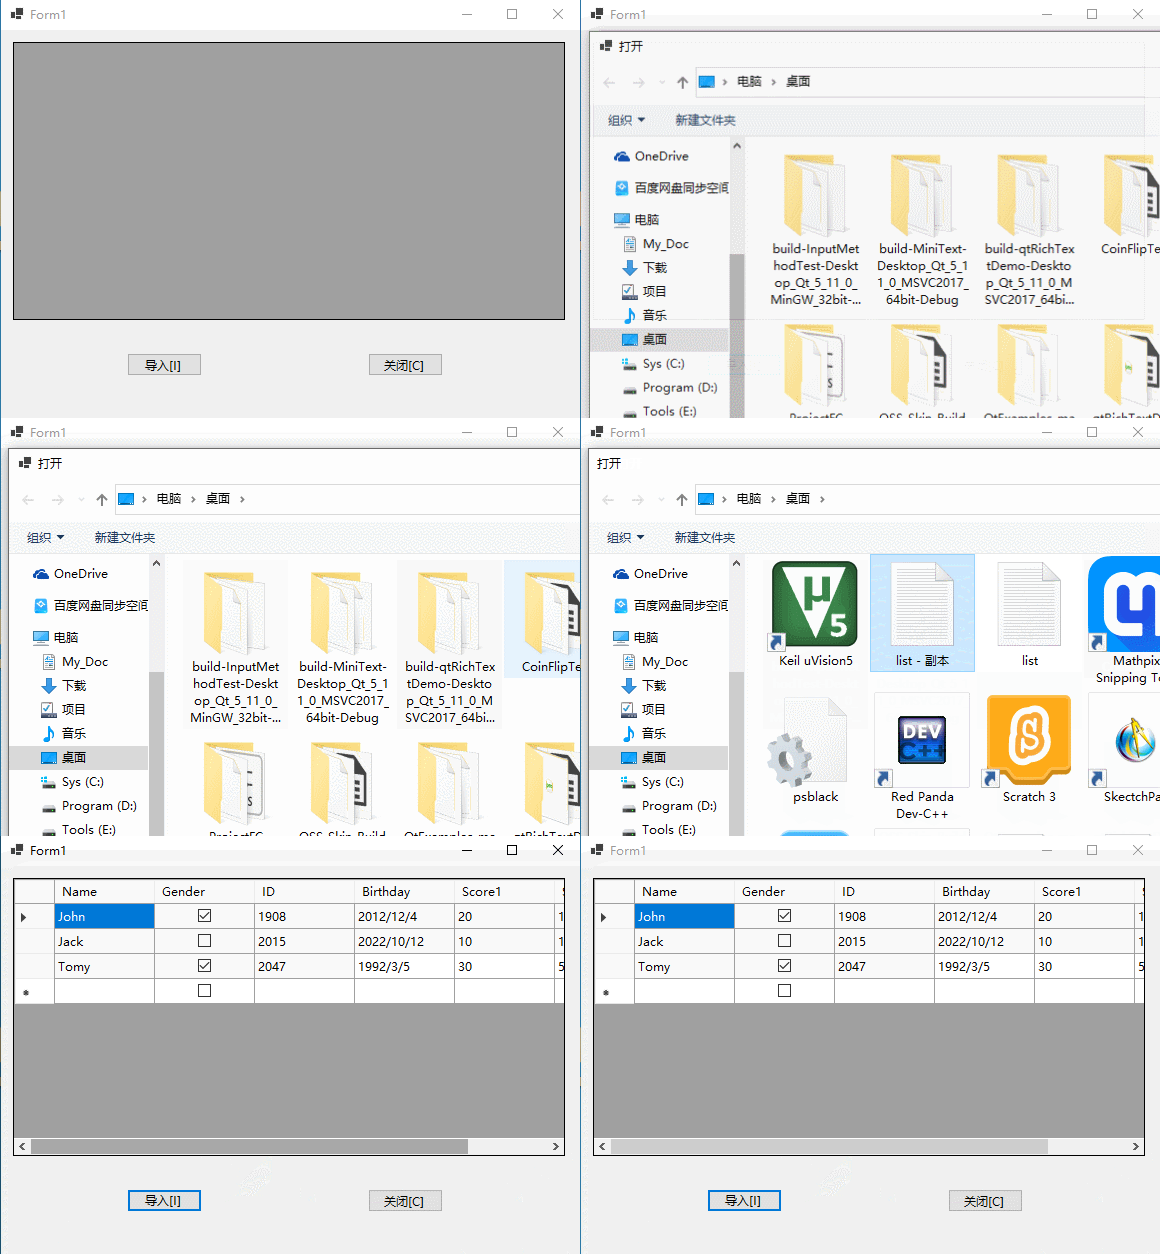
导入文本表格要做好文本字段之间的分割Split,这里不详说了,首先要从读入的文本流中取出表格的各列的名称和类型,然后再取出内容,然后分别形成数组,贴出关键代码:
 			StreamReader sr = new StreamReader(filepath, Encoding.UTF8);
            typetext = sr.ReadLine();
            headtext = sr.ReadLine();
            string[] typer = typetext.Split(',');
            ArrayList content = new ArrayList();
            //开始读文本中的每条记录的内容
            while ((str=sr.ReadLine()) != null)
            {
                content.Add(str);
                Console.WriteLine(str);
            }
            //定义一个表格的字段类型
            List<string> typeDef = new List<string>();
            for (int i = 0; i < typer.Length; i++)
            {
                typeDef.Add("System." + typer[i].ToString());
             }

            //表格字段内容
            ArrayList head = new ArrayList();
            string[] header = headtext.Split(',');
            for (int i = 0; i < header.Length; i++)
            {
                head.Add( header[i].ToString());
            }
将上述代码得到的三个列表传入下面的DataTable处理函数中即可得到DataGridView的DataSource需要的DataTable
       DataTable initialDataTable(List<String> typelist, ArrayList headerlist,ArrayList contentarry)
        {

            DataTable dt = new DataTable();
            DataColumn col = new DataColumn();
            for (int i = 0; i < headerlist.Count; i++)
            {
                col = new DataColumn();
                col.ColumnName = headerlist[i].ToString();
                col.DataType = System.Type.GetType(typelist[i]);
                dt.Columns.Add(col);
            }
            // 加入内容
            for (int i = 0; i < contentarry.Count; i++)
            {
                dt.Rows.Add(contentarry[i].ToString().Split(','));
            }
            return dt;
        }
可以参考的文本:
String,Boolean,Int32,DateTime,Int32,Int32
Name,Gender,ID,Birthday,Score1,Score2
John, true,1908, 2012-12-4, 20, 16
Jack, false2015, 2022-10-12, 10, 125
Tomy, true, 2047,1992-3-5, 30, 15,
Mophy, true, 1147,2014-6-3, 40, 24
Tollor, false,2347,2102-2-15, 50, 55
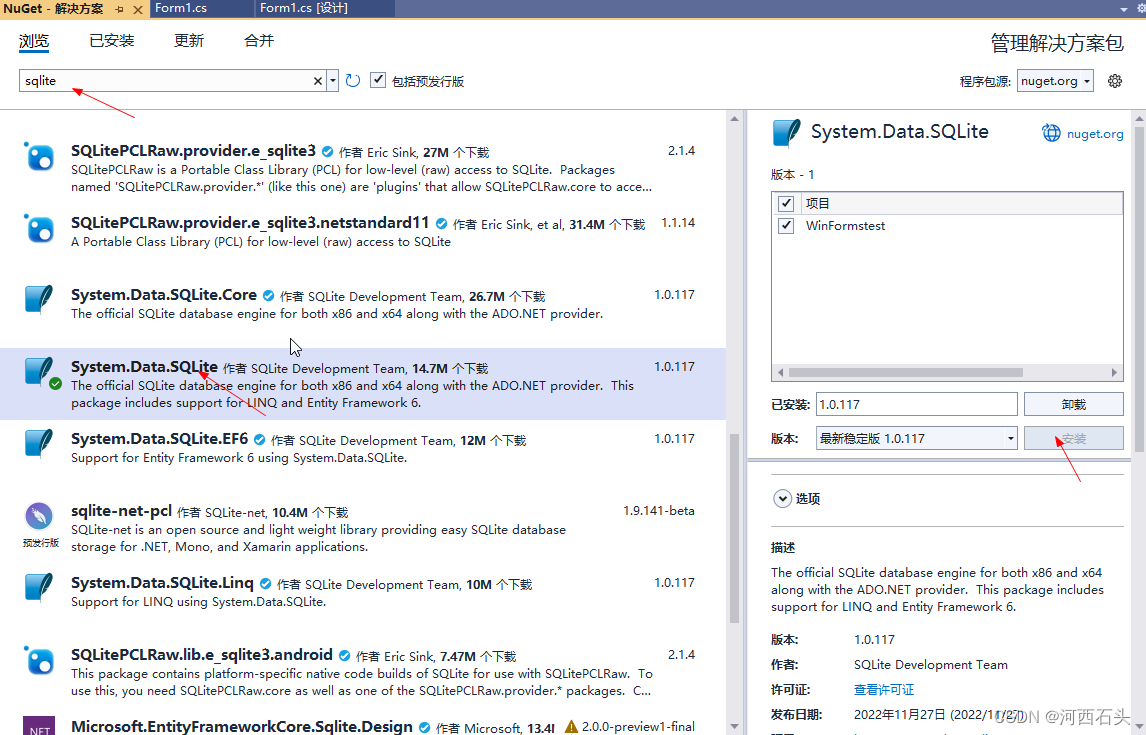
如果有数据库,那是最好不过的啦,直接将查询所得的表赋值给DataGridView的DataSource即可。这里我们使用sqlite,事先要安装上sqlite,到Nuget中最快方式获得。
有了sqlite的环境,我们可以开始组织数据库读取了。这里我们调用的句子非常少,其实这是直接通过SQLiteDataAdapter 填充了一个新建的DataTable而已。
  //指定数据库地址(我这里就放在debug目录下)
  string constr = "Data Source=tbdb.db;";
   //设置SQL查询语句
  string sql = "select * from TestTab";
  SQLiteDataAdapter mAdapter = new SQLiteDataAdapter(sql, constr);
  DataTable dt = new DataTable();
  mAdapter.Fill(dt);
  dataGridView1.DataSource = dt;
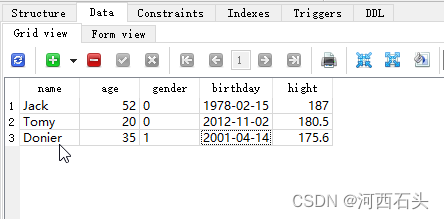
数据库中的表:
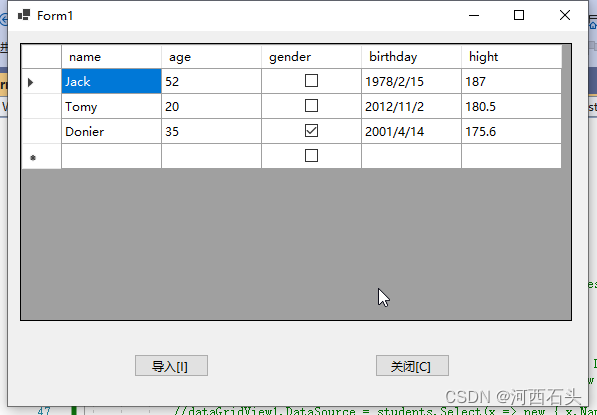
运行效果:
上面用到的student类,这里列出来省得大家重新编写:
class Student
{
    string _name = "";
    bool _gender =false;
    DateTime _birthday;
    int _age;
    decimal _hight;
    public string School;

    public Student() {

        School = "";
    }

    public  Student(string name, bool gender, DateTime birthday, int age, decimal hight)
    {
        Name = name;
        Gender = gender;
        Birthday = birthday;
        Age = age;
        Hight = hight;
        School = "";
    }

    public string Name{get { return _name; }set { _name = value; }}
    public bool Gender{get { return _gender; } set { _gender = value; }}
    public DateTime Birthday{ get { return _birthday; } set { _birthday = value; } }
    public int Age { get { return _age; } set { _age = value; } }
    public decimal Hight { get { return _hight; } set { _hight = value; } }
    public List<int> Scores { get; set; }
}
文章原出处:https://blog.csdn.net/haigear/article/details/128764698
其实关于DataGridView的操作还有很多,控件中最复杂的就属它了,所以如果说你要重新编写一个自定义控件,它也是最复杂的,这里我们只是讲了表格的数据填充,后面一篇我们会讲到样式设置和编辑,有时间我们还可以讲讲自定义DataGridView的编写。感兴趣的童鞋可以继续关注。
转发注明出处,码字不易。
我正在学习如何使用Nokogiri,根据这段代码我遇到了一些问题:require'rubygems'require'mechanize'post_agent=WWW::Mechanize.newpost_page=post_agent.get('http://www.vbulletin.org/forum/showthread.php?t=230708')puts"\nabsolutepathwithtbodygivesnil"putspost_page.parser.xpath('/html/body/div/div/div/div/div/table/tbody/tr/td/div
我有一个Ruby程序,它使用rubyzip压缩XML文件的目录树。gem。我的问题是文件开始变得很重,我想提高压缩级别,因为压缩时间不是问题。我在rubyzipdocumentation中找不到一种为创建的ZIP文件指定压缩级别的方法。有人知道如何更改此设置吗?是否有另一个允许指定压缩级别的Ruby库? 最佳答案 这是我通过查看rubyzip内部创建的代码。level=Zlib::BEST_COMPRESSIONZip::ZipOutputStream.open(zip_file)do|zip|Dir.glob("**/*")d
类classAprivatedeffooputs:fooendpublicdefbarputs:barendprivatedefzimputs:zimendprotecteddefdibputs:dibendendA的实例a=A.new测试a.foorescueputs:faila.barrescueputs:faila.zimrescueputs:faila.dibrescueputs:faila.gazrescueputs:fail测试输出failbarfailfailfail.发送测试[:foo,:bar,:zim,:dib,:gaz].each{|m|a.send(m)resc
很好奇,就使用rubyonrails自动化单元测试而言,你们正在做什么?您是否创建了一个脚本来在cron中运行rake作业并将结果邮寄给您?git中的预提交Hook?只是手动调用?我完全理解测试,但想知道在错误发生之前捕获错误的最佳实践是什么。让我们理所当然地认为测试本身是完美无缺的,并且可以正常工作。下一步是什么以确保他们在正确的时间将可能有害的结果传达给您? 最佳答案 不确定您到底想听什么,但是有几个级别的自动代码库控制:在处理某项功能时,您可以使用类似autotest的内容获得关于哪些有效,哪些无效的即时反馈。要确保您的提
假设我做了一个模块如下:m=Module.newdoclassCendend三个问题:除了对m的引用之外,还有什么方法可以访问C和m中的其他内容?我可以在创建匿名模块后为其命名吗(就像我输入“module...”一样)?如何在使用完匿名模块后将其删除,使其定义的常量不再存在? 最佳答案 三个答案:是的,使用ObjectSpace.此代码使c引用你的类(class)C不引用m:c=nilObjectSpace.each_object{|obj|c=objif(Class===objandobj.name=~/::C$/)}当然这取决于
我正在尝试使用ruby和Savon来使用网络服务。测试服务为http://www.webservicex.net/WS/WSDetails.aspx?WSID=9&CATID=2require'rubygems'require'savon'client=Savon::Client.new"http://www.webservicex.net/stockquote.asmx?WSDL"client.get_quotedo|soap|soap.body={:symbol=>"AAPL"}end返回SOAP异常。检查soap信封,在我看来soap请求没有正确的命名空间。任何人都可以建议我
关闭。这个问题是opinion-based.它目前不接受答案。想要改进这个问题?更新问题,以便editingthispost可以用事实和引用来回答它.关闭4年前。Improvethisquestion我想在固定时间创建一系列低音和高音调的哔哔声。例如:在150毫秒时发出高音调的蜂鸣声在151毫秒时发出低音调的蜂鸣声200毫秒时发出低音调的蜂鸣声250毫秒的高音调蜂鸣声有没有办法在Ruby或Python中做到这一点?我真的不在乎输出编码是什么(.wav、.mp3、.ogg等等),但我确实想创建一个输出文件。
我在我的项目目录中完成了compasscreate.和compassinitrails。几个问题:我已将我的.sass文件放在public/stylesheets中。这是放置它们的正确位置吗?当我运行compasswatch时,它不会自动编译这些.sass文件。我必须手动指定文件:compasswatchpublic/stylesheets/myfile.sass等。如何让它自动运行?文件ie.css、print.css和screen.css已放在stylesheets/compiled。如何在编译后不让它们重新出现的情况下删除它们?我自己编译的.sass文件编译成compiled/t
我想将html转换为纯文本。不过,我不想只删除标签,我想智能地保留尽可能多的格式。为插入换行符标签,检测段落并格式化它们等。输入非常简单,通常是格式良好的html(不是整个文档,只是一堆内容,通常没有anchor或图像)。我可以将几个正则表达式放在一起,让我达到80%,但我认为可能有一些现有的解决方案更智能。 最佳答案 首先,不要尝试为此使用正则表达式。很有可能你会想出一个脆弱/脆弱的解决方案,它会随着HTML的变化而崩溃,或者很难管理和维护。您可以使用Nokogiri快速解析HTML并提取文本:require'nokogiri'h
我想为Heroku构建一个Rails3应用程序。他们使用Postgres作为他们的数据库,所以我通过MacPorts安装了postgres9.0。现在我需要一个postgresgem并且共识是出于性能原因你想要pggem。但是我对我得到的错误感到非常困惑当我尝试在rvm下通过geminstall安装pg时。我已经非常明确地指定了所有postgres目录的位置可以找到但仍然无法完成安装:$envARCHFLAGS='-archx86_64'geminstallpg--\--with-pg-config=/opt/local/var/db/postgresql90/defaultdb/po
