目录
实现如图的纵向滚动效果

<scroll-view class="container_2" scroll-y>
 <view>T</view>
<view>S</view>
<view>J</view>
</scroll-view>
复制代码
.container_2 view{
width: 100px;
height: 100px;
text-align: center;
line-height: 100px;
}
.container_2 view:nth-child(1){
background-color: red;
}
.container_2 view:nth-child(2){
  background-color: yellowgreen;
}
.container_2 view:nth-child(3){
  background-color: blue;
}
.container_2{
  display: flex;
  justify-content: space-around
}

.container_2{
  border: 1px solid yellowgreen;
  height: 130px;
  width: 100px;
}
复制代码
scroll-y 改成 scroll-x
实现如图的横向滚动效果:

<scroll-view class="container_2" scroll-x>
 <view>横           向           滑           动           演           示</view>
</scroll-view>
复制代码
.container_2 view{
width: 300px;
height: 100px;
text-align: center;
line-height: 100px;
}
.container_2 view:nth-child(1){
background-color: red;
}
.container_2{
  display: flex;
  justify-content: space-around
}

.container_2{
  border: 1px solid yellowgreen;
  height: 100px;
  width: 100px;
}
复制代码
实现如图的轮播图效果:
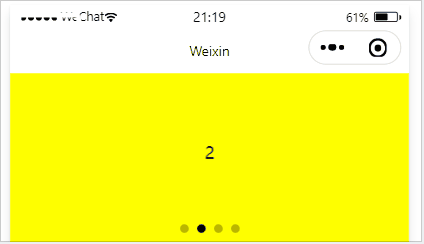
<swiper class="container_3" indicator-dots>
<swiper-item>
<view class="item">1</view>
</swiper-item>

<swiper-item>
  <view class="item">2</view>
</swiper-item>

<swiper-item>
  <view class="item">3</view>
</swiper-item>

<swiper-item>
  <view class="item">4</view>
</swiper-item>
</swiper>
复制代码
.container_3{
  height: 160px;
}

.item{
  height: 100%;
  line-height: 150px;
  text-align: center;
}

swiper-item:nth-child(1) .item{
  background-color: burlywood;
}
swiper-item:nth-child(2) .item{
  background-color: yellow;
}
swiper-item:nth-child(3) .item{
  background-color: pink;
}
swiper-item:nth-child(4) .item{
  background-color: aqua;
}
复制代码
.swiper 组件的常用属性
属性 | 类型 | 默认值 | 说明 |
indicator-dots | boolean | false | 是否显示面板指示点 |
| indicator-color | color | rgba(0, 0, 0, .3) | 指示点颜色 |
| indicator-active-color | color | #000000 | 当前选中的指示点颜色 |
| autoplay | boolean | false | 是否自动切换 |
| interval | number | 5000 | 自动切换时间间隔 |
| circular | boolean | false | 是否采用衔接滑动 |
文本组件
类似于 HTML 中的 span 标签,是一个行内元素
通过 text 组件的 selectable 属性,实现长按选中文本内容的效果:
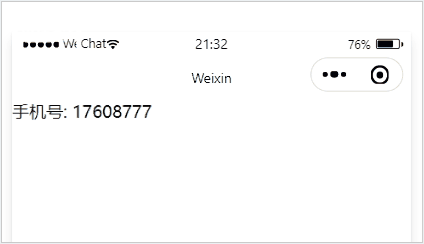
<view>
手机号:
<text selectable>17608777</text>
</view>
复制代码
富文本组件 支持把 HTML 字符串渲染为 WXML 结构
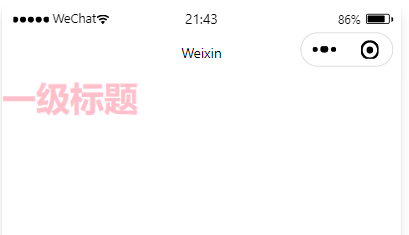
<rich-text nodes="<h1 style='color:pink;'>一级标题 <h1>"></rich-text>复制代码
<!--pages/swiper/swiper.wxml-->
<text>pages/swiper/swiper.wxml</text>
<!-- 滑块视图 先添加一个滑块容器 -->
<!-- 是否自动播放 ,增加提示点 ,是否衔接滑动(例如从最后一张到第一张),提示点颜色 -->
<swiper
autoplay="{{false}}"
indicator-dots
circular
indicator-color="rgba(0,0,0,1)">
<!-- 添加一个内容  更改轮播图图片 -->
<block wx:for="{{image}}" wx:key="this" wx:for-index="ind1">
<!-- 将该for的下标Index命名为ind1  可以不用block,可以直接在swiper-item使用wx:for-->
<swiper-item  >
<image src="{{item}}" data-ccc="ind1" ></image>
<!-- 将下标给到本地数据库data,并且命名ccc -->
</swiper-item >
</block>
</swiper>
<button bindtap="getImg">更改轮播图的图片</button>
<button bindtap="getc">在轮播图最后面添加一个图片</button>

<!-- 单独换图片 -->
<swiper indicator-dots
indicator-color="rgba(20,0,225,1)"
next-margin="20px"
previous-margin="20px"
autoplay
bindchange="pdd">
<swiper-item wx:for="{{imgArr}}" wx:key="this" >  <!-- 循环imgArr里的内容 -->
<image src="{{item}}"   bindtap="getima"   data-cc="{{index}}" >
<!--image src="{{item}}含义: imgArr变量里的内容,如本文定义的图片地址 -->
<!-- 将下标给到本地数据库data,并且命名cc -->
 </image>
</swiper-item >
</swiper>
复制代码
Page({

    /**
     * 页面的初始数据
     */
    data: {
        image: ["/images/0.jpg", "/images/1.jpg", "/images/2.jpeg"],

        imgArr:["/images/0.jpg", "/images/1.jpg", "/images/2.jpeg"],
        pdd:0,
    },
    getImg() {
        var _this = this;
        wx.chooseImage({
            count: 3, //选择1张,最多选择9张
            sizeType: ['original', 'compressed'], //是否原图
            sourceType: ['album', 'camera'], //是否用相机还是相册

            success(res) {
                // tempFilePath可以作为img标签的src属性显示图片
                const tempFilePaths = res.tempFilePaths
                _this.setData({
                    image: res.tempFilePaths,
                })
            }
        })
    },
getc() {
        var acc=this;
        wx.chooseImage({
            count: 1, //选择1张,最多选择9张
            sizeType: ['original', 'compressed'], //是否原图
            sourceType: ['album', 'camera'], //是否用相机还是相册
            success(res) {
                // tempFilePath可以作为img标签的src属性显示图片
                const tempFilePaths = res.tempFilePaths
                console.log(tempFilePaths);
                acc.data.image.push([tempFilePaths.toString()])
                // 在数组image后面增加图片
                console.log(acc.data.image);
                acc.setData({
                    image:acc.data.image
                })
            }
        })
    },
    getima(e){
        var _this=this;
        //1.拿到我点击的图片下标
         console.log(e);
        // //2.把下标赋值给ac
        var ac=parseInt(e.currentTarget.dataset.cc);
        // console.log(ac);
        // console.log(this.data.pdd);

        wx.chooseImage({
           count: 3, //选择1张,最多选择9张
             sizeType: ['original', 'compressed'], //是否原图
             sourceType: ['album', 'camera'], //是否用相机还是相册

            success(res) {
                // tempFilePath可以作为img标签的src属性显示图片
                const tempFilePaths = res.tempFilePaths

                // 3.将选择的图片的路径,赋值给imgArr
                 _this.data.imgArr[ac]=res.tempFilePaths[0]
                // _this.data.imgArr[_this.data.pdd]=res.tempFilePaths[0]

                _this.setData({
                    //4.将存在_this.data.imgArr的路径,赋值到imgArr
                     imgArr: _this.data.imgArr,

                })
            }
        })
    },

    pdd(e){
        // console.log(e.detail.current);
        this.setData({
            pdd:e.detail.current
        })

    }
})
复制代码
这里pdd(e)使用的是第二种方法(不需要可以删除),将所要修改的图片信息赋值给data:{}定义的pdd,此时_this.data.imgArr[_this.data.pdd]=res.tempFilePaths[0]这行里的_this.data.pdd为轮播图里的第几个图片,将要替换的图片的数据,替换近imArr[]里的第几个(_this.data.pdd)图片,最后_this.setData进行替换
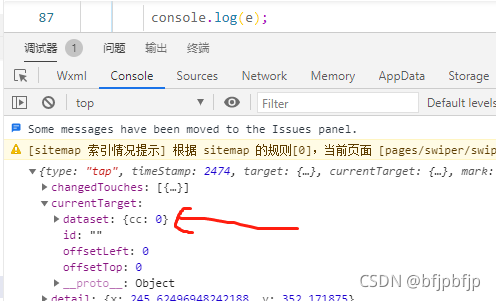
通过console.log输出的数据,看到将下标写入了本地数据,并且命名为cc
总的来说,我对ruby还比较陌生,我正在为我正在创建的对象编写一些rspec测试用例。许多测试用例都非常基础,我只是想确保正确填充和返回值。我想知道是否有办法使用循环结构来执行此操作。不必为我要测试的每个方法都设置一个assertEquals。例如:describeitem,"TestingtheItem"doit"willhaveanullvaluetostart"doitem=Item.new#HereIcoulddotheitem.name.shouldbe_nil#thenIcoulddoitem.category.shouldbe_nilendend但我想要一些方法来使用
我试图在一个项目中使用rake,如果我把所有东西都放到Rakefile中,它会很大并且很难读取/找到东西,所以我试着将每个命名空间放在lib/rake中它自己的文件中,我添加了这个到我的rake文件的顶部:Dir['#{File.dirname(__FILE__)}/lib/rake/*.rake'].map{|f|requiref}它加载文件没问题,但没有任务。我现在只有一个.rake文件作为测试,名为“servers.rake”,它看起来像这样:namespace:serverdotask:testdoputs"test"endend所以当我运行rakeserver:testid时
作为我的Rails应用程序的一部分,我编写了一个小导入程序,它从我们的LDAP系统中吸取数据并将其塞入一个用户表中。不幸的是,与LDAP相关的代码在遍历我们的32K用户时泄漏了大量内存,我一直无法弄清楚如何解决这个问题。这个问题似乎在某种程度上与LDAP库有关,因为当我删除对LDAP内容的调用时,内存使用情况会很好地稳定下来。此外,不断增加的对象是Net::BER::BerIdentifiedString和Net::BER::BerIdentifiedArray,它们都是LDAP库的一部分。当我运行导入时,内存使用量最终达到超过1GB的峰值。如果问题存在,我需要找到一些方法来更正我的代
我需要在客户计算机上运行Ruby应用程序。通常需要几天才能完成(复制大备份文件)。问题是如果启用sleep,它会中断应用程序。否则,计算机将持续运行数周,直到我下次访问为止。有什么方法可以防止执行期间休眠并让Windows在执行后休眠吗?欢迎任何疯狂的想法;-) 最佳答案 Here建议使用SetThreadExecutionStateWinAPI函数,使应用程序能够通知系统它正在使用中,从而防止系统在应用程序运行时进入休眠状态或关闭显示。像这样的东西:require'Win32API'ES_AWAYMODE_REQUIRED=0x0
Rails2.3可以选择随时使用RouteSet#add_configuration_file添加更多路由。是否可以在Rails3项目中做同样的事情? 最佳答案 在config/application.rb中:config.paths.config.routes在Rails3.2(也可能是Rails3.1)中,使用:config.paths["config/routes"] 关于ruby-on-rails-Rails3中的多个路由文件,我们在StackOverflow上找到一个类似的问题
Rackup通过Rack的默认处理程序成功运行任何Rack应用程序。例如:classRackAppdefcall(environment)['200',{'Content-Type'=>'text/html'},["Helloworld"]]endendrunRackApp.new但是当最后一行更改为使用Rack的内置CGI处理程序时,rackup给出“NoMethodErrorat/undefinedmethod`call'fornil:NilClass”:Rack::Handler::CGI.runRackApp.newRack的其他内置处理程序也提出了同样的反对意见。例如Rack
我需要从一个View访问多个模型。以前,我的links_controller仅用于提供以不同方式排序的链接资源。现在我想包括一个部分(我假设)显示按分数排序的顶级用户(@users=User.all.sort_by(&:score))我知道我可以将此代码插入每个链接操作并从View访问它,但这似乎不是“ruby方式”,我将需要在不久的将来访问更多模型。这可能会变得很脏,是否有针对这种情况的任何技术?注意事项:我认为我的应用程序正朝着单一格式和动态页面内容的方向发展,本质上是一个典型的网络应用程序。我知道before_filter但考虑到我希望应用程序进入的方向,这似乎很麻烦。最终从任何
我想用ruby编写一个小的命令行实用程序并将其作为gem分发。我知道安装后,Guard、Sass和Thor等某些gem可以从命令行自行运行。为了让gem像二进制文件一样可用,我需要在我的gemspec中指定什么。 最佳答案 Gem::Specification.newdo|s|...s.executable='name_of_executable'...endhttp://docs.rubygems.org/read/chapter/20 关于ruby-在Ruby中编写命令行实用程序
我在我的项目中添加了一个系统来重置用户密码并通过电子邮件将密码发送给他,以防他忘记密码。昨天它运行良好(当我实现它时)。当我今天尝试启动服务器时,出现以下错误。=>BootingWEBrick=>Rails3.2.1applicationstartingindevelopmentonhttp://0.0.0.0:3000=>Callwith-dtodetach=>Ctrl-CtoshutdownserverExiting/Users/vinayshenoy/.rvm/gems/ruby-1.9.3-p0/gems/actionmailer-3.2.1/lib/action_mailer
我构建了两个需要相互通信和发送文件的Rails应用程序。例如,一个Rails应用程序会发送请求以查看其他应用程序数据库中的表。然后另一个应用程序将呈现该表的json并将其发回。我还希望一个应用程序将存储在其公共(public)目录中的文本文件发送到另一个应用程序的公共(public)目录。我从来没有做过这样的事情,所以我什至不知道从哪里开始。任何帮助,将不胜感激。谢谢! 最佳答案 无论Rails是什么,几乎所有Web应用程序都有您的要求,大多数现代Web应用程序都需要相互通信。但是有一个小小的理解需要你坚持下去,网站不应直接访问彼此