Shader变体、Shader属性定义技巧、自定义材质面板,这三个知识点任何一个单拿出来都是一套知识体系,不能一概而论,本文章目的在于将学习和实际工作中遇见的问题进行总结,类似于网络笔记之用,方便后续回顾查看,如有以偏概全、不祥不尽之处,还望海涵。
......
Properties{
	[KeywordEnum(on,off)] USL_USE_COL("Is Use Color Mix Tex?", int) = 0
	[Toggle(IS_RED_ON)]_IsRed("IsRed?", int) = 0
}
......//中间省略,后续会有完整代码
	#pragma multi_compile USL_USE_COL_ON USL_USE_COL_OFF
    //"_" 代表除了ON之外的另外一种情况
    #pragma multi_compile IS_RED_ON _
    ......
1.两种在属性菜单内定义 宏 (变体) 的方式;
2.“#pragma multi_compile” 作为定义变体的一种方式,对比的还有 “#pragma shader_feature”两种方式构建全局变体;
3.二者区别在于:
“#pragma multi_compile” 无差别构建Shader,即根据定义的变体数量,排列组合出全部的Shader可能,利用内存的空间,换取加载时间和速度;
此处引用站内的一位朋友的文章,并且借用他的一张图表示一下变体的排列组合方式和规则:在此表示感谢;
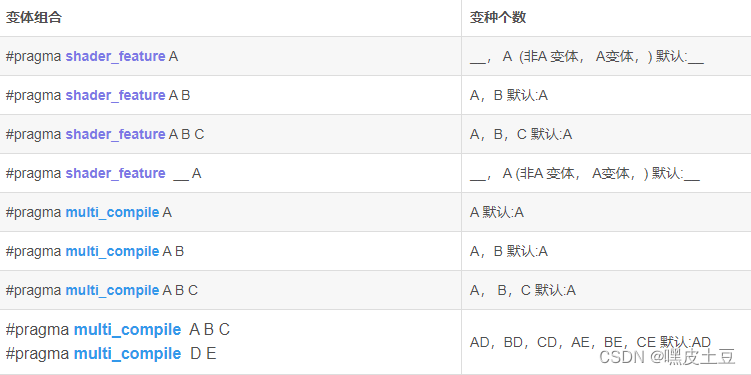
“#pragma shader_feature” 在打包之后,材质球用到的变体组合才会打包出来,没有用到的变体组合是不会打包的,但是缺点也是很明显,即导出之后如果想用没有导出的变体组合,是会报错的,相对于 “#pragma multi_compile” 只有内存开销会小一些。
最常见的分支语句:
if(A){}//动态加载语句
else{}//优点:可以选择条件A进行判断,同时可以在一个 Shader 内实现动态加载,即时切换分支;
//缺点:由于动态加载,所以运算开销会多一些,因为需要全部分支内容走过一遍,才能判断最终需要走的分支,所以时间和开销比较浪费。
此处引用一下本文分享的Shader代码:
......
 #if defined (USL_USE_COL_ON)
 	#if defined (IS_RED_ON)
 		mainColor = fixed4(1,0,0,col.a);
 		col *= mainColor;
 	#else
		 mainColor = fixed4(0,1,0,col.a);
 	col *= mainColor;
 	#endif
 #else
 	col = mainColor;
 #endif
 ......
这里使用了静态分支的嵌套,静态分支的各种属性:
原理:着色器编译时选择代码分支;
使用条件:在编译之前就已经是确定的执行条件,编译之后只会运行已经确定的分支,同时编译器会裁剪没有激活的分支;
小注意:目前Unity的最新版本已经建议使用 “#if defined(A)” 这种方式,所以在选择时也不用过多纠结其余的写法,跟着官方走就好了。
没错,着色器变体其实属于分支语句的一种,是更高级的静态分支;
着色器变体的原理:
编译时,生成多个静态分支的着色器版本;
运行时,根据要使用的Shader功能动态选择要执行的着色器版本;
解释一下这个原理,上面已经说过变体会排列组合的生成很多着色器版本,只是在运行时会选择性使用着色器版本;
所以从涵盖关系上看,每一个变体所排列组合出来的着色器版本,就是某些静态分支的组合;
从灵活度上看,静态分支更像是一个Shader的固定渲染方案,此时想要其他的渲染效果,总不至于重新写Shader,此时利用变体的组合,就可以在一个Shader内创造出另外一种渲染可能,相同的是,新创造出来的着色器版本也是静态分支渲染,只有一种渲染结果。
可以这样说,着色器变体是静态分支更高级的用法,为本来需要写很多Shader的工作量集合到一个Shader内,让Unity自动生成着色器版本,自动选择要使用的版本。
而动态分支就是在一个Shader内分出多条不同的渲染路线,根据设置的条件选择最终的渲染方案,可以在编译之后的工作中仍可灵活选择一种方案。
还是引用一段代码:
		[Enum(UnityEngine.Rendering.CullMode)] _Culling("Cull Mode", int) = 2

        [Enum(UnityEngine.Rendering.BlendMode)] _BleModSour("Blend-Source", int) = 5
        [Enum(UnityEngine.Rendering.BlendMode)] _BleModDest("Blend-Destination", int) = 10

        _MainColor("ColorTest", Color) = (1,1,1,1)
        _MainTex ("Texture", 2D) = "white" {}

        [KeywordEnum(on,off)] USL_USE_COL("Is Use Color Mix Tex?", int) = 0
        //[Toggle]_IsRed("IsRed?", int) = 0
        [Toggle(IS_RED_ON)]_IsRed("IsRed?", int) = 0

        _StencilRef("Stencil Ref ID", int) = 0
        [Enum(UnityEngine.Rendering.CompareFunction)] _StencilComp("Stencil Comp Style", int) = 3
在 Shader 内可以引用Unity的部分API,其中 “UnityEngine.Rendering.CullMode” 就是其中的一种,类似的还有下面的几种引用可以参见Unity官方文档参考,这边不做过多解释。
着重说一下以下两行代码:
//关键词表示变体,在后续的变体引用中,需要将关键字配合“Enum”内的字体变成大写引用
//具体引用结果参见后文全部代码;
[KeywordEnum(on,off)] USL_USE_COL("Is Use Color Mix Tex?", int) = 0
[Toggle(IS_RED_ON)]_IsRed("IsRed?", int) = 0
//上述两行都是创建了变体,但是后者会更加简单一些,同时在Material UI上的显示方式
//也是略有差别,看情况选择性使用;

第一种方式是一个下拉选择菜单,同时支持多种结果选择;
第二种则是勾选框,只有 是否 两种选择。
在属性内定义,然后在 Shader 的 CG/HLSL 片段内重新定义,然后就可以在后续的顶点片元着色器使用;
......
fixed4 _MainColor;
sampler2D _MainTex;
float4 _MainTex_ST;

//int _IsRed;
......
......
SubShader
    {
        Tags { "RenderType"="Transparent" "Queue" = "Transparent"}
        LOD 100
        //使用 [] 的方式替换特定的一种选择,这样就可以避免重定义再使用属性的问题,
        //同时这样对于美术同学很是友好。
        Blend [_BleModSour][_BleModDest]
        Cull[_Culling]

        Stencil
        {
            Ref [_StencilRef]
            //Comp Equal
            Comp [_StencilComp]
        }
        Pass
        {......}
        ......
第二种引用方式需要在官方文档内注意引用的属性的顺序,例如:
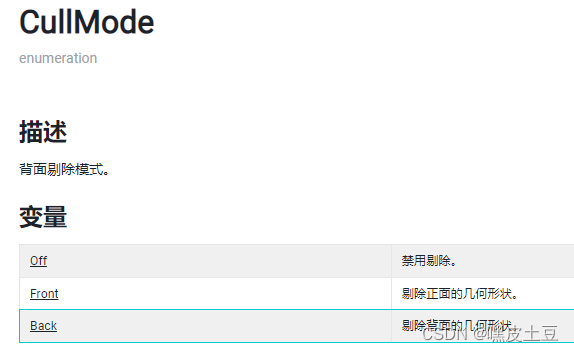
引用时,默认值 “0” 对应 “Off”,默认值 “1” 对应 “Front”, 默认值 “2” 对应 “Back”,其他的引用属性一样类推。
在 Shader 内增加一行代码:(最后的位置)
......
                return fixed4(col.rgb, col.a);
            }
            ENDCG
        }
    }
    //就是下面这一行代码:
    //需要注意这个名称对应脚本的名称,一定是对应上的。
    CustomEditor "MainShaderGUI"
}
完整的脚本代码:
using UnityEngine;
using UnityEditor;

//名称和Shader内的名称一一对应,和脚本的文件名完全一致
public class MainShaderGUI : ShaderGUI
{

    static bool TextureColor;
    static bool CullAndBlendMode;
    static bool StencilProperties;

	//定义脚本内需要引用的 Shader 属性名称并赋值;
    MaterialProperty _Culling = null;
    MaterialProperty _BleModSour = null;
    MaterialProperty _BleModDest = null;
    MaterialProperty _MainColor = null;
    MaterialProperty _MainTex = null;
    MaterialProperty USL_USE_COL = null;
    MaterialProperty _IsRed = null;
    MaterialProperty _StencilRef = null;
    MaterialProperty _StencilComp = null;

	// #region 和 #endregion 二者一一对应;
	//作用:
	//1. 分段代码,方便后续的修改和更新,使代码结构清晰;
	//2. 在Material 面板上,可以起到分割和避免重叠的作用;

    public override void OnGUI(MaterialEditor materialEditor, MaterialProperty[] properties)
    {
        #region Shader Properties

		//将Shader属性在脚本内一一对应
        _Culling = ShaderGUI.FindProperty("_Culling", properties);
        _BleModSour = ShaderGUI.FindProperty("_BleModSour", properties);
        _BleModDest = ShaderGUI.FindProperty("_BleModDest", properties);
        _MainColor = ShaderGUI.FindProperty("_MainColor", properties);
        _MainTex = ShaderGUI.FindProperty("_MainTex", properties);
        USL_USE_COL = ShaderGUI.FindProperty("USL_USE_COL", properties);
        _IsRed = ShaderGUI.FindProperty("_IsRed", properties);
        _StencilRef = ShaderGUI.FindProperty("_StencilRef", properties);
        _StencilComp = ShaderGUI.FindProperty("_StencilComp", properties);

        #endregion

        #region Culling And Blend
		//新建一个下拉菜单UI,返回一个 Bool 值;
		//"Cull And Blend" 是这个下拉菜单的名称;
        CullAndBlendMode = EditorGUILayout.Foldout(CullAndBlendMode, "Cull And Blend", true, EditorStyles.foldout);

        if (CullAndBlendMode)//动态分支选择,相当于 if(true){}
        {
            GUILayout.Space(10);//空格(一行)
            //下拉菜单内包含的属性;
            materialEditor.ShaderProperty(_Culling, new GUIContent(_Culling.displayName));
            materialEditor.ShaderProperty(_BleModSour, new GUIContent(_BleModSour.displayName));
            materialEditor.ShaderProperty(_BleModDest, new GUIContent(_BleModDest.displayName));
            GUILayout.Space(10);
        }
        #endregion

        #region Color And Tex

        Rect r_texturecolor = EditorGUILayout.BeginVertical("Button");//增加背景方便分类识别

        TextureColor = EditorGUILayout.Foldout(TextureColor, "Color And Texture", true, EditorStyles.foldout);

        if (TextureColor)
        {
            GUILayout.Space(10);
            materialEditor.ShaderProperty(_MainColor, new GUIContent(_MainColor.displayName));
            materialEditor.ShaderProperty(_MainTex, new GUIContent(_MainTex.displayName));
            materialEditor.ShaderProperty(USL_USE_COL, new GUIContent(USL_USE_COL.displayName));
            materialEditor.ShaderProperty(_IsRed, new GUIContent(_IsRed.displayName));
            GUILayout.Space(10);
        }

        EditorGUILayout.EndVertical();//增加背景的结束语句;

        #endregion

        #region Stencil Properties

        StencilProperties = EditorGUILayout.Foldout(StencilProperties, "Stencil Properties", true, EditorStyles.foldout);

        if (StencilProperties)
        {
            GUILayout.Space(10);
            materialEditor.ShaderProperty(_StencilRef, new GUIContent(_StencilRef.displayName));
            materialEditor.ShaderProperty(_StencilComp, new GUIContent(_StencilComp.displayName));
            GUILayout.Space(10);
        }
        #endregion
    }
}
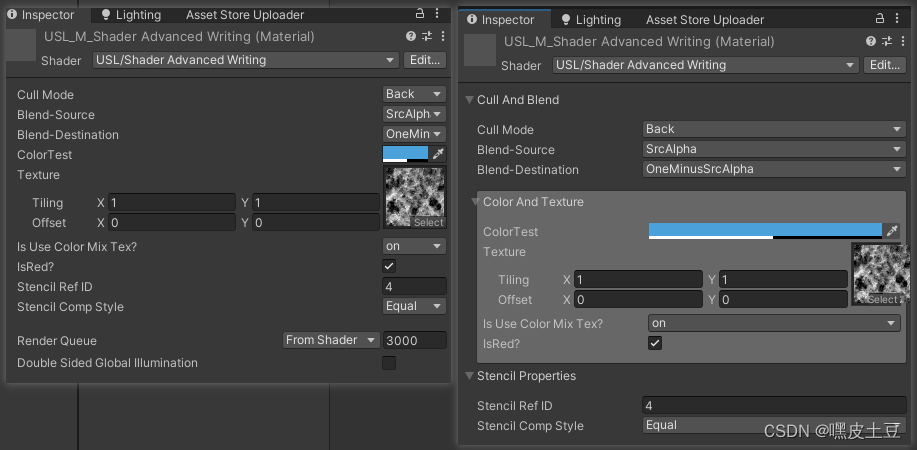
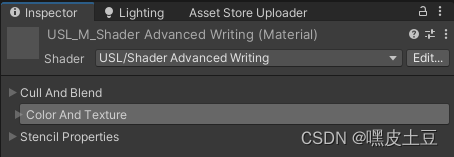
Shader "USL/Shader Advanced Writing"
{
    Properties
    {
        [Enum(UnityEngine.Rendering.CullMode)] _Culling("Cull Mode", int) = 2

        [Enum(UnityEngine.Rendering.BlendMode)] _BleModSour("Blend-Source", int) = 5
        [Enum(UnityEngine.Rendering.BlendMode)] _BleModDest("Blend-Destination", int) = 10

        _MainColor("ColorTest", Color) = (1,1,1,1)
        _MainTex ("Texture", 2D) = "white" {}

        [KeywordEnum(on,off)] USL_USE_COL("Is Use Color Mix Tex?", int) = 0
        //[Toggle]_IsRed("IsRed?", int) = 0
        [Toggle(IS_RED_ON)]_IsRed("IsRed?", int) = 0

        _StencilRef("Stencil Ref ID", int) = 0
        [Enum(UnityEngine.Rendering.CompareFunction)] _StencilComp("Stencil Comp Style", int) = 3
    }
    SubShader
    {
        //Tags { "RenderType"="Opaque" }
        Tags { "RenderType"="Transparent" "Queue" = "Transparent"}
        LOD 100

        Blend [_BleModSour][_BleModDest]
        Cull[_Culling]

        Stencil
        {
            Ref [_StencilRef]
            //Comp Equal
            Comp [_StencilComp]
        }

        Pass
        {
            CGPROGRAM
            #pragma vertex vert
            #pragma fragment frag
            // make fog work
            #pragma multi_compile_fog

            #pragma multi_compile USL_USE_COL_ON USL_USE_COL_OFF
            //"_" 代表除了ON之外的另外一种情况
            #pragma multi_compile IS_RED_ON _

            //此双变体形式组合成四种Shader :
            //两两组合,默认不规定 #if 的情况下使用变体的第一种组合,USL_USE_COL_ON + IS_RED_ON
            #include "UnityCG.cginc"

            struct appdata
            {
                float4 vertex : POSITION;
                float2 uv : TEXCOORD0;
            };

            struct v2f
            {
                float2 uv : TEXCOORD0;
                UNITY_FOG_COORDS(1)
                float4 vertex : SV_POSITION;
            };

            fixed4 _MainColor;
            sampler2D _MainTex;
            float4 _MainTex_ST;

            //int _IsRed;


            v2f vert (appdata v)
            {
                v2f o;
                o.vertex = UnityObjectToClipPos(v.vertex);
                o.uv = TRANSFORM_TEX(v.uv, _MainTex);
                UNITY_TRANSFER_FOG(o,o.vertex);
                return o;
            }
            /*
            //变体和动态选择(if + else)可以组合使用。
            fixed4 frag (v2f i) : SV_Target
            {
                // sample the texture
                fixed4 col = tex2D(_MainTex, i.uv);
                fixed4 mainColor = _MainColor;
                // apply fog
                UNITY_APPLY_FOG(i.fogCoord, col);

                #if defined (USL_USE_COL_ON)

                    if (_IsRed)
                    {
                        mainColor = fixed4(1,0,0,1);
                        col *= mainColor;
                    }

                    else if(!_IsRed)
                    {
                        mainColor = fixed4(0,1,0,1);
                        col *= mainColor;
                    }
                    col *= mainColor;

                #else
                    col = mainColor;

                #endif

                return col;
            }
            */
            fixed4 frag (v2f i) : SV_Target
            {
                // sample the texture
                fixed4 col = tex2D(_MainTex, i.uv);
                fixed4 mainColor = _MainColor;
                // apply fog
                UNITY_APPLY_FOG(i.fogCoord, col);

                //变体嵌套的形式结果
                #if defined (USL_USE_COL_ON)
                    #if defined (IS_RED_ON)
                        mainColor = fixed4(1,0,0,col.a);
                        col *= mainColor;
                    #else
                        mainColor = fixed4(0,1,0,col.a);
                        col *= mainColor;
                    #endif
                #else
                    col = mainColor;
                #endif

                return fixed4(col.rgb, col.a);
            }
            ENDCG
        }
    }
    CustomEditor "MainShaderGUI"
}
能看到最后的,估计寥寥无几,如果觉得写的还可以,可以点个赞,让我知道还是有人需要这种比较初级的教程,本文只能简单的陈述一下,并不能完整的将项目经验进行传达,有必要的情况还请留言。
如果有写的不好的地方,还请大佬批评指正,感谢。
我正在尝试设置一个puppet节点,但rubygems似乎不正常。如果我通过它自己的二进制文件(/usr/lib/ruby/gems/1.8/gems/facter-1.5.8/bin/facter)在cli上运行facter,它工作正常,但如果我通过由rubygems(/usr/bin/facter)安装的二进制文件,它抛出:/usr/lib/ruby/1.8/facter/uptime.rb:11:undefinedmethod`get_uptime'forFacter::Util::Uptime:Module(NoMethodError)from/usr/lib/ruby
我希望我的UserPrice模型的属性在它们为空或不验证数值时默认为0。这些属性是tax_rate、shipping_cost和price。classCreateUserPrices8,:scale=>2t.decimal:tax_rate,:precision=>8,:scale=>2t.decimal:shipping_cost,:precision=>8,:scale=>2endendend起初,我将所有3列的:default=>0放在表格中,但我不想要这样,因为它已经填充了字段,我想使用占位符。这是我的UserPrice模型:classUserPrice回答before_val
我在我的项目中添加了一个系统来重置用户密码并通过电子邮件将密码发送给他,以防他忘记密码。昨天它运行良好(当我实现它时)。当我今天尝试启动服务器时,出现以下错误。=>BootingWEBrick=>Rails3.2.1applicationstartingindevelopmentonhttp://0.0.0.0:3000=>Callwith-dtodetach=>Ctrl-CtoshutdownserverExiting/Users/vinayshenoy/.rvm/gems/ruby-1.9.3-p0/gems/actionmailer-3.2.1/lib/action_mailer
我有一个包含模块的模型。我想在模块中覆盖模型的访问器方法。例如:classBlah这显然行不通。有什么想法可以实现吗? 最佳答案 您的代码看起来是正确的。我们正在毫无困难地使用这个确切的模式。如果我没记错的话,Rails使用#method_missing作为属性setter,因此您的模块将优先,阻止ActiveRecord的setter。如果您正在使用ActiveSupport::Concern(参见thisblogpost),那么您的实例方法需要进入一个特殊的模块:classBlah
我想向我的Controller传递一个参数,它是一个简单的复选框,但我不知道如何在模型的form_for中引入它,这是我的观点:{:id=>'go_finance'}do|f|%>Transferirde:para:Entrada:"input",:placeholder=>"Quantofoiganho?"%>Saída:"output",:placeholder=>"Quantofoigasto?"%>Nota:我想做一个额外的复选框,但我该怎么做,模型中没有一个对象,而是一个要检查的对象,以便在Controller中创建一个ifelse,如果没有检查,请帮助我,非常感谢,谢谢
我已经从我的命令行中获得了一切,所以我可以运行rubymyfile并且它可以正常工作。但是当我尝试从sublime中运行它时,我得到了undefinedmethod`require_relative'formain:Object有人知道我的sublime设置中缺少什么吗?我正在使用OSX并安装了rvm。 最佳答案 或者,您可以只使用“require”,它应该可以正常工作。我认为“require_relative”仅适用于ruby1.9+ 关于ruby-主要:Objectwhenrun
我有一个具有一些属性的模型:attr1、attr2和attr3。我需要在不执行回调和验证的情况下更新此属性。我找到了update_column方法,但我想同时更新三个属性。我需要这样的东西:update_columns({attr1:val1,attr2:val2,attr3:val3})代替update_column(attr1,val1)update_column(attr2,val2)update_column(attr3,val3) 最佳答案 您可以使用update_columns(attr1:val1,attr2:val2
我有这个html标记:我想得到这个:我如何使用Nokogiri做到这一点? 最佳答案 require'nokogiri'doc=Nokogiri::HTML('')您可以通过xpath删除所有属性:doc.xpath('//@*').remove或者,如果您需要做一些更复杂的事情,有时使用以下方法遍历所有元素会更容易:doc.traversedo|node|node.keys.eachdo|attribute|node.deleteattributeendend 关于ruby-Nokog
对于Rails模型,是否可以/建议让一个类的成员不持久保存到数据库中?我想将用户最后选择的类型存储在session变量中。由于我无法从我的模型中设置session变量,我想将值存储在一个“虚拟”类成员中,该成员只是将值传递回Controller。你能有这样的类(class)成员吗? 最佳答案 将非持久属性添加到Rails模型就像任何其他Ruby类一样:classUser扩展解释:在Ruby中,所有实例变量都是私有(private)的,不需要在赋值前定义。attr_accessor创建一个setter和getter方法:classUs
我有一些代码在几个不同的位置之一运行:作为具有调试输出的命令行工具,作为不接受任何输出的更大程序的一部分,以及在Rails环境中。有时我需要根据代码的位置对代码进行细微的更改,我意识到以下样式似乎可行:print"Testingnestedfunctionsdefined\n"CLI=trueifCLIdeftest_printprint"CommandLineVersion\n"endelsedeftest_printprint"ReleaseVersion\n"endendtest_print()这导致:TestingnestedfunctionsdefinedCommandLin
