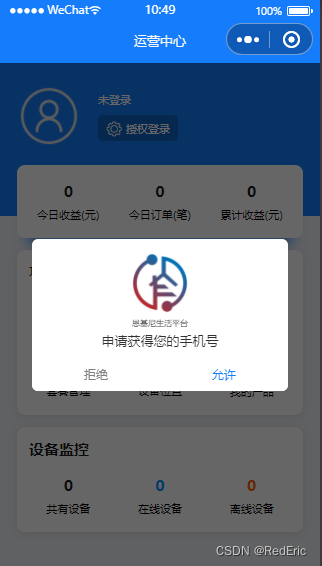
这里我们通过uniapp的方式展示,通过弹窗的方式来实现用户登录授权、获取昵称、头像
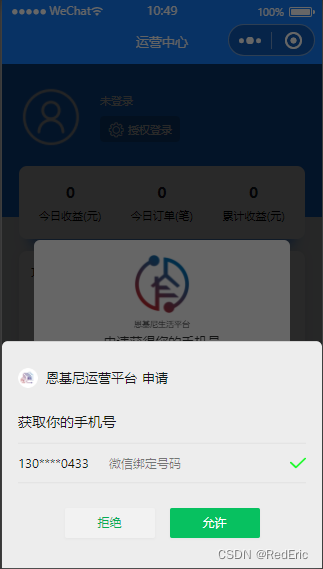
第一次弹窗,获取用户手机号,做自动登录使用
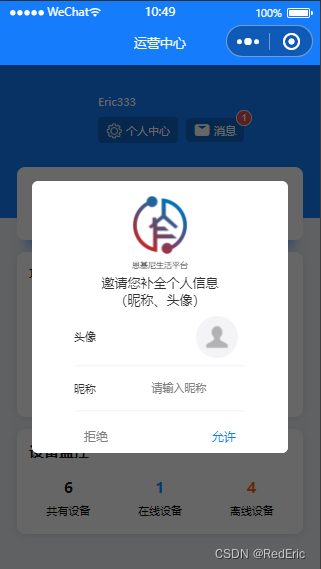
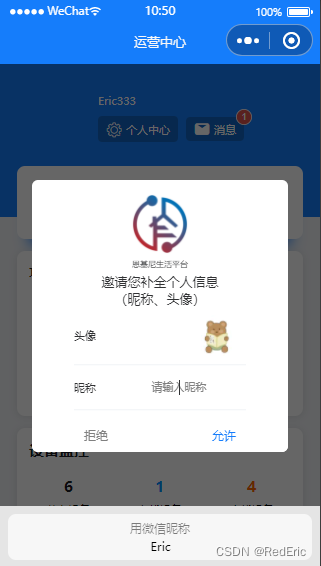
第二次弹窗,让用户补全头像、昵称信息,便于用户在系统中操作
这里还有两个小坑
注意基础库的版本 2.21.2 版本开始支持
type=nickname的input通过:value的方式获取不到
需要通过 @blur绑定的事件才能获取
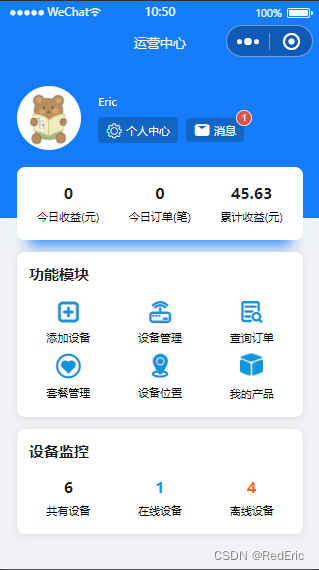
话不多说先贴图。

   <u-modal v-model="showAuthorizePhone" :show-title="false"
                 :show-confirm-button="false">
            <view class="slot-content">
                <div class="auth-card">
                    <div class="img">
                        <img class="avatar-img"
                               src="@/static/logo-min.png"
                               mode="widthFix">
                    </div>
                    <div class="title">{{bname}}</div>
                    <div class="content">申请获得您的手机号</div>
                </div>
                <div class="auth-btncard">
                    <div class="btn-unok"><u-button :hair-line='false' :custom-style="customStyleUnOk" @click="showAuthorizePhone=false"> 拒绝</u-button></div>
                    <div class="btn-ok"><u-button :hair-line='false' :custom-style="customStyleOk" open-type="getPhoneNumber" @getphonenumber="authPhone"> 允许</u-button></div>
                </div>
            </view>
        </u-modal>
<u-modal v-model="showAuthorizeUser" :show-title="false"
                 :show-confirm-button="false">
    <view class="slot-content">
        <div class="auth-card">
            <div class="img">
                <img class="avatar-img"
                     src="/static/logo-min.png"
                     mode="widthFix">
            </div>
            <div class="title">{{bname}}</div>
            <div class="content">邀请您补全个人信息<br></br>(昵称、头像)</div>
        <div style="margin-left: 100rpx;margin-right: 100rpx">
            <u-form :model="user" ref="uForm">
                <u-form-item label="头像">
                    <button class="avatar-wrapper" open-type="chooseAvatar" @chooseavatar="onChooseAvatar" slot="right">
                        <image class="avatar" :src="user.avatarUrl"></image>
                    </button>
                </u-form-item>
                <u-form-item label="昵称">
                    <input type="nickname" class="weui-input" @blur="userNameInput" placeholder="请输入昵称"/>
                </u-form-item>
            </u-form>
        </div>
        </div>
    <div class="auth-btncard">
        <div class="btn-unok"><u-button :hair-line='false' :custom-style="customStyleUnOk" @click="showAuthorizeUser=false"> 拒绝</u-button></div>
        <div class="btn-ok"><u-button :hair-line='false' :custom-style="customStyleOk" @click="authUser"> 允许</u-button></div>
    </div>
    </view>
</u-modal>
微信登录的逻辑如下:
export default {
    data() {
        return {
            user:{   avatarUrl:'https://mmbiz.qpic.cn/mmbiz/icTdbqWNOwNRna42FI242Lcia07jQodd2FJGIYQfG0LAJGFxM4FbnQP6yfMxBgJ0F3YRqJCJ1aPAK2dQagdusBZg/0',
                nickName:'',
            },
            hasUserInfo:false,

            // 用户基本信息
            userInfo: null,
            // 微信,支付宝用户code
            code: '',
            // 是否弹出登录注册授权弹窗
            showAuthorizeUser: false,
            showAuthorizePhone: false,
        }
    },
     onShow() {
         this.getWxCode()
         setTimeout(() => {
             this.showAuthorizePhone = true
         }, 100);
    },
    methods: {
          // 静默获取code
        async getWxCode() {
            const loginResult = await uni.login()
            const { code } = loginResult[1]
            this.code = code
            console.log('-------------------code', code)
        },
        //获取昵称输入内容
        userNameInput(e){
            this.user.nickName = e.detail.value
        },
        onChooseAvatar(e) {
            console.log('头像信息》')
            console.log(e)
            this.user.avatarUrl = e.detail.avatarUrl;
        },
        authPhone(e){
            let _this = this
            const { errMsg, iv, encryptedData } = e.detail;
            if (errMsg !== 'getPhoneNumber:ok') return;
            let data = {
                code: this.code,
                encryptedData: encryptedData,
                iv: iv
            }
            console.log('----------登陆中')
            this.$api.register(data, res => {
                console.log('微信登录返回结果========')
                if(res.data.data.avatarurl){
                    _this.hasUserInfo = true;
                    _this.userInfo = res.data.data;
                }else{
                    _this.showAuthorizeUser = true
                }
                uni.setStorageSync('userInfo', res.data.data)
                setTimeout(() => {
                    _this.$interactive.toast('登陆成功')
                }, 300);
                console.log('---------登陆成功')
            })
            this.showAuthorizePhone = false
        },
        authUser(){
            let userInfo = uni.getStorageSync('userInfo')
            if(this.user.nickName==''){
                this.$interactive.toast('请输入您的昵称!')
                return;
            }
            userInfo.avatarurl = this.user.avatarUrl;
            userInfo.nickname =  this.user.nickName;
            this.userInfo = userInfo;
            uni.setStorageSync('userInfo', userInfo)
            this.user.id = userInfo.id;
            this.$api.saveUserInfo(this.user, res => {
                this.hasUserInfo = true;
                this.showAuthorizeUser = false;
            },res =>{})
        },
        openAuth(){
            let userInfo = uni.getStorageSync('userInfo')
            console.log('userInfo>>>>>>>>>>>>>>>>>>>>>')
            console.log(userInfo)
            if(userInfo){
                this.showAuthorizeUser = true;
            }else{
                this.showAuthorizePhone = true;
            }
        }
    }
}
大家自行删减一些无用的css样式。
<style lang="scss" scoped>
@import "@/common/scss/common.scss";
.auth-btncard{
    .btn-unok{
        width: 50%;
        float: left;
    }
    .btn-ok{
        width: 50%;
        float: left;
        margin: 0;
        padding: 0;
        border: 0px solid transparent;  //自定义边框
        outline: none;    //消除默认点击蓝色边框效果
        u-button{
            margin: 0;
            padding: 0;
            border: 0px solid transparent;  //自定义边框
            outline: none;    //消除默认点击蓝色边框效果
        }
    }
}
.auth-card{
    text-align: center;
    .avatar-img{
        width: 150rpx;
        height: 150rpx;
        overflow: hidden;
        border-radius: 100%;
        margin-top: 30rpx;
    }
    .title{
        font-size: 20rpx;
    }
    .content{
        margin-top: 10rpx;
    }
}
.mine_box {
    height: 360upx;
    color: #fff;
    background-color: $primarycolor;
    .avatar-img {
        width: 150rpx;
        height: 150rpx;
        overflow: hidden;
        border-radius: 100%;
        /*margin-right: 40rpx;*/
    }
    .avatar_box {
        position: relative;
        width: 150rpx;
        height: 150rpx;
        overflow: hidden;
        border-radius: 100%;
        margin-right: 40rpx;
        .avatar-img {
            width: 100%;
            height: 100%;
            /* #ifdef MP-WEIXIN*/
            width: 150rpx;
            height: 150rpx;
            /* #endif */
        }
        .get_user_data {
            z-index: 11;
            opacity: 0;
            width: 100%;
            height: 100%;
            position: absolute;
            left: 0;
            top: 0;
        }
    }

    .nick-name-box {
        height: 100%;
    }
    .user-nickName {
        font-size: 40rpx;
        color: #fff;
        margin-bottom: 20rpx;
    }
    .shiming_box {
        border-radius: 10upx;
        font-size: 28upx;
        padding: 10upx 20upx;
        background-color: rgba(15, 77, 139, 0.5);
        .icon-shezhi {
            margin-right: 10rpx;
            margin-top: 5rpx;
        }
    }
}
.authorize-box {
    background-color: transparent;
    text-align: center;
    .authorize-avatar {
        width: 200rpx;
        height: 200rpx;
    }
    .authorize-btn {
        position: relative;
        top: 40rpx;
    }
}
/deep/.u-mode-center-box {
    background-color: transparent !important;
}
</style>
<style>
    .avatar-wrapper{
        width: 150rpx;
        height: 100rpx;
        color: #333 !important;
        text-align: center !important;
        border: none !important;
        border-radius:0 !important;
        background-color:transparent !important;
    }
    .avatar-wrapper::after {
        border: none !important;
    }
    .avatar{
        width: 100rpx;
        height: 100rpx;
        overflow: hidden;
        border-radius: 100%;
    }
</style>
微信头像目前获取到的是一个临时路径,因为临时路径有失效的风险,所以建议获取到之后把头像上传存储到自己的服务器,可以通过base64的方式存储成一个字符串给后端,这样头像就不会失效啦。
下一篇:
因为通过微信头像昵称填写功能获取到头像是一个临时头像,这个url只能一段时间内在微信访问,并且无法在公网访问这个url。所以非常有必要把这个url转成我么实际可用的头像到数据库中。让头像持久化的在微信和公网任何位置都能访问。
微信小程序上传头像和昵称持久化保存
springboot微信支付宝双端兼容授权手机号后台接口(待完善)
我将应用程序升级到Rails4,一切正常。我可以登录并转到我的编辑页面。也更新了观点。使用标准View时,用户会更新。但是当我添加例如字段:name时,它不会在表单中更新。使用devise3.1.1和gem'protected_attributes'我需要在设备或数据库上运行某种更新命令吗?我也搜索过这个地方,找到了许多不同的解决方案,但没有一个会更新我的用户字段。我没有添加任何自定义字段。 最佳答案 如果您想允许额外的参数,您可以在ApplicationController中使用beforefilter,因为Rails4将参数
有没有办法在这个简单的get方法中添加超时选项?我正在使用法拉第3.3。Faraday.get(url)四处寻找,我只能先发起连接后应用超时选项,然后应用超时选项。或者有什么简单的方法?这就是我现在正在做的:conn=Faraday.newresponse=conn.getdo|req|req.urlurlreq.options.timeout=2#2secondsend 最佳答案 试试这个:conn=Faraday.newdo|conn|conn.options.timeout=20endresponse=conn.get(url
我有一个存储主机名的Ruby数组server_names。如果我打印出来,它看起来像这样:["hostname.abc.com","hostname2.abc.com","hostname3.abc.com"]相当标准。我想要做的是获取这些服务器的IP(可能将它们存储在另一个变量中)。看起来IPSocket类可以做到这一点,但我不确定如何使用IPSocket类遍历它。如果它只是尝试像这样打印出IP:server_names.eachdo|name|IPSocket::getaddress(name)pnameend它提示我没有提供服务器名称。这是语法问题还是我没有正确使用类?输出:ge
我想获取模块中定义的所有常量的值:moduleLettersA='apple'.freezeB='boy'.freezeendconstants给了我常量的名字:Letters.constants(false)#=>[:A,:B]如何获取它们的值的数组,即["apple","boy"]? 最佳答案 为了做到这一点,请使用mapLetters.constants(false).map&Letters.method(:const_get)这将返回["a","b"]第二种方式:Letters.constants(false).map{|c
我安装了ruby版本管理器,并将RVM安装的ruby实现设置为默认值,这样'哪个ruby'显示'~/.rvm/ruby-1.8.6-p383/bin/ruby'但是当我在emacs中打开inf-ruby缓冲区时,它使用安装在/usr/bin中的ruby。有没有办法让emacs像shell一样尊重ruby的路径?谢谢! 最佳答案 我创建了一个emacs扩展来将rvm集成到emacs中。如果您有兴趣,可以在这里获取:http://github.com/senny/rvm.el
假设我有这个范围:("aaaaa".."zzzzz")如何在不事先/每次生成整个项目的情况下从范围中获取第N个项目? 最佳答案 一种快速简便的方法:("aaaaa".."zzzzz").first(42).last#==>"aaabp"如果出于某种原因你不得不一遍又一遍地这样做,或者如果你需要避免为前N个元素构建中间数组,你可以这样写:moduleEnumerabledefskip(n)returnto_enum:skip,nunlessblock_given?each_with_indexdo|item,index|yieldit
我意识到这可能是一个非常基本的问题,但我现在已经花了几天时间回过头来解决这个问题,但出于某种原因,Google就是没有帮助我。(我认为部分问题在于我是一个初学者,我不知道该问什么......)我也看过O'Reilly的RubyCookbook和RailsAPI,但我仍然停留在这个问题上.我找到了一些关于多态关系的信息,但它似乎不是我需要的(尽管如果我错了请告诉我)。我正在尝试调整MichaelHartl'stutorial创建一个包含用户、文章和评论的博客应用程序(不使用脚手架)。我希望评论既属于用户又属于文章。我的主要问题是:我不知道如何将当前文章的ID放入评论Controller。
我目前正在使用以下方法获取页面的源代码:Net::HTTP.get(URI.parse(page.url))我还想获取HTTP状态,而无需发出第二个请求。有没有办法用另一种方法做到这一点?我一直在查看文档,但似乎找不到我要找的东西。 最佳答案 在我看来,除非您需要一些真正的低级访问或控制,否则最好使用Ruby的内置Open::URI模块:require'open-uri'io=open('http://www.example.org/')#=>#body=io.read[0,50]#=>"["200","OK"]io.base_ur
我在新的Debian6VirtualBoxVM上安装RVM时遇到问题。我已经安装了所有需要的包并使用下载了安装脚本(curl-shttps://rvm.beginrescueend.com/install/rvm)>rvm,但以单个用户身份运行时bashrvm我收到以下错误消息:ERROR:Unabletocheckoutbranch.安装在这里停止,并且(据我所知)没有安装RVM的任何文件。如果我以root身份运行脚本(对于多用户安装),我会收到另一条消息:Successfullycheckedoutbranch''安装程序继续并指示成功,但未添加.rvm目录,甚至在修改我的.bas
如何在Ruby中获取BasicObject实例的类名?例如,假设我有这个:classMyObjectSystem我怎样才能使这段代码成功?编辑:我发现Object的实例方法class被定义为returnrb_class_real(CLASS_OF(obj));。有什么方法可以从Ruby中使用它? 最佳答案 我花了一些时间研究irb并想出了这个:classBasicObjectdefclassklass=class这将为任何从BasicObject继承的对象提供一个#class您可以调用的方法。编辑评论中要求的进一步解释:假设你有对象