谈到持续集成工具就离不开众所周知的Jenkins,本文带你了解如何在 Kubernetes 上安装 Jenkins,后续文章会带你深入了解如何使用k8s pod 作为 Jenkins的build agents。
需要一个running的 Kubernetes Cluster, 可以参考我前面的文章 云原生之旅 - 4)基础设施即代码 使用 Terraform 创建 Kubernetes
Step 1: 创建Namespace
apiVersion: v1
kind: Namespace
metadata:
name: jenkinskubectl apply -f namespace.yaml
Step 2: 创建 k8s service account and RBAC 权限
---
apiVersion: rbac.authorization.k8s.io/v1
kind: ClusterRole
metadata:
  name: jenkins-admin
rules:
  - apiGroups: [""]
    resources: ["*"]
    verbs: ["*"]

---
apiVersion: v1
kind: ServiceAccount
metadata:
  name: jenkins-admin
  namespace: jenkins

---
apiVersion: rbac.authorization.k8s.io/v1
kind: ClusterRoleBinding
metadata:
  name: jenkins-admin
roleRef:
  apiGroup: rbac.authorization.k8s.io
  kind: ClusterRole
  name: jenkins-admin
subjects:
- kind: ServiceAccount
  name: jenkins-admin
namespace: jenkinskubectl apply -f serviceAccount.yaml
Step 3: 创建 StorageClass 和 PersistentVolumeClaim(我的例子是在GCP上面,其它云提供商类似)
---
## if not create StorageClass, default to use standard StorageClass
apiVersion: storage.k8s.io/v1
kind: StorageClass
metadata:
  name: jenkins-sc
  namespace: jenkins
provisioner: kubernetes.io/gce-pd
volumeBindingMode: Immediate
allowVolumeExpansion: true
reclaimPolicy: Delete
parameters:
  type: pd-standard
  fstype: ext4
  replication-type: none

---
apiVersion: v1
kind: PersistentVolumeClaim
metadata:
  name: jenkins-storage
  namespace: jenkins
spec:
  storageClassName: jenkins-sc
  accessModes:
    - ReadWriteOnce
  resources:
    requests:
storage: 20Gikubectl apply -f volume.yaml
检查绑定结果
kubectl get pvc -n jenkins

NAME              STATUS   VOLUME                                     CAPACITY   ACCESS MODES   STORAGECLASS   AGE
jenkins-storage   Bound    pvc-27efe7b9-c963-4366-b100-a3b01bb25666   20Gi       RWO            jenkins-sc     23s
Step 4: 创建 Deployment
Jenkins home 目录需要mount,不然 Jenkins pod 一旦重启的话,数据会丢失。
apiVersion: apps/v1
kind: Deployment
metadata:
  name: jenkins
  namespace: jenkins
spec:
  replicas: 1
  selector:
    matchLabels:
      app: jenkins-server
  template:
    metadata:
      labels:
        app: jenkins-server
    spec:
      securityContext:
            fsGroup: 1000
            runAsUser: 1000
      serviceAccountName: jenkins-admin
      containers:
        - name: jenkins
          image: jenkins/jenkins:lts
          resources:
            limits:
              memory: "2Gi"
              cpu: "1000m"
            requests:
              memory: "500Mi"
              cpu: "500m"
          ports:
            - name: httpport
              containerPort: 8080
            - name: jnlpport
              containerPort: 50000
          livenessProbe:
            httpGet:
              path: "/login"
              port: 8080
            initialDelaySeconds: 90
            periodSeconds: 10
            timeoutSeconds: 5
            failureThreshold: 5
          readinessProbe:
            httpGet:
              path: "/login"
              port: 8080
            initialDelaySeconds: 60
            periodSeconds: 10
            timeoutSeconds: 5
            failureThreshold: 3
          volumeMounts:
            - name: jenkins-data
              mountPath: /var/jenkins_home
      volumes:
        - name: jenkins-data
          persistentVolumeClaim:
claimName: jenkins-storagekubectl apply -f deployment.yaml
检查部署结果
kubectl get deploy -n jenkins

NAME      READY   UP-TO-DATE   AVAILABLE   AGE
jenkins   1/1     1            1           89s
Step 5: Create Service
---
apiVersion: v1
kind: Service
metadata:
  name: jenkins-service
  namespace: jenkins
spec:
  selector:
    app: jenkins-server
  type: NodePort
  ports:
    - port: 8080
      targetPort: 8080
      nodePort: 32000

---
kind: Service
apiVersion: v1
metadata:
  name: jenkins-agent
  namespace: jenkins
spec:
  selector:
    app: jenkins-server
  ports:
    - protocol: TCP
      port: 50000
targetPort: 50000kubectl apply -f service.yaml
### 本文首发于 https://www.cnblogs.com/wade-xu/p/16863933.html
Option 1: 端口转发
kubectl -n jenkins port-forward service/jenkins-service 8010:8080
Option 2: 推荐使用Gateway
1. Ingress-Nginx 可以参考 云原生之旅 - 8)云原生时代的网关 Ingress Nginx
2. Emissary Ingress 可以参考云原生之旅 - 9)云原生时代网关的后起之秀Envoy Proxy 和基于Envoy 的 Emissary Ingress
kubectl get pods -n jenkins

kubectl logs jenkins-998474795-7n6ls -n jenkins
日志结果
*************************************************************

Jenkins initial setup is required. An admin user has been created and a password generated.
Please use the following password to proceed to installation:

xxxxxxxxxxxxxx

This may also be found at: /var/jenkins_home/secrets/initialAdminPassword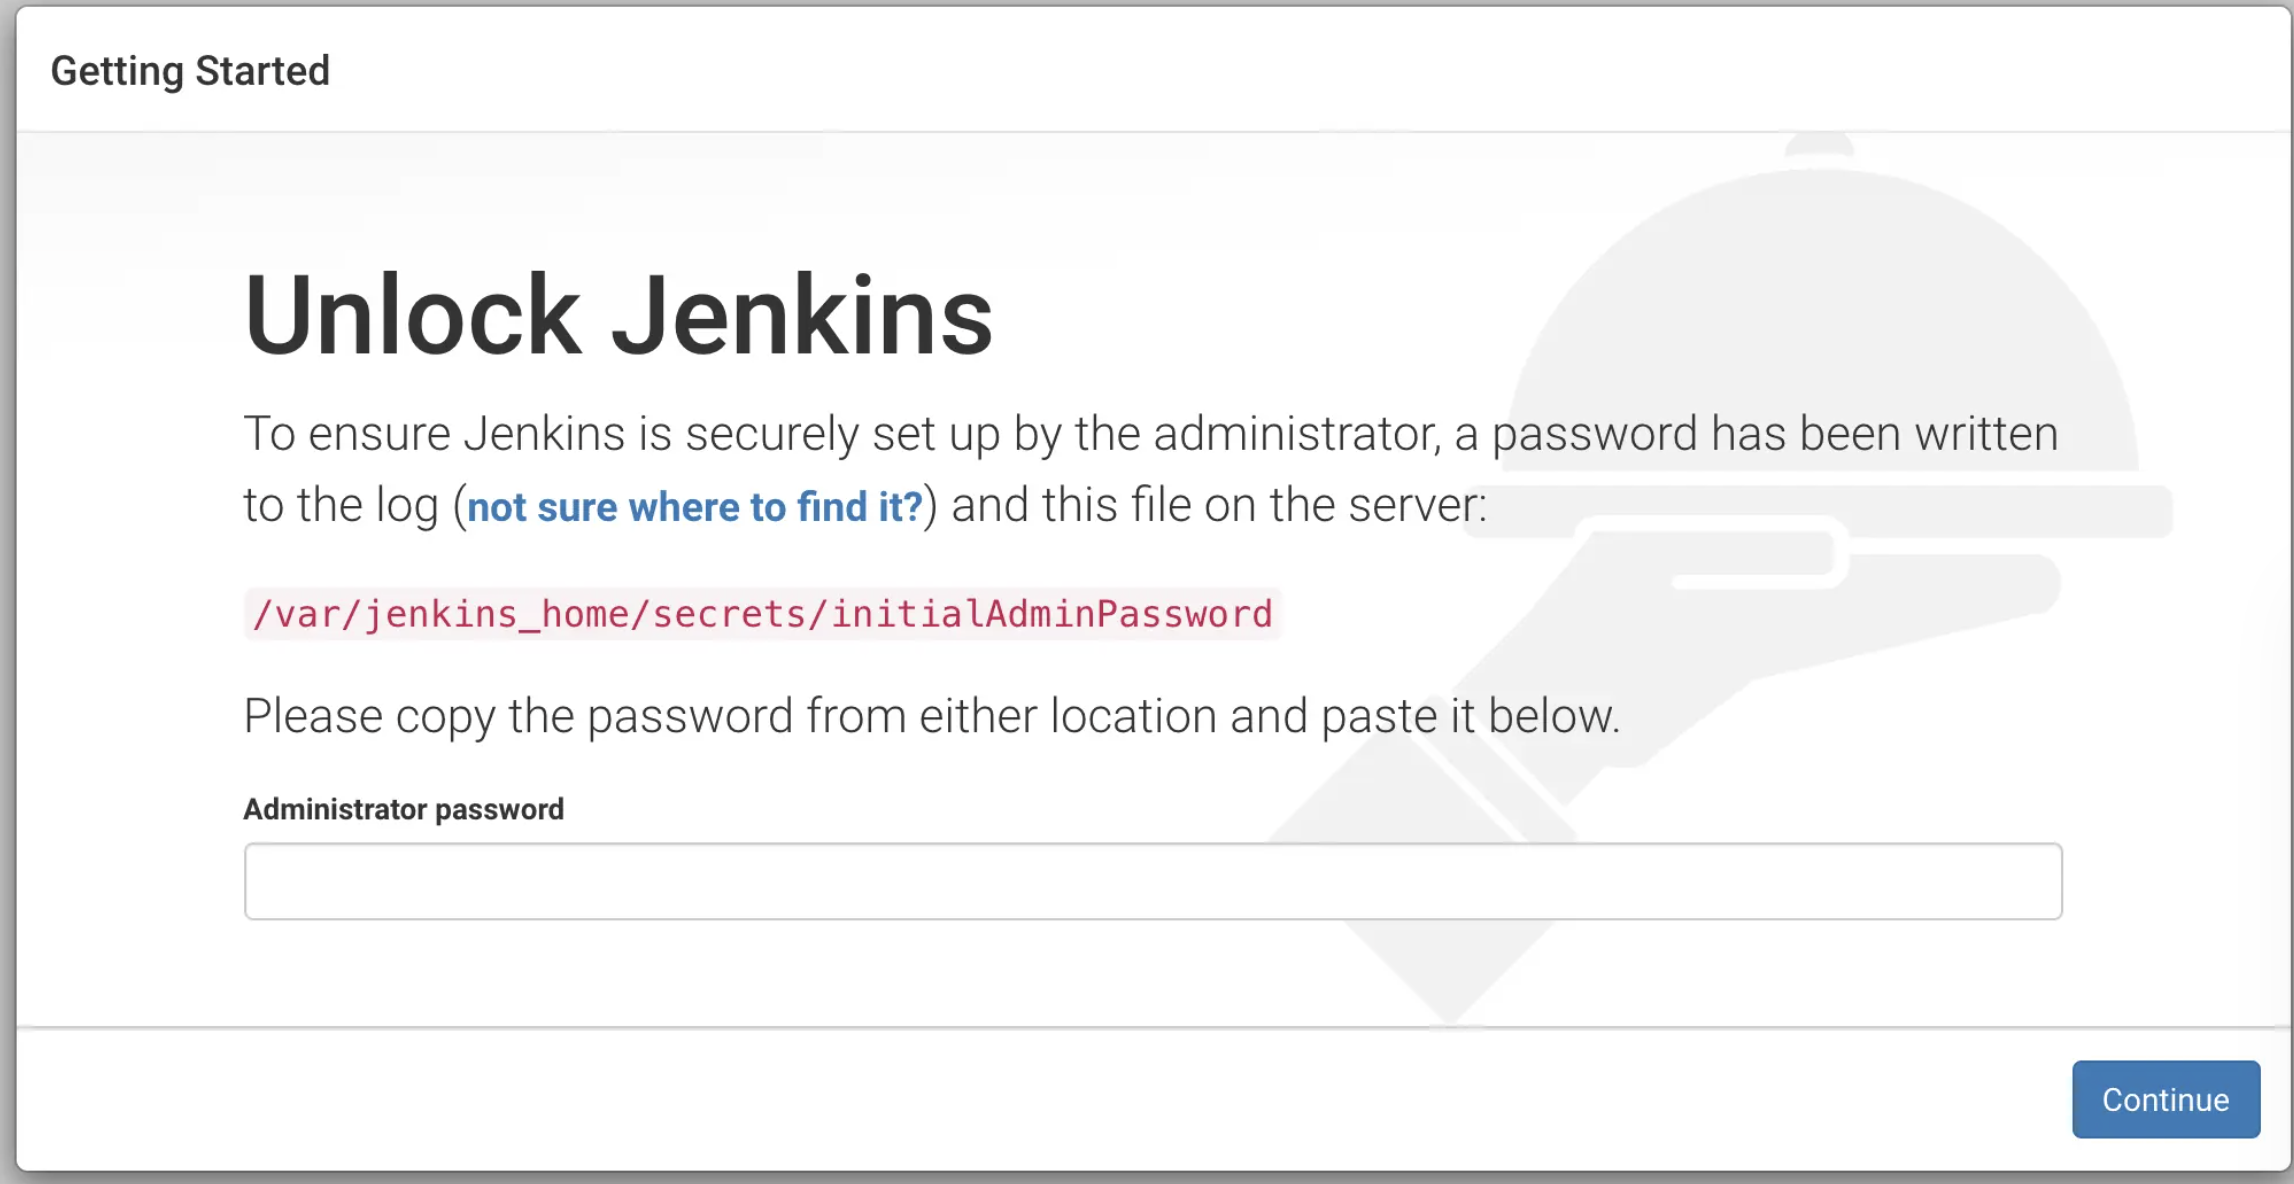
输入 password 然后会提示 install the suggested plugin 和创建一个 admin user.
### 本文首发于 https://www.cnblogs.com/wade-xu/p/16863933.html
我想为Heroku构建一个Rails3应用程序。他们使用Postgres作为他们的数据库,所以我通过MacPorts安装了postgres9.0。现在我需要一个postgresgem并且共识是出于性能原因你想要pggem。但是我对我得到的错误感到非常困惑当我尝试在rvm下通过geminstall安装pg时。我已经非常明确地指定了所有postgres目录的位置可以找到但仍然无法完成安装:$envARCHFLAGS='-archx86_64'geminstallpg--\--with-pg-config=/opt/local/var/db/postgresql90/defaultdb/po
我打算为ruby脚本创建一个安装程序,但我希望能够确保机器安装了RVM。有没有一种方法可以完全离线安装RVM并且不引人注目(通过不引人注目,就像创建一个可以做所有事情的脚本而不是要求用户向他们的bash_profile或bashrc添加一些东西)我不是要脚本本身,只是一个关于如何走这条路的快速指针(如果可能的话)。我们还研究了这个很有帮助的问题:RVM-isthereawayforsimpleofflineinstall?但有点误导,因为答案只向我们展示了如何离线在RVM中安装ruby。我们需要能够离线安装RVM本身,并查看脚本https://raw.github.com/wayn
我有一个奇怪的问题:我在rvm上安装了rubyonrails。一切正常,我可以创建项目。但是在我输入“railsnew”时重新启动后,我有“程序'rails'当前未安装。”。SystemUbuntu12.04ruby-v"1.9.3p194"gemlistactionmailer(3.2.5)actionpack(3.2.5)activemodel(3.2.5)activerecord(3.2.5)activeresource(3.2.5)activesupport(3.2.5)arel(3.0.2)builder(3.0.0)bundler(1.1.4)coffee-rails(
我刚刚为fedora安装了emacs。我想用emacs编写ruby。为ruby提供代码提示、代码完成类型功能所需的工具、扩展是什么? 最佳答案 ruby-mode已经包含在Emacs23之后的版本中。不过,它也可以通过ELPA获得。您可能感兴趣的其他一些事情是集成RVM、feature-mode(Cucumber)、rspec-mode、ruby-electric、inf-ruby、rinari(用于Rails)等。这是我当前用于Ruby开发的Emacs配置:https://github.com/citizen428/emacs
我正在尝试在我的centos服务器上安装therubyracer,但遇到了麻烦。$geminstalltherubyracerBuildingnativeextensions.Thiscouldtakeawhile...ERROR:Errorinstallingtherubyracer:ERROR:Failedtobuildgemnativeextension./usr/local/rvm/rubies/ruby-1.9.3-p125/bin/rubyextconf.rbcheckingformain()in-lpthread...yescheckingforv8.h...no***e
我的最终目标是安装当前版本的RubyonRails。我在OSXMountainLion上运行。到目前为止,这是我的过程:已安装的RVM$\curl-Lhttps://get.rvm.io|bash-sstable检查已知(我假设已批准)安装$rvmlistknown我看到当前的稳定版本可用[ruby-]2.0.0[-p247]输入命令安装$rvminstall2.0.0-p247注意:我也试过这些安装命令$rvminstallruby-2.0.0-p247$rvminstallruby=2.0.0-p247我很快就无处可去了。结果:$rvminstall2.0.0-p247Search
我实际上是在尝试使用RVM在我的OSX10.7.5上更新ruby,并在输入以下命令后:rvminstallruby我得到了以下回复:Searchingforbinaryrubies,thismighttakesometime.Checkingrequirementsforosx.Installingrequirementsforosx.Updatingsystem.......Errorrunning'requirements_osx_brew_update_systemruby-2.0.0-p247',pleaseread/Users/username/.rvm/log/138121
由于fast-stemmer的问题,我很难安装我想要的任何rubygem。我把我得到的错误放在下面。Buildingnativeextensions.Thiscouldtakeawhile...ERROR:Errorinstallingfast-stemmer:ERROR:Failedtobuildgemnativeextension./System/Library/Frameworks/Ruby.framework/Versions/2.0/usr/bin/rubyextconf.rbcreatingMakefilemake"DESTDIR="cleanmake"DESTDIR=
当我尝试安装Ruby时遇到此错误。我试过查看this和this但无济于事➜~brewinstallrubyWarning:YouareusingOSX10.12.Wedonotprovidesupportforthispre-releaseversion.Youmayencounterbuildfailuresorotherbreakages.Pleasecreatepull-requestsinsteadoffilingissues.==>Installingdependenciesforruby:readline,libyaml,makedepend==>Installingrub
当我执行>rvminstall1.9.2时一切顺利。然后我做>rvmuse1.9.2也很顺利。但是当涉及到ruby-v时..sam@sjones:~$rvminstall1.9.2/home/sam/.rvm/rubies/ruby-1.9.2-p136,thismaytakeawhiledependingonyourcpu(s)...ruby-1.9.2-p136-#fetchingruby-1.9.2-p136-#downloadingruby-1.9.2-p136,thismaytakeawhiledependingonyourconnection...%Total%Rece