IdentityServer4 实现鉴权、授权,AspNetCore Identity实现数据库用户管理表直接生成。
ps:IdentityServer4文档上最后给的例子是 // 配置使用内存存储用户信息,但使用 EF 存储客户端和资源信息,
我初步要实现的是 //数据库存储用户信息 内存存储资源 (下一步资源也放数据库 以后弄好了有机会更)
直接干活:
1.创建.Net6 API程序,一顿引用,包括
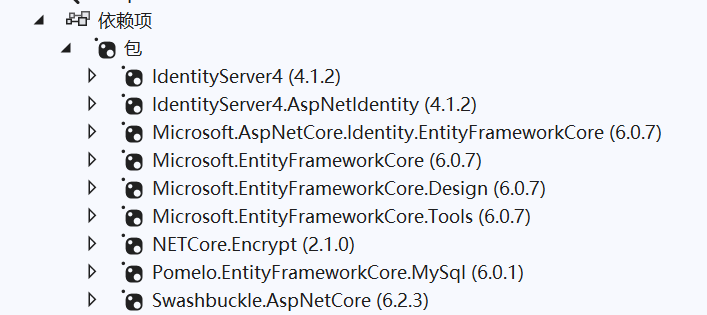
防止图片挂掉打一遍文字:
IdentityServer4、
IdengtityServer4.AspNetIdentity、
AspNetCore.Identity.EntityFrameWorkCore(生成数据库表用的)、
EntityFrameWork+Disign+Tool三件套 (缺了不能自动迁移)、
Pomelo.EntityFrameWorkCore.MySql(我是用的MySql,如果是SqlServer 不用这个用一个大概叫EF.Sqlserver的)、
Encrypt (加密MD5用的 不必须)、
下面那个是自带的。
2.建立数据库连接类
 1  public class IdpDbContext : IdentityDbContext<ApplicationUser>
 2     {
 3         public IdpDbContext(DbContextOptions<IdpDbContext> opt) : base(opt)
 4         {
 5
 6         }
 7         protected override void OnModelCreating(ModelBuilder builder)
 8         {
 9             base.OnModelCreating(builder);
10             builder.Entity<ApplicationUser>().ToTable("ApplicationUsers");
11             #region #
12             //builder.Entity<IdentityUserLogin<string>>().ToTable("ApplicationLogins");
13             //builder.Entity<IdentityUserClaim<string>>().ToTable("ApplicationUserClaims");
14             //builder.Entity<ApplicationUserRole>().ToTable("ApplicationUserRoles");
15             //builder.Entity<IdentityUserToken<string>>().ToTable("ApplicationUserTokens");
16             //builder.Entity<ApplicationRole>().ToTable("ApplicationRoles");
17             //builder.Entity<IdentityRoleClaim<string>>().ToTable("ApplicationRoleClaims");
18             //builder.Entity<ApplicationUserRole>().HasKey(t => t.Id).HasName("PK_UserRole_ID_KEY");
19             #endregion
20
21             builder.Entity<ApplicationUser>().HasData(
22                 new ApplicationUser()
23                 {
24                     Id = Guid.NewGuid().ToString(),
25                     RealName = "alice1",
26                     UserName = "alice1",
27                     PasswordHash = "alice1"
28                 });
29             #region 初始化用戶与角色的种子数据
30             //1. 更新用戶与角色的外鍵
31             builder.Entity<ApplicationUser>(
32                 u => u.HasMany(x => x.UserRoles).WithOne().HasForeignKey(ur => ur.UserId).IsRequired()
33                 );
34             //2. 添加管理员角色
35             var adminRoleId = "f8df1775-e889-46f4-acdd-421ec8d9ba64";
36             builder.Entity<IdentityRole>().HasData(
37                 new IdentityRole()
38                 {
39                     Id = adminRoleId,
40                     Name = "Admin",
41                     NormalizedName = "Admin".ToUpper()
42                 }
43             );
44             //3. 添加用户
45             var adminUserId = "f8df1775-e889-46f4-acdd-421ec8d9ba65";
46             ApplicationUser adminUser = new ApplicationUser
47             {
48                 Id = adminUserId,
49                 UserName = "admin",
50                 NormalizedUserName= "admin".ToUpper(),
51                 RealName = "admin",
52                 NormalizedEmail = "admin@qq.com".ToUpper(),
53                 Email = "admin@qq.com",
54                 TwoFactorEnabled = false,
55                 EmailConfirmed = true,
56                 PhoneNumber = "123456789",
57                 PhoneNumberConfirmed = false,
58
59             };
60             MyPasswordHasher ph = new MyPasswordHasher();
61             adminUser.PasswordHash = ph.HashPassword(adminUser, "123456");
62             builder.Entity<ApplicationUser>().HasData(adminUser);
63             //4. 给用户加入管理员角色
64             builder.Entity<IdentityUserRole<string>>().HasData(
65                 new IdentityUserRole<string>()
66                 {
67                     RoleId = adminRoleId,
68                     UserId = adminUserId
69                 }
70                 );
71             #endregion
72
73         }
74     }
3.Program里开始加东西(如果是历史的Net版本,是在StartUp里):
直接代码
 1 using Microsoft.AspNetCore.Identity;
 2 using Microsoft.EntityFrameworkCore;
 3 using MyIDP;
 4 using MyIDP.Models;
 5 using MyIDP.Permission;
 6
 7 var builder = WebApplication.CreateBuilder(args);
 8
 9 // Add services to the container.
10 builder.Services.AddControllers();
11 // Learn more about configuring Swagger/OpenAPI at https://aka.ms/aspnetcore/swashbuckle
12 builder.Services.AddEndpointsApiExplorer();
13 builder.Services.AddSwaggerGen();
14
15 //由此重要
16 builder.Services.AddDbContext<IdpDbContext>(opt =>
17 {
18     opt.UseMySql("server=127.0.0.1;Port=3306;database=AccountDb;uid=root;pwd=123456;", new MySqlServerVersion(new Version(8,0,29)));
19 });
20
21 builder.Services.AddIdentity<ApplicationUser, IdentityRole>()
22                 .AddUserManager<MyUserManager>()
23                 .AddEntityFrameworkStores<IdpDbContext>()
24                 .AddDefaultTokenProviders();
25
26 builder.Services.AddIdentityServer()
27     .AddDeveloperSigningCredential()
28
29     .AddInMemoryIdentityResources(MyIDP.IdpConfig.GetIdentityResources())
30     .AddInMemoryClients(MyIDP.IdpConfig.GetClients())
31     .AddInMemoryApiScopes( MyIDP.IdpConfig.GetScope())
32     .AddInMemoryApiResources( MyIDP.IdpConfig.GetApiResources())    //.AddResourceOwnerValidator<MyResourceOwnerPasswordValidator>() //这句可以打开自主验证登录用户
33     //.AddProfileService<MyProfileService>()
34     .AddAspNetIdentity<ApplicationUser>()
35     //.AddTestUsers(new List<IdentityServer4.Test.TestUser>
36     //{
37     //    new IdentityServer4.Test.TestUser
38     //    {
39     //        SubjectId="123",
40     //        Username = "alice",
41     //        Password = "alice",
42     //        Claims = new List<Claim>() {
43     //            new Claim(JwtClaimTypes.Role, "superadmin"),
44     //            new Claim(JwtClaimTypes.Role, "admin")
45     //        }
46     //    }
47     //})
48     ;
49
50 var app = builder.Build();
51
52 // Configure the HTTP request pipeline.
53 if (app.Environment.IsDevelopment())
54 {
55     app.UseSwagger();
56     app.UseSwaggerUI();
57 }
58
59 app.UseIdentityServer();
60 app.UseAuthorization();
61 app.MapControllers();
62 app.Run();
因为使用的是内存储存t鉴权信息的方式,所以建立IdentityServer4的配置类IdpConfig
 1  public static class IdpConfig
 2     {
 3         public static IEnumerable<IdentityResource> GetIdentityResources()
 4         {
 5             return new IdentityResource[]
 6             {
 7                 new IdentityResources.OpenId(),
 8                 new IdentityResources.Profile(),
 9                 new IdentityResources.Address(),
10                 new IdentityResources.Phone(),
11                 new IdentityResources.Email()
12             };
13         }
14
15         public static IEnumerable<ApiResource> GetApiResources()
16         {
17             //return new ApiResource[]
18             //{
19             //    new ApiResource("api1", "My API #1",new List<string>(){JwtClaimTypes.Role})
20             //};
21             //新写法
22             return new[]
23             {
24                 new ApiResource("api1", "My API #1")
25                 {
26                     Scopes = { "scope1"}
27                 }
28             };
29         }
30
31         public static IEnumerable<Client> GetClients()
32         {
33             return new[]
34             {
35                 #region MyRegion
36                  //// client credentials flow client
37                 //new Client
38                 //{
39                 //    ClientId = "console client",
40                 //    ClientName = "Client Credentials Client",
41
42                 //    AllowedGrantTypes = GrantTypes.ClientCredentials,
43
44                 //    ClientSecrets = { new Secret("511536EF-F270-4058-80CA-1C89C192F69A".Sha256()) },
45
46                 //    AllowedScopes = { "api1" }
47                 //},
48
49     #endregion
50
51                 // wpf client, password grant
52                 new Client
53                 {
54                     ClientId = "client",
55                     AllowedGrantTypes = GrantTypes.ResourceOwnerPassword,
56                     ClientSecrets =
57                     {
58                         new Secret("secret".Sha256())
59                     },
60                     AllowedScopes = //允许当访问的资源
61                     {
62                         "scope1",
63                         //"api1",
64                         IdentityServerConstants.StandardScopes.OpenId,
65                         IdentityServerConstants.StandardScopes.Email,
66                         IdentityServerConstants.StandardScopes.Address,
67                         IdentityServerConstants.StandardScopes.Phone,
68                         IdentityServerConstants.StandardScopes.Profile }
69                 }
70             };
71         }
72
73         public static IEnumerable<ApiScope> GetScope()
74         {
75             return new ApiScope[] {
76                 new ApiScope("scope1"),
77                 new ApiScope("scope2"),
78             };
79         }
80 }数据库的usernamager
 1 public class MyUserManager : UserManager<ApplicationUser>
 2     {
 3         public MyUserManager(IUserStore<ApplicationUser> store, IOptions<IdentityOptions> optionsAccessor, IPasswordHasher<ApplicationUser> passwordHasher,
 4           IEnumerable<IUserValidator<ApplicationUser>> userValidators, IEnumerable<IPasswordValidator<ApplicationUser>> passwordValidators, ILookupNormalizer keyNormalizer, IdentityErrorDescriber errors, IServiceProvider services, ILogger<UserManager<ApplicationUser>> logger)
 5            : base(store, optionsAccessor, new MyPasswordHasher(), userValidators, passwordValidators, keyNormalizer, errors, services, logger)
 6         {
 7             optionsAccessor.Value.Password.RequireDigit = false;
 8             optionsAccessor.Value.Password.RequiredLength = 4;
 9             optionsAccessor.Value.Password.RequireLowercase = false;
10             optionsAccessor.Value.Password.RequireUppercase = false;
11             optionsAccessor.Value.Password.RequireNonAlphanumeric = false;
12         }
13
14 }重写验证密码的方法类MyResourceOwnerPasswordValidator,(如果没有打开Program中的AddResourceOwnerValidator<MyResourceOwnerPasswordValidator>() 则不需要)
public class MyResourceOwnerPasswordValidator : IResourceOwnerPasswordValidator
    {
        public readonly SignInManager<ApplicationUser> signInManager;
        private readonly MyUserManager userManager;
        //public readonly IEventService service;
        public MyResourceOwnerPasswordValidator(MyUserManager userService, SignInManager<ApplicationUser> signInManager)//, IEventService service)
        {
            userManager = userService;
            this.signInManager = signInManager;
            //this.service = service;

        }
        public async Task ValidateAsync(ResourceOwnerPasswordValidationContext context)
        {
            if (string.IsNullOrEmpty(context.UserName) || string.IsNullOrEmpty(context.Password))
            {
                context.Result = new GrantValidationResult(TokenRequestErrors.InvalidGrant, "验证被拒绝,用户名或者密码为空。");
                return;
            }
            var user = await userManager.FindByNameAsync(context.UserName);
            if (user == null)
            {
                context.Result = new GrantValidationResult(TokenRequestErrors.InvalidGrant, "验证失败,不存在当前用户。");
                return;
            }
            //检验用户密码(虽然我也不知道他的密码是采用什么加密方式得到的,但是我也不需要知道)
            var passwordPass = await userManager.CheckPasswordAsync(user, context.Password);
            if (!passwordPass)
            {
                context.Result = new GrantValidationResult(TokenRequestErrors.InvalidGrant, "验证失败,用户凭证错误");
                return;
            }
            else
            {
                try
                {
                    await userManager.AddLoginAsync(user, new UserLoginInfo(user.Id, "", user.UserName));
                }
                catch (Exception ex)
                {
                    ;
                }
                finally
                {
                    context.Result = new GrantValidationResult(user.Id, GrantType.ResourceOwnerPassword, new List<Claim>() { new Claim("account", user.UserName) });
                }
            }
            return;
        }

}MyPasswordHasher
 1 public class MyPasswordHasher : PasswordHasher<ApplicationUser>
 2     {
 3         public override string HashPassword(ApplicationUser user, string password)
 4         {
 5             //PasswordHasher<ApplicationUser> ph = new PasswordHasher<ApplicationUser>();
 6             //var pstr = ph.HashPassword(new ApplicationUser(), password);
 7             //return pstr;
 8             return password.MD5();
 9         }
10
11         public override PasswordVerificationResult VerifyHashedPassword(ApplicationUser user, string hashedPassword, string providedPassword)
12         {
13             if (providedPassword.MD5().Equals(hashedPassword))
14             {
15                 return PasswordVerificationResult.Success;
16             }
17             else
18             {
19                 return PasswordVerificationResult.Failed;
20             }
21         }
22 }创建自己的User类 ApplicationUser继承 IdentityUser 复写自带的AspNetUser表
  public class ApplicationUser : IdentityUser
    {
        public string MySomething { get; set; } = "";
        /// <summary>
        /// 创建时间
        /// </summary>
        public DateTime CreateTime { get; set; }

        /// <summary>
        /// 创建人Id
        /// </summary>
        public string CreatorId { get; set; } = "";

        /// <summary>
        /// 否已删除
        /// </summary>
        public bool Deleted { get; set; }


        /// <summary>
        /// 姓名
        /// </summary>
        public string RealName { get; set; }

        /// <summary>
        /// 性别
        /// </summary>
        public Sex Sex { get; set; }

        /// <summary>
        /// 出生日期
        /// </summary>
        public DateTime? Birthday { get; set; }

        /// <summary>
        /// 所属部门Id
        /// </summary>
        public string DepartmentId { get; set; } = "";

        public string OtherData { get; set; } = "";

        // 用户角色 用户权限 用户信息 用户登录tokens  重新绑定与父类的关系 命名必须和父类一致
        public virtual ICollection<IdentityUserRole<string>> UserRoles { get; set; }
        public virtual ICollection<IdentityUserClaim<string>> Claims { get; set; }
        public virtual ICollection<IdentityUserLogin<string>> Logins { get; set; }
        public virtual ICollection<IdentityUserToken<string>> Tokens { get; set; }
    }

    public enum Sex
    {
        [Description("男")]
        Man = 1,

        [Description("女")]
        Woman = 0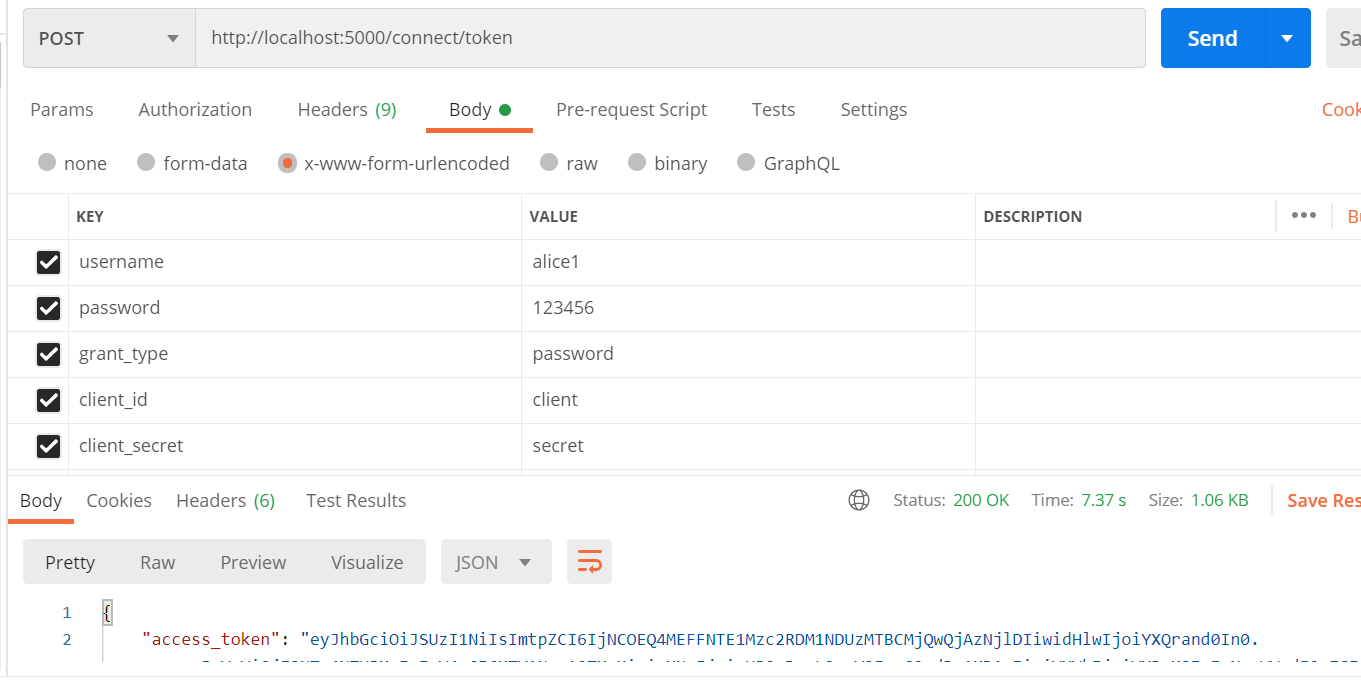
}至此可以生成数据库迁移后 Postman测试一下
作为我的Rails应用程序的一部分,我编写了一个小导入程序,它从我们的LDAP系统中吸取数据并将其塞入一个用户表中。不幸的是,与LDAP相关的代码在遍历我们的32K用户时泄漏了大量内存,我一直无法弄清楚如何解决这个问题。这个问题似乎在某种程度上与LDAP库有关,因为当我删除对LDAP内容的调用时,内存使用情况会很好地稳定下来。此外,不断增加的对象是Net::BER::BerIdentifiedString和Net::BER::BerIdentifiedArray,它们都是LDAP库的一部分。当我运行导入时,内存使用量最终达到超过1GB的峰值。如果问题存在,我需要找到一些方法来更正我的代
我正在使用i18n从头开始构建一个多语言网络应用程序,虽然我自己可以处理一大堆yml文件,但我说的语言(非常)有限,最终我想寻求外部帮助帮助。我想知道这里是否有人在使用UI插件/gem(与django上的django-rosetta不同)来处理多个翻译器,其中一些翻译器不愿意或无法处理存储库中的100多个文件,处理语言数据。谢谢&问候,安德拉斯(如果您已经在rubyonrails-talk上遇到了这个问题,我们深表歉意) 最佳答案 有一个rails3branchofthetolkgem在github上。您可以通过在Gemfi
我正在寻找执行以下操作的正确语法(在Perl、Shell或Ruby中):#variabletoaccessthedatalinesappendedasafileEND_OF_SCRIPT_MARKERrawdatastartshereanditcontinues. 最佳答案 Perl用__DATA__做这个:#!/usr/bin/perlusestrict;usewarnings;while(){print;}__DATA__Texttoprintgoeshere 关于ruby-如何将脚
是的,我知道最好使用webmock,但我想知道如何在RSpec中模拟此方法:defmethod_to_testurl=URI.parseurireq=Net::HTTP::Post.newurl.pathres=Net::HTTP.start(url.host,url.port)do|http|http.requestreq,foo:1endresend这是RSpec:let(:uri){'http://example.com'}specify'HTTPcall'dohttp=mock:httpNet::HTTP.stub!(:start).and_yieldhttphttp.shou
好的,所以我的目标是轻松地将一些数据保存到磁盘以备后用。您如何简单地写入然后读取一个对象?所以如果我有一个简单的类classCattr_accessor:a,:bdefinitialize(a,b)@a,@b=a,bendend所以如果我从中非常快地制作一个objobj=C.new("foo","bar")#justgaveitsomerandomvalues然后我可以把它变成一个kindaidstring=obj.to_s#whichreturns""我终于可以将此字符串打印到文件或其他内容中。我的问题是,我该如何再次将这个id变回一个对象?我知道我可以自己挑选信息并制作一个接受该信
我在app/helpers/sessions_helper.rb中有一个帮助程序文件,其中包含一个方法my_preference,它返回当前登录用户的首选项。我想在集成测试中访问该方法。例如,这样我就可以在测试中使用getuser_path(my_preference)。在其他帖子中,我读到这可以通过在测试文件中包含requiresessions_helper来实现,但我仍然收到错误NameError:undefinedlocalvariableormethod'my_preference'.我做错了什么?require'test_helper'require'sessions_hel
我有用于控制用户任务的Rails5API项目,我有以下错误,但并非总是针对相同的Controller和路由。ActionController::RoutingError:uninitializedconstantApi::V1::ApiController我向您描述了一些我的项目,以更详细地解释错误。应用结构路线scopemodule:'api'donamespace:v1do#=>Loginroutesscopemodule:'login'domatch'login',to:'sessions#login',as:'login',via::postend#=>Teamroutessc
我一直很高兴地使用DelayedJob习惯用法:foo.send_later(:bar)这会调用DelayedJob进程中对象foo的方法bar。我一直在使用DaemonSpawn在我的服务器上启动DelayedJob进程。但是...如果foo抛出异常,Hoptoad不会捕获它。这是任何这些包中的错误...还是我需要更改某些配置...或者我是否需要在DS或DJ中插入一些异常处理来调用Hoptoad通知程序?回应下面的第一条评论。classDelayedJobWorker 最佳答案 尝试monkeypatchingDelayed::W
我安装了ruby版本管理器,并将RVM安装的ruby实现设置为默认值,这样'哪个ruby'显示'~/.rvm/ruby-1.8.6-p383/bin/ruby'但是当我在emacs中打开inf-ruby缓冲区时,它使用安装在/usr/bin中的ruby。有没有办法让emacs像shell一样尊重ruby的路径?谢谢! 最佳答案 我创建了一个emacs扩展来将rvm集成到emacs中。如果您有兴趣,可以在这里获取:http://github.com/senny/rvm.el
我目前正在使用以下方法获取页面的源代码:Net::HTTP.get(URI.parse(page.url))我还想获取HTTP状态,而无需发出第二个请求。有没有办法用另一种方法做到这一点?我一直在查看文档,但似乎找不到我要找的东西。 最佳答案 在我看来,除非您需要一些真正的低级访问或控制,否则最好使用Ruby的内置Open::URI模块:require'open-uri'io=open('http://www.example.org/')#=>#body=io.read[0,50]#=>"["200","OK"]io.base_ur