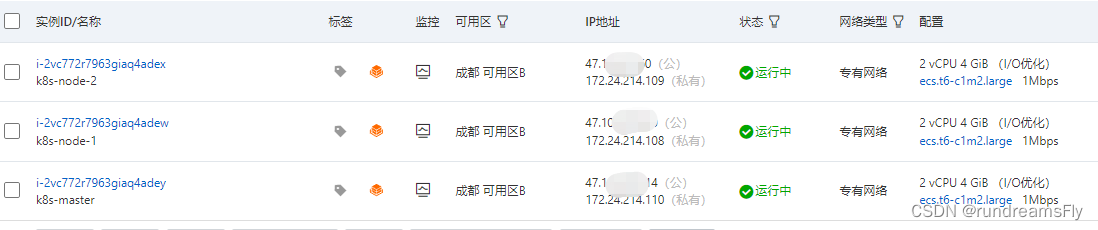
hostnamectl set-hostname k8s-master
hostnamectl set-hostname k8s-node-1
hostnamectl set-hostname k8s-node-2
vi /etc/hosts

172.24.214.110 k8s-master
172.24.214.108 k8s-node-1
172.24.214.109 k8s-node-2
yum install update
yum install lrzsz
yum install -y conntrack ipvsadm ipset jq sysstat curl iptables libseccomp
wget -O docker.sh https://files.rundreams.net/sh/docker.sh && sh docker.sh
sudo yum-config-manager --add-repo http://mirrors.aliyun.com/docker-ce/linux/centos/docker-ce.repo
sudo mkdir -p /etc/docker
sudo tee /etc/docker/daemon.json <<-'EOF'
{
  "registry-mirrors": ["https://j16wttpi.mirror.aliyuncs.com"]
}
EOF
wget https://mirrors.aliyun.com/docker-ce/linux/centos/docker-ce.repo -O /etc/yum.repos.d/docker-ce.repo
yum install -y docker-ce
systemctl start docker
systemctl enable docker
docker info
wget -O k8s-init.sh https://files.rundreams.net/sh/k8s-init.sh && sh k8s-init.sh
systemctl stop firewalld && systemctl disable firewalld
setenforce 0
sed -i 's/^SELINUX=enforcing$/SELINUX=permissive/' /etc/selinux/config
swapoff -a
sed -i '/swap/s/^\(.*\)$/#\1/g' /etc/fstab
iptables -F && iptables -X && iptables -F -t nat && iptables -X -t nat && iptables -P FORWARD ACCEPT
cat <<EOF >  /etc/sysctl.d/k8s.conf
net.bridge.bridge-nf-call-ip6tables = 1
net.bridge.bridge-nf-call-iptables = 1
EOF

sysctl --system
链接:https://pan.baidu.com/s/1zBjp74MDV8Kkrnp2ZZbeNQ?pwd=8dpk
提取码:8dpk
链接:https://caiyun.139.com/m/i?1F5C35BxQfMvl
提取码:De7b
tar -xf cri-dockerd-0.2.6.amd64.tgz
cp cri-dockerd/cri-dockerd /usr/bin/
chmod +x /usr/bin/cri-dockerd
cat <<"EOF" > /usr/lib/systemd/system/cri-docker.service
[Unit]
Description=CRI Interface for Docker Application Container Engine
Documentation=https://docs.mirantis.com
After=network-online.target firewalld.service docker.service
Wants=network-online.target
Requires=cri-docker.socket
[Service]
Type=notify
ExecStart=/usr/bin/cri-dockerd --network-plugin=cni --pod-infra-container-image=registry.aliyuncs.com/google_containers/pause:3.7
ExecReload=/bin/kill -s HUP $MAINPID
TimeoutSec=0
RestartSec=2
Restart=always
StartLimitBurst=3
StartLimitInterval=60s
LimitNOFILE=infinity
LimitNPROC=infinity
LimitCORE=infinity
TasksMax=infinity
Delegate=yes
KillMode=process
[Install]
WantedBy=multi-user.target
EOF
cat <<"EOF" > /usr/lib/systemd/system/cri-docker.socket
[Unit]
Description=CRI Docker Socket for the API
PartOf=cri-docker.service
[Socket]
ListenStream=%t/cri-dockerd.sock
SocketMode=0660
SocketUser=root
SocketGroup=docker
[Install]
WantedBy=sockets.target
EOF
systemctl daemon-reload
systemctl enable cri-docker --now
systemctl is-active cri-docker
cat > /etc/yum.repos.d/kubernetes.repo << EOF
[kubernetes]
name=Kubernetes
baseurl=https://mirrors.aliyun.com/kubernetes/yum/repos/kubernetes-el7-x86_64/
enabled=1
gpgcheck=0
repo_gpgcheck=0
gpgkey=https://mirrors.aliyun.com/kubernetes/yum/doc/yum-key.gpg https://mirrors.aliyun.com/kubernetes/yum/doc/rpm-package-key.gpg
EOF
yum install -y kubelet-1.25.0 kubeadm-1.25.0 kubectl-1.25.0

kubeadm version
systemctl enable kubelet
cat <<EOF > /etc/sysconfig/kubelet
KUBELET_EXTRA_ARGS="--cgroup-driver=systemd"
EOF
cat <<EOF > /etc/docker/daemon.json
{
  "registry-mirrors": ["https://j16wttpi.mirror.aliyuncs.com"],
  "exec-opts": ["native.cgroupdriver=systemd"]
}
EOF
systemctl daemon-reload
systemctl restart docker
kubeadm init \
--apiserver-advertise-address=172.24.214.110 \
--image-repository registry.aliyuncs.com/google_containers \
--kubernetes-version v1.25.0 \
--service-cidr=10.10.0.0/12 \
--pod-network-cidr=172.17.0.0/16 \
--cri-socket /var/run/cri-dockerd.sock \
--ignore-preflight-errors=all

kubeadm join 172.24.214.110:6443 --token 5efiso.2zibi97nx4cunivt \
        --discovery-token-ca-cert-hash sha256:158fb29cb08d54e58d76239292eed553c25c54fb307424bee8d5776690827303 \
        --cri-socket /var/run/cri-dockerd.sock
wget https://docs.projectcalico.org/manifests/calico.yaml --no-check-certificate
链接:https://pan.baidu.com/s/1KATNHOZdtZ0169NLfa2JDQ?pwd=nhp6
提取码:nhp6
calico.yaml https://www.aliyundrive.com/s/geVBb4b4t2A
链接: https://caiyun.139.com/m/i?1F5C2RFMpI4zl
提取码:Fm1S
链接:https://pan.baidu.com/s/1nxQAJX21-dbaZRkv4pbvWg?pwd=6w6j
提取码:6w6j
链接:https://caiyun.139.com/m/i?1F5C2lG1dGd66
提取码:Odq8

docker load -i calico~cni~v3.24.3.tar.gz
docker load -i calico~kube~controllers~v3.24.3.tar.gz
docker load -i calico~node~v3.24.3.tar.gz
docker images | grep calico 查看是否成功
kubectl apply -f calico.yaml
kubectl get node -o wide
https://blog.csdn.net/qq_41822345/article/details/126679925
https://blog.csdn.net/xiaohuixing16134/article/details/102784269
https://blog.csdn.net/bilibilidicks/article/details/125825282
https://blog.csdn.net/zl8751/article/details/126308198
https://blog.csdn.net/weibo1230123/article/details/121732361
https://blog.csdn.net/u010800804/article/details/124524688
Unfortunately, an error has occurred:
timed out waiting for the condition
This error is likely caused by:
- The kubelet is not running
- The kubelet is unhealthy due to a misconfiguration of the node in some way (required cgroups disabled)
If you are on a systemd-powered system, you can try to troubleshoot the error with the following commands:
- ‘systemctl status kubelet’
- ‘journalctl -xeu kubelet’
Additionally, a control plane component may have crashed or exited when started by the container runtime.
To troubleshoot, list all containers using your preferred container runtimes CLI.
Here is one example how you may list all running Kubernetes containers by using crictl:
- ‘crictl --runtime-endpoint unix:///var/run/cri-dockerd.sock ps -a | grep kube | grep -v pause’
Once you have found the failing container, you can inspect its logs with:
- ‘crictl --runtime-endpoint unix:///var/run/cri-dockerd.sock logs CONTAINERID’
error execution phase wait-control-plane: couldn’t initialize a Kubernetes cluster
To see the stack trace of this error execute with --v=5 or higher
Found multiple CRI endpoints on the host. Please define which one do you wish to use by setting the ‘criSocket’ field in the kubeadm configuration file: unix:///var/run/containerd/containerd.sock, unix:///var/run/cri-dockerd.sock
To see the stack trace of this error execute with --v=5 or higher
我想为Heroku构建一个Rails3应用程序。他们使用Postgres作为他们的数据库,所以我通过MacPorts安装了postgres9.0。现在我需要一个postgresgem并且共识是出于性能原因你想要pggem。但是我对我得到的错误感到非常困惑当我尝试在rvm下通过geminstall安装pg时。我已经非常明确地指定了所有postgres目录的位置可以找到但仍然无法完成安装:$envARCHFLAGS='-archx86_64'geminstallpg--\--with-pg-config=/opt/local/var/db/postgresql90/defaultdb/po
在选择我想要运行操作的频率时,唯一的选项是“每天”、“每小时”和“每10分钟”。谢谢!我想为我的Rails3.1应用程序运行调度程序。 最佳答案 这不是一个优雅的解决方案,但您可以安排它每天运行,并在实际开始工作之前检查日期是否为当月的第一天。 关于ruby-如何每月在Heroku运行一次Scheduler插件?,我们在StackOverflow上找到一个类似的问题: https://stackoverflow.com/questions/8692687/
我对最新版本的Rails有疑问。我创建了一个新应用程序(railsnewMyProject),但我没有脚本/生成,只有脚本/rails,当我输入ruby./script/railsgeneratepluginmy_plugin"Couldnotfindgeneratorplugin.".你知道如何生成插件模板吗?没有这个命令可以创建插件吗?PS:我正在使用Rails3.2.1和ruby1.8.7[universal-darwin11.0] 最佳答案 随着Rails3.2.0的发布,插件生成器已经被移除。查看变更日志here.现在
我打算为ruby脚本创建一个安装程序,但我希望能够确保机器安装了RVM。有没有一种方法可以完全离线安装RVM并且不引人注目(通过不引人注目,就像创建一个可以做所有事情的脚本而不是要求用户向他们的bash_profile或bashrc添加一些东西)我不是要脚本本身,只是一个关于如何走这条路的快速指针(如果可能的话)。我们还研究了这个很有帮助的问题:RVM-isthereawayforsimpleofflineinstall?但有点误导,因为答案只向我们展示了如何离线在RVM中安装ruby。我们需要能够离线安装RVM本身,并查看脚本https://raw.github.com/wayn
我有一个奇怪的问题:我在rvm上安装了rubyonrails。一切正常,我可以创建项目。但是在我输入“railsnew”时重新启动后,我有“程序'rails'当前未安装。”。SystemUbuntu12.04ruby-v"1.9.3p194"gemlistactionmailer(3.2.5)actionpack(3.2.5)activemodel(3.2.5)activerecord(3.2.5)activeresource(3.2.5)activesupport(3.2.5)arel(3.0.2)builder(3.0.0)bundler(1.1.4)coffee-rails(
我刚刚为fedora安装了emacs。我想用emacs编写ruby。为ruby提供代码提示、代码完成类型功能所需的工具、扩展是什么? 最佳答案 ruby-mode已经包含在Emacs23之后的版本中。不过,它也可以通过ELPA获得。您可能感兴趣的其他一些事情是集成RVM、feature-mode(Cucumber)、rspec-mode、ruby-electric、inf-ruby、rinari(用于Rails)等。这是我当前用于Ruby开发的Emacs配置:https://github.com/citizen428/emacs
我正在尝试在我的centos服务器上安装therubyracer,但遇到了麻烦。$geminstalltherubyracerBuildingnativeextensions.Thiscouldtakeawhile...ERROR:Errorinstallingtherubyracer:ERROR:Failedtobuildgemnativeextension./usr/local/rvm/rubies/ruby-1.9.3-p125/bin/rubyextconf.rbcheckingformain()in-lpthread...yescheckingforv8.h...no***e
我的最终目标是安装当前版本的RubyonRails。我在OSXMountainLion上运行。到目前为止,这是我的过程:已安装的RVM$\curl-Lhttps://get.rvm.io|bash-sstable检查已知(我假设已批准)安装$rvmlistknown我看到当前的稳定版本可用[ruby-]2.0.0[-p247]输入命令安装$rvminstall2.0.0-p247注意:我也试过这些安装命令$rvminstallruby-2.0.0-p247$rvminstallruby=2.0.0-p247我很快就无处可去了。结果:$rvminstall2.0.0-p247Search
我在我的Rails项目中使用Pow和powifygem。现在我尝试升级我的ruby版本(从1.9.3到2.0.0,我使用RVM)当我切换ruby版本、安装所有gem依赖项时,我通过运行railss并访问localhost:3000确保该应用程序正常运行以前,我通过使用pow访问http://my_app.dev来浏览我的应用程序。升级后,由于错误Bundler::RubyVersionMismatch:YourRubyversionis1.9.3,butyourGemfilespecified2.0.0,此url不起作用我尝试过的:重新创建pow应用程序重启pow服务器更新战俘
我实际上是在尝试使用RVM在我的OSX10.7.5上更新ruby,并在输入以下命令后:rvminstallruby我得到了以下回复:Searchingforbinaryrubies,thismighttakesometime.Checkingrequirementsforosx.Installingrequirementsforosx.Updatingsystem.......Errorrunning'requirements_osx_brew_update_systemruby-2.0.0-p247',pleaseread/Users/username/.rvm/log/138121
