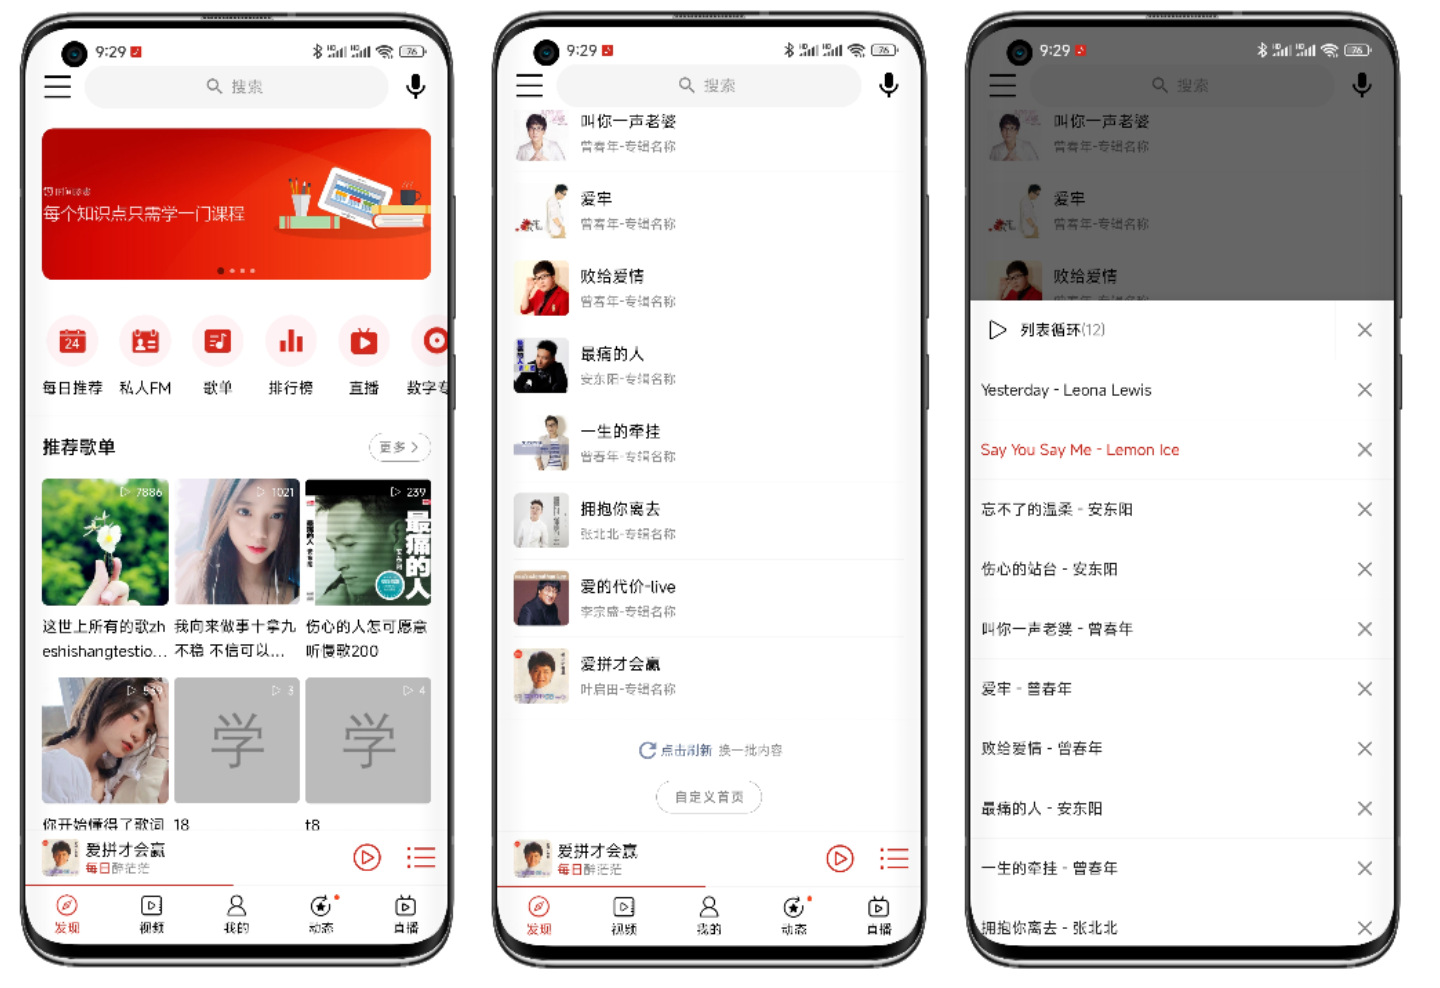
效果图依次为发现界面顶部,包含首页轮播图,水平滚动的按钮,推荐歌单;然后是发现界面推荐单曲,点击单曲就是直接进入播放界面;最后是全局播放控制条上点击播放列表按钮显示的播放列表弹窗。
整体使用RecycerView实现,每个不同的块是一个Item,例如:轮播图是一个Item,按钮也是,推荐歌单和下面的歌单是,推荐单曲,还有最后的自定义首页那块也是一样。
提示:之所以把推荐歌单下面的歌单和推荐歌单标题放一个Item,主要是首页要实现自定义顺序功能,更方便管理。
<?xml version="1.0" encoding="utf-8"?>
<androidx.constraintlayout.widget.ConstraintLayout xmlns:android="http://schemas.android.com/apk/res/android"
    android:layout_width="match_parent"
    xmlns:app="http://schemas.android.com/apk/res-auto"
    android:layout_height="wrap_content"
    android:layout_margin="@dimen/padding_outer">

    <com.youth.banner.Banner
        android:id="@+id/banner"
        android:layout_width="0dp"
        android:layout_height="0dp"
        app:layout_constraintDimensionRatio="H,0.389"
        app:layout_constraintLeft_toLeftOf="parent"
        app:layout_constraintRight_toRightOf="parent"
        app:layout_constraintTop_toTopOf="parent" />
</androidx.constraintlayout.widget.ConstraintLayout>
//banner
BannerData data = (BannerData) d;

Banner bannerView = holder.getView(R.id.banner);

BannerImageAdapter<Ad> bannerImageAdapter = new BannerImageAdapter<Ad>(data.getData()) {

    @Override
    public void onBindView(BannerImageHolder holder, Ad data, int position, int size) {
        ImageUtil.show(getContext(), (ImageView) holder.itemView, data.getIcon());
    }
};

bannerView.setAdapter(bannerImageAdapter);

bannerView.setOnBannerListener(onBannerListener);

bannerView.setBannerRound(DensityUtil.dip2px(getContext(), 10));

//添加生命周期观察者
bannerView.addBannerLifecycleObserver(fragment);

bannerView.setIndicator(new CircleIndicator(getContext()));
<?xml version="1.0" encoding="utf-8"?>
<HorizontalScrollView xmlns:android="http://schemas.android.com/apk/res/android"
    android:layout_width="match_parent"
    android:layout_height="wrap_content"
    android:paddingVertical="@dimen/padding_outer"
    android:scrollbars="none">

    <LinearLayout
        android:id="@+id/container"
        android:layout_width="match_parent"
        android:layout_height="wrap_content"
        android:orientation="horizontal"
        android:paddingHorizontal="@dimen/padding_meddle">

    </LinearLayout>
</HorizontalScrollView>
LinearLayout container = holder.getView(R.id.container);
if (container.getChildCount() > 0) {
    //已经添加了
    return;
}

//横向显示5个半
float containerWidth = ScreenUtil.getScreenWith(container.getContext()) - DensityUtil.dip2px(container.getContext(), 10 * 2);
int itemWidth = (int) (containerWidth / 5.5);
DiscoveryButtonBinding binding;
LinearLayout.LayoutParams layoutParams;
for (IconTitleButtonData it : data.getData()) {
    binding = DiscoveryButtonBinding.inflate(LayoutInflater.from(getContext()));
    binding.icon.setImageResource(it.getIcon());
    binding.title.setText(it.getTitle());

    if (it.getIcon() == R.drawable.day_recommend) {
        SuperViewUtil.show(binding.more);

        //显示日期
        binding.more.setText(String.valueOf(SuperDateUtil.currentDay()));
    }

    //设置点击事件
    binding.getRoot().setOnClickListener(new View.OnClickListener() {
        @Override
        public void onClick(View v) {

        }
    });

    layoutParams = new LinearLayout.LayoutParams(itemWidth, ViewGroup.LayoutParams.WRAP_CONTENT);
    container.addView(binding.getRoot(), layoutParams);
}
<?xml version="1.0" encoding="utf-8"?>
<LinearLayout xmlns:android="http://schemas.android.com/apk/res/android"
    android:layout_width="match_parent"
    android:layout_height="wrap_content"
    android:orientation="vertical">

    <include layout="@layout/item_discovery_title" />

    <androidx.recyclerview.widget.RecyclerView
        android:id="@+id/list"
        android:layout_width="match_parent"
        android:layout_height="wrap_content"
        android:paddingHorizontal="@dimen/padding_outer"
        android:paddingBottom="@dimen/d5" />
</LinearLayout>
private void bindSheetData(BaseViewHolder holder, SheetData data) {
    //设置标题,将标题放到每个具体的item上,好处是方便整体排序
    holder.setText(R.id.title, R.string.recommend_sheet);

    //显示更多容器
    holder.setVisible(R.id.more, true);
    holder.getView(R.id.more).setOnClickListener(v -> {

    });

    RecyclerView listView = holder.getView(R.id.list);
    if (listView.getAdapter() == null) {
        //设置显示3列
        GridLayoutManager layoutManager = new GridLayoutManager(listView.getContext(), 3);
        listView.setLayoutManager(layoutManager);

        sheetAdapter = new SheetAdapter(R.layout.item_sheet);

        //item点击
        sheetAdapter.setOnItemClickListener(new OnItemClickListener() {
            @Override
            public void onItemClick(@NonNull BaseQuickAdapter<?, ?> adapter, @NonNull View view, int position) {
                if (discoveryAdapterListener != null) {
                    discoveryAdapterListener.onSheetClick((Sheet) adapter.getItem(position));
                }
            }
        });
        listView.setAdapter(sheetAdapter);

        GridDividerItemDecoration itemDecoration = new GridDividerItemDecoration(getContext(), (int) DensityUtil.dip2px(getContext(), 5F));
        listView.addItemDecoration(itemDecoration);
    }

    sheetAdapter.setNewInstance(data.getData());
}
<?xml version="1.0" encoding="utf-8"?>
<LinearLayout xmlns:android="http://schemas.android.com/apk/res/android"
    xmlns:app="http://schemas.android.com/apk/res-auto"
    android:layout_width="match_parent"
    android:layout_height="wrap_content"
    android:layout_marginVertical="@dimen/padding_outer"
    android:gravity="center_horizontal"
    android:orientation="vertical">

    <androidx.appcompat.widget.LinearLayoutCompat
        android:layout_width="wrap_content"
        android:layout_height="wrap_content"
        android:gravity="center_vertical">

        <TextView
            android:id="@+id/refresh_button"
            android:layout_width="wrap_content"
            android:layout_height="wrap_content"
            android:drawableLeft="@drawable/refresh"
            android:gravity="center_vertical"
            android:text="@string/click_refresh"
            android:textColor="@color/link"
            android:textSize="@dimen/text_small" />

        <TextView
            android:layout_width="wrap_content"
            android:layout_height="wrap_content"
            android:layout_marginLeft="@dimen/padding_small"
            android:text="@string/change_content"
            android:textColor="@color/black80"
            android:textSize="@dimen/text_small" />
    </androidx.appcompat.widget.LinearLayoutCompat>

    <com.google.android.material.button.MaterialButton
        android:id="@+id/custom"
        style="@style/Widget.MaterialComponents.Button.UnelevatedButton"
        android:layout_width="wrap_content"
        android:layout_height="@dimen/d30"
        android:layout_marginTop="@dimen/padding_outer"
        android:backgroundTint="?attr/colorSurface"
        android:insetTop="0dp"
        android:insetBottom="0dp"
        android:text="@string/custom_discovery"
        android:textColor="@color/black80"
        android:textSize="@dimen/text_small"
        app:cornerRadius="@dimen/d15"
        app:elevation="0dp"
        app:strokeColor="@color/black80"
        app:strokeWidth="@dimen/d0_5" />
</LinearLayout>
holder.getView(R.id.refresh_button).setOnClickListener(v -> discoveryAdapterListener.onRefreshClick());
holder.getView(R.id.custom).setOnClickListener(v -> discoveryAdapterListener.onCustomDiscoveryClick());
他是一个自定义Fragment,哪里要显示就放到哪里就行了。
/**
 * 播放列表对话框
 */
public class MusicPlayListDialogFragment extends BaseViewModelBottomSheetDialogFragment<FragmentDialogAudioPlayListBinding> {

    ...

    @Override
    protected void initListeners() {
        super.initListeners();
        //删除所有按钮点击
        binding.deleteAll.setOnClickListener(new View.OnClickListener() {
            @Override
            public void onClick(View v) {
                //关闭对话框
                dismiss();

                //删除全部音乐
                getMusicListManager().deleteAll();
            }
        });

        //item中子控件点击
        //删除按钮点击
        adapter.addChildClickViewIds(R.id.delete);

        adapter.setOnItemChildClickListener(new OnItemChildClickListener() {
            @Override
            public void onItemChildClick(BaseQuickAdapter adapter, View view, int position) {
                //由于这里只有一个按钮点击
                //所以可以不判断
                if (R.id.delete == view.getId()) {
                    //删除按钮点击
                    removeItem(position);
                }
            }
        });

        //循环模式点击
        binding.loopModel.setOnClickListener(new View.OnClickListener() {
            @Override
            public void onClick(View v) {
                //更改循环模式
                getMusicListManager().changeLoopModel();

                //显示循环模式
                showLoopModel();

            }
        });

        //设置item点击事件
        adapter.setOnItemClickListener(new OnItemClickListener() {
            @Override
            public void onItemClick(BaseQuickAdapter adapter, View view, int position) {
                //关闭dialog
                //可以根据具体的业务逻辑来决定是否关闭
                dismiss();

                //播放点击的这首音乐
                getMusicListManager().play(getMusicListManager().getDatum().get(position));
            }
        });

    }

    private void removeItem(int position) {
        adapter.removeAt(position);

        //从列表管理器中删除
        getMusicListManager().delete(position);

        showCount();
    }

    /**
     * 显示循环模式
     */
    private void showLoopModel() {
        PlayListUtil.showLoopModel(getMusicListManager().getLoopModel(), binding.loopModel);
    }

    private void showCount() {
        binding.count.setText(String.format("(%d)", getMusicListManager().getDatum().size()));
    }
}
感谢你的阅读,更多文章请关注我们,点击,评论,转发支持。
只是想确保我理解了事情。据我目前收集到的信息,Cucumber只是一个“包装器”,或者是一种通过将事物分类为功能和步骤来组织测试的好方法,其中实际的单元测试处于步骤阶段。它允许您根据事物的工作方式组织您的测试。对吗? 最佳答案 有点。它是一种组织测试的方式,但不仅如此。它的行为就像最初的Rails集成测试一样,但更易于使用。这里最大的好处是您的session在整个Scenario中保持透明。关于Cucumber的另一件事是您(应该)从使用您的代码的浏览器或客户端的角度进行测试。如果您愿意,您可以使用步骤来构建对象和设置状态,但通常您
是否可以为特定(或所有)项目使用多个布局?例如,我有几个项目,我想对其应用两种不同的布局。一个是绿色的,一个是蓝色的(但是)。我想将它们编译到我的输出目录中的两个不同文件夹中(例如v1和v2)。我一直在玩弄规则和编译block,但我不知道这是怎么回事。因为,每个项目在编译过程中只编译一次,我不能告诉nanoc第一次用layout1编译,第二次用layout2编译。我试过这样的东西,但它导致输出文件损坏。compile'*'doifitem.binary?#don’tfilterbinaryitemselsefilter:erblayout'layout1'layout'layout2'
最近因为项目需要,需要将Android手机系统自带的某个系统软件反编译并更改里面某个资源,并重新打包,签名生成新的自定义的apk,下面我来介绍一下我的实现过程。APK修改,分为以下几步:反编译解包,修改,重打包,修改签名等步骤。安卓apk修改准备工作1.系统配置好JavaJDK环境变量2.需要root权限的手机(针对系统自带apk,其他软件免root)3.Auto-Sign签名工具4.apktool工具安卓apk修改开始反编译本文拿Android系统里面的Settings.apk做demo,具体如何将apk获取出来在此就不过多介绍了,直接进入主题:按键win+R输入cmd,打开命令窗口,并将路
我在加密来self正在使用的第三方供应商的值时遇到问题。他们的指令如下:1)Converttheencryptionpasswordtoabytearray.2)Convertthevaluetobeencryptedtoabytearray.3)Theentirelengthofthearrayisinsertedasthefirstfourbytesontothefrontofthefirstblockoftheresultantbytearraybeforeencryption.4)EncryptthevalueusingAESwith:1.256-bitkeysize,2.25
我正在开发西洋跳棋实现,其中有许多易于测试的方法,但我不确定如何测试我的主要#play_game方法。我的大多数方法都可以很容易地确定输入和输出,因此也很容易测试,但这种方法是多方面的,实际上并没有容易辨别的输出。这是代码:defplay_gameputs@gui.introwhile(game_over?==false)message=nil@gui.render_board(@board)@gui.move_requestplayer_input=getscoordinates=UserInput.translate_move_request_to_coordinates(play
方法应返回-1,0或1分别表示“小于”、“等于”和“大于”。对于某些类型的可排序对象,通常将排序顺序基于多个属性。以下是可行的,但我认为它看起来很笨拙:classLeagueStatsattr_accessor:points,:goal_diffdefinitializepts,gd@points=pts@goal_diff=gdenddefothercompare_pts=pointsother.pointsreturncompare_ptsunlesscompare_pts==0goal_diffother.goal_diffendend尝试一下:[LeagueStats.new(
在Rails自动生成的功能测试(test/functional/products_controller_test.rb)中,我看到以下代码:classProductsControllerTest我的问题是:方法调用products()在哪里/如何定义?products(:one)到底是什么意思?看代码,大概意思是“创建一个产品”,但是它是如何工作的呢?注意我是Ruby/Rails的新手,如果这些是微不足道的问题,我深表歉意。 最佳答案 如果您查看test/fixtures文件夹,您会看到一个products.yml文件。这是在您创建
关闭。这个问题需要更多focused.它目前不接受答案。想改进这个问题吗?更新问题,使其只关注一个问题editingthispost.关闭8年前。Improvethisquestion我们有以下(以及更多)系统,我们将数据从一个应用推送/拉取到另一个:托管CRM(InsideSales.com)Asterisk电话系统(内部)横幅广告系统(openx,我们托管)潜在客户生成系统(自行开发)电子商务商店(spree,我们托管)工作板(本土)一些工作网站抓取+入站工作提要电子邮件传送系统(如Mailchimp,自主开发)事件管理系统(如eventbrite,自主开发)仪表板系统(大量图表和
在我的一些Controller中,我有一个before_filter检查用户是否登录?用于CRUD操作。application.rbdeflogged_in?unlesscurrent_userredirect_toroot_pathendendprivatedefcurrent_user_sessionreturn@current_user_sessionifdefined?(@current_user_session)@current_user_session=UserSession.findenddefcurrent_userreturn@current_userifdefine
require'pp'p*1..10这会打印出1-10。为什么这么简洁?您还可以用它做什么? 最佳答案 它是“splat”运算符。它可用于分解数组和范围并在赋值期间收集值。这里收集赋值中的值:a,*b=1,2,3,4=>a=1b=[2,3,4]在此示例中,内部数组([3,4])中的值被分解并收集到包含数组中:a=[1,2,*[3,4]]=>a=[1,2,3,4]您可以定义将参数收集到数组中的函数:deffoo(*args)pargsendfoo(1,2,"three",4)=>[1,2,"three",4]