文章目录
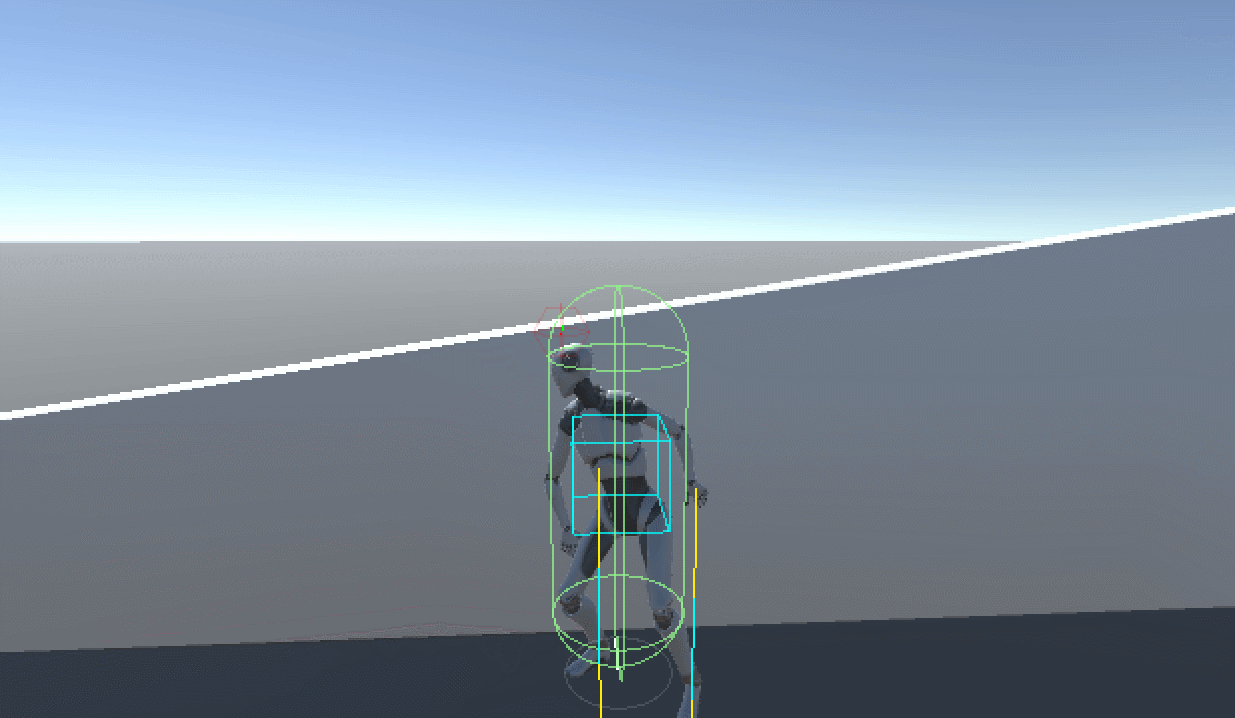
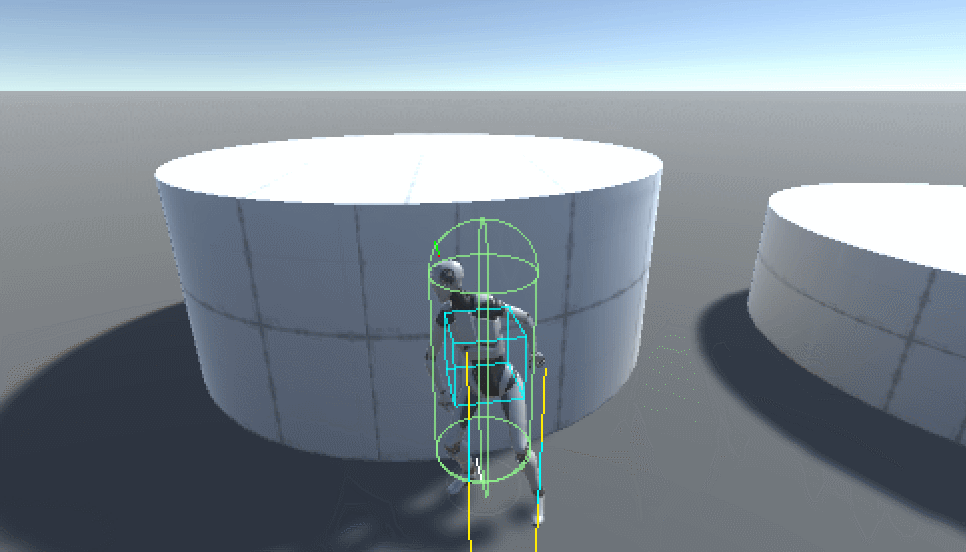
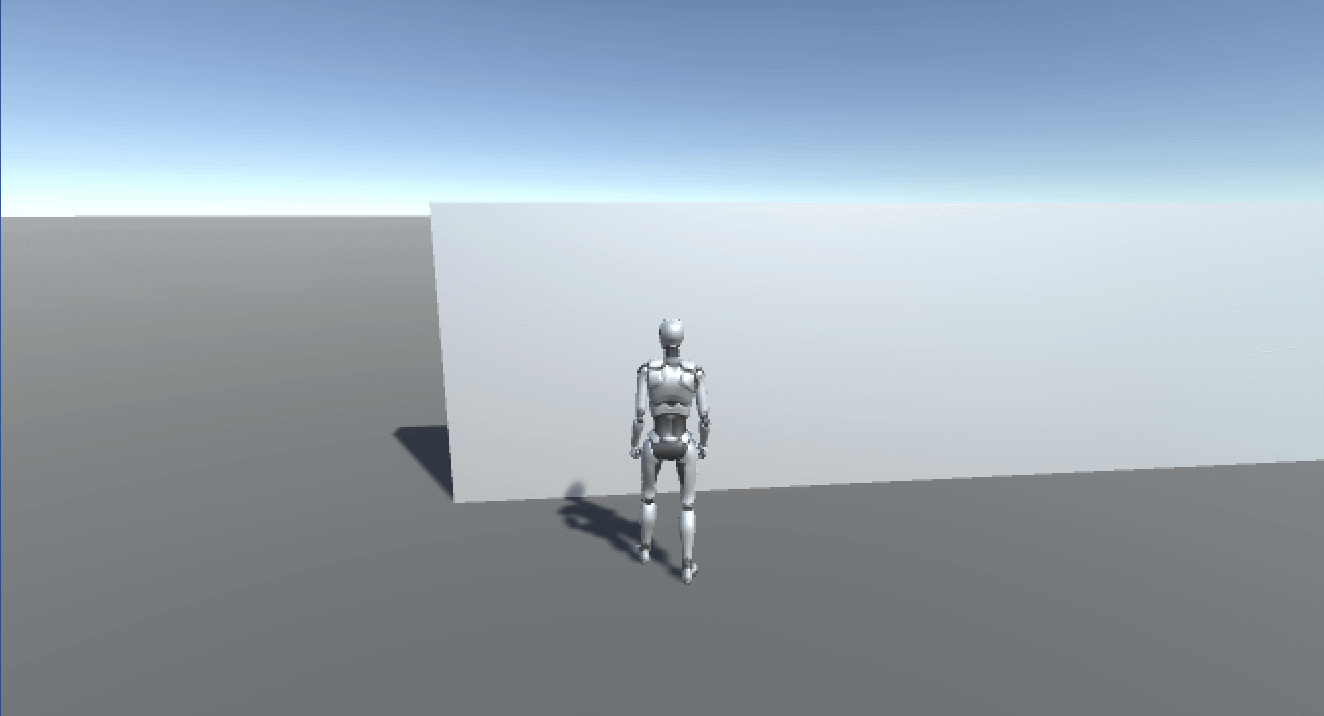
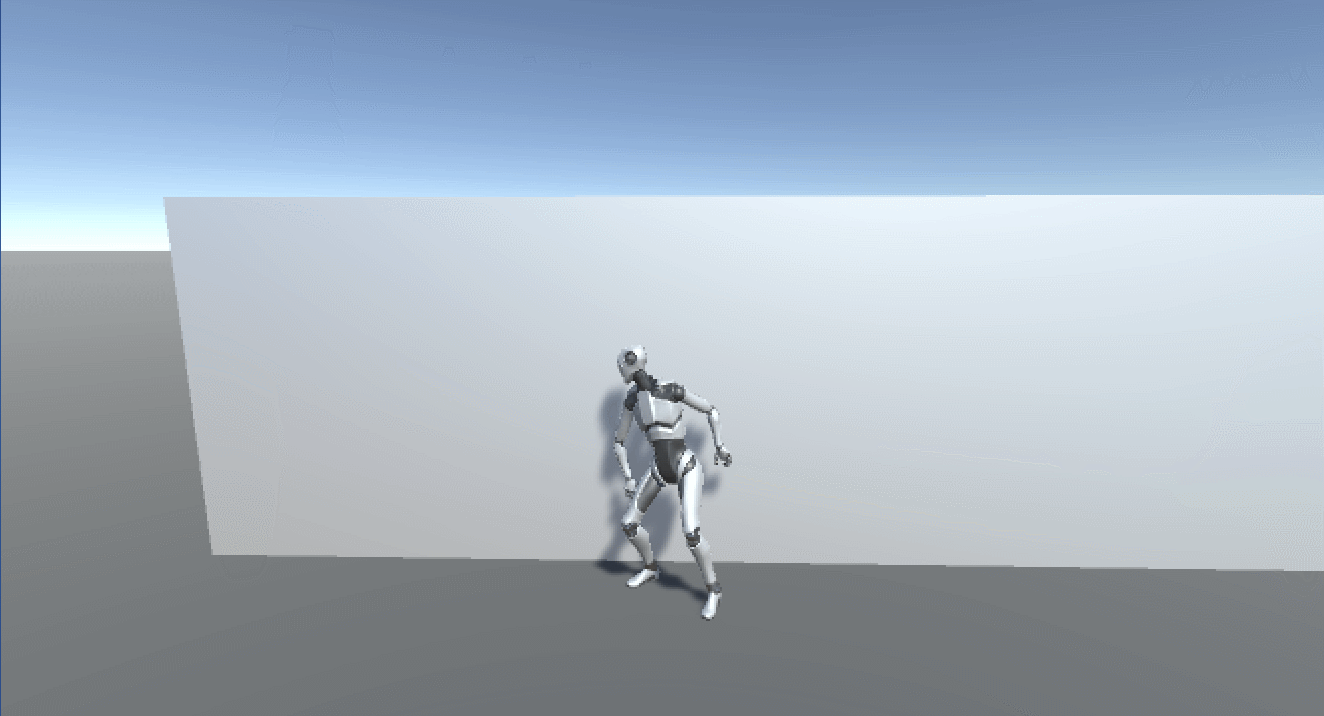
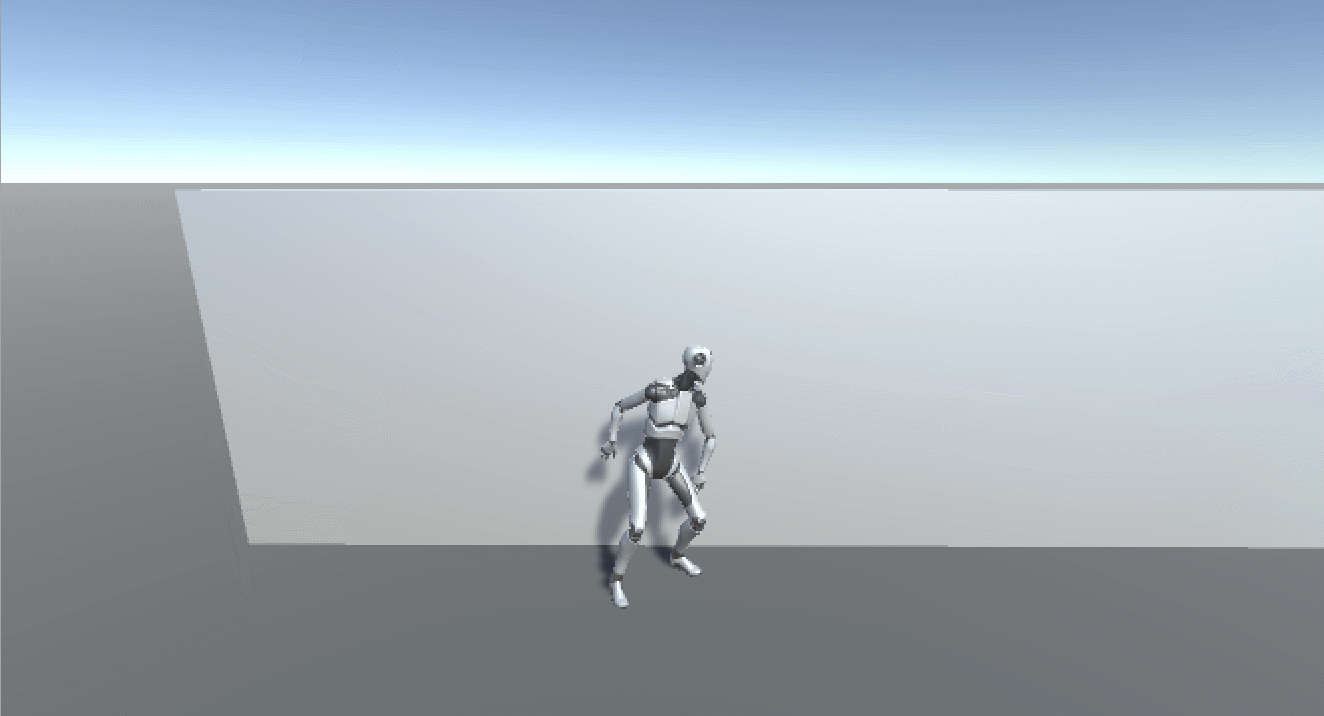
本文介绍如何在Unity中实现一个Avatar角色的智能掩体系统,效果如图所示:

初版1.0.0代码已上传至SKFramework框架Package Manager中:
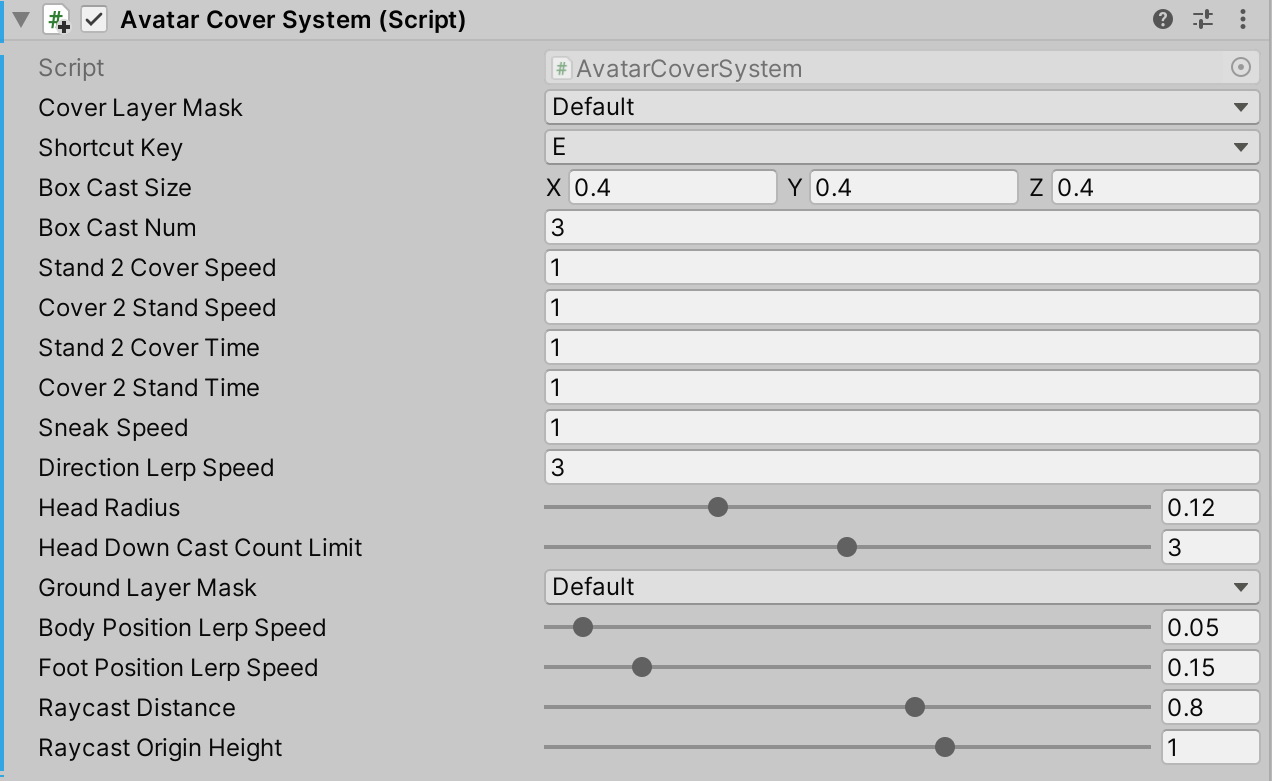
Cover Layer Mask:掩体物体的Layer层级Shortcut Key:进入、退出掩体状态的快捷键Box Cast Size:寻找掩体所用物理检测的Box大小Box Cast Num:寻找掩体所用物理检测的Box数量(maxDistance = boxCastSize * boxCastNum)Stand 2 Cover Speed:切换至掩体状态的移动速度Cover 2 Stand Speed:退出掩体状态的移动速度Stand 2 Cover Time:切换至掩体状态的时长(动画时长决定)Cover 2 Stand Time:退出掩体状态的时长(动画时长决定)Sneak Speed:掩体状态下移动的速度Direction Lerp Speed:左右方向的插值速度Head Radius:头部的半径 用于物理检测 未检测到碰撞时身体高度向下调整 并启用脚部IKHead Down Cast Count Limit:头部下方物理检测的次数限制(每次下降一个半径的单位进行检测)Ground Layer Mask:地面的Layer层级 用于脚部IK检测地面Body Position Lerp Speed:身体高度插值的速度Foot Position Lerp Speed:脚部IK插值的速度Raycast Distance:脚部IK检测用的距离Raycast Origin Height:脚部IK检测的高度Mixamo:动作文件全部是在Mixamo网站上下载的: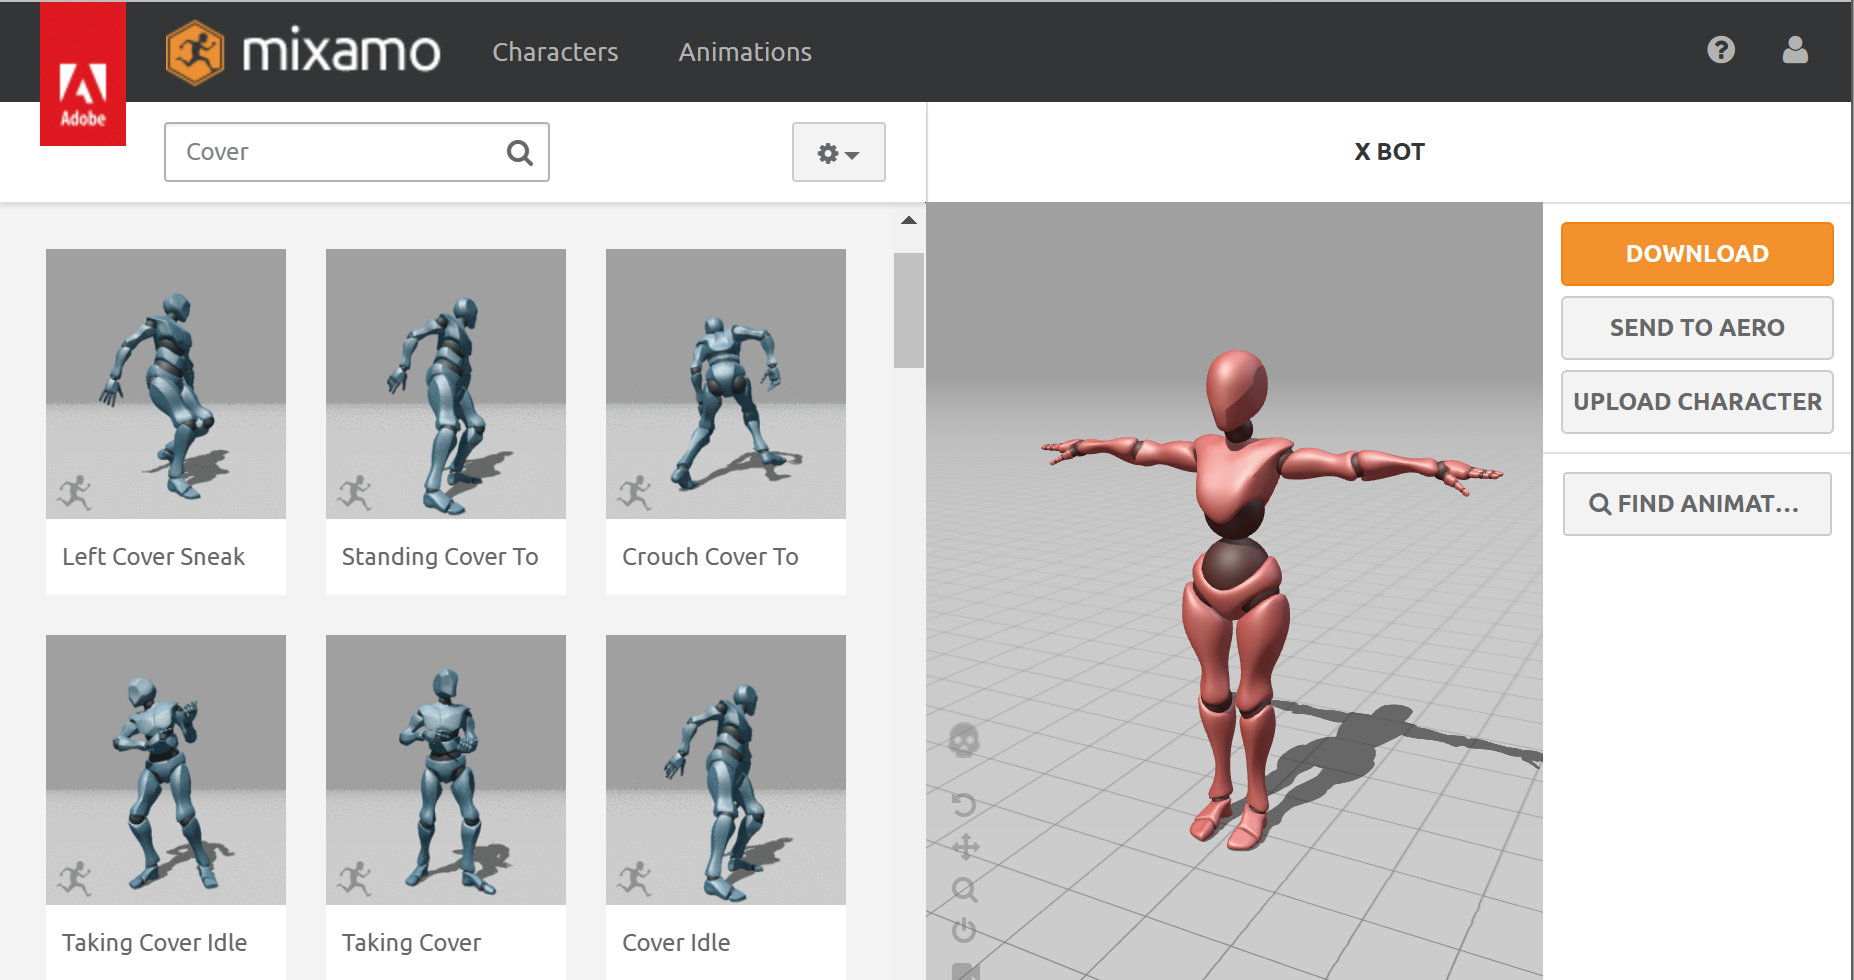
Humanoid:Animation Type设为Humanoid人形动画: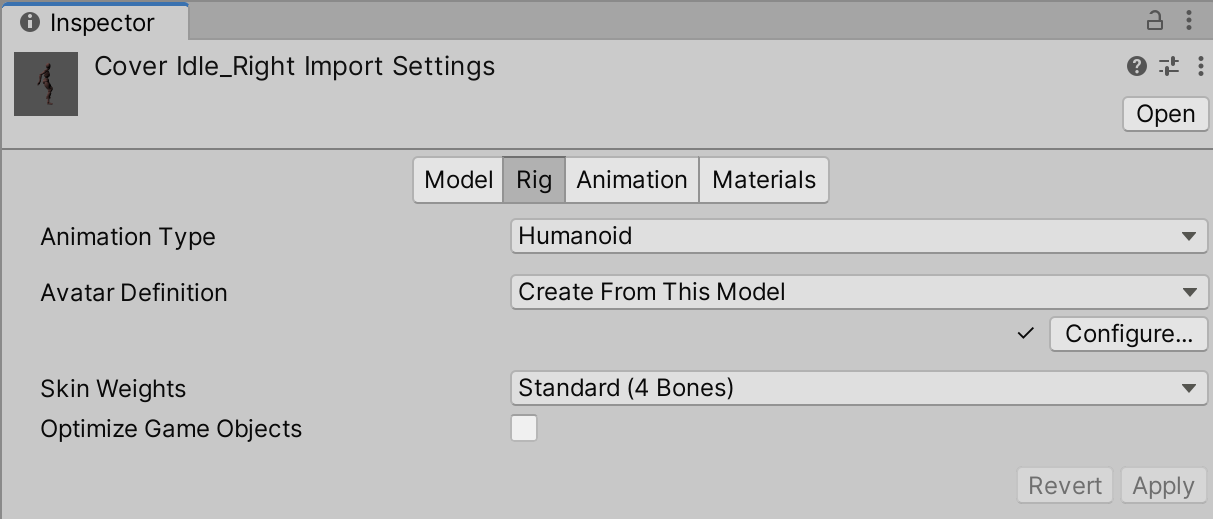
Animation:调整相关设置: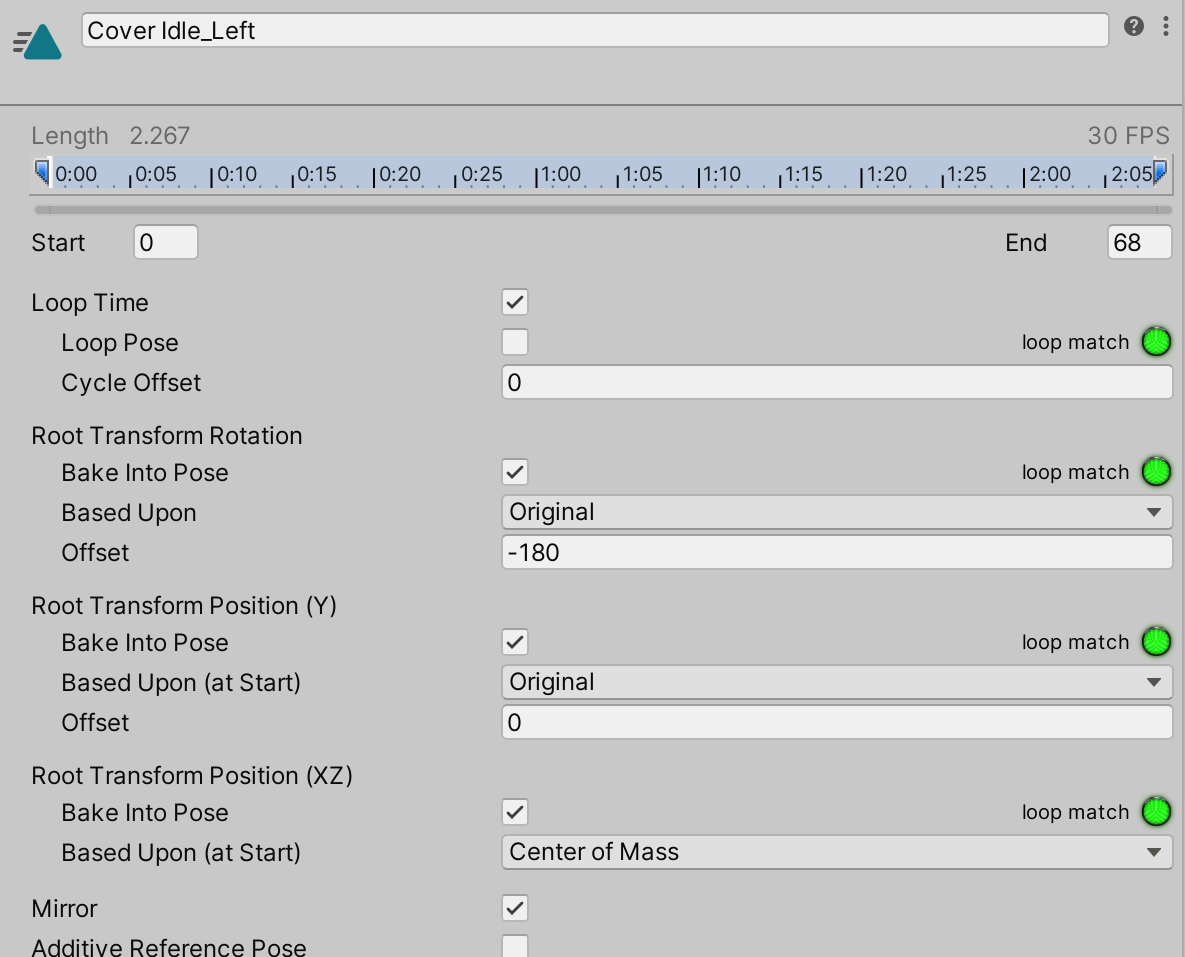
Root Transform Rotation Offset:此处设为-180,目的为了调整朝向,使其与Stand2Cover、Cover2Stand等动画连贯。
Animator Parameters:添加相关参数:
Stand2Cover:bool类型,用于进入、退出掩体状态;Cover Direction:float类型,用于控制左右方向的混合树;Cover Sneak:float类型,用于控制移动的混合树。Sub-State Machine:创建一个子状态机,用于处于Cover相关状态: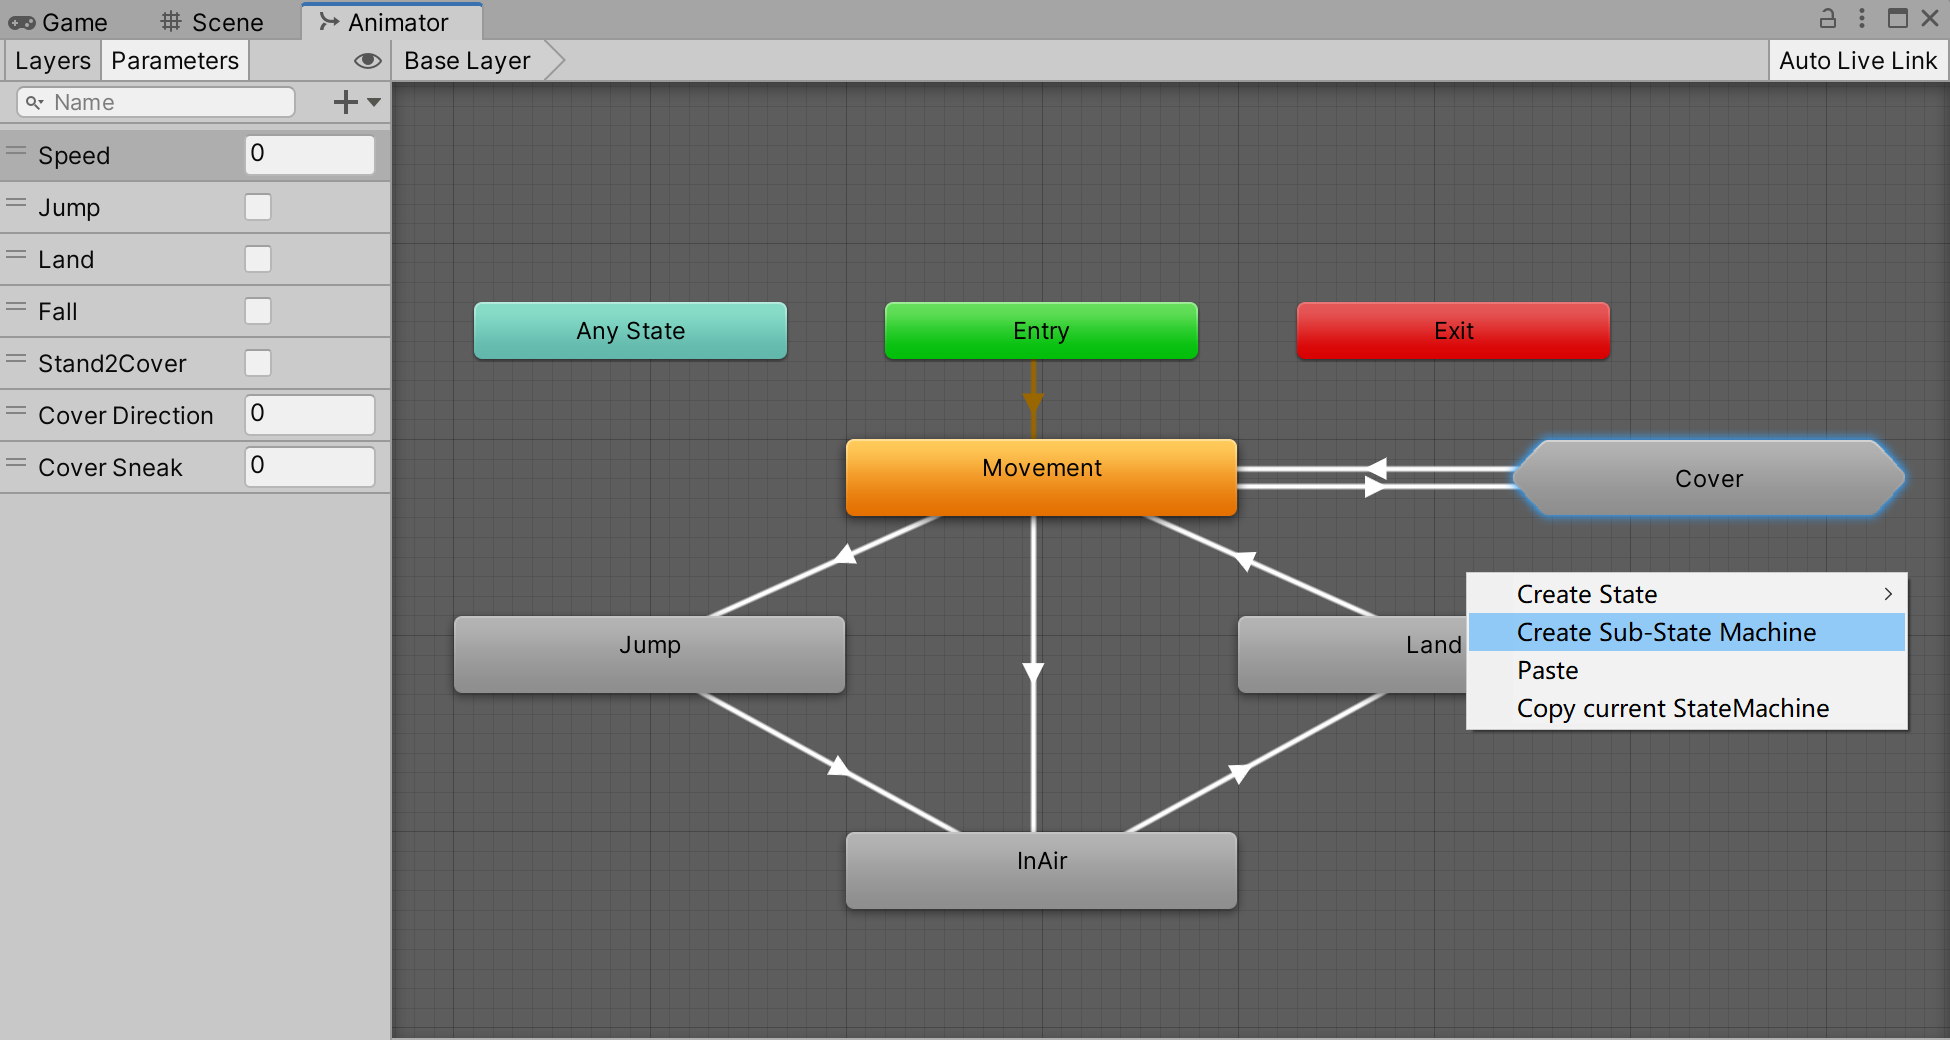
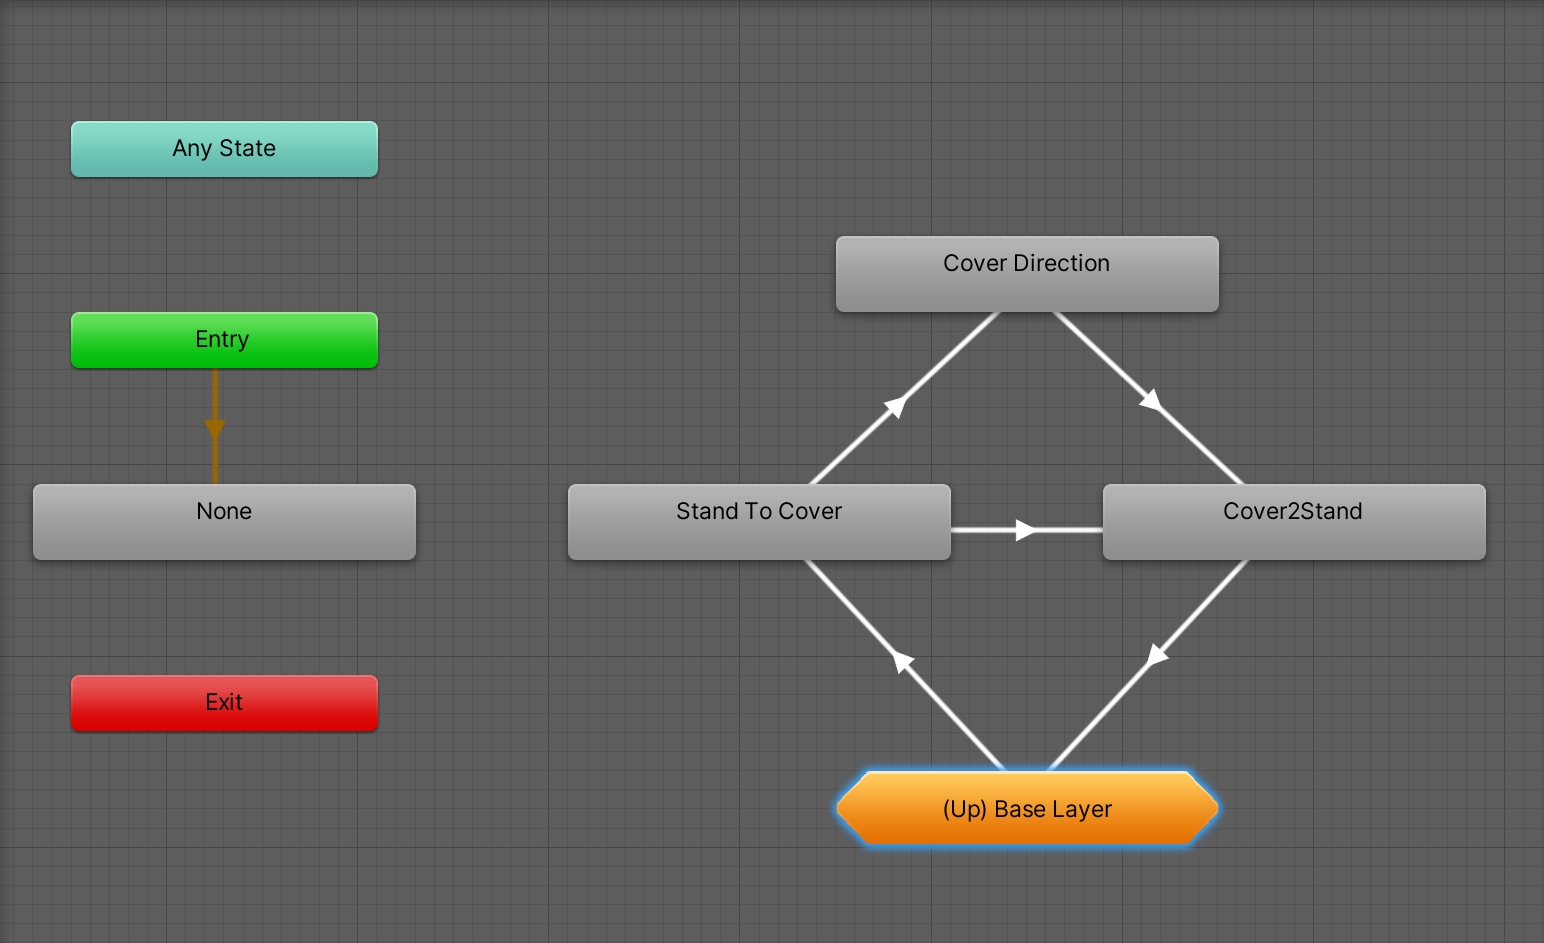
Cover子状态机中添加Stand2Cover、Cover2Stand动画状态及Cover Direction混合树:
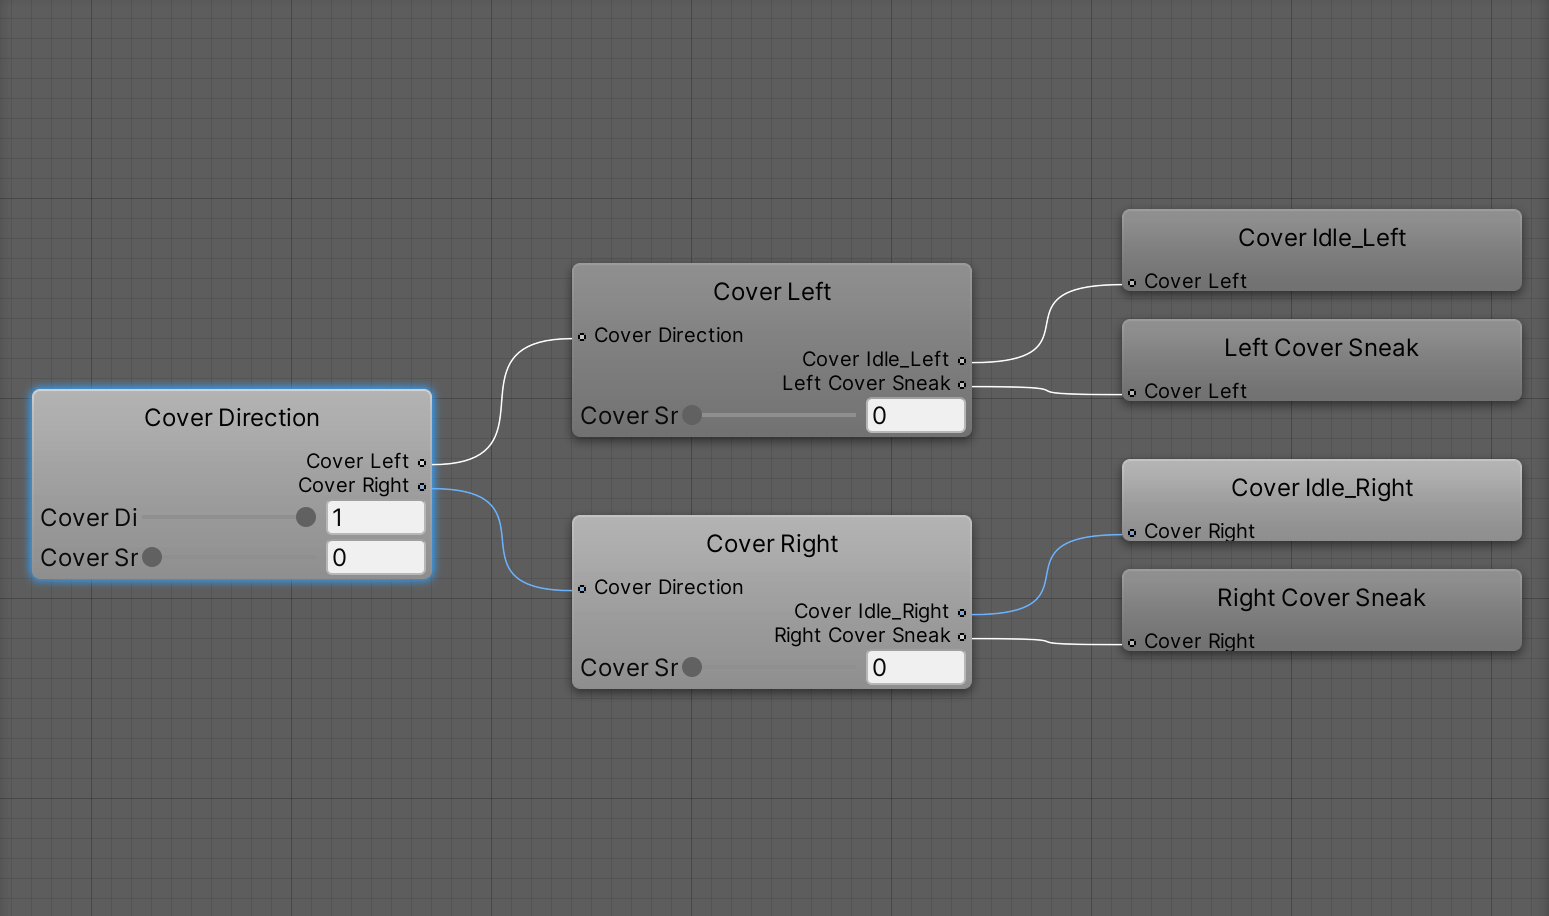
Cover Direction混合树:包含Cover Left、Cover Right子混合树,两个子混合树又分别包含其对应方向的Idle和Sneak动画。Cover Direction参数用于控制进入Cover Left还是Cover Right,Cover Sneak参数用于控制Idle和Sneak之间的混合:
IK Pass:启用对应层级的IK Pass通道,计算脚部IK所需:
定义相关状态:
None:未在任何状态;Stand2Cover:正在切换至掩体状态(切换过程)IsCovering:正处于掩体状态Cover2Stand:正在退出掩体状态(切换过程)public enum State
{
None, //未在任何状态
Stand2Cover, //正在切换至掩体状态
IsCovering, //正处于掩体状态
Cover2Stand, //正在退出掩体状态
}
//当前状态
private State state = State.None;
/// <summary>
/// 当前状态
/// </summary>
public State CurrentState
{
get
{
return state;
}
}
未处于任何状态时,向身体前方进行BoxCast物理检测寻找掩体,当检测到掩体时,按下指定快捷键则进入Stand2Cover切换过程:
//未处于掩体状态
case State.None:
    {
    //Box检测的中心点
    Vector3 boxCastCenter = transform.position + transform.up;
    //最大检测距离
    float maxDistance = boxCastSize.z * boxCastNum;
    //向身体前方进行Box检测 寻找掩体
    castResult = Physics.BoxCast(boxCastCenter, boxCastSize * .5f, transform.forward, out hit, transform.rotation, maxDistance, coverLayerMask);
    //调试:法线方向
    Debug.DrawLine(hit.point, hit.point + hit.normal, Color.magenta);

    //检测到掩体
    if (castResult)
    {
        //按下快捷键 进入掩体状态
        if (Input.GetKeyDown(shortcutKey))
        {
            //正在切换至掩体状态
            state = State.Stand2Cover;
            //播放动画
            animator.SetBool(AnimParam.Stand2Cover, true);
            //禁用其他人物控制系统
            GetComponent<AvatarController>().enabled = false;
            //默认右方(动画Stand2Cover默认右方)
            targetCoverDirection = 1f;
            //启用脚部IK
            enableFootIk = true;
            bodyYOffset = 0.04f;
        }
    }
}
break;
切换至掩体状态的过程中,向RaycastHit中的法线反方向移动,移动到掩体前方:
case State.Stand2Cover:
{
    //计时
    stand2CoverTimer += Time.deltaTime;
    if (stand2CoverTimer < stand2CoverTime)
    {
        //向法线反方向移动 到掩体前
        cc.Move(-hit.normal * Time.deltaTime * stand2CoverSpeed);
        //朝向 面向法线方向
        transform.forward = Vector3.Lerp(transform.forward, -hit.normal, Time.deltaTime * stand2CoverSpeed);
    }
    else
    {
        //重置计时器
        stand2CoverTimer = 0f;
        //切换完成 进入掩体状态
        state = State.IsCovering;
        bodyYOffset = 0.02f;
    }
}
break;
在掩体状态时,获取用户Horizontal水平方向上的输入,通过输入控制Avatar转向左侧或右侧并进行Sneak移动:
//获取水平方向输入
float horizontal = Input.GetAxis("Horizontal");
//目标方向 输入为负取-1 为正取1
if (horizontal != 0f)
{
    targetCoverDirection = horizontal < 0f ? -1f : 1f;
    castResult = Physics.BoxCast(transform.position + transform.up, boxCastSize * .5f, transform.forward, out hit, Quaternion.identity, boxCastSize.z * boxCastNum, coverLayerMask);
    Debug.DrawLine(hit.point, hit.point + hit.normal, Color.magenta);
    cc.Move(-hit.normal * sneakSpeed * Time.deltaTime);
    transform.forward = Vector3.Lerp(transform.forward, -hit.normal, Time.deltaTime * stand2CoverSpeed);
}
//方向插值运算
coverDirection = Mathf.Lerp(coverDirection, targetCoverDirection, Time.deltaTime * directionLerpSpeed);
//动画 方向
animator.SetFloat(AnimParam.CoverDirection, coverDirection);
//动画 掩体状态行走
animator.SetFloat(AnimParam.CoverSneak, Mathf.Abs(horizontal));
//通过输入控制移动
cc.Move(horizontal * sneakSpeed * Time.deltaTime * transform.right);
按下快捷键时,退出掩体状态:
animator.SetBool(AnimParam.Stand2Cover, false);
state = State.Cover2Stand;
退出掩体状态的过程中,向身体后方移动:
//计时
cover2StandTimer += Time.deltaTime;
cover2StandTimer = Mathf.Clamp(cover2StandTimer, 0f, cover2StandTime);
if (cover2StandTimer < cover2StandTime)
{
    //后移
    cc.Move(cover2StandSpeed * Time.deltaTime * -transform.forward);
}
else
{
    //重置计时器
    cover2StandTimer = 0f;
    state = State.None;
    //启用其他人物控制脚本
    GetComponent<AvatarController>().enabled = true;
}
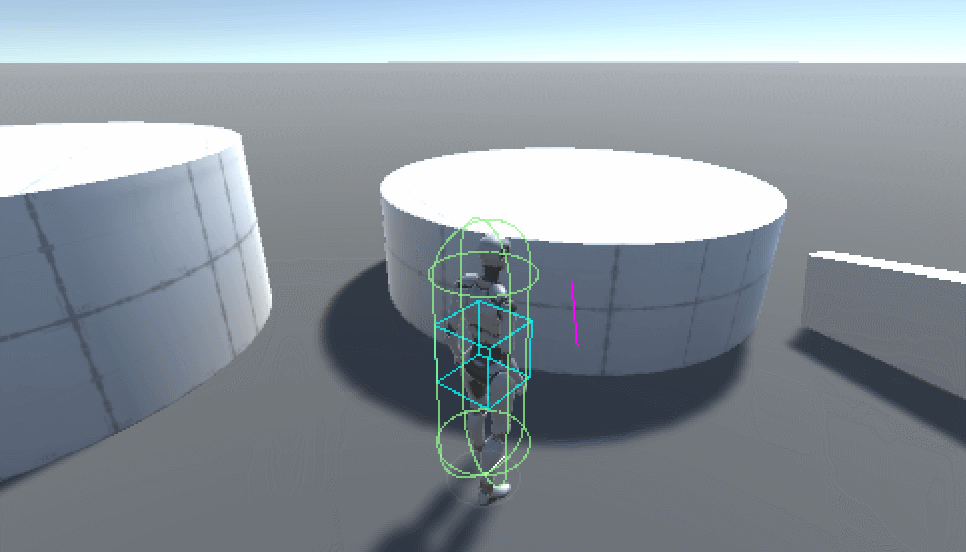
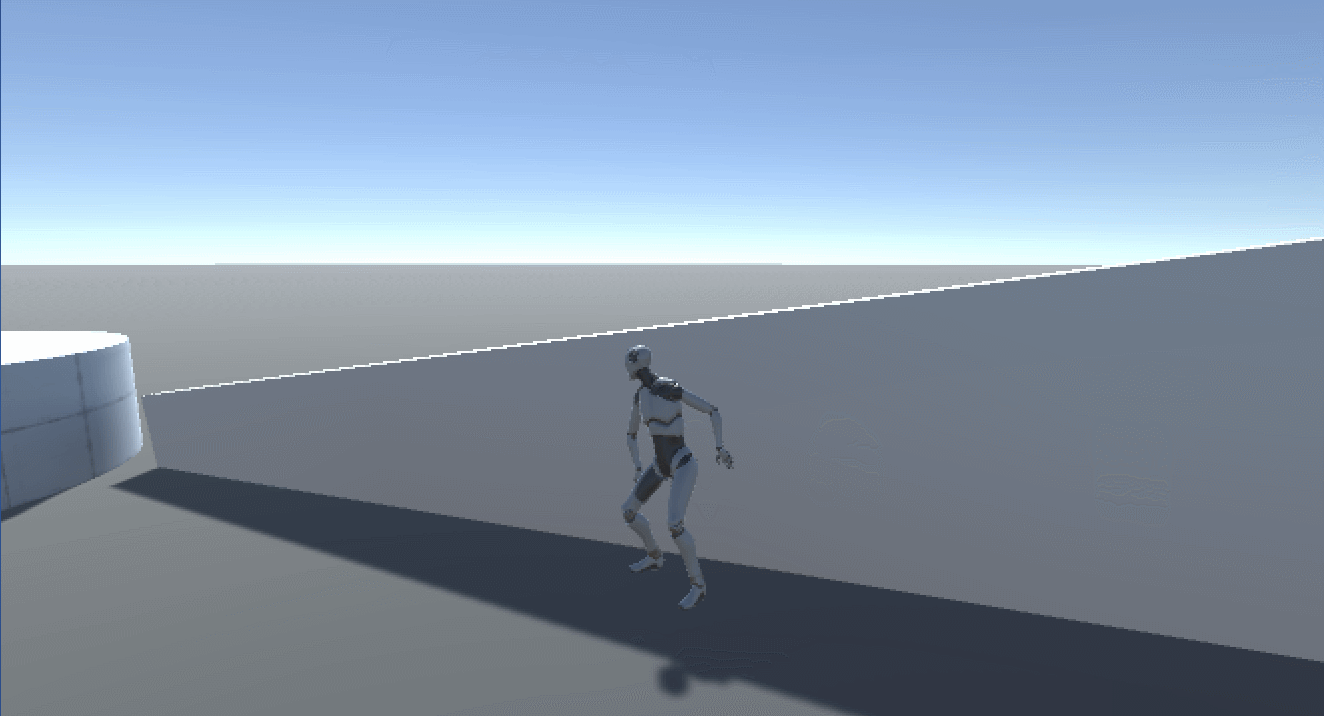
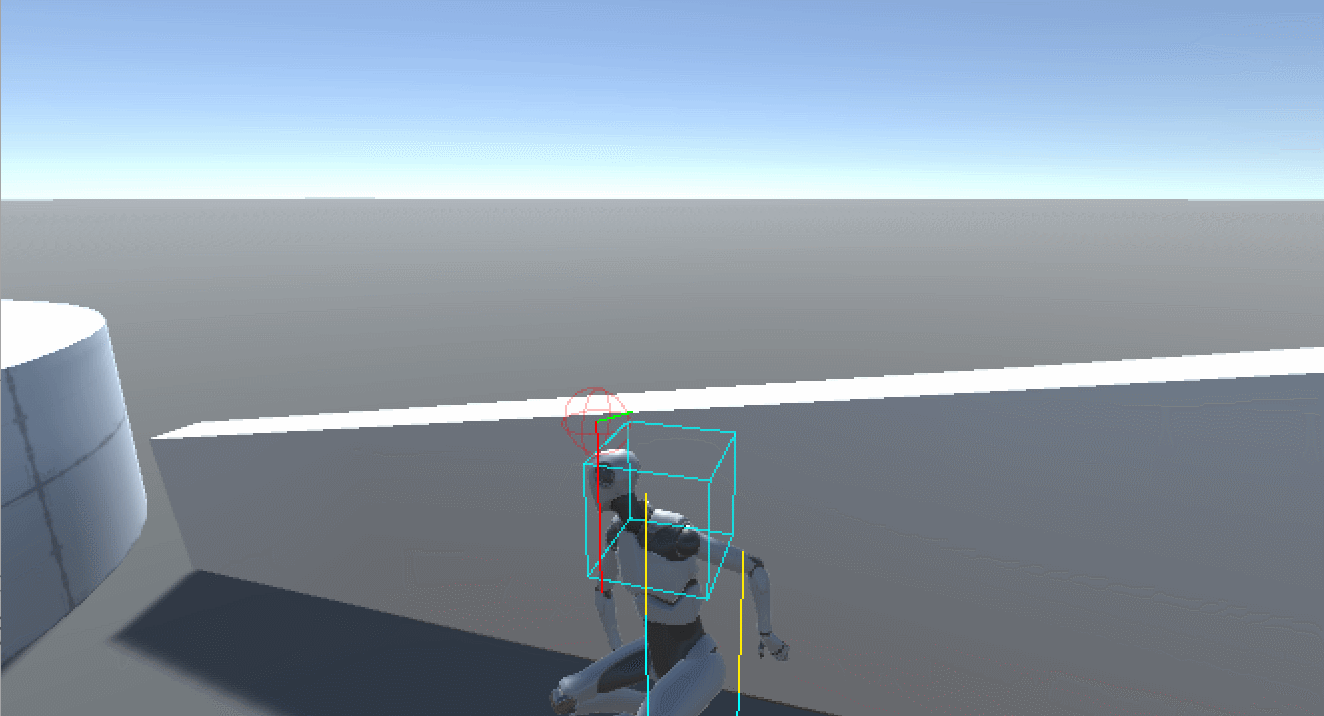
如图所示,当掩体的高度降低时,角色会逐渐下蹲调整高度,实现该功能一方面需要在头部进行物理检测,另一方面需要启用脚部的IK。
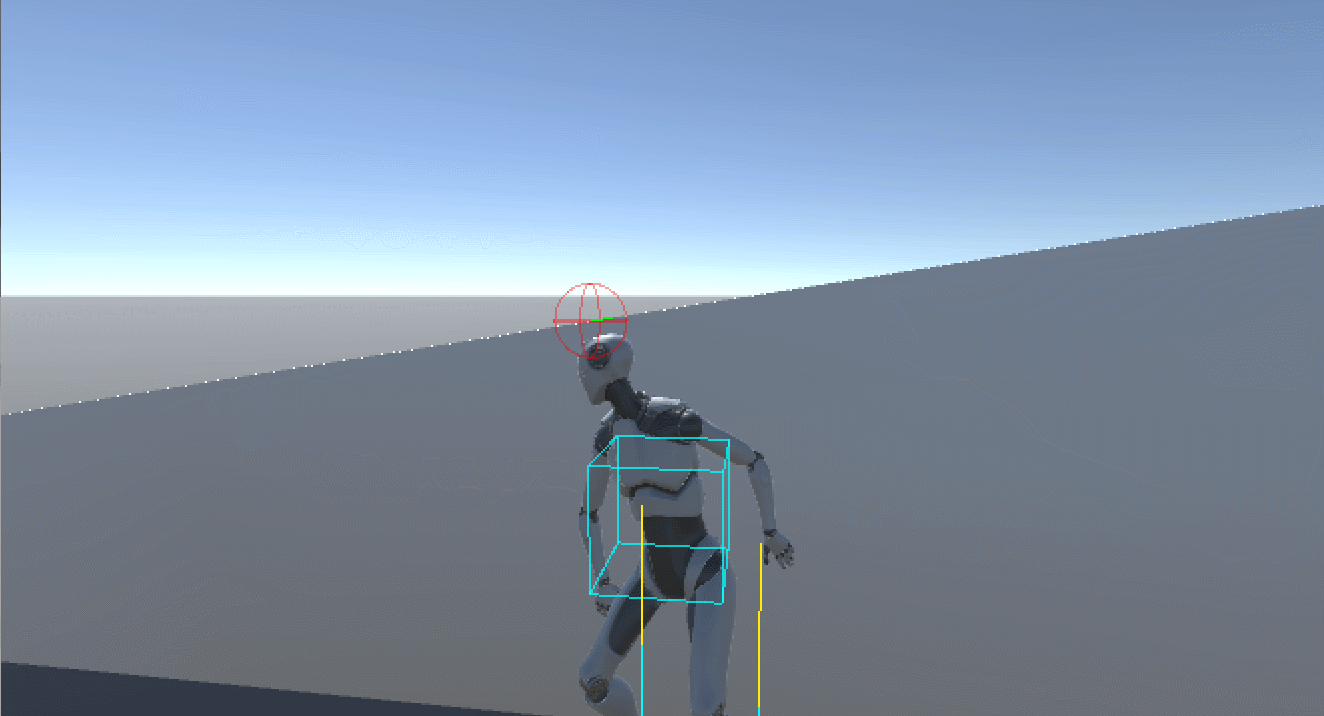
高度检测贯穿于Stand2Cover和IsCovering状态中,注意观察下图中红色球的变动,当SphereCast球形检测在初始高度未检测到掩体时,会下降一个球半径的单位再次进行检测,如果在限制次数中都未检测到掩体,则退出掩体状态,如果检测到掩体,则获取碰撞点和初始高度的delta差值,该差值就是身体要下降的高度:
//头部物理检测的初始点
headSphereCastOrigin = transform.position + Vector3.up * headOriginPosY + transform.right * targetCoverDirection * headRadius * 2f;
//向前方进行球形检测(掩体状态下前方就是后脑勺的方向)
headCastResult = Physics.SphereCast(headSphereCastOrigin, headRadius, transform.forward, out RaycastHit headHit, coverLayerMask);
int i = 0;
if (!headCastResult)
{
    for (i = 0; i < headDownCastCountLimit; i++)
    {
        //每次下降一个半径的单位进行检测
        headSphereCastOrigin -= Vector3.up * headRadius;
        headCastResult = Physics.SphereCast(headSphereCastOrigin, headRadius, transform.forward, out headHit, coverLayerMask);
        if (headCastResult) break;
    }
}
if (headCastResult)
{
    Debug.DrawLine(headSphereCastOrigin, headHit.point, Color.green);
    float delta = headOriginPosY - headHit.point.y;
    targetBodyPositionY = originBodyPositionY - delta - headRadius;
    Debug.DrawLine(headSphereCastOrigin, headSphereCastOrigin - Vector3.up * (delta + i * headRadius), Color.red);
}
检测的位置受Cover Direction方向影响,当处于Cover Left时,会在头部左侧一定单位进行检测,相反,处于Cover Right时,会在头部右侧一定单位进行检测:
获取到身体要下降的高度后,在OnAnimatorIK函数中调整Animator组件的bodyPosition属性:
Vector3 bodyPosition = animator.bodyPosition;
bodyPosition.y = Mathf.Lerp(lastBodyPositionY, targetBodyPositionY, bodyPositionLerpSpeed);
animator.bodyPosition = bodyPosition;
lastBodyPositionY = animator.bodyPosition.y;
单纯的下调身体高度会导致脚穿模到地面以下,因此需要启用脚部IK,不断调整脚的位置,脚部IK在前面的文章中有介绍,这里不再详细说明,代码如下:
private void FixedUpdate()
{
    //未启用FootIK or 动画组件为空
    if (!enableFootIk || animator == null) return;

    #region 计算左脚IK
    //左脚坐标
    leftFootPosition = animator.GetBoneTransform(HumanBodyBones.LeftFoot).position;
    leftFootPosition.y = transform.position.y + raycastOriginHeight;

    //左脚 射线检测
    leftFootRaycast = Physics.Raycast(leftFootPosition, Vector3.down, out RaycastHit hit, raycastDistance + raycastOriginHeight, groundLayerMask);
    if (leftFootRaycast)
    {
        leftFootIkPosition = leftFootPosition;
        leftFootIkPosition.y = hit.point.y + bodyYOffset;
        leftFootIkRotation = Quaternion.FromToRotation(transform.up, hit.normal);
#if UNITY_EDITOR
        //射线
        Debug.DrawLine(leftFootPosition, leftFootPosition + Vector3.down * (raycastDistance + raycastOriginHeight), Color.yellow);
        //法线
        Debug.DrawLine(hit.point, hit.point + hit.normal * .5f, Color.cyan);
#endif
    }
    else
    {
        leftFootIkPosition = Vector3.zero;
    }
    #endregion

    #region 计算右脚IK
    //右脚坐标
    rightFootPosition = animator.GetBoneTransform(HumanBodyBones.RightFoot).position;
    rightFootPosition.y = transform.position.y + raycastOriginHeight;
    //右脚 射线检测
    rightFootRaycast = Physics.Raycast(rightFootPosition, Vector3.down, out hit, raycastDistance + raycastOriginHeight, groundLayerMask);
    if (rightFootRaycast)
    {
        rightFootIkPosition = rightFootPosition;
        rightFootIkPosition.y = hit.point.y + bodyYOffset;
        rightFootIkRotation = Quaternion.FromToRotation(transform.up, hit.normal);

#if UNITY_EDITOR
        //射线
        Debug.DrawLine(rightFootPosition, rightFootPosition + Vector3.down * (raycastDistance + raycastOriginHeight), Color.yellow);
        //法线
        Debug.DrawLine(hit.point, hit.point + hit.normal * .5f, Color.cyan);
#endif
    }
    else
    {
        rightFootIkPosition = Vector3.zero;
    }
    #endregion
}
#region 应用左脚IK
//权重
animator.SetIKPositionWeight(AvatarIKGoal.LeftFoot, 1f);
animator.SetIKRotationWeight(AvatarIKGoal.LeftFoot, 1f);

Vector3 targetIkPosition = animator.GetIKPosition(AvatarIKGoal.LeftFoot);
if (leftFootRaycast)
{
    //转局部坐标
    targetIkPosition = transform.InverseTransformPoint(targetIkPosition);
    Vector3 world2Local = transform.InverseTransformPoint(leftFootIkPosition);
    //插值计算
    float y = Mathf.Lerp(lastLeftFootPositionY, world2Local.y, footPositionLerpSpeed);
    targetIkPosition.y += y;
    lastLeftFootPositionY = y;
    //转全局坐标
    targetIkPosition = transform.TransformPoint(targetIkPosition);
    //当前旋转
    Quaternion currRotation = animator.GetIKRotation(AvatarIKGoal.LeftFoot);
    //目标旋转
    Quaternion nextRotation = leftFootIkRotation * currRotation;
    animator.SetIKRotation(AvatarIKGoal.LeftFoot, nextRotation);
}
animator.SetIKPosition(AvatarIKGoal.LeftFoot, targetIkPosition);
#endregion

#region 应用右脚IK
//权重
animator.SetIKPositionWeight(AvatarIKGoal.RightFoot, 1f);
animator.SetIKRotationWeight(AvatarIKGoal.RightFoot, 1f);
targetIkPosition = animator.GetIKPosition(AvatarIKGoal.RightFoot);
if (rightFootRaycast)
{
    //转局部坐标
    targetIkPosition = transform.InverseTransformPoint(targetIkPosition);
    Vector3 world2Local = transform.InverseTransformPoint(rightFootIkPosition);
    //插值计算
    float y = Mathf.Lerp(lastRightFootPositionY, world2Local.y, footPositionLerpSpeed);
    targetIkPosition.y += y;
    lastRightFootPositionY = y;
    //转全局坐标
    targetIkPosition = transform.TransformPoint(targetIkPosition);
    //当前旋转
    Quaternion currRotation = animator.GetIKRotation(AvatarIKGoal.RightFoot);
    //目标旋转
    Quaternion nextRotation = rightFootIkRotation * currRotation;
    animator.SetIKRotation(AvatarIKGoal.RightFoot, nextRotation);
}
animator.SetIKPosition(AvatarIKGoal.RightFoot, targetIkPosition);
#endregion
我正在学习如何使用Nokogiri,根据这段代码我遇到了一些问题:require'rubygems'require'mechanize'post_agent=WWW::Mechanize.newpost_page=post_agent.get('http://www.vbulletin.org/forum/showthread.php?t=230708')puts"\nabsolutepathwithtbodygivesnil"putspost_page.parser.xpath('/html/body/div/div/div/div/div/table/tbody/tr/td/div
总的来说,我对ruby还比较陌生,我正在为我正在创建的对象编写一些rspec测试用例。许多测试用例都非常基础,我只是想确保正确填充和返回值。我想知道是否有办法使用循环结构来执行此操作。不必为我要测试的每个方法都设置一个assertEquals。例如:describeitem,"TestingtheItem"doit"willhaveanullvaluetostart"doitem=Item.new#HereIcoulddotheitem.name.shouldbe_nil#thenIcoulddoitem.category.shouldbe_nilendend但我想要一些方法来使用
关闭。这个问题是opinion-based.它目前不接受答案。想要改进这个问题?更新问题,以便editingthispost可以用事实和引用来回答它.关闭4年前。Improvethisquestion我想在固定时间创建一系列低音和高音调的哔哔声。例如:在150毫秒时发出高音调的蜂鸣声在151毫秒时发出低音调的蜂鸣声200毫秒时发出低音调的蜂鸣声250毫秒的高音调蜂鸣声有没有办法在Ruby或Python中做到这一点?我真的不在乎输出编码是什么(.wav、.mp3、.ogg等等),但我确实想创建一个输出文件。
给定这段代码defcreate@upgrades=User.update_all(["role=?","upgraded"],:id=>params[:upgrade])redirect_toadmin_upgrades_path,:notice=>"Successfullyupgradeduser."end我如何在该操作中实际验证它们是否已保存或未重定向到适当的页面和消息? 最佳答案 在Rails3中,update_all不返回任何有意义的信息,除了已更新的记录数(这可能取决于您的DBMS是否返回该信息)。http://ar.ru
我在我的项目目录中完成了compasscreate.和compassinitrails。几个问题:我已将我的.sass文件放在public/stylesheets中。这是放置它们的正确位置吗?当我运行compasswatch时,它不会自动编译这些.sass文件。我必须手动指定文件:compasswatchpublic/stylesheets/myfile.sass等。如何让它自动运行?文件ie.css、print.css和screen.css已放在stylesheets/compiled。如何在编译后不让它们重新出现的情况下删除它们?我自己编译的.sass文件编译成compiled/t
我正在寻找执行以下操作的正确语法(在Perl、Shell或Ruby中):#variabletoaccessthedatalinesappendedasafileEND_OF_SCRIPT_MARKERrawdatastartshereanditcontinues. 最佳答案 Perl用__DATA__做这个:#!/usr/bin/perlusestrict;usewarnings;while(){print;}__DATA__Texttoprintgoeshere 关于ruby-如何将脚
Rackup通过Rack的默认处理程序成功运行任何Rack应用程序。例如:classRackAppdefcall(environment)['200',{'Content-Type'=>'text/html'},["Helloworld"]]endendrunRackApp.new但是当最后一行更改为使用Rack的内置CGI处理程序时,rackup给出“NoMethodErrorat/undefinedmethod`call'fornil:NilClass”:Rack::Handler::CGI.runRackApp.newRack的其他内置处理程序也提出了同样的反对意见。例如Rack
使用带有Rails插件的vim,您可以创建一个迁移文件,然后一次性打开该文件吗?textmate也可以这样吗? 最佳答案 你可以使用rails.vim然后做类似的事情::Rgeneratemigratonadd_foo_to_bar插件将打开迁移生成的文件,这正是您想要的。我不能代表textmate。 关于ruby-使用VimRails,您可以创建一个新的迁移文件并一次性打开它吗?,我们在StackOverflow上找到一个类似的问题: https://sta
我需要从一个View访问多个模型。以前,我的links_controller仅用于提供以不同方式排序的链接资源。现在我想包括一个部分(我假设)显示按分数排序的顶级用户(@users=User.all.sort_by(&:score))我知道我可以将此代码插入每个链接操作并从View访问它,但这似乎不是“ruby方式”,我将需要在不久的将来访问更多模型。这可能会变得很脏,是否有针对这种情况的任何技术?注意事项:我认为我的应用程序正朝着单一格式和动态页面内容的方向发展,本质上是一个典型的网络应用程序。我知道before_filter但考虑到我希望应用程序进入的方向,这似乎很麻烦。最终从任何
我想要做的是有2个不同的Controller,client和test_client。客户端Controller已经构建,我想创建一个test_clientController,我可以使用它来玩弄客户端的UI并根据需要进行调整。我主要是想绕过我在客户端中内置的验证及其对加载数据的管理Controller的依赖。所以我希望test_clientController加载示例数据集,然后呈现客户端Controller的索引View,以便我可以调整客户端UI。就是这样。我在test_clients索引方法中试过这个:classTestClientdefindexrender:template=>