文章目录
一个docker容器对应一个前端项目
使用Dockerfile构建镜像,而镜像内部使用nginx,最后把前端构建好的静态文件放到nginxhtml目录下面就可
多个前端项目依次创建多个docker容器即可
使用一个docker容器部署多个前端项目
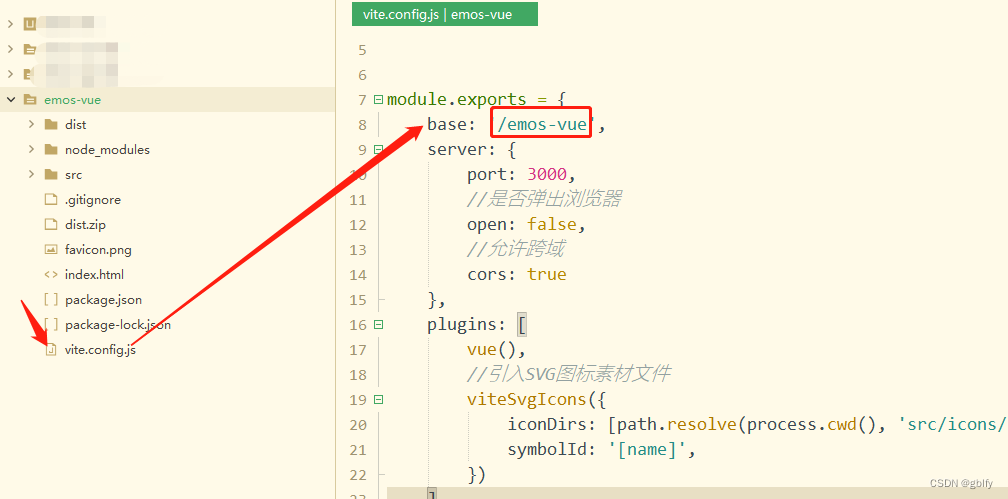
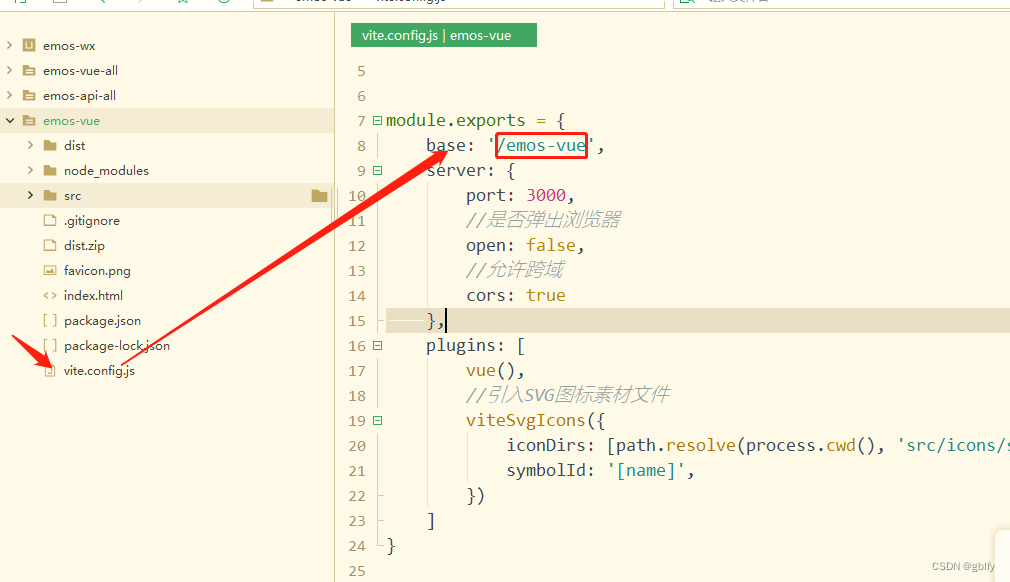
在构建之前规划好按照不同路径访问前端项目,在配置文件中配置访问路径即可,
举例:
项目1 /emos-vue
项目2 /emos-vue2
以此类推…
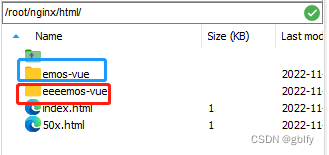
然后,将多个构建后的前端项目静态目录上传到nginx的html文件夹中,前端访问按照规划好的路径访问即可。
这样好处是不用浪费资源,缺点是项目之间还是有耦合度
首先下载安装Nginx镜像,这里我依然使用特定版本的镜像。
docker pull nginx:1.21.3
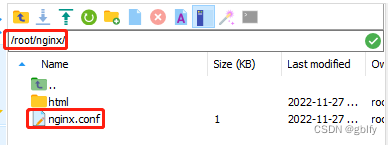
在root目录中,创建nginx文件夹。然后把课程git上面“其他”目录中的nginx.conf文件,上传到该目录。并且创建html文件夹,把index.html和50x.html文件上传到该目录。
具体文件内容:见文章末尾附录
mkdir /root/nginx/html -p
执行下面的命令,创建Nginx容器,然后用浏览器访问云主机的80端口,可以看到Nginx的欢迎画面。
docker run -it -d --name nginx -m 200m --net=host \
-v /root/nginx/nginx.conf:/etc/nginx/nginx.conf:ro \
-v /root/nginx/html:/usr/share/nginx/html:ro \
-e TZ=Asia/Shanghai \
nginx:1.21.3

把 dist.zip 文件上传到 /root/nginx/html 目录中,然后执行unzip命令解压缩。

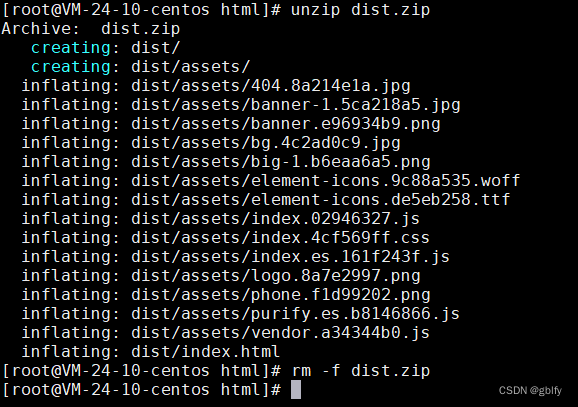
#进入到html目录
cd /root/nginx/html

#解压缩文件夹
unzip dist.zip

#删除压缩文件
rm -rf dist.zip

#给文件夹改名
mv dist emos-vue
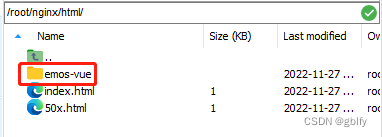
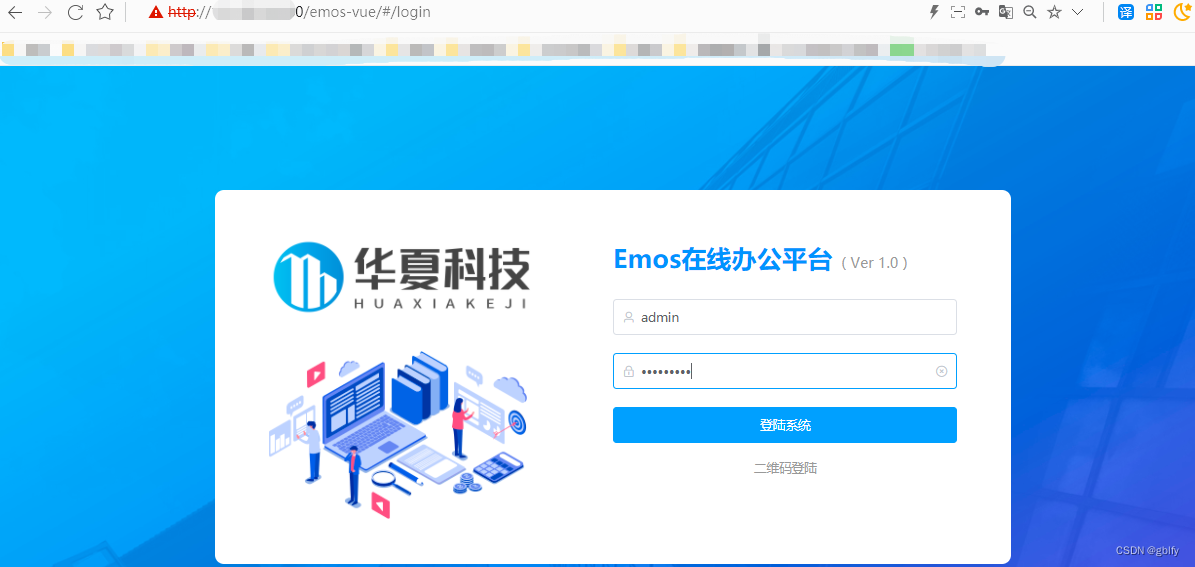
打开浏览器,访问 http://云主机IP:80/emos-vue ,如果能看到登陆页面,说明程序部署成功
<!DOCTYPE html>
<html>
<head>
<title>Welcome to nginx!</title>
<style>
    body {
        width: 35em;
        margin: 0 auto;
        font-family: Tahoma, Verdana, Arial, sans-serif;
    }
</style>
</head>
<body>
<h1>Welcome to nginx!</h1>
<p>If you see this page, the nginx web server is successfully installed and
working. Further configuration is required.</p>

<p>For online documentation and support please refer to
<a href="http://nginx.org/">nginx.org</a>.<br/>
Commercial support is available at
<a href="http://nginx.com/">nginx.com</a>.</p>

<p><em>Thank you for using nginx.</em></p>
</body>
</html>
<!DOCTYPE html>
<html>
<head>
<title>Error</title>
<style>
    body {
        width: 35em;
        margin: 0 auto;
        font-family: Tahoma, Verdana, Arial, sans-serif;
    }
</style>
</head>
<body>
<h1>An error occurred.</h1>
<p>Sorry, the page you are looking for is currently unavailable.<br/>
Please try again later.</p>
<p>If you are the system administrator of this resource then you should check
the error log for details.</p>
<p><em>Faithfully yours, nginx.</em></p>
</body>
</html>
user  nginx;
worker_processes  auto;

error_log  /var/log/nginx/error.log notice;
pid        /var/run/nginx.pid;


events {
    worker_connections  1024;
}


http {
    include       /etc/nginx/mime.types;
    default_type  application/octet-stream;

    log_format  main  '$remote_addr - $remote_user [$time_local] "$request" '
                      '$status $body_bytes_sent "$http_referer" '
                      '"$http_user_agent" "$http_x_forwarded_for"';

    access_log  /var/log/nginx/access.log  main;

    sendfile        on;
    #tcp_nopush     on;

    keepalive_timeout  65;

    #gzip  on;

    include /etc/nginx/conf.d/*.conf;
}
Rails2.3可以选择随时使用RouteSet#add_configuration_file添加更多路由。是否可以在Rails3项目中做同样的事情? 最佳答案 在config/application.rb中:config.paths.config.routes在Rails3.2(也可能是Rails3.1)中,使用:config.paths["config/routes"] 关于ruby-on-rails-Rails3中的多个路由文件,我们在StackOverflow上找到一个类似的问题
我有多个ActiveRecord子类Item的实例数组,我需要根据最早的事件循环打印。在这种情况下,我需要打印付款和维护日期,如下所示:ItemAmaintenancerequiredin5daysItemBpaymentrequiredin6daysItemApaymentrequiredin7daysItemBmaintenancerequiredin8days我目前有两个查询,用于查找maintenance和payment项目(非排他性查询),并输出如下内容:paymentrequiredin...maintenancerequiredin...有什么方法可以改善上述(丑陋的)代
如何在buildr项目中使用Ruby?我在很多不同的项目中使用过Ruby、JRuby、Java和Clojure。我目前正在使用我的标准Ruby开发一个模拟应用程序,我想尝试使用Clojure后端(我确实喜欢功能代码)以及JRubygui和测试套件。我还可以看到在未来的不同项目中使用Scala作为后端。我想我要为我的项目尝试一下buildr(http://buildr.apache.org/),但我注意到buildr似乎没有设置为在项目中使用JRuby代码本身!这看起来有点傻,因为该工具旨在统一通用的JVM语言并且是在ruby中构建的。除了将输出的jar包含在一个独特的、仅限ruby
我需要从一个View访问多个模型。以前,我的links_controller仅用于提供以不同方式排序的链接资源。现在我想包括一个部分(我假设)显示按分数排序的顶级用户(@users=User.all.sort_by(&:score))我知道我可以将此代码插入每个链接操作并从View访问它,但这似乎不是“ruby方式”,我将需要在不久的将来访问更多模型。这可能会变得很脏,是否有针对这种情况的任何技术?注意事项:我认为我的应用程序正朝着单一格式和动态页面内容的方向发展,本质上是一个典型的网络应用程序。我知道before_filter但考虑到我希望应用程序进入的方向,这似乎很麻烦。最终从任何
我有一个具有一些属性的模型:attr1、attr2和attr3。我需要在不执行回调和验证的情况下更新此属性。我找到了update_column方法,但我想同时更新三个属性。我需要这样的东西:update_columns({attr1:val1,attr2:val2,attr3:val3})代替update_column(attr1,val1)update_column(attr2,val2)update_column(attr3,val3) 最佳答案 您可以使用update_columns(attr1:val1,attr2:val2
我在我的Rails项目中使用Pow和powifygem。现在我尝试升级我的ruby版本(从1.9.3到2.0.0,我使用RVM)当我切换ruby版本、安装所有gem依赖项时,我通过运行railss并访问localhost:3000确保该应用程序正常运行以前,我通过使用pow访问http://my_app.dev来浏览我的应用程序。升级后,由于错误Bundler::RubyVersionMismatch:YourRubyversionis1.9.3,butyourGemfilespecified2.0.0,此url不起作用我尝试过的:重新创建pow应用程序重启pow服务器更新战俘
我已经像这样安装了一个新的Rails项目:$railsnewsite它执行并到达:bundleinstall但是当它似乎尝试安装依赖项时我得到了这个错误Gem::Ext::BuildError:ERROR:Failedtobuildgemnativeextension./System/Library/Frameworks/Ruby.framework/Versions/2.0/usr/bin/rubyextconf.rbcheckingforlibkern/OSAtomic.h...yescreatingMakefilemake"DESTDIR="cleanmake"DESTDIR="
我正在尝试修改当前依赖于定义为activeresource的gem:s.add_dependency"activeresource","~>3.0"为了让gem与Rails4一起工作,我需要扩展依赖关系以与activeresource的版本3或4一起工作。我不想简单地添加以下内容,因为它可能会在以后引起问题:s.add_dependency"activeresource",">=3.0"有没有办法指定可接受版本的列表?~>3.0还是~>4.0? 最佳答案 根据thedocumentation,如果你想要3到4之间的所有版本,你可以这
我是Google云的新手,我正在尝试对其进行首次部署。我的第一个部署是RubyonRails项目。我基本上是在关注thisguideinthegoogleclouddocumentation.唯一的区别是我使用的是我自己的项目,而不是他们提供的“helloworld”项目。这是我的app.yaml文件runtime:customvm:trueentrypoint:bundleexecrackup-p8080-Eproductionconfig.ruresources:cpu:0.5memory_gb:1.3disk_size_gb:10当我转到我的项目目录并运行gcloudprevie
假设我有这个范围:("aaaaa".."zzzzz")如何在不事先/每次生成整个项目的情况下从范围中获取第N个项目? 最佳答案 一种快速简便的方法:("aaaaa".."zzzzz").first(42).last#==>"aaabp"如果出于某种原因你不得不一遍又一遍地这样做,或者如果你需要避免为前N个元素构建中间数组,你可以这样写:moduleEnumerabledefskip(n)returnto_enum:skip,nunlessblock_given?each_with_indexdo|item,index|yieldit