作者:KaliArch(薛磊),某 Cloud MSP 服务商产品负责人,熟悉企业级高可用/高并发架构,包括混合云架构、异地灾,熟练企业 DevOPS 改造优化,熟悉 Shell/Python/Go 等开发语言,熟悉 Kubernetes、 Docker、 云原生、微服务架构等。
十年云计算浪潮下,DevOps、容器、微服务等技术飞速发展,云原生成为潮流。企业云化从“ON Cloud” 走向 “IN Cloud”,成为“新云原生企业”,新生能力与既有能力立而不破、有机协同,实现资源高效、应用敏捷、业务智能、安全可信。整个云原生概念很大,细化到可能是我们在真实场景中遇到的一些小问题,本文就针对日常工作中遇到的自己的小需求,及解决思路方法,分享给大家。
在我日常使用 kubectl 查看 K8s 资源的时候,想直接查看对应资源的容器名称和镜像名称,目前 kubectl 还不支持该选型,需要我们 describe 然后来查看,对于集群自己比较多,不是很方便,因此萌生了自己开发 kubectl 插件来实现该功能。
首先需要调用 Kubernetes 需要使用 client-go 项目来实现对 Kubernetes 资源的获取,对于插件使用 Golang 语言开发,因为是客户端执行,为了方便集成到及命令行工具,采用和 K8s 相同的命令行脚手架工具 Cobra,最后将其开源发布到 GitHub。
在云原生开发中,Google 非常多的开源项目都是使用 Golang 开发,其跨平台编译后可以发布到多个平台,我们开发的插件基于 Golang,后续也就支持多平台使用。
Cobra 是一个命令行程序库,其是一个用来编写命令行的神器,提供了一个脚手架,用于快速生成基于 Cobra 应用程序框架。我们可以利用 Cobra 快速的去开发出我们想要的命令行工具,非常的方便快捷。
在 K8s 运维中,我们可以使用 kubectl、客户端库或者 REST 请求来访问 K8s API。而实际上,无论是 kubectl 还是客户端库,都是封装了 REST 请求的工具。client-go 作为一个客户端库,能够调用 K8s API,实现对 K8s 集群中资源对象(包括 deployment、service、Ingress、ReplicaSet、Pod、Namespace、Node 等)的增删改查等操作。
Krew 是 类似于系统的 apt、dnf 或者 brew 的 kubectl 插件包管理工具,利用其可以轻松的完成 kubectl 插件的全上面周期管理,包括搜索、下载、卸载等。
kubectl 其工具已经比较完善,但是对于一些个性化的命令,其宗旨是希望开发者能以独立而紧张形式发布自定义的 kubectl 子命令,插件的开发语言不限,需要将最终的脚步或二进制可执行程序以 kubectl- 的前缀命名,然后放到 PATH 中即可,可以使用 kubectl plugin list 查看目前已经安装的插件。
如果你需要某个 Action,不必自己写复杂的脚本,直接引用他人写好的 Action 即可,整个持续集成过程,就变成了一个 Actions 的组合。Github是做了一个商店的功能。这样大家就可以自己定义自己的 Action,然后方便别人复用。同时也可以统一自己的或者组织在构建过程中的一些公共流程。
GoReleaser 采用 Golang 开发,是一款用于 Golang 项目的自动发布工具。无需太多配置,只需要几行命令就可以轻松实现跨平台的包编译、打包和发布到 Github、Gitlab 等版本仓库种。
在开发环境中安装 Cobra,后去基于改命令行工具来生成项目脚手架,K8s 中很多组建也是用的改框架来生成的。
go get -v github.com/spf13/cobra/cobra$ cobra init --pkg-name kubectl-img
$ ls
LICENSE cmd main.go
$ tree
├── LICENSE
├── cmd
│ └── root.go
└── main.gogo mod init github.com/redhatxl/kubectl-img增加一个子命令 image,在此为我们的插件添加子命令。
$ cobra add image通过子命令+flag 形式,显示不同的资源镜像名称。
func Execute() {
    cobra.CheckErr(rootCmd.Execute())
}

func init() {
    KubernetesConfigFlags = genericclioptions.NewConfigFlags(true)
    imageCmd.Flags().BoolP("deployments", "d", false, "show deployments image")
    imageCmd.Flags().BoolP("daemonsets", "e", false, "show daemonsets image")
    imageCmd.Flags().BoolP("statefulsets", "f", false, "show statefulsets image")
    imageCmd.Flags().BoolP("jobs", "o", false, "show jobs image")
    imageCmd.Flags().BoolP("cronjobs", "b", false, "show cronjobs image")
    imageCmd.Flags().BoolP("json", "j", false, "show json format")
    KubernetesConfigFlags.AddFlags(rootCmd.PersistentFlags())
}注册子命令,并修改命令使用说明。
var imageCmd = &cobra.Command{
    Use:   "image",
    Short: "show resource image",
    Long:  `show k8s resource image`,
    RunE:  image,
}

func init() {
    rootCmd.AddCommand(imageCmd)
}由于需要调用 K8s 资源,在此我们使用 Client-go 中的 ClientSet 来根据用户输入的不同 flag 来获取不同的资源镜像。
// ClientSet k8s clientset
func ClientSet(configFlags *genericclioptions.ConfigFlags) *kubernetes.Clientset {
    config, err := configFlags.ToRESTConfig()
    if err != nil {
        panic("kube config load error")
    }
    clientSet, err := kubernetes.NewForConfig(config)
    if err != nil {

        panic("gen kube config error")
    }
    return clientSet
}利用反射实现根据不同资源类型查看具体对应资源镜像及镜像名称功能。
func image(cmd *cobra.Command, args []string) error {

    clientSet := kube.ClientSet(KubernetesConfigFlags)
    ns, _ := rootCmd.Flags().GetString("namespace")
    // 生命一个全局资源列表
    var rList []interface{}

    if flag, _ := cmd.Flags().GetBool("deployments"); flag {
        deployList, err := clientSet.AppsV1().Deployments(ns).List(context.Background(), v1.ListOptions{})
        if err != nil {
            fmt.Printf("list deployments error: %s", err.Error())
        }
        rList = append(rList, deployList)
    }
  ...
      deployMapList := make([]map[string]string, 0)
    for i := 0; i < len(rList); i++ {
        switch t := rList[i].(type) {
        case *kv1.DeploymentList:
            for k := 0; k < len(t.Items); k++ {
                for j := 0; j < len(t.Items[k].Spec.Template.Spec.Containers); j++ {
                    deployMap := make(map[string]string)
                    deployMap["NAMESPACE"] = ns
                    deployMap["TYPE"] = "deployment"
                    deployMap["RESOURCE_NAME"] = t.Items[k].GetName()
                    deployMap["CONTAINER_NAME"] = t.Items[k].Spec.Template.Spec.Containers[j].Name
                    deployMap["IMAGE"] = t.Items[k].Spec.Template.Spec.Containers[j].Image
                    deployMapList = append(deployMapList, deployMap)
                }
}利用 Table 来对结果进行输出,同样扩展 JSON 输出
func GenTable(mapList []map[string]string) *table.Table {
    t, err := gotable.Create(title...)
    if err != nil {
        fmt.Printf("create table error: %s", err.Error())
        return nil
    }
    t.AddRows(mapList)
    return t
}
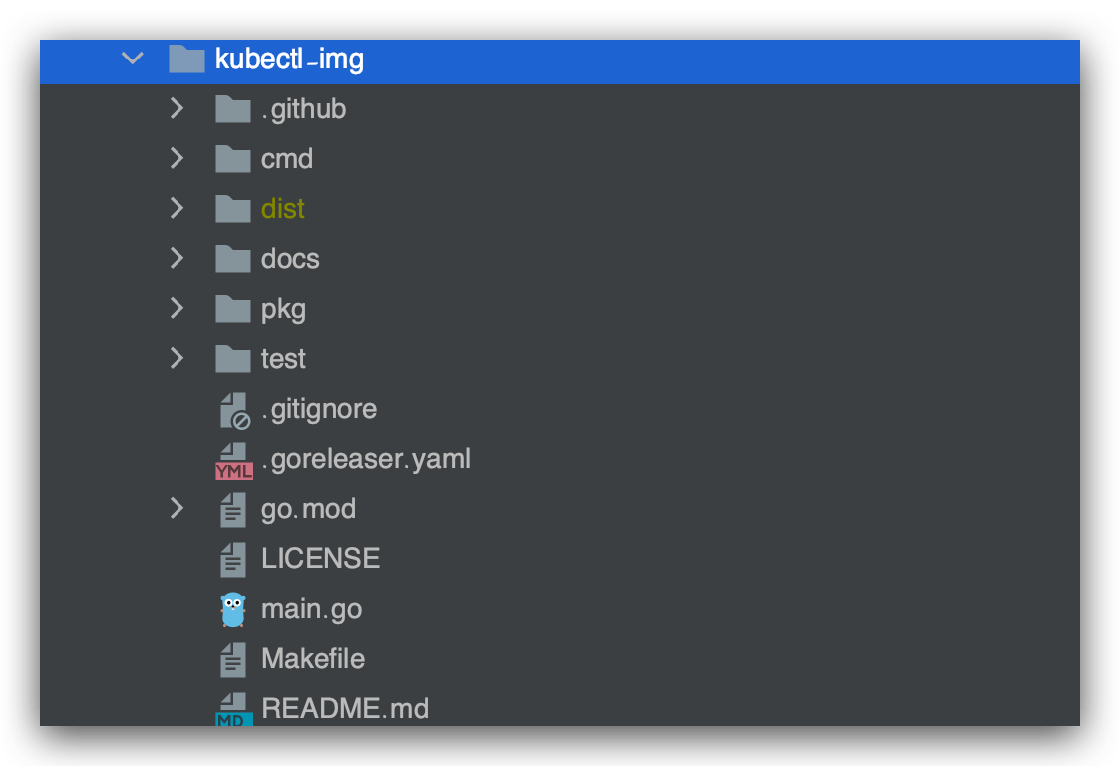
最终项目结构:
需要将最终的脚步或二进制可执行程序以 kubectl- 的前缀命名,然后放到 PATH 中即可,可以使用 kubectl plugin list 查看目前已经安装的插件。
$ kubectl plugin list
The following compatible plugins are available:=
/usr/local/bin/kubectl-debug
  - warning: kubectl-debug overwrites existing command: "kubectl debug"
/usr/local/bin/kubectl-v1.10.11
/usr/local/bin/kubectl-v1.20.0
/Users/xuel/.krew/bin/kubectl-df_pv
/Users/xuel/.krew/bin/kubectl-krew

# 将自己开发的插件重新命名为kubectl-img放到可执行路基下
$ cp kubectl-img /Users/xuel/.krew/bin/kubectl-img

$ kubectl plugin list
The following compatible plugins are available:=
/usr/local/bin/kubectl-debug
  - warning: kubectl-debug overwrites existing command: "kubectl debug"
/usr/local/bin/kubectl-v1.10.11
/usr/local/bin/kubectl-v1.20.0
/Users/xuel/.krew/bin/kubectl-df_pv
/Users/xuel/.krew/bin/kubectl-krew
/Users/xuel/.krew/bin/kubectl-img$ kubectl img image -h
show k8s resource image
Usage:
kubectl-img image [flags]
Flags:
-b, --cronjobs show cronjobs image
-e, --daemonsets show daemonsets image
-d, --deployments show deployments image
-h, --help help for image
-o, --jobs show jobs image
-j, --json show json format
-f, --statefulsets show statefulsets image
Global Flags:
--as string Username to impersonate for the operation
--as-group stringArray Group to impersonate for the operation, this flag can be repeated to specify multiple groups.
--cache-dir string Default cache directory (default "/Users/xuel/.kube/cache")
--certificate-authority string Path to a cert file for the certificate authority
--client-certificate string Path to a client certificate file for TLS
--client-key string Path to a client key file for TLS
--cluster string The name of the kubeconfig cluster to use
--context string The name of the kubeconfig context to use
--insecure-skip-tls-verify If true, the server's certificate will not be checked for validity. This will make your HTTPS connections insecure
--kubeconfig string Path to the kubeconfig file to use for CLI requests.
-n, --namespace string If present, the namespace scope for this CLI request
--request-timeout string The length of time to wait before giving up on a single server request. Non-zero values should contain a corresponding time unit (e.g. 1s, 2m, 3h). A value of zero means don't timeout requests. (default "0")
-s, --server string The address and port of the Kubernetes API server
--tls-server-name string Server name to use for server certificate validation. If it is not provided, the hostname used to contact the server is used
--token string Bearer token for authentication to the API server
--user string The name of the kubeconfig user to use# View the images of all deployments of the entire kubernetes cluster
kubectl img image --deployments
# View the images of all deployments of the entire kubernetes cluster
kubectl img image --deployments -n default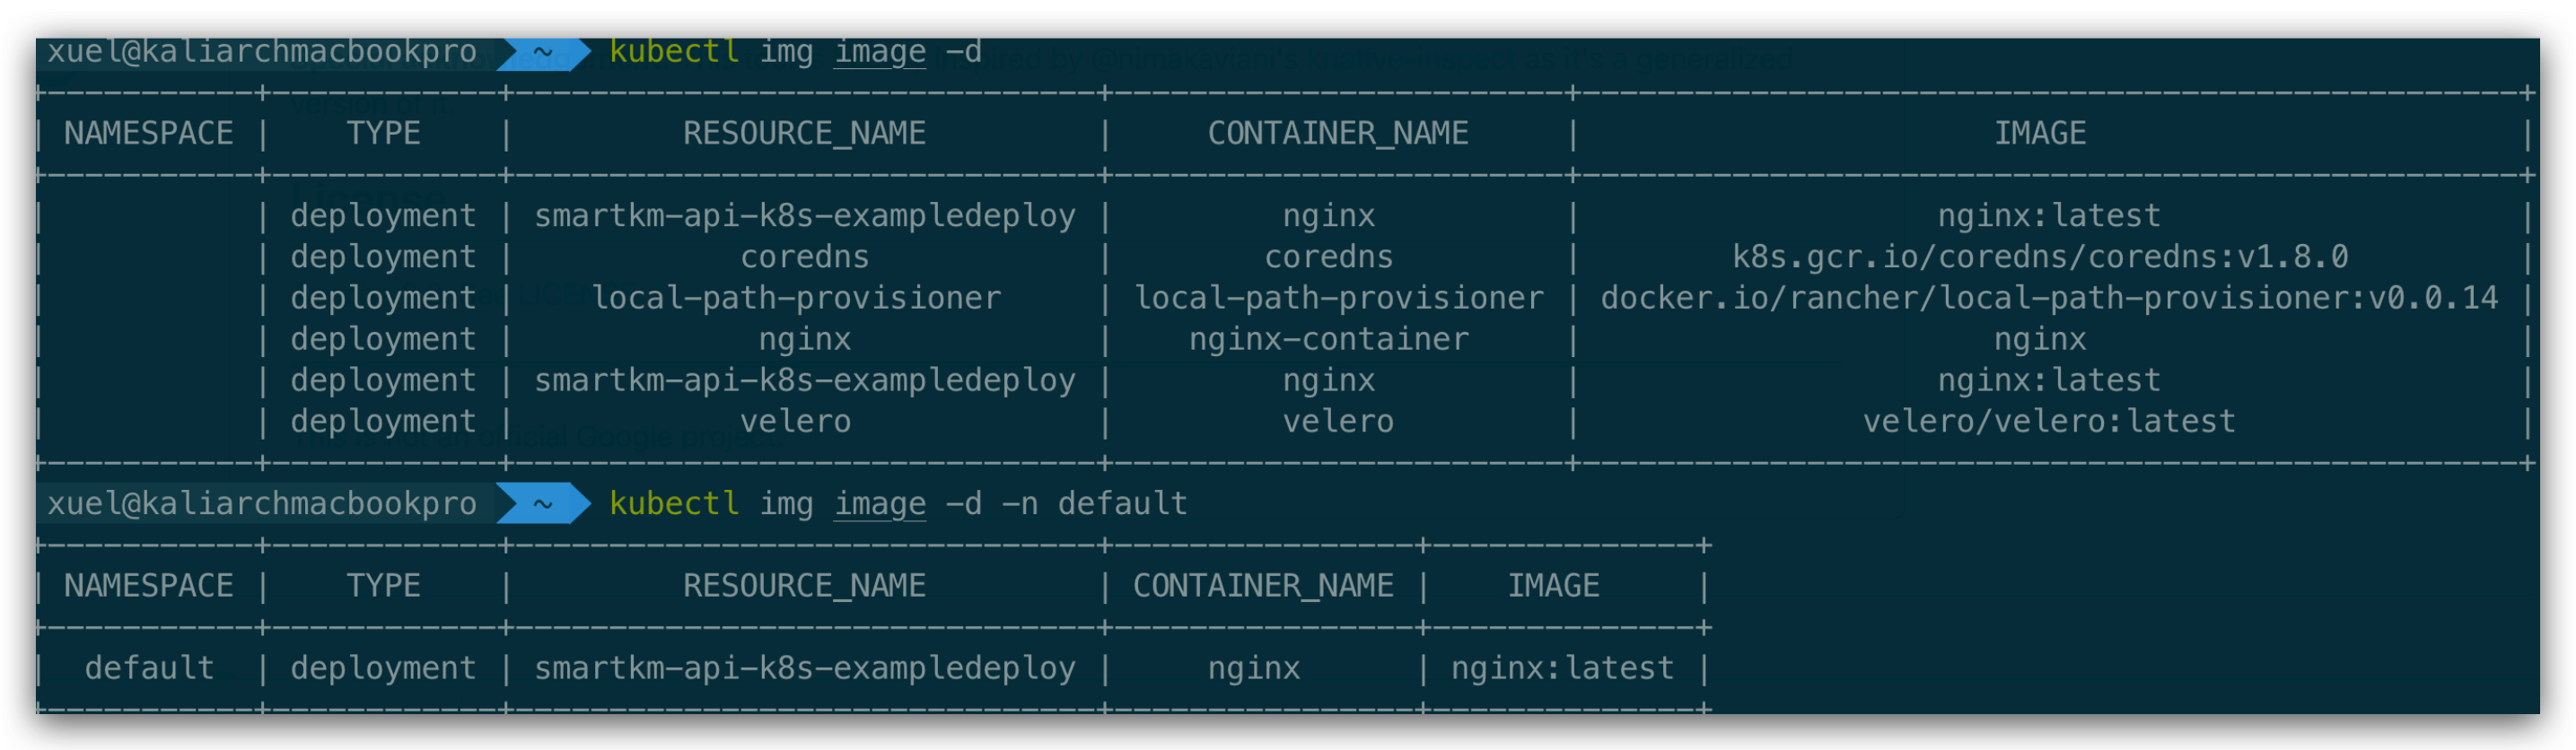
# view all resource
kubectl img image -bedof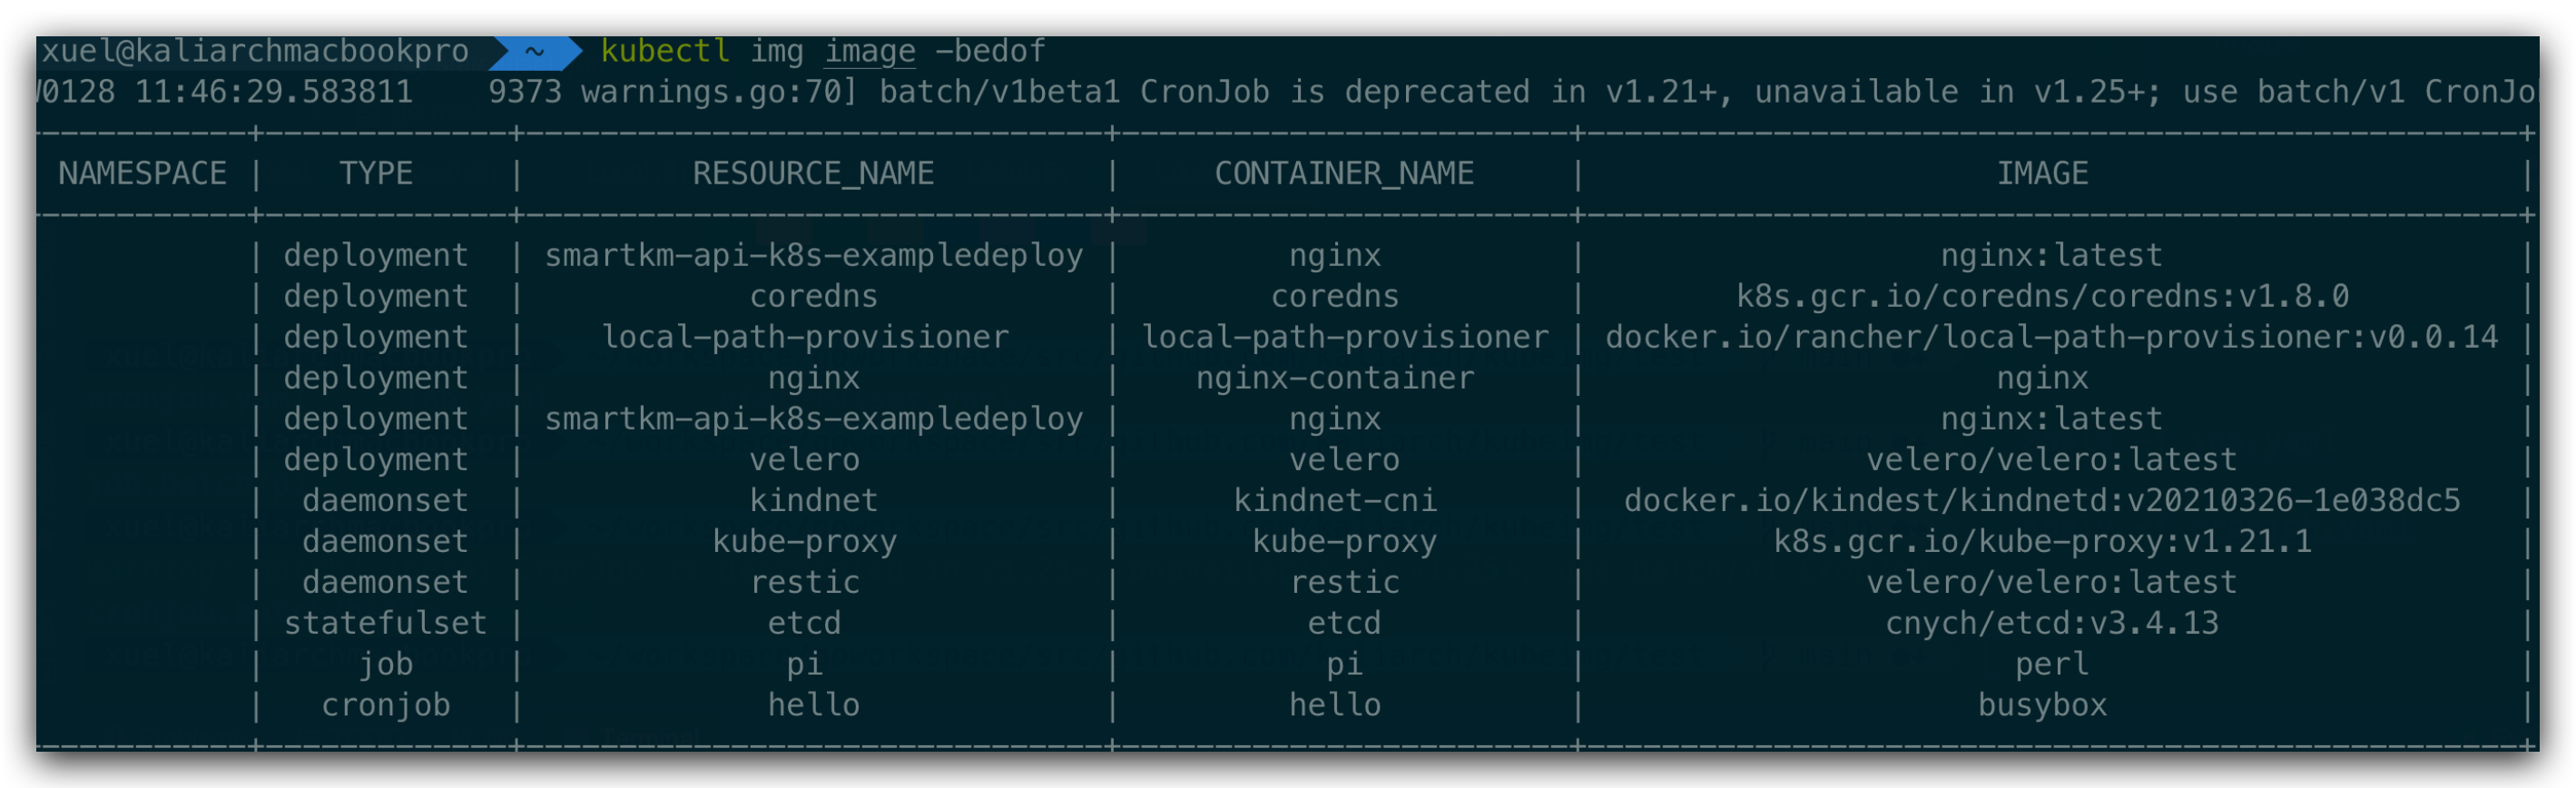
# Table display is used by default
kubectl img image --deployments -n default -j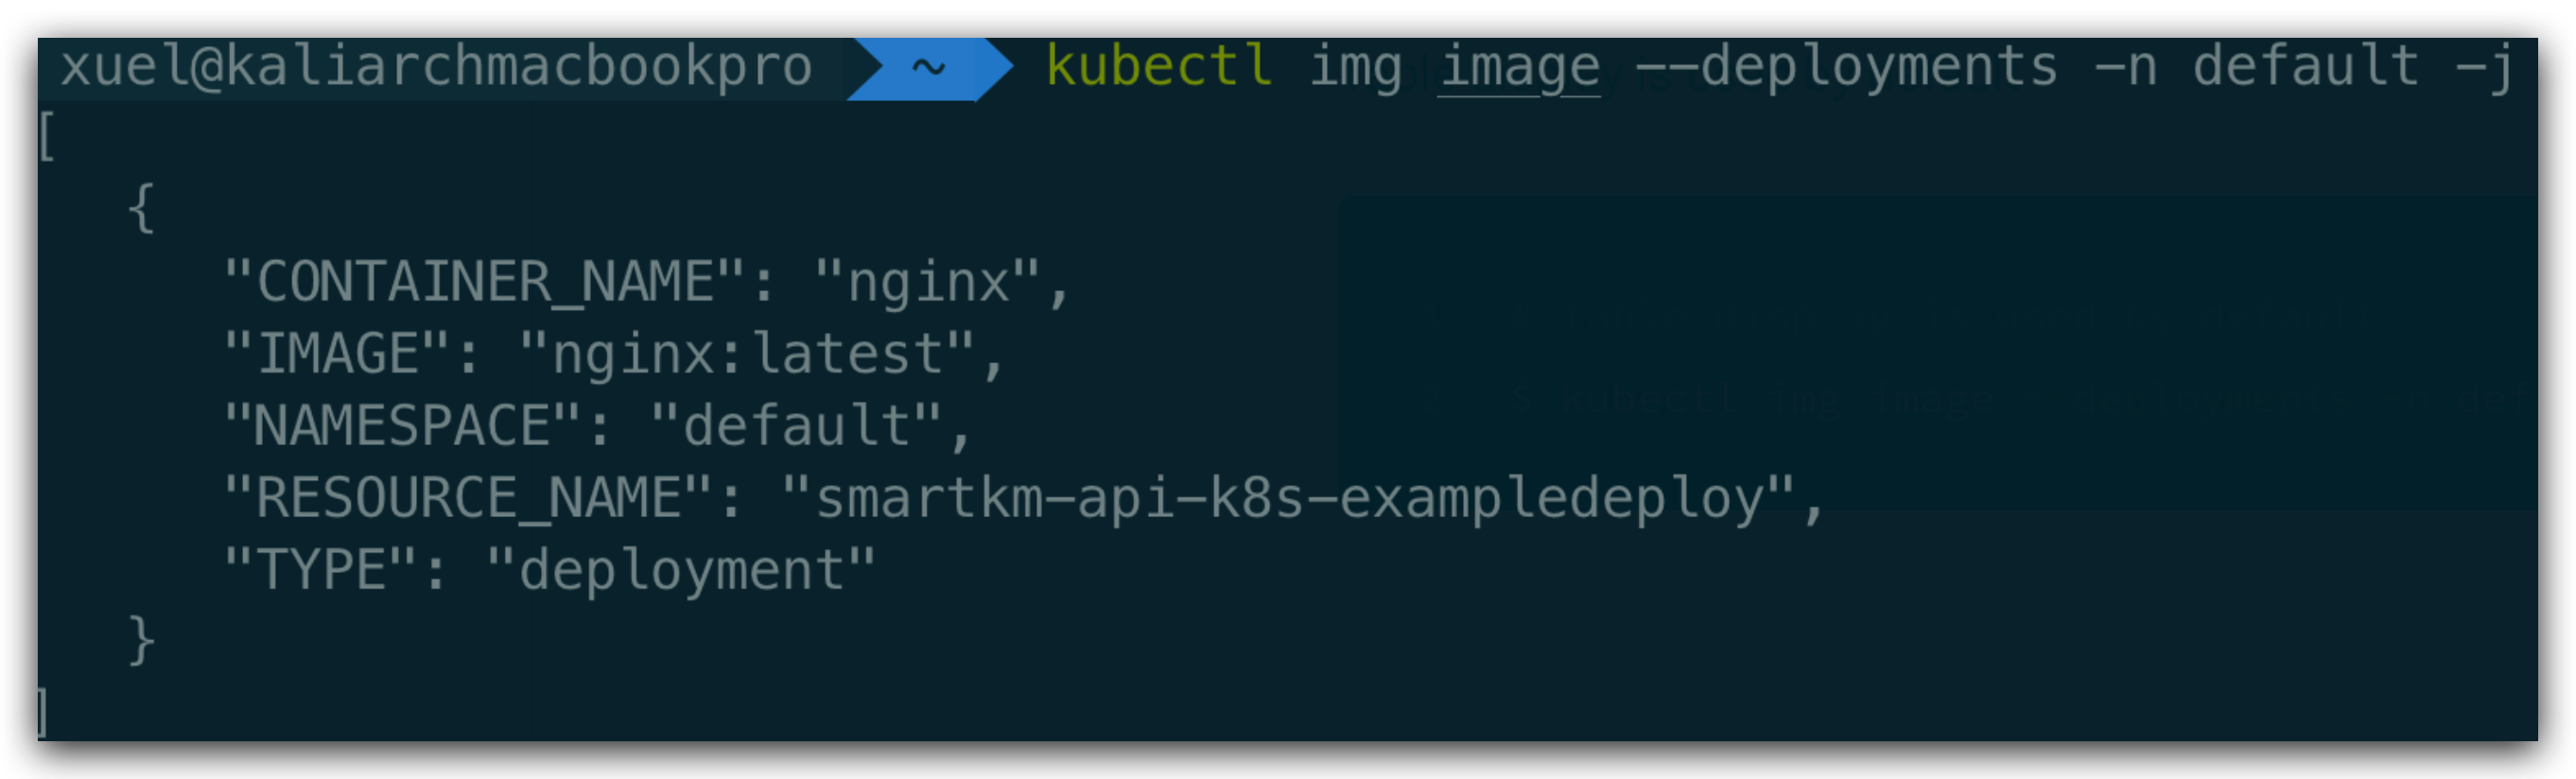
完成代码编写后,为了更多朋友学习交流,将其发布到 GitHub 上。
在项目根目录下创建 .github/workflows/ci.yml,文件内容如下
name: ci
on:
  push:
  pull_request:
jobs:
  goreleaser:
    runs-on: ubuntu-latest
    steps:
      - name: Checkout
        uses: actions/checkout@master
      - name: Setup Go
        uses: actions/setup-go@v1
        with:
          go-version: 1.16
      - name: GoReleaser
        uses: goreleaser/goreleaser-action@v1
        with:
          version: latest
          args: release --snapshot --rm-dist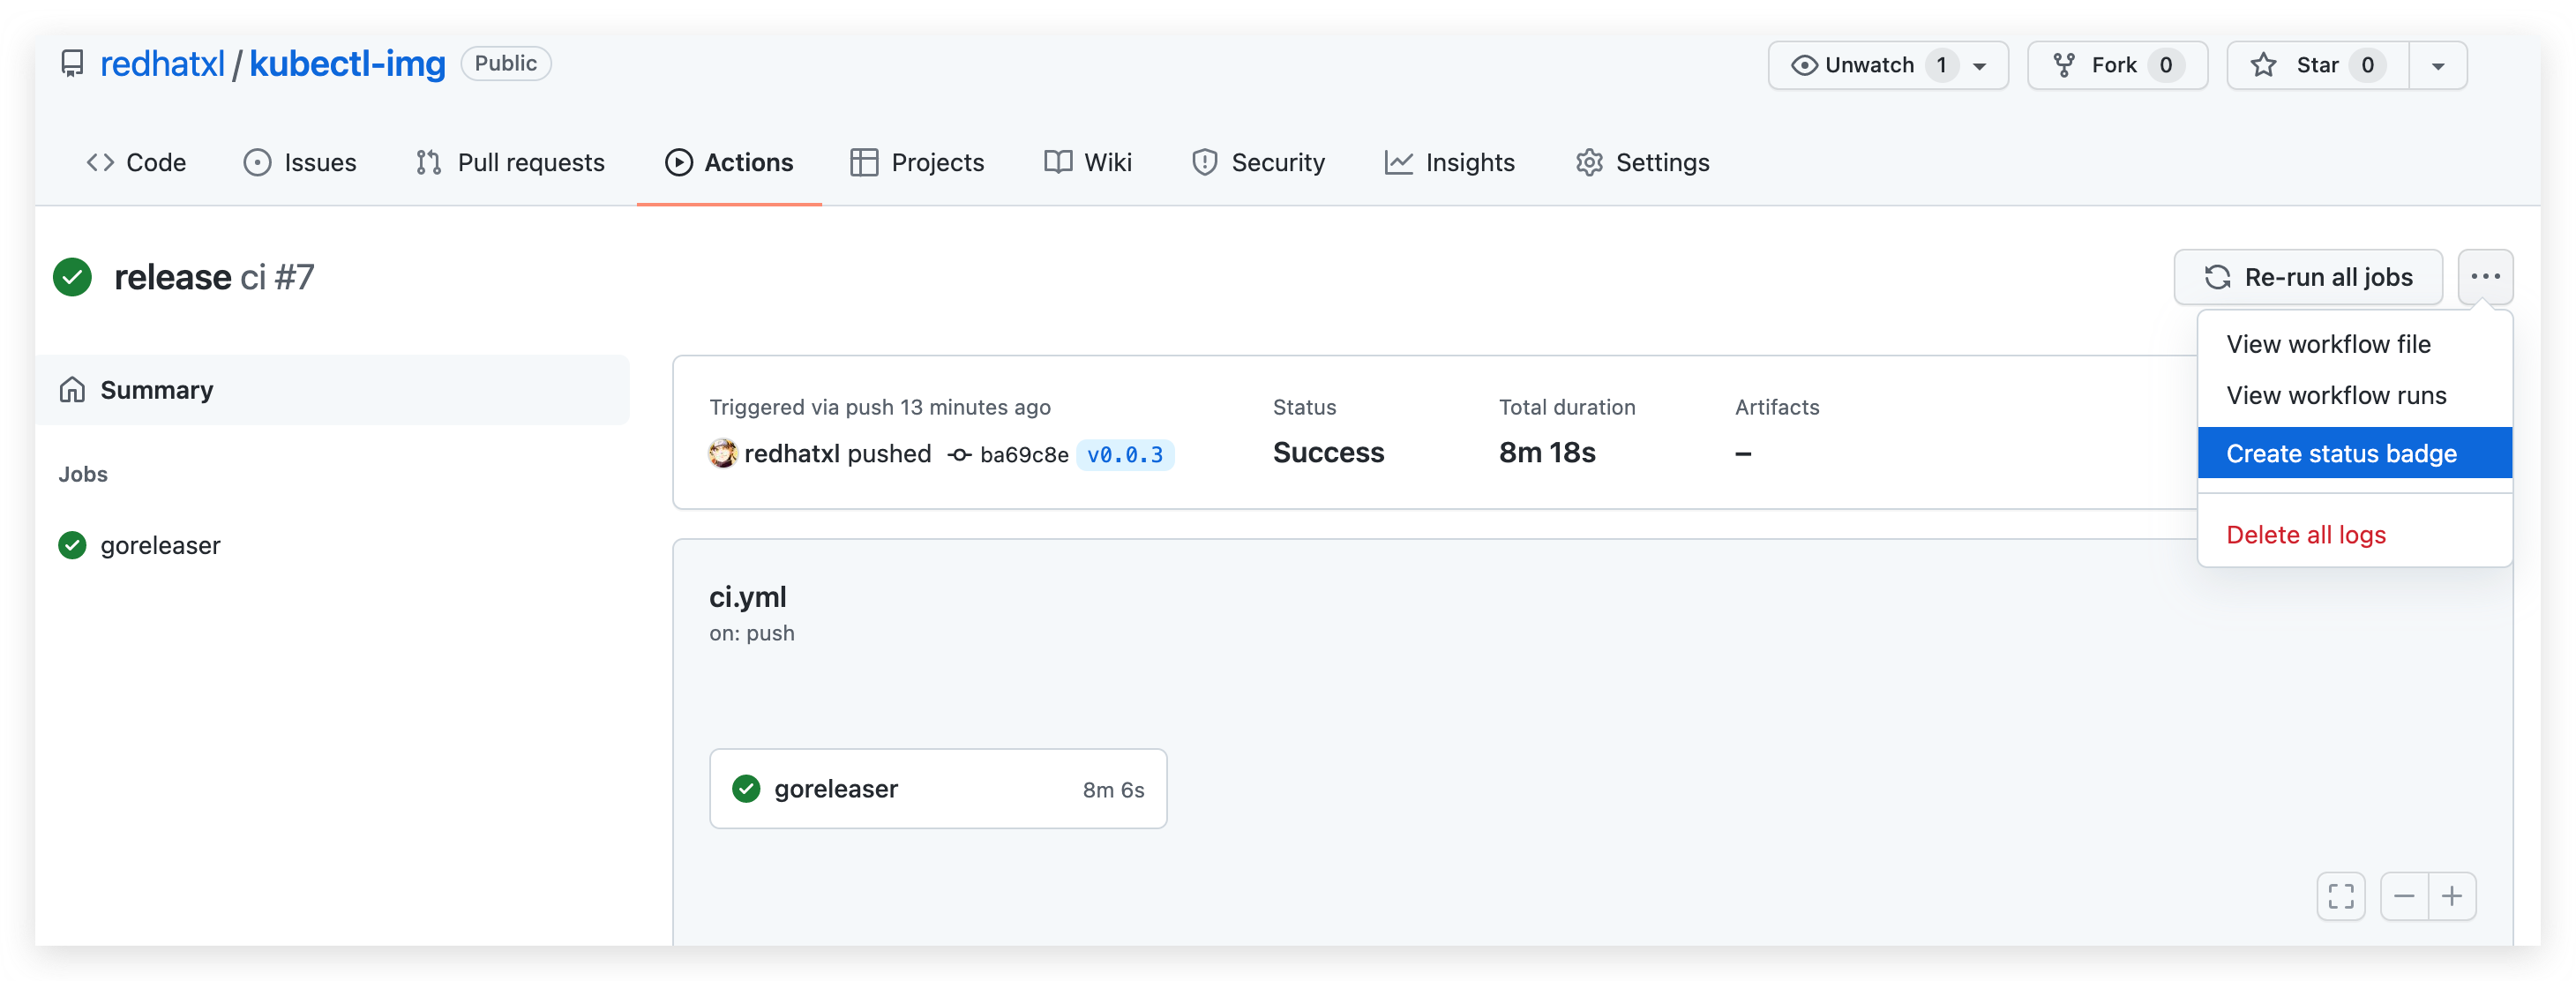
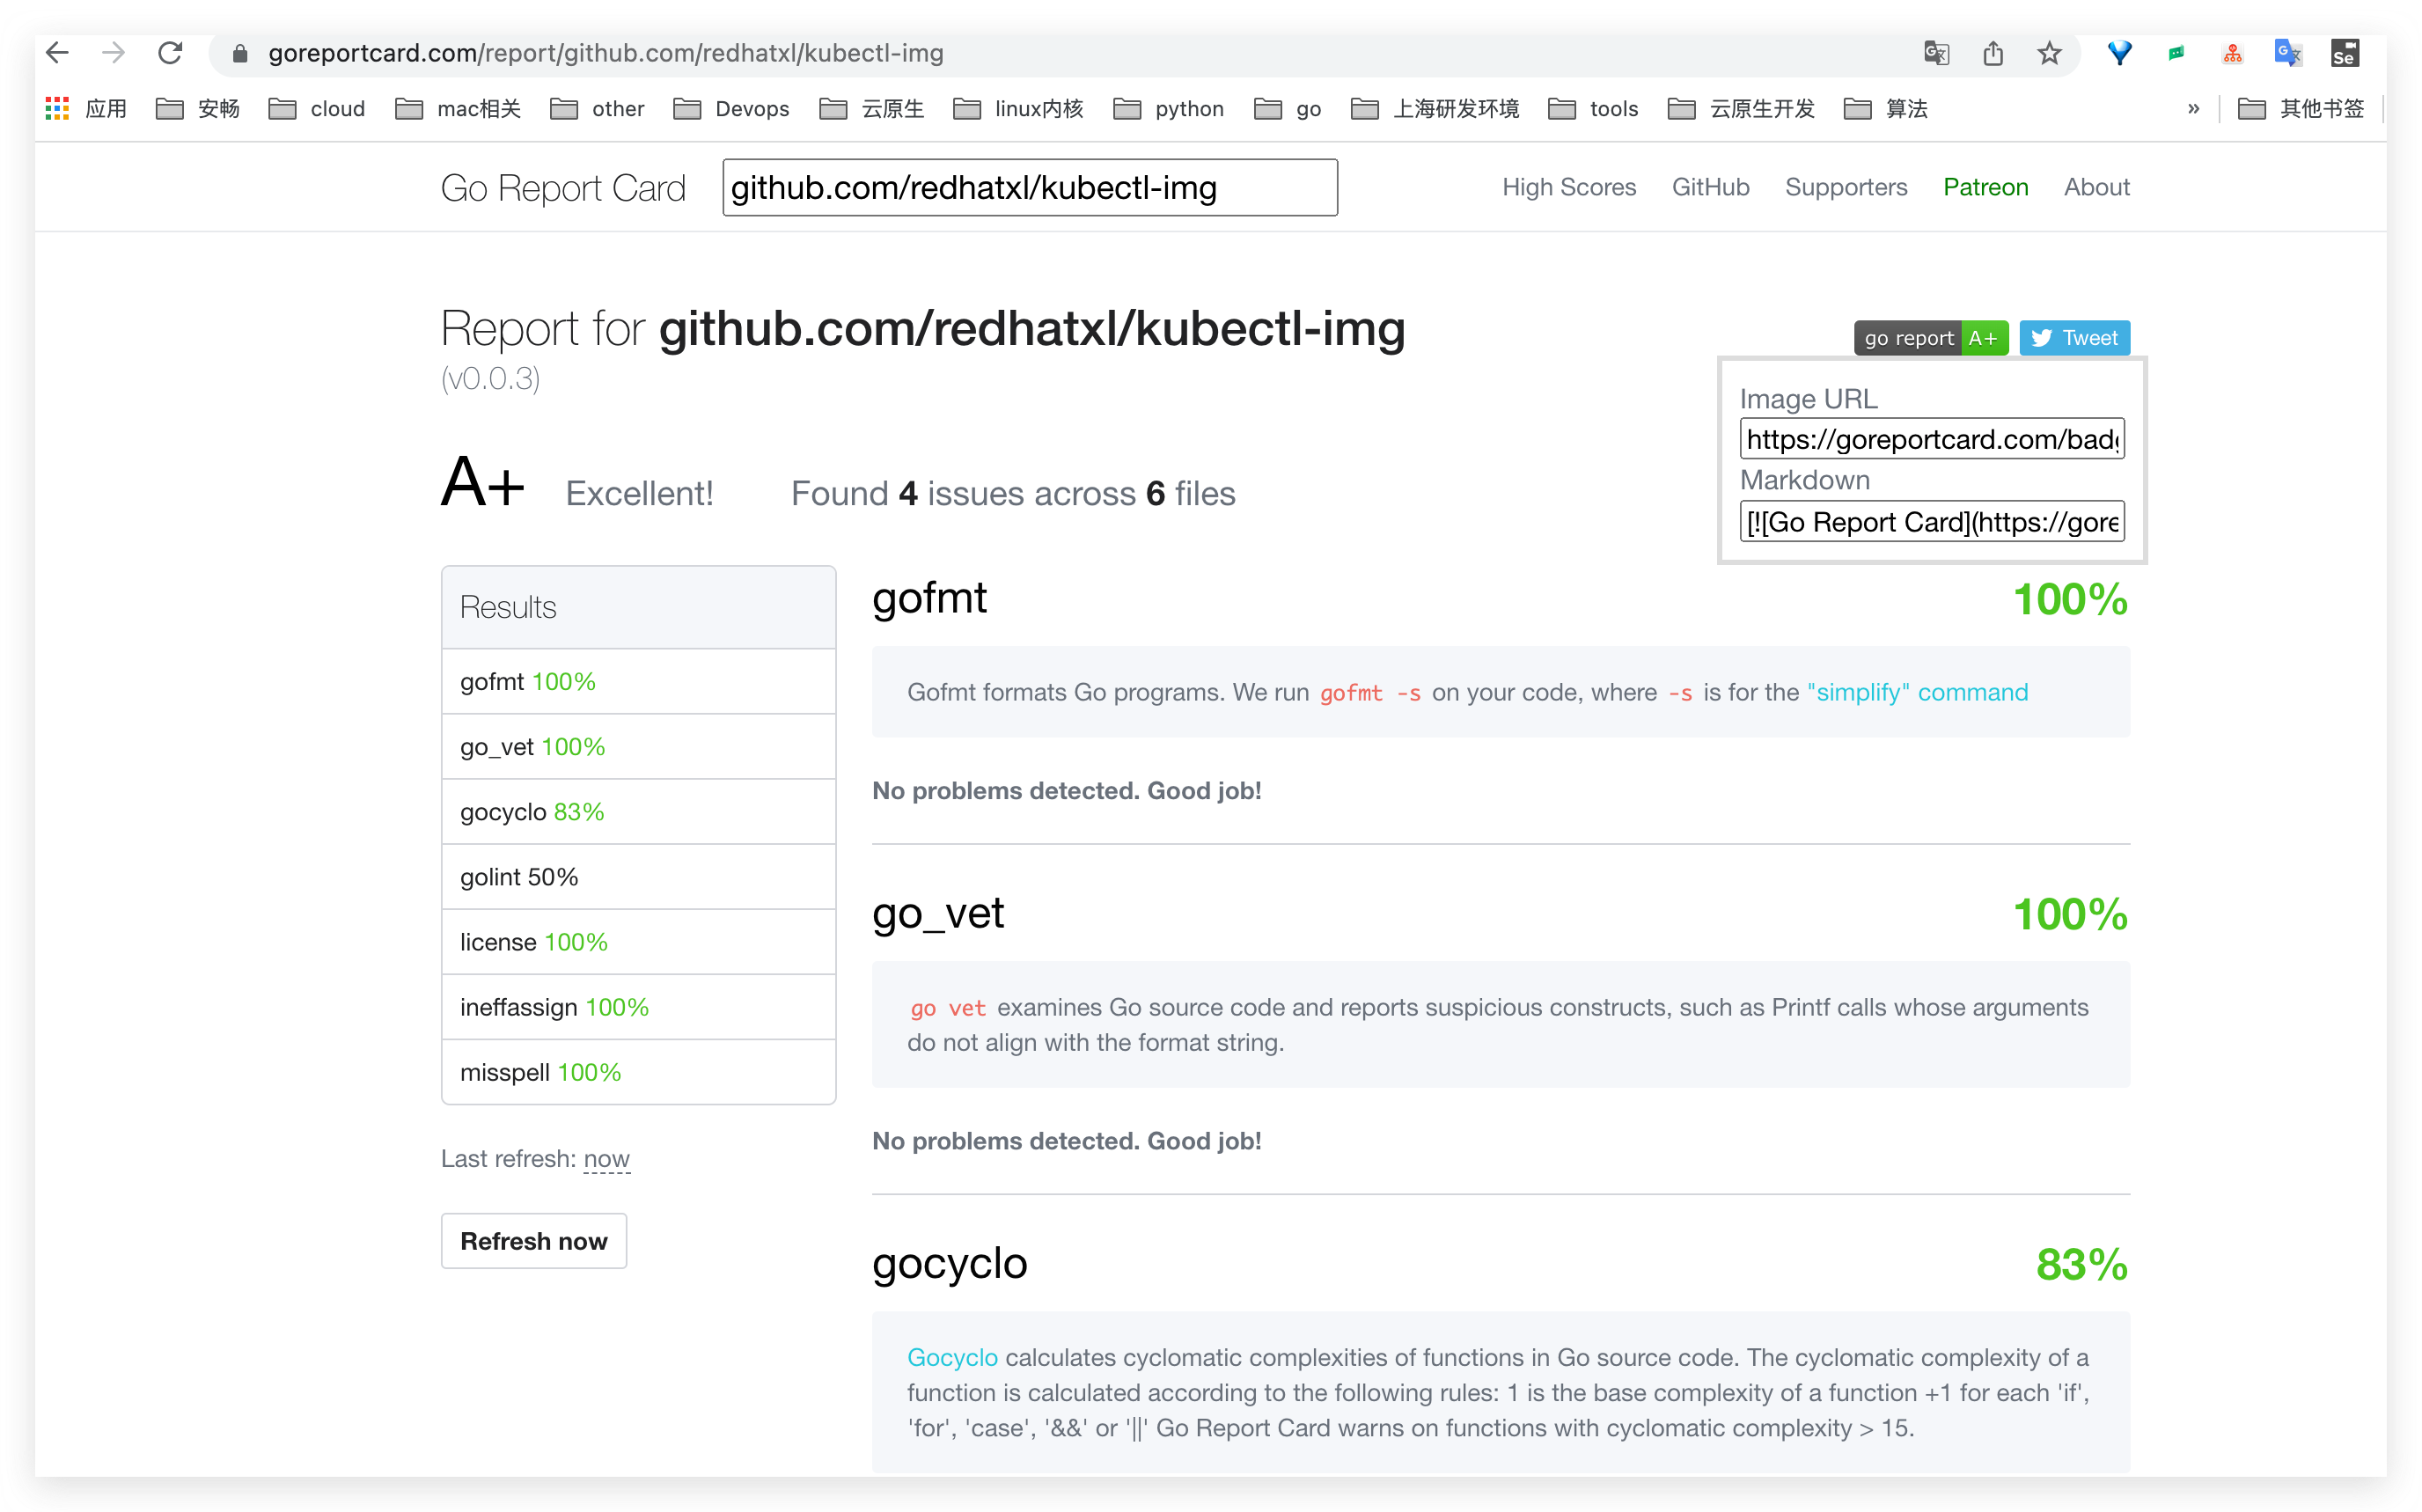
添加 Go 项目报告:https://goreportcard.com/
对于 Golang 项目,可以使用 GoReleaser 来发布一个漂亮的 Release。
由于使用的的 macOS ,这里使用 brew 来安装:
brew install goreleaser在项目根目录生成 .goreleaser.yml 配置:
goreleaser init配置好了以后要记得往 .gitignore 加上 dist,因为 goreleaser 会默认把编译编译好的文件输出到 dist 目录中。
# This is an example .goreleaser.yml file with some sensible defaults.
# Make sure to check the documentation at https://goreleaser.com
before:
  hooks:
    # You may remove this if you don't use go modules.
    - go mod tidy
    # you may remove this if you don't need go generate
    - go generate ./...
builds:
  - env:
      - CGO_ENABLED=0
    goos:
      - linux
      - windows
      - darwin
archives:
  - replacements:
      darwin: Darwin
      linux: Linux
      windows: Windows
      386: i386
      amd64: x86_64
checksum:
  name_template: 'checksums.txt'
snapshot:
  name_template: "{{ incpatch .Version }}-next"
changelog:
  sort: asc
  filters:
    exclude:
      - '^docs:'
      - '^test:'

project_name: kubectl-img
GoReleaser 配置好后,可以先编译测试一下:
注意: 首次使用 GoReleaser 要配置 GITHUB_TOKEN ,可以在这里申请,申请好之后运行下面的命令配置 GITHUB_TOKEN
export GITHUB_TOKEN=<YOUR_TOKEN>确保没有问题,那么就可以操作 Git 和 GoReleaser 来发布 Release 了。
git add .
git commit -m "add goreleaser"
git tag -a v0.0.2 -m "First release"
git push origin main
git push origin v0.0.2
全部搞定后,一行命令起飞:
$ goreleaser release --rm-dist
   • releasing...
   • loading config file       file=.goreleaser.yaml
   • loading environment variables
   • getting and validating git state
      • building...               commit=98703b3b9d9ac7f4661c5669c1e164d2cf3675d2 latest tag=v1.0.0
   • parsing tag
   • running before hooks
      • running                   hook=go mod tidy
      • running                   hook=go generate ./...
   • setting defaults
      • DEPRECATED: skipped windows/arm64 build on Go < 1.17 for compatibility, check https://goreleaser.com/deprecations/#builds-for-windowsarm64 for more info.
   • checking distribution directory
      • --rm-dist is set, cleaning it up
   • loading go mod information
   • build prerequisites
   • writing effective config file
      • writing                   config=dist/config.yaml
   • generating changelog
      • writing                   changelog=dist/CHANGELOG.md
   • building binaries
      • building                  binary=/Users/xuel/workspace/goworkspace/src/github.com/kaliarch/kubectl-img/dist/kubectl-img_linux_386/kubectl-img
      • building                  binary=/Users/xuel/workspace/goworkspace/src/github.com/kaliarch/kubectl-img/dist/kubectl-img_linux_amd64/kubectl-img
      • building                  binary=/Users/xuel/workspace/goworkspace/src/github.com/kaliarch/kubectl-img/dist/kubectl-img_darwin_arm64/kubectl-img
      • building                  binary=/Users/xuel/workspace/goworkspace/src/github.com/kaliarch/kubectl-img/dist/kubectl-img_linux_arm64/kubectl-img
      • building                  binary=/Users/xuel/workspace/goworkspace/src/github.com/kaliarch/kubectl-img/dist/kubectl-img_windows_amd64/kubectl-img.exe
      • building                  binary=/Users/xuel/workspace/goworkspace/src/github.com/kaliarch/kubectl-img/dist/kubectl-img_windows_386/kubectl-img.exe
      • building                  binary=/Users/xuel/workspace/goworkspace/src/github.com/kaliarch/kubectl-img/dist/kubectl-img_darwin_amd64/kubectl-img
   • archives
      • creating                  archive=dist/kubectl-img_1.0.0_Linux_i386.tar.gz
      • creating                  archive=dist/kubectl-img_1.0.0_Darwin_x86_64.tar.gz
      • creating                  archive=dist/kubectl-img_1.0.0_Linux_x86_64.tar.gz
      • creating                  archive=dist/kubectl-img_1.0.0_Windows_x86_64.tar.gz
      • creating                  archive=dist/kubectl-img_1.0.0_Linux_arm64.tar.gz
      • creating                  archive=dist/kubectl-img_1.0.0_Windows_i386.tar.gz
      • creating                  archive=dist/kubectl-img_1.0.0_Darwin_arm64.tar.gz
   • calculating checksums
   • storing release metadata
      • writing                   file=dist/artifacts.json
      • writing                   file=dist/metadata.json
   • publishing
      • scm releases
         • creating or updating release repo=redhatxl/kubectl-img tag=v1.0.0
         • release updated           url=https://github.com/redhatxl/kubectl-img/releases/tag/v1.0.0
         • uploading to release      file=dist/checksums.txt name=checksums.txt
         • uploading to release      file=dist/kubectl-img_1.0.0_Linux_i386.tar.gz name=kubectl-img_1.0.0_Linux_i386.tar.gz
         • uploading to release      file=dist/kubectl-img_1.0.0_Linux_x86_64.tar.gz name=kubectl-img_1.0.0_Linux_x86_64.tar.gz
         • uploading to release      file=dist/kubectl-img_1.0.0_Windows_i386.tar.gz name=kubectl-img_1.0.0_Windows_i386.tar.gz
         • uploading to release      file=dist/kubectl-img_1.0.0_Linux_arm64.tar.gz name=kubectl-img_1.0.0_Linux_arm64.tar.gz
         • uploading to release      file=dist/kubectl-img_1.0.0_Darwin_x86_64.tar.gz name=kubectl-img_1.0.0_Darwin_x86_64.tar.gz
         • uploading to release      file=dist/kubectl-img_1.0.0_Windows_x86_64.tar.gz name=kubectl-img_1.0.0_Windows_x86_64.tar.gz
         • uploading to release      file=dist/kubectl-img_1.0.0_Darwin_arm64.tar.gz name=kubectl-img_1.0.0_Darwin_arm64.tar.gz
   • announcing
   • release succeeded after 183.24s
查看发布好的 Release
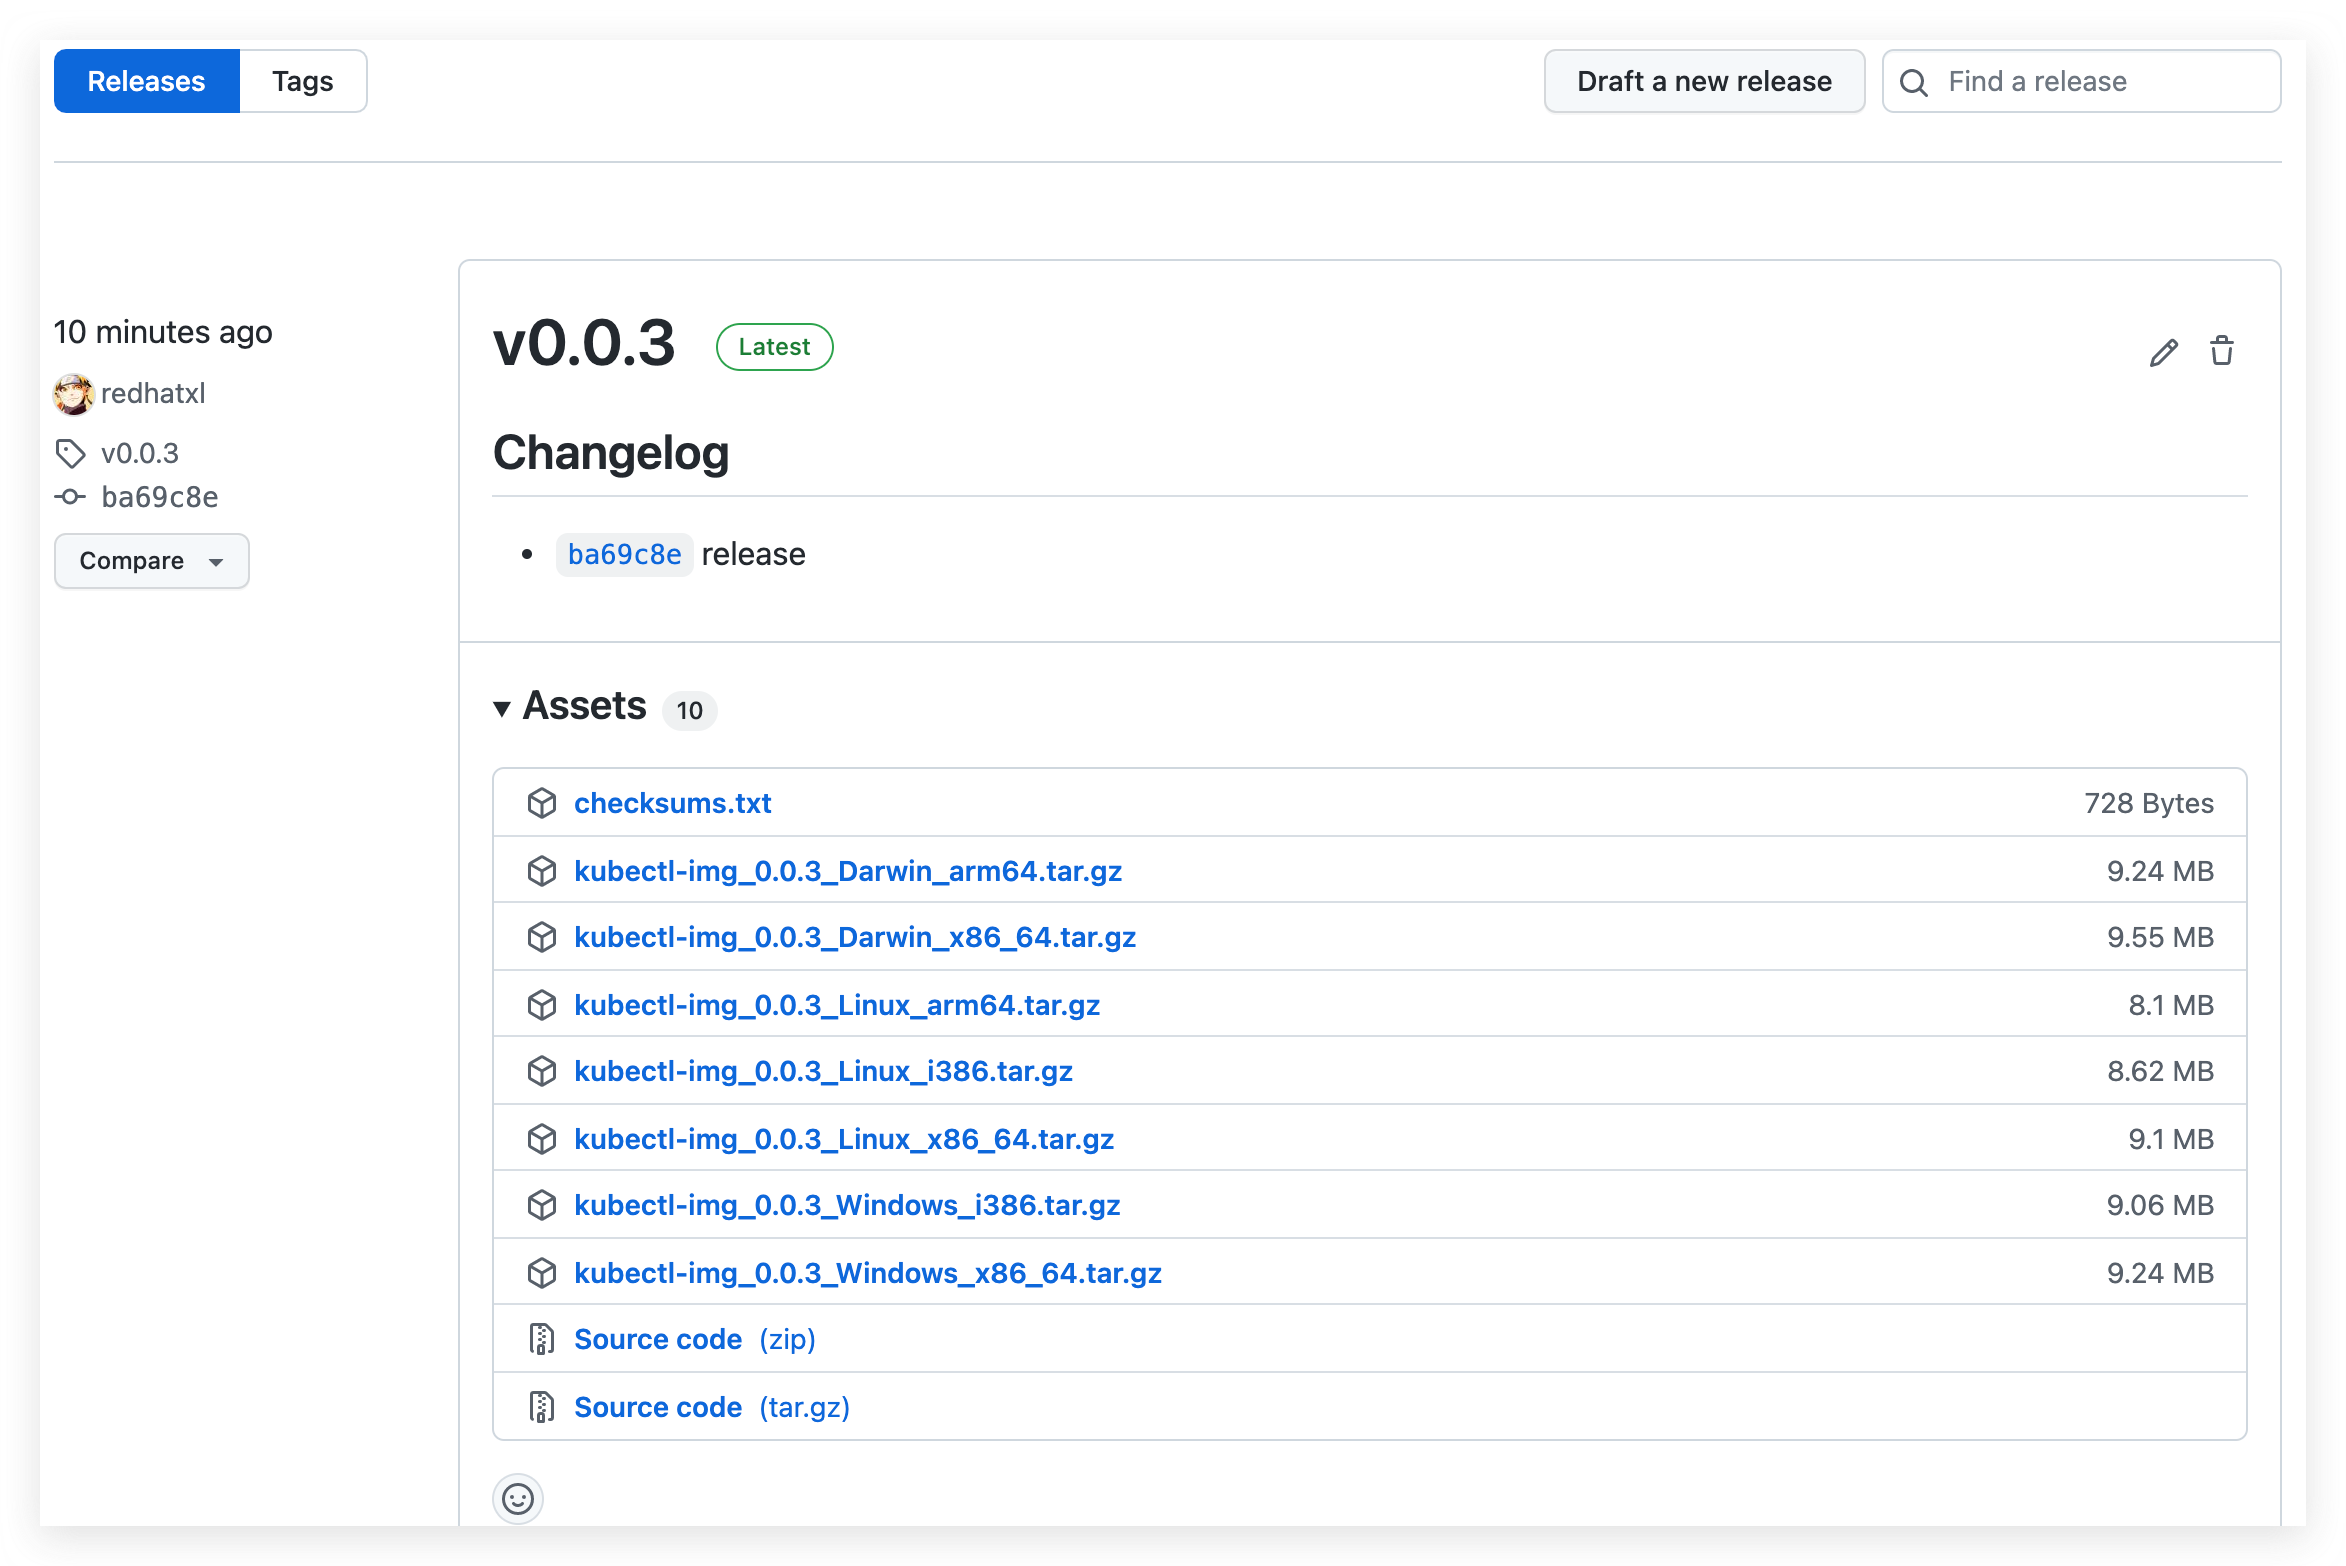
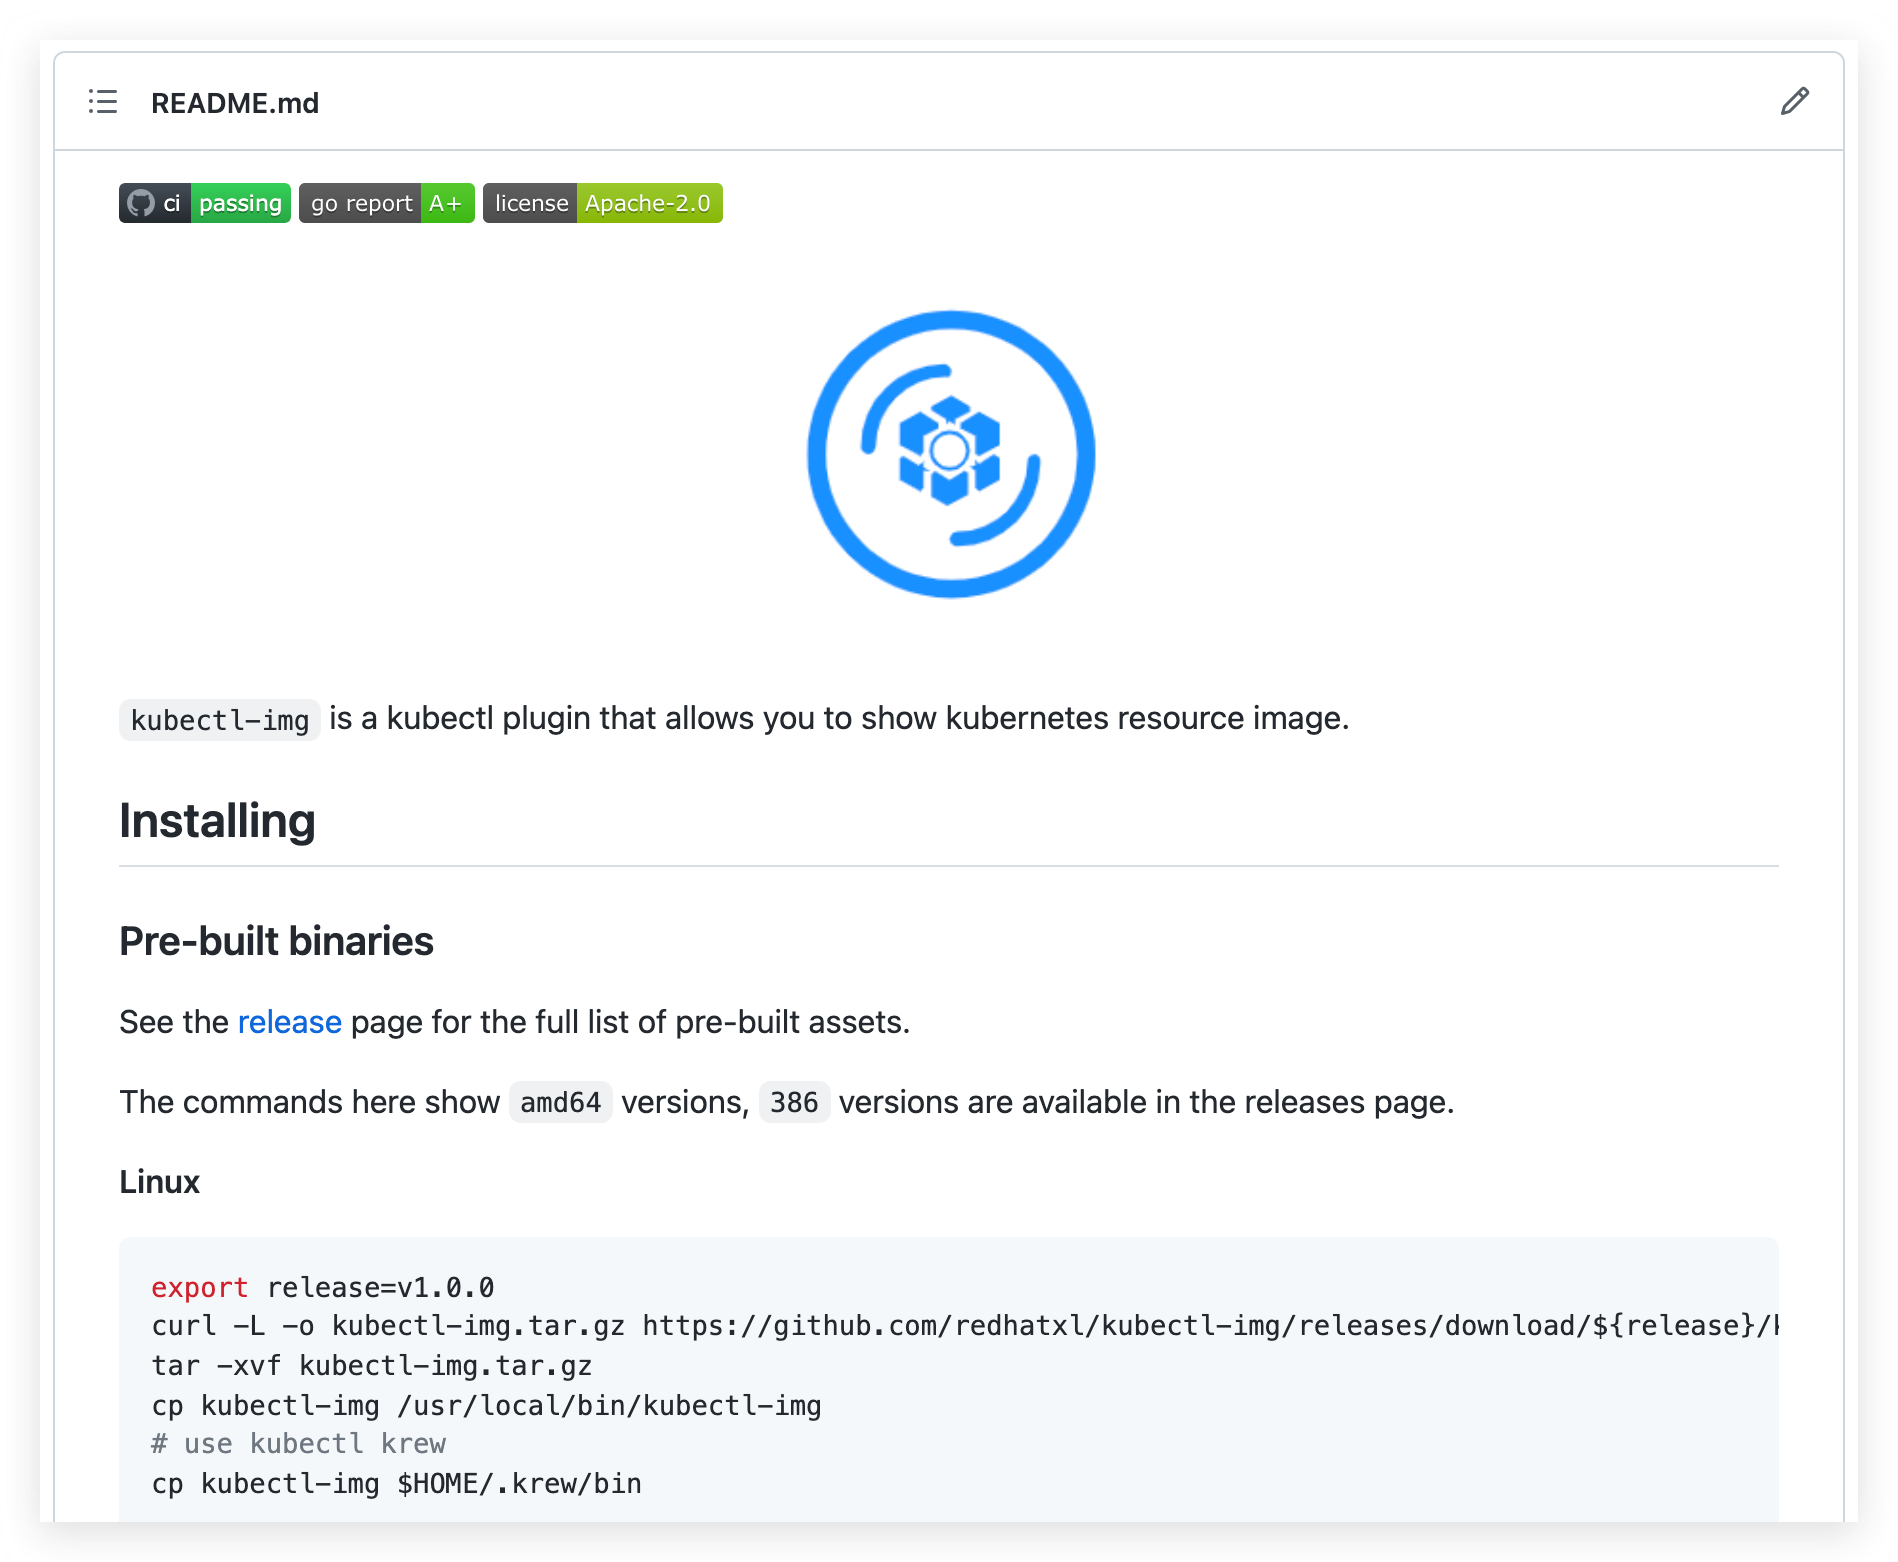
在项目 README 中添加不同平台的安装方式。
Linux
export release=v1.0.0
curl -L -o kubectl-img.tar.gz https://github.com/redhatxl/kubectl-img/releases/download/${release}/kubectl-img_${release}_Linux_arm64.tar.gz
tar -xvf kubectl-img.tar.gz
cp kubectl-img /usr/local/bin/kubectl-img
# use kubectl krew
cp kubectl-img $HOME/.krew/bin
OSX
export release=v1.0.0
curl -L -o kubectl-img.tar.gz https://github.com/redhatxl/kubectl-img/releases/download/${release}/kubectl-img_${release}_Darwin_x86_64.tar.gz
tar -xvf kubectl-img.tar.gz
mv kubectl-img /usr/local/bin/kubectl-img
# use kubectl krew
cp kubectl-img $HOME/.krew/bin
Windows
In PowerShell v5+
$url = "https://github.com/redhatxl/kubectl-img/releases/download/v1.0.0/kubectl-img_1.0.0_Windows_x86_64.tar.gz"
$output = "$PSScriptRoot\kubectl-img.zip"

Invoke-WebRequest -Uri $url -OutFile $output
Expand-Archive "$PSScriptRoot\kubectl-img.zip" -DestinationPath "$PSScriptRoot\kubectl-img"这里介绍一个展示 Badges 的神器:https://shields.io/ 。这个网站提供各种各样的 Badges ,如果你愿意,完全可以把你的 GitHub README.md 填满,有兴趣的同学可以自取。
目前实现的比较简单,以此来抛砖引玉的功能,后期可以进行更多功能或其他插件的开发,自己动手丰衣足食。从技术角度看,以容器、微服务以及动态编排为代表的云原生技术蓬勃发展,成为赋能业务创新的重要推动力,并已经应用到企业核心业务。从市场角度看,云原生技术已在金融、制造、互联网等多个行业得到广泛验证,支持的业务场景也愈加丰富,行业生态日渐繁荣。
本文从日常工作中最小的切入点,从 0 到 1 实战 K8s 插件开发并开源的思路及过程,希望相关同学可以一块交流学习。最近由于业务开发 Operator,也在研读 K8s 控制器相关代码,并做了一些自己的笔记,有兴趣的可以一块交流学习,博客地址 :kaliarch blog。
本文由博客一文多发平台 OpenWrite 发布!
我正在学习如何使用Nokogiri,根据这段代码我遇到了一些问题:require'rubygems'require'mechanize'post_agent=WWW::Mechanize.newpost_page=post_agent.get('http://www.vbulletin.org/forum/showthread.php?t=230708')puts"\nabsolutepathwithtbodygivesnil"putspost_page.parser.xpath('/html/body/div/div/div/div/div/table/tbody/tr/td/div
我有一个Ruby程序,它使用rubyzip压缩XML文件的目录树。gem。我的问题是文件开始变得很重,我想提高压缩级别,因为压缩时间不是问题。我在rubyzipdocumentation中找不到一种为创建的ZIP文件指定压缩级别的方法。有人知道如何更改此设置吗?是否有另一个允许指定压缩级别的Ruby库? 最佳答案 这是我通过查看rubyzip内部创建的代码。level=Zlib::BEST_COMPRESSIONZip::ZipOutputStream.open(zip_file)do|zip|Dir.glob("**/*")d
类classAprivatedeffooputs:fooendpublicdefbarputs:barendprivatedefzimputs:zimendprotecteddefdibputs:dibendendA的实例a=A.new测试a.foorescueputs:faila.barrescueputs:faila.zimrescueputs:faila.dibrescueputs:faila.gazrescueputs:fail测试输出failbarfailfailfail.发送测试[:foo,:bar,:zim,:dib,:gaz].each{|m|a.send(m)resc
很好奇,就使用rubyonrails自动化单元测试而言,你们正在做什么?您是否创建了一个脚本来在cron中运行rake作业并将结果邮寄给您?git中的预提交Hook?只是手动调用?我完全理解测试,但想知道在错误发生之前捕获错误的最佳实践是什么。让我们理所当然地认为测试本身是完美无缺的,并且可以正常工作。下一步是什么以确保他们在正确的时间将可能有害的结果传达给您? 最佳答案 不确定您到底想听什么,但是有几个级别的自动代码库控制:在处理某项功能时,您可以使用类似autotest的内容获得关于哪些有效,哪些无效的即时反馈。要确保您的提
假设我做了一个模块如下:m=Module.newdoclassCendend三个问题:除了对m的引用之外,还有什么方法可以访问C和m中的其他内容?我可以在创建匿名模块后为其命名吗(就像我输入“module...”一样)?如何在使用完匿名模块后将其删除,使其定义的常量不再存在? 最佳答案 三个答案:是的,使用ObjectSpace.此代码使c引用你的类(class)C不引用m:c=nilObjectSpace.each_object{|obj|c=objif(Class===objandobj.name=~/::C$/)}当然这取决于
我正在尝试使用ruby和Savon来使用网络服务。测试服务为http://www.webservicex.net/WS/WSDetails.aspx?WSID=9&CATID=2require'rubygems'require'savon'client=Savon::Client.new"http://www.webservicex.net/stockquote.asmx?WSDL"client.get_quotedo|soap|soap.body={:symbol=>"AAPL"}end返回SOAP异常。检查soap信封,在我看来soap请求没有正确的命名空间。任何人都可以建议我
关闭。这个问题是opinion-based.它目前不接受答案。想要改进这个问题?更新问题,以便editingthispost可以用事实和引用来回答它.关闭4年前。Improvethisquestion我想在固定时间创建一系列低音和高音调的哔哔声。例如:在150毫秒时发出高音调的蜂鸣声在151毫秒时发出低音调的蜂鸣声200毫秒时发出低音调的蜂鸣声250毫秒的高音调蜂鸣声有没有办法在Ruby或Python中做到这一点?我真的不在乎输出编码是什么(.wav、.mp3、.ogg等等),但我确实想创建一个输出文件。
我在我的项目目录中完成了compasscreate.和compassinitrails。几个问题:我已将我的.sass文件放在public/stylesheets中。这是放置它们的正确位置吗?当我运行compasswatch时,它不会自动编译这些.sass文件。我必须手动指定文件:compasswatchpublic/stylesheets/myfile.sass等。如何让它自动运行?文件ie.css、print.css和screen.css已放在stylesheets/compiled。如何在编译后不让它们重新出现的情况下删除它们?我自己编译的.sass文件编译成compiled/t
我想将html转换为纯文本。不过,我不想只删除标签,我想智能地保留尽可能多的格式。为插入换行符标签,检测段落并格式化它们等。输入非常简单,通常是格式良好的html(不是整个文档,只是一堆内容,通常没有anchor或图像)。我可以将几个正则表达式放在一起,让我达到80%,但我认为可能有一些现有的解决方案更智能。 最佳答案 首先,不要尝试为此使用正则表达式。很有可能你会想出一个脆弱/脆弱的解决方案,它会随着HTML的变化而崩溃,或者很难管理和维护。您可以使用Nokogiri快速解析HTML并提取文本:require'nokogiri'h
我想为Heroku构建一个Rails3应用程序。他们使用Postgres作为他们的数据库,所以我通过MacPorts安装了postgres9.0。现在我需要一个postgresgem并且共识是出于性能原因你想要pggem。但是我对我得到的错误感到非常困惑当我尝试在rvm下通过geminstall安装pg时。我已经非常明确地指定了所有postgres目录的位置可以找到但仍然无法完成安装:$envARCHFLAGS='-archx86_64'geminstallpg--\--with-pg-config=/opt/local/var/db/postgresql90/defaultdb/po