很早安装了,过来记录下。
ELK 是三个开源框架的简写,分别是:Elasticsearch、Logstash、Kibana 。
框架 简介 作用
Elasticsearch开源分布式搜索引擎,提供存储、分析、搜索功能。特点:分布式、基于reasful风格、支持海量高并发的准实时搜索场景、稳定、可靠、快速、使用方便等。 接收搜集的海量结构化日志数据,并提供给Kibana查询分析。
Logstash开源日志搜集、分析、过滤框架,支持多种数据输入输出方式。 用于收集日志,对日志进行过滤形成结构化数据,并转发到Elasticsearch中。
Kibana开源日志报表系统,对Elasticsearch以及Logstash有良好的web页面支持。 对Elasticsearch提供的数据进行分析展示。
官网下载地址:
https://www.elastic.co/cn/downloads/elasticsearch
国内镜像源(华为):https://mirrors.huaweicloud.com/elasticsearch/
选择合适的版本下载(推荐下载自带 JDK 的版本,否者自己配置的 JDK 可能不符合版本要求。注意:Elasticsearch, 会优先使用系统配置的 JDK 。可将 Elasticsearch 自带的 JDK 配置到系统的环境变量中,如果不这样做的话,在安装 Logstash 时,启动会报没有配置 JDK 环境变量的错误。)
wget https://mirrors.huaweicloud.com/elasticsearch/7.8.0/elasticsearch-7.8.0-linux-x86_64.tar.gz

进入安装目录
[root@localhost ~]# cd /usr/local/elk/elasticsearch-7.8.0/
修改config/elasticsearch.yml
[root@localhost elasticsearch-7.8.0]# vim /config/elasticsearch.yml
添加以下几项:
# network.host: 172.22.170.131  #主机地址,这里写本机IP
http.port: 9200   #端口
http.cors.enabled: true   #设置跨域
http.cors.allow-origin: "*"  #设置访问

ES为了安全考虑不允许使用root用户启动ElasticSearch,所以需要新建一个普通用户启动程序
Linux用户与组介绍 :https://www.runoob.com/linux/linux-user-manage.html
–添加用户 es
[root@localhost elasticsearch-7.8.0]# adduser es
–将对应的文件夹权限赋予用户 es
[root@localhost elasticsearch-7.8.0]# chown -R es /usr/local/elasticsearch
—切换至用户 es
[root@localhost elasticsearch-7.8.0]# su es
启动 ElasticSearch (-d 表示在后台启动)
[es@localhost elasticsearch-7.8.0]$ ./bin/elasticsearch -d
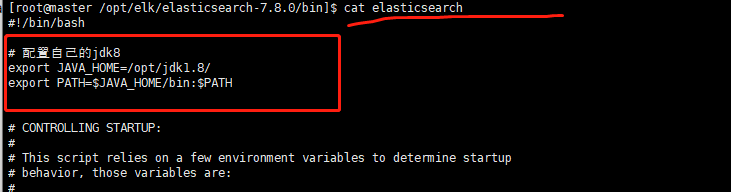
elasticsearch 启动需要jdk8以上,若低版本需配置:
[root@master /opt/elk/elasticsearch-7.8.0/bin]$ cat elasticsearch
# 配置自己的jdk8
export JAVA_HOME=/opt/jdk1.8/
export PATH=$JAVA_HOME/bin:$PATH

# 下面应该不需要:
# 添加jdk判断
if [ -x "$JAVA_HOME/bin/java" ]; then
        JAVA="/opt/jdk1.8/bin/java"
else
        JAVA=`which java`
fi
机器本身的内存小 : ./bin/elasticsearch -d 显示 killed 修改: config目录下的
jvm.options文件 ,默认1g,根据机器调整
启动之后可能会报以下三个错误:
ERROR: [3] bootstrap checks failed [1]: max file descriptors [4096] for elasticsearch process is too low, increase to at least [65535]
[2]: max number of threads [3795] for user [es] is too low, increase to at least [4096]
[3]: max virtual memory areas vm.max_map_count [65530] is too low, increase to at least [262144]
解决方式:
需切换到root用户解决错误:切换到 root 用户
[es@localhost elasticsearch-7.8.0]$ su root
[1] 和 [2] 的解决方法:修改 /etc/security/limits.conf 文件
[root@localhost elasticsearch-7.8.0]# vim /etc/security/limits.conf
添加以下四行
* soft nofile 65536
* hard nofile 131072
* soft nproc 2048
* hard nproc 4096
[3] 的解决方法:修改 /etc/sysctl.conf 文件
[root@localhost elasticsearch-7.8.0]# vim /etc/sysctl.conf
添加下面一行
vm.max_map_count=655360
执行命令
[root@localhost elasticsearch-7.8.0]# sysctl -p
阿里云访问报错:
ERROR: [1] bootstrap checks failed
[1]: the default discovery settings are unsuitable for production use; at least one of [discovery.seed_hosts, discovery.seed_providers, cluster.initial_master_nodes] must be configured
解决:
编辑 elasticsearch.yml 添加如下:
node.name: hcg # 设置节点名
cluster.initial_master_nodes: ["hcg"] # 设置集群初始主节点

切换到用户 es 重新启动程序就可以了
注意: 防火墙需要开放9200端口 (我是关闭的)
[root@localhost elasticsearch-7.8.0]# firewall-cmd --permanent --add-port=9200/tcp
success
[root@localhost elasticsearch-7.8.0]# firewall-cmd --permanent --add-port=9200/udp
success
[root@localhost elasticsearch-7.8.0]# firewall-cmd --reload
success
浏览器访问:http://192.168.40.149:9200 或者: 控制台 访问 curl http://127.0.0.1:9200
开放阿里云端口:


准备环境,两种方式:1、 官网安装node(很慢),2、国内华为镜像
https://mirrors.huaweicloud.com/
wget https://nodejs.org/dist/v8.11.3/node-v8.11.3-linux-x64.tar.xz
[root@localhost elk]# tar -xf node-v8.11.3-linux-x64.tar.xz
[root@localhost node-v8.11.3-linux-x64]# vi /etc/profile

# 添加如下
export NODE_HOME=/usr/local/elk/node-v8.11.3-linux-x64
export PATH=$PATH:$NODE_HOME/bin

保存成功 :刷新环境变量
[root@localhost node-v8.11.3-linux-x64]# source /etc/profile

了解一下,npm是随同NodeJS一起安装的包管理工具,能解决NodeJS代码部署上的很多问题,新版的nodejs已经集成了npm,所以之前npm也一并安装好了;装其他工具的时候,也会用到。
使用 npm 命令安装Node.js模块的语法格式是:npm install
npm 的包安装分为本地安装(local)、全局安装(global)两种:npm install -g 为全局安装,安装包放在 /usr/local 或者node 的安装目录下,能直接在命令行使用的;不加-g为本地安装,安装包放在 ./node_modules目录下,上图就有这个目录。
卸载包:npm uninstall
国内直接使用 npm 的官方镜像是非常慢的,推荐使用淘宝 NPM 镜像,用此代替官方版本(只读);使用淘宝定制的 cnpm (gzip压缩支持) 命令行工具代替默认的 npm
npm install -g cnpm --registry=https://registry.npm.taobao.org这样就可以使用 cnpm 命令来安装模块了:
cnpm install [name]
grunt是基于Node.js的项目构建工具,可以进行打包压缩、测试、执行等等工作,elasticsearch-head插件就是通过grunt启动的。
[root@bogon elasticsearch-head-master]# npm install grunt --save-dev
npm WARN deprecated coffee-script@1.10.0: CoffeeScript on NPM has moved to "coffeescript" (no hyphen)
npm notice created a lockfile as package-lock.json. You should commit this file.
npm WARN elasticsearch-head@0.0.0 license should be a valid SPDX license expression

+ grunt@1.0.1
added 94 packages from 65 contributors and audited 162 packages in 13.303s
found 9 vulnerabilities (2 low, 2 moderate, 5 high)
  run `npm audit fix` to fix them, or `npm audit` for details
这里用-save-dev的原因是grunt是用于开发和测试中需要用到,项目开发完成后,执行时不依赖于它
安装 grunt-cli
Grunt-cli 只是一个命令行工具,用来执行,而不是 Grunt 这个工具本身
[root@bogon elasticsearch-head-master]# npm install -g grunt-cli
/usr/local/nodejs/bin/grunt -> /usr/local/nodejs/lib/node_modules/grunt-cli/bin/grunt
+ grunt-cli@1.3.2
added 150 packages from 121 contributors in 6.181s

法1:从官网github下载:https://github.com/mobz/elasticsearch-head
目录:下载/elasticsearch-head-master.zip
法2:命令下载:
wget https://github.com/mobz/elasticsearch-head/archive/master.zip
法3:git clone下载
git clone git://github.com/mobz/elasticsearch-head.git


修改elasticsearch-head安装目录下的配置文件Gruntfile.js,增加hostname属性,设置为*,注意冒号后面要空一格!
修改配置文件2
修改elasticsearch-head安装目录下的配置文件_site/app.js,这个文件挺长。文件有一段代码,默认用"http://localhost:9200",我们需要做的是,先确认这个http是否和Elasticsearch目录下的配置文件config/elasticsearch.yml 中的network.host 的值是否一致?如果人家是具体的IP地址,就把
elasticsearch-head-master/_site/app.js文件里面的这行做个替换;如果人家没有任何设置,就不需要替换,默认用localhost。
先备份:在app.js文件中先找到需要被替换的行,文件长,可以下载本地改完上传
[es@bogon ~]$ cat elasticsearch-head-master/_site/app.js | grep "this.base_uri = this.config.base_uri || this.prefs.get"

两种:1、 前台启动

#用es用户,进入elasticsearch-head-master目录
[es@bogon ~]$ cd elasticsearch-head-master

#启动 - 前台运行
[es@bogon elasticsearch-head-master]$ grunt server
>> Local Npm module "grunt-contrib-jasmine" not found. Is it installed?

Running "connect:server" (connect) task
Waiting forever...
Started connect web server on http://localhost:9100
#或者启动 - 后台运行
[es@bogon elasticsearch-head-master]$ grunt server &
#查看进程
[es@bogon elasticsearch-head-master]$ ps -ef |grep gruntes       31898 29760  0 20:54 pts/0    00:00:00 gruntes       32057 31986  0 20:58 pts/1    00:00:00 grep --color=auto grunt

华为镜像源:
https://mirrors.huaweicloud.com/kibana
选择合适的版本下载(和Elasticsearch版本保持一致)。
下载安装包
[root@localhost ~]# wget https://mirrors.huaweicloud.com/kibana/7.8.0/kibana-7.8.0-linux-x86_64.tar.gz
解压到当前目录
[root@localhost ~]# tar -zxvf kibana-7.8.0-linux-x86_64.tar.gz
重命名并移动到指定目录
[root@localhost ~]# mv ./kibana-7.8.0-linux-x86_64 /usr/local/kibana-7.8.0
[root@localhost kibana-7.8.0]# vim ./config/kibana.yml
必须是linux bash命令,格式错误启动报错: 坑
FATAL ValidationError: child “server” fails because [child “host” fails because [“host” must be a valid hostname]]
# 服务端口
server.port: 5601
# 服务器ip  本机
server.host: "0.0.0.0"
# Elasticsearch 服务地址
elasticsearch.hosts: ["http://localhost:9200"]
# 设置语言为中文
i18n.locale: "zh-CN"
给 es 用户授予 kibana 目录的权限
[root@localhost ~]# chown -R es /usr/local/kibana-7.8.0
切换用户
root@localhost ~]# su es
注意:启动 Kibana 之前需要先启动 Elasticsearch
需要先配置防火墙打开5601端口:
[root@localhost kibana-7.8.0]# firewall-cmd --permanent --add-port=5601/tcp
success
[root@localhost kibana-7.8.0]# firewall-cmd --permanent --add-port=5601/udp
success
[root@localhost kibana-7.8.0]# firewall-cmd --reload
success
前台启动方式
[es@localhost kibana-7.8.0]$ ./bin/kibana
后台启动方式
[es@localhost kibana-7.8.0]$ nohup ./bin/kibana &
访问地址:
http://haocg.top:5601/

kibana的进程:
启动kibana : nohup ./kibana &
查看启动日志 : tail -f nohup
kibana 使用 ps -ef|grep kibana 是查不到进程的,主要原因大概是因为 kibana 是node写的。所以kibana 运行的时候是运行在node 里面。
netstat -tunlp|grep 5601
华为镜像源:
https://mirrors.huaweicloud.com/logstash
选择合适版本的安装包(和 Elasticsearch 保持一致)。
wget https://mirrors.huaweicloud.com/logstash/7.8.0/logstash-7.8.0.tar.gz
[root@localhost ~]# tar -zxvf logstash-7.8.0.tar.gz
** 移动到指定目录**
[root@localhost ~]# mv ./logstash-7.8.0 /usr/local/logstash-7.8.0
根据原有的 logstash-sample.conf 配置文件复制出一个新的配置文件并修改。
[root@localhost logstash-7.8.0]# cp config/logstash-sample.conf config/logstash-es.conf
修改配置文件logstash-es.conf
[root@localhost logstash-7.8.0]# vim config/logstash-es.conf
修改成如下内容:
input {
  tcp {
    port => 9601
    codec => json_lines
  }
}

output {
  elasticsearch {
    hosts => ["http://localhost:9200"]
  }
  stdout {
  	codec => rubydebug
  }
}
配置文件logstash-es.conf内容说明:
input {										# input输入源配置
tcp {										# 使用tcp输入源
    port => 9601							# 服务器监听端口9061接收日志,默认ip localhost
    codec => json_lines						# 使用json解析日志  需要安装json解析插件
     }
     }

output {									# output 数据输出配置
elasticsearch {						     	# 使用elasticsearch接收
    hosts => ["http://localhost:9200"]		# 集群地址 多个用,隔开
     }
      stdout {   	codec => rubydebug		 # 输出到命令窗口
              }
      }
由于国内无法访问默认的gem source,需要将gem source改为国内的源。
[root@master /opt/elk/logstash-7.8.0/bin]$ ./logstash-plugin install logstash-input-jdbc

 Validating logstash-input-jdbc
ERROR: Installation aborted, plugin 'logstash-input-jdbc' is already provided by 'logstash-integration-jdbc'
修改Gemfile
[root@localhost logstash-7.8.0]# vim Gemfile
将source这一行改成如下所示:
source "https://gems.ruby-china.com"
下载mysql-jdbc插件

[root@localhost logstash-7.8.0]# ./bin/logstash-plugin install logstash-codec-json_lines
如果报以下错误,请检查是否已经配置了 JDK 环境变量。
could not find java; set JAVA_HOME or ensure java is in PATH
配置 JDK 环境变量可参考此文章:Linux 安装并配置JDK环境变量
后台启动Logstash
[root@localhost logstash-7.8.0]# nohup ./bin/logstash -f ./config/logstash-es.conf &
或者验证控制台:
[root@localhost logstash-7.8.0]# ./bin/logstash -e 'input { stdin { } } output { stdout {} }'
控制台验证 导入es库中
[root@localhost logstash-7.8.0]# ./bin/logstash -e 'input { stdin { } } output {elasticsearch { hosts => ["localhost:9200"]} stdout {codec => rubydebug } }'
1、编写配置文件
[root@master /opt/elk/logstash-7.8.0/config]$ cat logstash-mysql-jdbc.conf
# Sample Logstash configuration for creating a simple
# Beats -> Logstash -> Elasticsearch pipeline.


input {
  stdin {
  }
  jdbc {
  jdbc_connection_string => "jdbc:mysql://101.101.61.47:3306/sd_deal_platform"
  jdbc_user => "root"
  jdbc_password => "123%"
  jdbc_driver_library => "/opt/elk/logstash-7.8.0/driver_jar/mysql-connector-java-6.0.6.jar"
  jdbc_driver_class => "com.mysql.jdbc.Driver"
  statement => "SELECT * FROM ncs_number limit 1000"
  type => "test"
  }
}
output {
  elasticsearch {
    hosts => "localhost:9200"
    index => "world"
    document_id => "%{id}"
  }
  stdout {
    codec => json_lines
  }
}


[root@master /opt/elk/logstash-7.8.0/config]$
2、启动:
[root@master /opt/elk/logstash-7.8.0]$ ./bin/logstash -f config/logstash-mysql-jdbc.conf
我想为Heroku构建一个Rails3应用程序。他们使用Postgres作为他们的数据库,所以我通过MacPorts安装了postgres9.0。现在我需要一个postgresgem并且共识是出于性能原因你想要pggem。但是我对我得到的错误感到非常困惑当我尝试在rvm下通过geminstall安装pg时。我已经非常明确地指定了所有postgres目录的位置可以找到但仍然无法完成安装:$envARCHFLAGS='-archx86_64'geminstallpg--\--with-pg-config=/opt/local/var/db/postgresql90/defaultdb/po
我打算为ruby脚本创建一个安装程序,但我希望能够确保机器安装了RVM。有没有一种方法可以完全离线安装RVM并且不引人注目(通过不引人注目,就像创建一个可以做所有事情的脚本而不是要求用户向他们的bash_profile或bashrc添加一些东西)我不是要脚本本身,只是一个关于如何走这条路的快速指针(如果可能的话)。我们还研究了这个很有帮助的问题:RVM-isthereawayforsimpleofflineinstall?但有点误导,因为答案只向我们展示了如何离线在RVM中安装ruby。我们需要能够离线安装RVM本身,并查看脚本https://raw.github.com/wayn
我有一个奇怪的问题:我在rvm上安装了rubyonrails。一切正常,我可以创建项目。但是在我输入“railsnew”时重新启动后,我有“程序'rails'当前未安装。”。SystemUbuntu12.04ruby-v"1.9.3p194"gemlistactionmailer(3.2.5)actionpack(3.2.5)activemodel(3.2.5)activerecord(3.2.5)activeresource(3.2.5)activesupport(3.2.5)arel(3.0.2)builder(3.0.0)bundler(1.1.4)coffee-rails(
我刚刚为fedora安装了emacs。我想用emacs编写ruby。为ruby提供代码提示、代码完成类型功能所需的工具、扩展是什么? 最佳答案 ruby-mode已经包含在Emacs23之后的版本中。不过,它也可以通过ELPA获得。您可能感兴趣的其他一些事情是集成RVM、feature-mode(Cucumber)、rspec-mode、ruby-electric、inf-ruby、rinari(用于Rails)等。这是我当前用于Ruby开发的Emacs配置:https://github.com/citizen428/emacs
我正在尝试在我的centos服务器上安装therubyracer,但遇到了麻烦。$geminstalltherubyracerBuildingnativeextensions.Thiscouldtakeawhile...ERROR:Errorinstallingtherubyracer:ERROR:Failedtobuildgemnativeextension./usr/local/rvm/rubies/ruby-1.9.3-p125/bin/rubyextconf.rbcheckingformain()in-lpthread...yescheckingforv8.h...no***e
我的最终目标是安装当前版本的RubyonRails。我在OSXMountainLion上运行。到目前为止,这是我的过程:已安装的RVM$\curl-Lhttps://get.rvm.io|bash-sstable检查已知(我假设已批准)安装$rvmlistknown我看到当前的稳定版本可用[ruby-]2.0.0[-p247]输入命令安装$rvminstall2.0.0-p247注意:我也试过这些安装命令$rvminstallruby-2.0.0-p247$rvminstallruby=2.0.0-p247我很快就无处可去了。结果:$rvminstall2.0.0-p247Search
我实际上是在尝试使用RVM在我的OSX10.7.5上更新ruby,并在输入以下命令后:rvminstallruby我得到了以下回复:Searchingforbinaryrubies,thismighttakesometime.Checkingrequirementsforosx.Installingrequirementsforosx.Updatingsystem.......Errorrunning'requirements_osx_brew_update_systemruby-2.0.0-p247',pleaseread/Users/username/.rvm/log/138121
由于fast-stemmer的问题,我很难安装我想要的任何rubygem。我把我得到的错误放在下面。Buildingnativeextensions.Thiscouldtakeawhile...ERROR:Errorinstallingfast-stemmer:ERROR:Failedtobuildgemnativeextension./System/Library/Frameworks/Ruby.framework/Versions/2.0/usr/bin/rubyextconf.rbcreatingMakefilemake"DESTDIR="cleanmake"DESTDIR=
这是一道面试题,我没有答对,但还是很好奇怎么解。你有N个人的大家庭,分别是1,2,3,...,N岁。你想给你的大家庭拍张照片。所有的家庭成员都排成一排。“我是家里的friend,建议家庭成员安排如下:”1岁的家庭成员坐在这一排的最左边。每两个坐在一起的家庭成员的年龄相差不得超过2岁。输入:整数N,1≤N≤55。输出:摄影师可以拍摄的照片数量。示例->输入:4,输出:4符合条件的数组:[1,2,3,4][1,2,4,3][1,3,2,4][1,3,4,2]另一个例子:输入:5输出:6符合条件的数组:[1,2,3,4,5][1,2,3,5,4][1,2,4,3,5][1,2,4,5,3][
我是Google云的新手,我正在尝试对其进行首次部署。我的第一个部署是RubyonRails项目。我基本上是在关注thisguideinthegoogleclouddocumentation.唯一的区别是我使用的是我自己的项目,而不是他们提供的“helloworld”项目。这是我的app.yaml文件runtime:customvm:trueentrypoint:bundleexecrackup-p8080-Eproductionconfig.ruresources:cpu:0.5memory_gb:1.3disk_size_gb:10当我转到我的项目目录并运行gcloudprevie


