
http://kafka.apache.org/downloads.html[ztx@hadoop102 kafka]$ cd config/
[ztx@hadoop102 config]$ vim server.properties
输入以下内容:
#broker的全局唯一编号,不能重复,只能是数字。
broker.id=0

#处理网络请求的线程数量
num.network.threads=3
#用来处理磁盘IO的线程数量
num.io.threads=8
#发送套接字的缓冲区大小
socket.send.buffer.bytes=102400
#接收套接字的缓冲区大小
socket.receive.buffer.bytes=102400
#请求套接字的缓冲区大小
socket.request.max.bytes=104857600

#kafka运行日志(数据)存放的路径,路径不需要提前创建,kafka自动帮你创建,可以配置多个磁盘路径,路径与路径之间可以用","分隔
log.dirs=/opt/module/kafka/datas

#topic在当前broker上的分区个数
num.partitions=1
#用来恢复和清理data下数据的线程数量
num.recovery.threads.per.data.dir=1
# 每个topic创建时的副本数,默认时1个副本
offsets.topic.replication.factor=1
#segment文件保留的最长时间,超时将被删除
log.retention.hours=168
#每个segment文件的大小,默认最大1G
log.segment.bytes=1073741824
# 检查过期数据的时间,默认5分钟检查一次是否数据过期
log.retention.check.interval.ms=300000

#配置连接Zookeeper集群地址(在zk根目录下创建/kafka,方便管理)
zookeeper.connect=hadoop102:2181,hadoop103:2181,hadoop104:2181/kafka
需要设置的参数有:
broker.id
log.dirs
zookeeper.connect
/opt/module/kafka/config/server.properties中的broker.id=1、broker.id=2
注:broker.id不得重复,整个集群中唯一。
[ztx@hadoop103 module]$ vim kafka/config/server.properties
修改:
# The id of the broker. This must be set to a unique integer for each broker.
broker.id=1

[ztx@hadoop104 module]$ vim kafka/config/server.properties
修改:
# The id of the broker. This must be set to a unique integer for each broker.
broker.id=2
sudo vim /etc/profile.d/my_env.sh
#KAFKA_HOME
export KAFKA_HOME=/opt/module/kafka
export PATH= P A T H : PATH: PATH:KAFKA_HOME/bin
source /etc/profile
ztx@hadoop102 module]$ sudo /home/atguigu/bin/xsync /etc/profile.d/my_env.sh
[ztx@hadoop103 module]$ source /etc/profile
[ztx@hadoop104 module]$ source /etc/profile
[ztx@hadoop102 kafka]$ zk.sh start
[ztx@hadoop102 kafka]$ bin/kafka-server-start.sh -daemon config/server.properties
[ztx@hadoop103 kafka]$ bin/kafka-server-start.sh -daemon config/server.properties
[ztx@hadoop104 kafka]$ bin/kafka-server-start.sh -daemon config/server.properties
注意:配置文件的路径要能够到server.properties。
[ztx@hadoop102 kafka]$ bin/kafka-server-stop.sh
[ztx@hadoop103 kafka]$ bin/kafka-server-stop.sh
[ztx@hadoop104 kafka]$ bin/kafka-server-stop.sh
[ztx@hadoop102 bin]$ vim kf.sh
脚本如下:
#! /bin/bash

case $1 in
"start"){
    for i in hadoop102 hadoop103 hadoop104
    do
        echo " --------启动 $i Kafka-------"
        ssh $i "/opt/module/kafka/bin/kafka-server-start.sh -daemon /opt/module/kafka/config/server.properties"
    done
};;
"stop"){
    for i in hadoop102 hadoop103 hadoop104
    do
        echo " --------停止 $i Kafka-------"
        ssh $i "/opt/module/kafka/bin/kafka-server-stop.sh "
    done
};;
esac
[ztx@hadoop102 bin]$ chmod +x kf.sh
[ztx@hadoop102 ~]$ kf.sh start
[ztx@hadoop102 ~]$ kf.sh stop
注意:停止Kafka集群时,一定要等Kafka所有节点进程全部停止后再停止Zookeeper集群。因为Zookeeper集群当中记录着Kafka集群相关信息,Zookeeper集群一旦先停止,Kafka集群就没有办法再获取停止进程的信息,只能手动杀死Kafka进程了。
[ztx@hadoop102 kafka]$ bin/kafka-topics.sh
| 参数 | 描述 |
|---|---|
| –bootstrap-server <String: server toconnect to> | 连接的Kafka Broker主机名称和端口号 |
| –topic <String: topic> | 操作的topic名称 |
| –create | 创建主题 |
| –delete | 删除主题 |
| –alter | 修改主题 |
| –list | 查看所有主题 |
| –describe | 查看主题详细描述 |
| –partitions <Integer: # of partitions> | 设置分区数 |
| –replication-factor<Integer: replication factor> | 设置分区副本 |
| –config <String: name=value> | 更新系统默认的配置 |
[ztx@hadoop102 kafka]$ bin/kafka-topics.sh --bootstrap-server hadoop102:9092 --list
[ztx@hadoop102 kafka]$ bin/kafka-topics.sh --bootstrap-server hadoop102:9092 --create --partitions 1 --replication-factor 3 --topic first
选项说明:
–topic 定义topic名
–replication-factor 定义副本数
–partitions 定义分区数
[ztx@hadoop102 kafka]$ bin/kafka-topics.sh --bootstrap-server hadoop102:9092 --describe --topic first
[ztx@hadoop102 kafka]$ bin/kafka-topics.sh --bootstrap-server hadoop102:9092 --alter --topic first --partitions 3
[ztx@hadoop102 kafka]$ bin/kafka-topics.sh --bootstrap-server hadoop102:9092 --describe --topic first
[ztx@hadoop102 kafka]$ bin/kafka-topics.sh --bootstrap-server hadoop102:9092 --delete --topic first
[ztx@hadoop102 kafka]$ bin/kafka-console-producer.sh
| 参数 | 描述 |
|---|---|
| 描述 | |
| –bootstrap-server <String: server toconnect to> | 连接的Kafka Broker主机名称和端口号 |
| –topic <String: topic> | 操作的topic名称 |
[ztx@hadoop102 kafka]$ bin/kafka-console-producer.sh --bootstrap-server hadoop102:9092 --topic first
>hello world
>atguigu  atguigu
[ztx@hadoop102 kafka]$ bin/kafka-console-consumer.sh
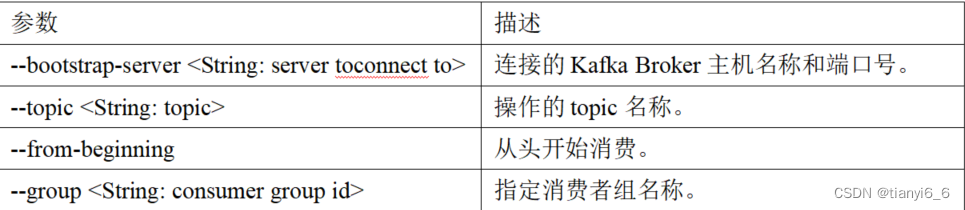
[ztx@hadoop102 kafka]$ bin/kafka-console-consumer.sh --bootstrap-server hadoop102:9092 --topic first
[ztx@hadoop102 kafka]$ bin/kafka-console-consumer.sh --bootstrap-server hadoop102:9092 --from-beginning --topic first
我想为Heroku构建一个Rails3应用程序。他们使用Postgres作为他们的数据库,所以我通过MacPorts安装了postgres9.0。现在我需要一个postgresgem并且共识是出于性能原因你想要pggem。但是我对我得到的错误感到非常困惑当我尝试在rvm下通过geminstall安装pg时。我已经非常明确地指定了所有postgres目录的位置可以找到但仍然无法完成安装:$envARCHFLAGS='-archx86_64'geminstallpg--\--with-pg-config=/opt/local/var/db/postgresql90/defaultdb/po
我打算为ruby脚本创建一个安装程序,但我希望能够确保机器安装了RVM。有没有一种方法可以完全离线安装RVM并且不引人注目(通过不引人注目,就像创建一个可以做所有事情的脚本而不是要求用户向他们的bash_profile或bashrc添加一些东西)我不是要脚本本身,只是一个关于如何走这条路的快速指针(如果可能的话)。我们还研究了这个很有帮助的问题:RVM-isthereawayforsimpleofflineinstall?但有点误导,因为答案只向我们展示了如何离线在RVM中安装ruby。我们需要能够离线安装RVM本身,并查看脚本https://raw.github.com/wayn
我有一个奇怪的问题:我在rvm上安装了rubyonrails。一切正常,我可以创建项目。但是在我输入“railsnew”时重新启动后,我有“程序'rails'当前未安装。”。SystemUbuntu12.04ruby-v"1.9.3p194"gemlistactionmailer(3.2.5)actionpack(3.2.5)activemodel(3.2.5)activerecord(3.2.5)activeresource(3.2.5)activesupport(3.2.5)arel(3.0.2)builder(3.0.0)bundler(1.1.4)coffee-rails(
我刚刚为fedora安装了emacs。我想用emacs编写ruby。为ruby提供代码提示、代码完成类型功能所需的工具、扩展是什么? 最佳答案 ruby-mode已经包含在Emacs23之后的版本中。不过,它也可以通过ELPA获得。您可能感兴趣的其他一些事情是集成RVM、feature-mode(Cucumber)、rspec-mode、ruby-electric、inf-ruby、rinari(用于Rails)等。这是我当前用于Ruby开发的Emacs配置:https://github.com/citizen428/emacs
我正在尝试在我的centos服务器上安装therubyracer,但遇到了麻烦。$geminstalltherubyracerBuildingnativeextensions.Thiscouldtakeawhile...ERROR:Errorinstallingtherubyracer:ERROR:Failedtobuildgemnativeextension./usr/local/rvm/rubies/ruby-1.9.3-p125/bin/rubyextconf.rbcheckingformain()in-lpthread...yescheckingforv8.h...no***e
我的最终目标是安装当前版本的RubyonRails。我在OSXMountainLion上运行。到目前为止,这是我的过程:已安装的RVM$\curl-Lhttps://get.rvm.io|bash-sstable检查已知(我假设已批准)安装$rvmlistknown我看到当前的稳定版本可用[ruby-]2.0.0[-p247]输入命令安装$rvminstall2.0.0-p247注意:我也试过这些安装命令$rvminstallruby-2.0.0-p247$rvminstallruby=2.0.0-p247我很快就无处可去了。结果:$rvminstall2.0.0-p247Search
我实际上是在尝试使用RVM在我的OSX10.7.5上更新ruby,并在输入以下命令后:rvminstallruby我得到了以下回复:Searchingforbinaryrubies,thismighttakesometime.Checkingrequirementsforosx.Installingrequirementsforosx.Updatingsystem.......Errorrunning'requirements_osx_brew_update_systemruby-2.0.0-p247',pleaseread/Users/username/.rvm/log/138121
由于fast-stemmer的问题,我很难安装我想要的任何rubygem。我把我得到的错误放在下面。Buildingnativeextensions.Thiscouldtakeawhile...ERROR:Errorinstallingfast-stemmer:ERROR:Failedtobuildgemnativeextension./System/Library/Frameworks/Ruby.framework/Versions/2.0/usr/bin/rubyextconf.rbcreatingMakefilemake"DESTDIR="cleanmake"DESTDIR=
我是Google云的新手,我正在尝试对其进行首次部署。我的第一个部署是RubyonRails项目。我基本上是在关注thisguideinthegoogleclouddocumentation.唯一的区别是我使用的是我自己的项目,而不是他们提供的“helloworld”项目。这是我的app.yaml文件runtime:customvm:trueentrypoint:bundleexecrackup-p8080-Eproductionconfig.ruresources:cpu:0.5memory_gb:1.3disk_size_gb:10当我转到我的项目目录并运行gcloudprevie
当我尝试安装Ruby时遇到此错误。我试过查看this和this但无济于事➜~brewinstallrubyWarning:YouareusingOSX10.12.Wedonotprovidesupportforthispre-releaseversion.Youmayencounterbuildfailuresorotherbreakages.Pleasecreatepull-requestsinsteadoffilingissues.==>Installingdependenciesforruby:readline,libyaml,makedepend==>Installingrub