目录
1.后端程序 2.数据库
1.JDBC 2. MyBatis
JDBC 的操作流程:
1. 创建数据库连接池 DataSource 2. 通过 DataSource 获取数据库连接 Connection 3. 编写要执⾏带 ? 占位符的 SQL 语句 4. 通过 Connection 及 SQL 创建操作命令对象 Statement 5. 替换占位符:指定要替换的数据库字段类型,占位符索引及要替换的值 6. 使⽤ Statement 执⾏ SQL 语句 7. 查询操作:返回结果集 ResultSet,更新操作:返回更新的数量 8. 处理结果集 9. 释放资源
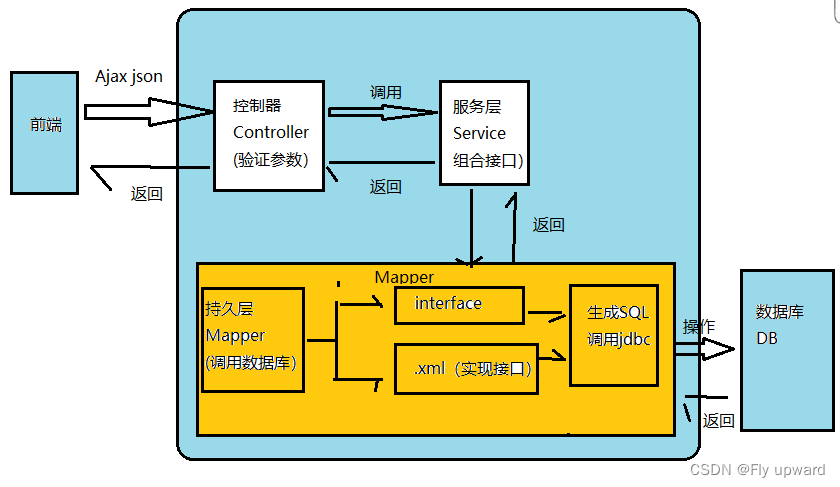
1. 将输⼊数据(即传⼊对象)+SQL 映射成原⽣ SQL 2. 将结果集映射为返回对象,即输出对象ORM 把数据库映射为对象: 数据库表(table)--> 类(class) 记录(record,⾏数据)--> 对象(object) 字段(field) --> 对象的属性(attribute)
⼀般的 ORM 框架,会将数据库模型的每张表都映射为⼀个 Java 类。 也就是说使⽤ MyBatis 可以像操作对象⼀样来操作数据库中的表,可以实现对象和数据库表之间的转换。
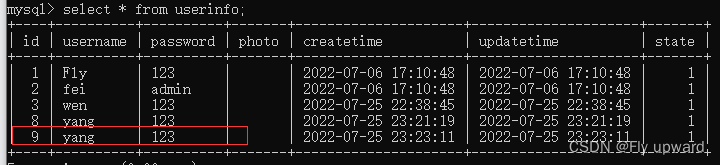
使⽤ MyBatis 的⽅式来读取⽤户表中的所有⽤户
创建用户表
drop table if exists  userinfo;
create table userinfo(
    id int primary key auto_increment,
    username varchar(100) not null,
    password varchar(32) not null,
    photo varchar(500) default '',
    createtime datetime default now(),
    updatetime datetime default now(),
    `state` int default 1
) default charset 'utf8mb4';
在创建新项目时,来到这一步,只需将下面的勾选即可

在 pom.xml 文件页面 鼠标右键进行下面操作


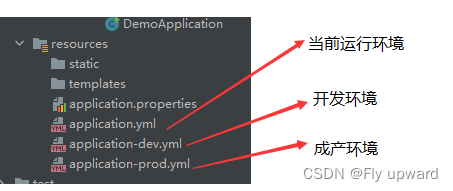
将当前运行环境选择开发环境的配置
application-dev.yml
#开发环境
#配置数据库连接
spring:
  datasource:
    url: jdbc:mysql://127.0.0.1:3306/myblog?characterEncoding=utf8
    username: root
    password: 123456
    driver-class-name: com.mysql.cj.jdbc.Driver

# 开启 MyBatis SQL 打印
logging:
  level:
    com:
      example:
        demo: debug
mybatis:
  configuration:
    log-impl: org.apache.ibatis.logging.stdout.StdOutImpl
application.yml
选择开发环境
spring:
  profiles:
active: dev#配置mybatis xml 保存路径
mybatis:
mapper-locations: classpsth:mybatis/**Mapper.xml
先添加用户实体类
/**
 * 普通用户实体类
 */
@Data
public class UserInfo {
    private Integer id;
    private String name;
    private String password;
    private String photo;
    private String createtime;
    private String updatetime;
    private int state;
}数据持久层的接口定义:
/**
 * 实现数据库映射
 */

@Mapper
public interface UserMapper {
    //查询用户 ID
    public UserInfo getUserById(@Param("id") Integer id);
}数据持久层的实现,mybatis 的固定 xml 格式
<?xml version="1.0" encoding="UTF-8"?>
<!DOCTYPE mapper PUBLIC "-//mybatis.org//DTD Mapper 3.0//EN" "http://mybatis.org/dtd/mybatis-3-mapper.dtd">
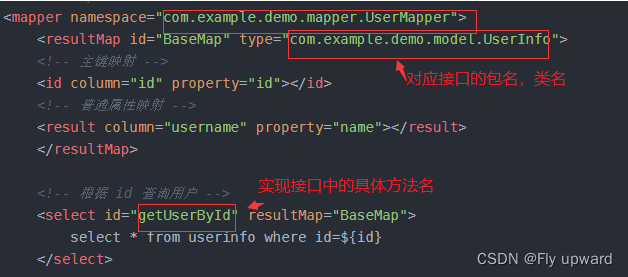
<!-- namespace 要设置是实现接口的具体包名加类名 -->
<mapper namespace="com.example.demo.mapper.UserMapper">
</mapper><?xml version="1.0" encoding="UTF-8"?>
<!DOCTYPE mapper PUBLIC "-//mybatis.org//DTD Mapper 3.0//EN" "http://mybatis.org/dtd/mybatis-3-mapper.dtd">
<!-- namespace 要设置是实现接口的具体包名加类名 -->
<mapper namespace="com.example.demo.mapper.UserMapper">
<resultMap id="BaseMap" type="com.example.demo.model.UserInfo">
<!-- 主键映射 -->
<id column="id" property="id"></id>
<!-- 普通属性映射 -->
<result column="username" property="name"></result>
</resultMap>
<!-- 根据 id 查询用户 -->
<select id="getUserById" resultMap="BaseMap">
select * from userinfo where id=${id}
</select>
</mapper>标签说明:
决定调用哪个mapper
@Service
public class UserService {

    @Resource
    private UserMapper userMapper;

    public UserInfo getUserById(Integer id) {
        return userMapper.getUserById(id);
    }

}@Controller
@ResponseBody
@RequestMapping("/user")
public class UserController {
@Autowired
private UserService userService;
@RequestMapping("/getuserbyid")
public UserInfo getUserById(Integer id) {
if (id == null) return null;
return userService.getUserById(id);
}
}
在 UserMapper 中增加修改的代码
    //修改方法根据 ID 修改名称
    public int update(@Param("id") Integer id,
                      @Param("name") String username);
UserMapper.xml 中增加接口的实现标签和具体的执行SQL
    <update id="update" >
        update userinfo set username=#{name} where id=#{id}
    </update>
通过单元测试,实现成功
   @Test
    void update() {
        int result = userMapper.update(2,"fei");
        Assertions.assertEquals(1,result);
    }
查询SQL语句可知,已经修改了
如果仅仅是为了测试功能是否实现,而不修改数据库中的内容,可以加入注解 @Transactional
    @Test
    @Transactional // 添加此注解后,执行完单元测试,不会修改数据库中的内容,即事务回滚
    void update() {
        int result = userMapper.update(2,"fei");
        Assertions.assertEquals(1,result);
}在 UserMapper 中增加删除的代码
    //删除方法
    public int del(@Param("id") Integer id);
UserMapper.xml 中增加接口的实现标签和具体的执行SQL
    <!--删除操作-->
    <delete id="del">
        delete from userinfo where id=#{id};
    </delete>
单元测试
    @Test
    @Transactional
    void del() {
        int result = userMapper.del(2);
        System.out.println("删除行数: " + result);
        Assertions.assertEquals(1,result);
    }
在 UserMapper 中添加增加的代码
    //增加用户方法
    // 传过来的是对象而不是某个成员变量
    public int add(UserInfo userInfo);
UserMapper.xml 中增加接口的实现标签和具体的执行SQL
    <!--增加操作,返回受影响的行数-->
    <insert id="add">
        insert into userinfo(username,password,photo)
        values(#{username}, #{password}, #{photo}); <!--和对象里面的属性一一对应-->
    </insert>
单元测试
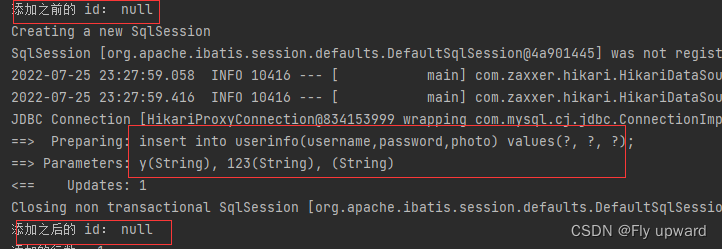
    @Test
    //@Transactional
    void add() {
        UserInfo userInfo = new UserInfo();
        userInfo.setName("y");
        userInfo.setPassword("123");
        userInfo.setPhoto("");
        System.out.println("添加之前的 id: " + userInfo.getId());
        int result = userMapper.add(userInfo);
        System.out.println("添加之后的 id: " + userInfo.getId());
        System.out.println("添加的行数: " + result);
        Assertions.assertEquals(1,result);
    }
在 UserMapper 中添加增加的代码
    //添加用户,返回自增ID
    public int addGetId(UserInfo userInfo);
UserMapper.xml 中增加接口的实现标签和具体的执行SQL
    <!--增加操作,返回受影响的行数和自增ID-->
    <insert id="addGetId" useGeneratedKeys="true" keyProperty="id" keyColumn="id">
        insert into userinfo(username,password,photo)
        values(#{name}, #{password}, #{photo}); <!--和对象里面的属性一一对应-->
    </insert>
单元测试
    @Test
    //@Transactional
    void addGetId() {
        UserInfo userInfo = new UserInfo();
        userInfo.setName("yang");
        userInfo.setPassword("123");
        userInfo.setPhoto("");
        System.out.println("添加之前的 id: " + userInfo.getId());
        int result = userMapper.addGetId(userInfo);
        System.out.println("添加之后的 id: " + userInfo.getId());
        System.out.println("添加的行数: " + result);
        Assertions.assertEquals(1,result);
    }
#{}:预编译处理 。处理时,成一个 问号? ,赋值时会加上 单引号 ‘ ’
${}:字符直接替换
区别:
1.定义不同 预编译处理是指:MyBatis 在处理#{}时,会将 SQL 中的 #{} 替换为?号,使⽤ PreparedStatement 的set ⽅法来赋值。 直接替换:是MyBatis 在处理 ${} 时,就是把 ${} 替换成变量的值。 2.使用不同:#{} 适用于所有类型的参数匹配,但${} 只适用于数值类型 3.安全性不同:#{} 性能高,并且没有安全问题;但 ${} 存在SQL注入的安全问题
    <select id="gerUserFullById" resultType="com.example.demo.model.UserInfo">
        select * from userinfo where username=#{name}
    </select>
@Test
void gerUserFullById() {
UserInfo userInfo = userMapper.gerUserFullById("fei");
System.out.println("userInfo: " + userInfo);
}
${}:字符直接替换
不加任何符合,直接替换上去,连成一个SQL 命令
    <select id="gerUserFullById" resultType="com.example.demo.model.UserInfo">
        select * from userinfo where username=${name}
    </select>
单元测试结果

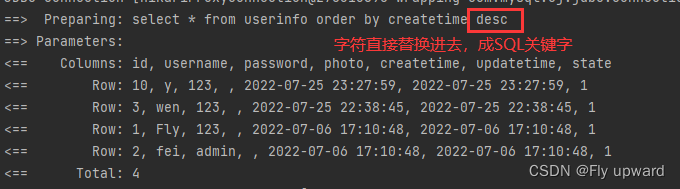
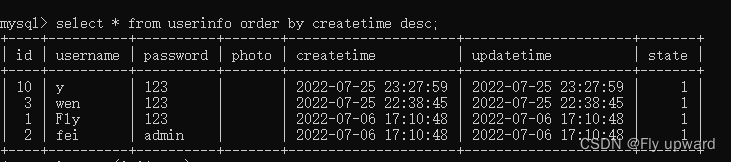
//对用户进行排序
    public List<UserInfo> getOrderList(@Param("order") String order);
此处使用的是 ${}, 如果使用 #{} 的话,会编译出错,因为它会把 desc 当成 ‘desc’ 一个value 值来使用,不构成一个 SQL命令语句
    <select id="getOrderList" resultType="com.example.demo.model.UserInfo">
        select * from userinfo order by createtime ${order}
    </select>
单元测试
    @Test
    void getOrderList() {
        List<UserInfo> list = userMapper.getOrderList("desc");
        log.info("列表: " + list);
    }
    //登录功能
    public UserInfo login(@Param("name") String username,
                          @Param("password") String password);
1) 在使用${} 时,需要加单引号,因为是直接替换
    <select id="login" resultType="com.example.demo.model.UserInfo">
        select * from userinfo where username='${name}' and password='${password}';
    </select>
单元测试
    @Test
    void login() {
        String username = "Fly";
        String password = "";
        UserInfo userInfo = userMapper.login(username,password);
        log.info("用户信息: " + userInfo);

    }
使用 " 'or 1=' 1" 时,SQL注入,密码会泄露,如下,因此在登录时应使用#{}
    @Test
    void login() {
        String username = "Fly";
        //String password = "";
        String password = "'or 1='1";
        UserInfo userInfo = userMapper.login(username,password);
        log.info("用户信息: " + userInfo);

    }
2)#{} 预编译处理,不会出现密码泄露
    <!--登录功能-->
    <select id="login" resultType="com.example.demo.model.UserInfo">
        <!--select * from userinfo where username='${name}' and password='${password}'; -->
        select * from userinfo where username=#{name} and password=#{password};
</select> 
    //like 模糊查询
    public List<UserInfo> getUserByName(@Param("name") String username);
1)直接使用 #{} 会报错
因为赋值时会加上单引号 ‘’
select * from userinfo where username like '%#{name}%'就相当于下面的语句,不符合查询条件
select * from userinfo where username like '%'name'%'2)使用${} 是不会报错,但在业务层的值不能穷举
3)#{} 在like中的正确用法,加上contat 拼接,演示如下

正确用法
因为#{} 在赋值的时候,会带上单引号‘’ ,所以下面的#{}不需要带单引号
    <!--like 模糊查询-->
    <select id="getUserByName" resultType="com.example.demo.model.UserInfo">
        <!-- select * from userinfo where username like '%#{name}%'-->
        select * from userinfo where username like concat('%',#{name},'%')
    </select>
单元测试
    @Test
    void getUserByName() {
        String username = "l";
        List<UserInfo> list= userMapper.getUserByName(username);
        log.info("用户列表: " + list);
    }
绝大数查询场景可以使用 resultType 进行返回,如下
    <!-- 根据 id 查询用户 -->
    <select id="getUserById" resultType="com.example.demo.model.UserInfo">
        select * from userinfo where id=${id}
</select>字段名称和程序中的属性名不同的情况, 可使⽤ resultMap 配置映射; 一对一和一对多关系可以使用 resultMap 映射并查询数据

userMapper.xml 代码如下
    <!-- 根据 id 查询用户 -->
    <select id="getUserById" resultType="com.example.demo.model.UserInfo">
        select * from userinfo where id=${id}
    </select>
查询结果


userMapper.xml 代码如下
    <resultMap id="BaseMap" type="com.example.demo.model.UserInfo">
        <!--主键映射-->
        <id column="id" property="id"></id>
        <!--普通属性映射-->
        <result column="username" property="name"></result>
        <result column="password" property="password"></result>
        <result column="photo" property="photo"></result>
        <result column="createtime" property="createtime"></result>
        <result column="updatetime" property="updatetime"></result>

    </resultMap>

    <!-- 根据 id 查询用户 -->
    <select id="getUserById" resultMap="BaseMap">
        select * from userinfo where id=${id}
</select> @Test
void getUserById() {
UserInfo userInfo = userMapper.getUserById(1);
//Assertions.assertNotNull(userInfo);
log.info("查询行数:" + userInfo);
}查询结果

创建文章实体类 ArticleInfo
@Data
public class ArticleInfo {
    private int id;
    private String title;
    private String content;
    private String createtime;
    private String updatetime;
    private int uid;
    private int rcount;
    private int state;
    private UserInfo userInfo;
}
mapper 实现数据库映射 ArticleMapper
@Mapper
public interface ArticleMapper {
    //根据文章 id 获取文章
    public ArticleInfo getArticleById(@Param("id") Integer id); //文章id
}
数据库命令,数据持久层的实现, ArticleMapper.xml
<mapper namespace="com.example.demo.mapper.ArticleMapper">
    <resultMap id="BaseMap" type="com.example.demo.model.ArticleInfo">
        <!--主键映射-->
        <id column="id" property="id"></id>
        <!--普通属性映射-->
        <result column="title" property="title"></result>
        <result column="content" property="content"></result>
        <result column="createtime" property="createtime"></result>
        <result column="uid" property="uid"></result>
        <result column="rcount" property="rcount"></result>
        <result column="state" property="state"></result>
        <association property="userInfo"
                     resultMap="com.example.demo.mapper.UserMapper.BaseMap"
                     columnPrefix="u_"></association>
    </resultMap>

    <select id="getArticleById" resultMap="BaseMap">
       select a.*,u.* from articleinfo a left join userinfo u on a.uid=u.id
    </select>
</mapper>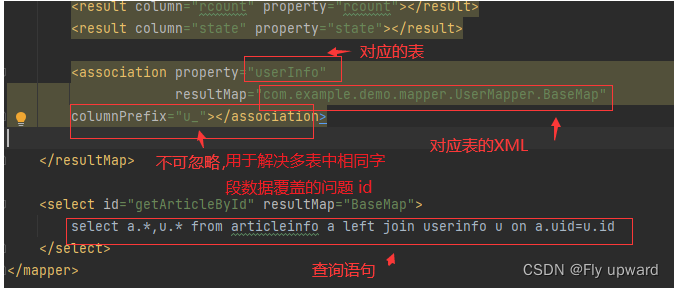
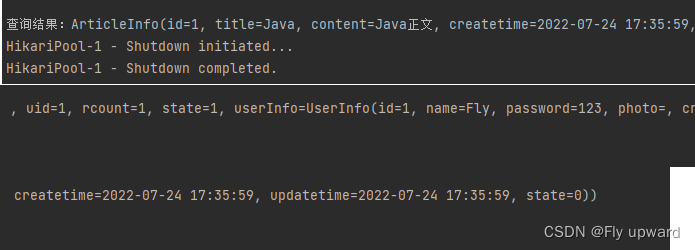
单元测试
    //将类属性注入
    @Resource
    private ArticleMapper articleMapper;

    @Test
    void getArticleById() {
        ArticleInfo articleInfo = articleMapper.getArticleById(1);
        log.info("查询结果:" + articleInfo  );
    }
查询结果
一个用户对应多篇文章
实体类
@Data
public class UserInfo {
    private Integer id;
    //private String username;//用于resultType
    private String name; //用于 resultMap
    private String password;
    private String photo;
    private String createtime;
    private String updatetime;
    private int state;
    //一对多
    private List<ArticleInfo> artlist;
}
mapper
   //一对多,多表查询
    //根据用户 id 查询用户及用户发表的所有文章
    public UserInfo getUserAndArticleByUid(@Param("uid") Integer uid);
XML
<resultMap id="BaseMap" type="com.example.demo.model.UserInfo">
        <!--主键映射-->
        <id column="id" property="id"></id>
        <!--普通属性映射-->
        <result column="username" property="name"></result>
        <result column="password" property="password"></result>
        <result column="photo" property="photo"></result>
        <result column="createtime" property="createtime"></result>
        <result column="updatetime" property="updatetime"></result>
        <result column="state" property="state"></result>
        <!--多表查询-->
        <collection property="artlist"
                    resultMap="com.example.demo.mapper.ArticleMapper.BaseMap"
                    columnPrefix="a_">
        </collection>
    </resultMap>

    <!--多表查询-->
    <select id="getUserAndArticleByUid" resultMap="BaseMap">

        select u.*,a.id a_id,a.title a_title,a.content a_content,
        a.createtime a_createtime,
        a.updatetime a_updatetime from userinfo u left join articleinfo a
        on u.id=a.uid where u.id=#{uid}

    </select>
单元测试
   @Test
    void getUserAndArticleByUid() {
        UserInfo userInfo = userMapper.getUserAndArticleByUid(1);
        log.info("用户详情:" + userInfo);
}动态SQL是mybatis 的强大特性之一,能够完成不同条件的SQL拼接
在填写个人信息时,会经常遇到一些必填项,一些非必填项,如下
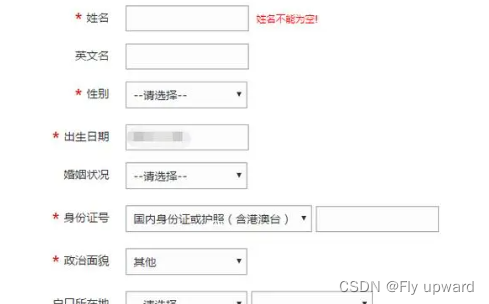
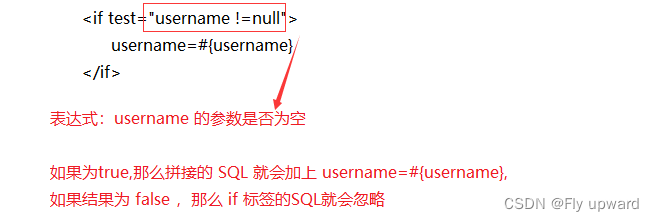
判断一个参数是否有值,如果没值,就会隐藏 if 中的SQL
现在有一张用户表
在新增用户的时候,将 photo 设为非比传参数

1)传入photo 时
mapper
    //动态SQL,添加用户,photo为非必传参数
    public int add2(UserInfo userInfo);
UserMapper.xml
    <!--动态SQL,添加用户-->
    <insert id="add2">
        insert into userinfo(username,password
        <if test="photo !=null">
            ,photo
        </if>
        ) values(#{name}, #{password}
        <if test="photo !=null">
            , #{photo}
        </if>
        )
    </insert>
注意 test 中的 photo 和 #{},是传⼊对象中的属性,不是数据库字段
单元测试
    @Test
    void add2() {
        UserInfo userInfo = new UserInfo();
        userInfo.setName("杨通");
        userInfo.setPassword("123");
        userInfo.setPhoto("123.jpg");
        int result = userMapper.add2(userInfo);
        log.info("添加用户:" + result);

    }
添加结果


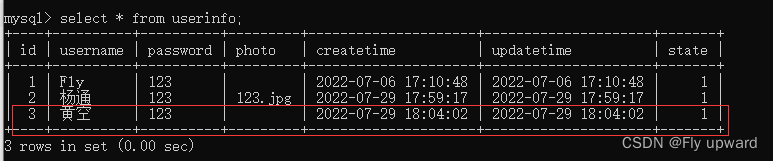
2)不传入 photo 时
不用像没使用动态SQL时,将 userInfo.setPhoto(""); 设为空,直接忽略不写就行了
    @Test
    void add2() {
        UserInfo userInfo = new UserInfo();
        userInfo.setName("黄空");
        userInfo.setPassword("123");
        //userInfo.setPhoto("123.jpg");
        int result = userMapper.add2(userInfo);
        log.info("添加用户:" + result);

    }
动态SQL直接忽略photo,添加成功

最主要的作用:去除SQL语句前后多余的某个字符
语法:

prefix: 表示这个语句快,以prefix的值作为前缀 suffix:表示整个语句块,以suffix的值作为后缀 prefixOverrides:表示整个语句块要去除掉的前缀 suffixOverrides:表示整个语句块要去除掉的后缀
UserMapper
    //动态SQL, <trim> 标签。添加用户,photo为非必传参数
    public int add3(UserInfo userInfo);
UserMapper.xml
    <!--动态SQL,<trim> 标签。添加用户-->
    <insert id="add3">
        insert into userinfo
        <trim prefix="(" suffix=")" suffixOverrides=",">
            <if test="name != null">
                <!--这里拼接的是数据库中的字段-->
                username,
            </if>
            <if test="password != null">
                password,
            </if>
            <if test="photo != null">
                photo
            </if>
        </trim>
        values
        <trim prefix="(" suffix=")" suffixOverrides=",">
            <if test="name != null">
                #{name},
            </if>
            <if test="password != null">
                #{password},
            </if>
            <if test="photo != null">
                #{photo}
            </if>
        </trim>
    </insert>
单元测试
这里不传photo,看拼接的字段前的一个逗号是否还在
    @Test
    void add3() {
        UserInfo userInfo = new UserInfo();
        userInfo.setName("黄小小");
        userInfo.setPassword("123");
        //userInfo.setPhoto("123.jpg"); 这里不传,看拼接的字段前的一个逗号是否还在
        int result = userMapper.add2(userInfo);
        log.info("添加用户:" + result);
    }

主要作用:实现查询中的 where SQL替换,它可以实现如果没有任何的查询条件,那么他可以因此查询中的 where SQL ,但如果存在查询中条件,那么会生成where的 SQL查询,并且使用 where 标签可以自动的去除最后一个 and字符。
1)SQL 替换
根据 id 查询用户:
    <!-- 根据 id 查询用户 -->
    <select id="getUserById" resultMap="BaseMap">
        select * from userinfo
        <where>
            <if test="id != null">
                id=#{id}
            </if>

        </where>
    </select>
当传入的 id 为 null 时
  @Test
    void getUserById() {
       UserInfo userInfo = userMapper.getUserById(null);
        //Assertions.assertNotNull(userInfo);
        log.info("查询行数:" + userInfo);
    }
2)去除 and

或者通过 id 或者 username 来查询时,如果username 为空就会去掉
作用:进行修改操作是,配合 if 来处理非必传字段,他的特点是主动去除最后一个英文逗号
语法:
update table_name
  <set>
    <if test="xxx">
        ...
    </if>
    ...
  </set>
  where ...
1)修改用户名
UserMapper
    //动态SQL, <set> 标签。修改用户
    public int update2(UserInfo userInfo);
UserMapper.xml
    <update id="update2">
        update userinfo
        <set>
            <if test="name != null">
                username=#{name},
            </if>
            <if test="password != null">
                password = #{password},
            </if>
            <if test="photo != null">
                photo = #{photo}
            </if>
        </set>
    </update>
单元测试
    @Test
    void update2() {
        UserInfo userInfo = new UserInfo();
        userInfo.setId(1); //查找 id 为 1 的用户
        userInfo.setName("fei"); // 将用户名修改为 fei
        int result = userMapper.update2(userInfo);
        log.info("修改结果: " + result);
    }

collection: 绑定方法参数中的集合,如List 、Set、Map或数组对象 item: 遍历时的每一个对象 open:语句块开头的字符串 close:语句块结束的字符串 separator:每次遍历之间间隔的字符串
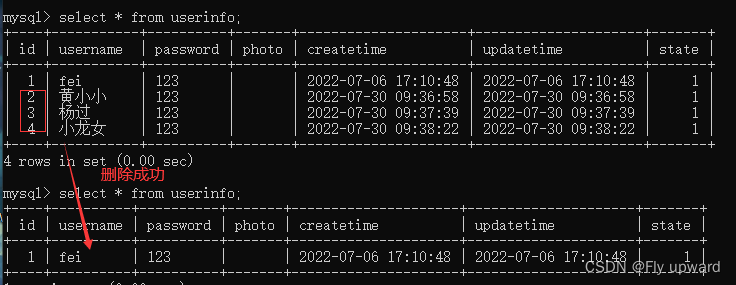
示例:根据用户 id 来对用户进行删除
UserMapper
    //动态SQL,<foreach>,删除多个用户
    public int delId(List<Integer> ids);
UserMapper.xml
    <!--动态SQL,删除多个用户-->
    <delete id="delId">
        delete from userinfo where id in
        <foreach collection="ids" open="(" close=")" item="id" separator=",">
            #{id}
        </foreach>
    </delete>
单元测试
    @Test
    void delId() {
        List<Integer> list = new ArrayList<>();
        list.add(2);
        list.add(3);
        list.add(4);
        int result = userMapper.delId(list);
        log.info("删除的行数:" + result);
    }
结果

很好奇,就使用rubyonrails自动化单元测试而言,你们正在做什么?您是否创建了一个脚本来在cron中运行rake作业并将结果邮寄给您?git中的预提交Hook?只是手动调用?我完全理解测试,但想知道在错误发生之前捕获错误的最佳实践是什么。让我们理所当然地认为测试本身是完美无缺的,并且可以正常工作。下一步是什么以确保他们在正确的时间将可能有害的结果传达给您? 最佳答案 不确定您到底想听什么,但是有几个级别的自动代码库控制:在处理某项功能时,您可以使用类似autotest的内容获得关于哪些有效,哪些无效的即时反馈。要确保您的提
在控制台中反复尝试之后,我想到了这种方法,可以按发生日期对类似activerecord的(Mongoid)对象进行分组。我不确定这是完成此任务的最佳方法,但它确实有效。有没有人有更好的建议,或者这是一个很好的方法?#eventsisanarrayofactiverecord-likeobjectsthatincludeatimeattributeevents.map{|event|#converteventsarrayintoanarrayofhasheswiththedayofthemonthandtheevent{:number=>event.time.day,:event=>ev
我正在编写一个包含C扩展的gem。通常当我写一个gem时,我会遵循TDD的过程,我会写一个失败的规范,然后处理代码直到它通过,等等......在“ext/mygem/mygem.c”中我的C扩展和在gemspec的“扩展”中配置的有效extconf.rb,如何运行我的规范并仍然加载我的C扩展?当我更改C代码时,我需要采取哪些步骤来重新编译代码?这可能是个愚蠢的问题,但是从我的gem的开发源代码树中输入“bundleinstall”不会构建任何native扩展。当我手动运行rubyext/mygem/extconf.rb时,我确实得到了一个Makefile(在整个项目的根目录中),然后当
这是一道面试题,我没有答对,但还是很好奇怎么解。你有N个人的大家庭,分别是1,2,3,...,N岁。你想给你的大家庭拍张照片。所有的家庭成员都排成一排。“我是家里的friend,建议家庭成员安排如下:”1岁的家庭成员坐在这一排的最左边。每两个坐在一起的家庭成员的年龄相差不得超过2岁。输入:整数N,1≤N≤55。输出:摄影师可以拍摄的照片数量。示例->输入:4,输出:4符合条件的数组:[1,2,3,4][1,2,4,3][1,3,2,4][1,3,4,2]另一个例子:输入:5输出:6符合条件的数组:[1,2,3,4,5][1,2,3,5,4][1,2,4,3,5][1,2,4,5,3][
我已经构建了一些serverspec代码来在多个主机上运行一组测试。问题是当任何测试失败时,测试会在当前主机停止。即使测试失败,我也希望它继续在所有主机上运行。Rakefile:namespace:specdotask:all=>hosts.map{|h|'spec:'+h.split('.')[0]}hosts.eachdo|host|begindesc"Runserverspecto#{host}"RSpec::Core::RakeTask.new(host)do|t|ENV['TARGET_HOST']=hostt.pattern="spec/cfengine3/*_spec.r
我们的git存储库中目前有一个Gemfile。但是,有一个gem我只在我的环境中本地使用(我的团队不使用它)。为了使用它,我必须将它添加到我们的Gemfile中,但每次我checkout到我们的master/dev主分支时,由于与跟踪的gemfile冲突,我必须删除它。我想要的是类似Gemfile.local的东西,它将继承从Gemfile导入的gems,但也允许在那里导入新的gems以供使用只有我的机器。此文件将在.gitignore中被忽略。这可能吗? 最佳答案 设置BUNDLE_GEMFILE环境变量:BUNDLE_GEMFI
这似乎非常适得其反,因为太多的gem会在window上破裂。我一直在处理很多mysql和ruby-mysqlgem问题(gem本身发生段错误,一个名为UnixSocket的类显然在Windows机器上不能正常工作,等等)。我只是在浪费时间吗?我应该转向不同的脚本语言吗? 最佳答案 我在Windows上使用Ruby的经验很少,但是当我开始使用Ruby时,我是在Windows上,我的总体印象是它不是Windows原生系统。因此,在主要使用Windows多年之后,开始使用Ruby促使我切换回原来的系统Unix,这次是Linux。Rub
我正在尝试在Rails上安装ruby,到目前为止一切都已安装,但是当我尝试使用rakedb:create创建数据库时,我收到一个奇怪的错误:dyld:lazysymbolbindingfailed:Symbolnotfound:_mysql_get_client_infoReferencedfrom:/Library/Ruby/Gems/1.8/gems/mysql2-0.3.11/lib/mysql2/mysql2.bundleExpectedin:flatnamespacedyld:Symbolnotfound:_mysql_get_client_infoReferencedf
我有一个使用SeleniumWebdriver和Nokogiri的Ruby应用程序。我想选择一个类,然后对于那个类对应的每个div,我想根据div的内容执行一个Action。例如,我正在解析以下页面:https://www.google.com/webhp?sourceid=chrome-instant&ion=1&espv=2&ie=UTF-8#q=puppies这是一个搜索结果页面,我正在寻找描述中包含“Adoption”一词的第一个结果。因此机器人应该寻找带有className:"result"的div,对于每个检查它的.descriptiondiv是否包含单词“adoption
我正在我的Rails项目中安装Grape以构建RESTfulAPI。现在一些端点的操作需要身份验证,而另一些则不需要身份验证。例如,我有users端点,看起来像这样:moduleBackendmoduleV1classUsers现在如您所见,除了password/forget之外的所有操作都需要用户登录/验证。创建一个新的端点也没有意义,比如passwords并且只是删除password/forget从逻辑上讲,这个端点应该与用户资源。问题是Grapebefore过滤器没有像except,only这样的选项,我可以在其中说对某些操作应用过滤器。您通常如何干净利落地处理这种情况?