Rust是一门安全的语言,最近也加入到Linux内核中,因此后续这门语言会越来越流行,所以准备学习下,本篇介绍Rust在Window平台上的安装过程。
目录
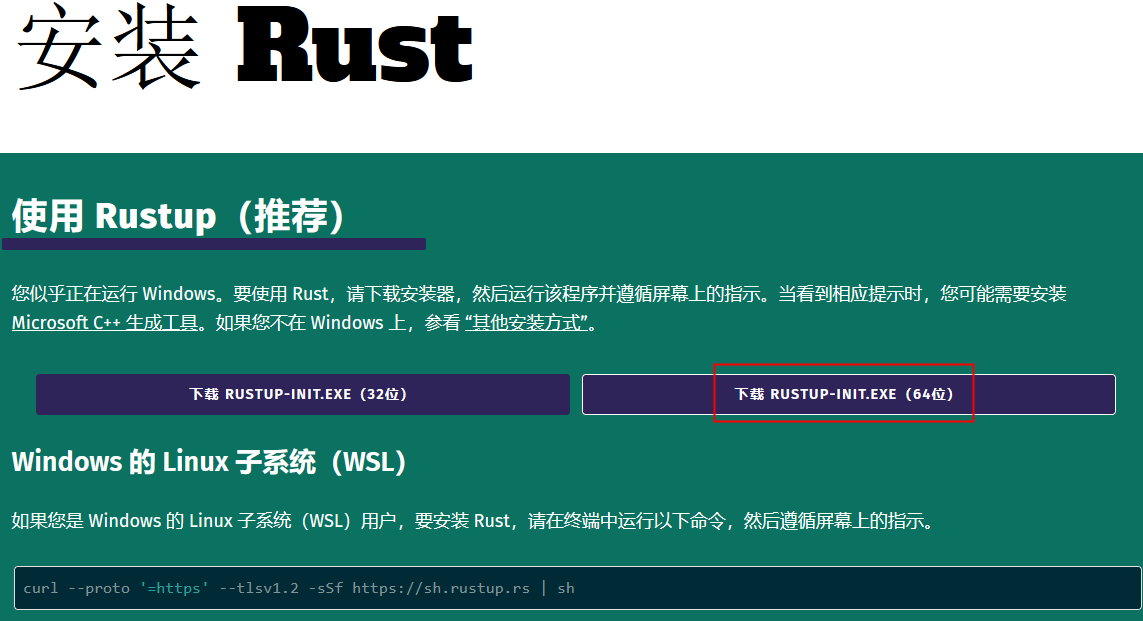
下载来是一个10左右的在线安装器rustup-init.exe
双击rustup-init运行安装器
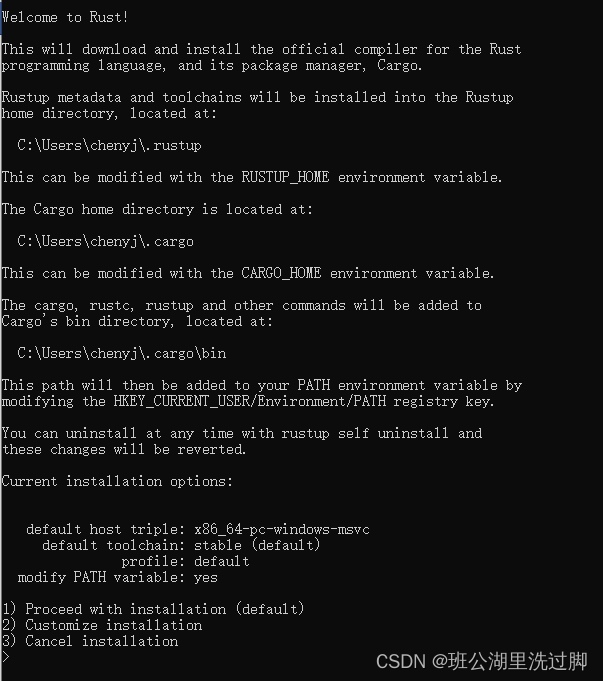
Welcome to Rust!

This will download and install the official compiler for the Rust
programming language, and its package manager, Cargo.

Rustup metadata and toolchains will be installed into the Rustup
home directory, located at:

  C:\Users\chenyj\.rustup

This can be modified with the RUSTUP_HOME environment variable.

The Cargo home directory is located at:

  C:\Users\chenyj\.cargo

This can be modified with the CARGO_HOME environment variable.

The cargo, rustc, rustup and other commands will be added to
Cargo's bin directory, located at:

  C:\Users\chenyj\.cargo\bin

This path will then be added to your PATH environment variable by
modifying the HKEY_CURRENT_USER/Environment/PATH registry key.

You can uninstall at any time with rustup self uninstall and
these changes will be reverted.

Current installation options:


   default host triple: x86_64-pc-windows-msvc
     default toolchain: stable (default)
               profile: default
  modify PATH variable: yes

1) Proceed with installation (default)
2) Customize installation
3) Cancel installation
>
上面显示安装的三个路径
C:\Users\chenyj\.cargo
C:\Users\chenyj\.cargo\bin
C:\Users\chenyj\.rustup
这里采用默认的安装方式,输入1
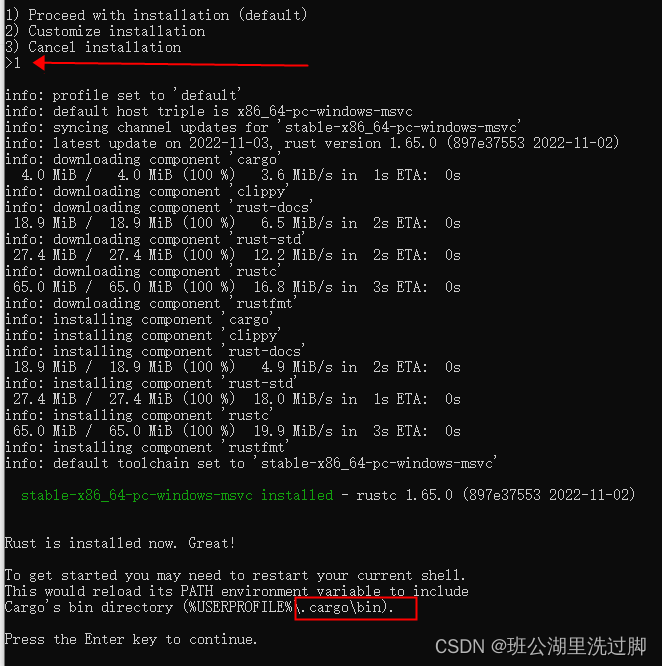
接回车安装完成

配置环境变量

测试环境变量 rustc -V //V是大写

以上结果显示rust安装成功
2.1. 下载vs Code
下载其最新可用的安装包:
Visual Studio Code - Code Editing. Redefined
安装成功后,配置中文菜单

2.2. 用同样的方法再安装 rust-analyzer 和 Native Debug 两个扩展


重新启动 VSCode,Rust 的开发环境就搭建好了。
3. 编写代码进行测试
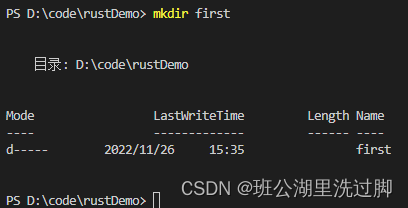
新建一个D:\code\rustDemo目录
在 VSCode 中打开新建的文件夹:
【文件】-》【打开文件夹】
打开文件夹之后选择菜单栏中的"终端"-"新建终端",会打开一个新的终端:

新建一个first文件夹
在这个文件夹下创建一个first.rs的文件
输入以下代码
fn main() {
    println!("this is first rust program!");
}
Hello, World! - Rust 程序设计语言 简体中文版
仅仅使用 rustc 编译简单程序是没问题的,不过随着项目的增长,你可能需要管理你项目的方方面面,并让代码易于分享。接下来,我们要介绍一个叫做 Cargo 的工具,它会帮助你编写真实世界中的 Rust 程序。
Hello, Cargo! - Rust 程序设计语言 简体中文版
在终端中输入命令:
$ cargo new hello_cargo
$ cd hello_cargo
第一行命令新建了名为 hello_cargo 的目录和项目。我们将项目命名为 hello_cargo,同时 Cargo 在一个同名目录中创建项目文件。
进入 hello_cargo 目录并列出文件。将会看到 Cargo 生成了两个文件和一个目录:一个 Cargo.toml 文件,一个 src 目录,以及位于 src 目录中的 main.rs 文件。
这也会在 hello_cargo 目录初始化了一个 git 仓库,以及一个 .gitignore 文件。如果在一个已经存在的 git 仓库中运行 cargo new,则这些 git 相关文件则不会生成;可以通过运行 cargo new --vcs=git 来覆盖这些行为。

hello_cargo目录下有个Cargo.toml文件,内容为
[package]
name = "hello_cargo"
version = "0.1.0"
edition = "2021"

# See more keys and their definitions at https://doc.rust-lang.org/cargo/reference/manifest.html

[dependencies]
构建并运行cargo项目。
cargo build
.\target\debug\hello_cargo
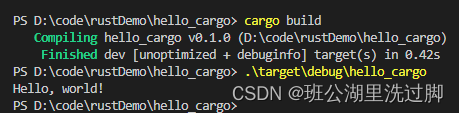
也可以使用 cargo run 在一个命令中同时编译并运行生成的可执行文件

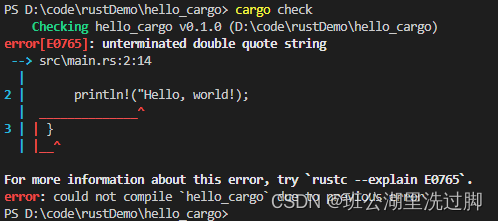
Cargo 还提供了一个叫 cargo check 的命令。该命令快速检查代码确保其可以编译,但并不产生可执行文件:

这里把代码故意写错一个符号
我们回顾下已学习的 Cargo 内容:
使用 Cargo 的一个额外的优点是,不管你使用什么操作系统,其命令都是一样的。所以从现在开始本书将不再为 Linux 和 macOS 以及 Windows 提供相应的命令。
vscodes配置调试环境
用vscode打开hello_cargo文件夹,
在hello_cargo文件夹中创建.vscode目录(前面是点号开头),新建两个文件tasks.json和launch.json,文件内容如下:
tasks.json文件内容:
{
	"version": "2.0.0",
	"tasks": [{
		"label": "build",
		"type": "shell",
		"command": "cargo",
		"args": ["build"]
	}]
}
launch.json文件内容:
{
	"version": "0.2.0",
	"configurations": [{
		"name": "(Windows)启动",
		"preLaunchTask": "build",
		"type": "cppvsdbg",
		"request": "launch",
		"program": "${workspaceFolder}/target/debug/${workspaceFolderBasename}.exe",
		"args": [],
		"stopAtEntry": false,
		"cwd": "${workspaceFolder}",
		"environment": [],
		"externalConsole": false
	}]
}
关于"program": "${workspaceFolder}/target/debug/${workspaceFolderBasename}.exe",
workspaceFolder这个代表工程目录, workspaceFolderBasename这个代表生成的可执行文件名,这个是固定的,不能随意修改。
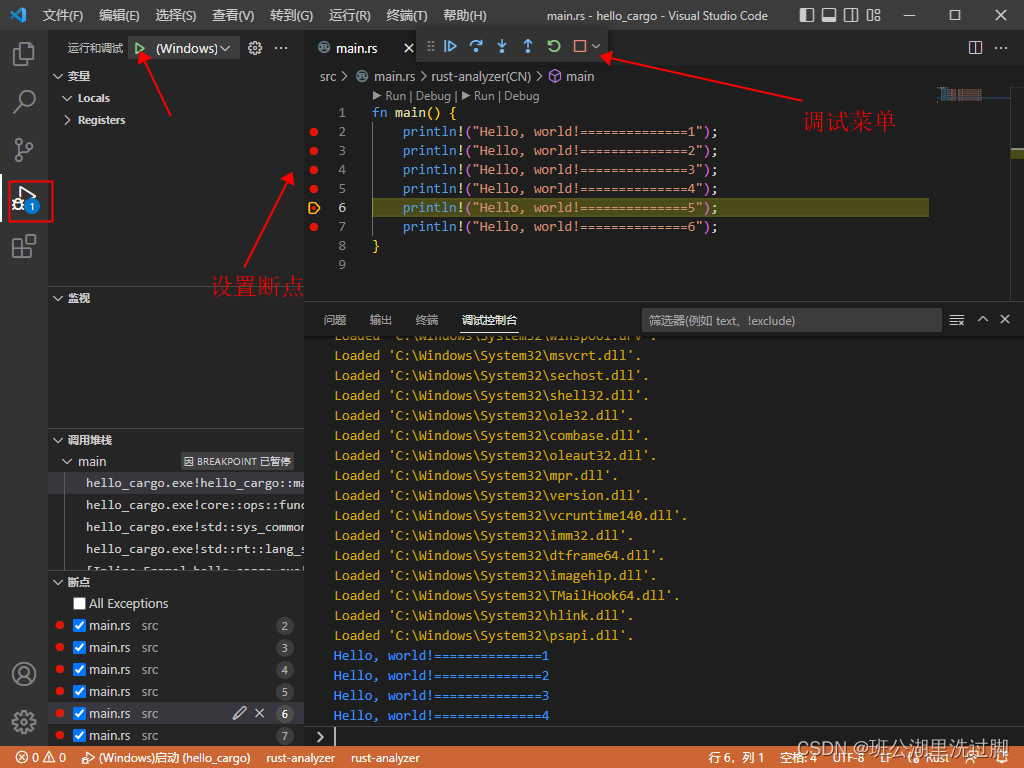
打开源文件,设置断点启动调试
参考:
我想为Heroku构建一个Rails3应用程序。他们使用Postgres作为他们的数据库,所以我通过MacPorts安装了postgres9.0。现在我需要一个postgresgem并且共识是出于性能原因你想要pggem。但是我对我得到的错误感到非常困惑当我尝试在rvm下通过geminstall安装pg时。我已经非常明确地指定了所有postgres目录的位置可以找到但仍然无法完成安装:$envARCHFLAGS='-archx86_64'geminstallpg--\--with-pg-config=/opt/local/var/db/postgresql90/defaultdb/po
我打算为ruby脚本创建一个安装程序,但我希望能够确保机器安装了RVM。有没有一种方法可以完全离线安装RVM并且不引人注目(通过不引人注目,就像创建一个可以做所有事情的脚本而不是要求用户向他们的bash_profile或bashrc添加一些东西)我不是要脚本本身,只是一个关于如何走这条路的快速指针(如果可能的话)。我们还研究了这个很有帮助的问题:RVM-isthereawayforsimpleofflineinstall?但有点误导,因为答案只向我们展示了如何离线在RVM中安装ruby。我们需要能够离线安装RVM本身,并查看脚本https://raw.github.com/wayn
我有一个奇怪的问题:我在rvm上安装了rubyonrails。一切正常,我可以创建项目。但是在我输入“railsnew”时重新启动后,我有“程序'rails'当前未安装。”。SystemUbuntu12.04ruby-v"1.9.3p194"gemlistactionmailer(3.2.5)actionpack(3.2.5)activemodel(3.2.5)activerecord(3.2.5)activeresource(3.2.5)activesupport(3.2.5)arel(3.0.2)builder(3.0.0)bundler(1.1.4)coffee-rails(
我刚刚为fedora安装了emacs。我想用emacs编写ruby。为ruby提供代码提示、代码完成类型功能所需的工具、扩展是什么? 最佳答案 ruby-mode已经包含在Emacs23之后的版本中。不过,它也可以通过ELPA获得。您可能感兴趣的其他一些事情是集成RVM、feature-mode(Cucumber)、rspec-mode、ruby-electric、inf-ruby、rinari(用于Rails)等。这是我当前用于Ruby开发的Emacs配置:https://github.com/citizen428/emacs
我正在尝试在我的centos服务器上安装therubyracer,但遇到了麻烦。$geminstalltherubyracerBuildingnativeextensions.Thiscouldtakeawhile...ERROR:Errorinstallingtherubyracer:ERROR:Failedtobuildgemnativeextension./usr/local/rvm/rubies/ruby-1.9.3-p125/bin/rubyextconf.rbcheckingformain()in-lpthread...yescheckingforv8.h...no***e
我的最终目标是安装当前版本的RubyonRails。我在OSXMountainLion上运行。到目前为止,这是我的过程:已安装的RVM$\curl-Lhttps://get.rvm.io|bash-sstable检查已知(我假设已批准)安装$rvmlistknown我看到当前的稳定版本可用[ruby-]2.0.0[-p247]输入命令安装$rvminstall2.0.0-p247注意:我也试过这些安装命令$rvminstallruby-2.0.0-p247$rvminstallruby=2.0.0-p247我很快就无处可去了。结果:$rvminstall2.0.0-p247Search
我实际上是在尝试使用RVM在我的OSX10.7.5上更新ruby,并在输入以下命令后:rvminstallruby我得到了以下回复:Searchingforbinaryrubies,thismighttakesometime.Checkingrequirementsforosx.Installingrequirementsforosx.Updatingsystem.......Errorrunning'requirements_osx_brew_update_systemruby-2.0.0-p247',pleaseread/Users/username/.rvm/log/138121
由于fast-stemmer的问题,我很难安装我想要的任何rubygem。我把我得到的错误放在下面。Buildingnativeextensions.Thiscouldtakeawhile...ERROR:Errorinstallingfast-stemmer:ERROR:Failedtobuildgemnativeextension./System/Library/Frameworks/Ruby.framework/Versions/2.0/usr/bin/rubyextconf.rbcreatingMakefilemake"DESTDIR="cleanmake"DESTDIR=
当我尝试安装Ruby时遇到此错误。我试过查看this和this但无济于事➜~brewinstallrubyWarning:YouareusingOSX10.12.Wedonotprovidesupportforthispre-releaseversion.Youmayencounterbuildfailuresorotherbreakages.Pleasecreatepull-requestsinsteadoffilingissues.==>Installingdependenciesforruby:readline,libyaml,makedepend==>Installingrub
当我执行>rvminstall1.9.2时一切顺利。然后我做>rvmuse1.9.2也很顺利。但是当涉及到ruby-v时..sam@sjones:~$rvminstall1.9.2/home/sam/.rvm/rubies/ruby-1.9.2-p136,thismaytakeawhiledependingonyourcpu(s)...ruby-1.9.2-p136-#fetchingruby-1.9.2-p136-#downloadingruby-1.9.2-p136,thismaytakeawhiledependingonyourconnection...%Total%Rece