Springboot扩展点系列实现方式、工作原理集合:
Springboot扩展点之ApplicationContextInitializer
Springboot扩展点之BeanFactoryPostProcessor
Springboot扩展点之BeanDefinitionRegistryPostProcessor
Springboot扩展点之BeanPostProcessor
Springboot扩展点之InstantiationAwareBeanPostProcessor
Springboot扩展点之SmartInstantiationAwareBeanPostProcessor
Springboot扩展点之ApplicationContextAwareProcessor
Springboot扩展点之InitializingBean
Springboot扩展点之SmartInitializingSingleton
Springboot扩展点之CommandLineRunner和ApplicationRunner
前面介绍了Springboot的扩展点之BeanPostProcessor,再来介绍另一个扩展点InstantiationAwareBeanPostProcessor就容易多了。因为InstantiationAwareBeanPostProcessor也属于Bean级的后置处理器,还继承于BeanPostProcessor,因此InstantiationAwareBeanPostProcessor除了可以实现BeanPostProcessor的扩展外,又额外增加了三个扩展点,这篇文章也是围绕这三个扩展点展示,主要介绍InstantiationAwareBeanPostProcessor扩展接口的功能特性、实现方式、工作原理、和应用场景,BeanPostProcessor扩展部分可以翻看前面的文章Springboot的扩展点之BeanPostProcessor。
1、虽然InstantiationAwareBeanPostProcessor继承于BeanPostProcessor,但是InstantiationAwareBeanPostProcessor的执行时机要稍早于BeanPostProcessor;
2、InstantiationAwareBeanPostProcessor有三个扩展方法,分别是:postProcessBeforeInstantiation()、postProcessAfterInstantiation()、postProcessProperties();
3、postProcessBeforeInstantiation()在Spring中Bean实例化前触发执行;
4、postProcessAfterInstantiation()、postProcessProperties()在Spring中Bean实例化后,属性注入前触发执行;
5、InstantiationAwareBeanPostProcessor继承于BeanPostProcessor的postProcessBeforeInitialization()和postProcessAfterInitialization()则在Spring中Bean实例化、属性注入完成后触发执行;
6、postProcessBeforeInstantiation()扩展点可以自定义个性化的Bean来替换掉目标Bean,需要注意的是替换掉目标Bean后,postProcessAfterInstantiation()会执行,其他的扩展点将不再触发;
7、postProcessAfterInstantiation()的返回值为布尔类型,如果返回值为true,则第三个扩展点postProcessProperties()会继续执行;如果返回值为false,则第三个扩展点postProcessProperties()将不再执行;
8、postProcessProperties()扩展点可以在目标Bean实例化后,属性注入前,对要注入的属性值内容进行更改,以替换掉原来的属性值;
总的来说InstantiationAwareBeanPostProcessor扩展点的实现方式很简单,实现接口,重写相应的方法实现扩展逻辑,并用@Component注解标记实现类,其余的由Spring自动完成。下面通过示例逐步详细介绍:
1、定义一个Controller类(ExampleController),通过setter方法注入属性ExampService;
@RestController
@RequestMapping("/example")
@Slf4j
public class ExampleController {
    private String creator="gaox";
    private ExampleService exampleService;
    @Autowired
    public void setExampleService(ExampleService exampleService) {
        this.exampleService = exampleService;
        log.info("----ExampleController内的exampleService属性被注入");
    }
    public void setCreator(String creator) {
        this.creator = creator;
        log.info("----ExampleController内的creator属性被注入");
    }
    public String getCreator() {
    return creator;
    }
    public ExampleController() {
        log.info("----ExampleController无参构造方法被执行");
    }
}
2、定义ExampleService类,以便作为引用属性注入到ExampleController中;
@Service
@Slf4j
public class ExampleService {
    public ExampleService() {
        log.info("----ExampleService无参构造方法被执行");
    }
    public void test(){
        System.out.println("test");
    }
}
3、定义InstantiationAwareBeanPostProcessor接口的实现类示例类MyInstantiationAwareBeanPostProcessor,并重写InstantiationAwareBeanPostProcessor接口的三个扩展方法和继承于BeanPostProcessor接口的两个扩展方法;
@Component
@Slf4j
public class MyInstantiationAwareBeanPostProcessor implements InstantiationAwareBeanPostProcessor {

    @SneakyThrows
    @Override
    public Object postProcessBeforeInstantiation(Class<?> beanClass, String beanName) throws BeansException {
        if (beanName.equals("exampleController")) {
            log.info("----postProcessBeforeInstantiation被执行:" + beanName);
            return null;
        }
        return null;
    }

    @Override
    public boolean postProcessAfterInstantiation(Object bean, String beanName) throws BeansException {
        if (beanName.equals("exampleController")) {
            log.info("----postProcessAfterInstantiation被执行:" + beanName);
        }
        return true;
    }

    @Override
    public PropertyValues postProcessProperties(PropertyValues pvs, Object bean, String beanName) throws BeansException {
        if (beanName.equals("exampleController")) {
           log.info("----postProcessProperties被执行:" + beanName);
            MutablePropertyValues  mutablePropertyValues=new MutablePropertyValues();
            mutablePropertyValues.addPropertyValue("creator","fanfu");
            pvs=mutablePropertyValues;
        }
        return pvs;
    }
    @Override
    public Object postProcessBeforeInitialization(Object bean, String beanName) throws BeansException {
        if (beanName.equals("exampleController")) {
            log.info("----postProcessBeforeInitialization---" + beanName);
            //如果特定的bean实例化完成后,还未执行InitializingBean.afterPropertiesSet()方法之前,有一些其他操作,可以在这里实现
        }
        return bean;
    }

    @Override
    public Object postProcessAfterInitialization(Object bean, String beanName) throws BeansException {
        if (beanName.equals("exampleController")) {
            log.info("----postProcessAfterInitialization---" + beanName);
            //如果特定的bean实例化完成,InitializingBean.afterPropertiesSet()方法执行后,有一些其他操作,可以在这里实现
        }
        return bean;
    }
}
4、编写单元测试验证InstantiationAwareBeanPostProcessor接口的功能特性;
@Test
public void test3(){
    AnnotationConfigApplicationContext context = new AnnotationConfigApplicationContext("com.fanfu");
    ExampleController bean = context.getBean(ExampleController.class);
    Assert.isTrue("fanfu".equals(bean.getCreator()),"属性替换失败");
    log.info("----"+bean.getCreator());

}
执行结果如下:

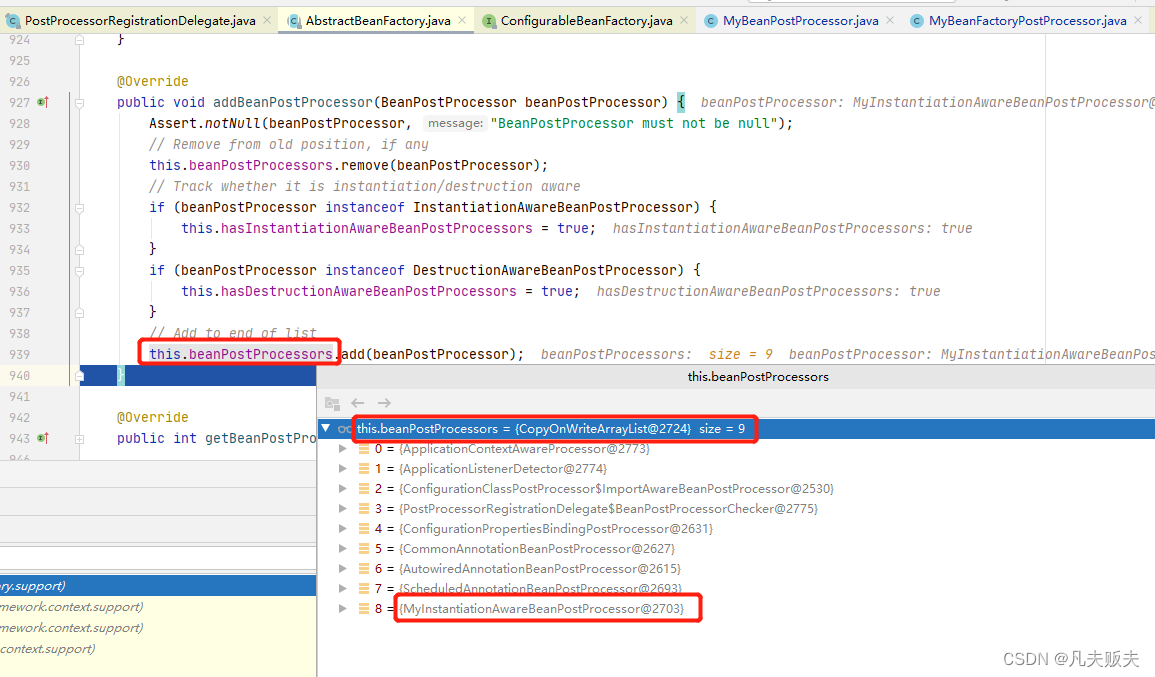
1、因为InstantiationAwareBeanPostProcessor接口继承于BeanPostProcessor接口,所以InstantiationAwareBeanPostProcessor接口的实现类的注册时机和BeanPostProcessor是一致的,因此很快就找到了InstantiationAwareBeanPostProcessor接口的实现类的注册入口,即org.springframework.context.support.AbstractApplicationContext#refresh--->registerBeanPostProcessors;
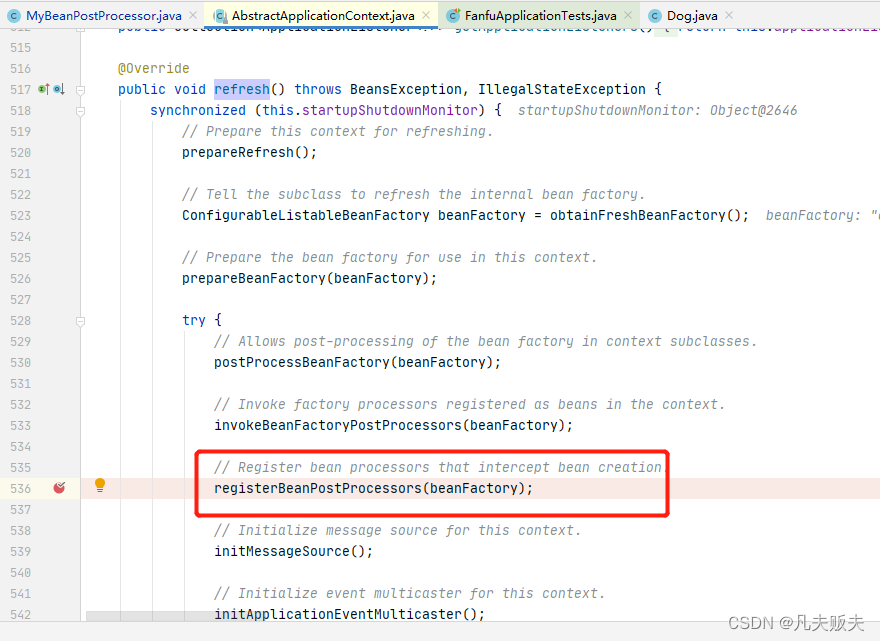
2、进入到AbstractApplicationContext#registerBeanPostProcessors方法内,会发现这段代码很干净,即依赖于PostProcessorRegistrationDelegate类的registerBeanPostProcessors()方法;
protected void registerBeanPostProcessors(ConfigurableListableBeanFactory beanFactory) {
PostProcessorRegistrationDelegate.registerBeanPostProcessors(beanFactory, this);
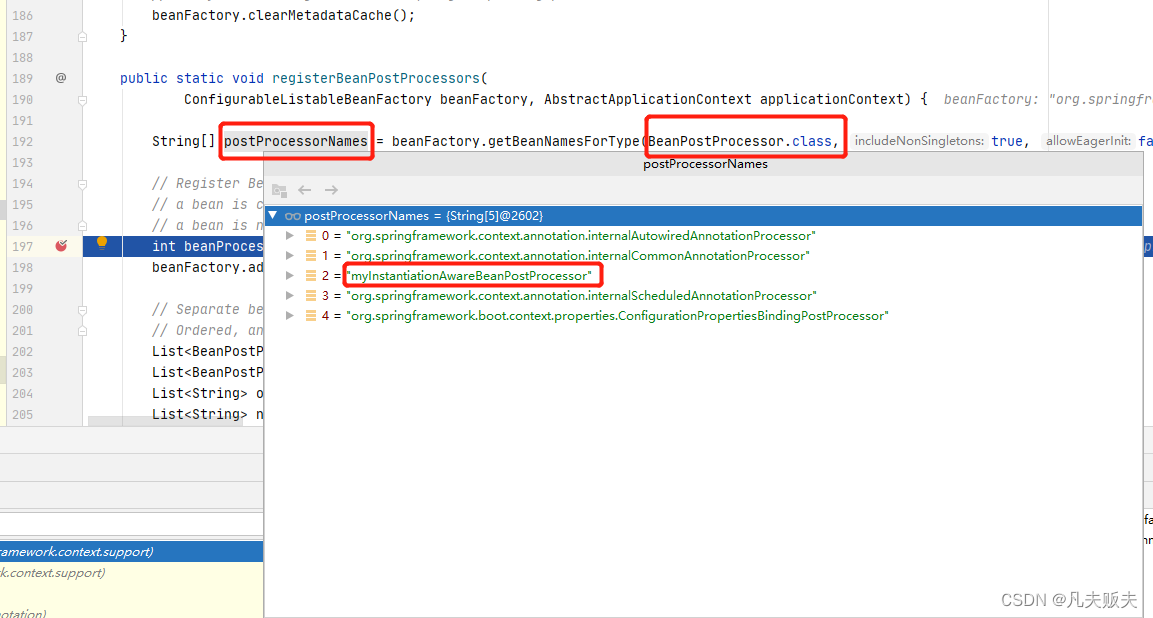
}3、进入到PostProcessorRegistrationDelegate类的registerBeanPostProcessors()方法又是另一番洞天:大致是可以分为四步,第一步,获取所有实现BeanPostProcessor接口的实现类的名称,实现方式示例中的MyBeanPostProcessors就在其中;
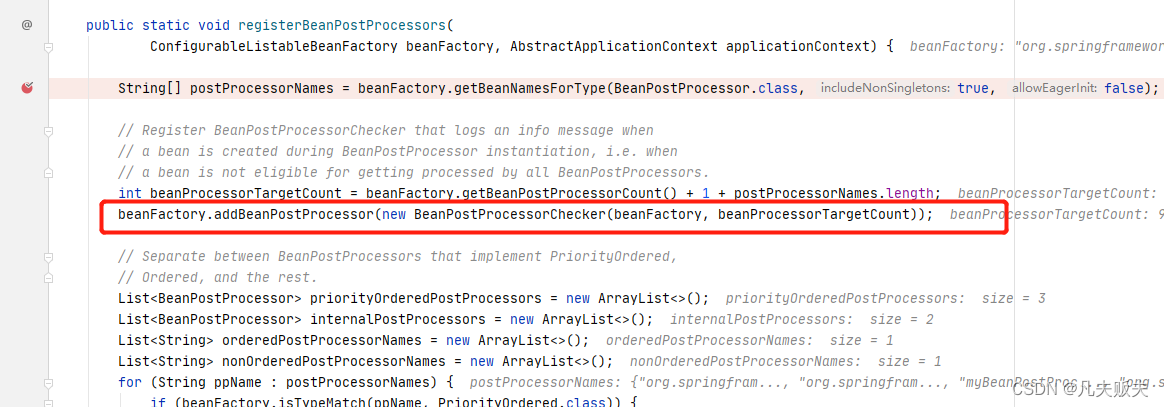
第二步,提前注册BeanPostProcessorChecker,主要用途是用于Bean创建过程中的日志信息打印记录;
第三步,就是把所有的BeanPostProcessor接口的实现类,按照是否实现PriorityOrdered接口、是否实现Ordered接口、其他,分为三组;
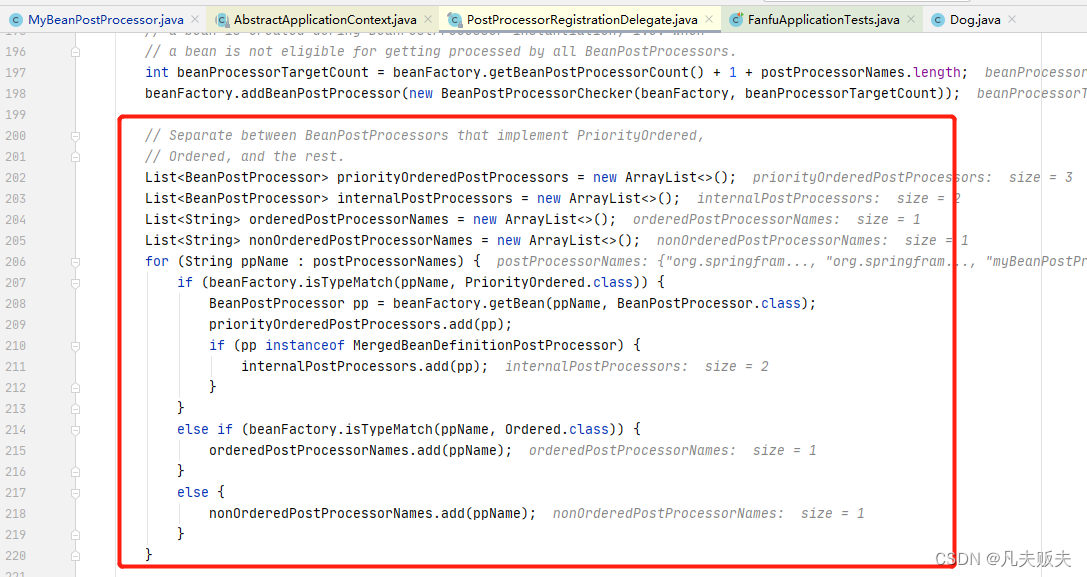
最后一步内容很长,不过很简单,即按第二步分成的三类,依次注册,具体的顺序是:1:实现PriorityOrdered接口BeanPostProcessor接口的实现类、2:实现实现Ordered接口BeanPostProcessor接口的实现类、3:其他的BeanPostProcessor接口的实现类,其中MyInstantiationAwareBeanPostProcessor属于第三类;
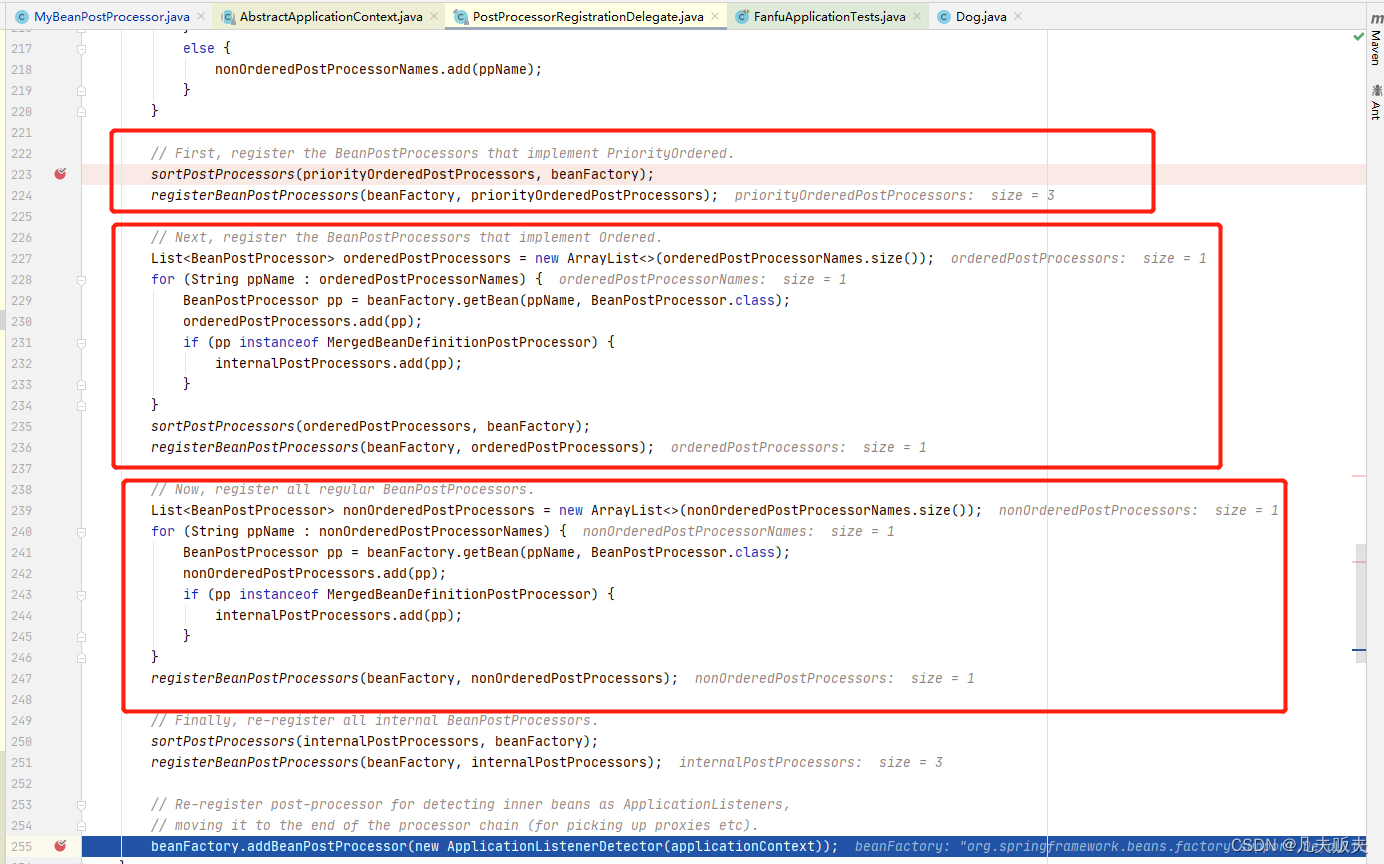
总结,InstantiationAwareBeanPostProcessor接口的实现类的注册,其本质是把接口的实现类注入到Spring容器的一个集合里存起来,具体的注册逻辑在PostProcessorRegistrationDelegate#registerBeanPostProcessors()。
从实现方式的示例的单元测试执行结果可以看出,InstantiationAwareBeanPostProcessor接口继承于BeanPostProcessor的postProcessBeforeInitialization()和postProcessAfterInitialization()扩展点的执行时机是在Bean(ExampleController)实例化、属性注入完成后触发执行的,其具体的工作原理可以参考Springboot的扩展点之BeanPostProcessor,下面就InstantiationAwareBeanPostProcessor接口的另外三个扩展点的执行时机进行分析。
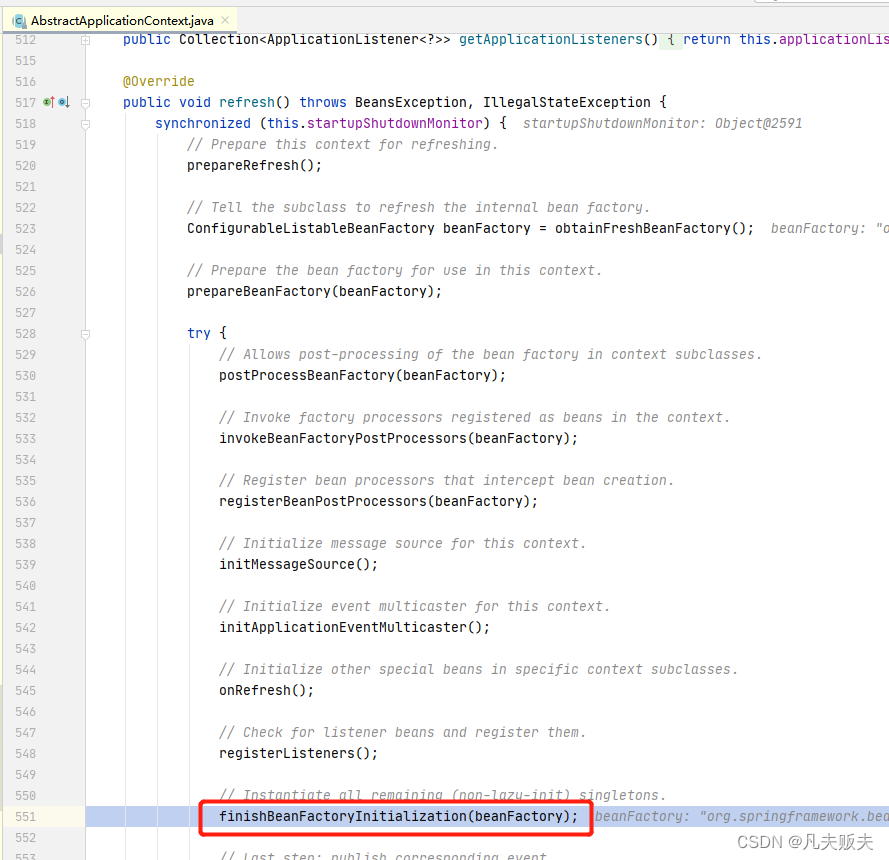
1、从实现方式示例中,可知InstantiationAwareBeanPostProcessor的第一个扩展点postProcessBeforeInstantiation()是在Eean实例化前触发执行的,所以寻找其执行时机的第一步就要找到Bean实例化的入口,通过debug很快找到了这个位置 ,AbstractApplicationContext#refresh--->finishBeanFactoryInitialization();
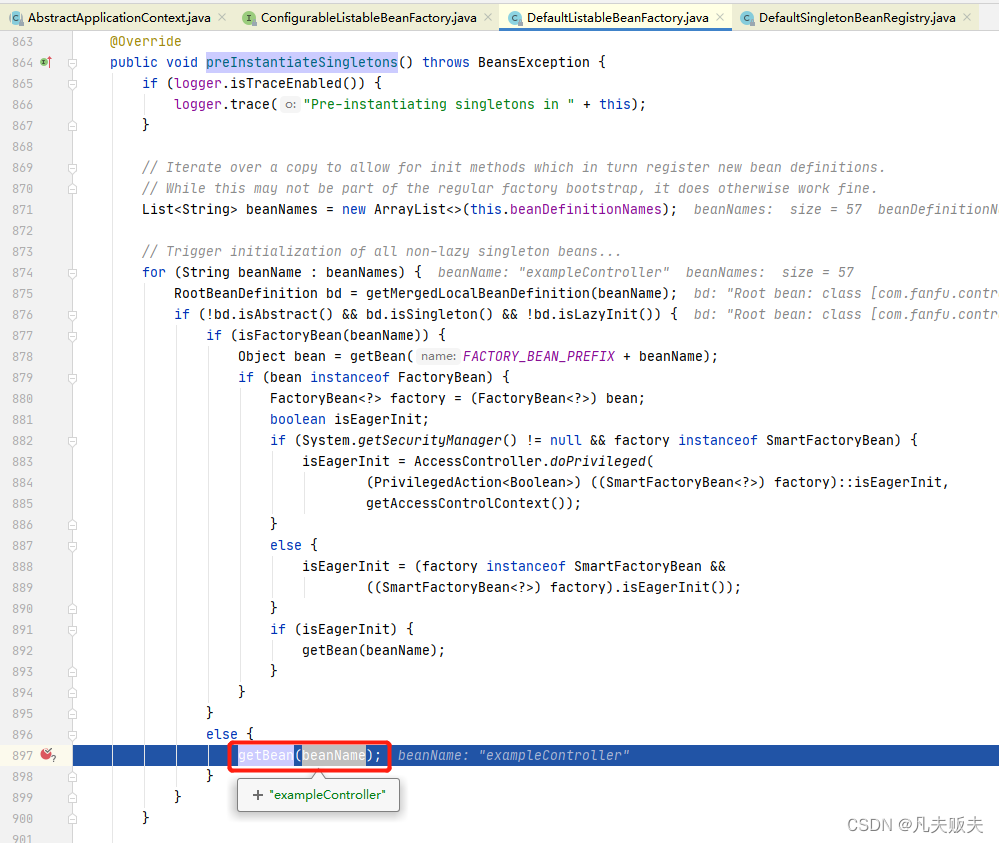
2、进入到finishBeanFactoryInitialization()方法,会发现ExampleController这个Bean的实例化是在
DefaultListableBeanFactory#preInstantiateSingletons方法;

3、这里实际被调用的是DefaultListableBeanFactory#preInstantiateSingletons方法,进入到这个方法内,又调用了AbstractBeanFactory#getBean(),从这才算真正Bean的获取或创建的入品口口。这里大致介绍一下getBean()的逻辑:当获取某一个bean时,先查询缓存确定是否存在,若存在,则直接返回,若不存在,则开始创建Bean,若Bean内依赖了另外一个Bean,则是上述过程的一个递归。
4、进入到AbstractBeanFactory#getBean方法,发现又调用了AbstractBeanFactory#doGetBean
-->DefaultSingletonBeanRegistry#getSingleton()
-->AbstractAutowireCapableBeanFactory#createBean();

这里需要注意一下,用到了lambda表达式,即把下面的函数式接口的具体实现作为DefaultSingletonBeanRegistry#getSingleton()的第二个形参singletonFactory
传进去,在DefaultSingletonBeanRegistry#getSingleton()内,执行到singletonFactory.getObject()时触发下面lambda表达式内的createBean();(lambda表达式的应用在Spirng的源码中应用很广泛,所以对这块不太熟悉的小伙伴可以着重研究一下)
() -> {
   try {
      return createBean(beanName, mbd, args);
   }
   catch (BeansException ex) {
      destroySingleton(beanName);
      throw ex;
   }
}5、源码分析本身并不难,难的是需要耐心,分析这么多了,实际上还未走到进入到InstantiationAwareBeanPostProcessor的扩展点,但是已经很接近了。进入到AbstractAutowireCapableBeanFactory#createBean()
--->AbstractAutowireCapableBeanFactory#resolveBeforeInstantiation(),定睛一看第一个扩展点到了,具体且看下面的注释内容:
protected Object resolveBeforeInstantiation(String beanName, RootBeanDefinition mbd) {
   Object bean = null;
   if (!Boolean.FALSE.equals(mbd.beforeInstantiationResolved)) {
      // 检查bean是不是合成的Bean,
      //InstantiationAwareBeanPostProcessor接口的实现类是否己注册
      if (!mbd.isSynthetic() && hasInstantiationAwareBeanPostProcessors()) {
           //查询出目标Bean的Class实例
           Class<?> targetType = determineTargetType(beanName, mbd);
         if (targetType != null) {
             //开始执行第一个扩展方法postProcessBeforeInstantiation
            bean = applyBeanPostProcessorsBeforeInstantiation(targetType, beanName);
            if (bean != null) {
               bean = applyBeanPostProcessorsAfterInitialization(bean, beanName);
            }
         }
      }
      mbd.beforeInstantiationResolved = (bean != null);
   }
   return bean;
}
具体的扩展点postProcessBeforeInstantiation()的执行也是朴实无华:查询出所有接口的实现类,然后循环执行;只一需要注意的是扩展点处的返回值处理,这个时候目标Bean(ExampleController)未实例化,这时可以自定义一个Bean对象作为返回值把目标Bean替换掉,那么后续的postProcessBeforeInitialization扩展点还会触发执行,而其他扩展点将会跳过不再执行;什么意思呢?简单点理解就是正常情况下Spring管理目标Bean会一步一步的实例化、属性注入、初始化,但你想要实现点个性化的东西,Spring就把这个Bean实例化及以后的权利交给你了。
protected Object applyBeanPostProcessorsBeforeInstantiation(Class<?> beanClass, String beanName) {
   for (BeanPostProcessor bp : getBeanPostProcessors()) {
      if (bp instanceof InstantiationAwareBeanPostProcessor) {
         InstantiationAwareBeanPostProcessor ibp = (InstantiationAwareBeanPostProcessor) bp;
         Object result = ibp.postProcessBeforeInstantiation(beanClass, beanName);
         if (result != null) {
            return result;
         }
      }
   }
   return null;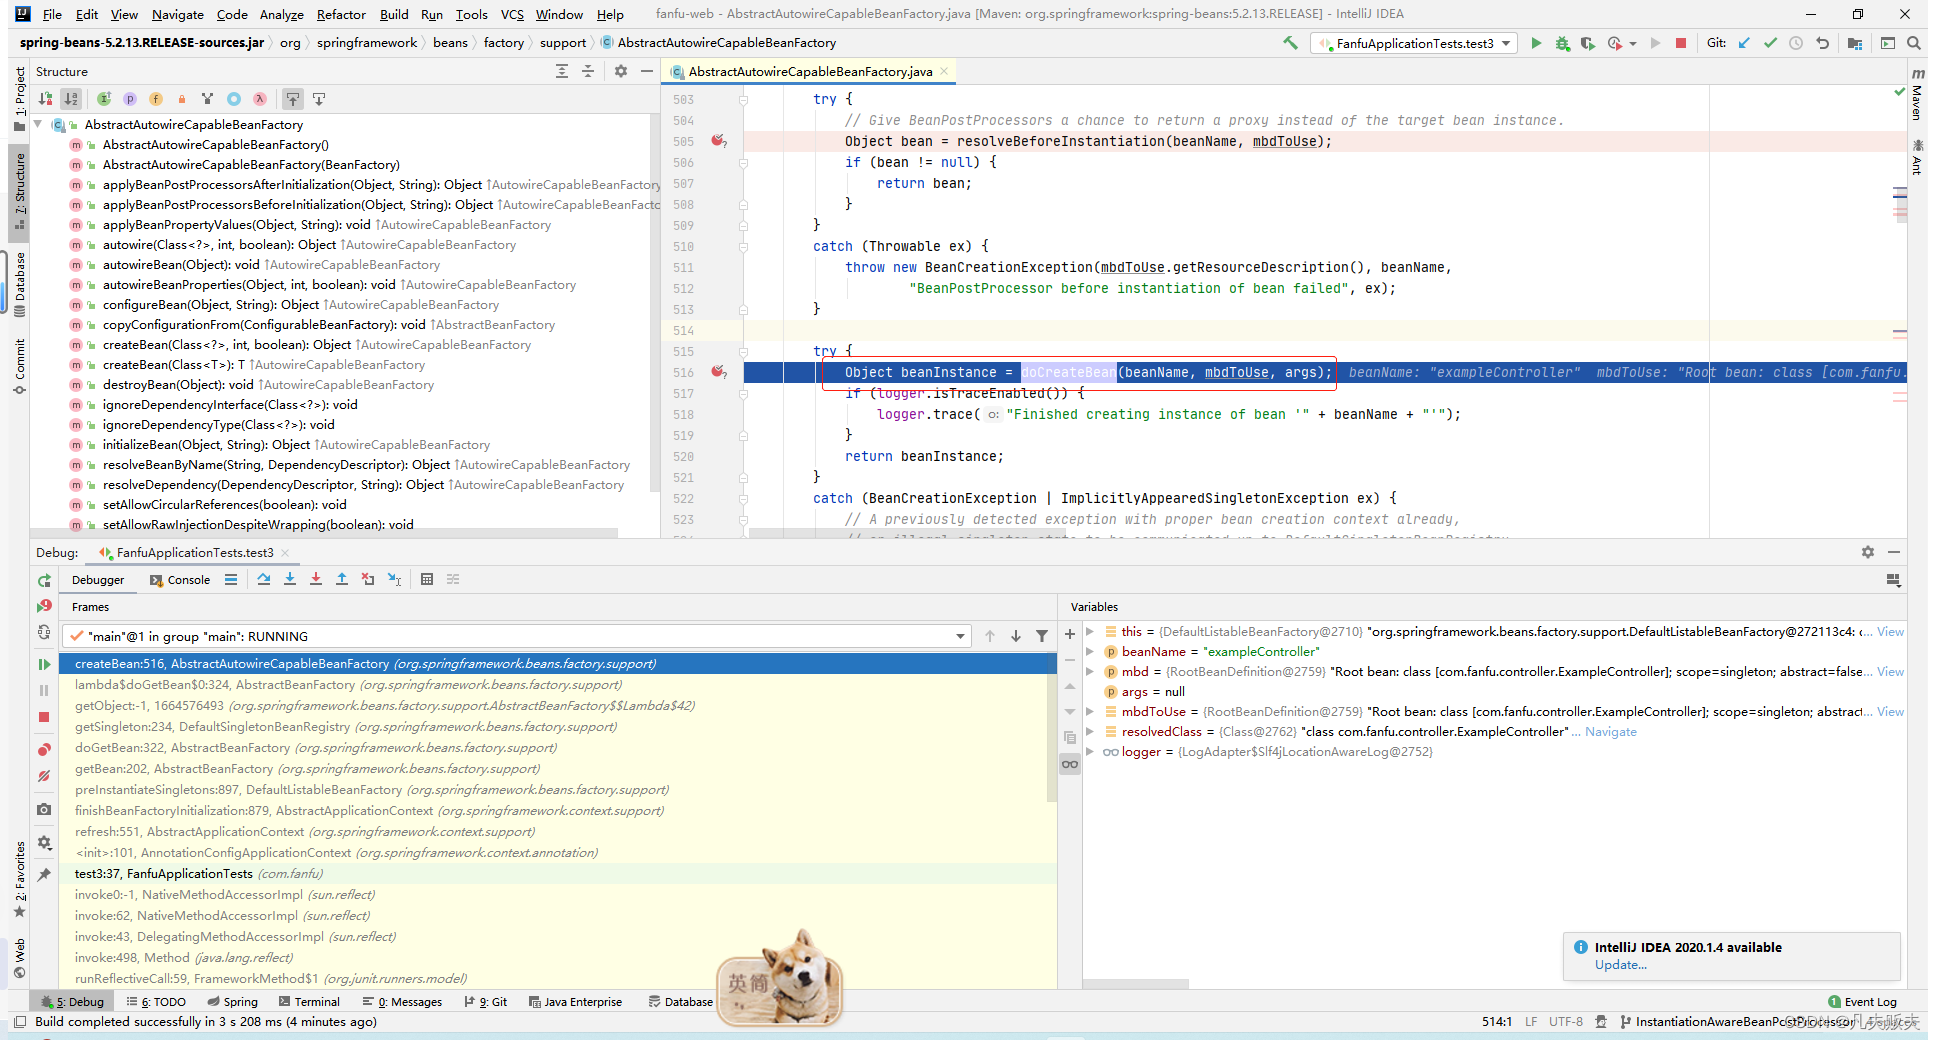
}6、从AbstractAutowireCapableBeanFactory#createBean()
--->AbstractAutowireCapableBeanFactory#resolveBeforeInstantiation()完成第一个扩展点的执行,继续往下走就是AbstractAutowireCapableBeanFactory#doCreateBean了,要找到第二个、第三个扩展点都在这里面;
7、进入到AbstractAutowireCapableBeanFactory#doCreateBean方法,如下图,instanceWrapper.getWrappedInstance()完成了目标Bean(ExampleController)的示例化,但是属性exampleService还未注入;
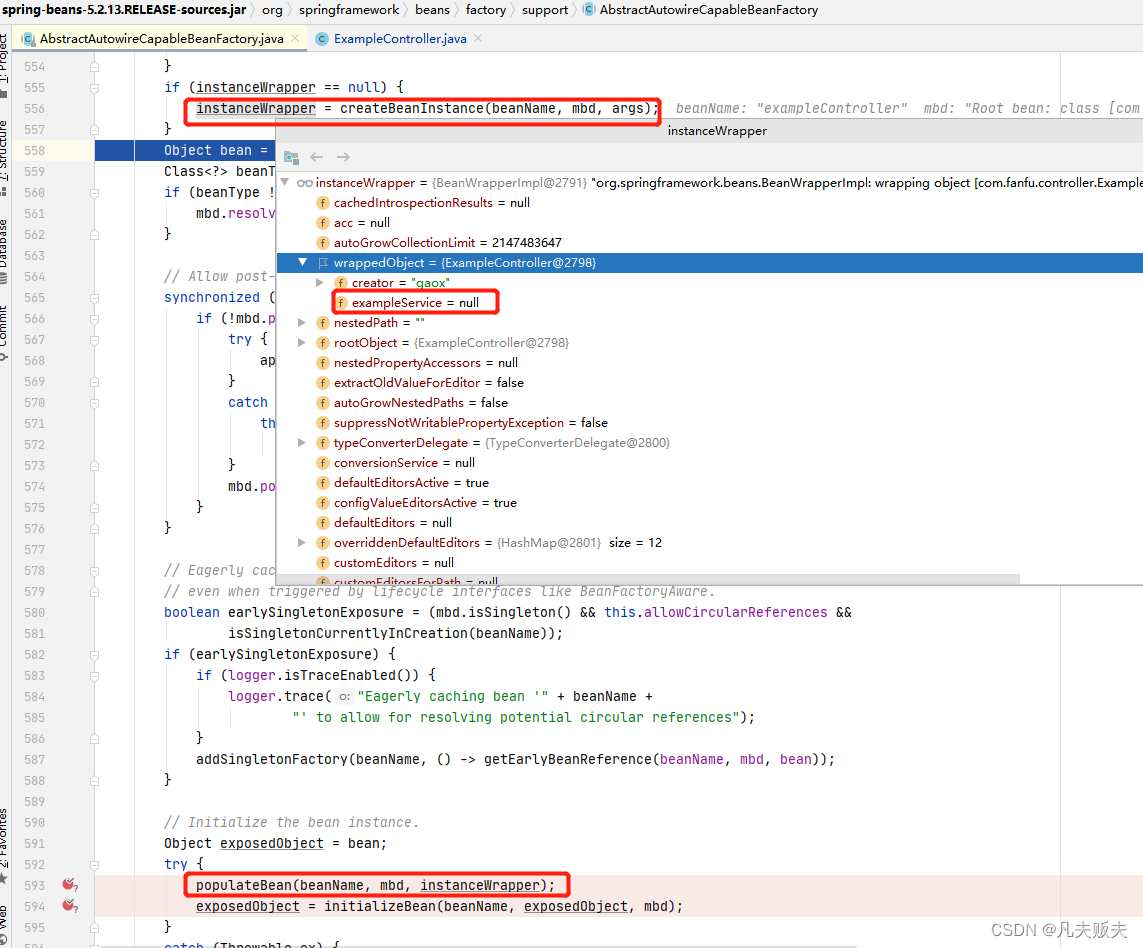
继续往下走,调用populateBean(),完成对已实例化的目标Bean(ExampleController)的属性注入;如图进入到populateBean()就开始了第二个扩展点postProcessAfterInstantiation()方法的执行;这里要注意一下返回值的类型为布尔类型:如果返回true,则会继续执行第三个扩展点;如果返回fase,则第三个扩展点不会执行,直接return跳出了当前方法;
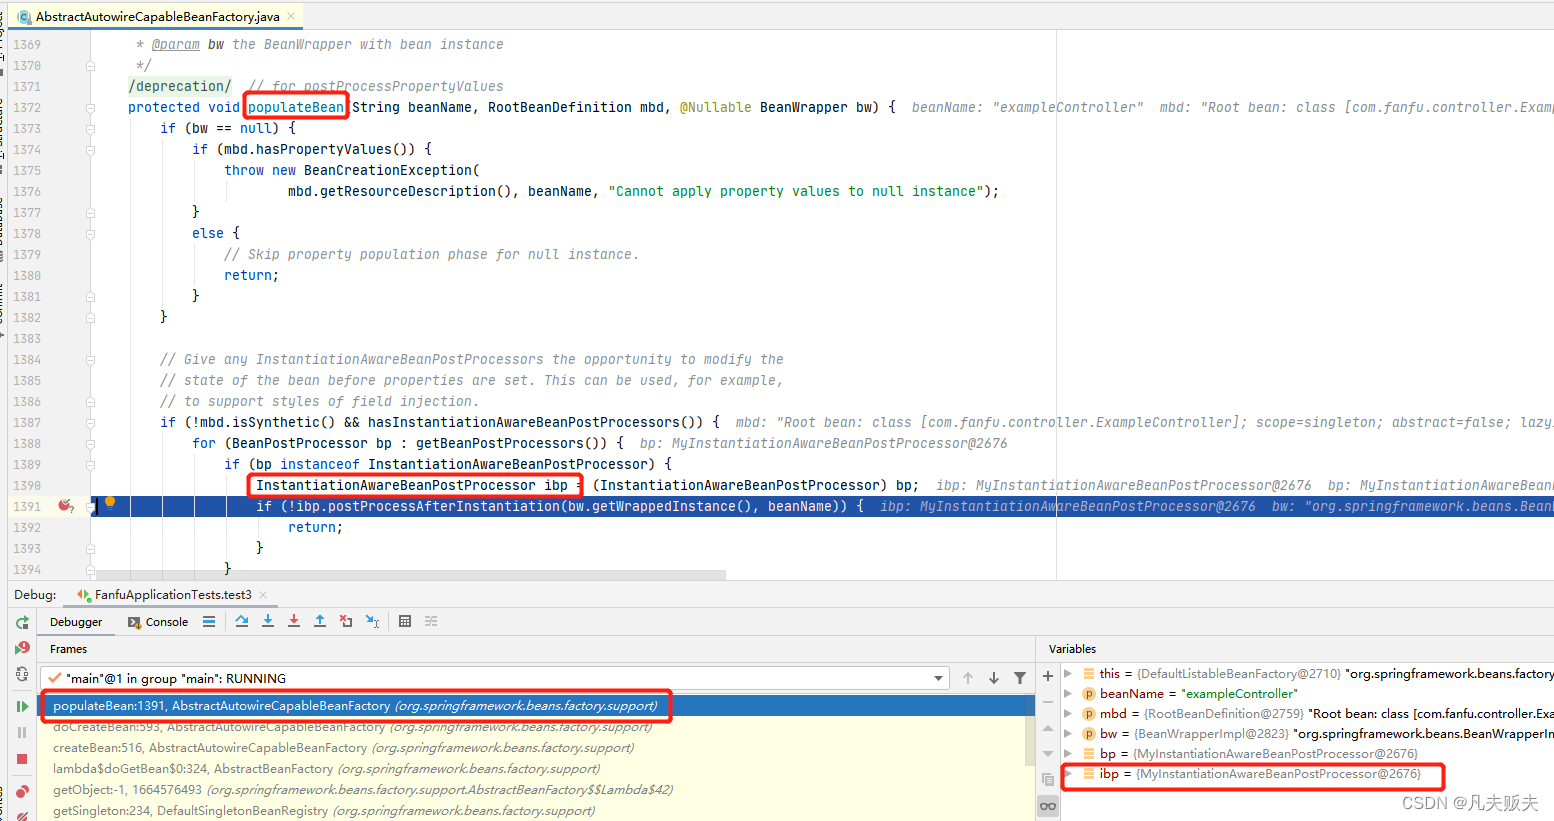
还是在AbstractAutowireCapableBeanFactory#populateBean方法中,第二个扩展点执行过且返回值为true,接着往下就会执行到第三个扩展点postProcessProperties();
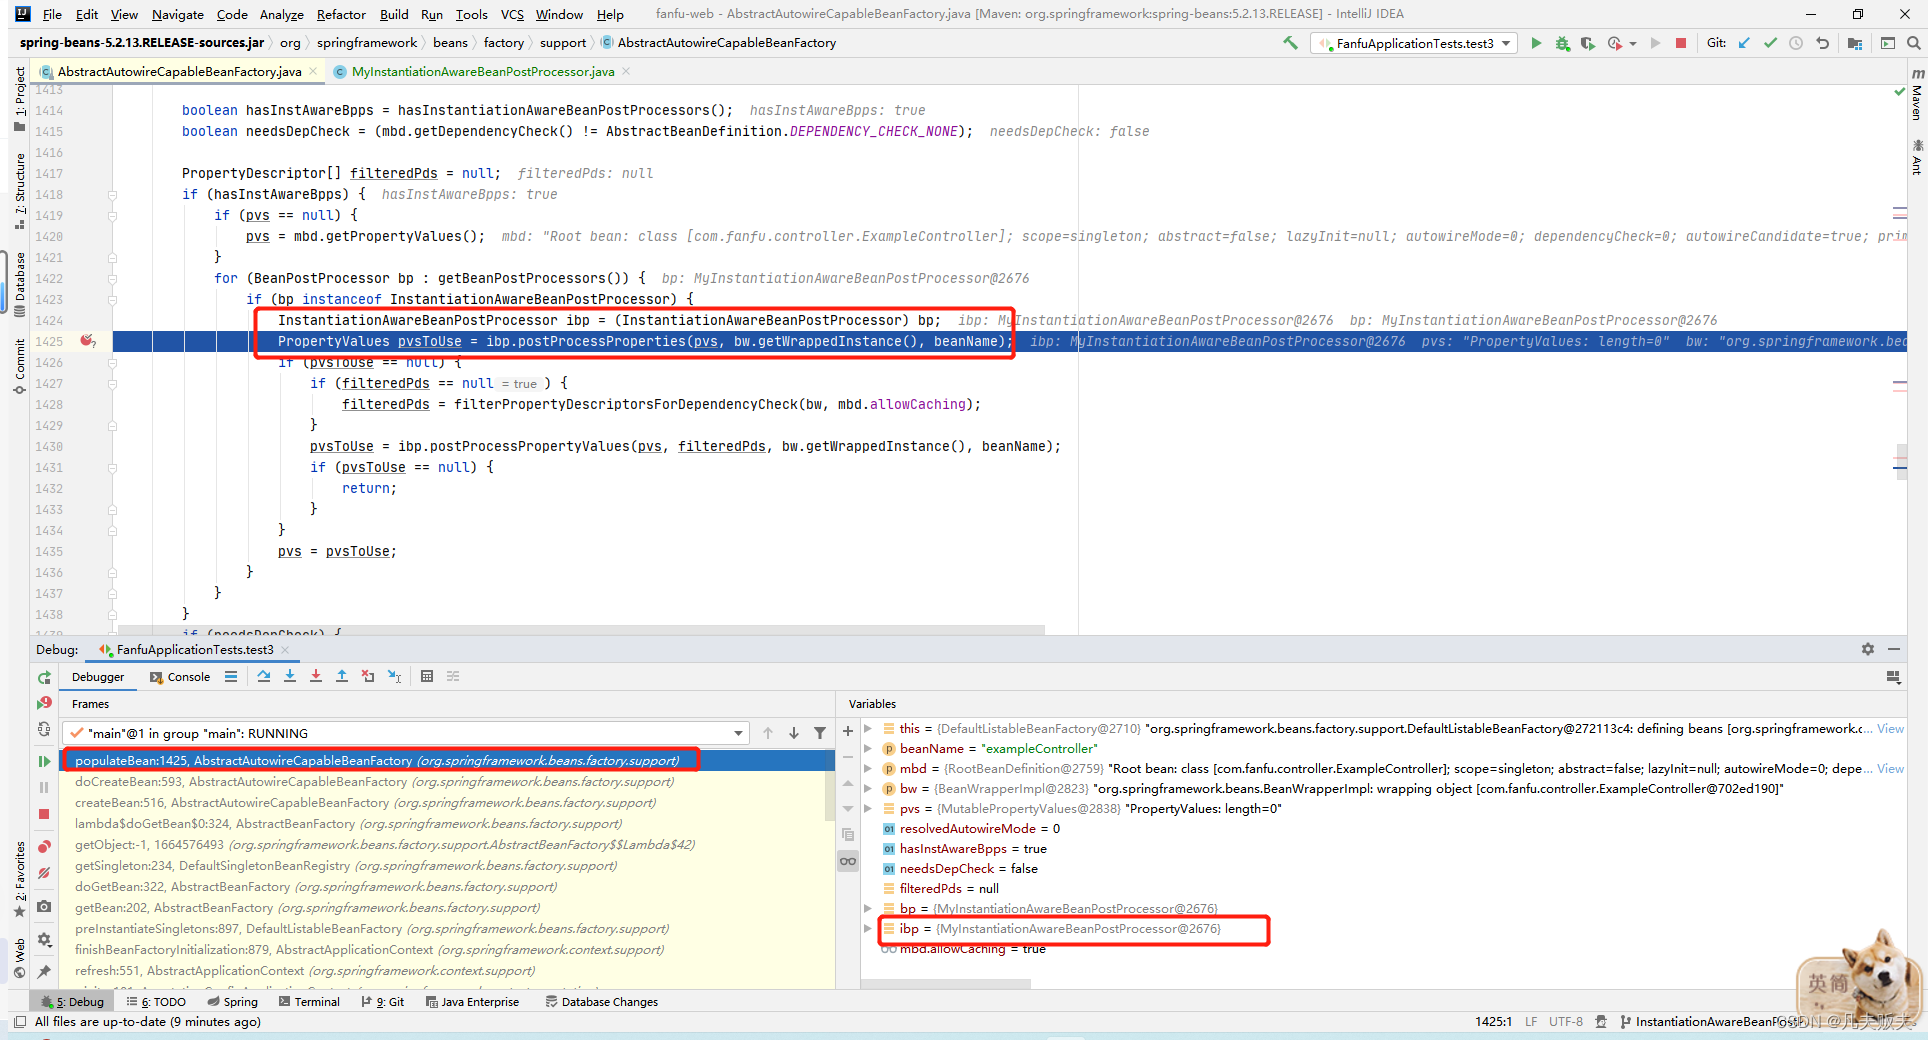
第三个扩展点要着重说一下,第三个扩展触发执行的时候Bean已经实例化,但是未完成属性注入,但是这里可以在里替换掉即将注入的属性。在实现方式的示例代码ExampleController类中,定义了一个String类型的属性creator,默认值为"gaox",在MyInstantiationAwareBeanPostProcessor#postProcessProperties中,把“gaox”替换为“fanfu”,再看单元测试的执行结果,默认值“gaox”被替换成了“fanfu”;
其实了解了InstantiationAwareBeanPostProcessorr的功能特性、实现方式和工作原理,在遇到类似的业务需求的时候都可以应用这些扩展点,这里举一个平时开发中经用到但是应该没有注意到的一个Spring内部经典实现AutowiredAnnotationBeanPostProcessor。
通过的UML类图,可以看到AutowiredAnnotationBeanPostProcessor继承于InstantiationAwareBeanPostProcessorAdapter,而InstantiationAwareBeanPostProcessorAdapter又实现了SmartInstantiationAwareBeanPostProcessor接口,SmartInstantiationAwareBeanPostProcessor接口又继承了InstantiationAwareBeanPostProcessor。
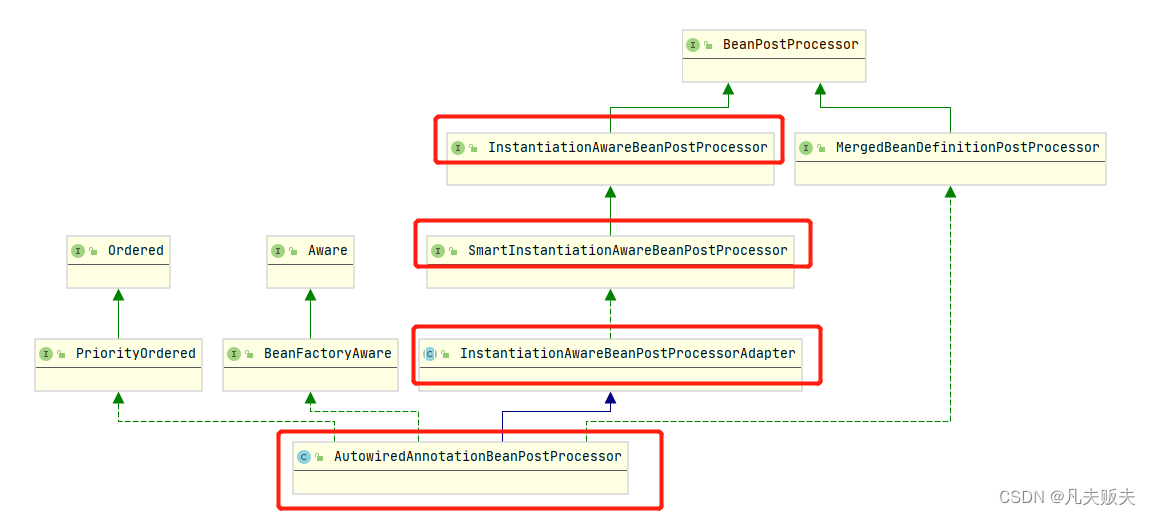
AutowiredAnnotationBeanPostProcessor又实现了InstantiationAwareBeanPostProcessor的postProcessProperties();实现方式中示例代码ExampleController类的exampleService属性用@Autowired注解标记后,实际的注入实现逻辑就在AutowiredAnnotationBeanPostProcessor的postProcessProperties()内,有兴趣的小伙伴可以继续深入下去探寻一翻。
@Override
public PropertyValues postProcessProperties(PropertyValues pvs, Object bean, String beanName) {
   InjectionMetadata metadata = findAutowiringMetadata(beanName, bean.getClass(), pvs);
   try {
      metadata.inject(bean, beanName, pvs);
   }
   catch (BeanCreationException ex) {
      throw ex;
   }
   catch (Throwable ex) {
      throw new BeanCreationException(beanName, "Injection of autowired dependencies failed", ex);
   }
   return pvs;
}
我正在编写一个包含C扩展的gem。通常当我写一个gem时,我会遵循TDD的过程,我会写一个失败的规范,然后处理代码直到它通过,等等......在“ext/mygem/mygem.c”中我的C扩展和在gemspec的“扩展”中配置的有效extconf.rb,如何运行我的规范并仍然加载我的C扩展?当我更改C代码时,我需要采取哪些步骤来重新编译代码?这可能是个愚蠢的问题,但是从我的gem的开发源代码树中输入“bundleinstall”不会构建任何native扩展。当我手动运行rubyext/mygem/extconf.rb时,我确实得到了一个Makefile(在整个项目的根目录中),然后当
我想这样组织C源代码:+/||___+ext||||___+native_extension||||___+lib||||||___(Sourcefilesarekeptinhere-maycontainsub-folders)||||___native_extension.c||___native_extension.h||___extconf.rb||___+lib||||___(Rubysourcecode)||___Rakefile我无法使此设置与mkmf一起正常工作。native_extension/lib中的文件(包含在native_extension.c中)将被完全忽略。
我知道还有其他相同的问题,但他们没有解决我的问题。我不断收到错误:Aws::Errors::MissingRegionErrorinBooksController#create,缺少区域;使用:region选项或将区域名称导出到ENV['AWS_REGION']。但是,这是我的配置开发.rb:config.paperclip_defaults={storage::s3,s3_host_name:"s3-us-west-2.amazonaws.com",s3_credentials:{bucket:ENV['AWS_BUCKET'],access_key_id:ENV['AWS_ACCE
有几种方法:first_or_create_by、find_or_create_by等,它们的工作原理是:与数据库对话以尝试找到我们想要的东西如果我们找不到,就自己做保存到数据库显然,并发调用这些方法可能会使两个线程都找不到它们想要的东西,并且在第3步中一个线程会意外失败。似乎更好的解决方案是,创建或查找即:提前在您的数据库中创建合理的唯一性约束。如果你想保存一些东西,就保存它如果有效,那就太好了。如果它因为RecordNotUnique异常而无法工作,它已经存在,太好了,加载它那么在什么情况下我想使用Rails内置的东西而不是我自己的(看起来更可靠)create_or_find?
我有一个要在我的Rails3项目中使用的数组扩展方法。它应该住在哪里?我有一个应用程序/类,我最初把它放在(array_extensions.rb)中,在我的config/application.rb中我加载路径:config.autoload_paths+=%W(#{Rails.root}/应用程序/类)。但是,当我转到railsconsole时,未加载扩展。是否有一个预定义的位置可以放置我的Rails3扩展方法?或者,一种预先定义的方式来添加它们?我知道Rails有自己的数组扩展方法。我应该将我的添加到active_support/core_ext/array/conversion
我仍然收到标题中的“错误”消息,但不知道如何解决。在ApplicationController中,classApplicationController在routes.rb#match'set_activity_account/:id/:value'=>'users#account_activity',:as=>:set_activity_account--thisdoesn'tworkaswell..resources:usersdomemberdoget:action_a,:action_bendcollectiondoget'account_activity'endend和User
我想编写一个ruby脚本来递归复制目录结构,但排除某些文件类型。因此,给定以下目录结构:folder1folder2file1.txtfile2.txtfile3.csfile4.htmlfolder2folder3file4.dll我想复制这个结构,但不包含.txt和.cs文件。因此,生成的目录结构应如下所示:folder1folder2file4.htmlfolder2folder3file4.dll 最佳答案 您可以使用查找模块。这是一个代码片段:require"find"ignored_extensions=[".cs"
这个问题有两个部分。在RubyProgrammingLanguage一书中,有一个使用模块扩展字符串对象和类的示例(第8.1.1节)。第一个问题。为什么如果您使用新方法扩展类,然后创建该类的对象/实例,则无法访问该方法?irb(main):001:0>moduleGreeter;defciao;"Ciao!";end;end=>nilirb(main):002:0>String.extend(Greeter)=>Stringirb(main):003:0>String.ciao=>"Ciao!"irb(main):004:0>x="foobar"=>"foobar"irb(main):
我在使用FasterCSV和我的rakedb:seeds迁移时遇到问题。我收到错误:“rake中止!未加引号的字段不允许\r或\n(第2行)”在以下seeds.rb数据上:require'csv'directory="db/init_data/"file_name="gardenzing020812.csv"path_to_file=directory+file_nameputs'LoadingPlantrecords'#Pre-loadallPlantrecordsn=0CSV.foreach(path_to_file)do|row|Plant.create!:name=>row[1
可能真的很简单,但我很难在网上找到关于这个的文档我在Ruby中有两个activerecord查询,我想通过OR运算符连接在一起@pro=Project.where(:manager_user_id=>current_user.id)@proa=Project.where(:account_manager=>current_user.id)我是ruby的新手,但我自己尝试使用||@pro=Project.where(:manager_user_id=>current_user.id||:account_manager=>current_user.id)这没有用,所以1.我想知道如何在