TensorRT是一个高性能的深度学习推理(Inference)优化器,可以为深度学习应用提供低延迟、高吞吐率的部署推理。TensorRT可用于对超大规模数据中心、嵌入式平台或自动驾驶平台进行推理加速。TensorRT现已能支持TensorFlow、Caffe、Mxnet、Pytorch等几乎所有的深度学习框架,将TensorRT和NVIDIA的GPU结合起来,能在几乎所有的框架中进行快速和高效的部署推理。
在平时的工作与学习中也都尝试过使用Libtorch和onnxruntime的方式部署过深度学习模型。但这两款多多少少存在着内存与显存占用的问题,并且无法完全释放。(下文的部署方式不仅简单并且在前向推理过程所需的显存更低,并且在推理结束后可以随时完全释放显存)。
win10
vs2019
cuda10.2
pytorch1.9
只要其中的pytorch,cuda版本与后续的Tensorrt版本对应即可
首先需要将pytorch的.pth模型转化为onnx的模型(为了后边的方便,目前讲解的方式都是单卡的方式)。转化方式很简单pytorch已经提供,网上也有许多讲解这个函数的博客。此处直接上代码:(必须确定.pth模型是可以正常使用的否则后面转化的模型也都无法使用)。
def Convert_ONNX(model,input_size):
    model.eval()
    dummy_input = torch.randn(input_size).cuda()

    torch.onnx.export(model,         # model being run
         dummy_input,       # model input (or a tuple for multiple inputs)
         "PytorchtoOnnx.onnx",       # where to save the model
#           dynamic_axes = {'inputs':{0:"batch"}},   #表示batch这个维度可变的  (有这个参数可以关闭不用设置)会麻烦很多
         verbose = True,
         export_params=True,  # store the trained parameter weights inside the model file
         input_names = ['inputs'],   # the model's input names
         output_names = ['modelOutput']) # the model's output names
print("end")首先去官网https://developer.nvidia.com/nvidia-tensorrt-download下载与自己pytorch版本和cuda版本适应的tensorrt版本。
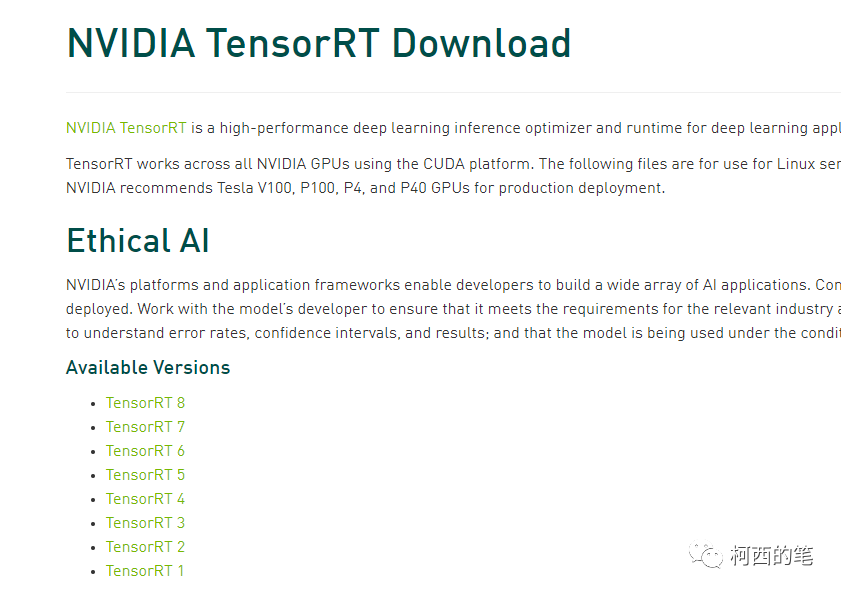
下载完成后打开里面的bin文件夹,里面存在着一个trtexec.exe。利用以下代码将之前获得的onnx文件转化为trt文件。这里讲解最简单的方式,因为trtexec.exe有许多可以优化的功能,最终都会影响模型的精度与速度。在命令行中输入如下指令。
trtexec.exe --onnx=PytorchtoOnnx.onnx --saveEngine=TrtModel.trt --explicitBatch --workspace=4096
这里模型转化可能需要一点时间,完成转化后会得到TrtMedel.trt模型。那么准备工作也就完成了。接下来开始C++部署。
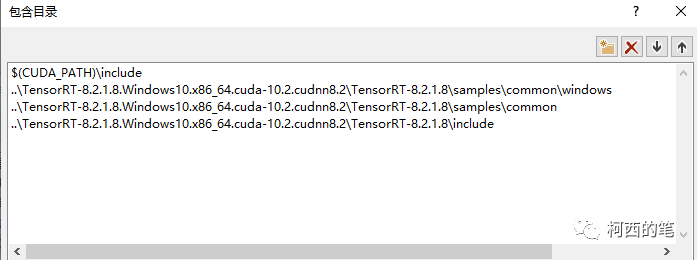
在VC++目录---包含目录中添加cuda路径和tensorrt路径(此处用的是相对路径,你也可以用绝对路径)其中$(CUDA_PATH)\include是指cuda中的include文件,我的在C:\Program Files\NVIDIA GPU Computing Toolkit\CUDA\v10.2\include
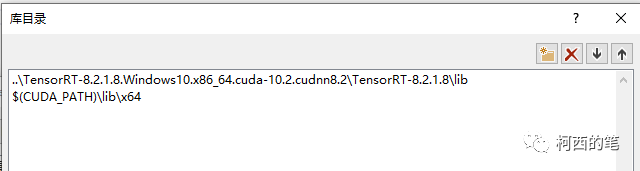
在VC++目录---库目录中添加
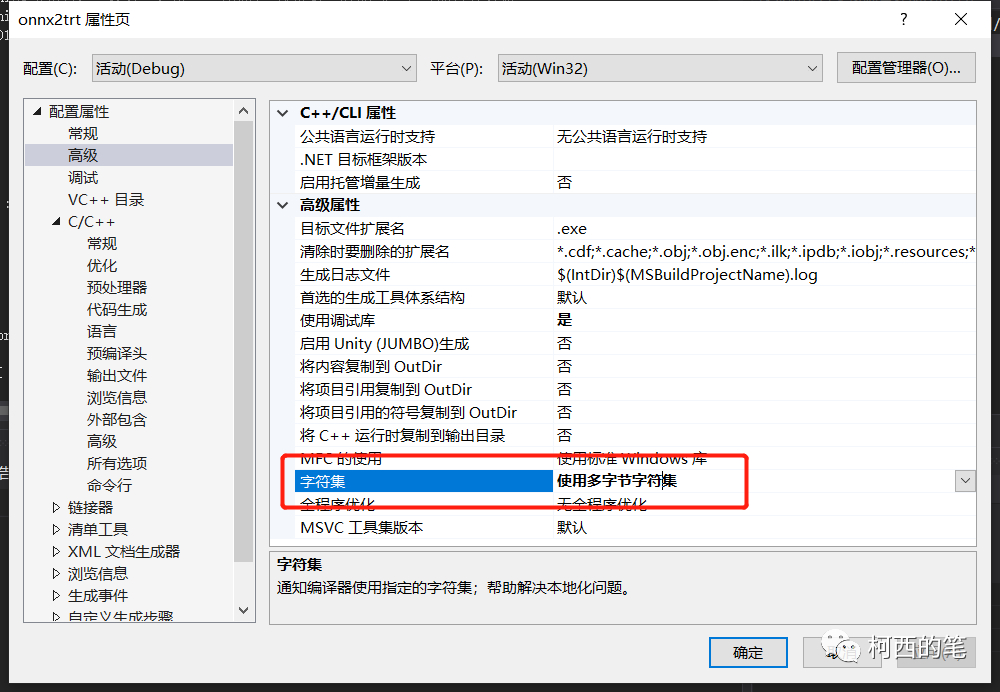
还需要将字符集改成:使用多字节字符集。否则会报C2664 “HMODULE LoadLibraryW(LPCWSTR)”: 无法将参数 1 从“const _Elem *”转换为“LPCWSTR” 的错误。
必须新建一个logger.cpp的文件。里面写入如下代码。
#include "logger.h"
#include "ErrorRecorder.h"
#include "logging.h"

SampleErrorRecorder gRecorder;
namespace sample
{
Logger gLogger{Logger::Severity::kINFO};
LogStreamConsumer gLogVerbose{LOG_VERBOSE(gLogger)};
LogStreamConsumer gLogInfo{LOG_INFO(gLogger)};
LogStreamConsumer gLogWarning{LOG_WARN(gLogger)};
LogStreamConsumer gLogError{LOG_ERROR(gLogger)};
LogStreamConsumer gLogFatal{LOG_FATAL(gLogger)};

void setReportableSeverity(Logger::Severity severity)
{
    gLogger.setReportableSeverity(severity);
    gLogVerbose.setReportableSeverity(severity);
    gLogInfo.setReportableSeverity(severity);
    gLogWarning.setReportableSeverity(severity);
    gLogError.setReportableSeverity(severity);
    gLogFatal.setReportableSeverity(severity);
}
} // namespace sample
再新建一个test.cpp进行测试。测试代码如下:(下面是一个unet的分割模型,并且前面的预处理例如标准化等都在外面完成了。下面只涉及到推理部分)。
#include <iostream>
#include <algorithm>
#include <cmath>
using namespace std;
#include <cuda_runtime_api.h>
#include "NvInfer.h"
#include "argsParser.h"
#include "logger.h"
#include "common.h"
#include "NvOnnxParser.h"
#include "buffers.h"
using namespace nvinfer1;

bool read_TRT_File(const std::string& engineFile, ICudaEngine*& engine)
{
  fstream file;
  file.open(engineFile, ios::binary | ios::in);
  file.seekg(0, ios::end);                     // 定位到 fileObject 的末尾
  int length = file.tellg();
  file.seekg(0, std::ios::beg);                // 定位到 fileObject 的开头
  unique_ptr<char[]> data(new char[length]);
  file.read(data.get(), length);
  file.close();

  nvinfer1::IRuntime* trtRuntime = createInferRuntime(sample::gLogger.getTRTLogger());
  engine = trtRuntime->deserializeCudaEngine(data.get(), length, nullptr);
  assert(engine != nullptr);
  std::cout << "The engine in TensorRT.cpp is not nullptr" << std::endl;
  //trtModelStream = engine->serialize();
  trtRuntime->destroy();
  return true;
}
void doInference(IExecutionContext& context, float* input, float* output,int InputSize, int OutPutSize,int BatchSize)
{

  const char* INPUT_BLOB_NAME = "inputs";
  const char* OUTPUT_BLOB_NAME = "modelOutput";

  const ICudaEngine& engine = context.getEngine();
  // input and output buffer pointers that we pass to the engine - the engine requires exactly IEngine::getNbBindings(),
  // of these, but in this case we know that there is exactly one input and one output.
  assert(engine.getNbBindings() == 2);
  void* buffers[2];

  // In order to bind the buffers, we need to know the names of the input and output tensors.
  // note that indices are guaranteed to be less than IEngine::getNbBindings()

  const int inputIndex = engine.getBindingIndex(INPUT_BLOB_NAME);
  const int outputIndex = engine.getBindingIndex(OUTPUT_BLOB_NAME);

  // DebugP(inputIndex); DebugP(outputIndex);
  // create GPU buffers and a stream
  CHECK(cudaMalloc(&buffers[inputIndex], InputSize * sizeof(float)));
  CHECK(cudaMalloc(&buffers[outputIndex], OutPutSize * sizeof(float)));

  cudaStream_t stream;
  CHECK(cudaStreamCreate(&stream));

  // DMA the input to the GPU,  execute the batch asynchronously, and DMA it back:
  CHECK(cudaMemcpyAsync(buffers[inputIndex], input, InputSize * sizeof(float), cudaMemcpyHostToDevice, stream));
  context.enqueue(BatchSize, buffers, stream, nullptr);
  CHECK(cudaMemcpyAsync(output, buffers[outputIndex], OutPutSize * sizeof(float), cudaMemcpyDeviceToHost, stream));
  cudaStreamSynchronize(stream);

  // release the stream and the buffers
  cudaStreamDestroy(stream);
  CHECK(cudaFree(buffers[inputIndex]));
  CHECK(cudaFree(buffers[outputIndex]));
}

void runs(short* Data, int ImageCol, int ImageRow, int ImageLayer, unsigned char* Outputs)
{
  int numall = ImageCol * ImageRow * ImageLayer;
  float* PatchData = new float[numall];
  Process(Data, ImageCol, ImageRow, ImageLayer, PatchData);   //前处理

  string eigineFile = "TrtMedel.trt";
  ICudaEngine* engine = nullptr;
  read_TRT_File(eigineFile, engine);

  IExecutionContext* context = engine->createExecutionContext();
  assert(context != nullptr);

  float* out_image = new float[3 * numall];
  int batchsize = 1;
  int InputSize = 1 * 1 * numall;
  int OutputSize = 1 * 3 * numall;
  doInference(*context, PatchData, out_image, InputSize, OutputSize, batchsize);
  EndProcess(out_image, 3, ImageCol, ImageRow, ImageLayer, Outputs);   //后处理


  context->destroy();
  engine->destroy();
  cudaDeviceReset();
  delete[] out_image;
  delete[] PatchData;
  cout<<"柯西的笔"<<endl;
}
如上代码可以即可以正常运行编译。目前Tensorrt只支持20系以上显卡,在10系显卡也可以部署但是并没有什么明显的加速效果,但是显存还是会比其他部署模块低。
如何涉及到整个项目完整在无CUDA环境中的部署,其实也很简单。有需求的可以私信我。(也请关注柯西的笔公众。
我有一个模型:classItem项目有一个属性“商店”基于存储的值,我希望Item对象对特定方法具有不同的行为。Rails中是否有针对此的通用设计模式?如果方法中没有大的if-else语句,这是如何干净利落地完成的? 最佳答案 通常通过Single-TableInheritance. 关于ruby-on-rails-Rails-子类化模型的设计模式是什么?,我们在StackOverflow上找到一个类似的问题: https://stackoverflow.co
我需要从一个View访问多个模型。以前,我的links_controller仅用于提供以不同方式排序的链接资源。现在我想包括一个部分(我假设)显示按分数排序的顶级用户(@users=User.all.sort_by(&:score))我知道我可以将此代码插入每个链接操作并从View访问它,但这似乎不是“ruby方式”,我将需要在不久的将来访问更多模型。这可能会变得很脏,是否有针对这种情况的任何技术?注意事项:我认为我的应用程序正朝着单一格式和动态页面内容的方向发展,本质上是一个典型的网络应用程序。我知道before_filter但考虑到我希望应用程序进入的方向,这似乎很麻烦。最终从任何
我有一个包含模块的模型。我想在模块中覆盖模型的访问器方法。例如:classBlah这显然行不通。有什么想法可以实现吗? 最佳答案 您的代码看起来是正确的。我们正在毫无困难地使用这个确切的模式。如果我没记错的话,Rails使用#method_missing作为属性setter,因此您的模块将优先,阻止ActiveRecord的setter。如果您正在使用ActiveSupport::Concern(参见thisblogpost),那么您的实例方法需要进入一个特殊的模块:classBlah
我有一个表单,其中有很多字段取自数组(而不是模型或对象)。我如何验证这些字段的存在?solve_problem_pathdo|f|%>... 最佳答案 创建一个简单的类来包装请求参数并使用ActiveModel::Validations。#definedsomewhere,atthesimplest:require'ostruct'classSolvetrue#youcouldevencheckthesolutionwithavalidatorvalidatedoerrors.add(:base,"WRONG!!!")unlesss
我想向我的Controller传递一个参数,它是一个简单的复选框,但我不知道如何在模型的form_for中引入它,这是我的观点:{:id=>'go_finance'}do|f|%>Transferirde:para:Entrada:"input",:placeholder=>"Quantofoiganho?"%>Saída:"output",:placeholder=>"Quantofoigasto?"%>Nota:我想做一个额外的复选框,但我该怎么做,模型中没有一个对象,而是一个要检查的对象,以便在Controller中创建一个ifelse,如果没有检查,请帮助我,非常感谢,谢谢
我有一些非常大的模型,我必须将它们迁移到最新版本的Rails。这些模型有相当多的验证(User有大约50个验证)。是否可以将所有这些验证移动到另一个文件中?说app/models/validations/user_validations.rb。如果可以,有人可以提供示例吗? 最佳答案 您可以为此使用关注点:#app/models/validations/user_validations.rbrequire'active_support/concern'moduleUserValidationsextendActiveSupport:
对于Rails模型,是否可以/建议让一个类的成员不持久保存到数据库中?我想将用户最后选择的类型存储在session变量中。由于我无法从我的模型中设置session变量,我想将值存储在一个“虚拟”类成员中,该成员只是将值传递回Controller。你能有这样的类(class)成员吗? 最佳答案 将非持久属性添加到Rails模型就像任何其他Ruby类一样:classUser扩展解释:在Ruby中,所有实例变量都是私有(private)的,不需要在赋值前定义。attr_accessor创建一个setter和getter方法:classUs
我有一个正在构建的应用程序,我需要一个模型来创建另一个模型的实例。我希望每辆车都有4个轮胎。汽车模型classCar轮胎模型classTire但是,在make_tires内部有一个错误,如果我为Tire尝试它,则没有用于创建或新建的activerecord方法。当我检查轮胎时,它没有这些方法。我该如何补救?错误是这样的:未定义的方法'create'forActiveRecord::AttributeMethods::Serialization::Tire::Module我测试了两个环境:测试和开发,它们都因相同的错误而失败。 最佳答案
我是Google云的新手,我正在尝试对其进行首次部署。我的第一个部署是RubyonRails项目。我基本上是在关注thisguideinthegoogleclouddocumentation.唯一的区别是我使用的是我自己的项目,而不是他们提供的“helloworld”项目。这是我的app.yaml文件runtime:customvm:trueentrypoint:bundleexecrackup-p8080-Eproductionconfig.ruresources:cpu:0.5memory_gb:1.3disk_size_gb:10当我转到我的项目目录并运行gcloudprevie
ruby如何管理内存。例如:如果我们在执行过程中采用C程序,则以下是内存模型。类似于这个ruby如何处理内存。C:__________________|||stack|||------------------||||------------------|||||Heap|||||__________________|||data|__________________|text|__________________Ruby:? 最佳答案 Ruby中没有“内存”这样的东西。Class#allocate分配一个对象并返回该对象。这就是程序
