git clone https://github.com/WongKinYiu/yolov7.git
cd yolov7
git checkout 44d8ab41780e24eba563b6794371f29db0902271
v7的训练可以参考v5训练:yolov5 初识(ubuntu版)、yolov5 初识(win版)
注意一下,opset_version=12

python export.py --weights="runs/train/exp/weights/best.pt" --simplify
git clone https://github.com/rockchip-linux/rknn-toolkit2.git
cd rknn-toolkit2
conda create -n rknn-toolkit2 python=3.6
conda activate rknn-toolkit2
pip install doc/requirements_cp36-*.txt
# if install bfloat16 failed, please install numpy manually first. "pip install numpy==1.16.6"
pip install doc/requirements_cp36-*.txt
pip install packages/rknn_toolkit2-*-cp36-*.whl
(样式照搬官方已有实例:test.jpg为任意一张测试集里的数据,dataset.txt为量化数据集的路径(200~500张?我也不太确定,这里只用了1张),test.py为转换代码,需修改。)
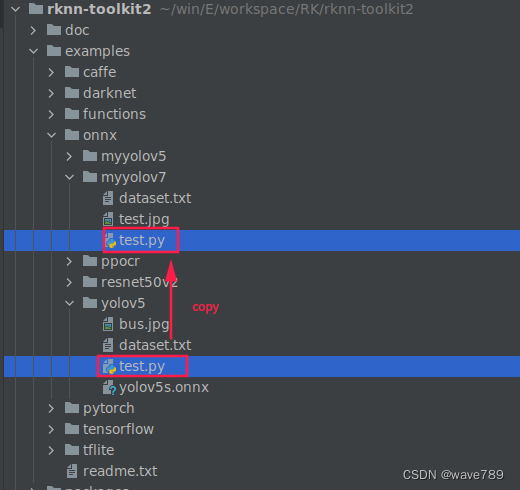
直接上图:
由来:
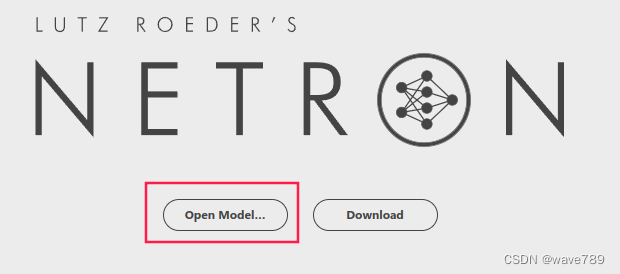
用这个网站打开转换的onnx模型
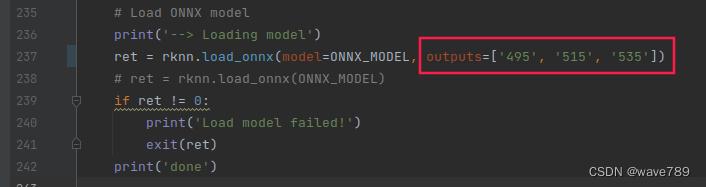
然后找到模型的三个输出,进行如下图的操作:

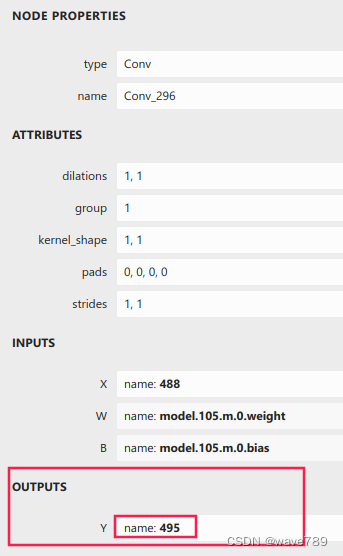
另外2个节点相同操作方法。
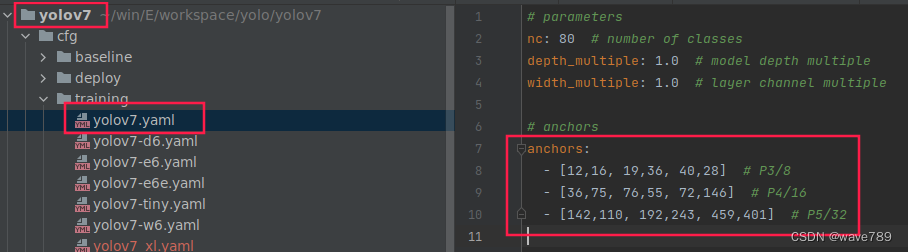
anchors用yolov7训练的:
由来:

import os
import urllib
import traceback
import time
import sys
import numpy as np
import cv2
from rknn.api import RKNN
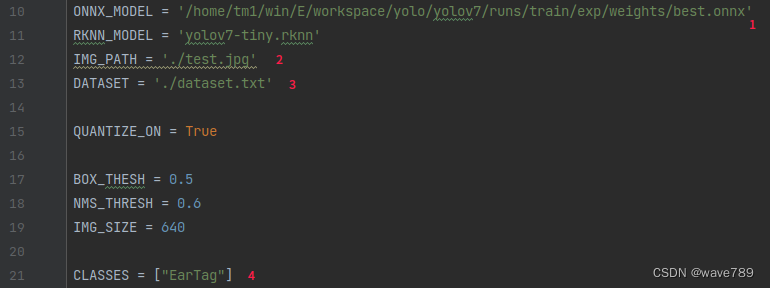
ONNX_MODEL = '/home/tm1/win/E/workspace/yolo/yolov7/runs/train/exp/weights/best.onnx'
RKNN_MODEL = 'yolov7.rknn'
IMG_PATH = './test.jpg'
DATASET = './dataset.txt'
QUANTIZE_ON = True
BOX_THESH = 0.45
NMS_THRESH = 0.25
IMG_SIZE = 640
CLASSES = ["EarTag"]
def sigmoid(x):
return 1 / (1 + np.exp(-x))
def xywh2xyxy(x):
# Convert [x, y, w, h] to [x1, y1, x2, y2]
y = np.copy(x)
y[:, 0] = x[:, 0] - x[:, 2] / 2 # top left x
y[:, 1] = x[:, 1] - x[:, 3] / 2 # top left y
y[:, 2] = x[:, 0] + x[:, 2] / 2 # bottom right x
y[:, 3] = x[:, 1] + x[:, 3] / 2 # bottom right y
return y
def process(input, mask, anchors):
anchors = [anchors[i] for i in mask]
grid_h, grid_w = map(int, input.shape[0:2])
box_confidence = sigmoid(input[..., 4])
box_confidence = np.expand_dims(box_confidence, axis=-1)
box_class_probs = sigmoid(input[..., 5:])
box_xy = sigmoid(input[..., :2]) * 2 - 0.5
col = np.tile(np.arange(0, grid_w), grid_w).reshape(-1, grid_w)
row = np.tile(np.arange(0, grid_h).reshape(-1, 1), grid_h)
col = col.reshape(grid_h, grid_w, 1, 1).repeat(3, axis=-2)
row = row.reshape(grid_h, grid_w, 1, 1).repeat(3, axis=-2)
grid = np.concatenate((col, row), axis=-1)
box_xy += grid
box_xy *= int(IMG_SIZE / grid_h)
box_wh = pow(sigmoid(input[..., 2:4]) * 2, 2)
box_wh = box_wh * anchors
box = np.concatenate((box_xy, box_wh), axis=-1)
return box, box_confidence, box_class_probs
def filter_boxes(boxes, box_confidences, box_class_probs):
"""Filter boxes with box threshold. It's a bit different with origin yolov5 post process!
# Arguments
boxes: ndarray, boxes of objects.
box_confidences: ndarray, confidences of objects.
box_class_probs: ndarray, class_probs of objects.
# Returns
boxes: ndarray, filtered boxes.
classes: ndarray, classes for boxes.
scores: ndarray, scores for boxes.
"""
box_classes = np.argmax(box_class_probs, axis=-1)
box_class_scores = np.max(box_class_probs, axis=-1)
pos = np.where(box_confidences[..., 0] >= BOX_THESH)
boxes = boxes[pos]
classes = box_classes[pos]
scores = box_class_scores[pos]
return boxes, classes, scores
def nms_boxes(boxes, scores):
"""Suppress non-maximal boxes.
# Arguments
boxes: ndarray, boxes of objects.
scores: ndarray, scores of objects.
# Returns
keep: ndarray, index of effective boxes.
"""
x = boxes[:, 0]
y = boxes[:, 1]
w = boxes[:, 2] - boxes[:, 0]
h = boxes[:, 3] - boxes[:, 1]
areas = w * h
order = scores.argsort()[::-1]
keep = []
while order.size > 0:
i = order[0]
keep.append(i)
xx1 = np.maximum(x[i], x[order[1:]])
yy1 = np.maximum(y[i], y[order[1:]])
xx2 = np.minimum(x[i] + w[i], x[order[1:]] + w[order[1:]])
yy2 = np.minimum(y[i] + h[i], y[order[1:]] + h[order[1:]])
w1 = np.maximum(0.0, xx2 - xx1 + 0.00001)
h1 = np.maximum(0.0, yy2 - yy1 + 0.00001)
inter = w1 * h1
ovr = inter / (areas[i] + areas[order[1:]] - inter)
inds = np.where(ovr <= NMS_THRESH)[0]
order = order[inds + 1]
keep = np.array(keep)
return keep
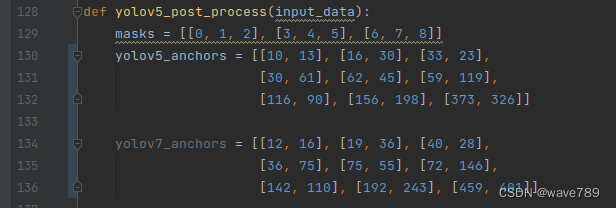
def yolov5_post_process(input_data):
masks = [[0, 1, 2], [3, 4, 5], [6, 7, 8]]
yolov5_anchors = [[10, 13], [16, 30], [33, 23],
[30, 61], [62, 45], [59, 119],
[116, 90], [156, 198], [373, 326]]
yolov7_anchors = [[12, 16], [19, 36], [40, 28],
[36, 75], [75, 55], [72, 146],
[142, 110], [192, 243], [459, 401]]
boxes, classes, scores = [], [], []
for input, mask in zip(input_data, masks):
b, c, s = process(input, mask, yolov5_anchors)
b, c, s = filter_boxes(b, c, s)
boxes.append(b)
classes.append(c)
scores.append(s)
boxes = np.concatenate(boxes)
boxes = xywh2xyxy(boxes)
classes = np.concatenate(classes)
scores = np.concatenate(scores)
nboxes, nclasses, nscores = [], [], []
for c in set(classes):
inds = np.where(classes == c)
b = boxes[inds]
c = classes[inds]
s = scores[inds]
keep = nms_boxes(b, s)
nboxes.append(b[keep])
nclasses.append(c[keep])
nscores.append(s[keep])
if not nclasses and not nscores:
return None, None, None
boxes = np.concatenate(nboxes)
classes = np.concatenate(nclasses)
scores = np.concatenate(nscores)
return boxes, classes, scores
def draw(image, boxes, scores, classes):
"""Draw the boxes on the image.
# Argument:
image: original image.
boxes: ndarray, boxes of objects.
classes: ndarray, classes of objects.
scores: ndarray, scores of objects.
all_classes: all classes name.
"""
for box, score, cl in zip(boxes, scores, classes):
top, left, right, bottom = box
print('class: {}, score: {}'.format(CLASSES[cl], score))
print('box coordinate left,top,right,down: [{}, {}, {}, {}]'.format(top, left, right, bottom))
top = int(top)
left = int(left)
right = int(right)
bottom = int(bottom)
cv2.rectangle(image, (top, left), (right, bottom), (255, 0, 0), 2)
cv2.putText(image, '{0} {1:.2f}'.format(CLASSES[cl], score),
(top, left + 10),
cv2.FONT_HERSHEY_SIMPLEX,
0.6, (0, 0, 255), 2)
def letterbox(im, new_shape=(640, 640), color=(0, 0, 0)):
# Resize and pad image while meeting stride-multiple constraints
shape = im.shape[:2] # current shape [height, width]
if isinstance(new_shape, int):
new_shape = (new_shape, new_shape)
# Scale ratio (new / old)
r = min(new_shape[0] / shape[0], new_shape[1] / shape[1])
# Compute padding
ratio = r, r # width, height ratios
new_unpad = int(round(shape[1] * r)), int(round(shape[0] * r))
dw, dh = new_shape[1] - new_unpad[0], new_shape[0] - new_unpad[1] # wh padding
dw /= 2 # divide padding into 2 sides
dh /= 2
if shape[::-1] != new_unpad: # resize
im = cv2.resize(im, new_unpad, interpolation=cv2.INTER_LINEAR)
top, bottom = int(round(dh - 0.1)), int(round(dh + 0.1))
left, right = int(round(dw - 0.1)), int(round(dw + 0.1))
im = cv2.copyMakeBorder(im, top, bottom, left, right, cv2.BORDER_CONSTANT, value=color) # add border
return im, ratio, (dw, dh)
if __name__ == '__main__':
# Create RKNN object
rknn = RKNN(verbose=True)
# pre-process config
print('--> Config model')
rknn.config(mean_values=[[0, 0, 0]], std_values=[[255, 255, 255]])
print('done')
# Load ONNX model
print('--> Loading model')
ret = rknn.load_onnx(model=ONNX_MODEL, outputs=['495', '515', '535'])
# ret = rknn.load_onnx(ONNX_MODEL)
if ret != 0:
print('Load model failed!')
exit(ret)
print('done')
# Build model
print('--> Building model')
ret = rknn.build(do_quantization=QUANTIZE_ON, dataset=DATASET)
if ret != 0:
print('Build model failed!')
exit(ret)
print('done')
# Export RKNN model
print('--> Export rknn model')
ret = rknn.export_rknn(RKNN_MODEL)
if ret != 0:
print('Export rknn model failed!')
exit(ret)
print('done')
# Init runtime environment
print('--> Init runtime environment')
ret = rknn.init_runtime()
# ret = rknn.init_runtime('rk3566')
if ret != 0:
print('Init runtime environment failed!')
exit(ret)
print('done')
# Set inputs
img = cv2.imread(IMG_PATH)
# img, ratio, (dw, dh) = letterbox(img, new_shape=(IMG_SIZE, IMG_SIZE))
img = cv2.cvtColor(img, cv2.COLOR_BGR2RGB)
img = cv2.resize(img, (IMG_SIZE, IMG_SIZE))
# Inference
print('--> Running model')
outputs = rknn.inference(inputs=[img])
# np.save('./onnx_yolov5_0.npy', outputs[0])
# np.save('./onnx_yolov5_1.npy', outputs[1])
# np.save('./onnx_yolov5_2.npy', outputs[2])
print('done')
# post process
input0_data = outputs[0]
input1_data = outputs[1]
input2_data = outputs[2]
input0_data = input0_data.reshape([3, -1] + list(input0_data.shape[-2:]))
input1_data = input1_data.reshape([3, -1] + list(input1_data.shape[-2:]))
input2_data = input2_data.reshape([3, -1] + list(input2_data.shape[-2:]))
input_data = list()
input_data.append(np.transpose(input0_data, (2, 3, 0, 1)))
input_data.append(np.transpose(input1_data, (2, 3, 0, 1)))
input_data.append(np.transpose(input2_data, (2, 3, 0, 1)))
boxes, classes, scores = yolov5_post_process(input_data)
img_1 = cv2.cvtColor(img, cv2.COLOR_RGB2BGR)
if boxes is not None:
draw(img_1, boxes, scores, classes)
# show output
cv2.imshow("post process result", img_1)
cv2.waitKey(0)
cv2.destroyAllWindows()
rknn.release()
关于yolov5训练时参数workers和batch-size的理解yolov5训练命令workers和batch-size参数的理解两个参数的调优总结yolov5训练命令python.\train.py--datamy.yaml--workers8--batch-size32--epochs100yolov5的训练很简单,下载好仓库,装好依赖后,只需自定义一下data目录中的yaml文件就可以了。这里我使用自定义的my.yaml文件,里面就是定义数据集位置和训练种类数和名字。workers和batch-size参数的理解一般训练主要需要调整的参数是这两个:workers指数据装载时cpu所使
趁着寒假期间稍微尝试跑了一下yolov5和yolov7的代码,由于自己用的笔记本没有独显,台式机虽有独显但用起来并不顺利,所以选择了租云服务器的方式,选择的平台是矩池云(价格合理,操作便捷)需要特别指出的是,如果需要用pycharm链接云服务器训练,必须要使用pycharm的专业版而不是社区版,专业版可以使用SSH服务连接云服务器。关于专业版的获取,据我所知一是可以买,二是如果你是在校大学生,可以用学生证向JetBrain申请专业版使用权,我就是通过这种方式激活专业版账户的,我记得当时两三天官方就发激活邮件了,还是很人性化的,使用期一年。下面开始正题本教程只涉及将yolov5及yolov7跑通
目录背景1、Anaconda3安装(1)安装Anaconda3后,换源遇到的问题(2)处理方法(3)Anaconda3环境变量配置2、显卡驱动安装3、安装CUDA(1)安装CUDA(2)安装cuDNN(3)CUDA环境配置4、安装pytorch,配置pytorch环境,克隆yolov5包(1)安装pytorch(2)检测是否安装成功(3)yolov5-v3.1源码安装配置(4)测试yolov5环境代码完整安装步骤背景Windows系统下,()括号中为我安装的版本或者对版本解释1、安装Anaconda3(我的版本),配置好环境变量(不同版本环境变量文件可能不同)2、安装电脑对应的显卡版本驱动(N
简介最近在使用VisDrone作为目标检测任务的数据集,看到了这个TPH-YOLOv5这个模型在VisDrone2021testset-challenge数据集上的检测效果排到了第五,mAP达到39.18%。于是开始阅读它的论文,并跑一跑的它的代码。论文地址:https://arxiv.org/pdf/2108.11539.pdf项目地址:https://github.com/cv516Buaa/tph-yolov5VisDrone数据集下载:https://pan.baidu.com/s/1JzRTeSi_LgdUVhwtbWhA_w?pwd=8888解决问题TPH-YOLOv5旨在解决无人
给自己发发学习一下哦,只会一点yolo所以发代码 https://github.com/Oneflow-Inc/one-yolov5教程也同样适用于ultralytics/yolov5因为one-yolov5仅仅是换了一个运行时后端而已,计算逻辑和代码相比于ultralytics/yolov5没有做任何改变。YOLOv5针对不同大小(n,s,m,l,x)的网络整体架构都是一样的,只不过会在每个子模块中采用不同的深度和宽度,分别应对yaml文件中的depth_multiple和width_multiple参数。还需要注意一点,官方除了n,s,m,l,x版本外还有n6,s6,m6,l6,x6,区别
1、weights训练所得权重2、confusion_matrix混淆矩阵列代表预测的类别,行代表实际的类别。其对角线上的值表示预测正确的数量比例,非对角线元素则是预测错误的部分。混淆矩阵的对角线值越高越好,这表明许多预测是正确的。3、F1_curveF1得分与置信度关系x轴为置信度,y轴为F1得分4、hyp.yaml训练相关超参数5、labels一共四张图左一:每个类别的数据量右一:labels的bounding_box左二:labels的中心点坐标右二:labels的矩阵宽高6、labels_correlogramlabels的中心点x,y和矩阵宽高w,h顶端对角线上:各自的分布直方图其余
1、parameters(1)nc代表目标检测所检测的种类(2)depth_multiple:控制通道的深度的系数,表示channel的缩放系数,就是将配置里面的backbone和head部分有关通道的设置,全部乘以该系数即可;width_multiple:控制网络宽度的系数;在此解释一下网络深度与网络宽度网络深度实际在构建网络模型的时候,并不是直接使用上述第二个参数,而是用网络深度去乘以第二个参数,最终获得的数量才是真正的层数量。举个例子,此时网络深度是0.33,某个层的第二个参数是3,那么实际在构建网络模型的时候只创建了0.33*3=1个,并不是三个。网络宽度同网络深度都需要乘系数 2、
1.BoTNet(BottleneckTransformerNetwork)UC伯克利,谷歌研究院(AshishVaswani,大名鼎鼎的Transformer一作)论文:https://arxiv.org/abs/2101.11605Github:https://github.com/leaderj1001/BottleneckTransformersBoTNet(BottleneckTransformerNetwork):一种基于Transformer的新骨干架构。BoTNet同时使用卷积和自注意力机制,即在ResNet的最后3个bottleneckblocks中使用全局多头自注意力(Mu
文章目录前言1、前期准备2、PC端环境配置2.1创建虚拟环境2.2依赖库安装2.3其他库安装3、虚拟端环境配置3.1安装Ubuntu系统3.2下载并安装anaconda3.3创建py36虚拟环境4、虚拟端安装RKNN-Toolkit4.1下载RKNN-Toolkit4.2安装RKNN-Toolkit4.3验证环境是否正确前言 RKNN支持许多框架训练的模型,但由于本人目前主要使用pytorch框架来训练模型,因此该部署教程是以Pytorch模型部署过程为例进行说明,后面再继续补充ONNX模型部署过程。1、前期准备 首先根据下表,确定RKNNToolkit以及Pytorch的版本。 由于P
在前面的文章中已经详细介绍了在本机上安装YOLOv5的教程,安装YOLOv5可参考前面的文章YOLOv5训练自己的数据集(超详细)https://blog.csdn.net/qq_40716944/article/details/118188085https://blog.csdn.net/qq_40716944/article/details/118188085目录 一、数据集介绍二、构建训练数据集 1、先构建数据集文件夹2、数据集格式转换3、训练集划分代码4、生成yolo格式的标签三、修改配置文件1、数据配置文件2、网络参数修改3、trian.py修改四、训练及测试1、训练 2、测试一、数