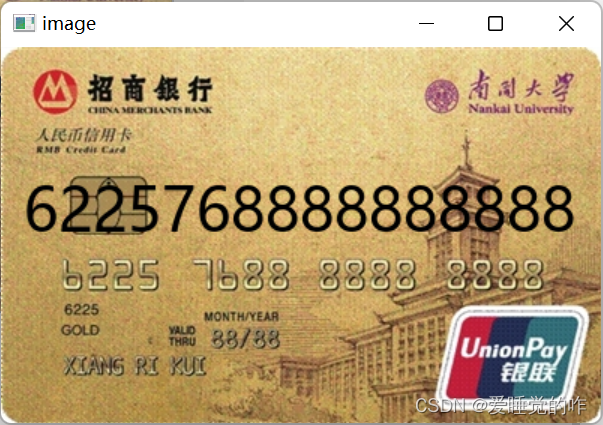
在日常生活中,常常需要输入自己的银行卡号。银行为保证卡号的唯一性和账号的安全性,会将卡号设计偏长,对于视力不好的人群以及老人不是很友好。传统银行卡服务时的人工识别银行卡号码太过费时费力。所以银行卡号的自动识别变得越来越重要。银行卡卡号的自动识别对实现银行卡的有效管理和进行银行卡的相关服务具有重要的理论意义和实际应用价值。本项目设计了一个银行卡卡号自动识别程序,传入银行卡照片即可获取银行卡号,为生活提供了遍历。。程序效果如下:
本项目中主要使用的方法为模板匹配,在opencv中也提供了API,为cv2.matchTemplate函数,现在我们一起来看一下这个函数的用法。
cv2.matchTemplate(img,img_Temp,method)
img:传入的需要匹配的图片
img_Temp:匹配的模板
method:模板匹配的算法,主要有:
在这里详细介绍一下我这个项目所使用的cv.TM_SQDIFF算法,这也是在模板匹配中最常用的算法,算法的公式为:
∑
x
,
y
[
Img
(
x
,
y
)
−
imgTemp
(
x
,
y
)
]
2
\sum_{x, y}[\operatorname{Img}(x, y)-\text { imgTemp }(x, y)]^2
x,y∑[Img(x,y)− imgTemp (x,y)]2
这与我们在机器学习中所提到的最小二乘法非常相似,都是先求对应位置的差,再平方变成正数,最后求和。从这个算法我们不能发现模板匹配也有一定的局限性:只能对特定的图片进行模板匹配,如果匹配目标发生旋转或大小变化那么算法失效!

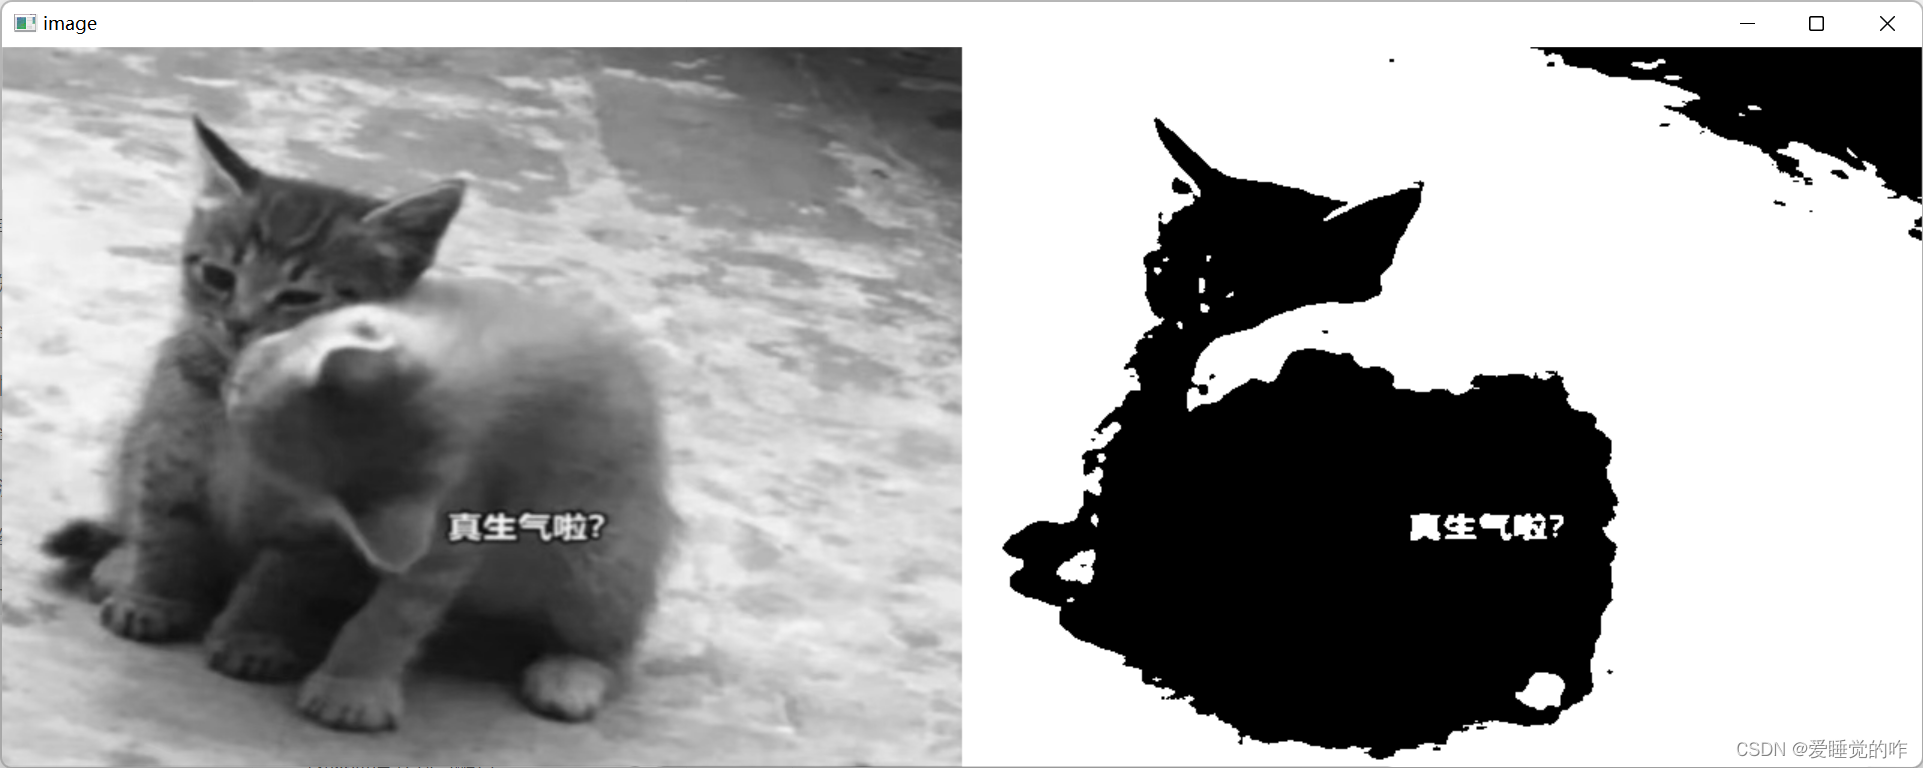
二值化是图像分割的一种最简单的方法。二值化可以把灰度图像转换成二值图像。把大于某个临界灰度值(阈值)的像素灰度设为灰度极大值(255),把小于这个值的像素灰度设为灰度极小值(0),从而实现二值化,简单来说:设定一个阈值valve,对于视频信号矩阵中的每一行,从左至右比较各像素值和阈值的大小,若图像灰度值大于或等于阈值,则判定该像素对应的255;反之,小于阈值的灰度值则为0。就是将图像上的像素点的灰度值设置为0或255,也就是将整个图像呈现出明显的黑白效果。
全局阈值即规定一个数字,将大于这个数字的像素全部变为指定的一个数,小于这个值的变为另一个数。我们首先看API函数,然后以具体以的例子来做讲解。对应全局阈值,opencv提供的API为:
cv2.threshold(src,thresh,maxVal,tpye)
src:输入的图片对象
thresh:阈值
maxVal:归成的最大值,归成的最小值为0,也就是黑色
tpye:cv2.THRESH_BINARY和cv2.THRESH_BINARY_INV


#!/usr/bin/env python
# -*- coding: UTF-8 -*-
"""
@Project :OpenCV识别银行卡数字
@File    :test.py
@IDE     :PyCharm
@Author  :咋
@Date    :2023/1/14 17:17
"""
import cv2
import numpy as np
# 读取图片
image = cv2.imread("Handsome.jpg")
# 转化为灰度图
image = cv2.cvtColor(image,cv2.COLOR_BGR2GRAY)
# 调整图片大小
image = cv2.resize(image,(640,480))
# 全局阈值处理
thresh,threshold_img = cv2.threshold(image,120,255,cv2.THRESH_BINARY)
# 展示图片
cv2.imshow("image",np.hstack((image,threshold_img)))
# cv2.imshow("image",image)
cv2.waitKey(0)
# 销毁窗口
cv2.destroyAllWindows()
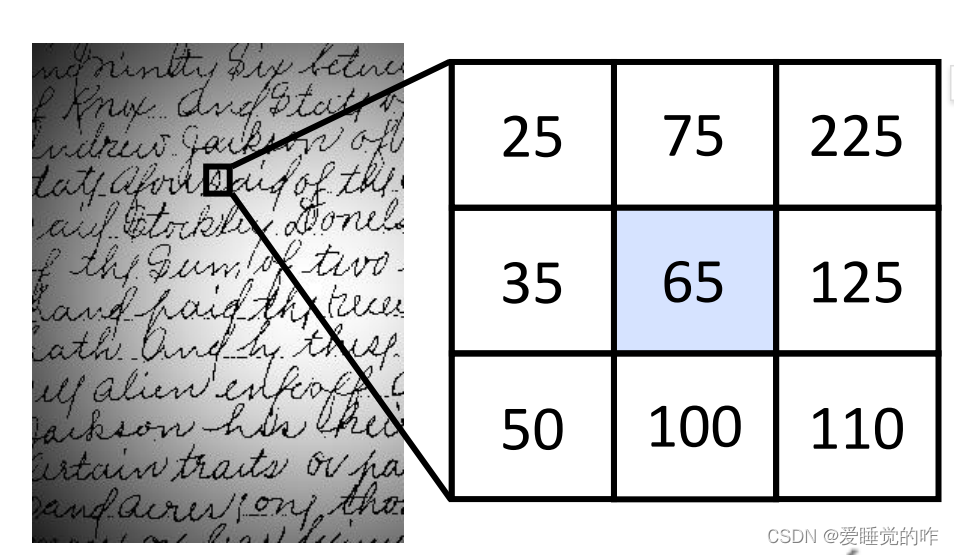
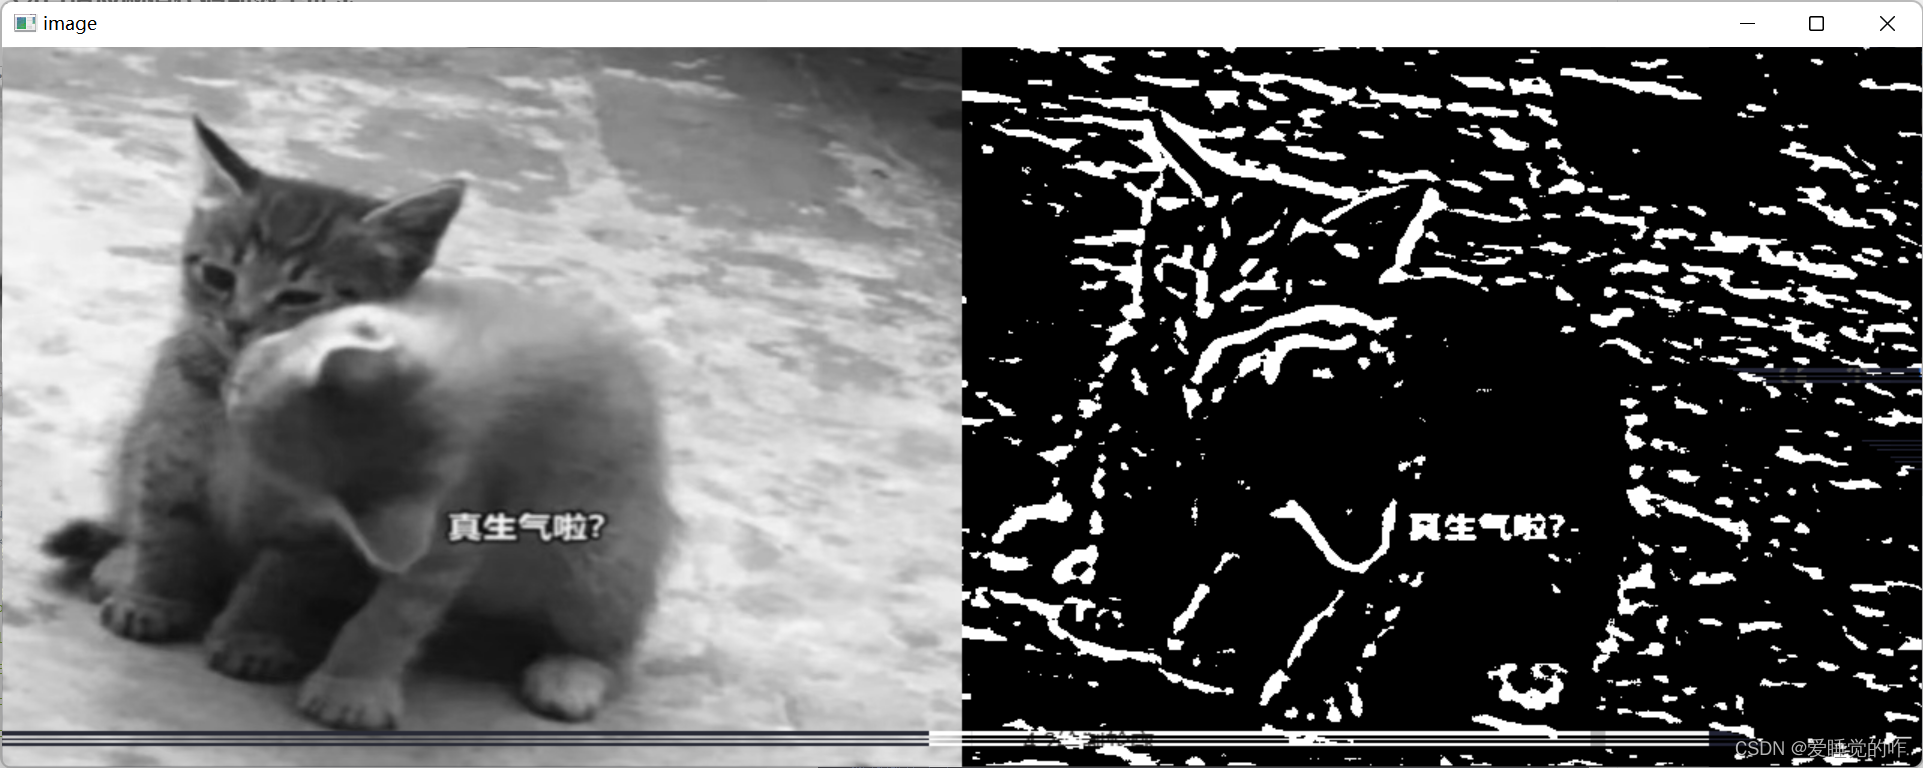
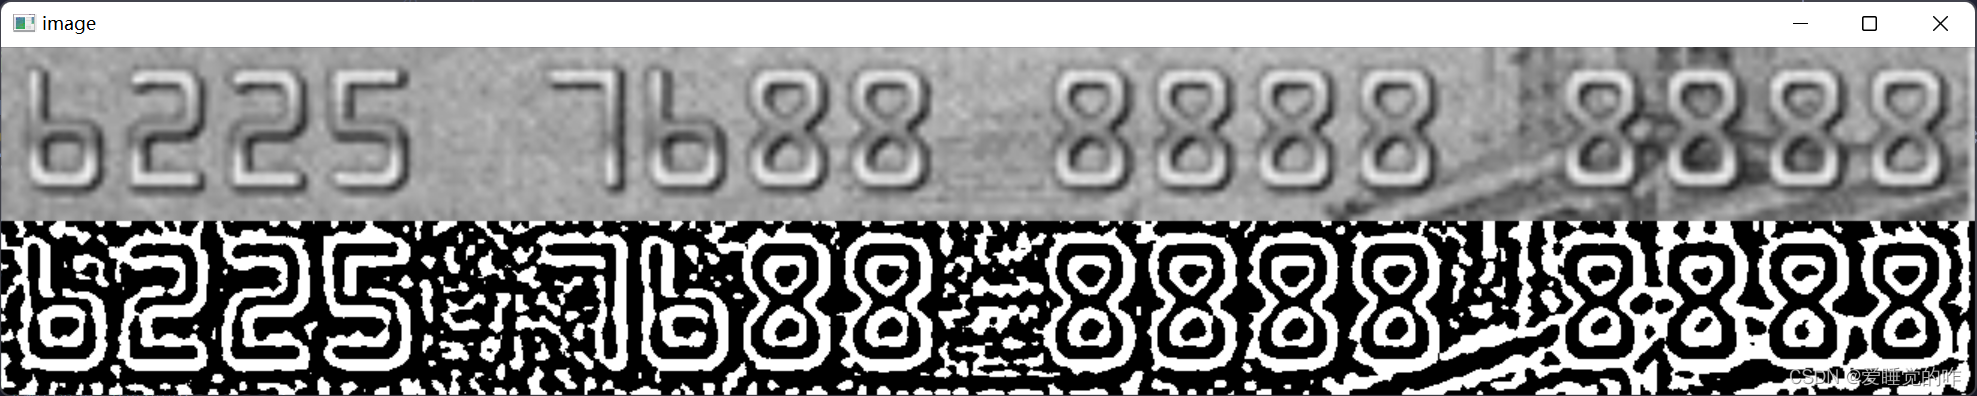
自适应阈值是根据周围的像素来确定当前的像素,同样我们结合AIP来讲解其中的原理。在opencv中为我们提供了自适应阈值的函数,为cv2.adaptiveThreshold()
cv2.adapptiveThreshold(src,maxVal,adaptiveMethod,type,blockSize,C)
src:输入的图片对象
maxVal:与全局阈值一样,指规定的最大值
adaptiveMethod:着重讲解一下我们项目中所用到的cv2.ADAPTIVE_THRESH_MEAN_C

tpye:即为:cv2.THRESH_BINARY和cv2.THRESH_BINARY_INV
blockSize:领域的大小,和卷积核非常相似,对此不熟悉的可以看我之前的CNN卷积神经网络的猫狗识别这篇文章:CNN卷积神经网络的猫狗识别
#!/usr/bin/env python
# -*- coding: UTF-8 -*-
"""
@Project :OpenCV识别银行卡数字
@File    :全局阈值.py
@IDE     :PyCharm
@Author  :咋
@Date    :2023/1/14 17:17
"""
import cv2
import numpy as np
# 读取图片
image = cv2.imread("cat_dog.jpg")
# 转化为灰度图
image = cv2.cvtColor(image,cv2.COLOR_BGR2GRAY)
# 调整图片大小
image = cv2.resize(image,(640,480))
# 全局阈值处理,注意有两个返回值,所以需要两个变量来接受
thresh,threshold_img = cv2.threshold(image,120,255,cv2.THRESH_BINARY)
# 展示图片
cv2.imshow("image",np.hstack((image,threshold_img)))
# cv2.imshow("image",image)
cv2.waitKey(0)
# 销毁窗口
cv2.destroyAllWindows()
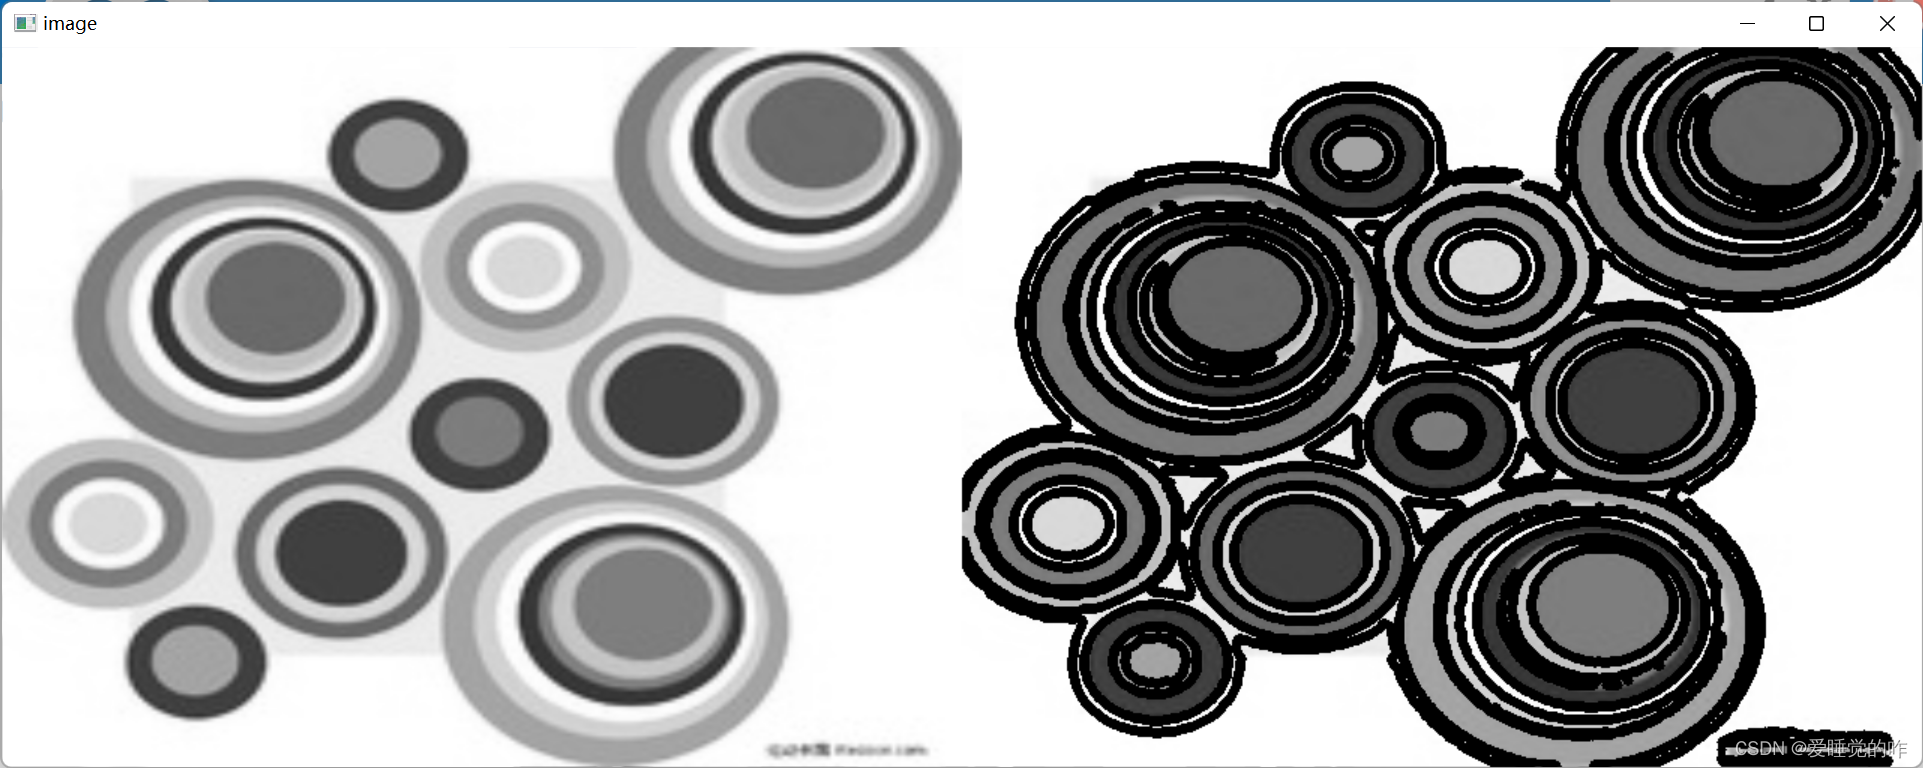
我直接来看API,在opencv中也给我们提供了轮廓检测的函数,在这里多说一句,由于opencv底层是C++写的,所以很多代码命名规范与Python不同,所以在python中调用API的时候,一定要分清楚大小写。轮廓检测的函数是cv2.findContours()
cv2.findContours(image,mode,method)


在此次项目中,我们轮廓检索模式为cv2.RETR_TREE,cv2.CHAIN_APPROX_SIMPLE。值得注意的是,返回值有两个,我们需要的是第一个contours,第二个hierarchy对我们没什么价值,我们用一个参数接收就可以了,重要的是contours,我们后面的很多操作都要用到检测出来的轮廓列表。
在上面检测完轮廓之后返回了一个轮廓列表,在opencv中也给我们提供了绘制轮廓的API:cv2.drawContours(image,contours,i,color,thickness)
#!/usr/bin/env python
# -*- coding: UTF-8 -*-
"""
@Project :OpenCV识别银行卡数字
@File    :轮廓检测.py
@IDE     :PyCharm
@Author  :咋
@Date    :2023/1/14 18:30
"""
import cv2
import numpy as np
# 读取图片
image = cv2.imread("img.png")
# 转化为灰度图
image = cv2.cvtColor(image,cv2.COLOR_BGR2GRAY)
# 调整图片大小
image = cv2.resize(image,(640,480))
true_img = image.copy()
# 自适应阈值处理
threshold_img = cv2.adaptiveThreshold(image,255,cv2.ADAPTIVE_THRESH_MEAN_C,cv2.THRESH_BINARY,21,-10)
cv2.imshow("threshold_img",threshold_img)
# 轮廓检测
contours,hierarchy = cv2.findContours(threshold_img,cv2.RETR_TREE,cv2.CHAIN_APPROX_SIMPLE)
print(contours)
image_draw = cv2.drawContours(image,contours,-1,(0,255,255),5)
# 展示图片
cv2.imshow("image",np.hstack((true_img,image_draw)))
# cv2.imshow("image",image_draw)
cv2.waitKey(0)
# 销毁窗口
cv2.destroyAllWindows()
cv2.erode(image,kernel,iterations)
腐蚀的原理很简单,就是用规定领域内像素的最小值代替当前的像素值,迭代次数就是腐蚀一边之后,是否还要腐蚀多次,腐蚀越多,图片的像素越小,图片也会越黑。
cv2.dilate(img,kernel,iterations)
膨胀的原理和腐蚀非常相似,只不过膨胀是用邻域内像素的最大值代替当前的像素值,其他的参数意义一样。
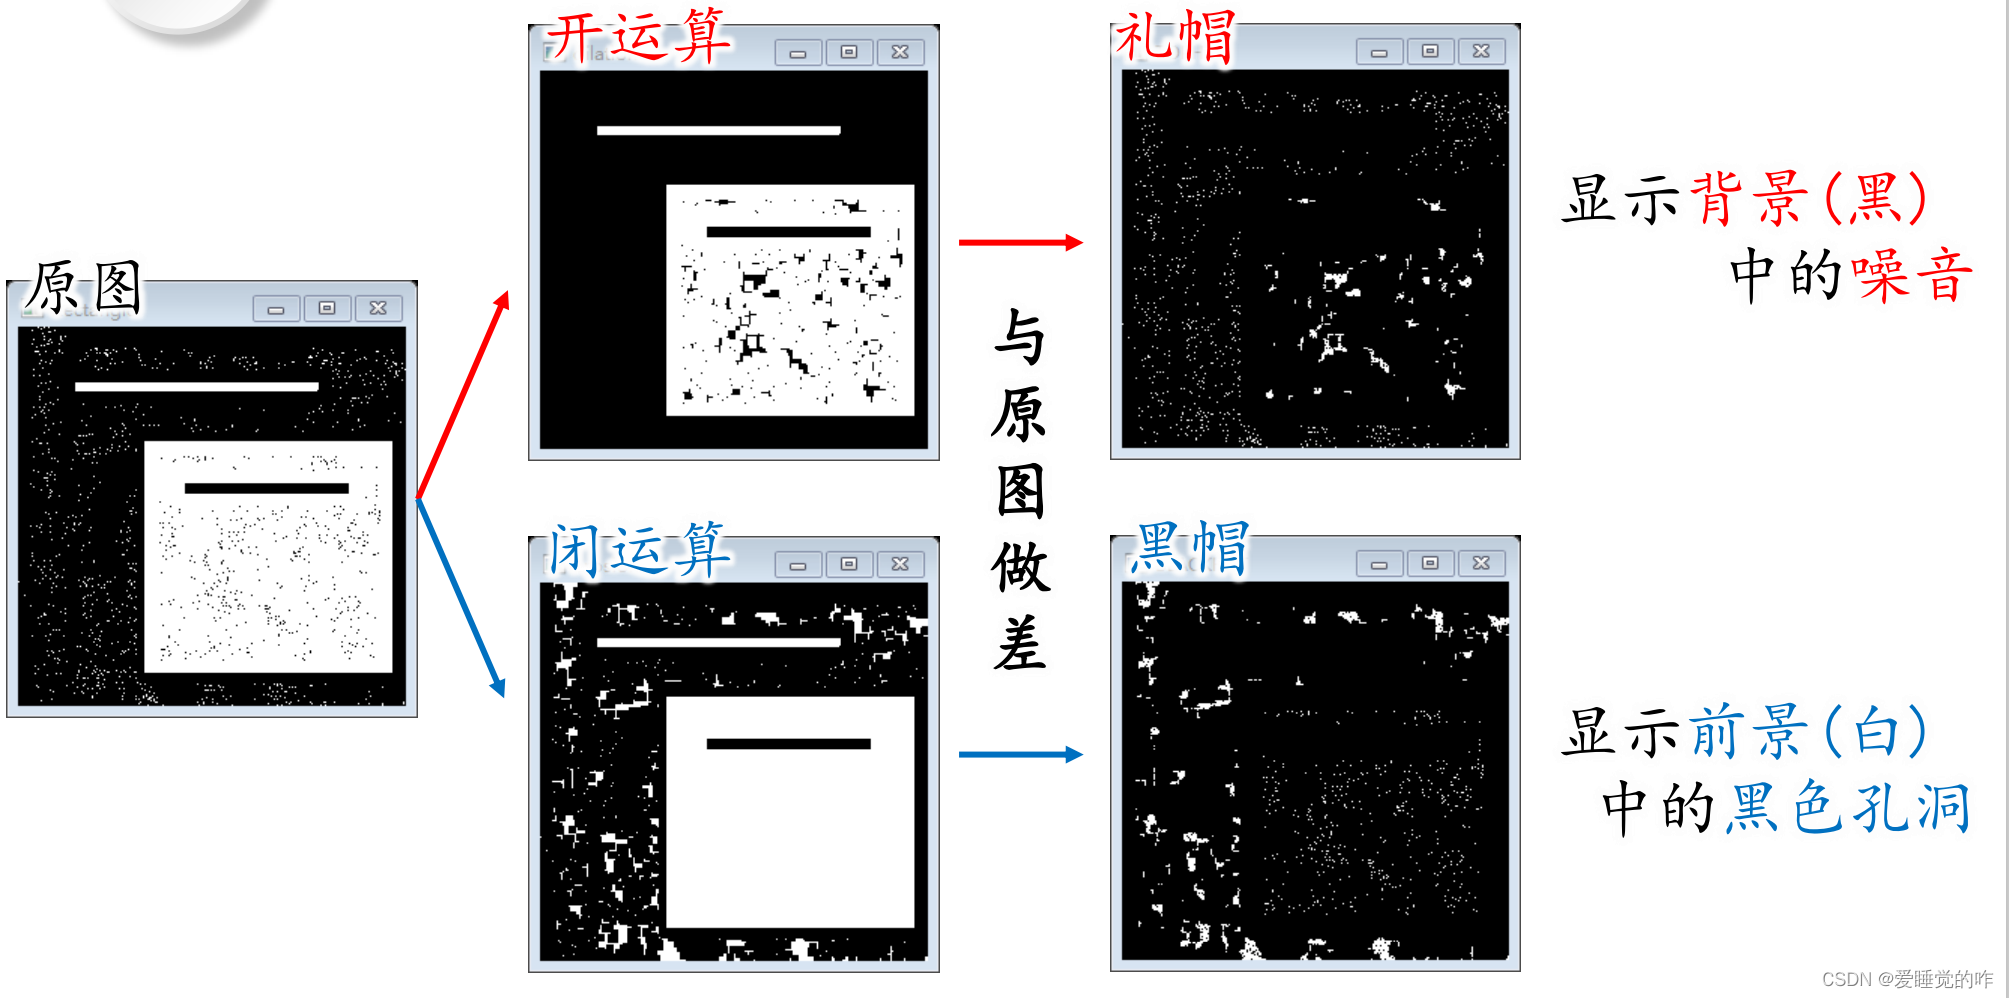
开运算与闭运算以及下面所要介绍的礼帽黑帽所用的API的是一样的,只不是是op参数不同。
cv2.morghologyEx(image,op,kernel)

#!/usr/bin/env python
# -*- coding: UTF-8 -*-
"""
@Project :OpenCV识别银行卡数字
@File    :6.1导入包读取图片.py
@IDE     :PyCharm
@Author  :咋
@Date    :2023/1/14 19:54
"""
import cv2
import numpy as np
# 读取图片
image = cv2.imread("bank_card41.jpg")
# 转化为灰度图
image = cv2.cvtColor(image,cv2.COLOR_BGR2GRAY)
# 调整图片大小
image = cv2.resize(image,(4*image.shape[1],4*image.shape[0]))
cv2.imshow("image",image)
cv2.waitKey(0)
# 销毁窗口
cv2.destroyAllWindows()

#!/usr/bin/env python
# -*- coding: UTF-8 -*-
"""
@Project :OpenCV识别银行卡数字
@File    :6.2自适应阈值处理.py
@IDE     :PyCharm
@Author  :咋
@Date    :2023/1/14 19:57
"""
import cv2
import numpy as np
# 读取图片
image = cv2.imread("bank_card4.jpg")
# 转化为灰度图
image = cv2.cvtColor(image,cv2.COLOR_BGR2GRAY)
# 调整图片大小
image = cv2.resize(image,(640,480))
# 自适应阈值处理
threshold_img = cv2.adaptiveThreshold(image,255,cv2.ADAPTIVE_THRESH_MEAN_C,cv2.THRESH_BINARY,21,3)
# 取反操作
thresh = cv2.bitwise_not(threshold_img)
cv2.imshow("image",np.hstack((image,thresh)))
cv2.waitKey(0)
# 销毁窗口
cv2.destroyAllWindows()
#!/usr/bin/env python
# -*- coding: UTF-8 -*-
"""
@Project :OpenCV识别银行卡数字
@File    :6.3寻找合适的轮廓.py
@IDE     :PyCharm
@Author  :咋
@Date    :2023/1/14 19:59
"""
import cv2
import numpy as np
# 读取图片
image = cv2.imread("bank_card41.jpg")
# 转化为灰度图
image = cv2.cvtColor(image,cv2.COLOR_BGR2GRAY)
# 调整图片大小
image = cv2.resize(image,(4*image.shape[1],4*image.shape[0]))
# 自适应阈值处理
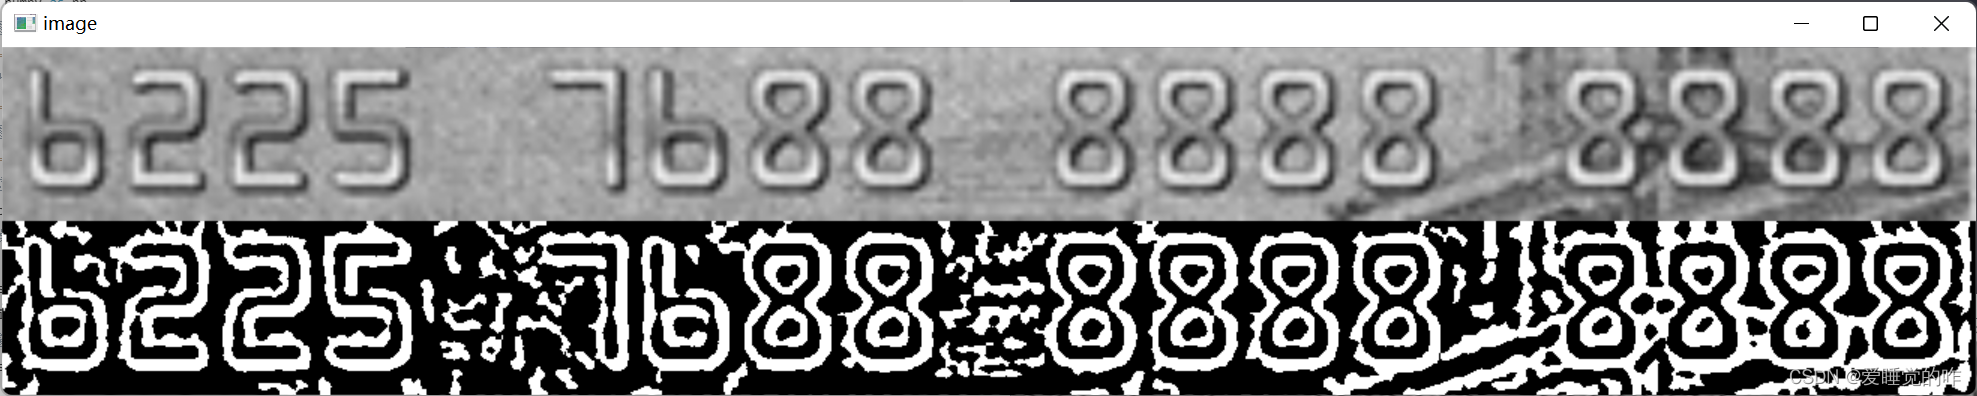
threshold_img = cv2.adaptiveThreshold(image,255,cv2.ADAPTIVE_THRESH_MEAN_C,cv2.THRESH_BINARY,21,3)
# 取反操作
thresh = cv2.bitwise_not(threshold_img)
# 寻找合适的轮廓
contours,hierarchy = cv2.findContours(thresh,cv2.RETR_TREE,cv2.CHAIN_APPROX_SIMPLE)
print(contours)
# 判断合适的轮廓
for i in range(len(contours)):
    # 根据轮廓的面积
    if cv2.contourArea(contours[i]) < 60:
        thresh = cv2.drawContours(thresh, contours, i, (0,0,0), -1)

cv2.imshow("image",np.vstack((image,thresh)))
cv2.waitKey(0)
# 销毁窗口
cv2.destroyAllWindows()
#!/usr/bin/env python
# -*- coding: UTF-8 -*-
"""
@Project :OpenCV识别银行卡数字
@File    :6.4黑帽+腐蚀py
@IDE     :PyCharm
@Author  :咋
@Date    :2023/1/14 20:12
"""
import cv2
import numpy as np
# 读取图片
image = cv2.imread("bank_card41.jpg")
# 转化为灰度图
image = cv2.cvtColor(image,cv2.COLOR_BGR2GRAY)
# 调整图片大小
image = cv2.resize(image,(4*image.shape[1],4*image.shape[0]))
# 自适应阈值处理
threshold_img = cv2.adaptiveThreshold(image,255,cv2.ADAPTIVE_THRESH_MEAN_C,cv2.THRESH_BINARY,21,3)
# 取反操作
thresh = cv2.bitwise_not(threshold_img)
# 寻找合适的轮廓
contours,hierarchy = cv2.findContours(thresh,cv2.RETR_TREE,cv2.CHAIN_APPROX_SIMPLE)
print(contours)
# 判断合适的轮廓
for i in range(len(contours)):
    # 根据轮廓的面积
    if cv2.contourArea(contours[i]) < 60:
        thresh = cv2.drawContours(thresh, contours, i, (0,0,0), -1)
# 黑帽操作
kernel = np.ones((15,15),dtype=np.uint8)
blackhat = cv2.morphologyEx(thresh, cv2.MORPH_BLACKHAT, kernel)
# 腐蚀操作
kernel = np.ones((3,3),dtype=np.uint8)
erosion = cv2.erode(blackhat,kernel,iterations = 1)
cv2.imshow("image",np.vstack((image,erosion)))
cv2.waitKey(0)
# 销毁窗口
cv2.destroyAllWindows()
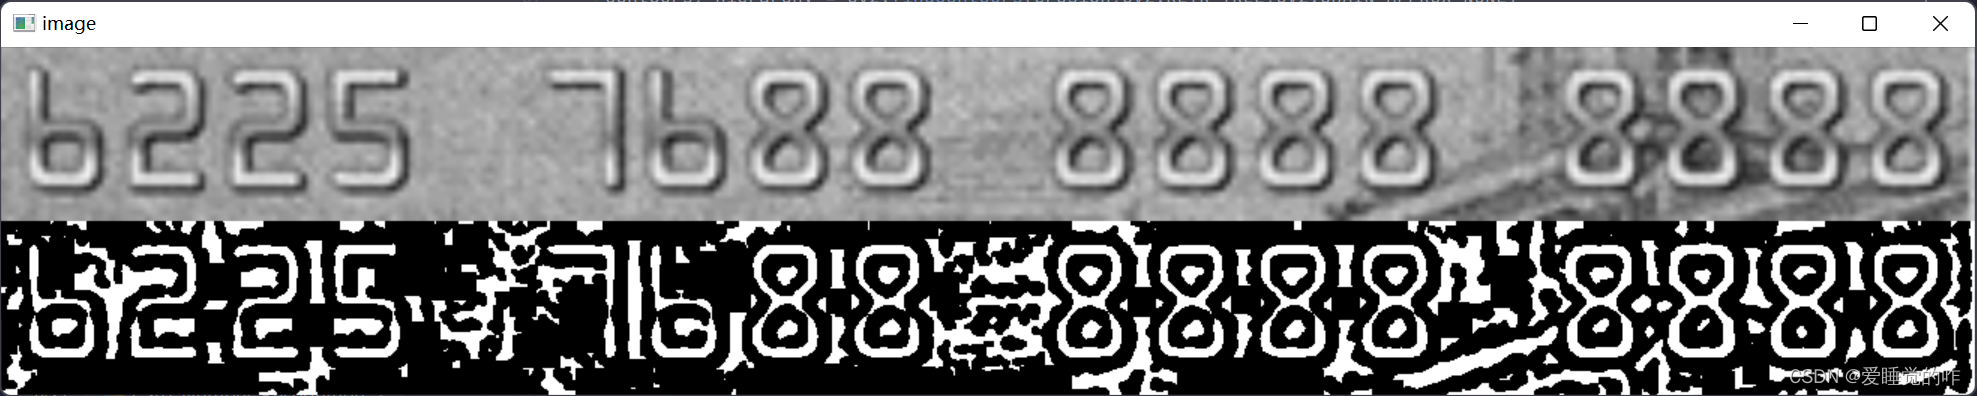
#!/usr/bin/env python
# -*- coding: UTF-8 -*-
"""
@Project :OpenCV识别银行卡数字
@File    :再次寻找轮廓+膨胀操作.py
@IDE     :PyCharm
@Author  :咋
@Date    :2023/1/14 20:21
"""
import cv2
import numpy as np
# 读取图片
image = cv2.imread("bank_card41.jpg")
# 转化为灰度图
image = cv2.cvtColor(image,cv2.COLOR_BGR2GRAY)
# 调整图片大小
image = cv2.resize(image,(4*image.shape[1],4*image.shape[0]))
# 自适应阈值处理
threshold_img = cv2.adaptiveThreshold(image,255,cv2.ADAPTIVE_THRESH_MEAN_C,cv2.THRESH_BINARY,9,3)
# 取反操作
thresh = cv2.bitwise_not(threshold_img)
# 寻找合适的轮廓
contours,hierarchy = cv2.findContours(thresh,cv2.RETR_TREE,cv2.CHAIN_APPROX_SIMPLE)
print(contours)
# 判断合适的轮廓
for i in range(len(contours)):
    # 根据轮廓的面积
    if cv2.contourArea(contours[i]) < 60:
        thresh = cv2.drawContours(thresh, contours, i, (0,0,0), -1)
# 黑帽操作
kernel = np.ones((15,15),dtype=np.uint8)
blackhat = cv2.morphologyEx(thresh, cv2.MORPH_BLACKHAT, kernel)
# 腐蚀操作
kernel = np.ones((3,3),dtype=np.uint8)
erosion = cv2.erode(blackhat,kernel,iterations = 1)

contours, hierarchy = cv2.findContours(erosion,cv2.RETR_TREE,cv2.CHAIN_APPROX_NONE)
for i in range(len(contours)):
    x,y,w,h = cv2.boundingRect(contours[i])
    aspect_ratio = float(w)/h
    A = float(w)*h
    if A < 1800:
        erosion = cv2.drawContours(erosion, contours, i, (0,0,0), -1)
    else:
        if aspect_ratio > 0.6 or aspect_ratio < 0.57:
            erosion = cv2.drawContours(erosion, contours, i, (0,0,0), -1)
cv2.imshow('erosion2',erosion)

kernel = np.ones((7,7),dtype=np.uint8)
dilation = cv2.dilate(erosion,kernel,iterations = 1)
# cv2.imshow('dilation',)
cv2.imshow("image",np.vstack((image,dilation)))
cv2.waitKey(0)
# 销毁窗口
cv2.destroyAllWindows()
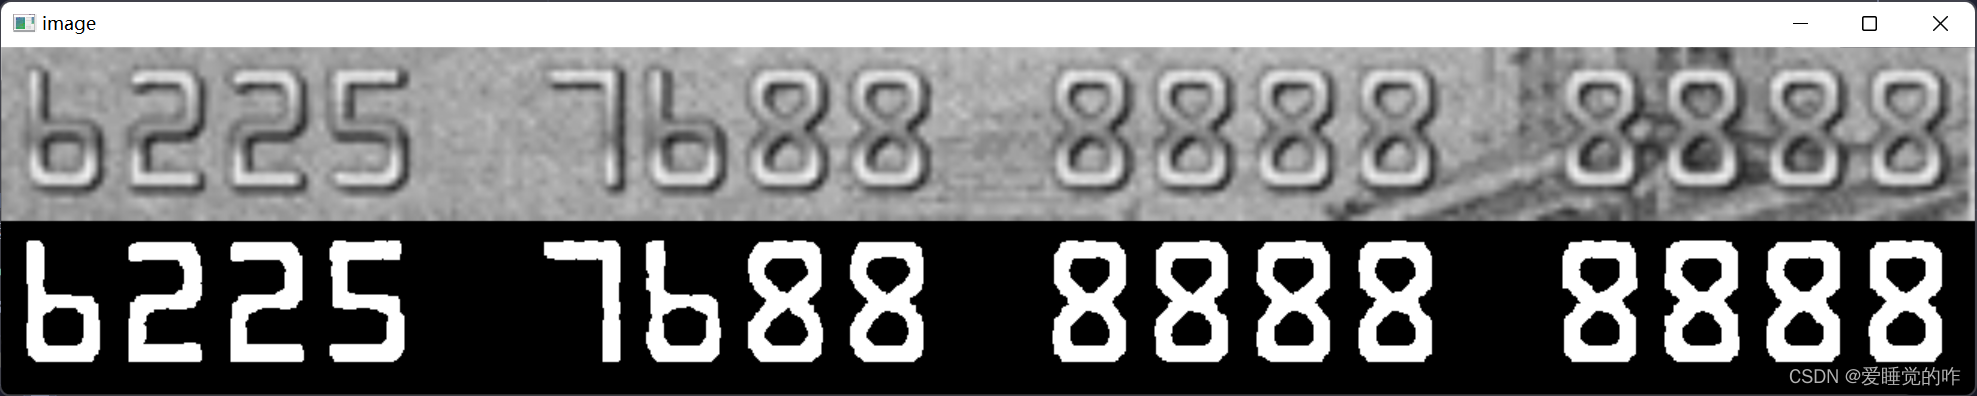
numTemplate = cv2.imread('bankCardNumTemplate.jpg')
numTemplate_GRAY = cv2.cvtColor(numTemplate, cv2.COLOR_BGR2GRAY)
ret, numTemplate_GRAY = cv2.threshold(numTemplate_GRAY, 200, 255, cv2.THRESH_BINARY)
# cv2.imshow('thresh',thresh)
# cv2.imshow('numTemplate_GRAY', numTemplate_GRAY)
contours, hierarchy = cv2.findContours(numTemplate_GRAY, cv2.RETR_EXTERNAL, cv2.CHAIN_APPROX_SIMPLE)
# print(np.size(contours))


def sequence_contours(dst_Binary, method, Rect_width, Rect_height):
    if method == "Left_to_Right" or method == 2:
        contours, hierarchy = cv2.findContours(dst_Binary, cv2.RETR_EXTERNAL, cv2.CHAIN_APPROX_SIMPLE)
        n = np.size(contours)
        RectBoxes0 = np.ones((n, 4), dtype=int)
        # print(n)
        for i in range(0, n):
            RectBoxes0[i] = cv2.boundingRect(contours[i])
            # print(RectBoxes0)

        RectBoxes = np.ones((n, 4), dtype=int)

        for i in range(0, n):
            sequence = 0
            for j in range(0, n):
                if RectBoxes0[i][0] > RectBoxes0[j][0]:
                    sequence = sequence + 1
            RectBoxes[sequence] = RectBoxes0[i]

        RectImgBoxes = [[] for i in range(n)]
        for i in range(0, n):
            img = dst_Binary[RectBoxes[i, 1]:(RectBoxes[i, 1] + RectBoxes[i, 3]),
                  RectBoxes[i, 0]:(RectBoxes[i, 0] + RectBoxes[i, 2])]
            # cv2.imshow('number'+ str(i), img)
            img = cv2.resize(img, (Rect_width, Rect_height))
            ret, img = cv2.threshold(img, 200, 255, cv2.THRESH_BINARY)
            RectImgBoxes[i] = img
        # print(RectBoxes)
        # print(np.size(RectImgBoxes))

    return RectBoxes, RectImgBoxes


RectBoxes_Temp, RectImgBoxes_Temp = sequence_contours(numTemplate_GRAY, method="Left_to_Right", Rect_width=50,
                                                      Rect_height=80)
# print(RectBoxes)
# cv2.imshow('numberTemp', RectImgBoxes_Temp[3])

RectBoxes, RectImgBoxes = sequence_contours(dilation, method="Left_to_Right", Rect_width=50, Rect_height=80)
# cv2.imshow('numberfin', RectImgBoxes[3])

# print(len(RectImgBoxes))
result = []
for i in range(len(RectImgBoxes)):
    score = np.zeros(len(RectImgBoxes_Temp), dtype=int)
    for j in range(len(RectImgBoxes_Temp)):
        score[j] = cv2.matchTemplate(RectImgBoxes[i], RectImgBoxes_Temp[j], cv2.TM_CCOEFF)
    # print(score)
    min_val, max_val, min_indx, max_indx = cv2.minMaxLoc(score)
    result.append(max_indx[1])

# 定义添加数字到图片的函数
def add_num(image,num_list):
    text = ""
    for i in num_list:
        text += str(i)
    font = ImageFont.truetype("msyh.ttc",50)
    # 创建一个pillow的图片
    pil_img = Image.fromarray(image)
    # 绘制图片
    draw = ImageDraw.Draw(pil_img)
    # 利用draw去绘制中文
    draw.text((0, 0), text , font=font, fill=0)  # 后面的fill即颜色,RGBA
    # 重新变为ndarray
    image = np.array(pil_img)
    return image
print(result)
image = add_num(image,result)
cv2.imshow("image",image)
# cv2.imshow("image",np.vstack((image,dilation)))
cv2.waitKey(0)
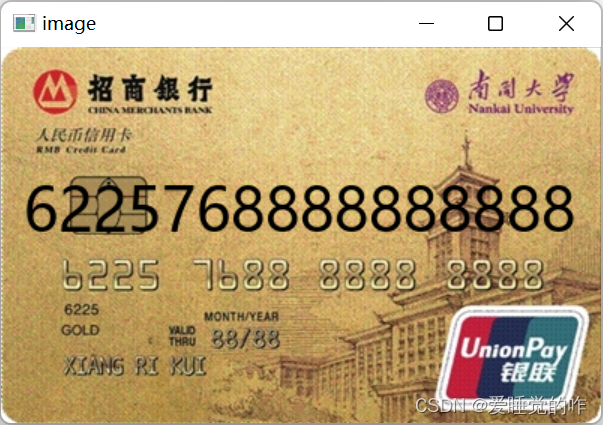
#!/usr/bin/env python
# -*- coding: UTF-8 -*-
"""
@Project :OpenCV识别银行卡数字
@File    :模板匹配.py
@IDE     :PyCharm
@Author  :咋
@Date    :2023/1/14 20:29
"""
import cv2
import numpy as np
from PIL import ImageFont,ImageDraw,Image
# 读取图片
image = cv2.imread("bank_card41.jpg")
true_img = cv2.imread("bank_card4.jpg")
# 转化为灰度图
image = cv2.cvtColor(image,cv2.COLOR_BGR2GRAY)
# 调整图片大小
image = cv2.resize(image,(4*image.shape[1],4*image.shape[0]))
# 自适应阈值处理
threshold_img = cv2.adaptiveThreshold(image,255,cv2.ADAPTIVE_THRESH_MEAN_C,cv2.THRESH_BINARY,9,3)
# 取反操作
thresh = cv2.bitwise_not(threshold_img)
# 寻找合适的轮廓
contours,hierarchy = cv2.findContours(thresh,cv2.RETR_TREE,cv2.CHAIN_APPROX_SIMPLE)
# print(contours)
# 判断合适的轮廓
for i in range(len(contours)):
    # 根据轮廓的面积
    if cv2.contourArea(contours[i]) < 60:
        thresh = cv2.drawContours(thresh, contours, i, (0,0,0), -1)
# 黑帽操作
kernel = np.ones((15,15),dtype=np.uint8)
blackhat = cv2.morphologyEx(thresh, cv2.MORPH_BLACKHAT, kernel)
# 腐蚀操作
kernel = np.ones((3,3),dtype=np.uint8)
erosion = cv2.erode(blackhat,kernel,iterations = 1)

contours, hierarchy = cv2.findContours(erosion,cv2.RETR_TREE,cv2.CHAIN_APPROX_NONE)
for i in range(len(contours)):
    x,y,w,h = cv2.boundingRect(contours[i])
    aspect_ratio = float(w)/h
    A = float(w)*h
    if A < 1800:
        erosion = cv2.drawContours(erosion, contours, i, (0,0,0), -1)
    else:
        if aspect_ratio > 0.6 or aspect_ratio < 0.57:
            erosion = cv2.drawContours(erosion, contours, i, (0,0,0), -1)
# cv2.imshow('erosion2',erosion)

kernel = np.ones((7,7),dtype=np.uint8)
dilation = cv2.dilate(erosion,kernel,iterations = 1)
# 模板匹配
numTemplate = cv2.imread('bankCardNumTemplate.jpg')
numTemplate_GRAY = cv2.cvtColor(numTemplate, cv2.COLOR_BGR2GRAY)
ret, numTemplate_GRAY = cv2.threshold(numTemplate_GRAY, 200, 255, cv2.THRESH_BINARY)
# cv2.imshow('thresh',thresh)
# cv2.imshow('numTemplate_GRAY', numTemplate_GRAY)
contours, hierarchy = cv2.findContours(numTemplate_GRAY, cv2.RETR_EXTERNAL, cv2.CHAIN_APPROX_SIMPLE)
# print(np.size(contours))


def sequence_contours(dst_Binary, method, Rect_width, Rect_height):
    if method == "Left_to_Right" or method == 2:
        contours, hierarchy = cv2.findContours(dst_Binary, cv2.RETR_EXTERNAL, cv2.CHAIN_APPROX_SIMPLE)
        n = np.size(contours)
        RectBoxes0 = np.ones((n, 4), dtype=int)
        # print(n)
        for i in range(0, n):
            RectBoxes0[i] = cv2.boundingRect(contours[i])
            # print(RectBoxes0)

        RectBoxes = np.ones((n, 4), dtype=int)

        for i in range(0, n):
            sequence = 0
            for j in range(0, n):
                if RectBoxes0[i][0] > RectBoxes0[j][0]:
                    sequence = sequence + 1
            RectBoxes[sequence] = RectBoxes0[i]

        RectImgBoxes = [[] for i in range(n)]
        for i in range(0, n):
            img = dst_Binary[RectBoxes[i, 1]:(RectBoxes[i, 1] + RectBoxes[i, 3]),
                  RectBoxes[i, 0]:(RectBoxes[i, 0] + RectBoxes[i, 2])]
            # cv2.imshow('number'+ str(i), img)
            img = cv2.resize(img, (Rect_width, Rect_height))
            ret, img = cv2.threshold(img, 200, 255, cv2.THRESH_BINARY)
            RectImgBoxes[i] = img
        # print(RectBoxes)
        # print(np.size(RectImgBoxes))

    return RectBoxes, RectImgBoxes


RectBoxes_Temp, RectImgBoxes_Temp = sequence_contours(numTemplate_GRAY, method="Left_to_Right", Rect_width=50,
                                                      Rect_height=80)
# print(RectBoxes)
# cv2.imshow('numberTemp', RectImgBoxes_Temp[3])

RectBoxes, RectImgBoxes = sequence_contours(dilation, method="Left_to_Right", Rect_width=50, Rect_height=80)
# cv2.imshow('numberfin', RectImgBoxes[3])

# print(len(RectImgBoxes))
result = []
for i in range(len(RectImgBoxes)):
    score = np.zeros(len(RectImgBoxes_Temp), dtype=int)
    for j in range(len(RectImgBoxes_Temp)):
        score[j] = cv2.matchTemplate(RectImgBoxes[i], RectImgBoxes_Temp[j], cv2.TM_CCOEFF)
    # print(score)
    min_val, max_val, min_indx, max_indx = cv2.minMaxLoc(score)
    result.append(max_indx[1])

# 定义添加数字到图片的函数
def add_num(image,num_list):
    text = ""
    for i in num_list:
        text += str(i)
    font = ImageFont.truetype("msyh.ttc",40)
    # 创建一个pillow的图片
    pil_img = Image.fromarray(image)
    # 绘制图片
    draw = ImageDraw.Draw(pil_img)
    # 利用draw去绘制中文
    draw.text((15, 80), text , font=font, fill=0)  # 后面的fill即颜色,RGBA
    # 重新变为ndarray
    image = np.array(pil_img)
    return image
print(result)
true_img = add_num(true_img,result)
cv2.imshow("image",true_img)
# cv2.imshow("image",np.vstack((image,dilation)))
cv2.waitKey(0)
附上图片和代码链接:欢迎需要的小伙伴自取链接https://pan.baidu.com/s/1UeXrFjLXn3LWiDoUudW13w?pwd=3hye
提取码:3hye
识别银行卡可算是Opencv的经典项目了,尤其是模板匹配,算得上是计算机视觉的精髓所在了。通过这个案例对二值化、轮廓检测、形态学变化腐蚀膨胀、开运算闭运算、礼帽黑帽有所了解,并能够组合在一起运算,算得上有所进步。
以此类推,模板匹配可以应用在很多项目中,关键的难点就在于怎么把图片和模板调整好,通过上述的方法以及参数的调整,可以达到这样的效果,还是需要多练习,才能真正掌握Opencv’的精髓。
✨ 原创不易,还希望各位大佬支持一下 \textcolor{blue}{原创不易,还希望各位大佬支持一下} 原创不易,还希望各位大佬支持一下
👍 点赞,你的认可是我创作的动力! \textcolor{green}{点赞,你的认可是我创作的动力!} 点赞,你的认可是我创作的动力!
⭐️ 收藏,你的青睐是我努力的方向! \textcolor{green}{收藏,你的青睐是我努力的方向!} 收藏,你的青睐是我努力的方向!
✏️ 评论,你的意见是我进步的财富! \textcolor{green}{评论,你的意见是我进步的财富!} 评论,你的意见是我进步的财富!
如何在buildr项目中使用Ruby?我在很多不同的项目中使用过Ruby、JRuby、Java和Clojure。我目前正在使用我的标准Ruby开发一个模拟应用程序,我想尝试使用Clojure后端(我确实喜欢功能代码)以及JRubygui和测试套件。我还可以看到在未来的不同项目中使用Scala作为后端。我想我要为我的项目尝试一下buildr(http://buildr.apache.org/),但我注意到buildr似乎没有设置为在项目中使用JRuby代码本身!这看起来有点傻,因为该工具旨在统一通用的JVM语言并且是在ruby中构建的。除了将输出的jar包含在一个独特的、仅限ruby
在rails源中:https://github.com/rails/rails/blob/master/activesupport/lib/active_support/lazy_load_hooks.rb可以看到以下内容@load_hooks=Hash.new{|h,k|h[k]=[]}在IRB中,它只是初始化一个空哈希。和做有什么区别@load_hooks=Hash.new 最佳答案 查看rubydocumentationforHashnew→new_hashclicktotogglesourcenew(obj)→new_has
在我的应用程序中,我需要能够找到所有数字子字符串,然后扫描每个子字符串,找到第一个匹配范围(例如5到15之间)的子字符串,并将该实例替换为另一个字符串“X”。我的测试字符串s="1foo100bar10gee1"我的初始模式是1个或多个数字的任何字符串,例如,re=Regexp.new(/\d+/)matches=s.scan(re)给出["1","100","10","1"]如果我想用“X”替换第N个匹配项,并且只替换第N个匹配项,我该怎么做?例如,如果我想替换第三个匹配项“10”(匹配项[2]),我不能只说s[matches[2]]="X"因为它做了两次替换“1fooX0barXg
如何匹配未被反斜杠转义的平衡定界符对(其本身未被反斜杠转义)(无需考虑嵌套)?例如对于反引号,我试过了,但是转义的反引号没有像转义那样工作。regex=/(?!$1:"how\\"#expected"how\\`are"上面的正则表达式不考虑由反斜杠转义并位于反引号前面的反斜杠,但我愿意考虑。StackOverflow如何做到这一点?这样做的目的并不复杂。我有文档文本,其中包括内联代码的反引号,就像StackOverflow一样,我想在HTML文件中显示它,内联代码用一些spanMaterial装饰。不会有嵌套,但转义反引号或转义反斜杠可能出现在任何地方。
我正在编写一个小脚本来定位aws存储桶中的特定文件,并创建一个临时验证的url以发送给同事。(理想情况下,这将创建类似于在控制台上右键单击存储桶中的文件并复制链接地址的结果)。我研究过回形针,它似乎不符合这个标准,但我可能只是不知道它的全部功能。我尝试了以下方法:defauthenticated_url(file_name,bucket)AWS::S3::S3Object.url_for(file_name,bucket,:secure=>true,:expires=>20*60)end产生这种类型的结果:...-1.amazonaws.com/file_path/file.zip.A
我有一个驼峰式字符串,例如:JustAString。我想按照以下规则形成长度为4的字符串:抓取所有大写字母;如果超过4个大写字母,只保留前4个;如果少于4个大写字母,则将最后大写字母后的字母大写并添加字母,直到长度变为4。以下是可能发生的3种情况:ThisIsMyString将产生TIMS(大写字母);ThisIsOneVeryLongString将产生TIOV(前4个大写字母);MyString将生成MSTR(大写字母+tr大写)。我设法用这个片段解决了前两种情况:str.scan(/[A-Z]/).first(4).join但是,我不太确定如何最好地修改上面的代码片段以处理最后一种
我的主要目标是能够完全理解我正在使用的库/gem。我尝试在Github上从头到尾阅读源代码,但这真的很难。我认为更有趣、更温和的踏脚石就是在使用时阅读每个库/gem方法的源代码。例如,我想知道RubyonRails中的redirect_to方法是如何工作的:如何查找redirect_to方法的源代码?我知道在pry中我可以执行类似show-methodmethod的操作,但我如何才能对Rails框架中的方法执行此操作?您对我如何更好地理解Gem及其API有什么建议吗?仅仅阅读源代码似乎真的很难,尤其是对于框架。谢谢! 最佳答案 Ru
当我尝试安装Ruby时遇到此错误。我试过查看this和this但无济于事➜~brewinstallrubyWarning:YouareusingOSX10.12.Wedonotprovidesupportforthispre-releaseversion.Youmayencounterbuildfailuresorotherbreakages.Pleasecreatepull-requestsinsteadoffilingissues.==>Installingdependenciesforruby:readline,libyaml,makedepend==>Installingrub
我的假设是moduleAmoduleBendend和moduleA::Bend是一样的。我能够从thisblog找到解决方案,thisSOthread和andthisSOthread.为什么以及什么时候应该更喜欢紧凑语法A::B而不是另一个,因为它显然有一个缺点?我有一种直觉,它可能与性能有关,因为在更多命名空间中查找常量需要更多计算。但是我无法通过对普通类进行基准测试来验证这一点。 最佳答案 这两种写作方法经常被混淆。首先要说的是,据我所知,没有可衡量的性能差异。(在下面的书面示例中不断查找)最明显的区别,可能也是最著名的,是你的
几个月前,我读了一篇关于rubygem的博客文章,它可以通过阅读代码本身来确定编程语言。对于我的生活,我不记得博客或gem的名称。谷歌搜索“ruby编程语言猜测”及其变体也无济于事。有人碰巧知道相关gem的名称吗? 最佳答案 是这个吗:http://github.com/chrislo/sourceclassifier/tree/master 关于ruby-寻找通过阅读代码确定编程语言的rubygem?,我们在StackOverflow上找到一个类似的问题:
