在本文中你将收获
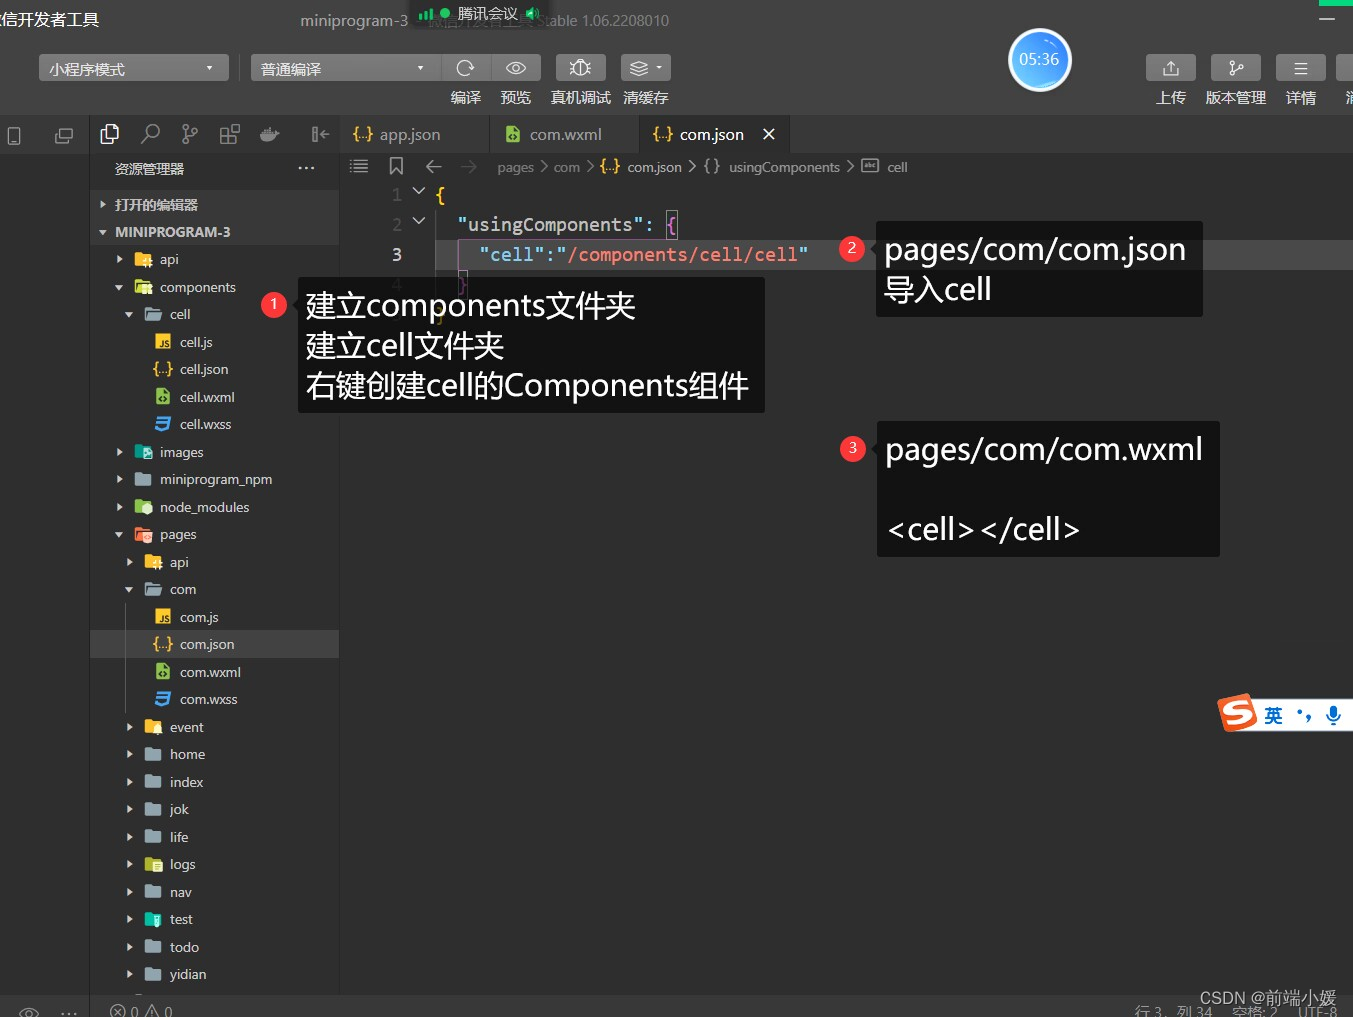
在根目录新建components文件夹,建立cell 文件夹,右击创建cell的Component组件
页面的xxx.json ,usingComponent注册
"usingComponents": {
"item":"/components/item/item"
}
<item></item>
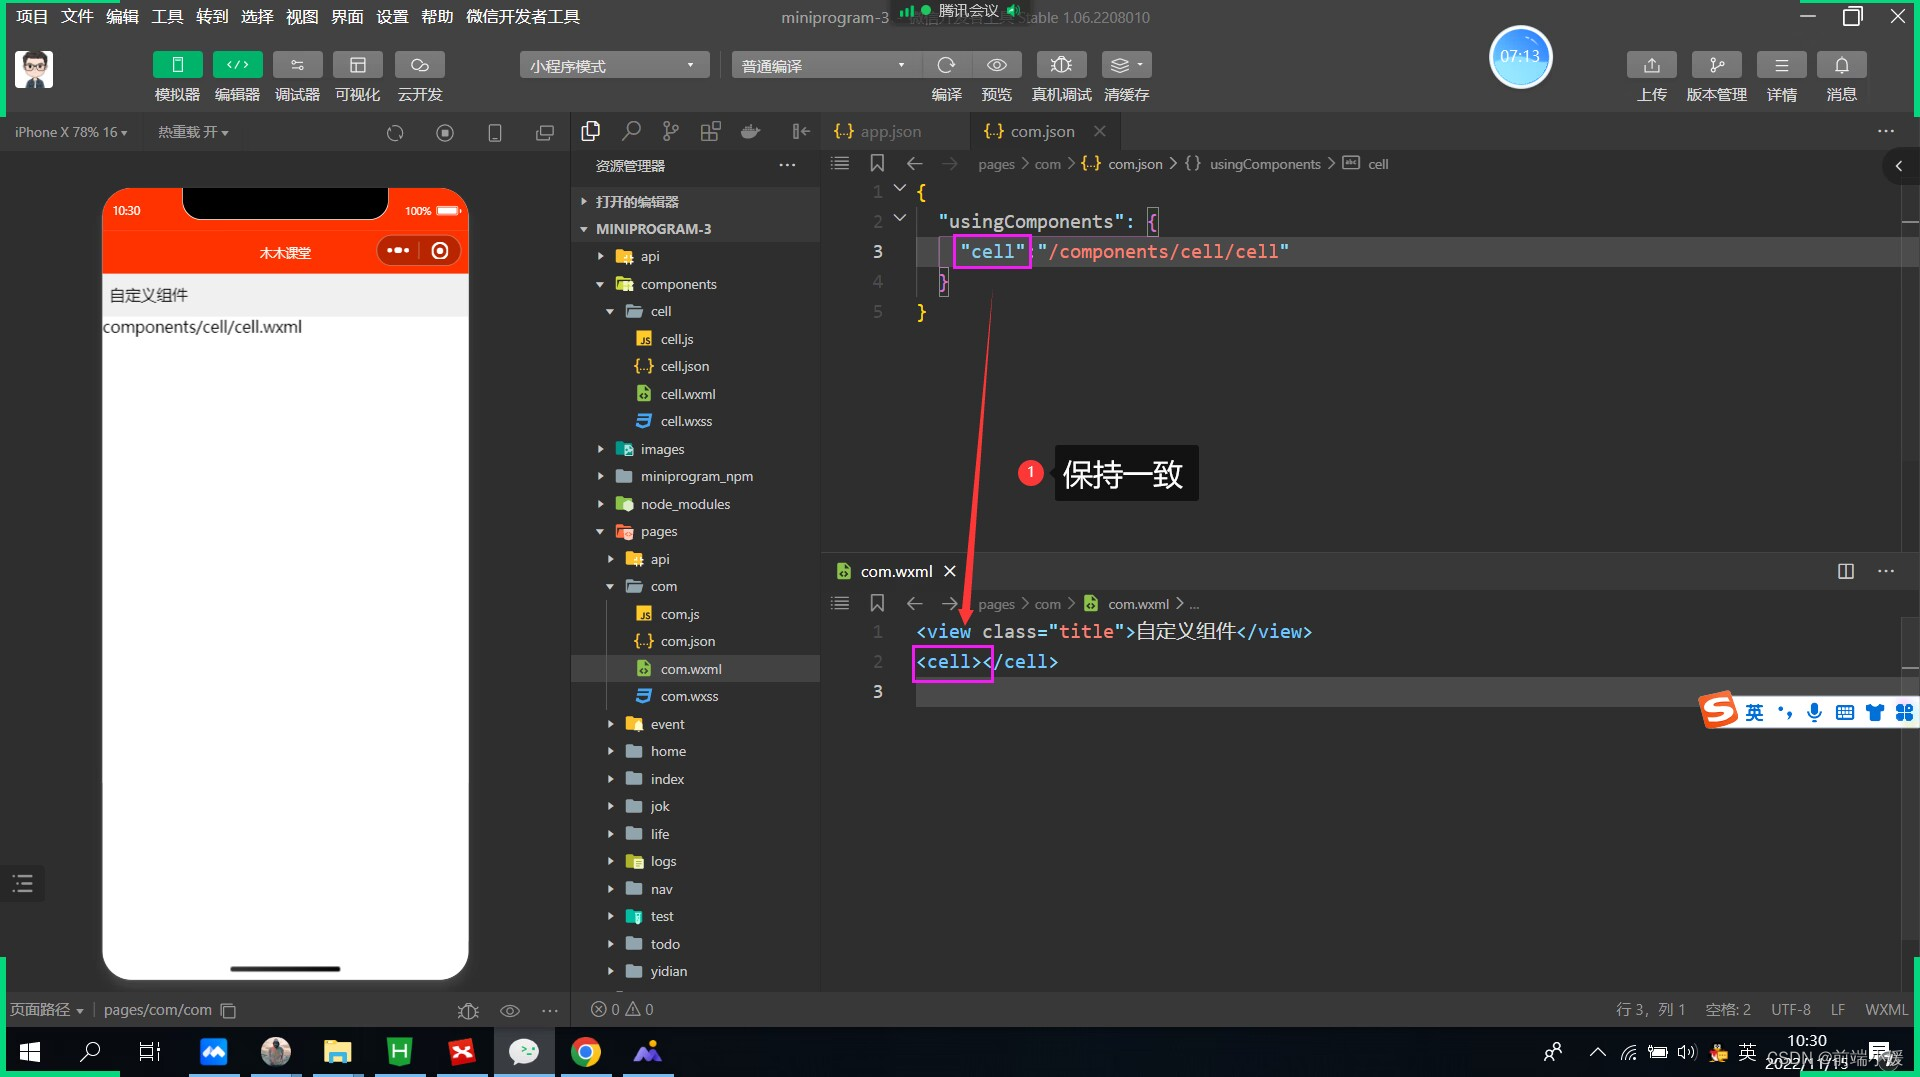
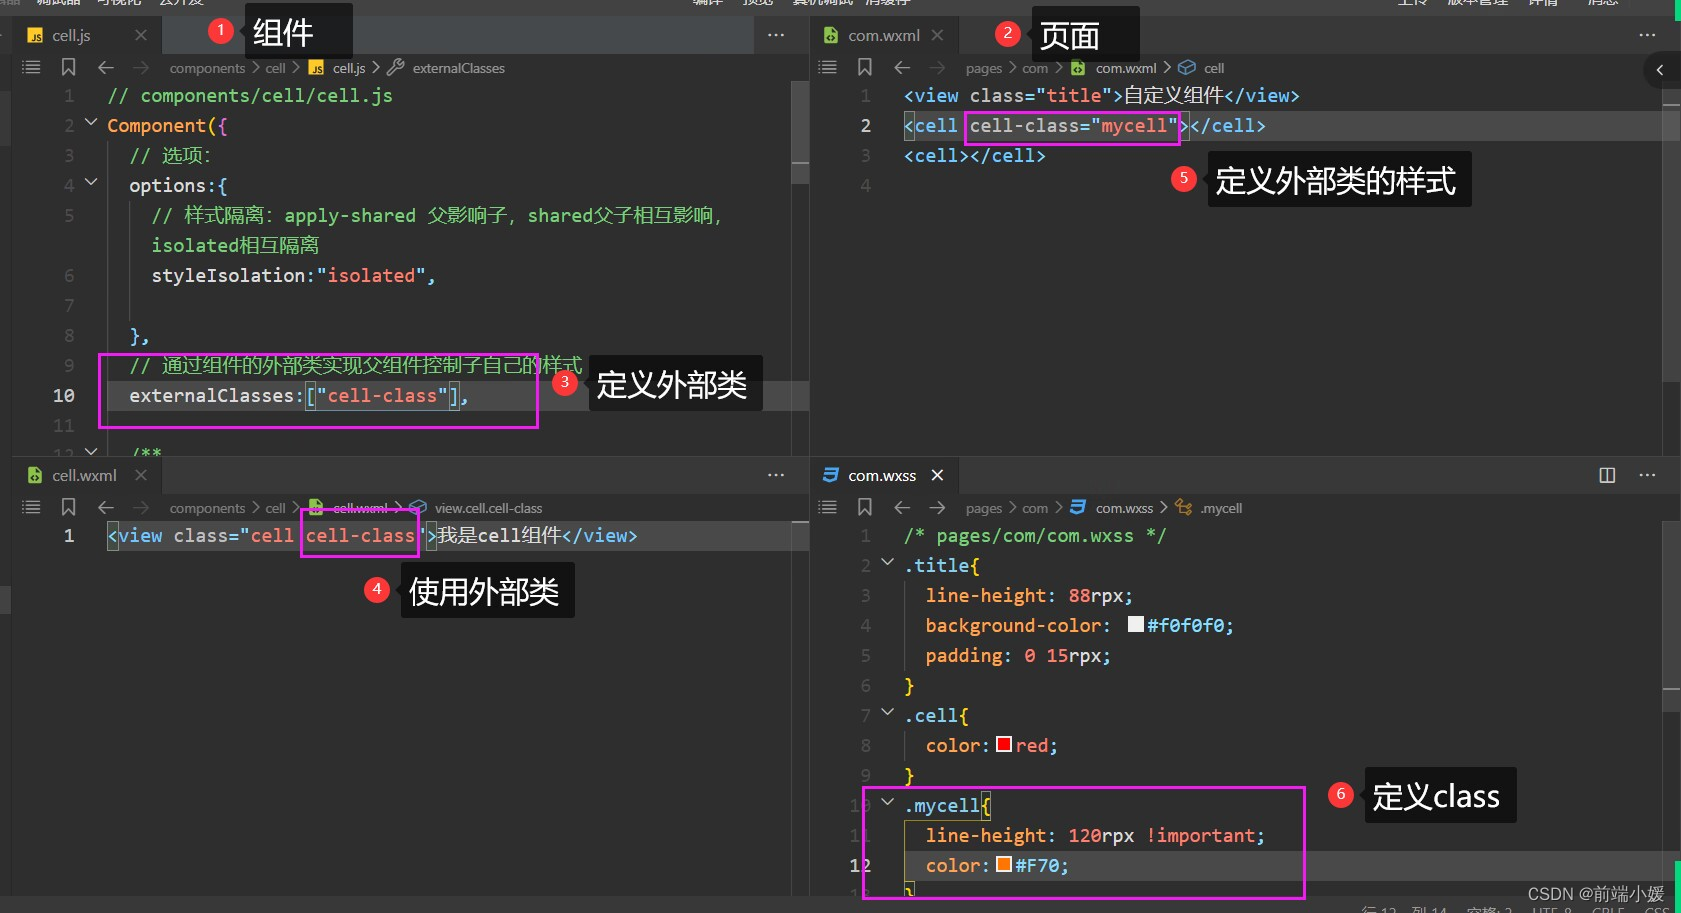
<view class="cell cell-class">
</view>
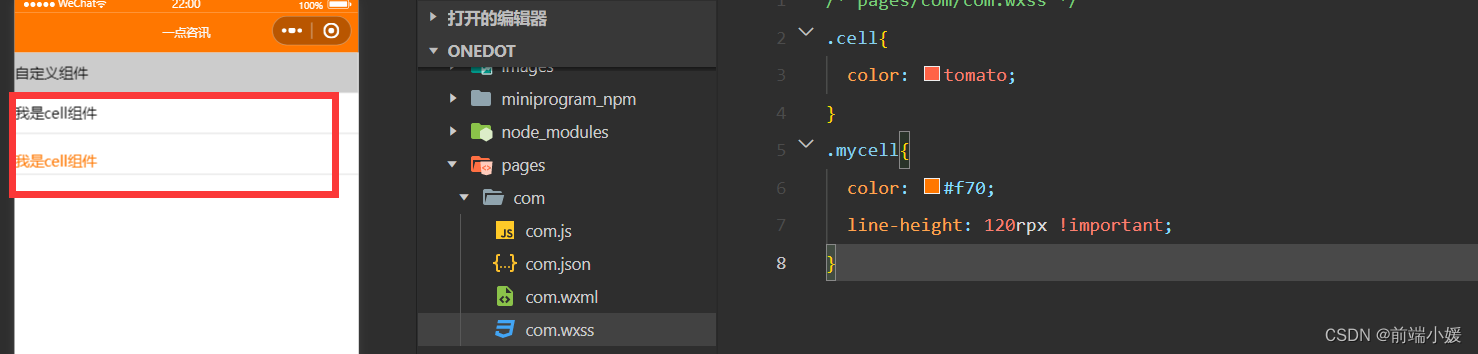
/* pages/com/com.wxss */
.cell{
  color: tomato;
}
.mycell{
  color: #f70;
  line-height: 120rpx !important;
}
  /* 选项 */
  options:{
    /* 样式隔离:apply-shared 父影响子
    shared 父子相互影响   isolated 相互隔离
    */
    styleIsolation:'isolated',
  },
  //通过组件的外部类实现父组件控制自己的样式
  externalClasses:["cell-class"],
<cell></cell>
<cell cell-class="mycell"></cell>
 <view class="cell">
  我是cell组件
  <slot></slot>
</view>
  /* 选项 */
  options:{
    //允许多个插槽
    multipleSlots:true,
  },
.cell{
  height: 88rpx;
  line-height: 88rpx;
  border-bottom: 1rpx solid #cccccc;
}
<cell>
  <text>放假</text>
  <text>快点到来</text>
</cell>
 <view class="cell cell-class">
  <slot name="pre"></slot>
  我是cell组件
  <slot></slot>
  <slot name="next"></slot>
</view>
  /* 选项 */
  options:{
    //允许多个插槽
    multipleSlots:true,
  },
.cell{
  height: 88rpx;
  line-height: 88rpx;
  border-bottom: 1rpx solid #cccccc;
}
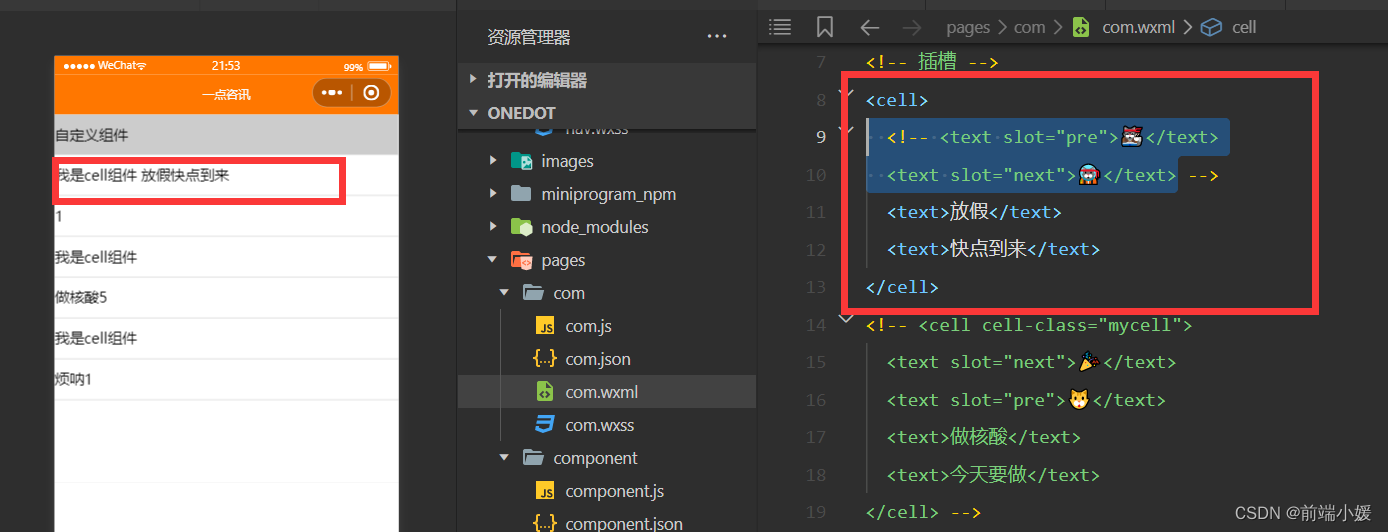
<!-- 插槽 -->
<cell>
<text slot="pre">🐱👓</text>
<text slot="next">🐱🚀</text>
<text>放假</text>
<text>快点到来</text>
</cell>
<cell cell-class="mycell">
<text slot="next">🎉</text>
<text slot="pre">🐱</text>
<text>做核酸</text>
<text>今天要做</text>
</cell>

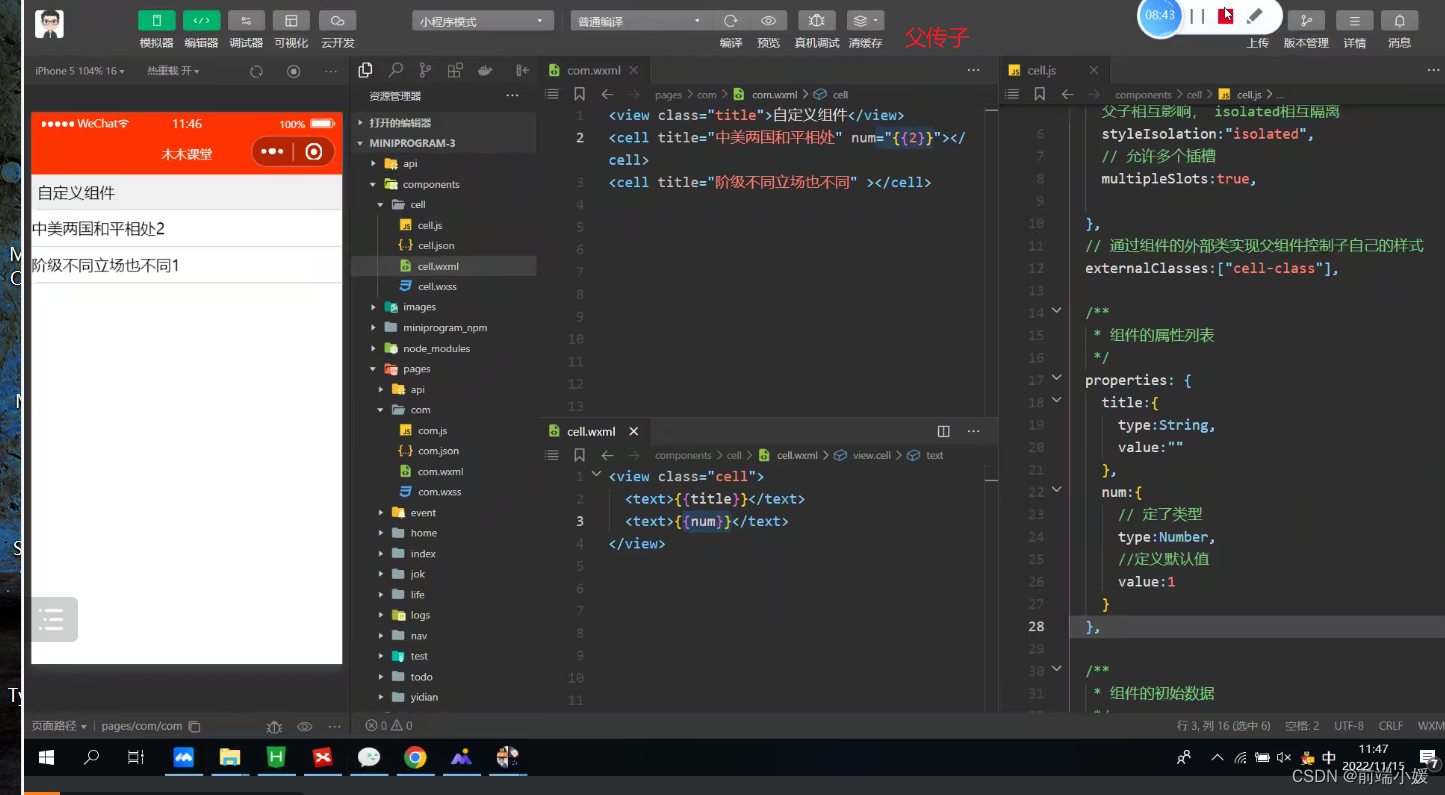
<view class="cell">
  <text>{{title}}</text>
  <text>{{num}}</text>
</view>
// components/cell/cell.js
Component({
  /* 选项 */
  options:{
    /* 样式隔离:apply-shared 父影响子
    shared 父子相互影响   isolated 相互隔离
    */
    styleIsolation:'isolated',
    //允许多个插槽
    multipleSlots:true,
  },
  /**
   * 组件的属性列表
   */
  properties: {
    title:{
      type:String,
      value:""
    },
    num:{
      type:Number,
      value:1
    }
  },

  /**
   * 组件的初始数据
   */
  data: {
    //定义组件自己的数据count
    count:1
  },
  /**
   * 组件的方法列表
   */
})
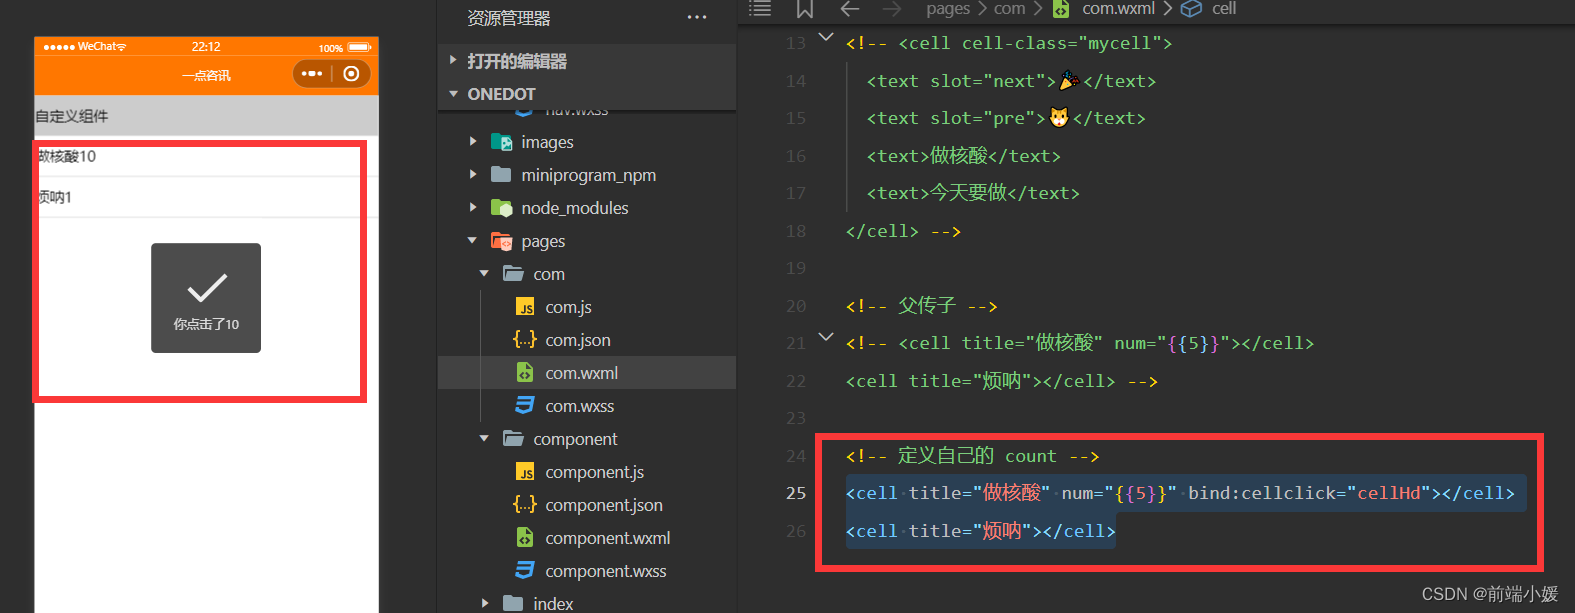
<cell title="做核酸" num="{{5}}"></cell>
<cell title="烦呐"></cell>
<view class="cell" bindtap="tapHd">
  <text>{{title}}</text>
  <text>{{count}}</text>
</view>
// components/cell/cell.js
Component({
  /* 选项 */
  options:{
    /* 样式隔离:apply-shared 父影响子
    shared 父子相互影响   isolated 相互隔离
    */
    styleIsolation:'isolated',
    //允许多个插槽
    multipleSlots:true,
  },
  /**
   * 组件的属性列表
   */
  properties: {
    title:{
      type:String,
      value:""
    },
    num:{
      type:Number,
      value:1
    }
  },

  /**
   * 组件的初始数据
   */
  data: {
    //定义组件自己的数据count
    count:1
  },
  lifetimes:{
    //在组件生命周期attached挂载更新count
    attached(){
      console.log(this.data);
      //count 的值为父组件传递的num值
      this.setData({count:this.data.num})
    }

  },
  /**
   * 组件的方法列表
   */
  methods: {
    tapHd(){
      this.setData({count:this.data.count+5})
      //发送一个事件
      this.triggerEvent("cellclick",this.data.count)
    }
  }
})
 <view class="cell" bindtap="tapHd">
  <text>{{title}}</text>
  <text>{{count}}</text>
</view>

<!--components/item/item.wxml-->
<navigator class="item itemclass" url="{{url}}" open-type="{{openType}}" bindtap="itemclick">
  <view class="icon" wx:if="{{icon}}">
    <image src="{{icon}}" mode="aspectFill"/>
  </view>
  <view class="content">
    <view class="title" wx:if="{{title}}">
      {{title}}
    </view>
    <slot name="title" wx:else ></slot>
    <view class="right" wx:if="{{!showrslot}}">
      <view class="tip">{{tip}}</view>
      <view class="badge" wx:if="{{badge}}">
      <view wx:if="{{badge===true}}" class="dot">  </view>
        <view wx:else class="redbadge">{{badge}}</view>
      </view>
      <view class="arrow"></view>
    </view>
    <slot name="right" wx:else></slot>
  </view>
</navigator>
/* components/item/item.wxss */
.item{
  line-height: 88rpx;
  display: flex;
  align-items: center;
  justify-content: space-between;
}
.icon{
  margin-left: 30rpx;
  margin-right: 30rpx;
  height: 100%;
  display: flex;
  align-items: center;
}
.icon image{
  width: 60rpx;
  height: 60rpx;
}
.content{
  padding: 0 30rpx;
  border-bottom: 1rpx solid #ccc;
  display: flex;
  flex: 1;
}
.title{
  flex: 1;
  color: #333;
  font-size: 35rpx;
}
.right{
  display: flex;
  align-items: center;
}
.right .arrow{
  height: 25rpx;
  width: 25rpx;
  border-top: 3rpx solid #999;
  border-right: 3rpx solid #999;
  transform: rotate(45deg);
}
.tip{
  color: #999;
  font-size: 28rpx;
}
.dot{
  height: 15rpx;
  width: 15rpx;
  background-color: #f30;
  margin-left: 15rpx;
  border-radius: 50%;
}
.redbadge{
  font-size: 20rpx;
  padding: 5rpx;
  background-color: #f30;
  width: 30rpx;
  max-height: 30rpx;
  line-height: 30rpx;
  color: #fff;
  text-align: center;
  margin-left: 15rpx;
  border-radius: 20rpx;
}
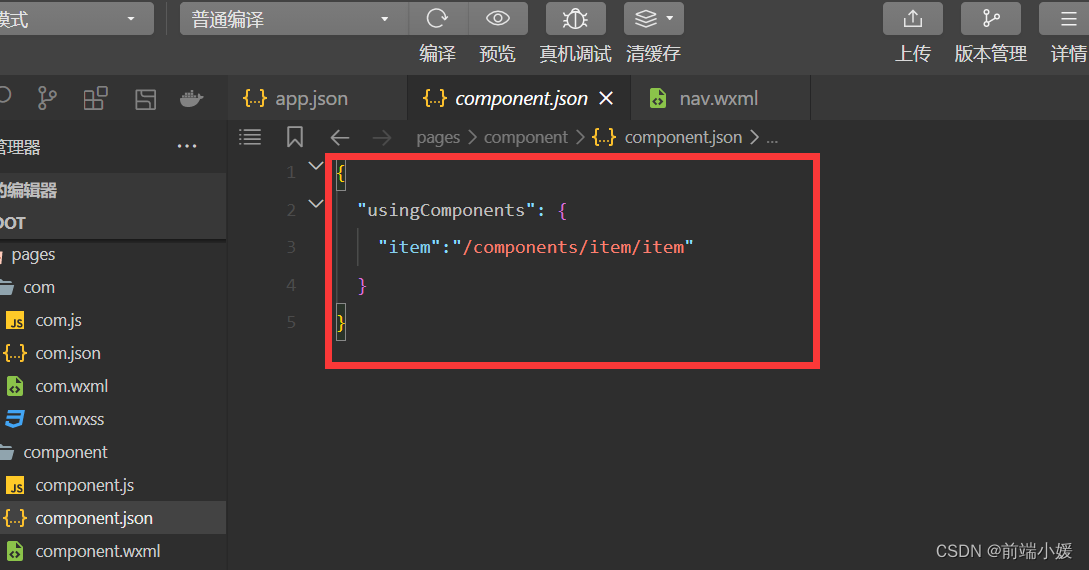
<!-- 引用组件的json文件 -->
{
  "usingComponents": {
    "cell": "/components/cell/cell"
  }
}
<!-- 引用组件的wxml文件 -->
<!--pages/component/component.wxml-->
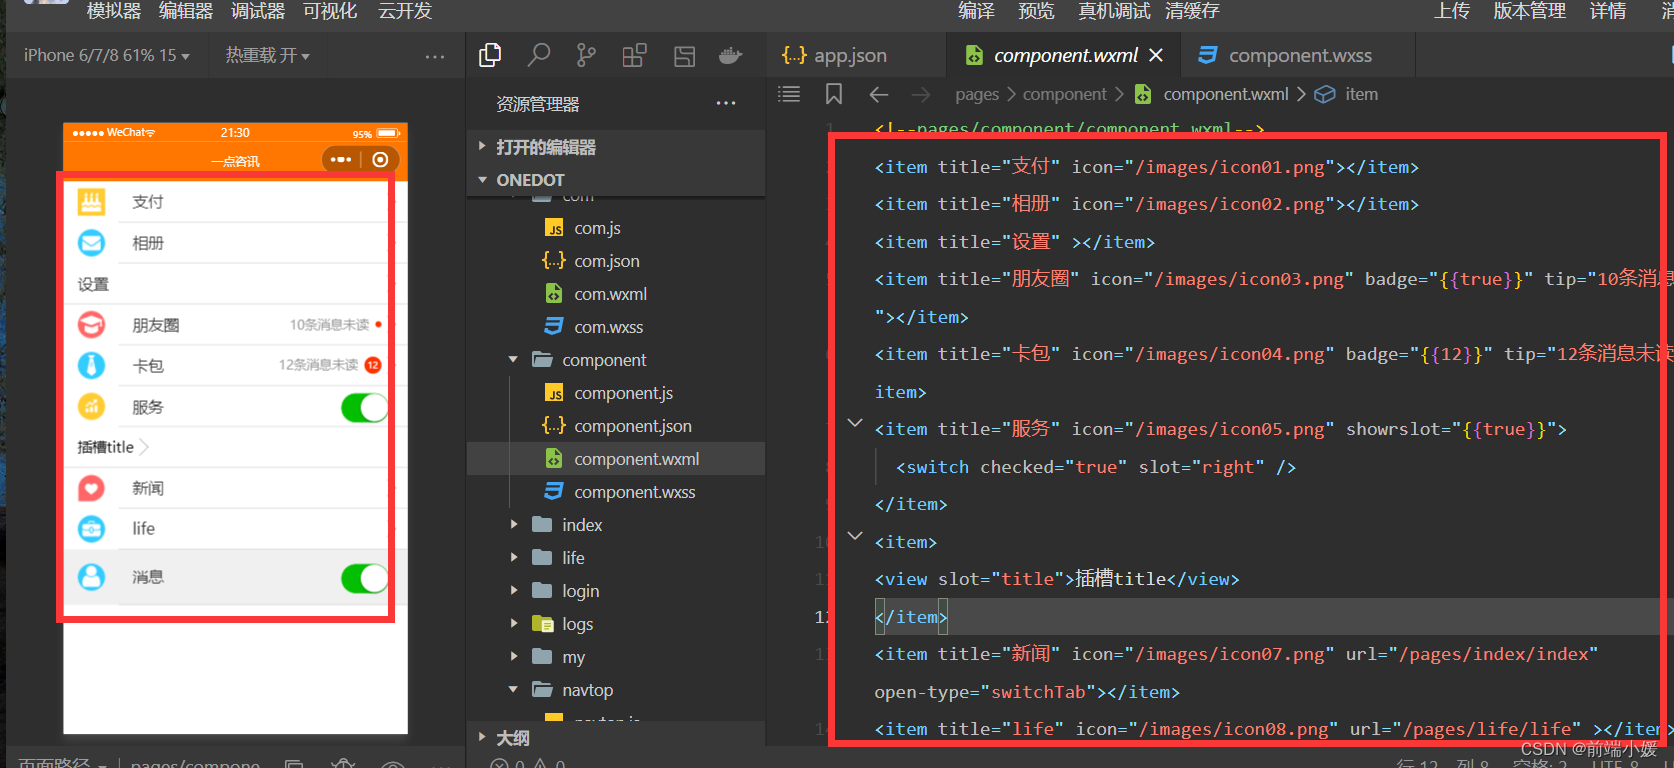
<item title="支付" icon="/images/icon01.png"></item>
<item title="相册" icon="/images/icon02.png"></item>
<item title="设置" ></item>
<item title="朋友圈" icon="/images/icon03.png" badge="{{true}}" tip="10条消息未读"></item>
<item title="卡包" icon="/images/icon04.png" badge="{{12}}" tip="12条消息未读"></item>
<item title="服务" icon="/images/icon05.png" showrslot="{{true}}">
<switch checked="true" slot="right" />
</item>
<item>
<view slot="title">插槽title</view>
</item>
<item title="新闻" icon="/images/icon07.png" url="/pages/index/index" open-type="switchTab"></item>
<item title="life" icon="/images/icon08.png" url="/pages/life/life" ></item>
<item title="消息" icon="/images/icon06.png" showrslot="{{true}}" itemclass="myitem">
<switch checked="true" slot="right" />
</item>
.myitem{
  line-height: 120rpx !important;
  background-color: #f0f0f0;
}
【Vue】描述项目中两个功能模块的业务(一点见解)
【Git】Git基础操作一文详解,入门易懂(附图和案例
【Vue3】整理的一些Vue3知识点和案例(Vue3 获取窗口宽和高)
我正在尝试设置一个puppet节点,但rubygems似乎不正常。如果我通过它自己的二进制文件(/usr/lib/ruby/gems/1.8/gems/facter-1.5.8/bin/facter)在cli上运行facter,它工作正常,但如果我通过由rubygems(/usr/bin/facter)安装的二进制文件,它抛出:/usr/lib/ruby/1.8/facter/uptime.rb:11:undefinedmethod`get_uptime'forFacter::Util::Uptime:Module(NoMethodError)from/usr/lib/ruby
我需要在客户计算机上运行Ruby应用程序。通常需要几天才能完成(复制大备份文件)。问题是如果启用sleep,它会中断应用程序。否则,计算机将持续运行数周,直到我下次访问为止。有什么方法可以防止执行期间休眠并让Windows在执行后休眠吗?欢迎任何疯狂的想法;-) 最佳答案 Here建议使用SetThreadExecutionStateWinAPI函数,使应用程序能够通知系统它正在使用中,从而防止系统在应用程序运行时进入休眠状态或关闭显示。像这样的东西:require'Win32API'ES_AWAYMODE_REQUIRED=0x0
Rackup通过Rack的默认处理程序成功运行任何Rack应用程序。例如:classRackAppdefcall(environment)['200',{'Content-Type'=>'text/html'},["Helloworld"]]endendrunRackApp.new但是当最后一行更改为使用Rack的内置CGI处理程序时,rackup给出“NoMethodErrorat/undefinedmethod`call'fornil:NilClass”:Rack::Handler::CGI.runRackApp.newRack的其他内置处理程序也提出了同样的反对意见。例如Rack
我想用ruby编写一个小的命令行实用程序并将其作为gem分发。我知道安装后,Guard、Sass和Thor等某些gem可以从命令行自行运行。为了让gem像二进制文件一样可用,我需要在我的gemspec中指定什么。 最佳答案 Gem::Specification.newdo|s|...s.executable='name_of_executable'...endhttp://docs.rubygems.org/read/chapter/20 关于ruby-在Ruby中编写命令行实用程序
我在我的项目中添加了一个系统来重置用户密码并通过电子邮件将密码发送给他,以防他忘记密码。昨天它运行良好(当我实现它时)。当我今天尝试启动服务器时,出现以下错误。=>BootingWEBrick=>Rails3.2.1applicationstartingindevelopmentonhttp://0.0.0.0:3000=>Callwith-dtodetach=>Ctrl-CtoshutdownserverExiting/Users/vinayshenoy/.rvm/gems/ruby-1.9.3-p0/gems/actionmailer-3.2.1/lib/action_mailer
我构建了两个需要相互通信和发送文件的Rails应用程序。例如,一个Rails应用程序会发送请求以查看其他应用程序数据库中的表。然后另一个应用程序将呈现该表的json并将其发回。我还希望一个应用程序将存储在其公共(public)目录中的文本文件发送到另一个应用程序的公共(public)目录。我从来没有做过这样的事情,所以我什至不知道从哪里开始。任何帮助,将不胜感激。谢谢! 最佳答案 无论Rails是什么,几乎所有Web应用程序都有您的要求,大多数现代Web应用程序都需要相互通信。但是有一个小小的理解需要你坚持下去,网站不应直接访问彼此
我尝试运行2.x应用程序。我使用rvm并为此应用程序设置其他版本的ruby:$rvmuseree-1.8.7-head我尝试运行服务器,然后出现很多错误:$script/serverNOTE:Gem.source_indexisdeprecated,useSpecification.Itwillberemovedonorafter2011-11-01.Gem.source_indexcalledfrom/Users/serg/rails_projects_terminal/work_proj/spohelp/config/../vendor/rails/railties/lib/r
刚入门rails,开始慢慢理解。有人可以解释或给我一些关于在application_controller中编码的好处或时间和原因的想法吗?有哪些用例。您如何为Rails应用程序使用应用程序Controller?我不想在那里放太多代码,因为据我了解,每个请求都会调用此Controller。这是真的? 最佳答案 ApplicationController实际上是您应用程序中的每个其他Controller都将从中继承的类(尽管这不是强制性的)。我同意不要用太多代码弄乱它并保持干净整洁的态度,尽管在某些情况下ApplicationContr
我想向我的Controller传递一个参数,它是一个简单的复选框,但我不知道如何在模型的form_for中引入它,这是我的观点:{:id=>'go_finance'}do|f|%>Transferirde:para:Entrada:"input",:placeholder=>"Quantofoiganho?"%>Saída:"output",:placeholder=>"Quantofoigasto?"%>Nota:我想做一个额外的复选框,但我该怎么做,模型中没有一个对象,而是一个要检查的对象,以便在Controller中创建一个ifelse,如果没有检查,请帮助我,非常感谢,谢谢
我已经从我的命令行中获得了一切,所以我可以运行rubymyfile并且它可以正常工作。但是当我尝试从sublime中运行它时,我得到了undefinedmethod`require_relative'formain:Object有人知道我的sublime设置中缺少什么吗?我正在使用OSX并安装了rvm。 最佳答案 或者,您可以只使用“require”,它应该可以正常工作。我认为“require_relative”仅适用于ruby1.9+ 关于ruby-主要:Objectwhenrun