文章目录
本文将详细介绍学生学籍管理项目的设计实现。
补充:数据库文件
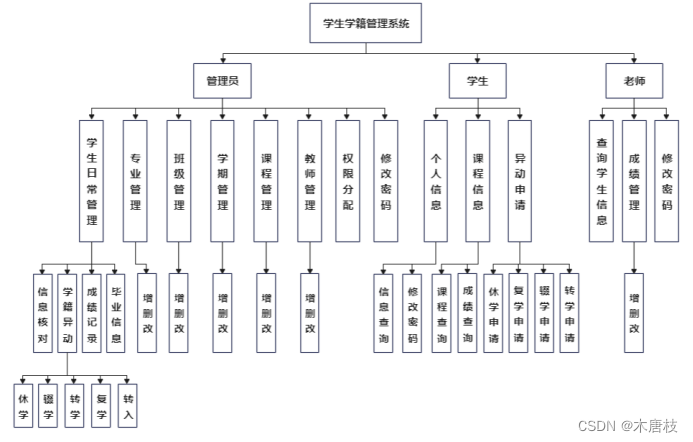
该项目面向管理员、学生、老师三方用户,用于对学生学籍信息进行管理。
项目主要功能:
(1)管理员可对学生、班级、专业、教师等信息进行增删改查,并分配权限。
(2)教师可查询学生信息,管理成绩,审批申请。
(3)学生可查询个人成绩、课程信息,提交申请。
各类用户均可查看个人信息以及修改密码。
系统功能结构如图所示:
本系统整体采用B/S体系结构、MVC设计模式进行设计开发。
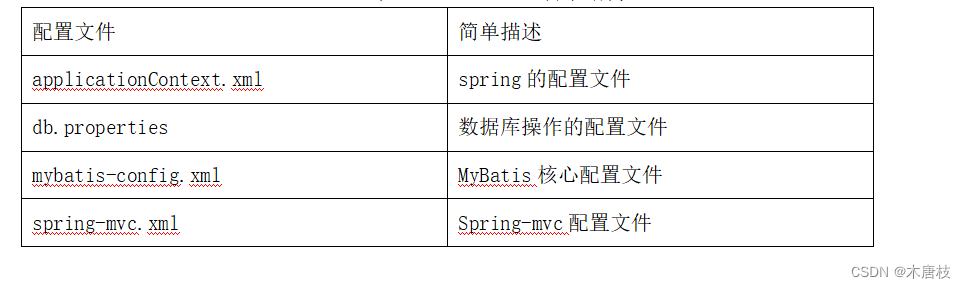
后端:SSM(Spring+SpringMVC+Mybatis)
前端:Layuimini
数据库:MySQL
开发工具:IDEA
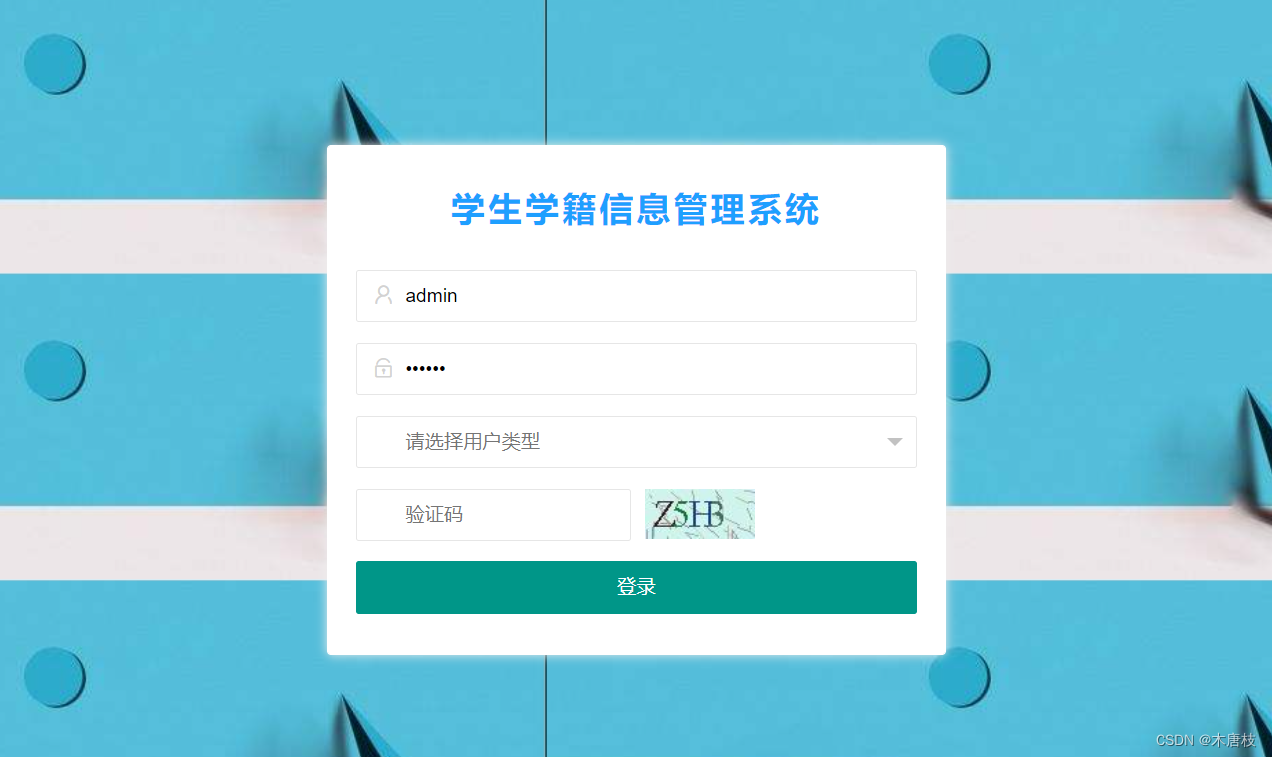
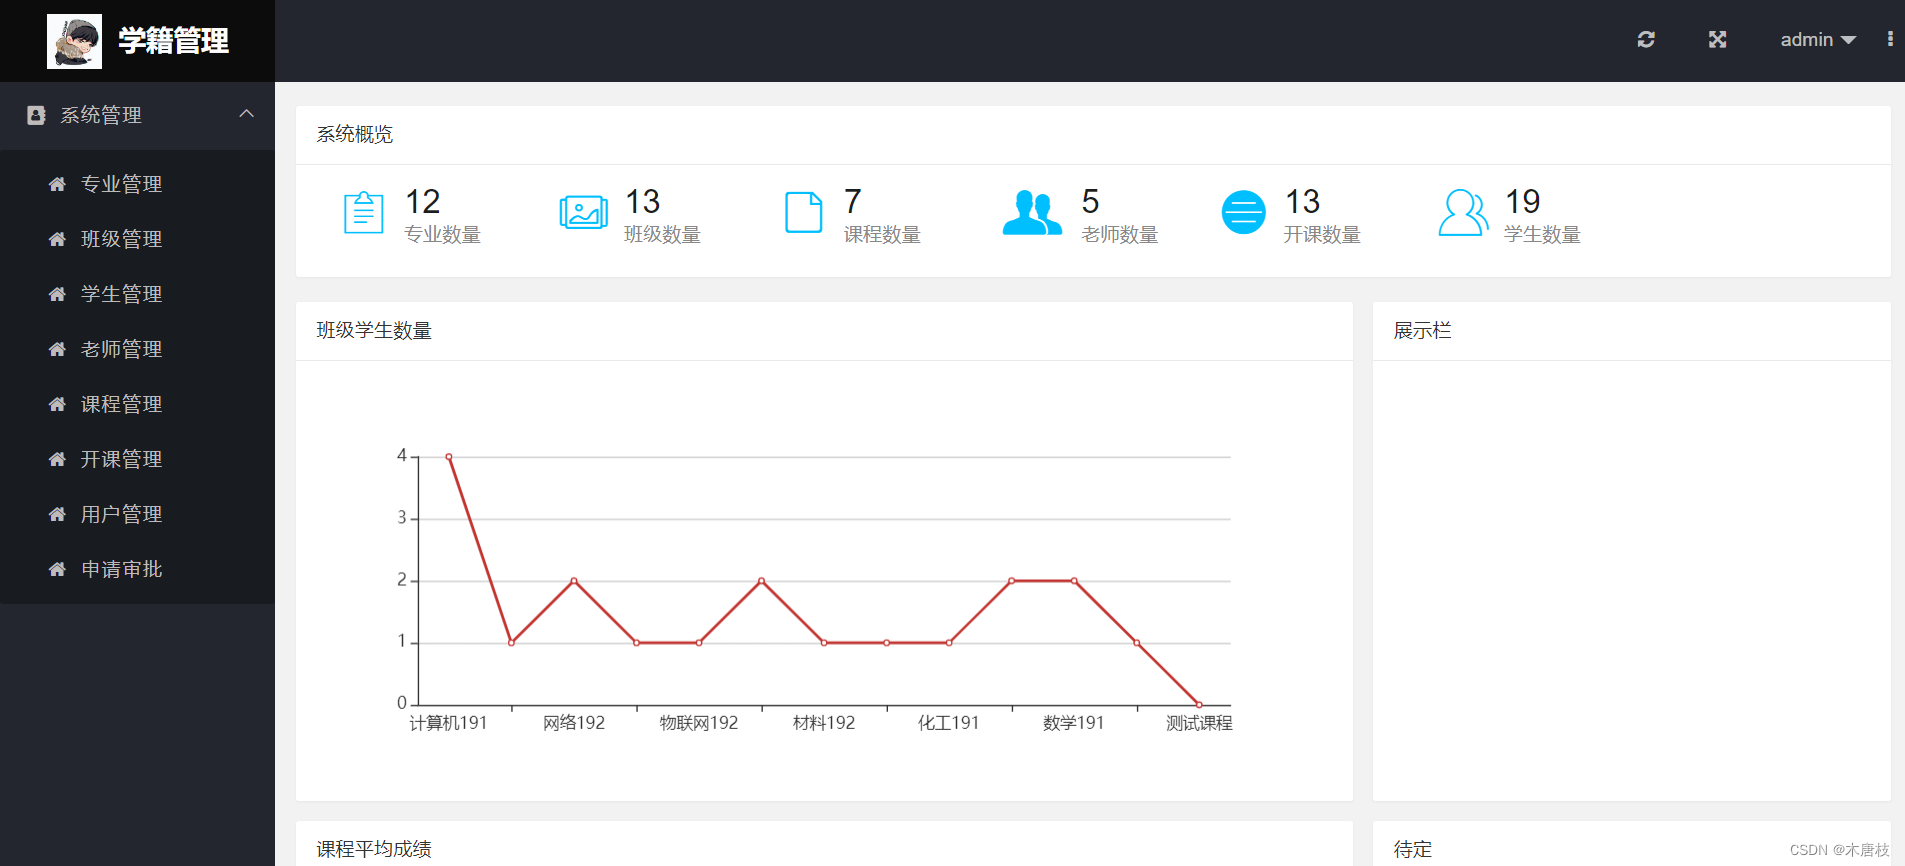
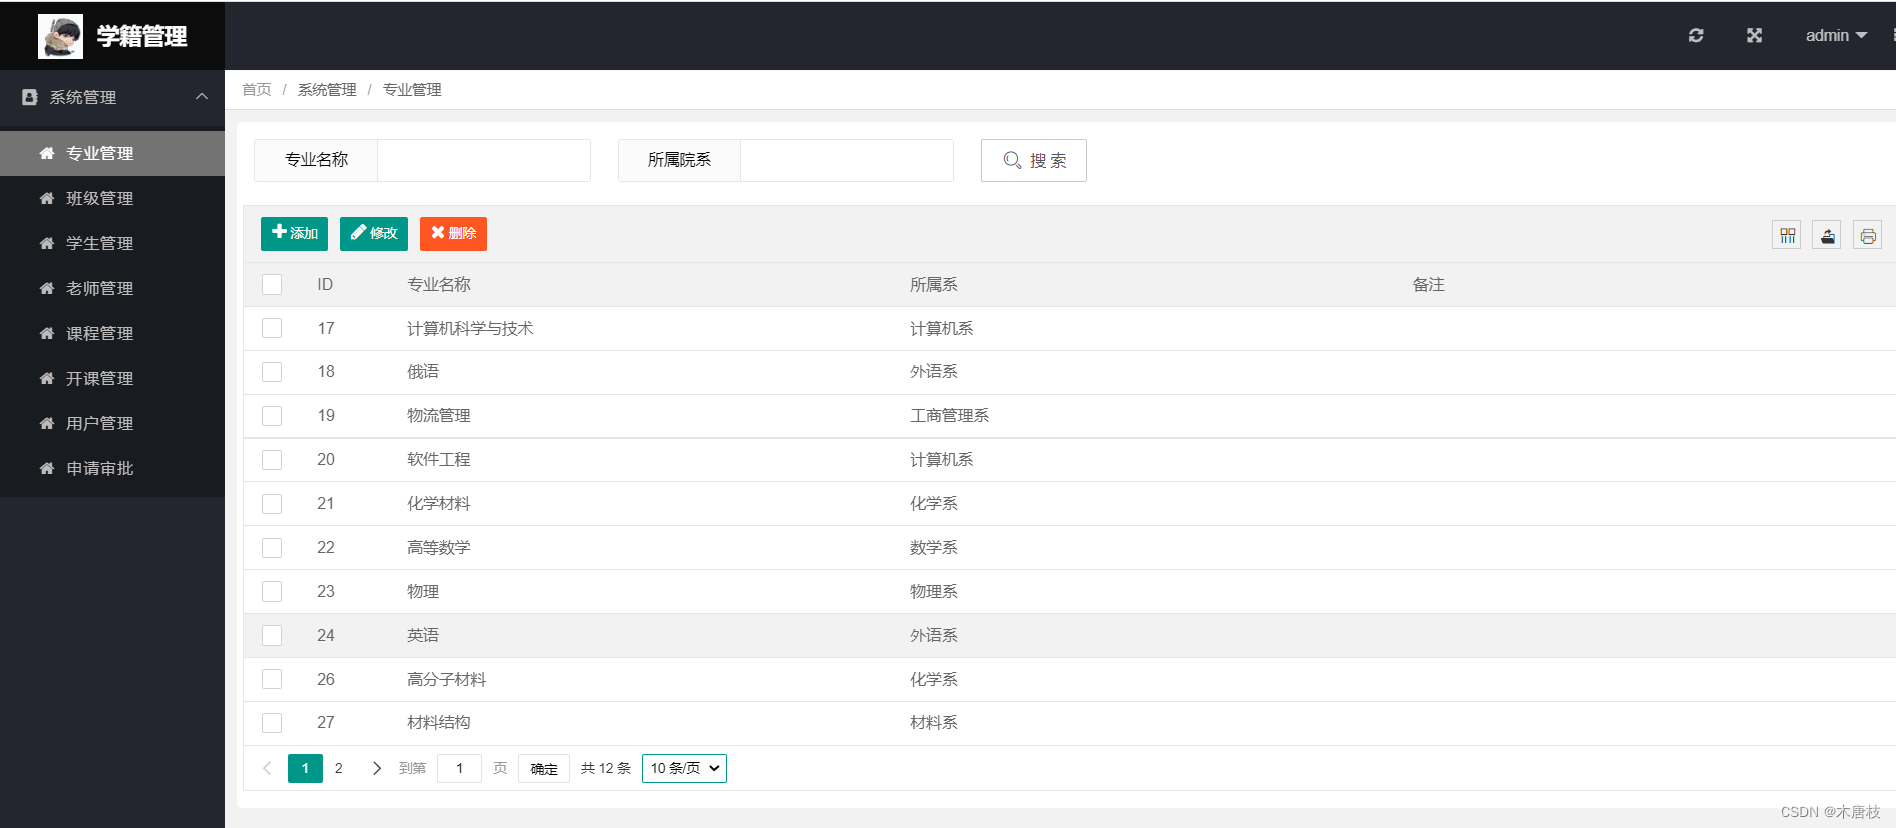
以下是部分页面展示。
登录界面:
管理员登录首页:
管理员-专业管理页面:
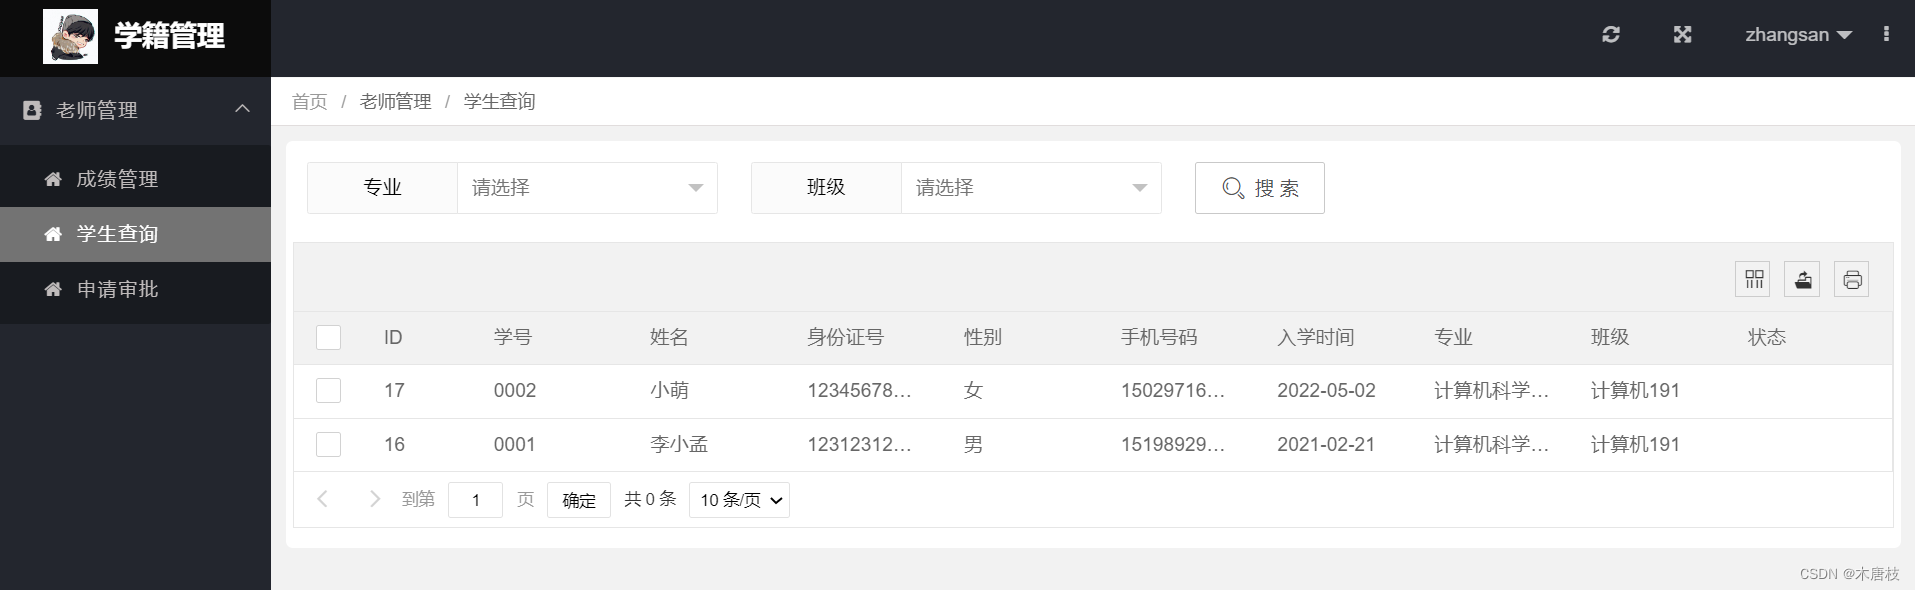
教师登录–学生查询页面:
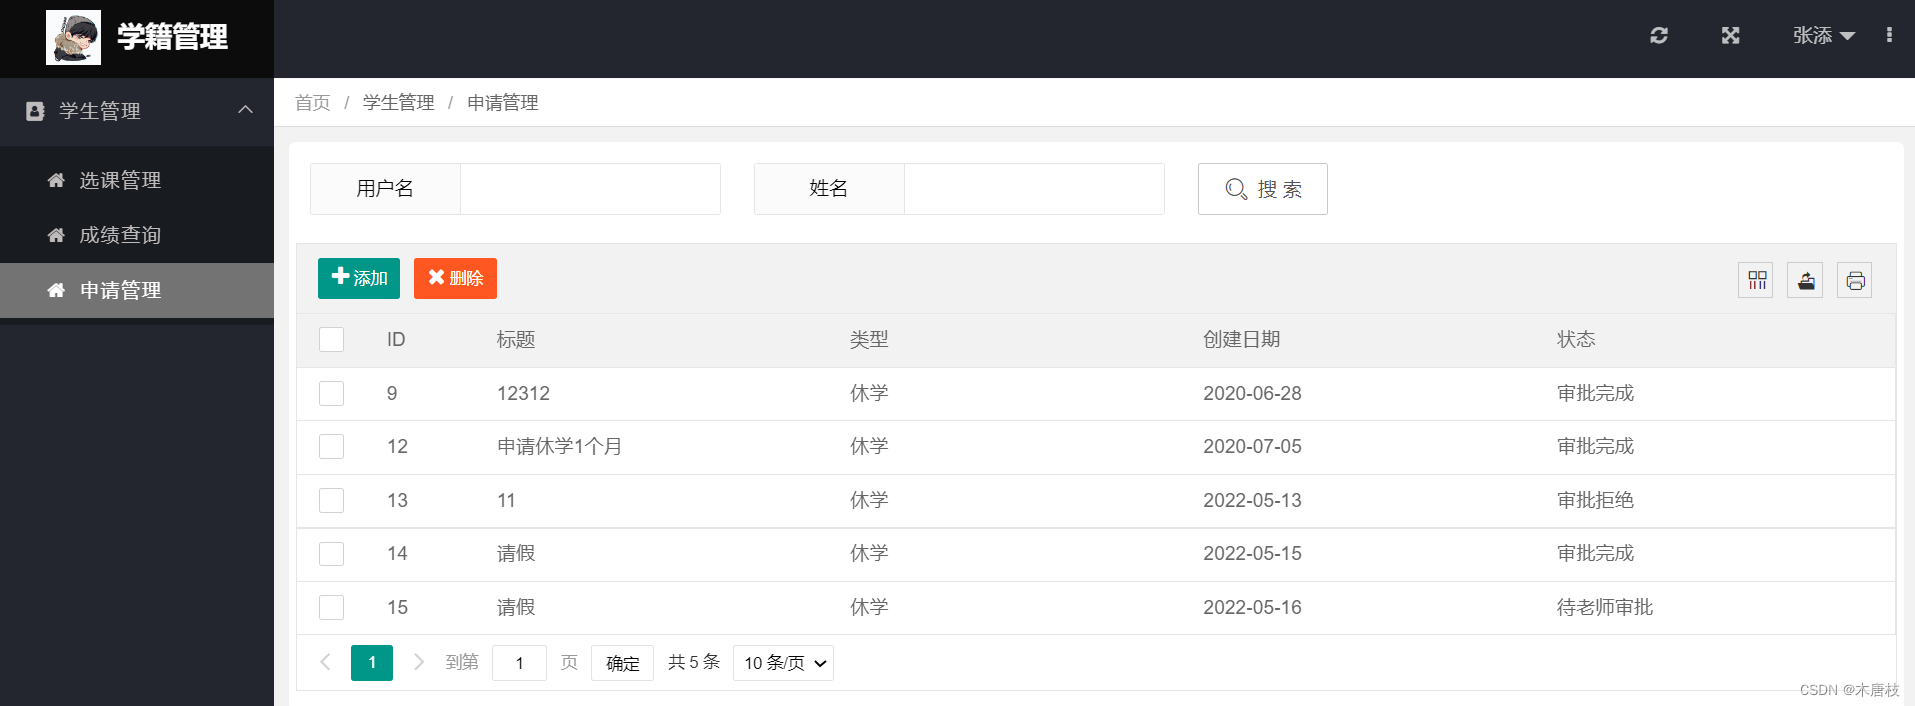
学生登录–申请管理页面:
以下是系统的数据库设计关系图:

由该图可得出各表之间的关联关系。
在idea中创建一个maven项目,在其核心文件pom.xml文件中引入spring框架所依赖的jar包以及mybatis、mybatis-spring包。
注意:创建maven项目之后,在跟webapp同级下创建java目录(存放源代码)以及resourse目录(存放资源信息)
补充:简单了解mybatis: MyBatis标签的使用
pom.xml文件中部分代码如下:
<!--引入Spring相关jar-->
<!--如:context坐标,context依赖core,beans等-->
<dependency>
     <groupId>org.springframework</groupId>
     <artifactId>spring-context</artifactId>
     <version>${spring.version}</version>
 </dependency>
 <dependency>
     <groupId>org.springframework</groupId>
     <artifactId>spring-core</artifactId>
     <version>${spring.version}</version>
 </dependency>
 <dependency>
     <groupId>org.springframework</groupId>
     <artifactId>spring-beans</artifactId>
     <version>${spring.version}</version>
 </dependency>
 <dependency>
     <groupId>org.springframework</groupId>
     <artifactId>spring-aop</artifactId>
     <version>${spring.version}</version>
 </dependency>
 <dependency>
     <groupId>org.springframework</groupId>
     <artifactId>spring-web</artifactId>
     <version>${spring.version}</version>
 </dependency>
 <dependency>
     <groupId>org.springframework</groupId>
     <artifactId>spring-webmvc</artifactId>
     <version>${spring.version}</version>
 </dependency>
 <dependency>
     <groupId>org.springframework</groupId>
     <artifactId>spring-jdbc</artifactId>
     <version>${spring.version}</version>
 </dependency>
 <dependency>
     <groupId>org.springframework</groupId>
     <artifactId>spring-tx</artifactId>
     <version>${spring.version}</version>
 </dependency>
 <dependency>
     <groupId>org.springframework</groupId>
     <artifactId>spring-test</artifactId>
     <version>${spring.version}</version>
 </dependency>
<!--引入mybatis相关jar-->
 <dependency>
     <groupId>org.mybatis</groupId>
     <artifactId>mybatis</artifactId>
     <version>3.5.5</version>
 </dependency>

 <dependency>
     <groupId>org.mybatis</groupId>
     <artifactId>mybatis-spring</artifactId>
     <version>2.0.5</version>
 </dependency>
在resources下创建applicationContext.xml配置文件
以下展示文件部分代码:
<?xml version="1.0" encoding="UTF-8"?>
<beans xmlns="http://www.springframework.org/schema/beans"
	xmlns:xsi="http://www.w3.org/2001/XMLSchema-instance"
	xsi:shemaLocation="http://www.springframework.org/schema/beans
	http://www.springframework.org/schema/beans/spring-beans.xsd">
</beans>
若对spring不了解可参考:SSM框架学习
在resources下创建spring-mvc.xml配置文件
以下展示文件部分代码:
<?xml version="1.0" encoding="UTF-8"?>
<beans xmlns="http://www.springframework.org/schema/beans"
	xmlns:xsi="http://www.w3.org/2001/XMLSchema-instance"
	xsi:schemaLocation="http://www.springframework.org/schema/beans
	http://www.springframework.org/schema/beans/spring-beans.xsd">
</beans>
整合spring步骤:
a. 配置前端控制器DispatcherServlet, 加载Spring-mvc.xml配置文件(加载 spring容器等)。
b. 配置Spring上下文监听器:加载applicationContext.xml文件。
c. 配置编码过滤器:解决编码问题
<servlet>
<servlet-name>student_system</servlet-name>
<!--配置前端控制器DispatcherServlet,加载Spring-mvc.xml配置文件,加载spring容器-->
<servlet-class>org.springframework.web.servlet.DispatcherServlet</servlet-class>
<!-- 加载-->
<init-param>
<param-name>contextConfigLocation</param-name>
<param-value>classpath:spring-mvc.xml</param-value>
</init-param>
<!--启动Tomcat容器就加载-->
<load-on-startup>1</load-on-startup>
</servlet>
<!--映射信息 <url-pattern>/</url-pattern> 拦截不带请求 -->
<servlet-mapping>
<servlet-name>student_system</servlet-name>
<url-pattern>/</url-pattern>
</servlet-mapping>
<!--配置上下文参数-->
<context-param>
<param-name>contextConfigLocation</param-name>
<param-value>classpath:applicationContext.xml</param-value>
</context-param>
<!--配置spring上下文监听 加载applicationContext.xml文件-->
<listener>
<listener-class>org.springframework.web.context.ContextLoaderListener</listener-class>
</listener>
<filter>
<filter-name>encodingFilter</filter-name>
<filter-class>org.springframework.web.filter.CharacterEncodingFilter</filter-class>
<init-param>
<param-name>encoding</param-name>
<param-value>utf-8</param-value>
</init-param>
</filter>
<!--3、配置编码过滤器:解决编码问题 –>-->
<filter-mapping>
<filter-name>encodingFilter</filter-name>
<url-pattern>/*</url-pattern>
</filter-mapping>
准备工作:
a.创建db.properties,存放数据库的连接信息

b.在resourse目录下创建mybatis-config.xml文件
<?xml version="1.0" encoding="UTF-8" ?>
<!DOCTYPE configuration
        PUBLIC "-//mybatis.org//DTD Config 3.0//EN"
        "http://mybatis.org/dtd/mybatis-3-config.dtd">
<!--根标签-->
<configuration>
    <!--settings:控制mybatis全局行为-->
    <settings>
        <!--设置mybatis输出日志-->
        <setting name="logImpl" value="STDOUT_LOGGING" />
    </settings>
</configuration>
c.在pom.xml文件中添加mysql依赖、数据库连接池
<dependency>
	<groupId>mysql</groupId>
	<artifactId>mysql-connector-java</artifactId>
	<version>8.0.12</version>
</dependency>

<dependency>
	<groupId>org.apache.commons</groupId>
	<artifactId>commons-dbcp2</artifactId>
	<version>2.7.0</version>
</dependency>
配置:在applicationContext.xml文件中:
可分为四个步骤:加载db.properties、 配置数据源、获取sqlSessionFactory工厂、扫描mapper文件
 <!--1.加载db.properties-->
 <context:property-placeholder location="classpath:db.properties" />
 <!--2.配置数据源-->
 <bean id="dataSource" class="org.apache.commons.dbcp2.BasicDataSource">
     <property name="driverClassName" value="${jdbc.driver}"></property>
     <property name="url" value="${jdbc.url}"></property>
     <property name="username" value="${jdbc.username}"></property>
     <property name="password" value="${jdbc.password}"></property>
 </bean>

 <!--3.获取sqlSessionFactory工厂-->
 <bean id="sqlSessionFactory" class="org.mybatis.spring.SqlSessionFactoryBean">
     <property name="dataSource" ref="dataSource"/>
     <!--加载mybatis核心配置文件-->
     <property name="configLocation" value="classpath:mybatis-config.xml"></property>
     <!--配置mapper文件-->
     <property name="mapperLocations">
         <list>
             <value>classpath:com/demo/dao/*.xml</value>
         </list>
     </property>
     <!--配置分页插件-->
     <property name="plugins">
         <array>
             <bean class="com.github.pagehelper.PageInterceptor">
                 <property name="properties">
                     <value>
                         helperDialect=mysql
                     </value>
                 </property>
             </bean>
         </array>
     </property>
 </bean>
 <!--4.扫描mapper文件-->
 <bean class="org.mybatis.spring.mapper.MapperScannerConfigurer">
 	<!--扫描dao目录下的所有mapper文件-->
     <property name="basePackage" value="com.demo.dao"></property>
     <property name="sqlSessionFactoryBeanName" value="sqlSessionFactory"></property>
 </bean>
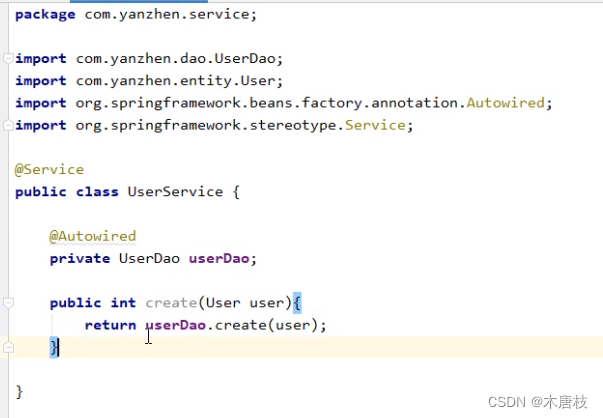
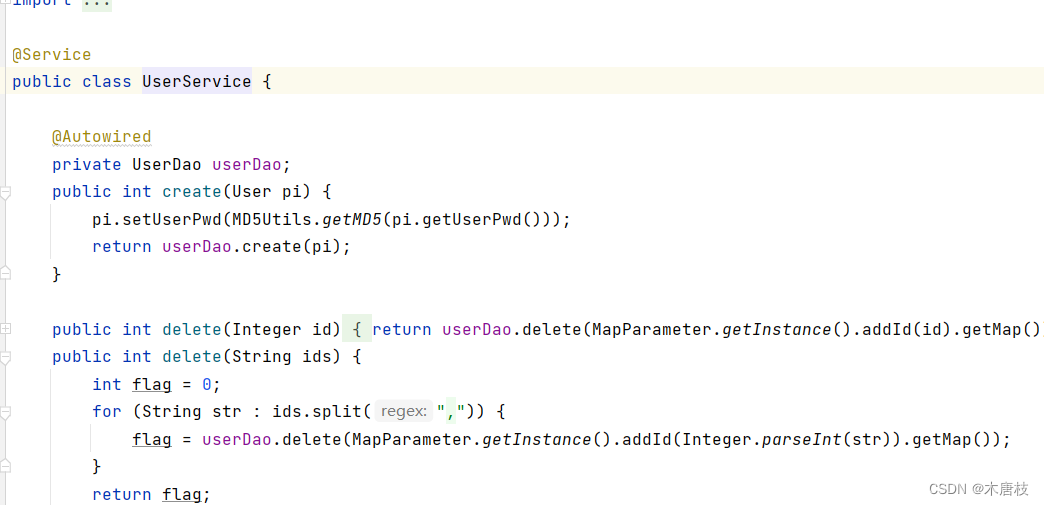
a.创建实体类: 在entity下创建实体类User
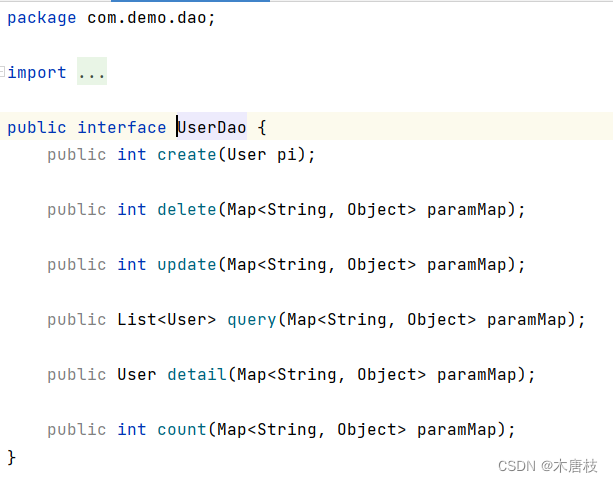
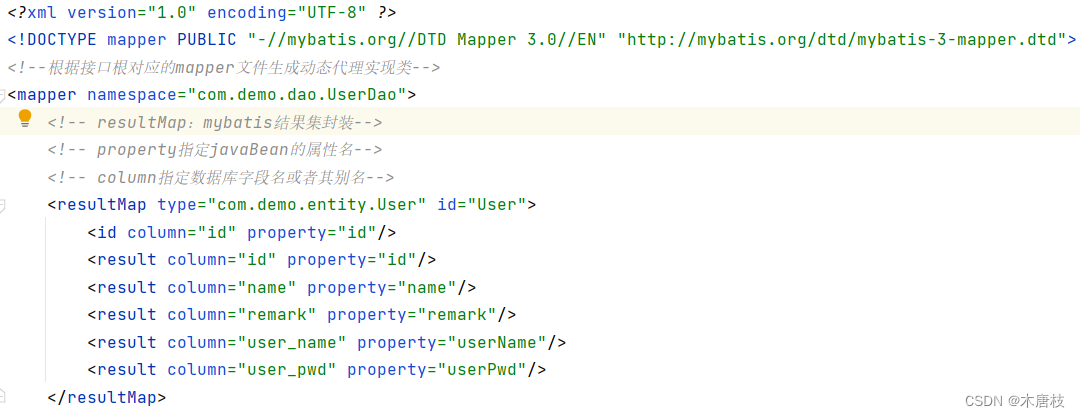
b.在Dao层创建接口: UserDao,以及对应的mapper文件:UserMapper.xml
UserDao:
UserMapper.xml部分截图如下:
c.在service层创建UserService
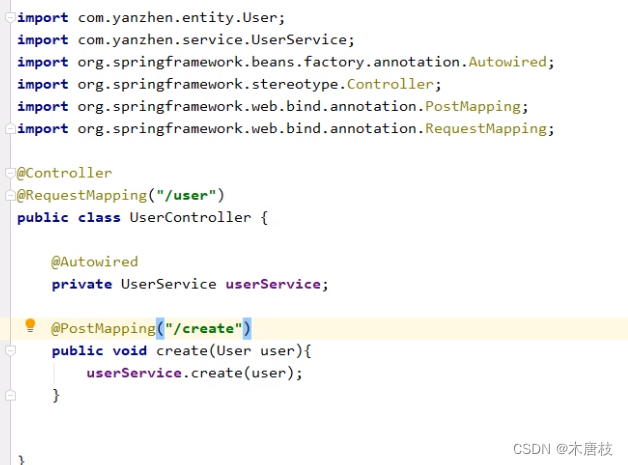
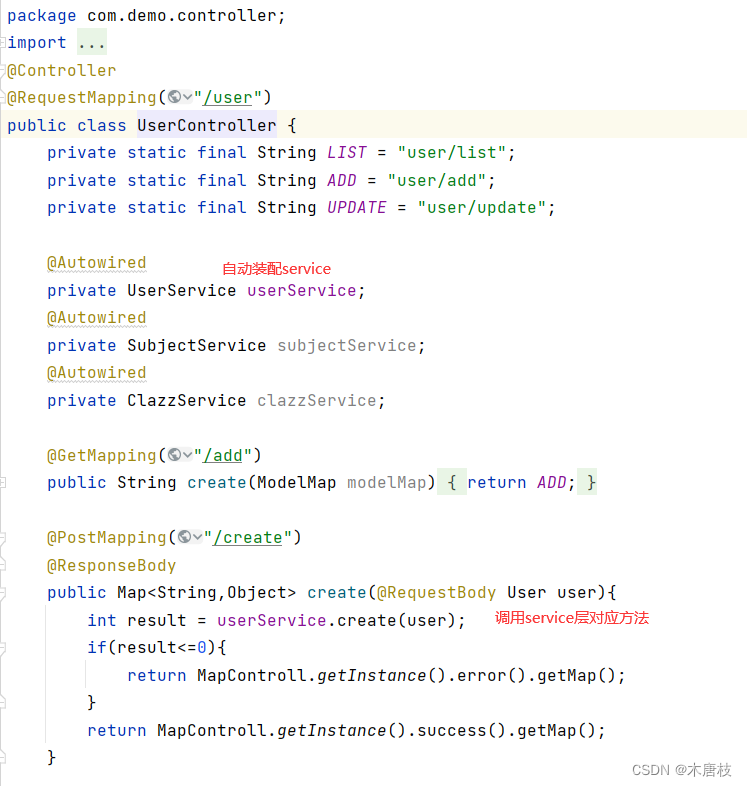
d.在controller层创建UserController
测试:
a. 在spring-mvc.xml中:

b. 在applicationContext.xml中:

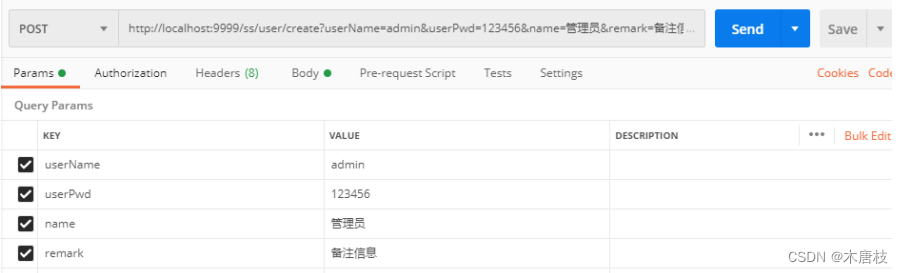
使用postman进行测试
框架搭建成功。
系统目录结构如图所示:
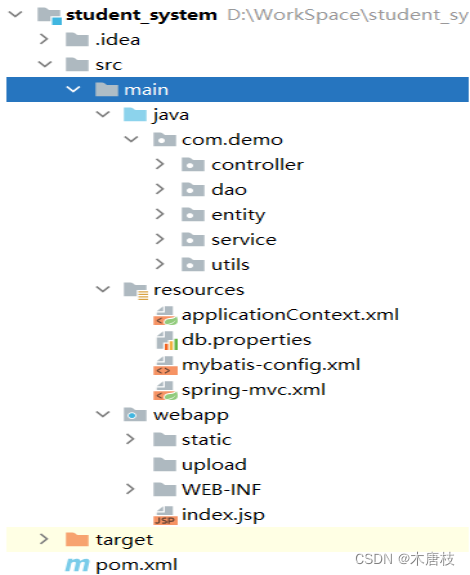
a. Controller(控制层): 负责具体业务模块流程的控制,接受页面过来的参数,调用对应的服务service完成用户请求的处理,接到返回值后再传给页面。
针对具体的业务流程,会有不同的控制器。
b. DAO层: 负责与数据库进行联络的一些任务都封装在此,如:增删改查基本sql语句操作。
c. entity层: 数据对象的实体(model层),是实体bean。
用于ORM对象关系映射,在此系统设计中将不同的实体映射成表,无业务逻辑代码。
d.Service层: 编写具体业务逻辑,也叫服务层。
每个Service一般包含一组相关的业务逻辑,在设计时先设计接口,再设计其实现的类,然后在Spring配置文件中配置其实现的关联。之后调用Service接口来进行业务处理。
e.utils层: 该目录为自定义工具类
如:BeanMapUtils 将bean对象转换成map。 MD5utils:将用户密码进行加密存储。
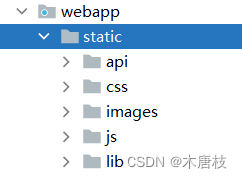
a. static目录: 存放layuimini框架引入的相关资源.
b.WEB-INF目录: 存放前端所有的Jsp页面。
以UserDao为例,在UserMapper.xml文件中进行具体增删改查实现。
采用动态sql技术实现:
若对动态sql技术不了解可参考:mapper映射文件中动态sql的使用
以下是UserMapper.xml代码部分:
<?xml version="1.0" encoding="UTF-8" ?>
<!DOCTYPE mapper PUBLIC "-//mybatis.org//DTD Mapper 3.0//EN" "http://mybatis.org/dtd/mybatis-3-mapper.dtd">
<!--根据接口根对应的mapper文件生成动态代理实现类-->
<mapper namespace="com.demo.dao.UserDao">
    <!-- resultMap:mybatis结果集封装-->
    <!-- property指定javaBean的属性名-->
    <!-- column指定数据库字段名或者其别名-->
    <resultMap type="com.demo.entity.User" id="User">
        <id column="id" property="id"/>
        <result column="id" property="id"/>
        <result column="name" property="name"/>
        <result column="remark" property="remark"/>
        <result column="user_name" property="userName"/>
        <result column="user_pwd" property="userPwd"/>
    </resultMap>
    <!--增-->
    <insert id="create" keyProperty="id" useGeneratedKeys="true" parameterType="com.demo.entity.User">
		insert into tb_user(
			name,
			remark,
			user_name,
			user_pwd
		)values(
			#{name},
			#{remark},
			#{userName},
			#{userPwd}
		)
	</insert>
    <!--删-->
    <delete id="delete">
        delete from tb_user
        <include refid="UserFindCriteria"/>
    </delete>
    <!--改-->
    <update id="update">
        update tb_user
        <include refid="UserUpdateCriteria"/>
        <include refid="UserFindCriteria"/>
    </update>
    <!--查-->
    <select id="query" resultMap="User">
        select * from tb_user
        <include refid="UserFindCriteria"/>
        <if test="offset!=null and rows!=null">limit ${offset} , ${rows}</if>
    </select>

    <!--查询分页-->
    <select id="count" resultType="int">
        select count(1) from tb_user
        <include refid="UserFindCriteria"/>
    </select>
    <!--查询明细-->
    <select id="detail" resultMap="User">
        select * from tb_user
        <include refid="UserFindCriteria"/>
        limit 1
    </select>
    <!--动态sql查询-->
    <sql id="UserFindCriteria">
        <where>
            <if test="id != null">and id = #{id}</if>
            <if test="name != null and name != ''">and name like concat('%',#{name},'%')</if>
            <if test="remark != null and remark != ''">and remark = #{remark}</if>
            <if test="userName != null and userName != ''">and user_name like concat('%',#{userName},'%')</if>
            <if test="userPwd != null and userPwd != ''">and user_pwd = #{userPwd}</if>
        </where>
    </sql>
    <!--动态sql更新-->
    <sql id="UserUpdateCriteria">
        <set>
            <if test="updateId != null">id = #{updateId},</if>
            <if test="updateName != null and updateName != ''">name = #{updateName},</if>
            <if test="updateRemark != null and updateRemark != ''">remark = #{updateRemark},</if>
            <if test="updateUserName != null and updateUserName != ''">user_name = #{updateUserName},</if>
            <if test="updateUserPwd != null and updateUserPwd != ''">user_pwd = #{updateUserPwd},</if>
        </set>
    </sql>

</mapper>
补充:在上述代码中,用到了#{}、以及${},其使用方式可参考:
另外,在查询条件中用了模糊查询:
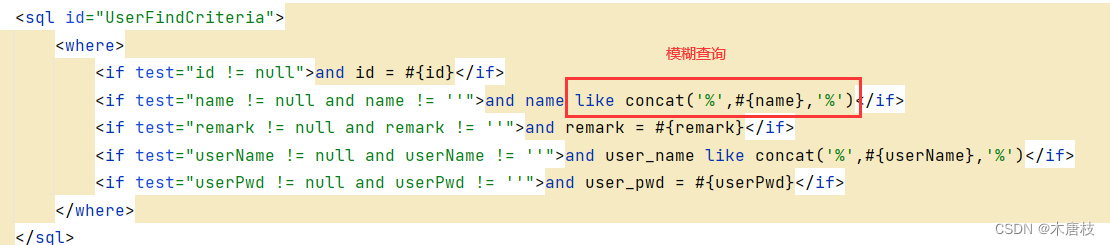
其使用方式可参考:mybatis中四种模糊查询的方式
在上述代码中用到了resultMap,其使用方式参考:Mybatis中ResultMap作用
在UserDao接口中定义具体实现方法:
package com.demo.dao;

import java.util.List;
import java.util.Map;

import com.demo.entity.User;

public interface UserDao {
    public int create(User pi);

    public int delete(Map<String, Object> paramMap);

    public int update(Map<String, Object> paramMap);

    public List<User> query(Map<String, Object> paramMap);

    public User detail(Map<String, Object> paramMap);

    public int count(Map<String, Object> paramMap);
}
Dao层其他模块编写类似:
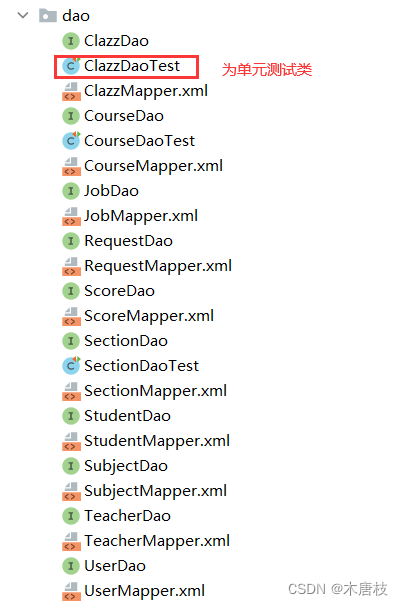
Dao层目录结构:
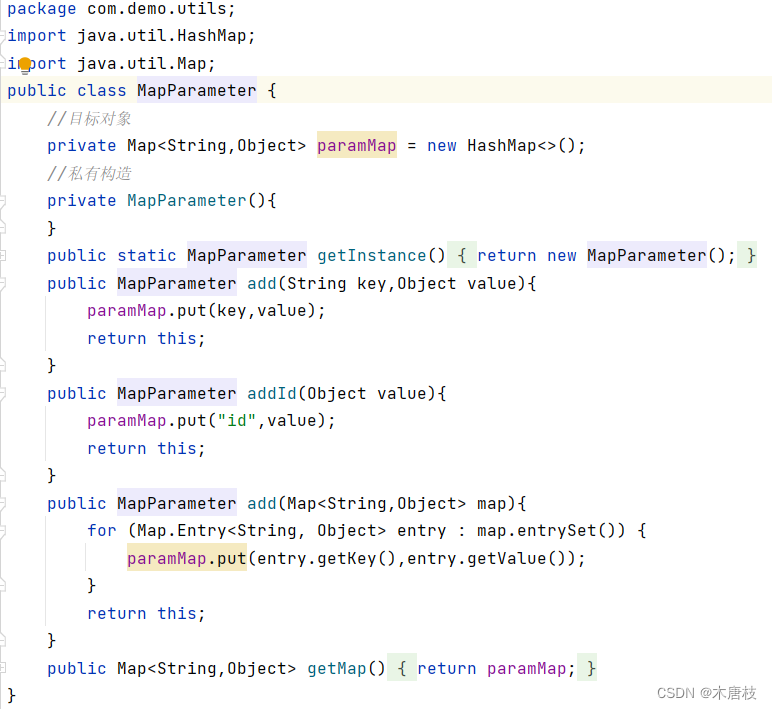
Dao层采用map进行数据传参,由于Service层需实现具体业务操作,数据传参为具体类对象(Bean),需将Bean转为Map
(1)在utils目录下建立BeanMapUtils类:
/* Bean转为Map */
public class BeanMapUtils {
    public static <T> Map<String, Object> beanToMap(T bean) {
        Map<String, Object> map = new HashMap();
        if (bean != null) {
            BeanMap beanMap = BeanMap.create(bean);
            for (Object key : beanMap.keySet()) {
                map.put(key+"", beanMap.get(key));
            }
        }
        return map;
    }
    //处理更新---多加的update
    public static <T> Map<String, Object> beanToMapForUpdate(T bean) {
        Map<String, Object> map = new HashMap();
        if (bean != null) {
            BeanMap beanMap = BeanMap.create(bean);
            for (Object key : beanMap.keySet()) {
                map.put("update"+upperFirstLatter(key+""),beanMap.get(key));
            }
        }
        return map;
    }
    //大小写转换
    public static String upperFirstLatter(String letter){
        char[] chars = letter.toCharArray();
        if(chars[0]>='a' && chars[0]<='z'){
            chars[0] = (char) (chars[0]-32);
        }
        return new String(chars);
    }
(2)对map进行封装: MapParameter
以UserService为例:
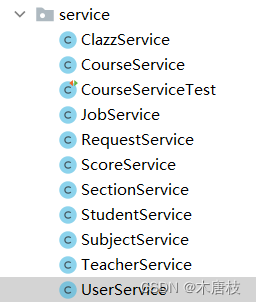
Service层其他模块编写类似:
Service层目录结构:
以UserController为例:
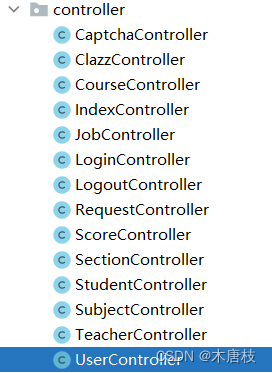
Controller层其他模块编写类似:
Controller层目录结构:
(1)在webapp下创建static目录,引入所需资源
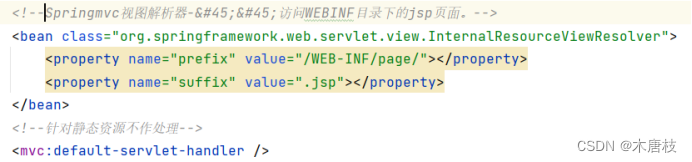
(2)Springmvc视图解析器
作用:访问WEBINF目录下的jsp页面。
在Springmvc.xml中配置:
(3)配置basePath路径:

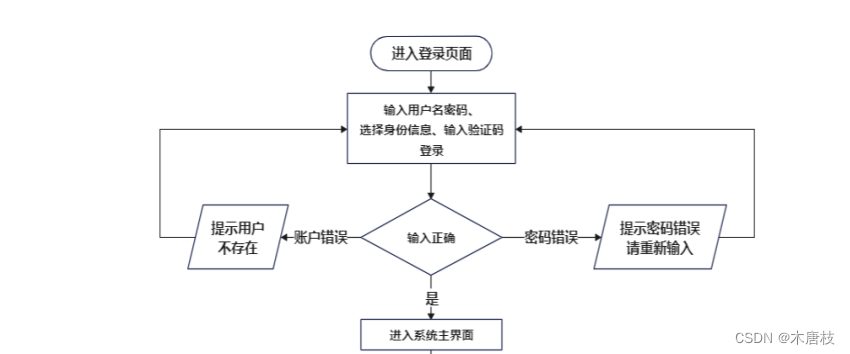
登录模块流程图如下:
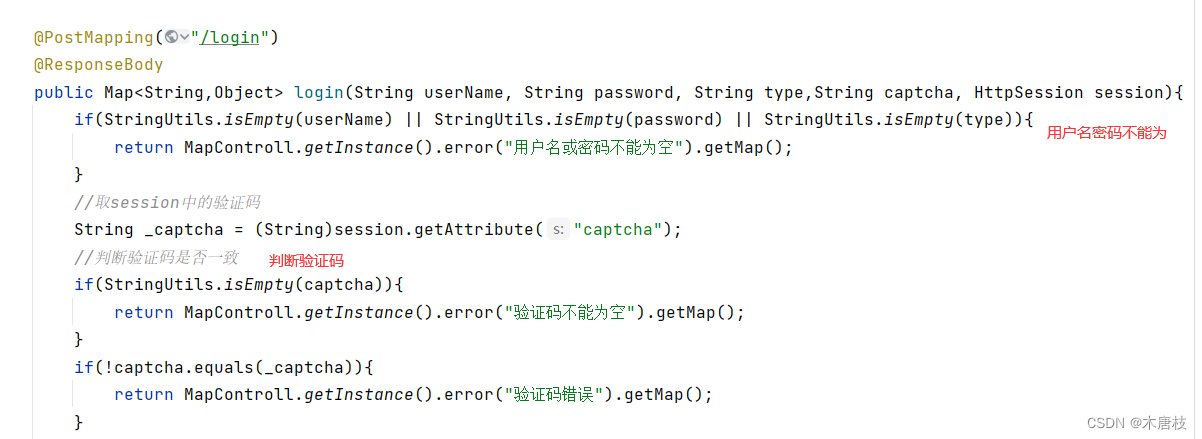
在login.jsp页面进行页面样式设计及表单数据提交:
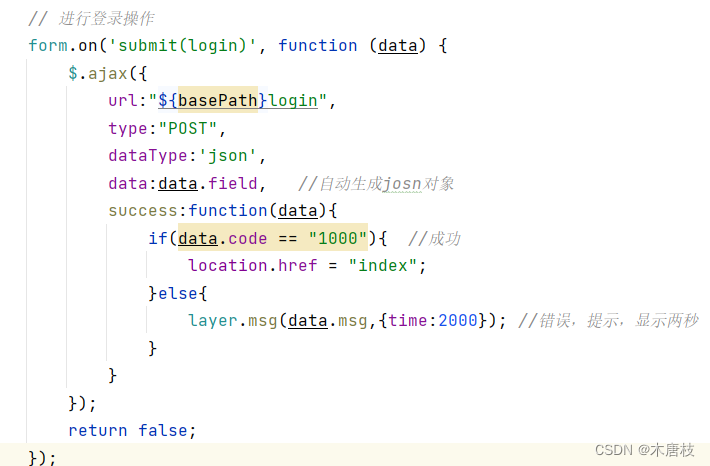
在LoginController中进行用户名密码数据校验:
不同用户登录:
 //管理员登录
 if("1".equals(type)){
       User user = userService.login(userName, MD5Utils.getMD5(password));
       if(user != null){
           session.setAttribute("user",user);
           session.setAttribute("type",1);
           return MapControll.getInstance().success().add("data",user).getMap();
       }else{
           return MapControll.getInstance().error("用户名或密码错误").getMap();
       }
   }
   //老师登录
   if("2".equals(type)){
       Teacher teacher = teacherService.login(userName, MD5Utils.getMD5(password));
       if(teacher != null){
           session.setAttribute("user",teacher);
           session.setAttribute("type",2);
           return MapControll.getInstance().success().add("data",teacher).getMap();
       }else{
           return MapControll.getInstance().error("用户名或密码错误").getMap();
       }

   }
   //学生登录
   if("3".equals(type)){
       Student student = studentService.login(userName, MD5Utils.getMD5(password));
       if(student != null){
           session.setAttribute("user",student);
           session.setAttribute("type",3);
           return MapControll.getInstance().success().add("data",student).getMap();
       }else{
           return MapControll.getInstance().error("用户名或密码错误").getMap();
       }
   }
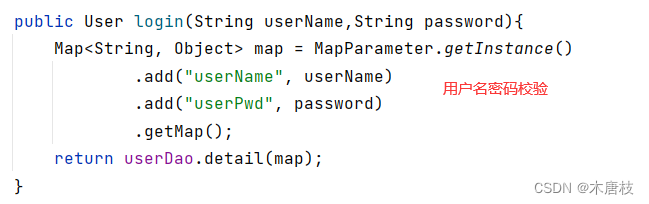
调用不同用户角色对应的Service层代码,以管理员登录为例,调用userService的login方法。
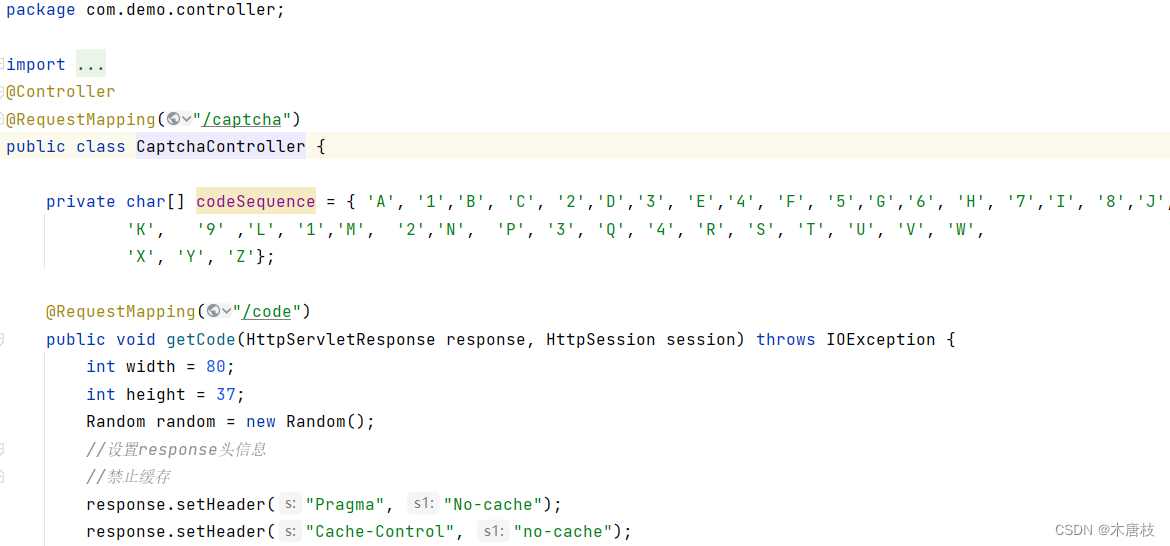
设计思路:
a. 当访问任何一个网站,创建一次会话session(不管是否登录)
b. 验证码本身图片(后台依据字母、数字组合而来,生成图片响应给客户端,在生成图片之前,会将生成的验证码的文字信息放入到session中)
c. 当登录时录入图片上的文字信息,判断与生成验证码的时候放入session的文字信息是否一致,如果一致,就验证码输入正确,否则提示验证码错误。
CaptchaController类:
为保证用户密码在数据库中存储加密,使用MD5加密算法进行加密
创建MD5Utils类:
package com.demo.utils;
import org.springframework.util.DigestUtils;
public class MD5Utils {
    //盐
    private static final String salt = "StudentSystemManager###$$@@";
    public static String getMD5(String string){
        String val = string+salt;
        return DigestUtils.md5DigestAsHex(val.getBytes());
    }
    //MD5加密
    public static void main(String[] args) {
        System.out.println(getMD5("123456"));
    }

}
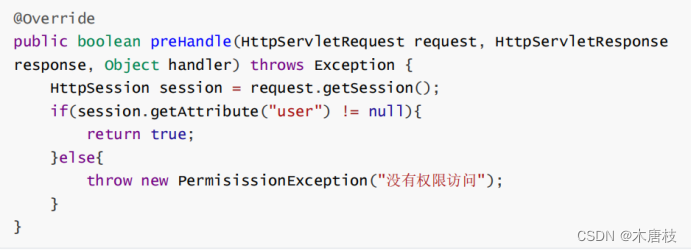
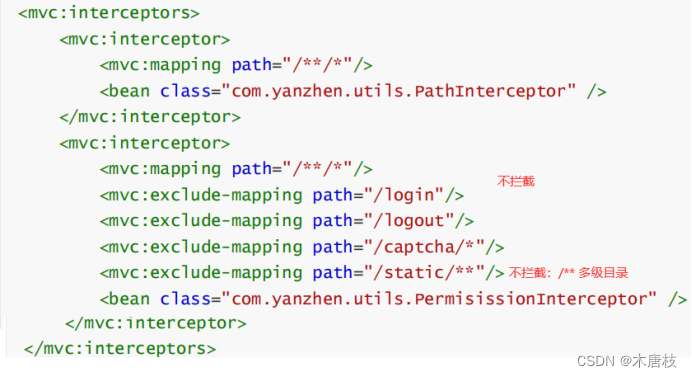
(1)创建拦截器:PermissionInterceptor中:
(2)SpringMVC.xml中:
以管理员身份进行登录,以专业管理为例:
班级管理、老师管理、课程管理、管理员管理基本相同。
a.在SubjectController中–页面跳转

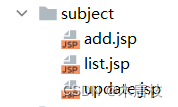
b.在page目录下创建subject目录–创建list.jsp、add.jsp、update.jsp页面
c.在list.jsp中实现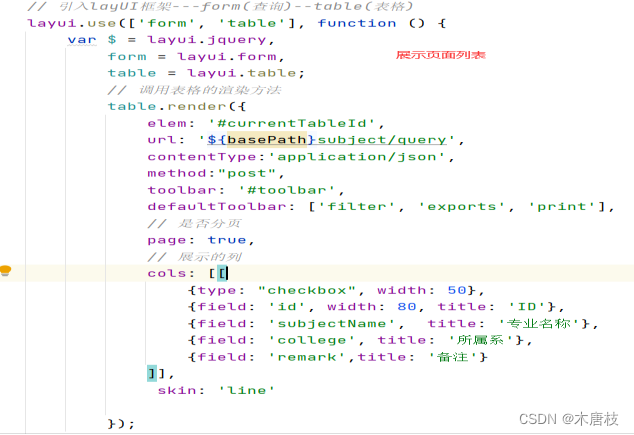
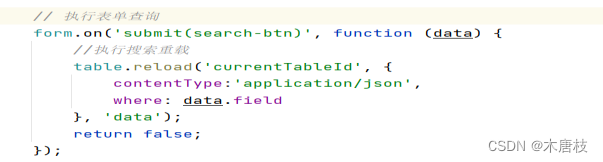
d.查询—form表单绑定提交事件
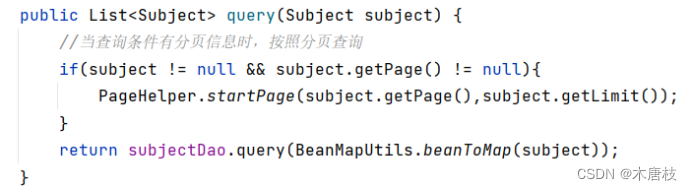
分页功能采用Mybatis-PageHelper插件
a.在applicationContext.xml中配置分页插件

b.建立实体类Entity(属性1:page 属性2:limit)-实现分页–让其他所有类继承自该类
c.在SubjectService中:
a.删除–批量删除 在list.jsp中:
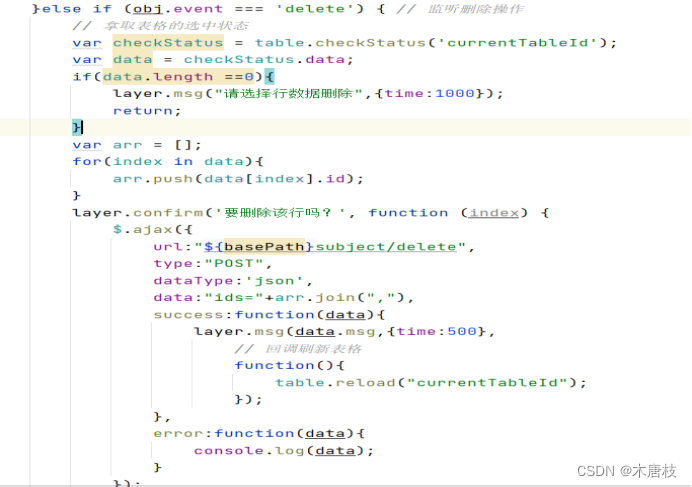
在controller层----service层(增加批量删除)

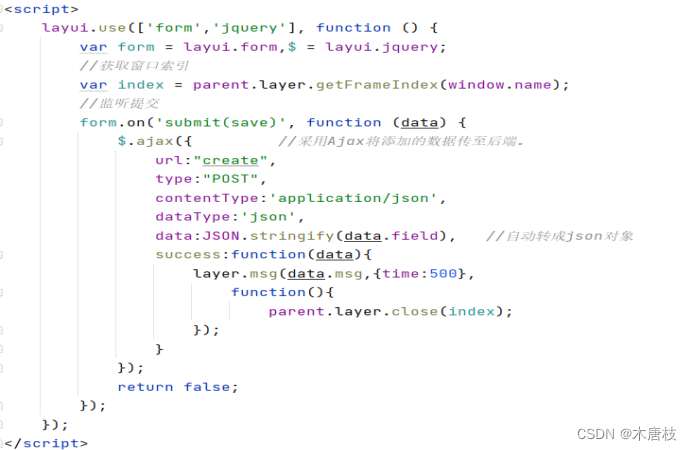
b. 新增–list.jsp中:

在add.jsp页面:
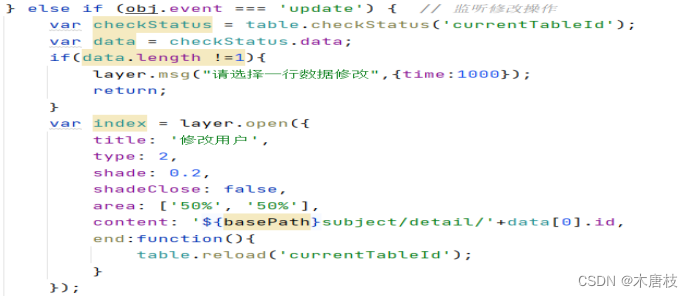
c.修改–list.jsp中,一次只能选中一行修改 controller service

以下是开课管理模块的界面截图:
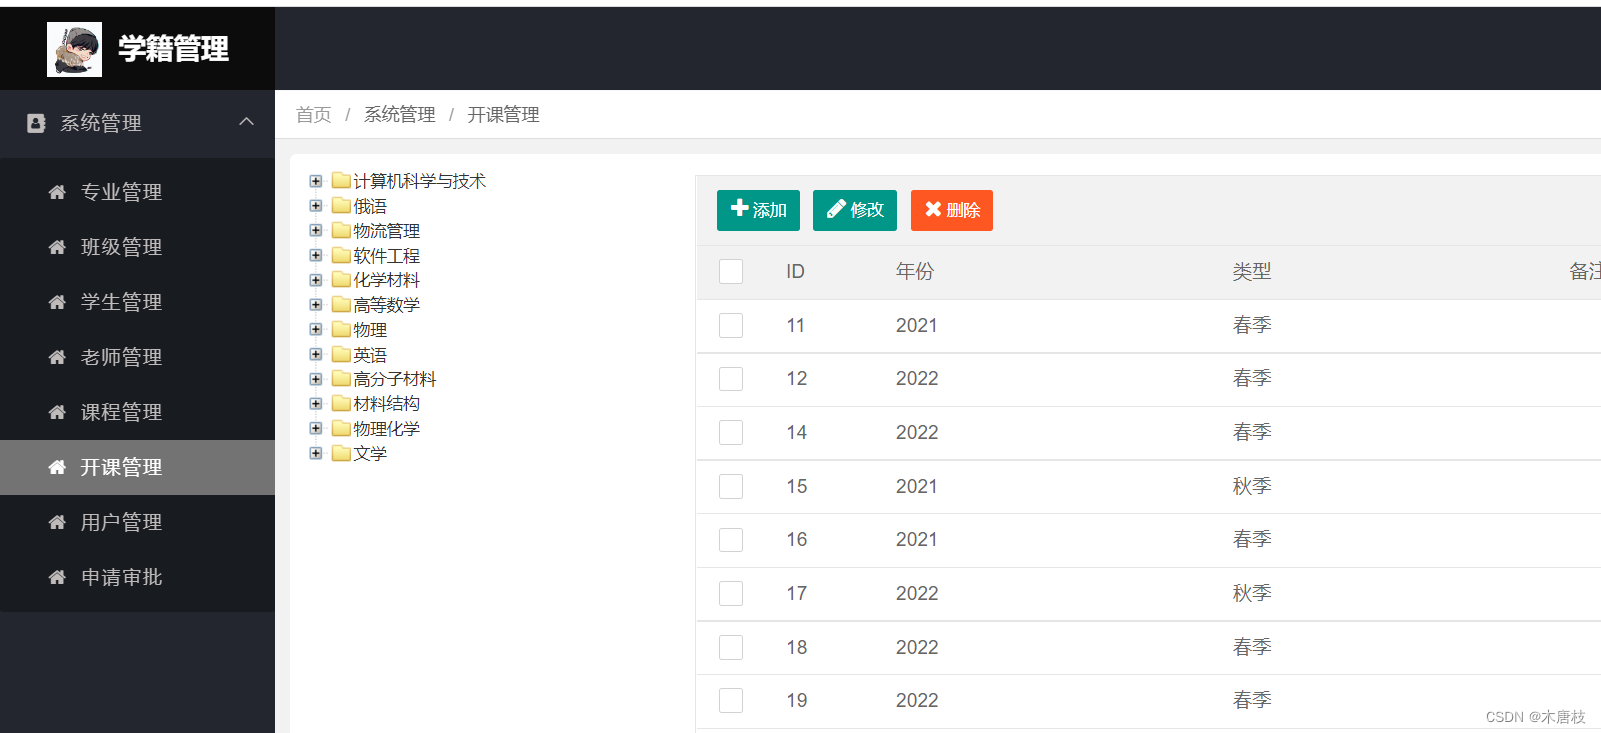
开课管理模块采用左右栅栏样式设计: 左边是树状结构,右边是列表结构
其中,树状结构采用ztree插件
(1)list.jsp页面布局:左右栅格式,进行数据提交

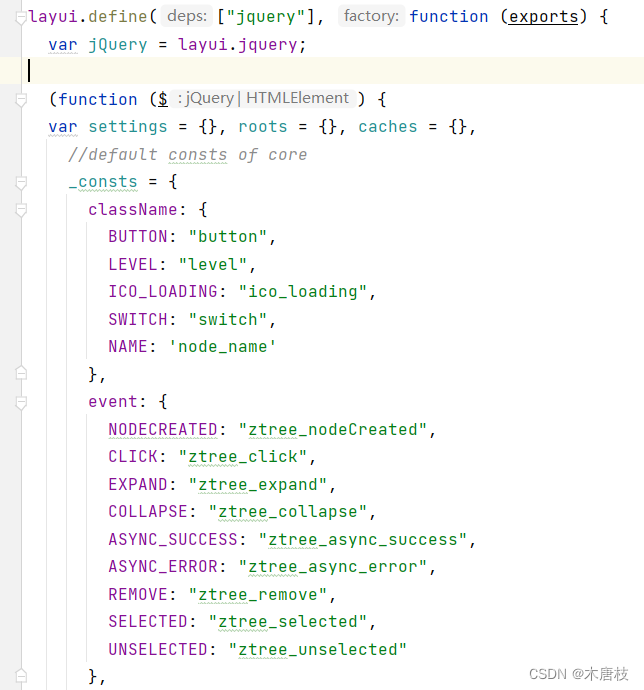
(2)layui+ztree集成(自定义模块)
ztree.js:
(3)整合开课管理的功能
在SectionController中:

其余角色(学生、老师)部分内容参考管理员专业管理部分。
项目源码: 学籍管理系统
以上就是本文的全部内容。
我正在使用i18n从头开始构建一个多语言网络应用程序,虽然我自己可以处理一大堆yml文件,但我说的语言(非常)有限,最终我想寻求外部帮助帮助。我想知道这里是否有人在使用UI插件/gem(与django上的django-rosetta不同)来处理多个翻译器,其中一些翻译器不愿意或无法处理存储库中的100多个文件,处理语言数据。谢谢&问候,安德拉斯(如果您已经在rubyonrails-talk上遇到了这个问题,我们深表歉意) 最佳答案 有一个rails3branchofthetolkgem在github上。您可以通过在Gemfi
我安装了ruby版本管理器,并将RVM安装的ruby实现设置为默认值,这样'哪个ruby'显示'~/.rvm/ruby-1.8.6-p383/bin/ruby'但是当我在emacs中打开inf-ruby缓冲区时,它使用安装在/usr/bin中的ruby。有没有办法让emacs像shell一样尊重ruby的路径?谢谢! 最佳答案 我创建了一个emacs扩展来将rvm集成到emacs中。如果您有兴趣,可以在这里获取:http://github.com/senny/rvm.el
是否有简单的方法来更改默认ISO格式(yyyy-mm-dd)的ActiveAdmin日期过滤器显示格式? 最佳答案 您可以像这样为日期选择器提供额外的选项,而不是覆盖js:=f.input:my_date,as::datepicker,datepicker_options:{dateFormat:"mm/dd/yy"} 关于ruby-on-rails-事件管理员日期过滤器日期格式自定义,我们在StackOverflow上找到一个类似的问题: https://s
导读:随着叮咚买菜业务的发展,不同的业务场景对数据分析提出了不同的需求,他们希望引入一款实时OLAP数据库,构建一个灵活的多维实时查询和分析的平台,统一数据的接入和查询方案,解决各业务线对数据高效实时查询和精细化运营的需求。经过调研选型,最终引入ApacheDoris作为最终的OLAP分析引擎,Doris作为核心的OLAP引擎支持复杂地分析操作、提供多维的数据视图,在叮咚买菜数十个业务场景中广泛应用。作者|叮咚买菜资深数据工程师韩青叮咚买菜创立于2017年5月,是一家专注美好食物的创业公司。叮咚买菜专注吃的事业,为满足更多人“想吃什么”而努力,通过美好食材的供应、美好滋味的开发以及美食品牌的孵
电脑0x0000001A蓝屏错误怎么U盘重装系统教学分享。有用户电脑开机之后遇到了系统蓝屏的情况。系统蓝屏问题很多时候都是系统bug,只有通过重装系统来进行解决。那么蓝屏问题如何通过U盘重装新系统来解决呢?来看看以下的详细操作方法教学吧。 准备工作: 1、U盘一个(尽量使用8G以上的U盘)。 2、一台正常联网可使用的电脑。 3、ghost或ISO系统镜像文件(Win10系统下载_Win10专业版_windows10正式版下载-系统之家)。 4、在本页面下载U盘启动盘制作工具:系统之家U盘启动工具。 U盘启动盘制作步骤: 注意:制作期间,U盘会被格式化,因此U盘中的重要文件请注
在应用开发中,有时候我们需要获取系统的设备信息,用于数据上报和行为分析。那在鸿蒙系统中,我们应该怎么去获取设备的系统信息呢,比如说获取手机的系统版本号、手机的制造商、手机型号等数据。1、获取方式这里分为两种情况,一种是设备信息的获取,一种是系统信息的获取。1.1、获取设备信息获取设备信息,鸿蒙的SDK包为我们提供了DeviceInfo类,通过该类的一些静态方法,可以获取设备信息,DeviceInfo类的包路径为:ohos.system.DeviceInfo.具体的方法如下:ModifierandTypeMethodDescriptionstatic StringgetAbiList()Obt
一、引擎主循环UE版本:4.27一、引擎主循环的位置:Launch.cpp:GuardedMain函数二、、GuardedMain函数执行逻辑:1、EnginePreInit:加载大多数模块int32ErrorLevel=EnginePreInit(CmdLine);PreInit模块加载顺序:模块加载过程:(1)注册模块中定义的UObject,同时为每个类构造一个类默认对象(CDO,记录类的默认状态,作为模板用于子类实例创建)(2)调用模块的StartUpModule方法2、FEngineLoop::Init()1、检查Engine的配置文件找出使用了哪一个GameEngine类(UGame
C#实现简易绘图工具一.引言实验目的:通过制作窗体应用程序(C#画图软件),熟悉基本的窗体设计过程以及控件设计,事件处理等,熟悉使用C#的winform窗体进行绘图的基本步骤,对于面向对象编程有更加深刻的体会.Tutorial任务设计一个具有基本功能的画图软件**·包括简单的新建文件,保存,重新绘图等功能**·实现一些基本图形的绘制,包括铅笔和基本形状等,学习橡皮工具的创建**·设计一个合理舒适的UI界面**注明:你可能需要先了解一些关于winform窗体应用程序绘图的基本知识,以及关于GDI+类和结构的知识二.实验环境Windows系统下的visualstudio2017C#窗体应用程序三.
项目介绍随着我国经济迅速发展,人们对手机的需求越来越大,各种手机软件也都在被广泛应用,但是对于手机进行数据信息管理,对于手机的各种软件也是备受用户的喜爱小学生兴趣延时班预约小程序的设计与开发被用户普遍使用,为方便用户能够可以随时进行小学生兴趣延时班预约小程序的设计与开发的数据信息管理,特开发了小程序的设计与开发的管理系统。小学生兴趣延时班预约小程序的设计与开发的开发利用现有的成熟技术参考,以源代码为模板,分析功能调整与小学生兴趣延时班预约小程序的设计与开发的实际需求相结合,讨论了小学生兴趣延时班预约小程序的设计与开发的使用。开发环境开发说明:前端使用微信微信小程序开发工具:后端使用ssm:VU
需求:要创建虚拟机,就需要给他提供一个虚拟的磁盘,我们就在/opt目录下创建一个10G大小的raw格式的虚拟磁盘CentOS-7-x86_64.raw命令格式:qemu-imgcreate-f磁盘格式磁盘名称磁盘大小qemu-imgcreate-f磁盘格式-o?1.创建磁盘qemu-imgcreate-fraw/opt/CentOS-7-x86_64.raw10G执行效果#ls/opt/CentOS-7-x86_64.raw2.安装虚拟机使用virt-install命令,基于我们提供的系统镜像和虚拟磁盘来创建一个虚拟机,另外在创建虚拟机之前,提前打开vnc客户端,在创建虚拟机的时候,通过vnc