目录
DeepSpeed是微软发布的用于PyTorch的开源深度学习优化库。其主要特性是:
官方文档:https://deepspeed.readthedocs.io/en/latest/
配置参数文档:https://www.deepspeed.ai/docs/config-json/
这里针对几组重要的参数进行说明:
train_batch_size = train_micro_batch_size_per_gpu * gradient_accumulation * number of GPUs.
// 训练批次的大小 = 每个GPU上的微批次大小 * 几个微批次 * 几个GPU
type:支持的有Adam, AdamW, OneBitAdam, Lamb, and OneBitLamb
其中常规的例子里用的是AdamW,也就是带L2正则化的Adam
params:参数字段填和torch里一样的参数
例如AdamW可以参考https://pytorch.org/docs/stable/optim.html#torch.optim.AdamW
// example:

  "optimizer": {
    "type": "AdamW",
    "params": {
        "lr": 3e-5,
        "betas": [0.8, 0.999],
        "eps": 1e-8,
        "weight_decay": 3e-7
    }
  }
type: 支持的有LRRangeTest, OneCycle, WarmupLR, WarmupDecayLR (见https://deepspeed.readthedocs.io/en/latest/schedulers.html)
NVIDIA 的 Apex 包的混合精度/FP16 训练的配置(Apex还提供了amp模式,也可以使用,但在deepspeed中如果使用amp,则不能使用zero offload)
float32(FP32,单精度)使用32位二进制表示浮点数,更低精度的float16(FP16,半精度)所能表示的数字范围也更小,但是fp16的好处在于:同样的GPU显存,可以容纳更大的参数量、更多的训练数据;低精度的算力(FLOPS)可以做得更高;单位时间内,计算单元访问GPU显存上的数据可以获得更高的速度(摘自:https://zhuanlan.zhihu.com/p/601250710)
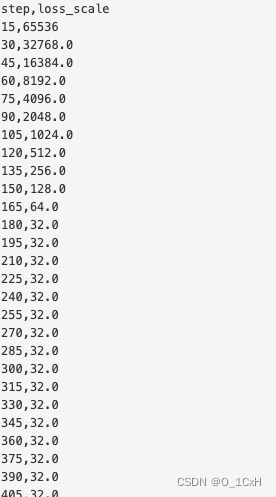
FP16的精度范围有限,训练一些模型的时候,梯度数值在FP16精度下都被表示为0,为了让这些梯度能够被FP16表示,可以在计算Loss的时候,将loss乘以一个扩大的系数loss scale,比如1024。这样,一个接近0的极小的数字经过乘法,就能过被FP16表示。这个过程发生在前向传播的最后一步,反向传播之前。loss scale有两种设置策略:
结合例子:
"fp16": {
    "enabled": true,
    "auto_cast": false,
    "loss_scale": 0,
    "initial_scale_power": 16,
    "loss_scale_window": 1000,
    "hysteresis": 2,
    "min_loss_scale": 1
}
这个配置打开了fp16,将初始的loss scale设置为2的16次方=65536,然后设置了动态调整(loss_scale=0.0使用动态调整,否则固定)
日志记录了一次训练中loss scale的变化
stage:zero优化有几个档位:0、1、2、3分别指禁用、优化器状态分区、优化器+梯度状态分区、优化器+梯度+参数分区。
offload_optimizer : 将优化器状态卸载到 CPU 或 NVMe,并将优化器计算卸载到 CPU,适用于 stage为 1、2、3。
offload_param : 将模型参数卸载到 CPU 或 NVMe,仅对stage = 3 有效
stage= 2 的例子:
"zero_optimization": {
      "stage": 2,
      "offload_optimizer": {
          "device": "cpu",
          "pin_memory": true
      },
      "allgather_partitions": true,
      "allgather_bucket_size": 2e8,
      "overlap_comm": true,
      "reduce_scatter": true,
      "reduce_bucket_size": 2e8,
      "contiguous_gradients": true
  }
stage = 3 的例子:
 "zero_optimization": {
      "stage": 3,
      "offload_optimizer": {
          "device": "cpu",
          "pin_memory": true
      },
      "offload_param": {
          "device": "cpu",
          "pin_memory": true
      },
      "overlap_comm": true,
      "contiguous_gradients": true,
      "sub_group_size": 1e9,
      "reduce_bucket_size": "auto",
      "stage3_prefetch_bucket_size": "auto",
      "stage3_param_persistence_threshold": "auto",
      "stage3_max_live_parameters": 1e9,
      "stage3_max_reuse_distance": 1e9,
      "stage3_gather_16bit_weights_on_model_save": true
  }
Monitor部分将训练详细信息记录到与 Tensorboard 兼容的文件、WandB 或简单的 CSV 文件中.
这是一个csv的例子:
"csv_monitor": {
    "enabled": true,
    "output_path": "output/ds_logs/",
    "job_name": "train_bert"
}
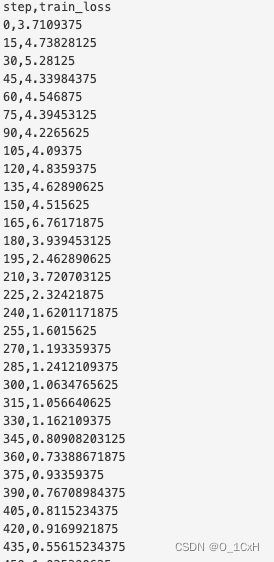
再一次训练中记录的loss值的变化
最后是两个可以直接使用的stage=2 和 3 的配置文件,参数均设置了auto
{
  "fp16": {
      "enabled": "auto",
      "loss_scale": 0,
      "loss_scale_window": 1000,
      "initial_scale_power": 16,
      "hysteresis": 2,
      "min_loss_scale": 1
  },

  "optimizer": {
      "type": "AdamW",
      "params": {
          "lr": "auto",
          "betas": "auto",
          "eps": "auto",
          "weight_decay": "auto"
      }
  },

  "scheduler": {
      "type": "WarmupLR",
      "params": {
          "warmup_min_lr": "auto",
          "warmup_max_lr": "auto",
          "warmup_num_steps": "auto"
      }
  },

  "zero_optimization": {
      "stage": 2,
      "offload_optimizer": {
          "device": "cpu",
          "pin_memory": true
      },
      "allgather_partitions": true,
      "allgather_bucket_size": 2e8,
      "overlap_comm": true,
      "reduce_scatter": true,
      "reduce_bucket_size": 2e8,
      "contiguous_gradients": true
  },

  "csv_monitor" : {
    "enabled": true,
    "job_name" : "stage2_test"
  },

  "gradient_accumulation_steps": "auto",
  "gradient_clipping": "auto",
  "steps_per_print": 100,
  "train_batch_size": "auto",
  "train_micro_batch_size_per_gpu": "auto",
  "wall_clock_breakdown": false
}
{
  "fp16": {
      "enabled": "auto",
      "loss_scale": 0,
      "loss_scale_window": 1000,
      "initial_scale_power": 16,
      "hysteresis": 2,
      "min_loss_scale": 1
  },

  "optimizer": {
      "type": "AdamW",
      "params": {
          "lr": "auto",
          "betas": "auto",
          "eps": "auto",
          "weight_decay": "auto"
      }
  },

  "scheduler": {
      "type": "WarmupLR",
      "params": {
          "warmup_min_lr": "auto",
          "warmup_max_lr": "auto",
          "warmup_num_steps": "auto"
      }
  },

  "zero_optimization": {
      "stage": 3,
      "offload_optimizer": {
          "device": "cpu",
          "pin_memory": true
      },
      "offload_param": {
          "device": "cpu",
          "pin_memory": true
      },
      "overlap_comm": true,
      "contiguous_gradients": true,
      "sub_group_size": 1e9,
      "reduce_bucket_size": "auto",
      "stage3_prefetch_bucket_size": "auto",
      "stage3_param_persistence_threshold": "auto",
      "stage3_max_live_parameters": 1e9,
      "stage3_max_reuse_distance": 1e9,
      "stage3_gather_16bit_weights_on_model_save": true
  },

  "csv_monitor" : {
    "enabled": true,
    "job_name" : "stage3_test"
  },

  "gradient_accumulation_steps": "auto",
  "gradient_clipping": "auto",
  "steps_per_print": 100,
  "train_batch_size": "auto",
  "train_micro_batch_size_per_gpu": "auto",
  "wall_clock_breakdown": false
}
exe应该在我打开页面时运行。异步进程需要运行。有什么方法可以在ruby中使用两个参数异步运行exe吗?我已经尝试过ruby命令-system()、exec()但它正在等待过程完成。我需要用参数启动exe,无需等待进程完成是否有任何rubygems会支持我的问题? 最佳答案 您可以使用Process.spawn和Process.wait2:pid=Process.spawn'your.exe','--option'#Later...pid,status=Process.wait2pid您的程序将作为解释器的子进程执行。除
我有一些Ruby代码,如下所示:Something.createdo|x|x.foo=barend我想编写一个测试,它使用double代替block参数x,这样我就可以调用:x_double.should_receive(:foo).with("whatever").这可能吗? 最佳答案 specify'something'dox=doublex.should_receive(:foo=).with("whatever")Something.should_receive(:create).and_yield(x)#callthere
我正在为一个项目制作一个简单的shell,我希望像在Bash中一样解析参数字符串。foobar"helloworld"fooz应该变成:["foo","bar","helloworld","fooz"]等等。到目前为止,我一直在使用CSV::parse_line,将列分隔符设置为""和.compact输出。问题是我现在必须选择是要支持单引号还是双引号。CSV不支持超过一个分隔符。Python有一个名为shlex的模块:>>>shlex.split("Test'helloworld'foo")['Test','helloworld','foo']>>>shlex.split('Test"
我有一个在Linux服务器上运行的ruby脚本。它不使用rails或任何东西。它基本上是一个命令行ruby脚本,可以像这样传递参数:./ruby_script.rbarg1arg2如何将参数抽象到配置文件(例如yaml文件或其他文件)中?您能否举例说明如何做到这一点?提前谢谢你。 最佳答案 首先,您可以运行一个写入YAML配置文件的独立脚本:require"yaml"File.write("path_to_yaml_file",[arg1,arg2].to_yaml)然后,在您的应用中阅读它:require"yaml"arg
我不确定传递给方法的对象的类型是否正确。我可能会将一个字符串传递给一个只能处理整数的函数。某种运行时保证怎么样?我看不到比以下更好的选择:defsomeFixNumMangler(input)raise"wrongtype:integerrequired"unlessinput.class==FixNumother_stuffend有更好的选择吗? 最佳答案 使用Kernel#Integer在使用之前转换输入的方法。当无法以任何合理的方式将输入转换为整数时,它将引发ArgumentError。defmy_method(number)
两者都可以defsetup(options={})options.reverse_merge:size=>25,:velocity=>10end和defsetup(options={}){:size=>25,:velocity=>10}.merge(options)end在方法的参数中分配默认值。问题是:哪个更好?您更愿意使用哪一个?在性能、代码可读性或其他方面有什么不同吗?编辑:我无意中添加了bang(!)...并不是要询问nobang方法与bang方法之间的区别 最佳答案 我倾向于使用reverse_merge方法:option
我已经在Sinatra上创建了应用程序,它代表了一个简单的API。我想在生产和开发上进行部署。我想在部署时选择,是开发还是生产,一些方法的逻辑应该改变,这取决于部署类型。是否有任何想法,如何完成以及解决此问题的一些示例。例子:我有代码get'/api/test'doreturn"Itisdev"end但是在部署到生产环境之后我想在运行/api/test之后看到ItisPROD如何实现? 最佳答案 根据SinatraDocumentation:EnvironmentscanbesetthroughtheRACK_ENVenvironm
我有一个只接受一个参数的方法:defmy_method(number)end如果使用number调用方法,我该如何引发错误??通常,我如何定义方法参数的条件?比如我想在调用的时候报错:my_method(1) 最佳答案 您可以添加guard在函数的开头,如果参数无效则引发异常。例如:defmy_method(number)failArgumentError,"Inputshouldbegreaterthanorequalto2"ifnumbereputse.messageend#=>Inputshouldbegreaterthano
我没有找到太多关于如何执行此操作的信息,尽管有很多关于如何使用像这样的redirect_to将参数传递给重定向的建议:action=>'something',:controller=>'something'在我的应用程序中,我在路由文件中有以下内容match'profile'=>'User#show'我的表演Action是这样的defshow@user=User.find(params[:user])@title=@user.first_nameend重定向发生在同一个用户Controller中,就像这样defregister@title="Registration"@user=Use
对于作为String#tr参数的单引号字符串文字中反斜杠的转义状态,我觉得有些神秘。你能解释一下下面三个例子之间的对比吗?我特别不明白第二个。为了避免复杂化,我在这里使用了'd',在双引号中转义时不会改变含义("\d"="d")。'\\'.tr('\\','x')#=>"x"'\\'.tr('\\d','x')#=>"\\"'\\'.tr('\\\d','x')#=>"x" 最佳答案 在tr中转义tr的第一个参数非常类似于正则表达式中的括号字符分组。您可以在表达式的开头使用^来否定匹配(替换任何不匹配的内容)并使用例如a-f来匹配一